A Visual Basic solution contains one or more related projects. A project contains files related to some topic. Usually, a project produces some kind compiled output (such as an executable program, class library, control library, and so forth). The project includes all the files related to the output, including source code files, resource files, documentation files, and whatever other kinds of files you decide to add to it.
This chapter describes the basic structure of a Visual Basic project. It explains the functions of some of the most common files and tells how you can use them to manage your applications.
This chapter also explains the basic structure of source code files. It explains regions, namespaces, and modules. It describes some simple typographic features provided by Visual Basic such as comments, line continuation, and line labels. These features do not execute programming commands themselves, but they are an important part of how you can structure your code.
HIDDEN FILES
Figure 14-1 shows the Solution Explorer window for a solution that contains two projects. The solution named MySolution contains two projects named WindowsApplication1 and WindowsApplication2. Each project contains a My Project item that represents the project's properties, various files containing project configuration settings, and a form named Form1.
In WindowsApplication2, the Show All Files button has been clicked (the second button from the left with the box around it) so that you can see all the project's files. WindowsApplication1 has similar files, but they are hidden by default.
These files are generated by Visual Basic for various purposes. For example, Resources.resx contains resources used by the project and Settings.settings contains project settings.
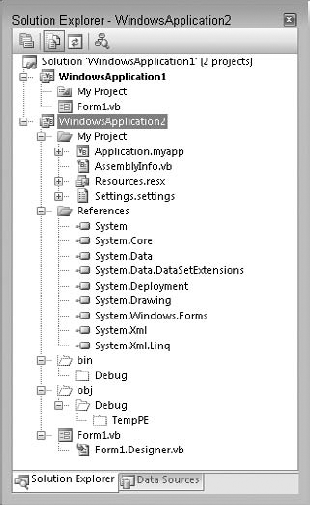
The following list describes the files contained in WindowsApplication2 and shown in Figure 14-1. The exact files you see may be different from those shown here, but this list should give you an idea of what's involved in building a project. Note that some of these files are generated automatically by Visual Studio and you shouldn't edit them manually. If you change them directly, you are likely to lose your changes when Visual Studio rebuilds them and you may even confuse Visual Studio.
WindowsApplication2 — This folder represents the entire project. You can expand or collapse it to show and hide the project's details.
My Project — This folder represents the project's assembly information, application-level events, resources, and configuration settings. Double-click the My Project entry to view and edit these values.
Application.myapp — This XML file defines application properties (such as whether it's a single instance program and whether its shutdown mode is AfterMainFormCloses or AfterAllFormsClose).
Application.Designer.vb — This file contains code that works with the values defined in Application.myapp.
AssemblyInfo.vb — This file contains information about the application's assembly such as copyright information, company name, trademark information, and assembly version.
Resources.resx — This resource file contains project's resources.
Resources.Designer.vb — This file contains Visual Basic code for manipulating resources defined in Resources.resx. For example, if you define a string resource named Greeting in Resources.resx, Visual Basic adds a read-only property to this module so you can read the value of Greeting as shown in the following code:
MessageBox.Show(My.Resources.Greeting)
Settings.settings — This file contains settings that you can define to control the application.
Settings.Designer.vb — This file contains Visual Basic code for manipulating settings defined in Settings.settings, much as Resources.Designer.vb contains code for working with Resources.resx. For example, the following code uses the UserMode setting:
If My.Settings.UserMode = "Clerk" Then ...
References — This folder lists references to external components such as DLLs and COM components.
bin — This folder is used to build the application before it is executed. It contains the compiled .exe file.
obj — This folder is used to build the application before it is executed.
ApplicationEvents.vb — This code file contains application-level event handlers for the MyApplication object. For example, it contains the application's Startup, Shutdown, and NetworkAvailabilityChanged event handlers.
Form1.vb — This is a form file. It contains the code you write for the form, its controls, their event handlers, and so forth.
Form1.Designer.vb — This file contains designer-generated Visual Basic code that builds the form. It initializes the form when it is created, adds the controls you placed on the form, and defines variables with the WithEvents keyword for the controls so that you can easily catch their events.
Some projects may have other hidden files. For example, when you add controls to a form, the designer adds a resource file to the form to hold any resources needed by the controls.
Normally, you do not need to work directly with the hidden files and doing so can mess up your application. At best, the changes you make will be lost. At worst, you may confuse Visual Studio so it can no longer load your project.
You can use other tools to modify hidden files indirectly. For example, the files Resources.Designer.vb, Settings.Designer.vb, and Form1.Designer.vb are automatically generated when you modify their corresponding source files Resources.resx, Settings.settings, and Form1.vb.
You don't even need to work with all of these source files directly. For example, if you double-click the My Project item in Solution Explorer, the property pages shown in Figure 14-2 appear. The Application tab shown in this figure lets you set high-level application settings. The View Application Events button at the bottom of the figure lets you edit the application-level events stored in ApplicationEvents.vb.
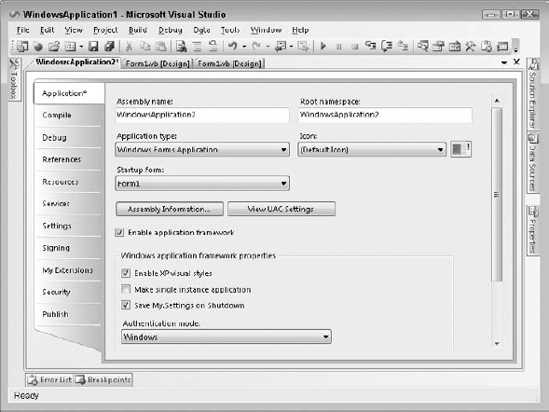
Figure 14.2. These property pages let you define the project's resources, settings, and general configuration.
The References tab shown in Figure 14-2 lets you view, add, and remove project references. As you can probably guess, the Resources and Settings tabs let you edit the project's resources and settings.
A particularly important section hidden away in these tabs is the assembly information. When you click the Assembly Information button shown in Figure 14-2, the dialog box shown in Figure 14-3 appears.
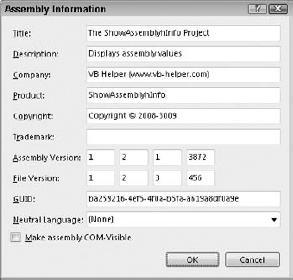
Figure 14.3. The Assembly Information dialog box lets you define basic project information such as title, copyright, and version number.
Many of the items in this dialog box, such as the application's title and description, are self-explanatory. They are simply strings that the assembly carries around for identification. The assembly and file versions are used by the Visual Studio runtime to verify compatibility between an application's components. The GUID (which stands for "globally unique identifier" and is pronounced to rhyme with "squid") uniquely identifies the assembly and is generated by Visual Studio. The "Make assembly COM-Visible" check box lets you determine whether the assembly should make types defined in the assembly visible to COM applications. For more information on this dialog box, see msdn2.microsoft.com//1h52t681.aspx.
An assembly is the fundamental unit of deployment and version control in Visual Studio .NET. An assembly can contain an executable application, a DLL (dynamic-link library), or a control library. Usually a project is contained in a single assembly.
The Assembly Information dialog box lets you define information that should be associated with the assembly, including the assembly's company name, description, copyright, trademark, name, product name, title, and version (which includes major, minor, revision, and build values).
The My.Application.AssemblyInfo namespace provides easy access to these values at runtime. Example program ShowAssemblyInfo uses the following code to display this information in a series of labels when it starts:
Private Sub Form1_Load() Handles MyBase.Load
    lblCompanyName.Text = My.Application.Info.CompanyName
    lblDescription.Text = My.Application.Info.Description
    lblCopyright.Text = My.Application.Info.Copyright
    lblTrademark.Text = My.Application.Info.Trademark
    lblDirectoryPath.Text = My.Application.Info.DirectoryPath
    lblProductName.Text = My.Application.Info.ProductName
    lblTitle.Text = My.Application.Info.Title
    lblVersion.Text = My.Application.Info.Version.ToString
End Sub

A form, class, or code module should contain the following sections in this order (if they are present — you can omit some):
Option statements — Option Explicit, Option Strict, Option Compare, or Option Infer. By default, Option Explicit is on, Option Strict is off, Option Compare is binary, and Option Infer is on.
Imports statements — These declare namespaces that the module will use.
A Main subroutine — The routine that starts execution when the program runs.
Class, Module, and Namespace statements — As needed.
Some of these items may be missing. For example, Option and Imports statements are optional. Note that an executable Windows program can start from a Main subroutine or it can start by displaying a form, in which case it doesn't need a Main subroutine. (In that case, the program starts with the automatically generated New subroutine in the file Application.Designer.vb.) Classes and code modules don't need Main subroutines.
The following code shows a simple code module. It sets Option Explicit On (so variables must be declared before used), Option Strict On (so implicit type conversions cause an error), and Option Infer Off (so you must give variables explicit data types). It imports the System.IO namespace so the program can easily use classes defined there. It then defines the Employee class.
Option Explicit On
Option Strict On
Option Infer Off

Imports System.IO

Public Class Employee
     ...
End Class
Usually, you put each class or module in a separate file, but you can add multiple Class or Module statements to the same file if you like.
Class and Module statements define top-level nodes in the code hierarchy. Click the minus sign to the left of one of these statements in the code editor to collapse the code it contains. When the code is collapsed, click the plus sign to the left of it to expand the code.
The project can freely refer to any public class, or to any public variable or routine in a module. If two modules contain a variable or routine with the same name, the program can select the version it wants by prefixing the name with the module's name. For example, if the AccountingTools and BillingTools modules both have a subroutine named ConnectToDatabase, the following statement executes the version in the BillingTools module:
BillingTools.ConnectToDatabase()
Class and Module statements define regions of code that you can expand or collapse to make the code easier to understand. Subroutines and functions also define collapsible code sections. In addition to these, you can use the Region statement to create your own collapsible sections of code. You can place subroutines that have a common purpose in a region so you can collapse and expand the code as needed. The following code shows a simple region:
#Region "Drawing Routines"
     ...
#End Region
Note that the IDE's search-and-replace features normally work only on expanded regions. If you collapse a region and make a global search-and-replace in the current document or the current selection, the collapsed code remains unchanged. If you make a global replace throughout the whole project, the replacement occurs within collapsed regions as well.
By itself, the End Region statement does not tell you which region it is ending. You can make your code easier to understand, particularly if you have many regions in the same module, by adding a comment after the End Region statement giving the name of the region, as shown in the following code:
#Region "Drawing Routines"
    ...
#End Region ' Drawing RoutinesSometimes it may be easier to move related pieces of code into separate files. The Partial keyword allows you to place parts of a class in different files. For example, you could move a form's code for loading and saving data into a separate file and use the Partial keyword to indicate that the code was part of the form. Chapter 26, "Classes and Structures," describes the Partial keyword in detail.
However, you cannot use the Partial keyword with modules so a module's code must all go in one file. In that case, you can use regions to similarly separate a group of related routines and make the code easier to read.
Conditional compilation statements allow you to include or exclude code from the program's compilation. The basic conditional compilation statement is similar to a multiline If Then Else statement. The following code shows a typical statement. If the value condition1 is True, the code in code_block_1 is included in the compiled program. If that value is False but the value condition2 is True, the code in code_block_2 becomes part of the compiled program. If neither condition is True, the code in code_block_3 is included in the program.
#Ifcondition1Thencode_block_1... #ElseIfcondition2Thencode_block_2... #Elsecode_block_3... #End if
It is important to understand that the code not included by the conditional compilation statements is completely omitted from the executable program. At compile time, Visual Studio decides whether or not a block of code should be included. That means any code that is omitted does not take up space in the executable program. It also means that you cannot set the execution statement to omitted lines in the debugger because those lines are not present.
In contrast, a normal If Then Else statement includes all the code in every code block in the executable program, and then decides which code to execute at runtime.
Because the conditional compilation statement evaluates its conditions at compile time, those conditions must be expressions that can be evaluated at compile time. For example, they can be expressions containing values that you have defined using compiler directives (described shortly). They cannot include values generated at runtime (such as the values of variables).
In fact, a conditional compilation statement evaluates its conditions at design time, so it can give feedback while you are writing the code. For example, if Option Explicit is set to On, Visual Basic flags the following assignment statement as an error. Because the first condition is True, the variable X is declared as a string. Option Explicit On disallows implicit conversion from an integer to a string, so the IDE flags the statement as an error.
#If True Then
    Dim X As String
#Else
    Dim X As Integer
#End If
    X = 10
That much makes sense, but it's also important to realize that the code not included in the compilation is not evaluated by the IDE. If the first condition in the previous code were False, the code would work properly because variable X would be declared as an integer. The IDE doesn't evaluate the other code, so it doesn't notice that there is an error if the condition is False. You probably won't notice the error until you try to actually use the other code.
You can set conditional compilation constants in two main ways: in code and in the project's compilation settings.
To set conditional compilation constants explicitly in your program, use a #Const statement, as shown in the following code:
#Const UserType = "Clerk"

#If UserType = "Clerk" Then
    ' Do stuff appropriate for clerks ...
    ...
#ElseIf UserType = "Supervisor" Then
    ' Do stuff appropriate for supervisors ...
...
#Else
' Do stuff appropriate for others ...
...
#End ifNote that these constants are defined only after the point at which they appear in the code. If you use a constant before it is defined, its value is False (unfortunately Option Explicit doesn't apply to these constants). That means the following code displays the value Slow followed by the value Fast:
#If UseFastAlgorithm Then
    MessageBox.Show("Fast")
#Else
    MessageBox.Show("Slow")
#End If

#Const UseFastAlgorithm = True

#If UseFastAlgorithm Then
    MessageBox.Show("Fast")
#Else
    MessageBox.Show("Slow")
#End if
To avoid possible confusion, many programmers define these constants at the beginning of the file so they don't need to worry about using a variable before it is defined.
Also note that your code can redefine a constant using a new #Const statement later. That means these are not really constants in the sense that their values are unchangeable.
To set constants with the project's compilation settings, open Solution Explorer and double-click My Project. Select the Compile tab and click its Advanced Compile Options button to open the Advanced Compiler Settings dialog box shown in Figure 14-4. Enter the names and values of the constants in the "Custom constants" text box. Enter each value in the form ConstantName=Value, separating multiple constants with commas.
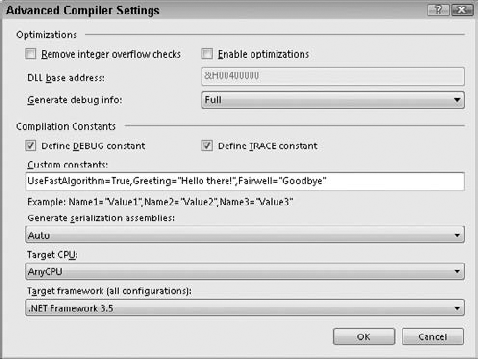
Constants that you specify on the Advanced Compiler Settings dialog box are available everywhere in the project. However, your code can redefine the constant using a #Const directive. The constant has the new value until the end of the file or until you redefine it again.
Example program CompilerConstantsSettings, which is available for download on the book's web site, includes constants set on this dialog and code to check their values.
Visual Basic automatically defines several conditional compilation constants that you can use to determine the code that your application compiles. The following table describes these constants.
CONSTANT | MEANING |
|---|---|
CONFIG | A string that gives the name of the current build. Typically, this will be "Debug" or "Release." |
DEBUG | A Boolean that indicates whether this is a debug build. By default, this value is True when you build a project's Debug configuration. |
A string that tells you the target platform for the application's current configuration. Unless you change this, the value is "AnyCPU." | |
TARGET | A string that tells the kind of application the project builds. This can be winexe (Windows Form or WPF application), exe (console application), library (class library), or module (code module). |
TRACE | A Boolean that indicates whether the Trace object should generate output in the Output window. |
VBC_VER | A number giving Visual Basic's major and minor version numbers. The value for Visual Basic 2005 is 8.0 and the value for Visual Basic 2008 is 9.0. The value for Visual Basic 2010 should logically be 10.0, but it was still 9.0 in late beta versions. |
_MyType | A string that tells what kind of application this is. Typical values are "Console" for a console application, "Windows" for a class or Windows control library, and "WindowsForms" for a Windows Forms application. |
Example program CompilerConstantsInCode, which is available for download on the book's web site, shows how a program can check these compiler constants. Example program WpfCompilerConstantsInCode, which is also available for download, is a WPF version of the same program.
The following sections describe the DEBUG, TRACE, and CONFIG constants and their normal uses in more detail.
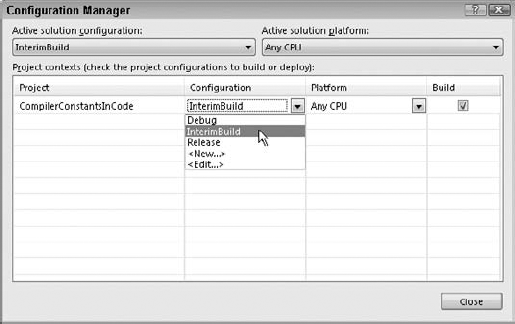
Normally when you make a debug build, Visual Basic sets the DEBUG constant to True. When you compile a release build, Visual Basic sets DEBUG to False. The Configuration Manager lets you select the Debug build, the Release build, or other builds that you define yourself.
After you have activated the Configuration Manager, you can open it by clicking the project in the Solution Explorer and then selecting the Build menu's Configuration Manager command. Figure 14-5 shows the Configuration Manager. Select Debug or Release from the drop-down list, and click Close.
When the DEBUG constant is True, the Debug object's methods send output to the Output window. When the DEBUG constant is not True, the Debug object's methods do not generate any code, so the object doesn't produce any output. This makes the Debug object useful for displaying diagnostic messages during development and then hiding the messages in release builds sent to customers.
The following sections describe some of the Debug object's most useful properties and methods.
The Debug.Assert method evaluates a Boolean expression and, if the expression is False, displays an error message. This method can optionally take as parameters an error message and a detailed message to display. The following code shows how a program might use Debug.Assert to verify that the variable NumEmployees is greater than zero:
Debug.Assert(NumEmployees > 0, _
    "The number of employees must be greater than zero.", _
    "The program cannot generate timesheets if no employees are defined")
Example program EmployeeAssert, which is available for download on the book's web site, demonstrates this Debug.Assert statement.
If NumEmployees is zero, this statement displays an error dialog that shows the error message and the detailed message. It also displays a long stack dump that shows exactly what code called what other code to reach this point of execution. Only the first few entries will make sense to practically anyone because the stack dump quickly moves out of the application's code and into the supporting Visual Basic libraries that execute the program.
The dialog also displays three buttons labeled Abort, Retry, and Ignore. If you click the Abort button, the program immediately halts. If you click Retry, the program breaks into the debugger, so you can examine the code. If you click Ignore, the program continues as if the Assert statement's condition was True.
A good use for the Assert method is to verify that a routine's parameters or other variable values are reasonable before starting calculations. For example, suppose that the AssignJob subroutine assigns a repairperson to a job. The routine could begin with a series of Assert statements that verify that the person exists, the job exists, the person has the skills necessary to perform the job, and so forth. It is usually easier to fix code if you catch these sorts of errors before starting a long calculation or database modification that may later fail because, for example, the repairperson doesn't have the right kind of truck to perform the job.
If the DEBUG constant is not True, the Assert method does nothing. This lets you automatically remove these rather obscure error messages from the compiled executable that you send to customers. The dialog with its messages and stack dump is so technical that it would terrify many users anyway, so there's no point inflicting it on them.
You should take some care when deciding what tests should be placed in Assert statements so that they are removed from the compiled executable. For example, suppose you use Assert to verify that a string entered by the user contains a valid value. When you run the compiled executable, this test is removed, so the program does not protect itself from bad data. When you use Assert to verify a condition, you must be certain that the program can run safely if the Assert statement is removed and the condition fails.
If the program cannot run safely when the condition fails, you should also add code to protect it even in the final compiled version.
The Debug.Fail method displays an error message just as Debug.Assert does when its Boolean condition parameter is False.
These properties and methods determine the amount of indentation used when the Debug object writes into the Output window. You can use them to indent the output in subroutines to show the program's structure more clearly.
The IndentSize property indicates the number of spaces that should be used for each level of indentation. The IndentLevel property determines the current indentation level. For example, if IndentSize is 4 and IndentLevel is 2, output is indented by eight spaces.
The Indent and Unindent methods increase and decrease the indentation level by one.
These routines send output to the Output window. The Write method prints text and stops without starting a new line. WriteLine prints text and follows it with a new line.
The WriteIf and WriteLineIf methods take a Boolean parameter and act the same as Write and WriteLine if the parameter's value is True.
The Trace object is very similar to the Debug object and provides the same set of properties and methods. The difference is that it generates output when the TRACE constant is defined rather than when the DEBUG constant is defined.
Normally, the TRACE constant is defined for both debug and release builds so Trace.Assert and other Trace object methods work in both builds. By default, DEBUG is defined only for debug builds, so you get Debug messages for debug builds.
You can add listener objects to the Trace object (or the Debug object) to perform different actions on any Trace output. For example, a listener could write the Trace output into a log file.
The CONFIG constant's value is the name of the type of build. Normally, this is either Debug or Release, but you can also create your own build configurations. You can use these for interim builds, point releases, alpha and beta releases, or any other release category you can think of.
To create a new build type, click the project in the Solution Explorer and then select the Build menu's Configuration Manager command to display the dialog box shown in Figure 14-5. Select <New . . . > from the drop-down list to display the New Project Configuration dialog box. Enter a name for the new configuration, select the existing configuration from which the new one should initially copy its settings, and click OK.
The following code shows how to use the CONFIG compiler constant to determine which build is being made and take different actions accordingly:
#If CONFIG = "Debug" Then
    ' Do stuff for a Debug build ...
#ElseIf CONFIG = "Release" Then
    ' Do stuff for a Release build ...
#ElseIf CONFIG = "InterimBuild" Then
    ' Do stuff for a custom InterimBuild ...
#Else
    MessageBox.Show("Unknown build type")
#End if
One reason you might want to make different configurations is to handle variations among operating systems. Your code can decide which configuration is in effect and then execute the appropriate code to handle the target operating system. For example, it might need to work around the reduced privileges that are granted by default on Vista.
Sometimes it is helpful to be able to easily adjust the level of diagnostic output a program generates. You could define the constant DEBUG_LEVEL and then send data to the Output window, depending on its value. For example, you might place level 1 Debug statements in major subroutines, level 2 statements in secondary routines, and level 3 statements throughout important routines to provide step-by-step information. Then you can define the DEBUG_LEVEL constant to quickly give you the amount of information you want.
The following code shows a small example. The IsPhoneNumberValid function determines whether its parameter looks like a valid 7- or 10-digit U.S. phone number. If DEBUG_LEVEL is at least 1, the function displays messages when it starts and when it exits. It also indents the output when it starts and unindents the output before it exits. If DEBUG_LEVEL is at least 2, the function also displays statements telling when it is about to check for 7- and 10-digit phone numbers.
#Const DEBUG_LEVEL = 2

    Private Function IsPhoneNumberValid(ByVal phone_number As String) As Boolean
#If DEBUG_LEVEL >= 1 Then
        Debug.WriteLine("Entering IsPhoneNumberValid(" & phone_number & ")")
        Debug.Indent()
#End If
        ' Check for a 7-digit phone number.
#If DEBUG_LEVEL >= 2 Then
        Debug.WriteLine("Checking for 7-digit phone number")
#End If
        Dim is_valid As Boolean = _
            phone_number Like "###-####"

        If Not is_valid Then
#If DEBUG_LEVEL >= 2 Then
            Debug.WriteLine("Checking for 10-digit phone number")
#End If
            is_valid = phone_number Like "###-###-####"
        End If

#If DEBUG_LEVEL >= 1 Then
        Debug.Unindent()
        Debug.WriteLine("Leaving IsPhoneNumberValid, returning " & is_valid)
#End If
        Return is_valid
    End Function

The following text shows the results in the Output window when DEBUG_LEVEL is set to 2:
Entering IsPhoneNumberValid(123-4567)
    Checking for 7-digit phone number
Leaving IsPhoneNumberValid, returning True
From this output, you can tell that the function examined the string 123-4567, did not need to check for a 10-digit phone number, and returned True.
Example program DebugLevel, which is available for download on the book's web site, uses this strategy to provide different levels of debugging output.
For more information on debugging Visual Basic applications, see Chapter 19, "Error Handling."
Visual Studio uses namespaces to categorize code. A namespace can contain other namespaces, which can contain others, forming a hierarchy of namespaces.
You can define your own namespaces to help categorize your code. By placing different routines in separate namespaces, you can allow pieces of code to include only the namespaces they are actually using. That makes it easier to ignore the routines that the program isn't using. It also allows more than one namespace to define items that have the same names.
For example, you could define an Accounting namespace that contains the AccountsReceivable and AccountsPayable namespaces. Each of those might contain a subroutine named ListOutstandingInvoices. The program could select one version or the other by calling either Accounting.AccountsReceivable.ListOutstandingInvoices or Accounting.AccountsPayable.ListOutstandingInvoices.
You can only use the Namespace statement at the file level or inside another namespace, not within a class or module. Within a namespace, you can define nested namespaces, classes, or modules.
The following example defines the AccountingModules namespace. That namespace contains the two classes PayableItem and ReceivableItem, the module AccountingRoutines, and the nested namespace OrderEntryModules. The AccountingRoutines module defines the PayInvoice subroutine. All the classes, modules, and namespaces may define other items.
Namespace AccountingModules
    Public Class PayableItem
         ...
    End Class

    Public Class ReceivableItem
         ...
    End Class

    Module AccountingRoutines
        Public Sub PayInvoice(ByVal invoice_number As Long)
...
End Sub
...
End Module
Namespace OrderEntryModules
Public Class OrderEntryClerk
...
End Class
...
End Namespace
End NamespaceCode using a module's namespace does not need to explicitly identify the module. If a module defines a variable or routine that has a unique name, you do not need to specify the module's name to use that item. In this example, there is only one subroutine named PayInvoice, so the code can invoke it as AccountingModules.PayInvoice. If the AccountingModules namespace contained another module that defined a PayInvoice subroutine, the code would need to indicate which version to use as in AccountingModules.AccountingRoutines.PayInvoice.
Although modules are transparent within their namespaces, nested namespaces are not. Because the nested OrderEntryModules namespace defines the OrderEntryClerk class, the code must specify the full namespace path to the class, as in the following code:
Dim oe_clerk As New AccountingModules.OrderEntryModules.OrderEntryClerk
You can use an Imports statement to simplify access to a namespace inside a file. For example, suppose that you are working on the GeneralAccounting project that has the root namespace GeneralAccounting. The first statement in the following code allows the program to use items defined in the AccountingModules namespace without prefixing them with AccountingModules. The second statement lets the program use items defined in the AccountingModules nested namespace OrderEntryModules. The last two lines of code declare variables using classes defined in those namespaces.
Imports GeneralAccounting.AccountingModules
Imports GeneralAccounting.AccountingModules.OrderEntryModules
...
Private m_OverdueItem As PayableItem   ' In the AccountingModules namespace.
Private m_ThisClerk As OrderEntryClerk ' In the namespace
' AccountingModules.OrderEntryModules.A few typographic code elements can make a program's structure a bit easier to understand. They do not execute programming commands themselves, but they are an important part of how you can structure your code. These elements include comments, line continuation and joining characters, and line labels.
Comments can help other developers (or you at a later date) understand the program's purpose, structure, and method. You start a comment by typing a single quotation mark (') that is not inside a quoted string. All of the characters starting at the quote and continuing until the end of the line are part of the comment and are ignored by Visual Basic.
If a line with a comment ends with a line continuation character (described shortly), Visual Basic ignores that character. That means the line is not continued onto the next line, so the comment ends with the current line. In other words, you cannot use line continuation characters to make a multi-line comment.
In the following code, the first declaration is followed by a comment. The comment ends with a line continuation character so you might expect the second declaration to be part of the comment. That is not the case. Because this can be misleading, you should not end comments with a line continuation character. The second statement declares and initializes a string using a value that contains a single quote. Because the quote is inside a quoted string, it becomes part of the string and does not start a comment. The next single quotation mark outside of the string begins a new comment.
Dim num_customers As Integer   ' The number of customers. _
                                 This doesn't work as a continued comment!
Dim product_name As String = "Bob's Miracle Code Fixer" ' The program's name.
If you want to continue a comment on the following line, you must use another comment character, as in the following example:
' Return True if the address is valid. This function checks the address
' format to see that it makes sense. It also looks up the ZIP code and
' verifies that the city is valid for that ZIP code. It does not verify
' that the street and street number exist.
Private Function IsAddressValid(ByVal address_text As String) As Boolean
     ...
To quickly comment or uncomment a large block of code, click and drag to select it using the mouse and then open the Edit menu's Advanced submenu. Select the Comment Selection command to comment out the selection or select Uncomment Selection to remove the comment characters from the front of the selection. Those commands are also available more conveniently as buttons in the Text Editor toolbar. Use the View menu's Toolbars submenu's Text Editor command to show or hide this toolbar.
Another way to quickly remove a chunk of code from the program is to surround it with compiler directives, as in the following code:
#If False Then
    Dim A As Integer
    Dim B As Integer
    Dim C As Integer
#End if
Use comments to make your code clear. Comments do not slow the executable program down (some superstitious developers think they must slow the code because they make the file bigger), so there's no good reason to exclude them.
A normal comment is just a piece of text that gives information to a developer trying to read your code. XML comments let you add some context to a comment. For example, you can mark a comment as a summary describing a subroutine.
Visual Studio automatically extracts XML comments to build an XML file describing the project. This file displays the hierarchical shape of the project, showing comments for the project's modules, namespaces, classes, and other elements.
The result is not particularly easy to read, but you can use it to automatically generate more useful documentation such as reports or web pages.
You can place a block of XML comments before code elements that are not contained in methods. Generally, you use them to describe a module, class, variable, property, method, or event.
To begin a comment block, place the cursor on the line before the element you want to describe and type three single quotes ('''). Visual Studio automatically inserts a template for an XML comment block. If the element that follows takes parameters, it includes sections describing the parameters, so it is in your best interest to completely define the parameters before you create the XML comment block. (Otherwise you'll need to add the appropriate comment sections by hand.)
The following code shows the XML comment block created for a simple subroutine. It includes a summary area to describe the subroutine, two param sections to describe the subroutine's parameters, and a remarks section to provide additional detail.
''' <summary>
'''
''' </summary>
''' <param name="jobs"></param>
''' <param name="employees"></param>
''' <remarks></remarks>
Public Sub AssignJobs(ByVal jobs() As Job, ByVal employees() As Employee)

End Sub
Note that XML elements can span multiple lines, as the summary element does in this example.
You can add more XML comment sections to the block simply by typing them, following the convention that they should begin with three single quotes. For example, the following code adds some content for the comments in the previous code and an extra WrittenBy element that contains a date attribute:
''' <summary>
''' Assigns jobs to employees, maximizing the total value of jobs assigned.
''' </summary>
''' <param name="jobs">The array of Jobs to assign.</param>
''' <param name="employees">The array of Employees to assign.</param>
''' <remarks>The full assignment is not guaranteed to be unique.</remarks>
''' <WrittenBy date="7/24/10">Rod Stephens</WrittenBy>
Public Sub AssignJobs(ByVal jobs() As Job, ByVal employees() As Employee)

End Sub
The following code shows the beginning of an application that assigns jobs to employees. The project contains two files, a form named Form1.vb and a code module named Module1.vb. The form contains very little code. The code module defines the Job and Employee classes and the AssignJobs subroutine. Each of these has an XML comment block.
Public Class Form1
    Private m_Jobs() As Job
    Private m_Employees() As Employee
End Class

Module Module1
    Public Class Job
        Public JobNumber As Integer
        ''' <summary>
        ''' A list of skills required to perform this job.
        ''' </summary>
        ''' <remarks>Represent required equipment as skills.</remarks>
        Public SkillsRequired As New Collection
        ''' <summary>
        ''' The value of this job.
        ''' </summary>
        ''' <remarks>Higher numbers indicate more priority.</remarks>
         Public Priority As Integer
    End Class

Public Class Employee
    Public FirstName As String
    Public LastName As String
    ''' <summary>
    ''' A list of skills this employee has.
    ''' </summary>
    ''' <remarks>Represent special equipment as skills.</remarks>
    Public Skills As New Collection
    End Class

    ''' <summary>
    ''' Assigns jobs to employees.
    ''' </summary>
    ''' <param name="jobs">Array of Jobs to assign.</param>
    ''' <param name="employees">Array of Employees to assign jobs.</param>
    ''' <remarks>Maximizes total value of jobs assigned.</remarks>
    ''' <WrittenBy date="7/26/04">Rod Stephens</WrittenBy>
    Public Sub AssignJobs(ByVal jobs() As Job, ByVal employees() As Employee)

    End Sub
End Module

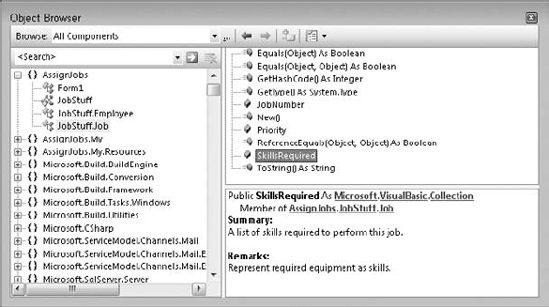
In addition to providing documentation for your use, XML comments let the Object Browser provide additional information about your code. Figure 14-6 shows the Object Browser describing the Job class's SkillsRequired property. The area on the lower right shows the property's XML summary and remarks sections. This project's name is AssignJobs, its root namespace is AssignJobs, and the Job class is contained in the JobStuff module, so the complete path to the Job class shown in the tree view on the left is AssignJobs (project)
When you compile the application, Visual Studio extracts the XML comments and places them in an XML file with the same name as the executable file in the project's binDebug directory. The following text shows the result. If you look through the document carefully, you can pick out the XML comments.
<?xml version="1.0"?>
<doc>
<assembly>
<name>
AssignJobs
</name>
</assembly>
<members>
<member name="F:AssignJobs.JobStuff.Job.SkillsRequired">
    <summary>
 A list of skills required to perform this job.
 </summary>
    <remarks>Represent required equipment as skills.</remarks>
</member><member name="F:AssignJobs.JobStuff.Job.Priority">
    <summary>
 The value of this job.
 </summary>
<remarks>Higher numbers indicate more priority.</remarks>
</membergt;<member name="F:AssignJobs.JobStuff.Employee.Skills">
<summary>
A list of skills this employee has.
</summary>
<remarks>Represent special equipment as skills.</remarks>
</member><member name="M:AssignJobs.JobStuff.AssignJobs(
AssignJobs.JobStuff.Job[],AssignJobs.JobStuff.Employee[])">
<summary>
Assigns jobs to employees.
</summary>
<param name="jobs">Array of Jobs to assign.</param>
<param name="employees">Array of Employees to assign jobs.</param>
<remarks>The assignment maximizes total value of jobs assigned.</remarks>
<WrittenBy date="1/13/07">Rod Stephens</WrittenBy>
</member>
</members>
</doc>Example program AssignJobs, which is available for download on the book's web site, defines job assignment classes that you can view with the Object Browser. If you compile the program (which actually doesn't do any job assignment, it just defines the classes), you can examine its XML documentation.
Line continuation characters let you break long lines across multiple shorter lines so that they are easier to read. To continue a line, end it with a space followed by an underscore (_). Visual Basic treats the following code as if it were all on one long line:
Dim background_color As Color = _
    Color.FromName( _
        My.Resources.ResourceManager.GetString( _
            "MainFormBackgroundColor"))
As the previous section explains, you cannot continue comments. A comment includes any space and underscore at the end of its line so the comment does not apply to the following line.
You can break a line just about anywhere that a space is allowed and between program elements. For example, you can break a line after the opening parenthesis in a parameter list, as shown in the following code:
AReallyReallyLongSubroutineNameThatTakesFiveParameters( _
    parameter1, parameter2, parameter3, parameter4, parameter5)
You cannot break a line inside a quoted string. If you want to break a string, end the string and restart it on the next line, as in the following example:
Dim txt As String = "To break a long string across multiple lines, " & _
    "end the string, add the line continuation character " & _
    "(space + underscore) " & _
    "and restart the string on the next line."
Visual Basic does not enforce its usual indentation rules on continued lines, so you can indent the lines in any way you like to make the code's structure more clear. For example, many programmers align parameters in long subroutine calls:
DoSomething( _
    parameter1, _
    parameter2, _
parameter3)Visual Basic can also guess where you are continuing a line even if you don't use the line continuation character, at least sometimes. For example, Visual Basic can figure out that the statement shown in the following code isn't complete until the final line so it treats all of this code as if it were written on a single long line.
Dim background_color As Color =
    Color.FromName(
        My.Resources.ResourceManager.GetString(
            "MainFormBackgroundColor"
        )
)Visual Basic does not allow implicit line continuation in all cases, however. For example, in the following code the "Next i" statement is split across two lines. Because a Next statement's variable name is optional, Visual Basic doesn't know that the following i is required so it doesn't look for it.
For i As Integer = 1 To 10

Next
    i
In fact, you can't break the statement "For i As Integer = 1 To 10" at any point without a line continuation character or Visual Basic gets confused.
Some places that Visual Basic does allow implicit line continuation include:
After an equals sign
After a binary operator such as + or *
After commas
After opening parentheses or brackets and before closing parentheses or brackets
The following code shows a few examples:
<
    ComClass()
>
Public Class Employee
    Public Function CalculateStuff(
        ByVal v1 As Integer,
        ByVal v2 As Integer
    )

        Dim a As Integer =
            Math.Max(
                v1,
                v2 +
                12
            )
        Return a
    End Function

     ...
End ClassNot only can you break a long statement across multiple lines, but you can also join short statements on a single line. To use two statements on a single line, separate them with a colon (:). The following line of code contains three statements that store the red, green, and blue components of a form's background color in the variables r, g, and b:
r = BackColor.R : g = BackColor.G : b = BackColor.B
Line joining is most useful when you have many lines in a row that all have a very similar structure. By scanning down the lines, you can tell if there are differences that may indicate a bug.
Use line joining with some caution. If the statements are long, or if you have a series of joined lines with dissimilar structure, combining lots of statements on a single line can make the code harder to read. If the code is easier to read with each statement on a separate line, write the code that way. Using more lines doesn't cost extra or make the code run any slower.
You can place a label to the left of any line of code. The label can be either a name or a number, followed by a colon. The following code defines three labels. The first is named DeclareX and marks the declaration of the variable X. The second has value 10 and is located on a line containing a comment. The third label, named Done, labels a blank line.
DeclareX: Dim X As Single
10:       ' Do something here.
Done:
You must label a line if you will later want to jump to that line. For example, the GoTo, On Error GoTo, and Resume statements can make code jump to a labeled line. These are less useful in Visual Basic .NET than they were in Visual Basic 6 and previous versions that didn't have structured error handling (the Try Catch block), but they are still available.
A Visual Studio solution contains a hierarchical arrangement of items. At the top level, it contains one or more projects. Each project contains several standard items such as My Project (that represents the project as a whole), References (that records information about references to external objects), the bin and obj items (that are used by Visual Studio when building the application), and app.config (that holds configuration information). Projects also contain form, class, and other code modules.
Normally, many of these files are hidden and you do not need to edit them directly. Instead, you can double-click Solution Explorer's My Project entry and use the project's Properties pages to view and modify application values. Other hidden files store code and resources that determine a form's appearance, and you can modify them by altering the form with the Form Designer.
Within a code module, you can use modules, classes, regions, and namespaces to group related code into blocks. You can use conditional compilation statements and conditional compilation constants to easily add or remove code to or from the compiled application. The Debug and Trace objects let you generate messages and alerts, depending on whether certain predefined constants are defined.
Finally, typographic elements such as comments, line continuation, and line joining let you format the code so that it is easier to read and understand. XML comments provide additional information that is useful to the Object Browser and that you can use to automatically generate more complete documentation.
Although all of these components are not required by Visual Basic, they can make the difference between understanding the code quickly and completely, and not understanding it at all. Over an application's lifetime of development, debugging, upgrading, and maintenance, this can determine a project's success.
This chapter describes structural elements that make up code files. Within those elements, you can place the code that gathers, manipulates, stores, and displays data. Chapter 15, "Data Types, Variables, and Constants," describes the variables that a program uses to hold data values. It explains how to declare variables, what types of data they can hold, and how Visual Basic converts from one data type to another.