In Windows Forms applications, Form objects play a special role. They represent the top-level user interface components in which all other controls reside. Ignoring behind-the-scenes chores such as parsing command-line arguments and messing with the operating system, a typical Windows Forms application starts by displaying a Form object. That Form may provide buttons, menus, and other controls that open other Form objects, but all of the controls are contained in Form objects.
In WPF applications, you can display controls on a Window, an object that is basically the WPF version of a Form. Alternatively you can display controls in a Page. A Page is a lot like a Window without decorations such as borders, title bar, and system menus (maximize, minimize, restore, close, and so forth). A Page must be hosted inside another object that provides these decorations. Usually, a Page is displayed in a web browser, but the WPF Frame control can also display Page objects.
This chapter explains how you can use these top-level objects, Window and Page, in your WPF applications. It explains how a program can display and manage multiple Window and Page objects, and provides some examples showing simple navigation schemes.
A typical desktop WPF application displays its controls in Window objects. To create this type of application, select the File menu's New Project command to display the New Project dialog. On the Visual Basic
The new application begins with a single Window class named Window1. Open the Solution Explorer and double-click the Window1.xaml entry to edit the Window's controls. Double-click the Window1.xaml.vb entry to edit the Visual Basic code behind the Window.
To add other Window classes, open the Project menu and select Add Window. Enter a name for the class and click OK.
To display a window in code, create a variable that refers to a new instance of the window. Call its Show method to display the window non-modally, or call its ShowDialog method to display the window modally. The following code creates a new window of type Window2 and displays it modally:
Dim win2 As New Window2
win2.ShowDialog()
Although several similarities exist between the way a program uses a Window and the way it uses a Form, there are many significant differences.
For example, both classes have a DialogResult property that indicates how the user closed the form. Both classes' ShowDialog methods return this result, so the code can easily determine the form's DialogResult value. In a Form, the DialogResult property is a value of type DialogResult, an enumerated type that provides values such as OK, Cancel, Yes, and No to indicate which button the user clicked to close the form. If the code sets this value, the form automatically hides, so the calling ShowDialog method returns.
In contrast, a WPF Window's DialogResult value is a Boolean intended to indicate whether the user accepted or canceled the dialog. If you need more detail (did the user click Yes, No, or Cancel?), you'll need to provide code in the dialog to remember which button the user clicked. If the code sets DialogResult, the window automatically closes so the calling ShowDialog method returns. Unfortunately, the window closes rather than hides so you cannot display the dialog again (you cannot display a window after it has closed). If you want to remember which button the user clicked and then hide the window without closing it, you'll need to implement your own property rather than DialogResult, and you'll need to hide the window explicitly.
The Windows Forms and WPF Button classes also both have properties that you can use to define a dialog's default and cancel buttons, but they work in different ways.
You can set a Windows Forms Button object's DialogResult property to the value you want the button to give to the form's DialogResult property. If the user clicks the button, it assigns the form's DialogResult value and hides the form so the calling ShowDialog method returns that value.
In a WPF application, you can set a button's IsCancel property to True to indicate that the button is the form's cancel button. If the user presses the Escape key or clicks the button, the button sets the form's DialogResult property and closes the form so the calling ShowDialog method returns. Unfortunately, the button closes the form rather than merely hiding it so, as before, you cannot display the dialog again.
You can also set a WPF button's IsDefault property to indicate that it should fire if the user presses the Enter key. Unfortunately, this does not automatically set the form's DialogResult property and does not close the dialog.
Example program UseDialog shows one approach to solving this problem. The dialog class Window2 contains three buttons labeled Yes, No, and Cancel.
The following code shows how the dialog handles button clicks. The single btn_Click event handler fires for all three of the buttons. It saves the button's text in the public variable UserClicked and then closes the form.
Partial Public Class Window2
    Public UserClicked As String = "Cancel"

    Private Sub btn_Click(ByVal btn As Button, _
     ByVal e As System.Windows.RoutedEventArgs) _
     Handles btnYes.Click, btnNo.Click, btnCancel.Click
       UserClicked = btn.Content
       Me.Close()
    End Sub
End Class

The following code shows how the program's main window displays the dialog and checks the result. When you click the Show Dialog button, the program creates a new dialog window and displays it modally. It then checks the dialog's UserClicked property to see which button the user clicked.
Private Sub btnShowDialog_Click() Handles btnShowDialog.Click
    Dim win2 As New Window2
    win2.ShowDialog()
    Select Case win2.UserClicked
        Case "Yes"
            MessageBox.Show("You clicked Yes", "Yes", MessageBoxButton.OK)
        Case "No"
            MessageBox.Show("You clicked No", "No", MessageBoxButton.OK)
        Case "Cancel"
            MessageBox.Show("You clicked Cancel", "Cancel", _
                MessageBoxButton.OK)
    End Select
End Sub

Most of the things that you can do with a Form you can do with a Window. For example, you can:
Nevertheless, the details between Form and Window operations may be different. You may need to use slightly different properties, and you may need to take a slightly different approach, but Window is a fairly powerful class and with some perseverance you should be able to build usable interfaces with it.
A Page is similar to a borderless Window. It doesn't provide its own decorations (border, title bar, and so forth), but instead relies on its container to provide those elements.
Often a Page is hosted by a web browser, although the WPF Frame control can also display Page objects.
The following sections explain how you can use Page objects to build WPF applications.
To make a XAML Browser Application (XBAP, pronounced ex-bap), select the File menu's New Project command to display the New Project dialog. On the Visual Basic
The new application begins with a single Page class named Page1. You can view and edit this Page exactly as you would view and edit a Window. Open the Solution Explorer and double-click the Page1.xaml entry to edit the Window's controls. Double-click the Window1.xaml.vb entry to edit the Visual Basic code behind the Window.
To run the application, open the Debug menu and select Start Debugging. Internet Explorer should open and display the initial Page. Visual Studio is nicely integrated with this instance of Internet
Explorer so you can set breakpoints in the code to stop execution and debug the code just as you can debug a Windows Forms application or a WPF Window application.
To add other Page classes to the application, open the Project menu and select Add Page. Enter a name for the class and click OK.
To display a Page in code, create a variable that refers to a new instance of the Page. Then use the current Page's NavigationService object's Navigate method to display the new Page.
The following code creates a new page of type Page2, and then uses the NavigationService object to display it:
Dim p2 As New Page2
NavigationService.Navigate(p2)
Because the application is hosted inside a browser, several differences exist in the ways in which the user will interact with the application. Rather than displaying new forms and dialogs, the application will generally display new material within the same browser.
This design has several consequences. For example, the previous code creates a new instance of the Page2 class and displays it. If the user were to execute this same code later, it would create a second instance of the class and display it. Because these are two instances of the class, they do not have the same controls, so any changes the user makes (entering text, checking radio buttons, and so forth) are not shared between the two pages. When the second instance appears, the user may wonder where all of the previous selections have gone.
The program can prevent this confusion by using a single application-global variable to hold references to the Page2 instance. Every time the program needs to show this page, it can display the same instance. That instance will display the same control values so the user's selections are preserved.
That approach solves one problem but leads to another. Because the application runs inside a browser, the browser's navigation and history tools work with it. If you press the browser's Back button, it will display the previous page. That part works relatively transparently, but every time the application uses NavigationService.Navigate to display a Page, that Page is added to the browser's history.
To see why this is an issue, suppose the application has an initial Page that contains a button leading to a second Page. That Page has a button that navigates back to the first page. If the user moves back and forth several times, the browser's history will be cluttered with entries such as Page 1, Page 2, Page 1, Page 2, Page 2, and so forth. Although this represents the user's actual path through the Pages, it isn't very useful.
You can reduce clutter in the browser's history by using the NavigationService object's GoForward and GoBack methods whenever it makes sense. In this example, it would probably make sense for the second Page to use the GoBack method to return to the main page. Instead of creating a new entry in the history as the Navigate method does, GoBack moves back one position in the existing history. After several trips between the two Pages, the history will contain only those two Pages, one possibly available via the browser's Back button and one possibly available via the browser's Next button.
Example program BrowserApp demonstrates this technique. The program uses two Pages that provide buttons to navigate to each other. Both Pages also contain a text box where you can enter some text, just to verify that the values are preserved when you navigate between the pages.
The following code shows how the main Page navigates to the second Page. If the NavigationService can go forward, the code calls its GoForward method. If the NavigationService cannot go forward, the code uses its Navigate method to visit a new Page2 object.
Private Sub btnPage2_Click() Handles btnPage2.Click
    If NavigationService.CanGoForward Then
        NavigationService.GoForward()
    Else
        NavigationService.Navigate(New Page2)
    End If
End Sub

The following code shows how the second Page returns to the first. This code simply calls the NavigationService object's GoBack method.
Private Sub btnBack_Click() Handles btnBack.Click
    Me.NavigationService.GoBack()
End Sub
Once you've built an XBAP, you can run it by pointing a web browser at the compiled xbap file. When I built the previous example program, the file BrowserApp.xbap was created in the project's bin/Debug directory and the file successfully loaded in either Internet Explorer or Firefox.
Building a Page class is almost exactly the same as building a Window class. You use the same XAML editor and Visual Basic code behind the scenes. The main difference is in how you navigate between the application's forms. In a WPF application, you create Window objects and use their Show or ShowDialog methods. In an XBAP, you create Page objects and use the NavigationService object's navigation methods.
Though Page objects normally sit inside a browser, the WPF Frame control can also host them. The program simply navigates the Frame control to a Page and the rest works exactly as it does for an XBAP.
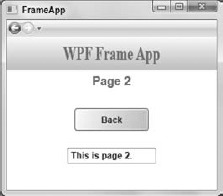
Example program FrameApp, which is available for download on the book's web page and shown in Figure 13-1, uses the following code to load a Page1 object into its Frame control:
fraPages.Navigate(New Page1)
This example contains the same Page1 and Page2 classes used by the BrowserApp example program described in the previous section.
If an XBAP runs so easily in a browser, why would you want to host pages in a Frame control?
One reason is that you can place multiple frames within a Window to let the user view different pieces of information or perform different tasks at the same time. For example, you can display help in a separate frame, possibly in a separate Window.
If you build each frame's contents in a separate XBAP, you can load the frames at runtime. That makes replacing XBAPs to upgrade or change their contents easy.
The Frame control also provides simple browser-style navigation that uses Next and Back buttons and that may be easier for users to navigate in some situations. Microsoft's web page "Top Rules for the Windows Vista User Experience" at msdn2.microsoft.com/Aa511327.aspx lists as Rule 7 "Use Windows Explorer-hosted, navigation-based user interfaces, provide a Back button." That page argues that this style of interaction simplifies navigation even in traditional applications.
The Frame control gives you more control than a browser does. For example, it provides easier access to Page history. You can also determine a Frame control's size whereas you have no control over a browser's size and position.
Displaying Page objects within a Frame control won't make sense for every application, but for some it can be a useful technique.
Microsoft's documentation says that a PageFunction is "a special type of page that allows you to treat navigation to a page in a similar fashion to calling a method." This is a fairly misleading statement. Navigating to a PageFunction is actually similar to navigating to any other Page object. What is different is that a PageFunction is intended to take parameters when it is displayed and to return a result when it finishes.
The PageFunction does not perform these tasks in the same way that a method call performs them. The program "passes parameters" to the object by including them in the PageFunction's constructor. It receives a "return value" by catching the PageFunction's Return event and examining a parameter passed to that event.
Example program UsePageFunction, which is shown in Figure 13-2, demonstrates the PageFunction class. This program is an XBAP that contains a startup Page and a PageFunction. The startup Page contains two text boxes: one for an initial value and one for a return value. Type some text into the Initial Value text box and click the "Go to Page 2" button.
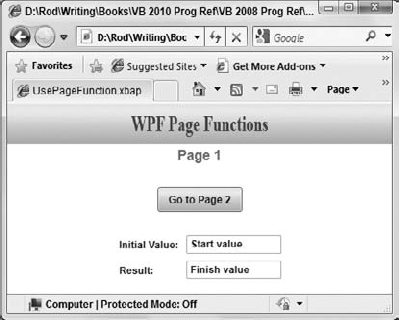
The second Page displays the text you typed on the first Page in a text box to show that the code successfully passed your text into the PageFunction. If you modify the text and click the Return button, the first Page displays the modified text to show that it successfully received the PageFunction object's return value.
The following code shows how the PageFunction works. Notice that the class inherits from PageFunction(Of String). That indicates that this is a PageFunction class and that its "parameter" and "return value" are strings. The wizard example described in the following section shows how a PageFunction can use a different data type.
Partial Public Class PageFunction1
    Inherits PageFunction(Of String)

    ' Start with the input value.
    Public Sub New(ByVal initial_value As String)
        Me.InitializeComponent()

        txtValue.Text = initial_value
    End Sub
' Return the current text.
Private Sub btnReturn_Click() Handles btnReturn.Click
OnReturn(New ReturnEventArgs(Of String)(txtValue.Text))
End Sub
End Class

The PageFunction's constructor takes a string as a parameter. It calls its InitializeComponent method to prepare its controls for use and saves the string value in the page's text box.
When you click the Return button, the btnReturn_Click event handler calls the PageFunction's OnReturn method, passing it a new ReturnEventArgs(Of String) object. That object becomes the return result that the first page receives. The code passes this object's constructor the string that it wants to return. In this example, the result is the text you modified in the text box.
The following code shows how the startup Page works:
Class Page1
    Private WithEvents page2 As PageFunction1

    Private Sub btnPage2_Click() Handles btnPage2.Click
        page2 = New PageFunction1(txtInitialValue.Text)
        NavigationService.Navigate(page2)
    End Sub

    ' Catch the Return event and process the result.
    Private Sub page2_Return(ByVal sender As Object, _
     ByVal e As System.Windows.Navigation.ReturnEventArgs(Of String)) _
     Handles page2.Return
        txtReturnedValue.Text = e.Result
    End Sub
End Class

This code starts by declaring a variable named Page2 of type PageFunction1. The code uses the WithEvents keyword, so it is easy to catch the object's events.
When you click the Page's Go to Page 2 button, the btnPage2_Click event handler creates a new PageFunction1 and saves it in the variable Page2 so it can catch that object's events. It then navigates to the new object.
When the PageFunction calls its OnReturn method, this Page catches the object's Return event. The event handler receives a parameter e that contains the return value in its Result property. The code displays the result in the txtReturnedValue text box.
This isn't exactly the way a method call works, but it does allow the application to pass a value to the PageFunction and receive a result. The next section describes a more complicated PageFunction example.
Although PageFunction objects, or XBAPs in general for that matter, are not appropriate for all situations, they work well for building wizards. A typical wizard walks the user through a series of steps one at a time until the user finishes the final step.
The BrowserWizard example program is an XBAP that uses PageFunction objects to build a simplistic dinner selection wizard.
The initial Page is a Page object that displays a Start Wizard button and a list of final selections made by the wizard (initially these are blank). When the user clicks the button, the program displays the wizard's first step.
The first step is displayed by a PageFunction that contains a combo box where the user can select an appetizer and a check box that lets the user select salad (or not). After making selections, the user can click the Next button to move to the wizard's second step. The user can also click the Cancel button to close the wizard.
The second step is another PageFunction that contains two combo boxes where the user can select an entrée and a drink. This step enables its Next button only after the user selects an entrée. This step also contains a Prev button that lets the user move back to the first step and a Cancel button that lets the user cancel the wizard.
The wizard's final step is also implemented with a PageFunction object. It contains a combo box that lets the user select a dessert. It provides Prev and Cancel buttons similar to those on the second page. Instead of a Next button, it displays a Finish button that ends the wizard. Control returns to the initial Page and that Page displays the user's choices.
This application passes an object of type WizardData to each of its steps. This class, shown in the following code, keeps track of the user's selections as the wizard walks through its steps:
Public Enum DessertType
    None
    IceCream
    Cake
    Pie
    Cookie
End Enum

' This is the data that the user will fill in.
' We set default values here.
Public Class WizardData
    Public Canceled As Boolean = True
    Public Appetizer As String = ""
    Public Entree As String = ""
    Public Salad As Boolean = False
    Public Drink As String = ""
    Public Dessert As DessertType = DessertType.None
End Class

In addition to fields to store the user's appetizer, entrée, salad, drink, and dessert selections, the WizardData class also defines a Canceled field to keep track of whether the user clicked the Cancel button at any stage.
The following code shows how the initial Page works:
Class WizardStart
    Private WithEvents m_Page1 As WizardPage1

    ' Display page 1.
    Private Sub btnPage1_Click() Handles btnPage1.Click
        m_Page1 = New WizardPage1(New WizardData)
        NavigationService.Navigate(m_Page1)
    End Sub

    ' Page 1 returned.
    Private Sub m_Page1_Return(ByVal sender As Object, _
     ByVal e As System.Windows.Navigation.ReturnEventArgs(Of WizardData)) _
     Handles m_Page1.Return
        Dim wiz_data As WizardData = e.Result

        ' See if the user canceled.
        If wiz_data.Canceled Then
            lblAppetizer.Content = ""
            lblEntree.Content = ""
            lblSalad.Content = ""
            lblDrink.Content = ""
            lblDessert.Content = ""
        Else
            lblAppetizer.Content = wiz_data.Appetizer
            lblEntree.Content = wiz_data.Entree
            lblSalad.Content = wiz_data.Salad.ToString
            lblDrink.Content = wiz_data.Drink
            lblDessert.Content = wiz_data.Dessert.ToString
        End If
    End Sub
End Class

This Page declares a variable of type WizardPage1, using the WithEvents keyword so it is easy to catch the object's Return event. When the user clicks the Start Wizard button, the btnPage1_Click event handler creates a new WizardPage1 object passing its constructor a new WizardData object and navigates to the new page.
When the WizardPage1 object returns, the start page catches its Return event. If the returned WizardData object's Canceled value is True, the code clears all of the start page's menu choice controls. If Canceled is False, the program displays the menu selections in the initial Page's controls.
The following code shows how the wizard's first step begins. Notice that this class inherits from PageFunction(Of WizardData) so its constructor and OnReturn method take WizardData objects as parameters.
Inherits PageFunction(Of WizardData)

Private m_WizardData As WizardData
Private WithEvents m_Page2 As WizardPage2

' Save the WizardData object.
Public Sub New(ByVal wizard_data As WizardData)
    InitializeComponent()

    m_WizardData = wizard_data
End Sub

The code declares a private WizardData variable to hold information about the user's current menu selections. The class's constructor initializes its controls and then saves the WizardData object it is passed in this variable.
The code also creates a variable of type WizardPage2. It displays this object when the user clicks this page's Next button.
When that step returns, the following code catches its Return event and calls this Page's OnReturn method passing it the same event parameter that it received. This forwards the results of the following step back to the initial Page.
' The next page returned. Return its result.
Private Sub m_Page2_Return(ByVal sender As Object, _
 ByVal e As System.Windows.Navigation.ReturnEventArgs(Of WizardData)) _
 Handles m_Page2.Return
    OnReturn(e)
End Sub

The following code shows the first Page's navigation code:
' Open the next page.
Public Sub btnNext_Click() Handles btnNext.Click
    If NavigationService.CanGoForward Then
        NavigationService.GoForward()
    Else
       m_Page2 = New WizardPage2(m_WizardData)
       NavigationService.Navigate(m_Page2)
    End If
End Sub

' Return a result indicating that we canceled.
Private Sub btnCancel_Click() Handles btnCancel.Click
    m_WizardData.Canceled = True
    OnReturn(New ReturnEventArgs(Of WizardData)(m_WizardData))
End Sub

When the user clicks the Next button, the btnNext_Click event handler checks whether the NavigationService can go forward. This object's CanGoForward property will be True if the user went to the next page and then came back to this one. In that case, the program shouldn't create a new Page object. Instead it calls NavigationService object's GoForward method to display the same object again.
If NavigationService.CanGoForward is False, the code has not displayed the second Page yet. The code creates a new WizardPage2 object, passing its constructor the WizardData object that holds the information about the user's current menu selections. It then navigates to the new Page.
If the user clicks the Cancel button, the btnCancel_Click event handler sets the WizardData object's Canceled property to True and then calls the page's OnReturn method, passing it the WizardData. Control returns to the start page where that page catches the Return event and sees that the WizardData object's Canceled property is True.
The following code records the user's appetizer and salad selections:
' Save the selection.
Private Sub cboAppetizer_SelectionChanged() _
 Handles cboAppetizer.SelectionChanged
    ' The ComboBox's Text property isn't updated yet.
    If cboAppetizer.SelectedIndex < 0 Then
        m_WizardData.Appetizer = ""
    Else
       m_WizardData.Appetizer = _
          cboAppetizer.Items(cboAppetizer.SelectedIndex).Content
    End If
End Sub

' Save the selection.
Private Sub chkSalad_Checked() _
 Handles chkSalad.Checked, chkSalad.Unchecked
    m_WizardData.Salad = chkSalad.IsChecked
End Sub

When the user selects an appetizer, the cboAppetizer_SelectionChanged event handler saves the user's new choice in the WizardData object's Appetizer field. Similarly, if the user checks or unchecks the Salad check box, the chkSalad_Checked event handler saves the user's new selection.
The second and third wizard pages are similar to the first except for two issues.
First, the user can navigate back to wizard steps that come before these steps. The following code shows how these steps move to the previous step when the user clicks the Prev button:
' Go back to the previous page.
Private Sub btnPrev_Click() Handles btnPrev.Click
    NavigationService.GoBack()
End Sub

Second, the final step does not navigate to a next step when the user clicked a Next button. Instead when the user clicks the Finish button, the following code executes:
' Finish.
Public Sub btnFinish_Click() Handles btnFinish.Click
    M_WizardData.Canceled = False
    OnReturn(New ReturnEventArgs(Of WizardData)(m_WizardData))
End Sub

This code sets the WizardData object's Canceled field to False to indicate that the user did not cancel. The code then calls the PageFunction's OnReturn method, passing it a new ReturnEventArgs object that contains the WizardData.
At this point, control cascades back through the navigations. The second Page catches this Page's Return event and calls its own OnReturn method. Next, the first Page catches the second Page's Return event and calls its own OnReturn method. Finally the initial Page catches the first wizard Page's Return event and displays the results contained in the returned WizardData object.
PageFunction classes are not necessary in every application, but they can simplify wizards such as this one and other applications that pass information back and forth through a series of Pages.
In a Windows Forms application, everything is contained in Form objects. Some of those Form classes may be dialogs or derived from the Form class, but ultimately everything is contained in a form.
In a WPF application, controls may be contained in Window objects or in Page objects. Window objects sit on the desktop much as Windows Forms do. Page objects must be hosted inside something else, usually a browser or a Frame control in a Window. The PageFunction class provides a modified version of a Page that makes it easier to pass values back and forth between coordinated Pages.
Chapters 8 through 13 give useful background on working with controls. They explain how to select and use both Windows Forms and WPF controls. They also explain the top-level user interface classes: Form for Windows Forms applications, and Window, Page, and PageFunction for WPF applications.
Although these are huge topics, there's even more to building a Visual Basic application than just controls. You also need to understand the code behind the Form or Window that lets the program take the controls' values, manipulate those values, and display a result in other controls. The next several chapters cover these topics in detail. Chapter 14, "Program and Module Structure," starts the process by explaining the files that make up a Visual Basic project and the structure contained within code files.