chapter 3
CIRCUMSTANTIAL LIGHT
As wedding photographers, we do not have the luxury of choosing the location where we will be working. The bride and groom choose their wedding venue and, of course, where they will be getting ready. Ideally, the bridal couple would choose a dressing area that is spacious, clean, and full of light, but that is usually not the case. If only we could be so lucky.
But one of the most gratifying aspects of photographing weddings is being able to create beautiful photographs in chaotic settings. That’s part of the enjoyment. Throughout my career, I have walked into many hotel rooms and private homes that have had every challenging scenario that could be thrown at a photographer. Many rooms have been relatively dark, and full of decor hanging on the walls, furnishings that take up most of the space, and, worse yet, junk everywhere. Last but not least, the rooms are usually cramped, and the couple’s families and the wedding party are often there getting ready and leaving plates of food and drinks wherever you look. However, by rearranging objects, removing context, and using clever composition, smart camera settings, and skillful use of light, you can eliminate most of those challenging distractions that are a part of shooting on location.
Before we continue, I would like to give you a definition for circumstantial light and how it differs from natural light. Natural light (or sunlight) refers to the properties of light, such as its wavelength or intensity. Circumstantial light forces you to pay careful attention to the exact direction natural light is coming from, the objects around your subject, and how those objects are influencing the natural light in your location. This is so important, especially for wedding photography, because you have to work quickly. A photographer needs to recognize that an object, such as a light-colored wall in close proximity to a major light source (like a large window), can provide great opportunities to create photographs with superb lighting. If that light-colored wall did not exist, then the window light would travel into the room and just fall off into darkness. There would be no object to bounce or reflect that light back onto your subject.
The same principle applies when photographing outdoors. Objects such as sidewalks, cars, buildings, and large trucks can greatly influence how the incoming sunlight is reflected back and forth at any given area. Having the knowledge of how light behaves when it strikes different objects is the core of circumstantial light. A great wedding photographer is acutely aware of all objects around the subject(s), because these objects are basically “light shapers.” Skilled photographers can use these light shapers to control light, to choose an effective shooting angle, to alter a pose based on the light, and to make people appear younger or older.
CIRCUMSTANTIAL LIGHT INDOORS
Every photographer is different, and every photographer approaches locations in his or her own way. However, by trial and error, I have learned from my many mistakes how to prioritize certain elements that give photography an elegant and timeless feel. For example, the first location I am usually faced with on a wedding day is a hotel room or a private home where the bride and groom will be preparing with their families and friends for the long day ahead. I scrutinize all rooms in the same way, whether it’s a room at a Motel 6 or a Presidential Suite at the Beverly Hills Hotel. Why? Photographers rely heavily on the beauty of the light illuminating our clients. Light is the primary reason why someone will love or hate the way a photo looks and feels. Clearly an elegant room helps with the overall aesthetics of the photograph, but I have learned not to become seduced by the location, only by the light. The location’s elegance and beauty is merely a bonus, not a necessity.
The first two questions I ask myself when I walk into a room where the photo session will take place are:
- •Where is the strongest light in the room coming from?
- •Is the strongest light direct window light or indirect window light?
The answers to these two questions are at the forefront of any photographic decision I make thereafter. After these two questions have been answered, the next question is:
- •Are there any naturally occurring reflectors that can reflect the window light back toward the subject?
These reflectors could be nearby light-colored walls, white bed sheets, etc. The closer these reflectors are to the window, the more effective their reflective capabilities will be. Having strong light coming from a window and a reflector nearby have become crucial components for creating an elegant and artistic style of work.
Figure 3.1: As you can see from this photo of the bride putting on her shoes, the two large windows are clearly not enough help. This photo was taken during my first year as a photographer. At that time, I had no concept of how important the knowledge and application of circumstantial light would be when photographing weddings. My original thought was, “I have two windows over here, so this should be a great place for the bride to be putting on her shoes.” As you can see, I couldn’t have been more wrong. The light is quite unflattering, even though she is close to the window. Let’s answer the three questions to see why this photo is a failure.
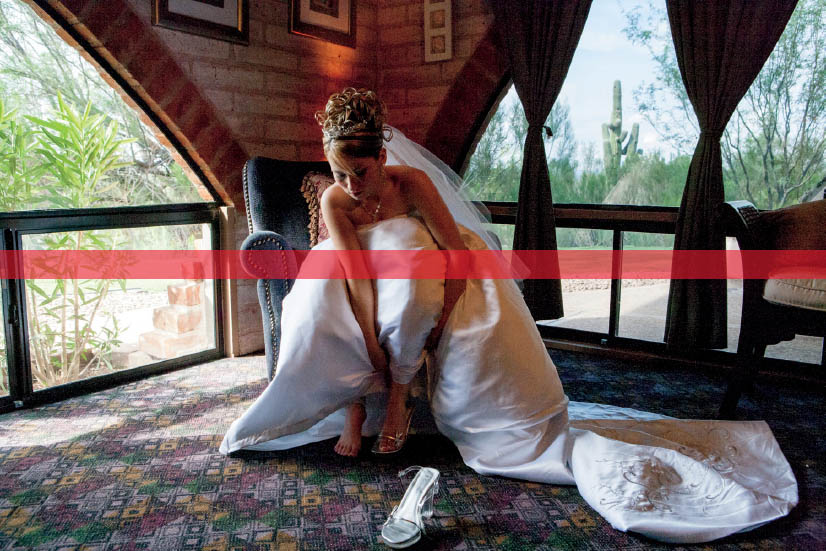
FIGURE 3.1
Where is the strongest light in the room coming from? The strongest light in this room is coming from the window on the left.
Is the window light direct window light or indirect window light? Both windows are receiving indirect sunlight. If you can see the sun when standing directly in front of a window, that is direct window light. If the sun is elsewhere and you cannot see it from the window, that is indirect window light. In this situation, the left window is receiving better light, but the sun is too high up to be considered direct window light. Therefore, the light entering the room through that window is just okay, not great. The window to the right is virtually useless. It is not providing much light at all, because the sun is on the opposite side of the building.
Are there any naturally occurring reflectors that can reflect the window light back toward the subject? Absolutely not! Circumstantial light asks us to pay attention to the objects around our subjects and how these objects are influencing the light. In this room, we have a textured red brick wall surrounding the bride, dark curtains, and worst of all, dark carpet, all of which absorb most of the light coming in from the windows. Once we combine the effects these objects have on the light with the fact that we are only working with indirect window light, there is a very good chance of failure. Not only does it appear that there is a red color cast on the bride due to the red bricks, but also the left side of her body (camera right) is completely underexposed. There is nothing in that room that is acting as a great reflector.
Figure 3.2: This photograph of Jessica replicates the previous photo of the bride putting on her shoes; however, this time it was done correctly. The crucial decision that contributed to the beauty of this photo was to ignore other parts of the hotel room that did not have the proper elements. This photo was taken in one of the largest suites at the Hotel Bel-Air in Los Angeles. However, I chose to place the bride in the narrow closet hallway. Why? Referring back to the three key questions, the main light is coming from the window on the right and the intensity of the light is strong. If you were to stand in front of that window, you would be able to see the sun above you. This signifies that the light coming in was almost direct window light. Finally, the closet doors on the left side of the photo are large, smooth, and white. These three attributes created a very effective reflector. The close proximity of the closet doors to the window actually increased the intensity of the reflected light. That hallway had all the criteria I needed to take elegant, quality photos. The rest of the large hotel room was beautiful, but it did not have the circumstantial light qualities that this little hallway possessed.
Figure 3.3: Being able to determine the direction of light and whether it is direct or indirect light will have a major impact on the way your photos look. This ability also separates a novice photographer from an experienced one. This photograph, like Figure 3.1, was also taken during my first year as a photographer. My intention was to take a photo that would feature the bride’s dress. Since I had no clue about how to read light properly indoors, I placed the bride in front of a clean background without giving a second thought to the circumstantial light at that location. The incoming window light was so weak that I had to crank up my camera’s ISO to 1600 to achieve a proper exposure on the dress. Regarding direction of light, the light was coming in from a poor angle that flattened the dress. This lack of directional light gives the photo a very flat and unflattering appearance.
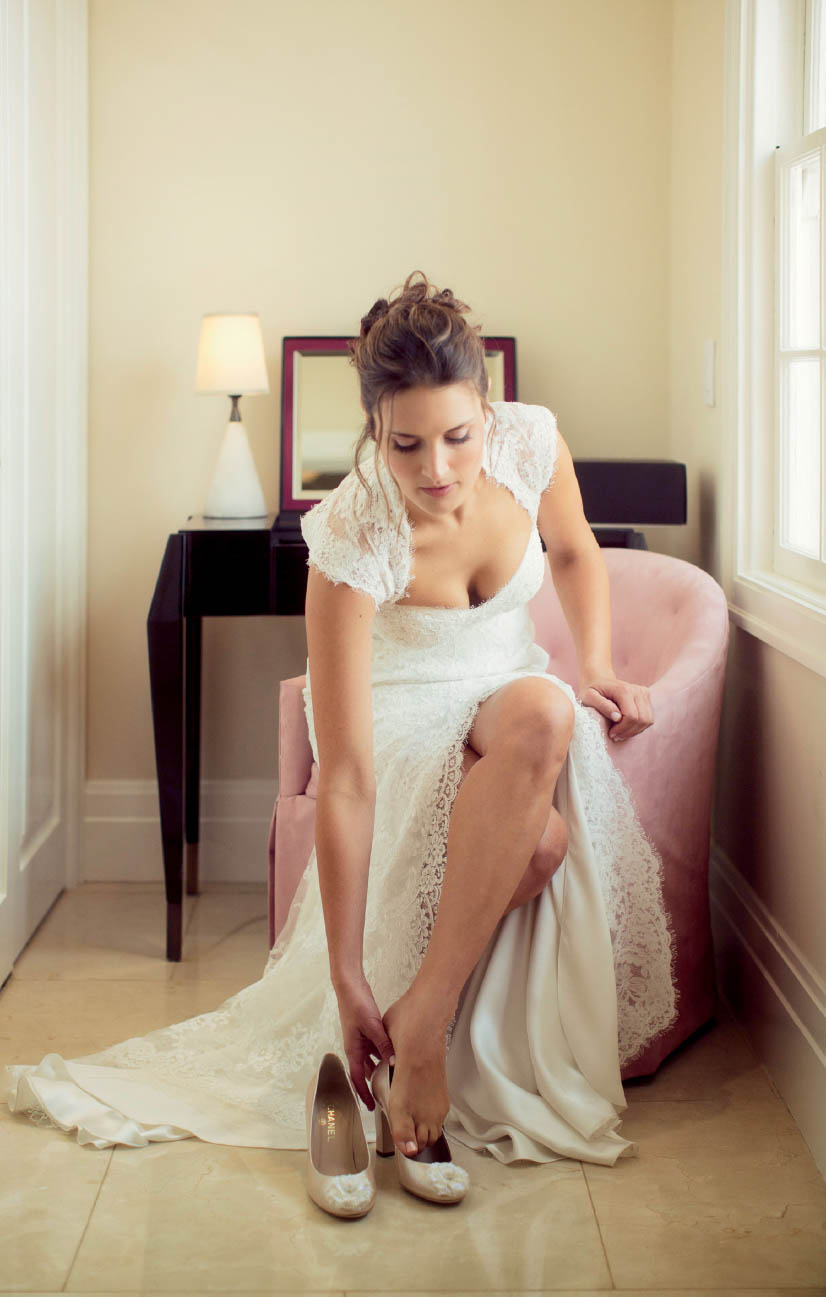
FIGURE 3.2
FIGURE 3.3
Figure 3.4: Again, my goal for this photograph was to feature the dress. The difference was that I took a minute to look around the venue to see if I could find a place with a window facing the sun. Better yet, this location also had a white wall opposite the window reflecting all that intense window light right back. Isn’t it amazing that these two photos have almost everything in common—similar pose, similar goal, similar camera angle—but clearly they are not the same. The significant difference is in how I used my knowledge of circumstantial light and knew what to look for.
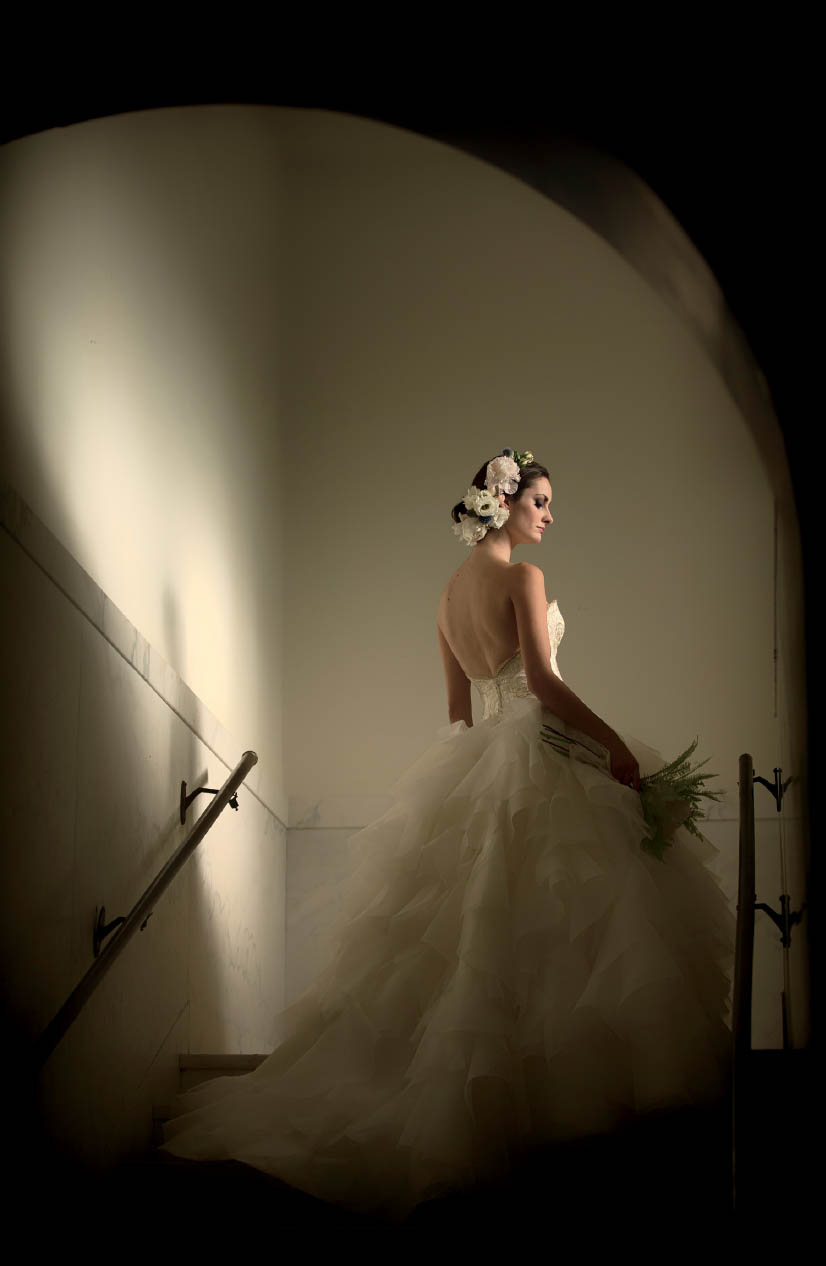
FIGURE 3.4
Working Around the Light
The next three photos are examples of a bride interacting with her wedding dress before putting it on. I took the first two as is. I did not think about the light during that time, nor did I think of the pose with respect to the light. Let me clarify that when I refer to a pose, it often means only making a quick adjustment to what the bride is already naturally doing, something as simple as turning her face toward the light. In wedding photography, the light is usually fixed, and we must learn to work around and with that light. The position of our subjects, the direction they are facing, how close/far away they stand from the light source: these are all decisions that are made with respect to the light we are working with.
Figure 3.5: In this photo, the bride is standing fairly far away from the window light. The result is a completely flat light that does very little to flatter her. Also, the light on the bride is the same as the light on the wall, the dress, and the door, so the photo lacks dimension and depth. By simply placing the bride closer to the window and strategically positioning her, as well as changing my shooting angle, the photo would have been much more flattering. As you will notice in the next photo, simply positioning the bride near the window is not enough. The angle from which you shoot and how she is posed make a tremendous difference. Keep in mind that the pose could have happened either naturally or with the photographer’s help.
FIGURE 3.5
Figure 3.6: Looking back at this photograph makes me laugh at my lack of knowledge. I had just invested $8,000 for the newest, state-of-the art camera at that time, and I imagined myself taking such wonderful photos with it. Those were the good old days of innocence. For this photo, I positioned the bride near the window. In theory, that should make this photo amazing, right? Not at all. Her pose and my shooting angle are totally wrong for this window light. First, the bride is facing the dark side of the room rather than the light side. Second, it’s difficult to enjoy the moment when more than 50% of the photo is completely blown out by the large window. Third, the camera tilt created distracting shapes from the curtain, the window, and the carpet. All of these shapes compete with the bride interacting with her dress.
FIGURE 3.6
Figure 3.7: This photo was taken recently at a wedding in Pasadena, California. We have very similar elements here as in the previous example. We have a curtain, a large window, and the bride interacting with her dress. Therefore, from an indoor circumstantial light perspective, we have similar elements as in Figure 3.6. However, in this example, the image was handled more skillfully. What makes this photo so elegant and beautiful is how the light graces the bride’s face because of her close proximity to the light source and the way she is positioned. If the bride had turned more toward the window, her face would have been completely hidden from the camera. If she had turned her face away from the window, her face would have been much darker.
Next, I positioned her on the left side of the window, because there is a nearby white wall on the left side reflecting light back. Had I not paid attention to the objects around the bride, I might have placed her on the right side of the window. This would have given this photo a much less flattering look and feel. Last but not least, all the vertical and horizontal lights in the scene are aligned with and parallel to the camera frame. This keeps everything looking very attractive and straight. These may be minor nuances, but the differences among these three photos are significant.

FIGURE 3.7
Proximity to the Light Source
Figure 3.8: One of the most visually impacting circumstantial lighting techniques you can use is to keep your subject close to the light source to achieve a beautiful light falloff as the light travels across your subject’s face. Posing the subject close to the main light source is what gives photos a glowing quality and dimensionality. Therefore, I never try to take a wedding photo as a photo-taker when the lighting looks flat. For example, let’s examine this photo of the groom, Andre. In this photo, the lighting on his face looks good but not great, because the groom is just a bit too far away from the light source (the window). Also, his face is turned away from the light.
One of the unique aspects of being a wedding photographer is that we must develop a keen attention to detail in a fast-paced environment. As you’ll see in the following image, when I posed the groom facing the window light and asked him to move just inches closer to the light, it completely transformed the look of the photo, making it much more dynamic.
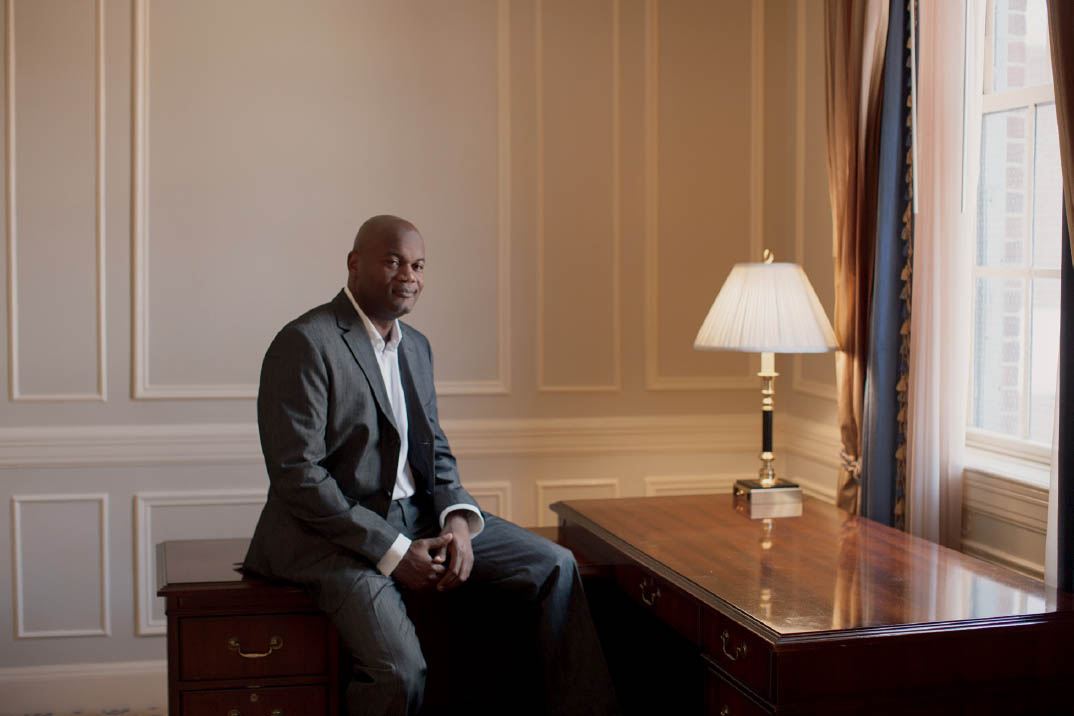
FIGURE 3.8
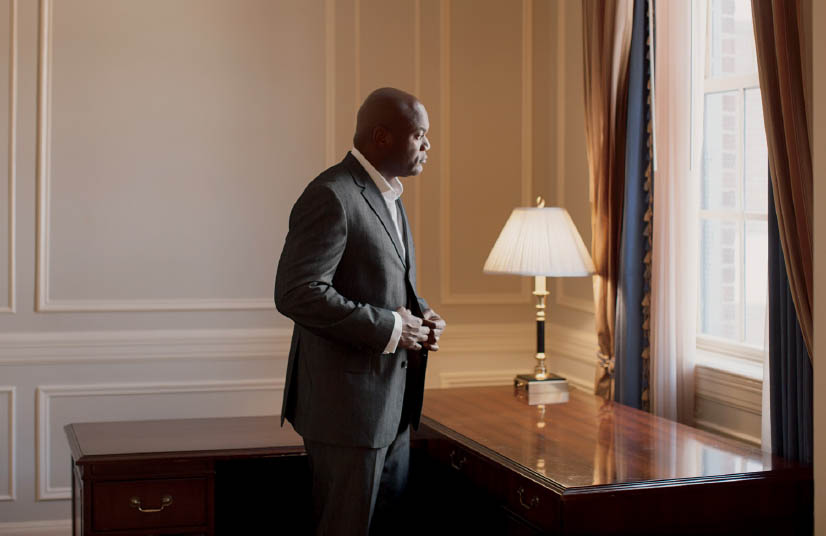
FIGURE 3.9
Figure 3.9: When I asked the groom to stand up, face the light, and lean his upper body toward it, the lighting was much more vibrant. Notice that the light on his face is strong and bold, but then it quickly falls off to a much darker shade just past his eyes. It’s incredible that such a short distance from the light source can make such a big difference in giving this photograph a high-end look.
Figure 3.10: It is imperative for me to take portraits of the bride as close to the strongest light source available. In this photo, the bride is approximately three meters, or 10 feet, away from the window light. When this photo was taken, I was unaware that I should look for the brightest window. I assumed that all windows were alike, but they definitely are not. As a result, the intensity of light illuminating the bright side of the bride’s face is not nearly intense enough. The distance between the window and the bride is also why the lighting on her face appears to be relatively flat. There are many more problems with this photo (location, distracting background, and forced pose, to name three), but for now, let’s just worry about the light.
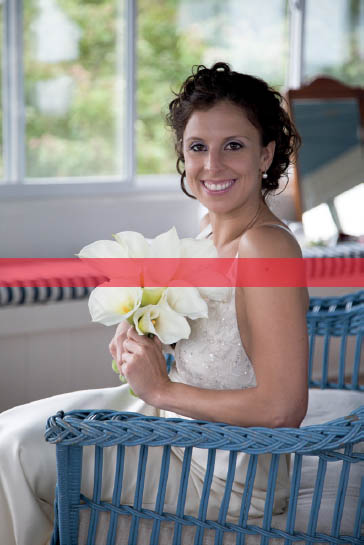
FIGURE 3.10
Figure 3.11: When I am photographing a bride, my lighting goal is to shower her with as much light as I can and then make sure to turn her head in such a way as to fill every possible wrinkle with light. In this situation, I only had indirect window light to work with. Therefore, I told the bride that I needed her to be as close to the window as possible. She was only inches away from the window in order to take advantage of every ray of light coming into the room. There were no walls behind the bride to act as reflectors, so I cropped tight and positioned her as close to the light as I could. The light on her face is now brighter than the light illuminating the rest of the room. That’s the goal! You always want the bride to shine with beautiful, flattering light.

FIGURE 3.11
Strategic People Placement with Circumstantial Light Indoors
It took me a while to learn from experience that I must be very strategic about where people stand during certain parts of the wedding when I have a bit more control—for example, when the bride and groom are getting ready. When working with window circumstantial light, making a mistake could emphasize unwanted facial wrinkles and might also block light from reaching one person due to another person.
Figure 3.12: I have learned the hard way how to make sure that people are standing in flattering light. This photo is an early example from when I did not want to say anything and just shot away. The bride is standing and facing away from the light, and the bridesmaid helping her has beautiful light on her back but not on her face. The result is that they both have terrible lighting on their faces and a red color cast from the circumstantial light in that room.
Figure 3.13: This is definitely an improvement from Figure 3.12, but it is still far from flattering. From a circumstantial light point of view, the bride has two windows illuminating her: one behind her and another to camera right. From my shooting angle, the bride is facing away from the window, and the bridesmaid’s dark blue dress is actually absorbing light. The result is that the bride has very poor lighting on her face, and you cannot see the bridesmaid’s face.
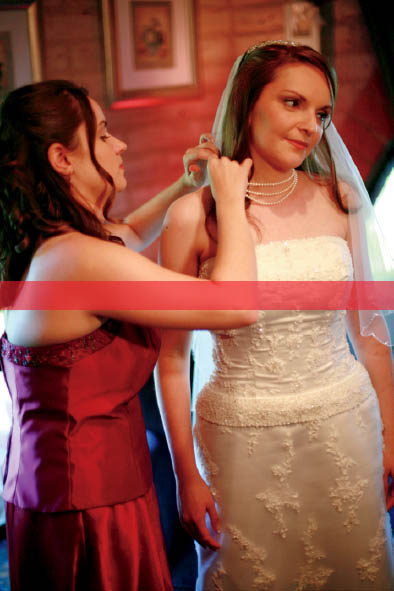
FIGURE 3.12
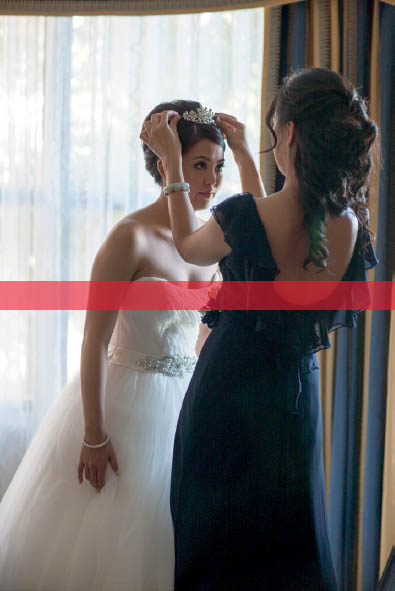
FIGURE 3.13
Figure 3.14: This is a recent photo taken at a wedding in Pasadena, California. Now, I can make sure that the wedding proceeds normally while also being sure to photograph with great light. The bride will always need help zipping up her dress, so this might as well happen where the light is flattering to both people. One oversight that a photographer often makes is to ask the person assisting the bride to stand directly behind her as she makes adjustments to the dress. This is a bad idea, because the bride will block most of the light from the other person’s face. To ensure that this does not happen, I ask whoever is helping the bride to simply stand slightly off to the side so that he/she will also receive great window light. Clearly, the bride should be positioned closer to the light source to give her greater importance by making her the brightest focal point.
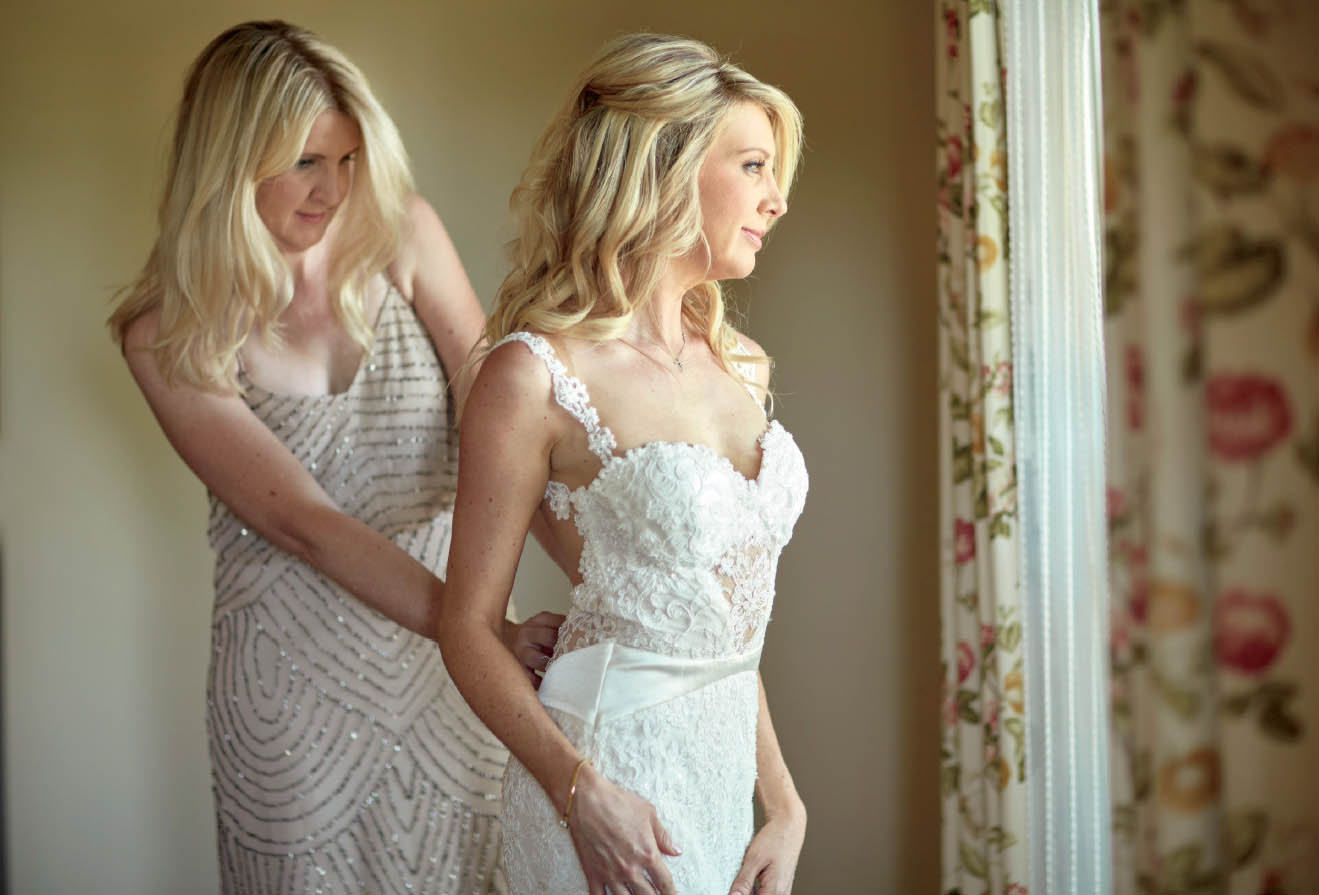
FIGURE 3.14
Reducing Wrinkles with Circumstantial Light
Figure 3.15: Posing your subjects close to a window does not necessarily mean that they will receive flattering light. You must also consider the angle from which the light is striking your subject. For example, when photographing portraits involving the mother or the grandmother of the bride, be sure to position the older person directly in front of the light to fill in every shadow created by facial wrinkles. My mistake in this photo was that I never paid attention to this detail, and I accidentally placed the mother of the bride in such a way that the light illuminated her from the side. This kind of directional light actually emphasizes texture. This is not a good technique if you want the mother of the bride to love the photos. Not to mention, the “prom” pose with the mother of the bride isn’t exactly suitable, either.

FIGURE 3.15
Figure 3.16: This is the correct way to pose the mother of the bride in circumstantial window light. In this case, both the bride and her mother are positioned more directly toward and as close as possible to the light source. Notice how much more flattering their faces appear by reducing the appearance of texture on their skin. These days, I simply ask them to directly face the window light to take their photo. Even if the background is distracting, I still believe that this is the best option; looking younger and more flattering is far more important to members of the family than a distracting piece of wall decor in the background.
A major exception to this would be if the distracting element in the background is a light, as in Figure 3.17. Simply moving the group more to the left and cropping that wall light out of camera would have solved the problem. These kinds of oversights occur, because in the heat of the moment and with everything going on, we photographers often forget to take a few seconds to breathe and observe our surroundings.
Also, here’s a helpful tip: If someone in the photo is wearing white, such as the bride, be sure to turn her body to the side and her face toward the light. If the groom is wearing a white shirt, either turn him to the side as well or have him put his jacket on. The reason is that having something large and white in front of a window calls far too much attention to the width of that part of the body, and it’s incredibly distracting due to its brightness.
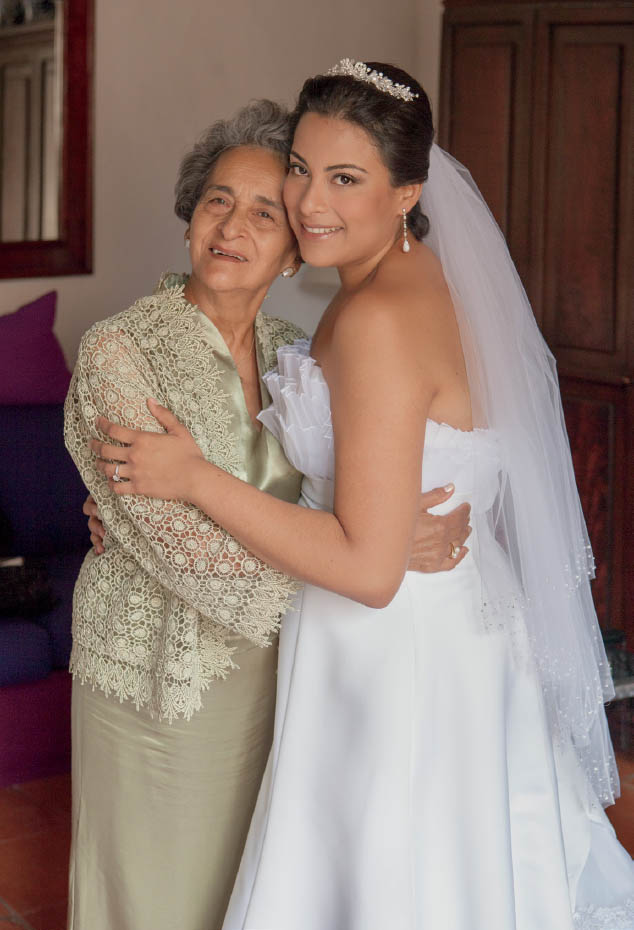
FIGURE 3.16
FIGURE 3.17
CIRCUMSTANTIAL LIGHT OUTDOORS
I know that weddings are fast-paced events, and finding time to do a good job or to take advantage of the location is a constant struggle. For these reasons, I have learned to pay more attention to the surrounding objects around my couple in order to use these objects as natural reflectors of sunlight.
During the day, the sun is always above you. This means that people will always have dark eye sockets caused by the supraorbital ridge bone beneath the eyebrow. Being skilled at recognizing and utilizing circumstantial light will be one of the major talents that set you apart from other photographers. Not all wedding photographers, of course, but a great majority of wedding photographers don’t give circumstantial light much thought. They simply place their couples in front of an attractive location and start shooting. They will continually shoot until, hopefully, one or two photos look decent. However, the light illuminating their clients will most likely leave a shadow on the eyes due to the direction of light. This is very unfortunate, because there is nothing more beautiful than a photo of the bride with gorgeous, glowing eyes.
Look at wedding photographers’ websites from around the world. You will rarely find a photographer who intentionally illuminates his or her clients with horizontal light, not just the vertical light traveling down from the sun. In order to find horizontal light, we must seek objects that can reflect the sun toward our subjects. Those objects could be a large tree trunk, the walls of a nearby building, a large white delivery truck, or a light-colored smooth sidewalk reflecting light back up. My personal favorite is an outside, open structure that provides shade but also allows strong sunlight to enter it. A good example of this would be a garage with the door open to let light in.
All of these objects, and many more, help reflected light from the sun to travel horizontally, casting beautiful light onto our subjects’ eyes. As soon as I step outside of a hotel room to photograph any portraits required by the couple, I have four extremely important goals with regard to how these portraits will be lit. Keep in mind that in wedding photography, we don’t always get everything we want. In fact, it’s rare that we ever do. Therefore, these goals are at the forefront of my thought process as I shoot, but there are many instances when I cannot accomplish these goals for a variety of reasons. During tough times, you just do your best and move on. The four goals are outlined here. Let’s take a look at a few examples.
Four Goals for Circumstantial Light Outdoors
- •First, achieve clean light across the subject’s face. Then, utilize circumstantial light to reflect light horizontally toward the subject’s face. If there is nothing in close proximity reflecting light back toward the subject, use a reflector, diffuser, flashes, or video lights (LED) to ensure that horizontal light illuminates them.
- •Maintain even or consistent light levels throughout the frame. For backlit portraits, you can only minimize hotspots around the scene.
- •Make sure that the subject is, at the very least, as bright as the background with the exception of the sky.
- •If working with direct sun on your subject, carefully adjust the pose to fit the light and flatter the subject.
Figure 3.18: It’s very clear why the first goal is so important. Without paying attention to even, clean light across the couple’s faces, the result is splotchy lighting, such as in this example. This photo was taken during my first year as a photographer, when I did not know how to look for clean light across my subjects’ faces. The easiest way to achieve clean light during strong sunny conditions is to simply photograph with the sun directly behind their faces. The quickest way to make sure that the sun is directly behind your subjects is to find their shadows and have them stand in the same direction as the apex of their shadows. Note that they do not have to stand on the tip of their shadow, just stand in the same direction as the tip of the shadow.
FIGURE 3.18
Figures 3.19 and 3.20 demonstrate how circumstantial light techniques were used to reflect light back toward the subjects’ faces. In both cases, the light-colored ground functioned as a very effective reflector. For this reason, in Figure 3.19, I had the bride tilt her head slightly downward in order to pick up more reflected light on her face. Notice that in Figure 3.20 I should have asked her to tilt her head down slightly more. Because I did not think about that during the shoot, the result is that her chin is illuminated much more than her eyes. This is a strong testament to how strong the reflected light is coming up from the ground.
FIGURE 3.19
FIGURE 3.20
Figure 3.21: In this example, I managed to keep the light on their faces consistent. However, while there may not be splotchy lighting in this photo, the couple’s faces are completely dark. The second goal was basically ignored. There are multiple hotspots all over the frame. This is very distracting when you are trying to visually emphasize the bride and groom. With a photo such as this, your eyes travel everywhere, from hotspot to hotspot. Even the bouquet has a heavy hotspot. I was such an inexperienced photographer when I took this photo. The sad part is, there was wonderful light at that time of day, and it’s unfortunate that I did not think about the hotspots surrounding the couple.
Figure 3.22: We have a similar oversight in this example. It’s very difficult to photograph a scene with depth, such as this one, without having any hotspots from the sun striking the ground or a tree. However, try to avoid having a hotspot near your subjects’ faces. A hotspot there is much more damaging to the photograph than if the hotspot is near the ground away from their faces. In this case, there is a heavy hotspot right behind the bride’s upper back, close to her face. You can see from looking at this photo how distracting that hotspot is. If I had changed my camera angle slightly to the left, I could have avoided this hotspot or I could have cropped it out in camera. The lesson to take away is to avoid heavy hotspots near your clients’ faces. On a more positive note, the first goal was achieved by having clean and consistent light across her face.
FIGURE 3.21
FIGURE 3.22
Figure 3.23: As I said in the previous example, it is very difficult to take a photo with depth without the sun directly striking different objects, such as the ground or plants. This photo achieves all of my four goals. It falls just a bit short on my second goal. The light levels are fairly even and consistent throughout the frame, with the exception of the ground. But the reason this works is because the ground is far away from their faces, which greatly diminishes the distraction. After I cropped out the ground from this photo, I finished with Figure 3.24. Now, you can see that all four of my outdoor circumstantial light goals were well executed.
FIGURE 3.23
FIGURE 3.24
Figure 3.25: This is a recent bridal portrait that I took during a wedding in Orange County, California. I successfully achieved all four of my circumstantial light goals for this portrait. From corner to corner, the beautiful lighting looks almost surreal. At weddings, you cannot always make all four circumstantial light goals work together; however, there are times when the stars align and the opportunity is there. You just have to know what to look for and to take advantage of these opportunities. In this instance, the sun was illuminating a light-colored building in front of the bride. That building then reflected a great deal of soft light back toward her, and the results speak for themselves.
FIGURE 3.25
Figure 3.26: There are times when we must work with direct sunlight illuminating our bride and/or groom. For this reason, the fourth goal states that when working in direct sun, we must adjust the pose carefully to keep the light and shadows under control. In this case, I chose to have the bride receive the direct light rays from the sun. To control the shadows that this pose would create, I adjusted the pose by tilting her head upward until most of the shadows disappeared from her face. Then, I simply had the groom kiss her upper cheekbone to ensure that he would also have his face tilted slightly up. The result is a dynamic photo with strong light that is still flattering to the couple.
FIGURE 3.26
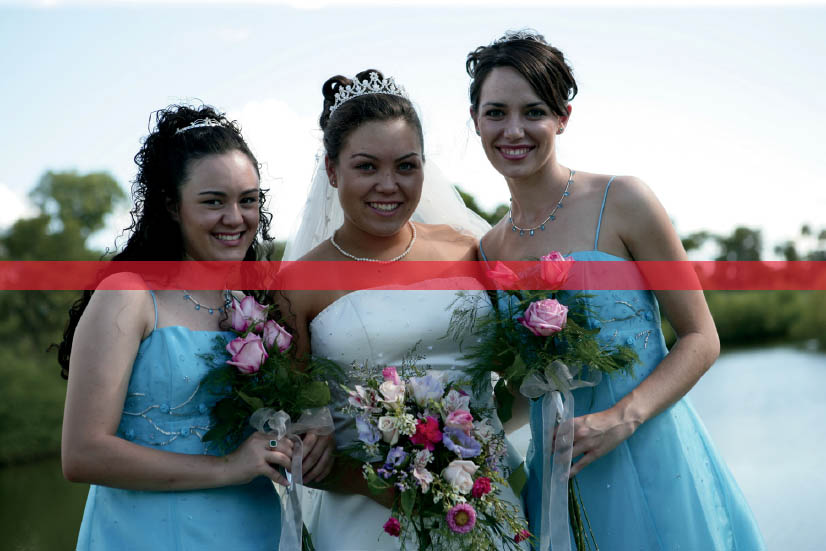
FIGURE 3.27
Comparing a Photo with Proper Outdoor Circumstantial Light with a Photo that Completely Ignores It
I cannot emphasize enough the importance of the objects surrounding your subjects and the effects they will have on the lighting quality of your photographs. Through experience, I have become more acutely aware of all objects and how they influence the scene.
Compare the lighting quality in Figures 3.27 and 3.28. Both of these outdoor photos are of bridesmaids holding their bouquets. Although the two photos are similar in some ways, they could not be more different with respect to the quality of light illuminating the subjects.
Figure 3.27 practically disregards all of the circumstantial light goals listed above. The bridesmaids are standing over green grass, which not only leaves an unflattering green color cast, but also absorbs most of the light coming from the sun. There is no light traveling horizontally to illuminate the subjects’ eye sockets, and there is splotchy lighting on their faces.
Now, compare that lighting to Figure 3.28. In this photo, I positioned the bridesmaids under the cover of an arch. This arch blocked the sunlight from directly striking their heads. Although the arch provided some shade, I strategically positioned the bridesmaids as close to the sunlit ground as possible. I wanted them to receive as much reflected light from the ground and walls as possible. You can see how effective horizontal light can be by looking at each of the bridesmaids’ eye sockets. They are perfectly illuminated, giving each and every one of them a beautiful sparkle in their eyes.
The subject of circumstantial light can go much deeper. However, because there is so much more to being a great storyteller than just good lighting, I kept this topic to the point with emphasis on the most crucial aspects that a wedding photographer will deal with. If you wish to dig deeper into this subject, you can read my lighting book titled Picture Perfect Lighting. A great deal of that book is dedicated to mastering circumstantial light.
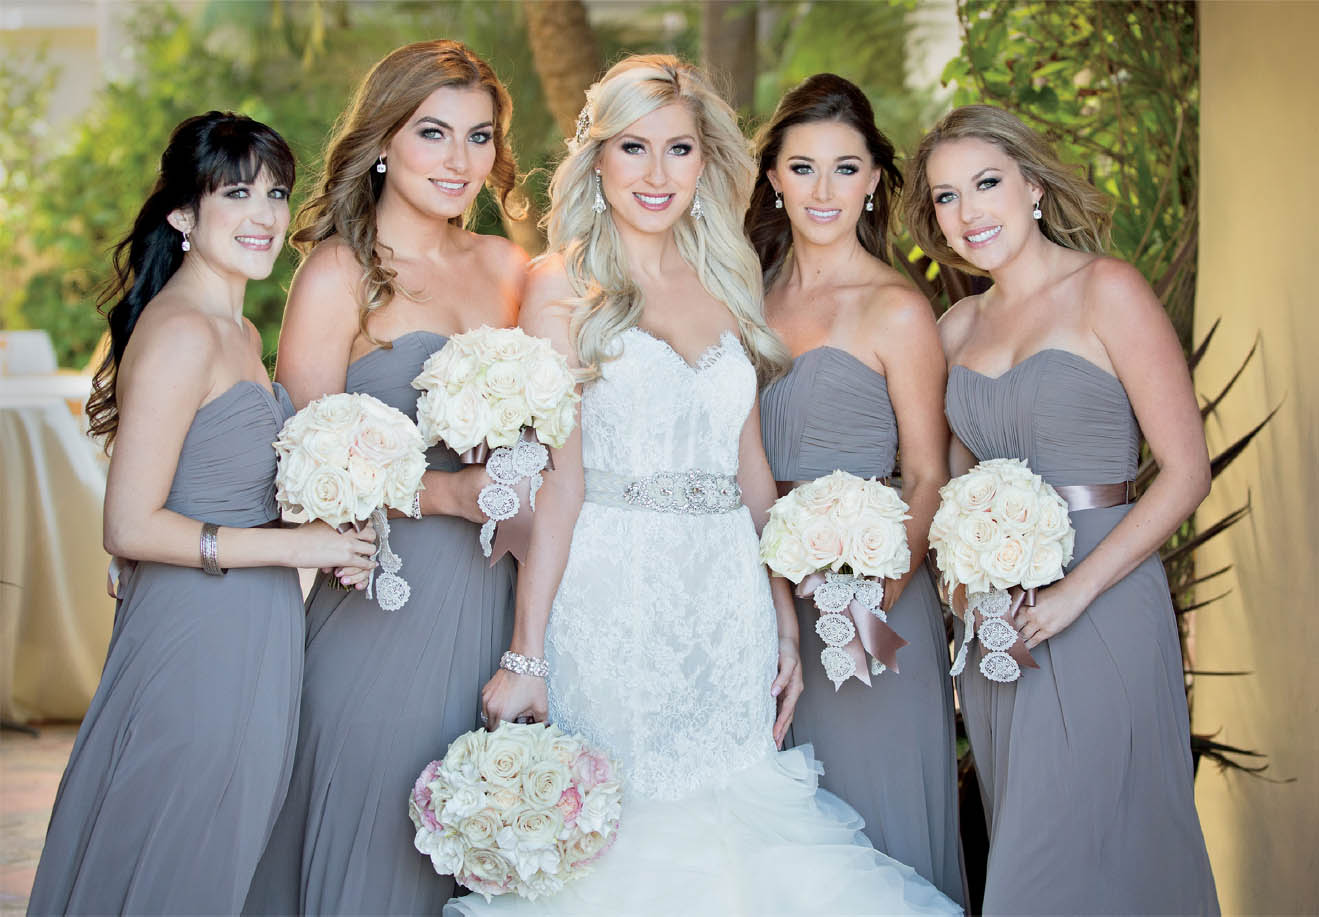
FIGURE 3.28