chapter 5
DEPTH AND WALLS
As my experience in wedding photography has grown, I have learned to regard buildings and the space around me as photographic tools. When I arrive at a place where I will be taking photos, I immediately take a short walk to become familiar with all of my surroundings. I also take notice of the location of the sun, because this directional light will highly impact my decisions regarding where I will shoot. Indoors, an action as simple as walking into a room becomes a quick but very detailed inspection of the walls and the space within that room. Most people cannot imagine how many ways walls can be used to achieve spectacular photo results.
Depth is another critical component of wedding photography. Without depth, photos run the risk of looking flat, lifeless, and unimaginative. Depth can also be used to capture stories happening in the background as well as in the foreground. For example, a bride could be in the foreground talking with guests, while her parents are captured in the background looking tenderly at her. The photographic opportunities using depth and walls are endless. But if you wish to become a master wedding photographer, you must be fully aware of the many benefits and challenges these two artistic techniques can provide and how to balance each of them to tell a visual story.
THE PROS AND CONS OF USING DEPTH
During a wedding, if you decide that you do not want to place your couple directly in front of a wall, but instead you wish to add depth to your photograph, then you should know the following characteristics that will help you choose opportunities and recognize the challenges that depth provides. Then you can make a much more informed decision, especially if you are pressed for time.
The principal beneficial characteristics depth provides to a photo are the following:
- •The context of space and surroundings
- •A feeling of openness
- •A sense of romance
- •Foreground/background storytelling
Now that you know the benefits of having depth behind your subjects, you must keep in mind that these benefits mean nothing if you don’t include the two location skill components we discussed in Chapters 3 and 4: circumstantial light, and showing and removing context and clutter. Think about it. What is the point of having depth in your photo if the lighting on your subjects is terrible or if you are showing too many distracting objects in the photo? It is a top priority to keep in mind that you must use all the skill components to create a spectacular photo. These are your building blocks.
Figure 5.1: This photograph has depth, so why does it look so terrible? Quite simply, this photo clearly illustrates the consequences of not implementing the previously discussed skill components for this photograph. To begin, the circumstantial light is not complementary to the couple at all. The bride is illuminated by direct sunlight and the groom’s face is partially in shade. The strips of light illuminating the road are distracting because they are inconsistent, and they do not create a light/shadow pattern. The road is black, therefore not much sunlight is being reflected upward toward the couple’s faces. When considering lighting, this photo is a complete mess.

FIGURE 5.1
When photographing with context, as in Figure 5.1, you should really be cautious about camera tilt. Any tilt with context can be extremely distracting. When photographing in front of a wall with no context, you can get away with some camera tilt, but not much.
Now let’s discuss the context and clutter. First, there is far too much negative context in the area. The cars, trees, buildings, and telephone wires are all just clutter, and they provide nothing but distractions in this photograph.
Simply adding depth to your photos does not automatically yield the benefits of depth. You must consider circumstantial light, context, and clutter to even begin to take a successful photo with depth.
Figure 5.2: While casing my surroundings during a wedding, I searched for an open area that had relatively the same color palette, as well as similar luminosity levels. This means that everything at the scene would be lit by similar lighting intensity. The tree above the groom’s head is the brightest part of the image, but it is still within the range of the rest of the scene. For these reasons, I chose that location as the place to pose my couple and incorporate depth as my artistic decision. It is clear to see that the first three major benefits of depth listed above are present in this photograph.
As a side note, the roses on the left side of the frame made the composition left-heavy. Therefore, I compensated by placing the couple on the right side of the frame. As a result, the photograph feels well balanced.

FIGURE 5.2
I began this book by saying that you do not have to take perfect photos at weddings. Do your best to minimize issues, but don’t worry about it if one or two issues exist. For example, in this photo you can see a small hotspot on the groom’s forehead. I could have asked my assistant to move the diffuser above their heads a bit more to cover his whole head, but it would have been at the cost of this beautiful expression. I will always prioritize the couple’s expressions or a beautiful moment over a slight technical issue. I recommend that you do so, as well.
Figure 5.3: When I think of using depth for an artistic decision on location, this photo always comes to mind. I took this photo of my wonderful friends Angie and Darin a few years ago during their wedding in beautiful Savannah, Georgia. To me, this photo exemplifies the romance and impact that depth can have on your wedding photos. Keep in mind that everything in this gorgeous scene at the Wormsloe Historic Site adds to the overall impact of the photo. Having plenty of context contributes to the breathtaking scenery.
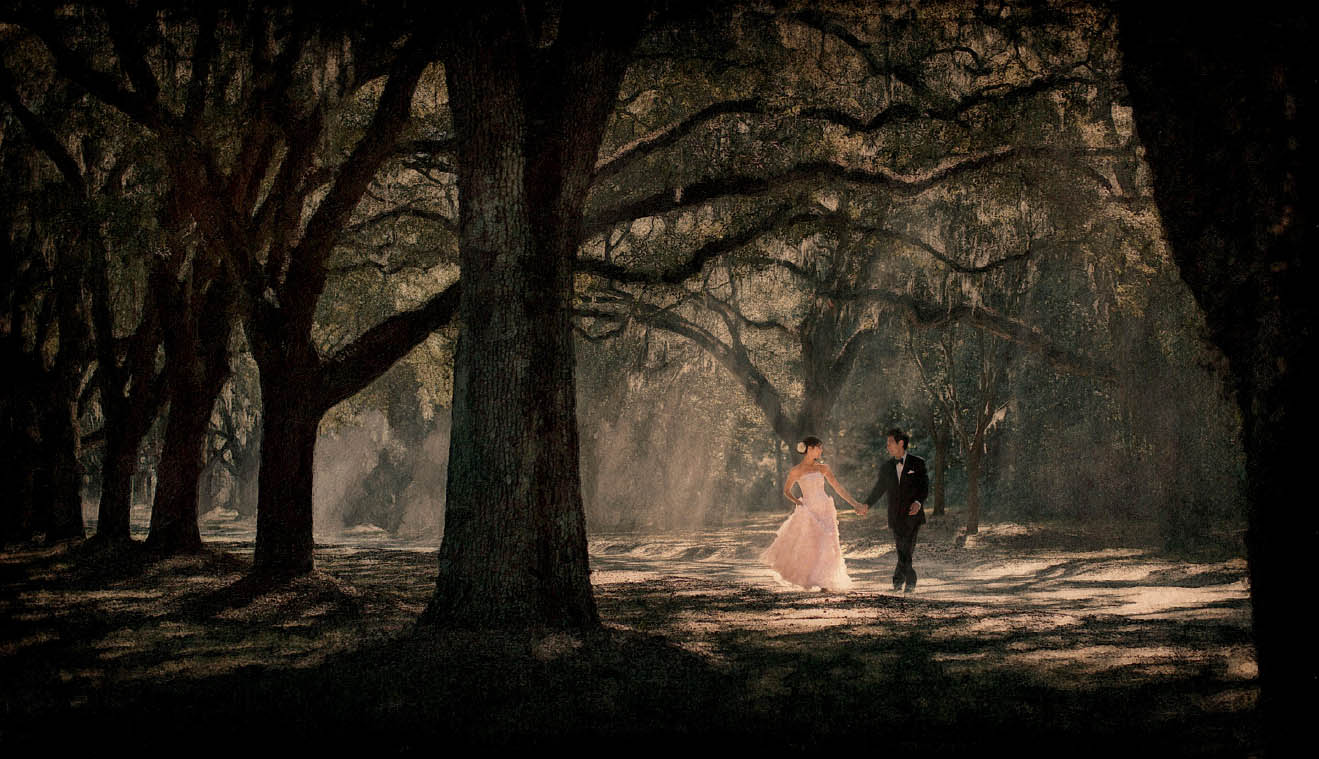
FIGURE 5.3
Figure 5.4: During a wedding in Kauai, Hawaii, we drove up to the north side of the island and encountered this stunning pier with the most incredible mountains in the background. I actually remember asking more than 30 people if they would move away from the pier for just a few minutes so I could take this photo without anyone else in the scene. To my surprise, they all gladly moved and became animated spectators throughout the whole process.
I thought about context and lighting before deciding upon how to take this photo. The scene was too beautiful to use walls. It was a no-brainer to use depth, but I wanted the entire pier in the image. I had to walk quite a distance away from the pier to be able to use a telephoto lens to compress the scene. The greatest challenge at the site was that the circumstantial light was not good enough to separate the couple from the rest of the scene. To solve this problem, I placed a flash on the pier pointing up at them and triggered it from my camera. Now the couple is a little brighter than the rest of the scene.

FIGURE 5.4
It’s so important to take the extra effort to correct the lighting in your photographs. Without it here, the choice of using depth would have been wasted. This scene has impact because it has many elements coming together, and it was properly executed.
Figure 5.5: Here we see foreground and background storytelling. This is one of many examples I have taken using depth to create two separate stories within the frame. In this photo, the bride is in the foreground interacting with something to her left (camera right). The bridesmaids are in the background reacting to the bride’s reaction. The bride is in focus while the bridesmaids are far back enough to be gently out of focus.

FIGURE 5.5
Figure 5.6: In this example, too, I used depth to create two separate stories. Not every story has to be from a person’s point of view. In this situation, the bride and groom are out of focus in the background, and the grass is in focus in the foreground. It is as if this view of the bride and groom comes from the perspective or point of view of something in the grass.

FIGURE 5.6
As I said, the photographic opportunities that depth provides are endless. It all depends upon your creativity and how much you want to push yourself to utilize depth in different ways. For example, you could put two wine glasses in the foreground very close to the camera’s lens and out of focus, and frame the couple in the background. The list goes on and on.
THE PROS AND CONS OF USING WALLS
Walls are a rather simple subject, but it is important to know their impact on your images whether you choose to take portraits in front of walls or with depth (space) behind your clients. Believe it or not, there are a great number of techniques you can employ for both choices. Naturally, during portions of the wedding, a photographer should take photos with a photojournalistic approach and should quickly react to moments happening around him or her, regardless of the location.
In either case, walls are everywhere. To an unobservant person, a wall is just that: a wall. To a skilled wedding photographer, walls are much more than structural elements. Walls are photographic tools that should be used in the best possible way. In order to do so, you should be aware of the photographic benefits both walls and depth can bring to your photography.
One unique aspect to wedding photography is that you don’t always know where you will be working. A wedding is on-location photography. This means that all the elements in your surroundings become your light modifiers and studio backdrops.
The principal characteristics walls provide to a photo are the following:
- •Simplicity
- •Light modifiers
- •Monochromatic color palette
- •Contrast through colors or size
- •Graphic elements through either decor or shadows
Simplicity
Figure 5.7: This is a photo taken during my early years as a wedding photographer. Like most beginners, I did not pay attention to how distracting the context was in this photo. There was no need for this background at all, because it added nothing to the photo. In hindsight, I could have used the cream-colored wall by the doors on the right side of the frame. Then, the wall would have kept the scene simple and free from distractions. However, additional light would have been needed, since that wall was in open shade.
FIGURE 5.7
Figure 5.8: Here we have a similar situation as in Figure 5.7. This photograph was taken at the Parker Hotel in Palm Springs. The back courtyard of the hotel is full of distracting elements. I deliberately kept the photo simple because I wanted the viewer’s attention to be on the intricate flower arrangement. Notice that the focal point is on the flowers, and the bride is slightly out of focus. Also, since there is a wall of bushes in the background, there is nothing distracting you from the desired message. This is key. When I want to communicate a simple message, I usually choose to use a wall, which removes all context and provides me with a simple, clean background. Compare this photo with Figure 5.7.

FIGURE 5.8
Figure 5.9: You don’t always need to remove all context if you wish to use a wall to keep a photo simple. This wedding took place in Oaxaca, Mexico. I wanted to maintain the Mexican flavor of the locale, so I kept some of the context while still harnessing the simplicity of the wall for this portrait of the groom.

FIGURE 5.9
Walls as Light Modifiers
Figure 5.10: I realize that this is not a wedding photo. But this is a perfect behind-the-scenes example of how I use walls to create soft light during weddings. I usually carry multiple flashes and a portable Profoto strobe with me. The light where the model was sitting was adequate but not great. The lighting was quickly remedied by using a strobe and aiming it toward the wall, rather than at the subject. The wall is much larger than the light modifier, so it will create much softer light. This is a great technique for beauty lighting, and brides love the way they look with high intensity soft light such as this. Now you can see how walls don’t have to be used just as backdrops; they can also be used as great light modifiers.
Figure 5.11: This is the result of using a wall in front of the bride as a light modifier. I used a flash and bounced it against the wall in front of the bride. I used the other wall as a clean and simple backdrop. It is very important to remember that great lighting is crucial to create a great photo. A nice wall is useless if it’s in terrible light. In this case, the lighting on the bride was fine, but it wasn’t great. I enhanced it significantly by adding a flash and bouncing it against the opposing wall.

FIGURE 5.10

FIGURE 5.11
Monochromatic Color Palette
Figure 5.12: I absolutely love finding walls that have a gentle color palette. Brides look ravishing in front of such walls. It gives the photo a fine-art feel because it takes on a monochromatic color palette. Quite a bit of consideration was taken with respect to the lighting for this portrait.

FIGURE 5.12
Contrast Through Colors or Size
Figure 5.13: Walls can be of all sizes and colors. If you have a large wall and you place a couple in front of it, it can make an interesting contrast in size. In this photo, the wall was a beautiful sky blue color, and the bride was wearing a white dress. The contrasting colors really give the photograph a lovely feel.

FIGURE 5.13
Graphic Elements Through Either Decor or Shadows
Figure 5.14: There are many instances when walls can provide interesting graphics to enhance the visual interest of a photograph. For this reason, we must keep our eyes open for any graphics that are printed on walls. At this engagement photo shoot, I noticed this wall depicting a little girl holding a teddy bear. The painting reminded me of innocence. For this reason, I posed the couple against a cheerful, pure backdrop.

FIGURE 5.14
Figure 5.15: This location at the Ritz Carlton in Orange County had a few paintings decorating its walls. Next to me, my friend Collin is enhancing the light with a reflector; I refuse to be complacent about lighting the moment I take a photo. I wanted to make the background look like a wall instead of a painting on the wall, so I removed all context from the scene.
Figure 5.16: By removing all context from the scene in Figure 5.15, the viewer no longer has any idea where the photo shoot was held or how large that wall is. The roses symbolize romance, so I tried to make the photo romantic. Furthermore, the roses seem to be directing the viewer’s eyes to the bottom of the frame toward the couple. For this reason, I chose this particular painting over the other two on the wall.

FIGURE 5.15
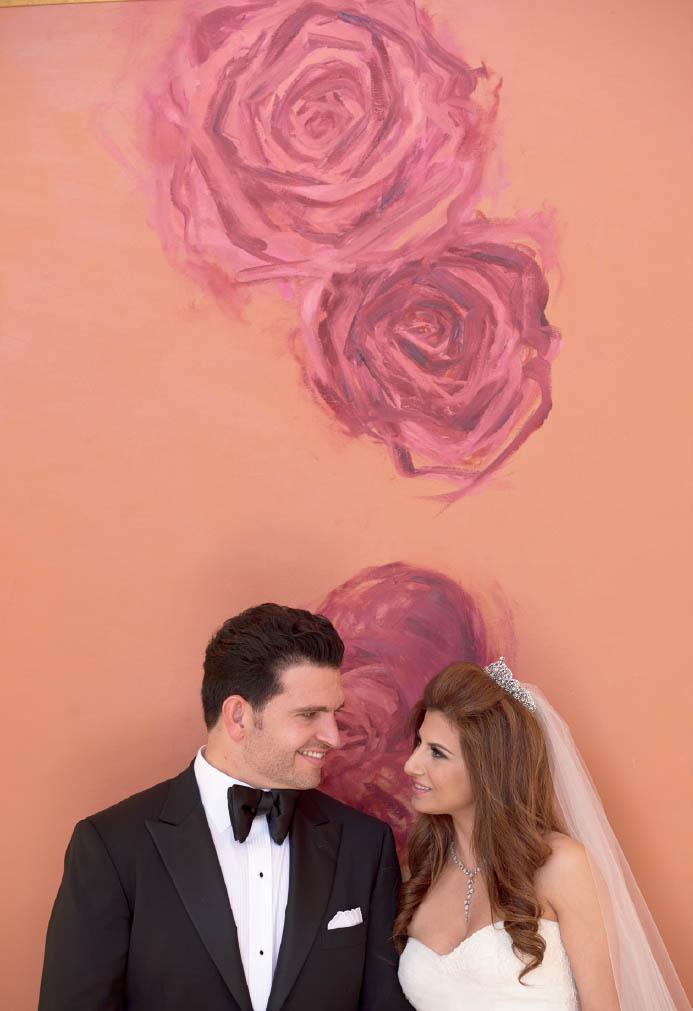
FIGURE 5.16
Figure 5.17: This wall was a perfectly clean background. When I come across a large, clean, and clear wall such as this one, I think about adding a graphic element to the wall by creating light and shadow designs. All a photographer needs is any kind of object with a cutout design. With a flash, the light passes through the cutout and replicates the pattern on the wall in the form of light and shadow.

FIGURE 5.17
Figure 5.18: Now, the simple wall with no visual interest becomes quite interesting. I purposely had my helper move the chair up or down until the light strip illuminated the bride’s eyes perfectly.

FIGURE 5.18
Figure 5.19: After wrapping up a wedding in New York City, I was about to return to my hotel when I noticed this wall outside of the reception area. As I said before, I am always on the alert for walls that could be clean canvases for graphic designs. In this case, I did not have a chair or anything else that I could use to add the graphic, so I asked the couple to pose in such a way that I could see their silhouettes on the wall when a strong light illuminated them. This time, I used a Profoto strobe to illuminate the couple and create their shadows on the wall.
Figure 5.20: It is this kind of photo that can give you an edge over other photographers, not because the photo is out of this world but because it shows creativity within your surroundings. Couples want to hire a photographer who is going to “make magic” at their wedding. Photos like this one give them confidence about your skill set, and they would be more than willing to pay for it.

FIGURE 5.19
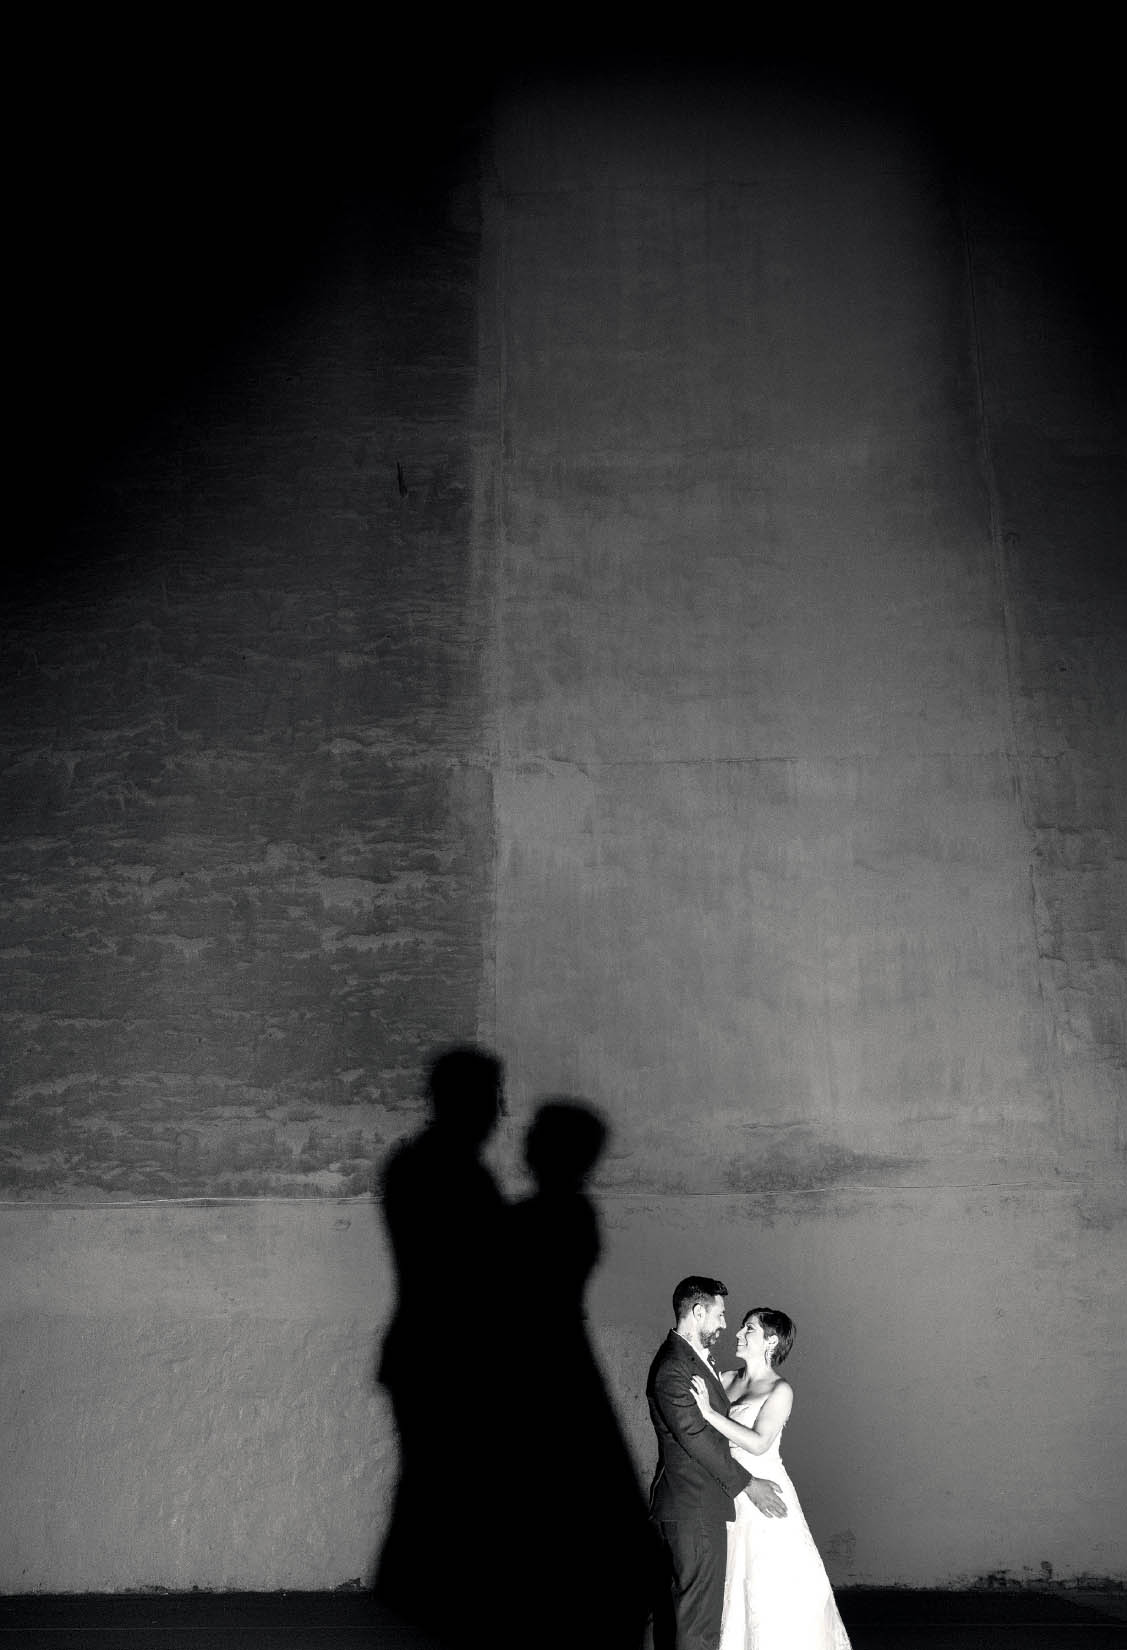
FIGURE 5.20