chapter 4
SHOWING OR REMOVING CONTEXT AND CLUTTER
I can guess what many of you are thinking: “Clean out the clutter? That’s obvious!” Evidently, it’s not. If clearing clutter from photos were common sense, why do I discover clutter in most professional photographers’ wedding photos? It is a significant issue, but it can be resolved quickly. Clutter-free images focus all the visual attention on the intended subject(s). After finding a room with the best circumstantial light, the next step is to determine what kind of situation we are confronting with respect to how clean or messy that location is. Ideally, the bridal couple should be getting ready in the cleanest part of the room with the best lighting. But most times, there will be a serious mess in every corner of the room.
Wedding photo sessions of the bride or groom getting ready usually occur at their private home or in a hotel room. These rooms can accommodate three or four people comfortably. However, during a wedding, the photographer will be dealing with the bride and groom, their entire wedding party, and family members. There will be food and drinks everywhere, as well as items of clothing, garment bags, make-up, flowers, televisions, beds, lamps, bedside tables, etc. For the sake of your photography, this mess must always be dealt with.
In my experience, if you ask politely, you will always receive permission to move things around a bit and to clear the clutter from the area where you will be photographing the most. If you don’t ask and just assume that you can meddle, it is likely that you will appear unprofessional and rude. On the other hand, if you don’t wish to interfere with the current state of the room, your photos will show the entire distracting mess.
“Showing or removing context” refers to the artistic decisions a photographer makes about how much or how little of a room or location he or she wants to show in the photographs. As you gain experience in wedding photography, your decisions regarding how much of the scene you show will become one of the most important decisions you make.
PROPERLY DEALING WITH CLUTTER
Take a look at Figures 4.1–4.3. They show the reality of what wedding photographers encounter when they first see the bride or groom getting ready, and these are not even the worst situations I’ve worked in. I have entered rooms where there is so much clutter that I cannot even see the carpet. Yet, it is in rooms such as these that we must produce beautiful and elegant work. I believe that part of the thrill of being a wedding photographer is overcoming these challenges and somehow taking great photographs.
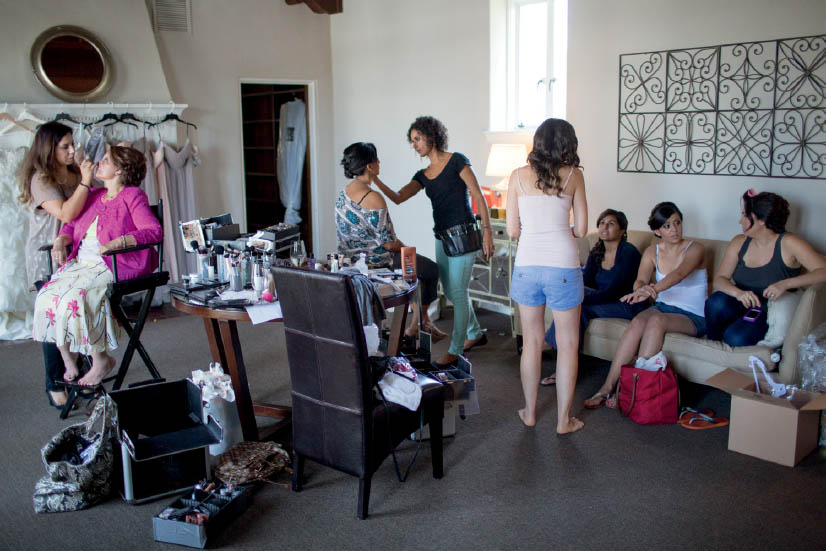
FIGURE 4.1
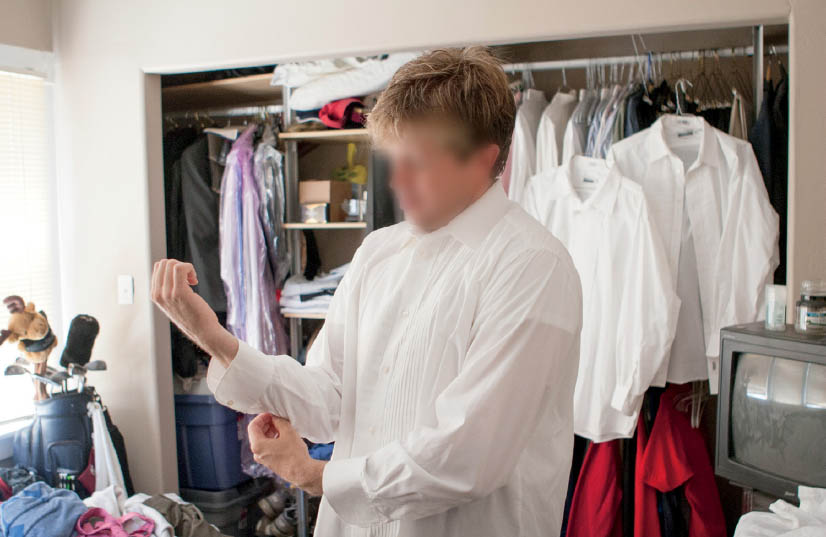
FIGURE 4.2
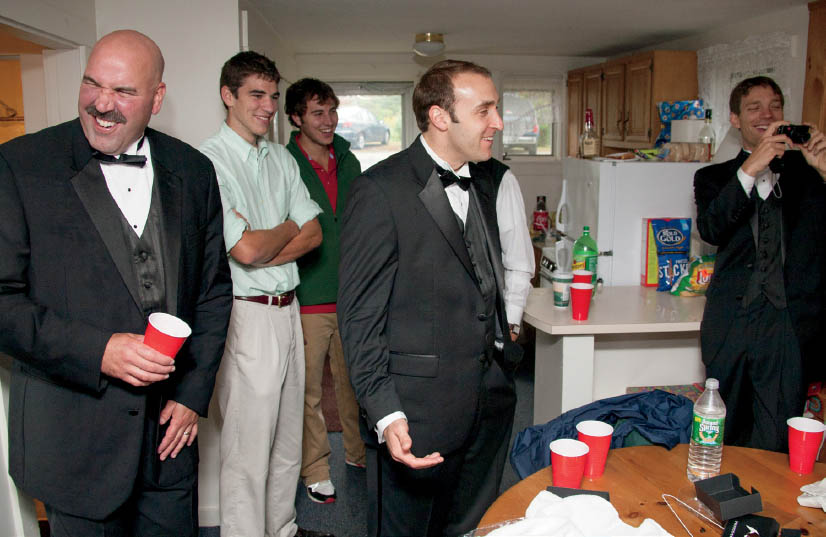
FIGURE 4.3
Photographers are obviously aware of the negative impact that distracting clutter has on photographs. But I still see clutter as a major problem when I look at photographers’ work from around the world. Below are the steps I take to manage clutter in wedding dressing rooms. Please note that only my assistants and I clear out unwanted clutter and furniture. Never ask the wedding party or the couple’s family to help you move furniture, etc.
- Food and drinks: Find the area of the room with the very best circumstantial light. Once this area has been found, ask if you can move all food items to another part of the room where you are sure those items will be completely out of the way.
- Furniture and accessories: If the best light is near a window, which is usually the case, try to remove all distracting furniture and accessories such as phones, some lamps, and cables. You want the area to be as clean as possible. If you move furniture around, make sure you put everything back the same way you found it. Your clients will perceive you as being very professional and considerate.
- Placing emotional objects: Once the area of the room where you will be taking photos is clean, sometimes add items that could be part of the story or that add emotional value to the photographs. Those items could be a gift from the groom, the bride’s wedding dress, shoes, or a bouquet. When placing these items in the scene, make sure they are attractively balanced with respect to where the bride or groom will be posed.
- Moving: If the room is too messy to clean, and there are no areas with great lighting, simply find another room, or ask the bride to get ready outside, if it’s convenient to do so. You have to use your judgment on this, of course. But if, for example, there is a large balcony available or the bride’s parents have another room somewhere in the hotel, ask if you can use those areas instead.
I have even asked the front desk if they have an available room that faces the sun that I could borrow for a few minutes. Not only does that give me a clean room in which to photograph, but it provides me with direct window light to work with. Depending on how flexible the hotel staff is and how you ask, they usually give you a room for 30 minutes or so. Naturally, moving to a different location to photograph the bride or groom getting ready is a last-resort solution. The point is, I personally believe that it is very important to go to great lengths to photograph with beautiful light. To make an analogy, I consider great lighting to be as important to wedding photography as a surgeon would consider scrubbing up to be important before surgery. I know it sounds extreme, but it was this kind of thinking that propelled my photography to higher levels, year after year.
Figures 4.4 and 4.5: During a wedding in Orange County, California, we walked into the groom’s dressing room. If you take a minute to analyze the room, you will quickly see that from a circumstantial light point of view, this room is quite challenging. As I mentioned in the previous chapter, a large window provides the best light coming into the room. With that established, look at the area around the window. The dark brown wall will absorb light, not reflect it, and the carpet will also absorb light. There is a distracting white lamp near the corner of the room, and the lounge chair is taking up too much valuable space. That whole area needed to be cleared so that we could convert it into a cleaner canvas to work with. Remember, everything needs to be done respectfully and after receiving permission. If we move personal items, we must tell the subjects exactly where we are moving their items. Furthermore, do not let the wedding party help you. It’s not their job to move furniture for the photographer. The last thing you need is for someone from the wedding party to pull a muscle or become injured on your behalf. Trust me, it is not worth the risk.
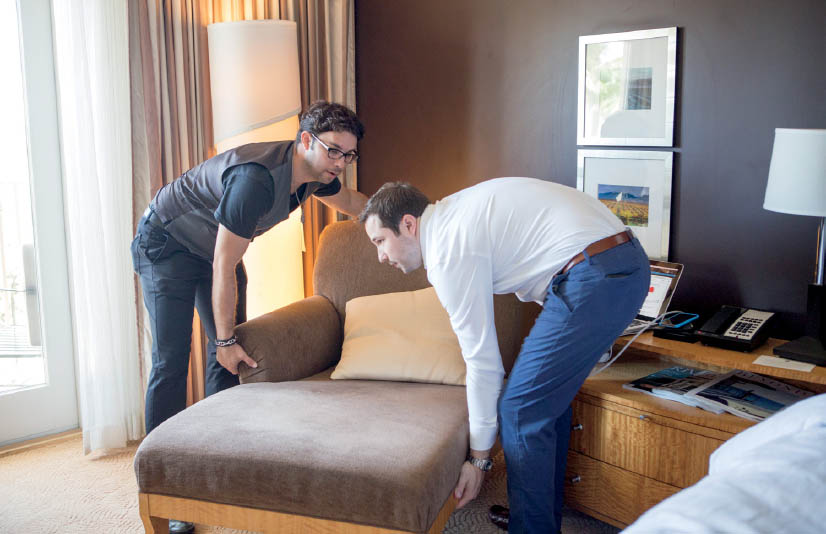
FIGURE 4.4
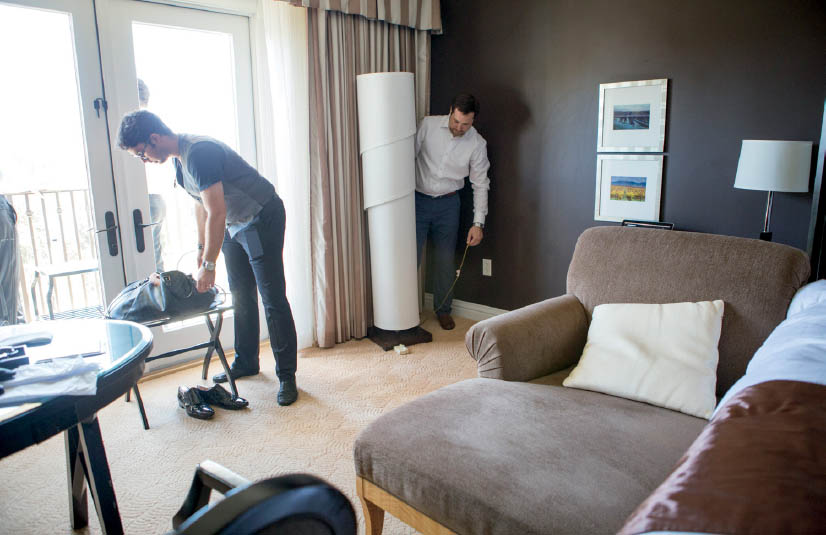
FIGURE 4.5
Figure 4.6: The results of clearing out that area of the room really paid off. This attractive photo of the groom has nothing in the background that distracts from the story. It’s all him. Just imagine what the photograph would have looked like with that white lamp close to his head and the large brown couch blocking most of the space.
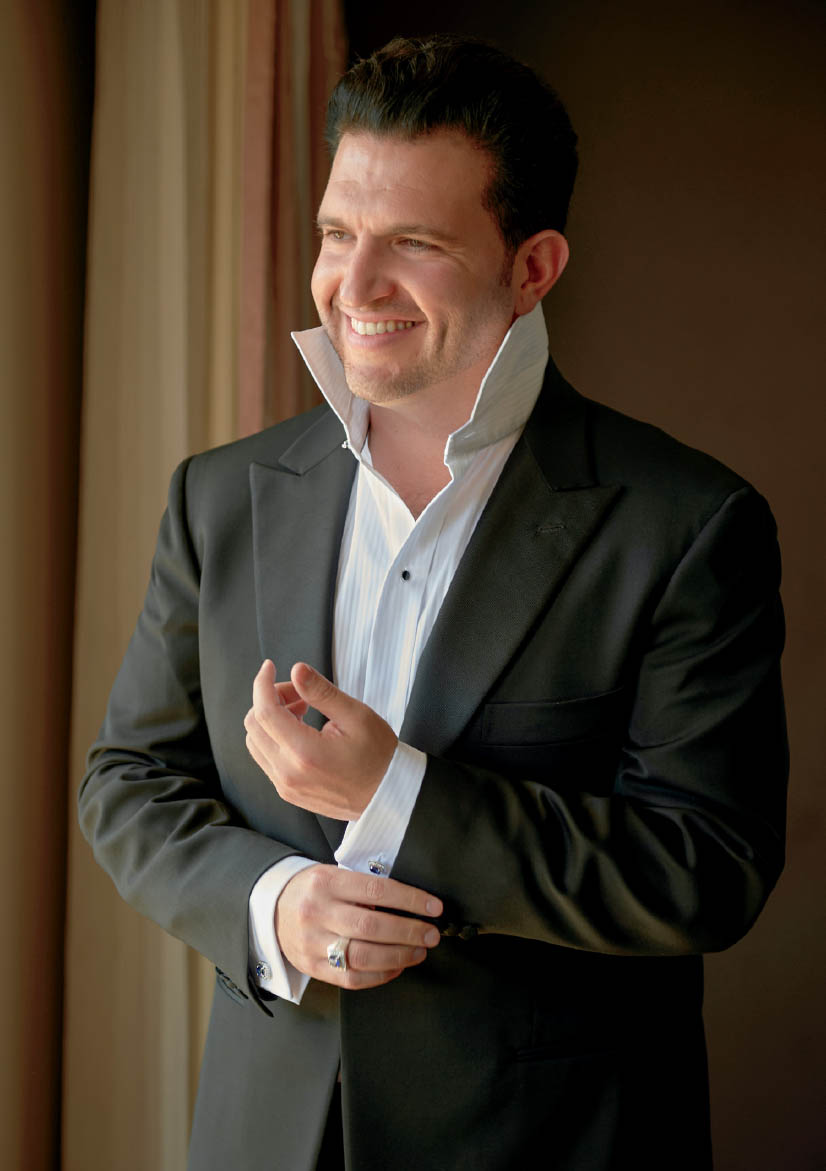
FIGURE 4.6
Figure 4.7: This photograph illustrates how I cleared a portion of the bride’s room of distracting objects and replaced those objects with items that have emotional value to the bride. The Indian jewelry that she is pulling out of the jewelry box has cultural meaning to the bride and her family and will adorn her sari for the Indian ceremony. You can also see the sari itself hanging on the right side of the curtain rod. To the left, you see the traditional wedding dress giving you (the viewer) a visual cue that she will have two ceremonies, an Indian ceremony and a traditional Christian ceremony. In the foreground, there are hints of the rest of the wedding dress and the shoes she will be wearing. Most importantly, you do not see anything else, just treasured items and the bride herself. Any clutter would have completely ruined the elegant and symbolic mood of the photo. The next time you walk into a room, you should not just think about clearing out the clutter from your well-chosen area based upon the light, but you should also think about items you can place in the scene that may have symbolic meaning for the bride and/or the groom.
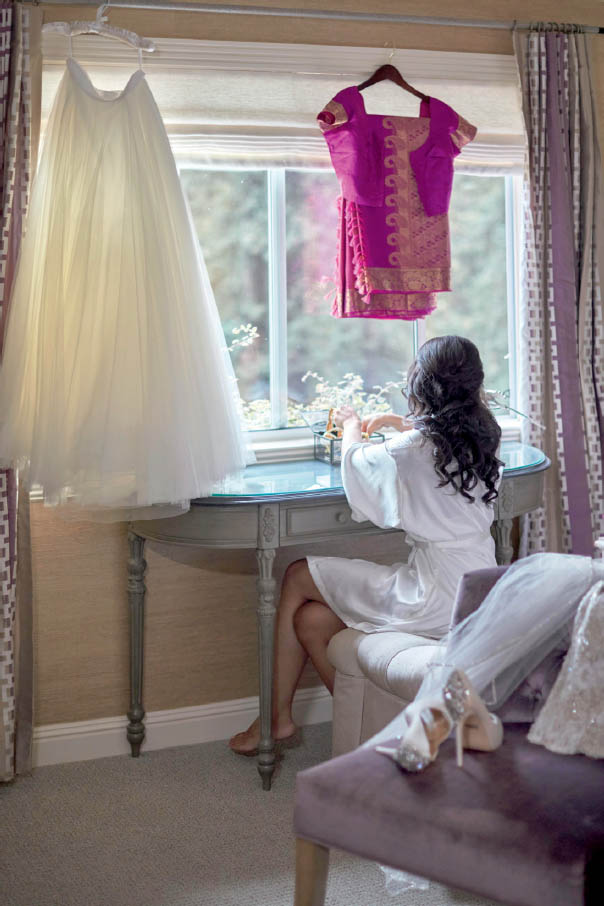
FIGURE 4.7
Figure 4.8: The wedding coordinator asked me to allow the bride to get ready in this particular room. She informed me that the wedding dress was already hanging there for me to photograph. When I arrived at that room, this is what I saw. First, the light in the room was flat and not intense enough, and second, the room left much to be desired from an aesthetic point of view. My immediate reaction was to move to a different place. That particular building had several rooms adjacent to the main room where the dress was hanging. I took a few minutes to walk around and explore the other rooms in the house, and I found a small room with a bed. Although small, the room had more light coming in from two large windows. I politely asked the bride and the coordinator if we could move to the room I had just found. The other bedroom was in the same house, so it was quite convenient to just walk to the other room.
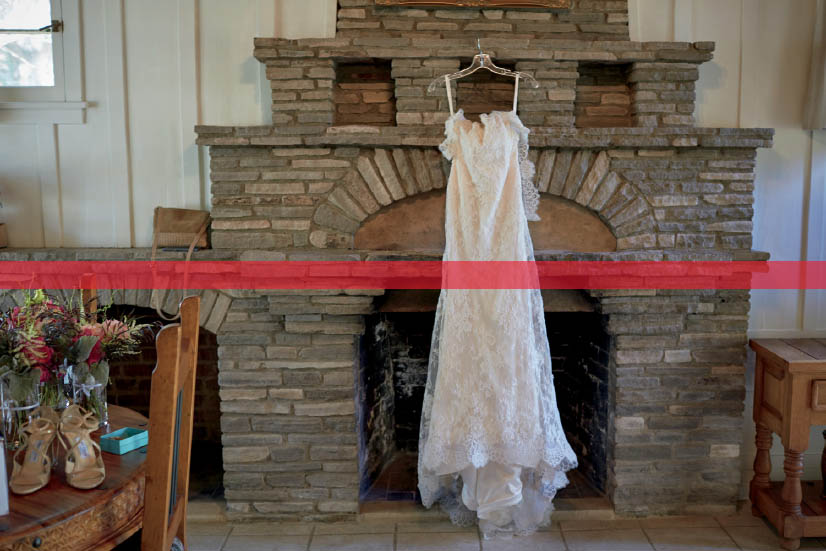
FIGURE 4.8
Figure 4.9: This is the room I asked the bride to move to. How much cleaner does this look? There is no doubt that it was well worth the short time it took to walk to another room in the house. I respect the philosophy of not intervening too much with the scene, but I also know that the bride or groom will be very thankful that their wedding photographer took the initiative to find a room that yielded much cleaner and more elegant results.
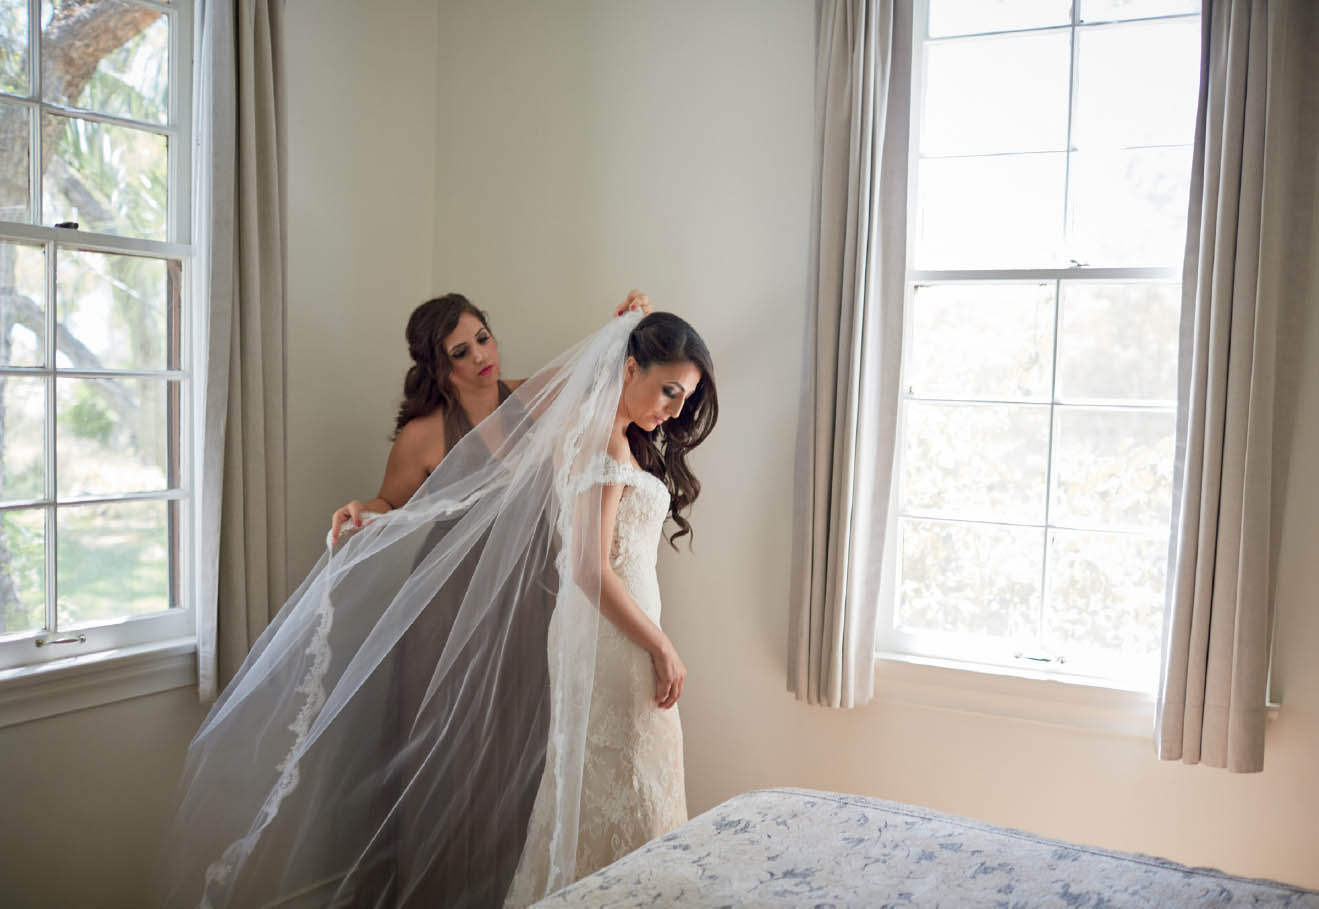
FIGURE 4.9
Figure 4.10: In the previous situation, the room did not look great, and there was very little light coming in. In this example, the light was much better, but it was far too crowded. The make-up artists had occupied the room and the wedding party was comfortably seated on the couch. It would take a long time to clear out a room such as this, and it’s not worth it. After assessing the situation, I decided it would be better to move the bride to a different room completely free of clutter and people. The move was made to photograph the important moments of getting ready for the wedding, such as putting on the dress, veil, and shoes.

FIGURE 4.10
Figure 4.11: The building where the bride’s family was preparing for the wedding was quite large and had multiple rooms. It was not difficult for me to search for a room containing the most amount of light. In less than a minute, I located this perfectly clean, beautifully lit room. I asked the bride if she would mind putting on her dress and accessories in this room, and I explained to her why it would be worthwhile to move. I wanted to keep the photos as clean and elegant as possible. Without hesitation, the bride agreed to move rooms. This touching photo captures the mother of the bride helping her daughter to put on her dress. Nothing in that room distracts from that special moment between mother and daughter.
FIGURE 4.11
Figure 4.12: During a recent wedding, I was given a tour by the venue manager. As we walked together, she showed me this particular room and mentioned that this is where the brides get ready. The room was narrow, completely filled with wall decor, and worst of all, it had practically no natural light coming in. I immediately began to look for another room, as I did for Figure 4.11. In this case, there were no other rooms available. I began photographing the bride with her family and bridesmaids in this room, and this is one of the photo results. As you can see, there is clutter everywhere and the room was far too distracting for my taste. Luckily for me, this was a one-story building, and as soon as we walked out of that room, we were outdoors.
FIGURE 4.12
Figure 4.13: If you look to the right, you can see the door to the room in Figure 4.12. By taking a few steps outside, I was able to get rid of all that clutter and take advantage of the natural light. It’s worth noting that this portion of the walkway just outside the room was in open shade. Most open shade situations leave darkness in people’s eyes, so for this photo I used a flash bounced against an umbrella to fill the eyes with much needed light. (Using flash to boost natural light is a topic for another chapter.) I absolutely love the way it appears as if the bride was getting ready by the garden. This photograph would have looked much different had we remained in that dark, crowded, cramped room. But I was lucky. If that room had been on an upper floor of a high-rise building, we would not have been able to go outside.
In wedding photography, time is of the essence. These decisions are all based on balancing the beauty of the photographs for your clients with the convenience of going somewhere else or the time needed to clear the room. Common sense and good judgment help you make these decisions from wedding to wedding.
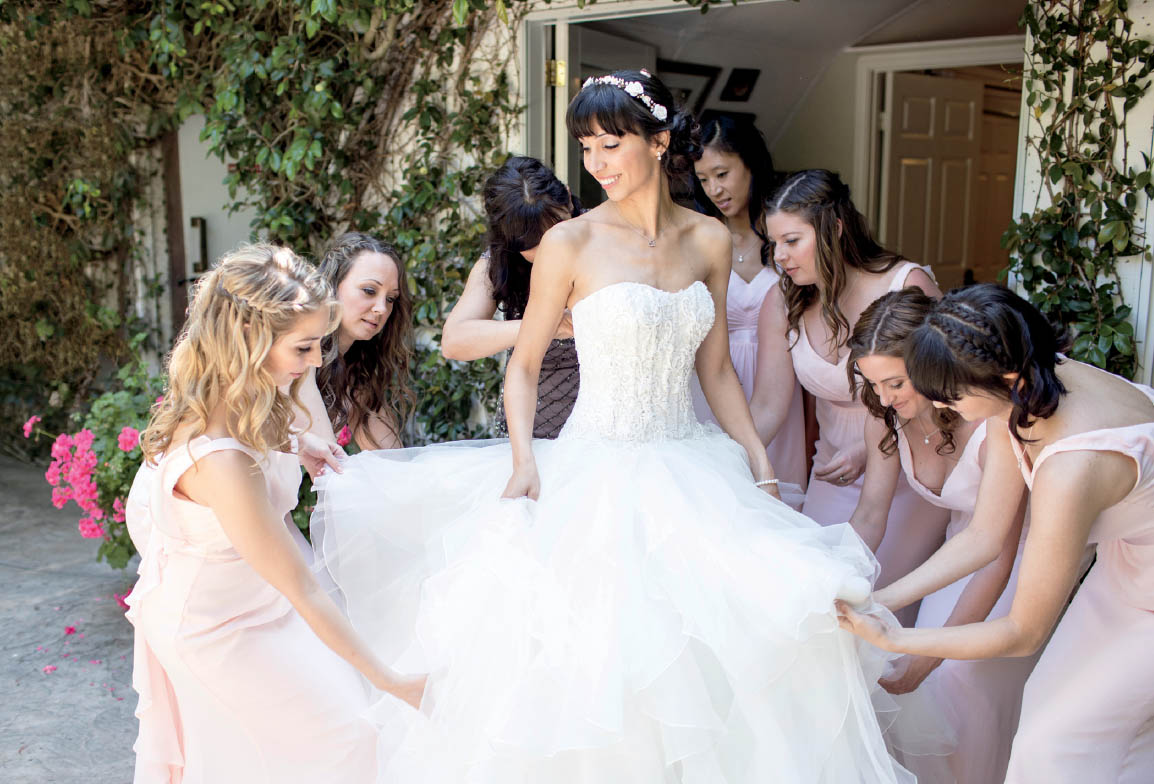
FIGURE 4.13
WHEN, HOW, AND HOW MUCH CONTEXT TO SHOW IN A SCENE
How much of a scene you should show or not show are decisions that will always change and evolve as your artistic maturity and experience increases. At first, most photographers are not very selective about how much to show. They don’t feel confident about cropping parts of a scene out of the frame. Instead, they show everything and everyone from head to toe.
To me, context is about three things: clarity, storytelling, and composition. If the scene adds to the story and the clarity of the message I’m trying to tell, then I add as much context as necessary. However, if the scene is simply a scene that doesn’t add to the visual story, then it becomes a distraction. The third element to consider when deciding about context is composition. Here is a clear list of the three most important elements.
Decision Points to Consider Regarding How Much or How Little Context to Show in a Scene
- •Clarity: Does the scene or context shown in camera add or remove clarity from the main subject?
- •Storytelling: Does the scene or context add to the visual story or setting in the photograph, or does it distract the viewer from the story?
- •Composition: Can the elements in the scene be used for compositional techniques, such as (but not limited to) creating balance or contrast in the scene?
Creating photographs in very strange places can look bizarre to an untrained eye, but to a skilled photographer the scene will look very different in the final photograph. I am often questioned by the wedding party as to why I am taking the photos where I decided to take them. You can’t blame the wedding party for being skeptical. To them, a photo in an alley surrounded by trash bins doesn’t exactly fit the stereotype of beauty. However, a skilled photographer does not see the alley for what it is, but sees it for its quality of circumstantial light, colors, textures, contrasts, and depth. The human eye sees everything within view, but a photographer can use equipment to crop out unwanted parts of the scene and only show the very best of that environment.
Figure 4.14: How does this scene look to you? Imagine that you are part of the wedding party and witness this photo being taken in front of an ordinary elevator in a corporate hotel. It doesn’t exactly look appealing, right? Now, try to imagine the scene without the pink walls, the elevator call buttons, and the emergency exit map posted on the wall; just visualize the metal portion of the elevator doors. How would the photo look? This is an exercise I practice all the time. I visually crop things in my head and imagine photographs taken with what’s left over. Doing this will highly elevate your ability to visualize how scenes would look cropped in camera.
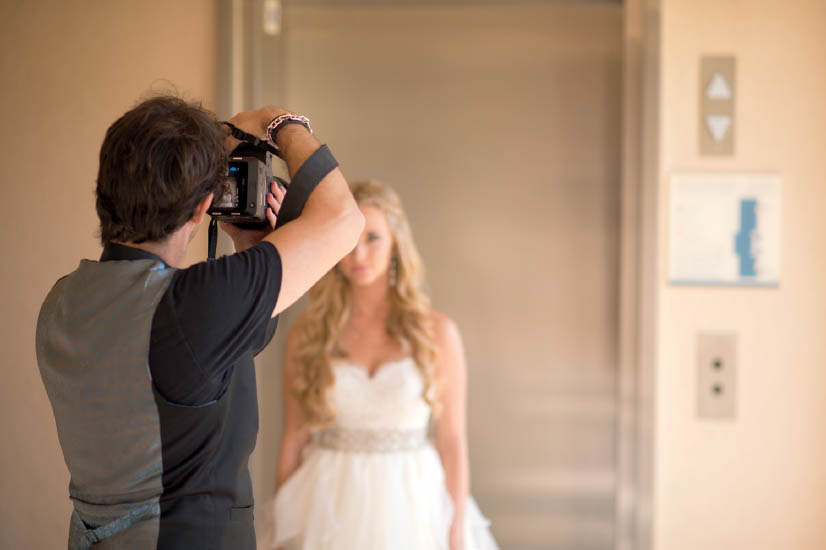
FIGURE 4.14
Figure 4.15: This is the result of cropping out the unwanted elevator features. By answering the context questions I have repeated below, you can see why I was drawn to this scene and why I made the decision to crop out what I did.
Does the scene or context shown in camera add or remove clarity from the main subject? By cropping out the walls, elevator call buttons, the map on the wall, and the elevator door frame, I isolated a clean, polished surface that focuses attention and clarity on the bride.
Does the scene or context add to the visual story or setting in the photograph, or does it distract the viewer from the story? The story is about the stunning beauty of the bride. Everything that shows in this photograph directs the viewer’s attention to her. There is not a single element shown in the photo that would take away or distract from the story.
Can the elements in the scene be used for compositional techniques such as (but not limited to) creating balance or contrast to the scene? The color of the elevator doors and the bride’s skin tone create a monochromatic feel to the photograph, which contrasts with her hair, eyes, and dress. In this case, there are no other elements in the background, and it would not be applicable to place new elements in the scene for balance.
FIGURE 4.15
Removing Context with Light
One very important technique every wedding photographer should have readily available is the ability to use high intensity light to darken distracting objects in a scene. Simply stated, when the light illuminating your subject is much brighter than the light falling on the rest of the scene, the photographer will most likely expose for the brightest point on the subject. Therefore, the exposure on the brightly lit subject will be correct, which leaves everything else that’s not lit by the same high intensity light falling into darkness. I use this technique quite often at weddings.
Figure 4.16: This room is full of distracting objects, including supporting columns, tables, and window frames. However, this location is lit by direct sunlight coming in through the windows. You can stand in front of the window, look out, and see the sun.
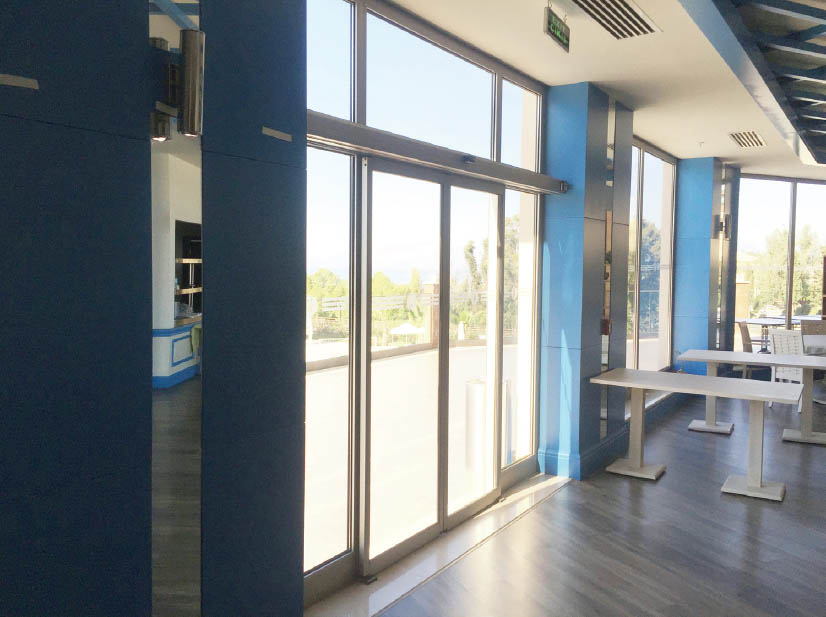
FIGURE 4.16
Figure 4.17: I posed the groom in the direct sunlight coming through the window and exposed for the brightest part of his face. Everything else in that room that was not lit by the same intensity of light would fall to almost complete darkness. Therefore, all the distracting objects were no longer an issue. They were far too underexposed to compete with the groom. In this case, I also took advantage of the mirror to the groom’s left to add his reflection to the image and create a more balanced composition.
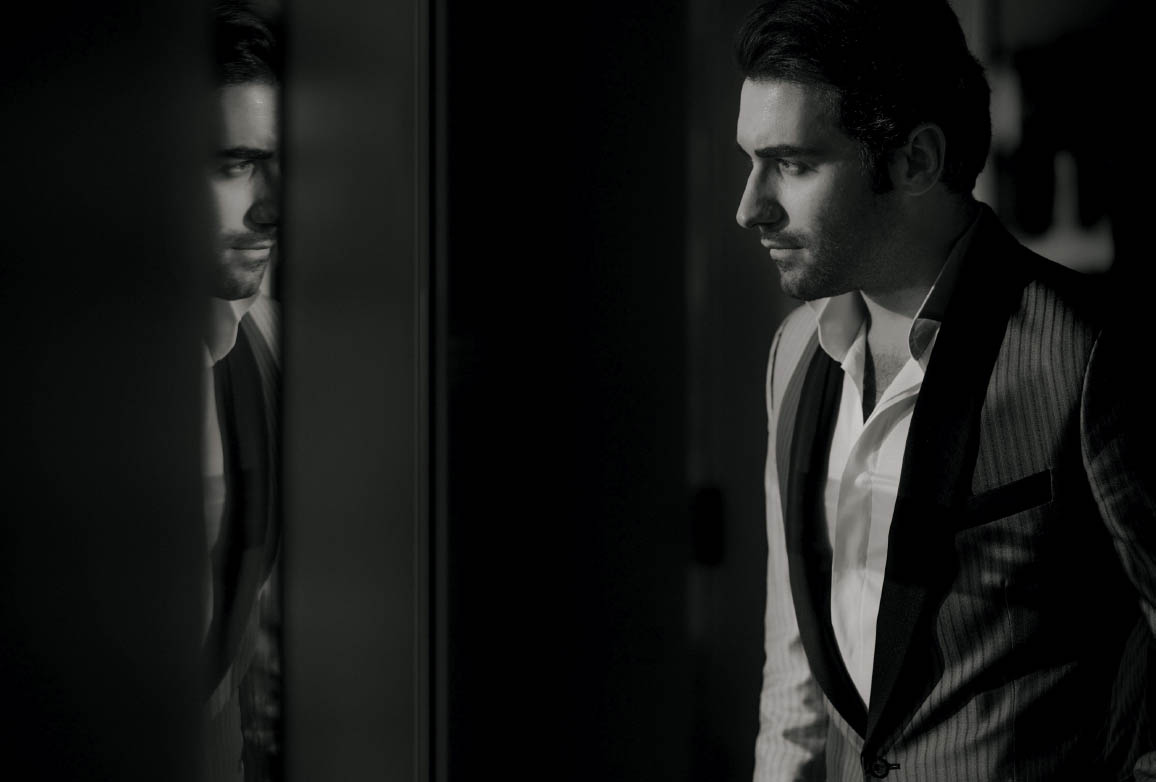
FIGURE 4.17
Compressing the Scene to Remove Context
Another helpful technique to reduce context in a busy scene is to compress the scene with longer lenses. The key is to use a lens that allows you to photograph at 200mm or close to it. Lenses with high compression capabilities, such as telephoto lenses, can greatly reduce the appearance of distance in a scene. This proves to be incredibly handy when trying to reduce the amount of distracting elements in a scene. For example, a series of trees in the background can appear as wallpaper, creating a perfect backdrop for a portrait.
Figure 4.18: This photo was taken at New York’s famous High Line Park. The couple requested unique photos here, since they live in the city, and they wanted my artistic interpretation of High Line Park. Unfortunately, about 30,000 other people also had the same idea to enjoy the park on that beautiful, sunny Saturday afternoon. As I walked around frantically trying to find a peaceful area among the chaos and confined spaces, I spied this billboard of a woman located far away across the street. Her eyes intrigued me enough to give me the idea to use compression to make the billboard appear as if it were directly behind the groom.
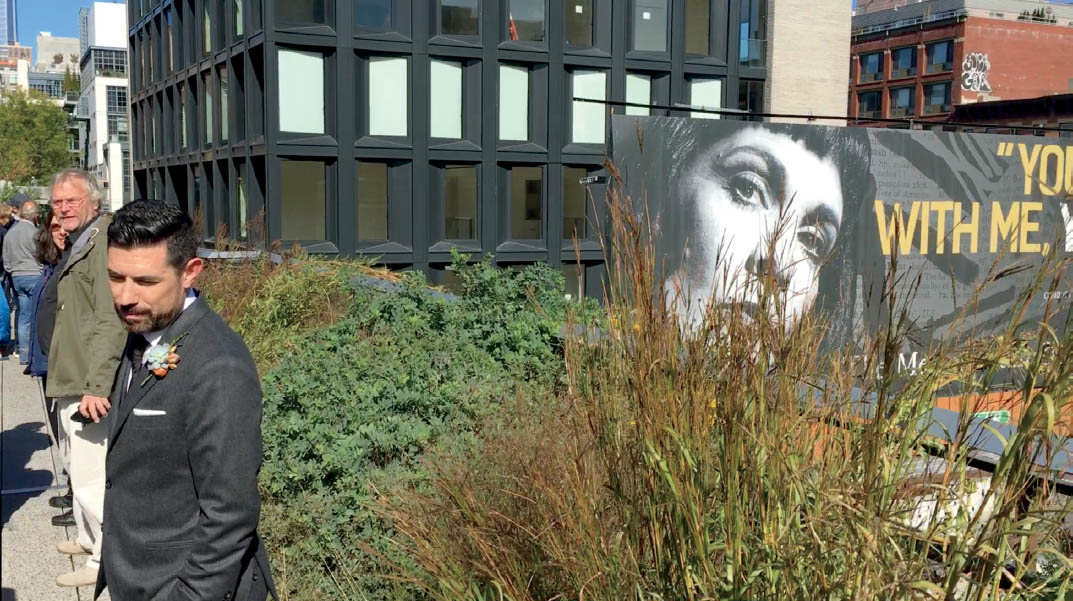
FIGURE 4.18
Figure 4.19: This is a behind-the-scenes photo of me shooting this scene using a Canon 200mm f/2 lens to obtain as much compression as possible. I wanted to remove all context except for the woman’s eyes. You can see how far I had to backtrack from the billboard in order to get just the right amount of the scene within my frame.
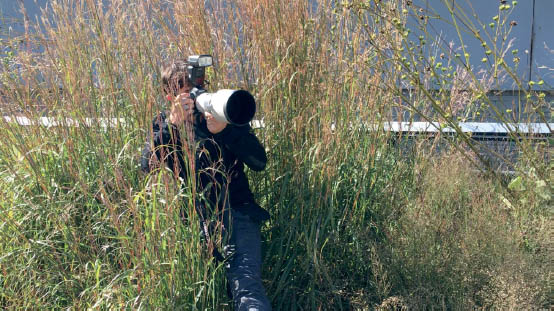
FIGURE 4.19
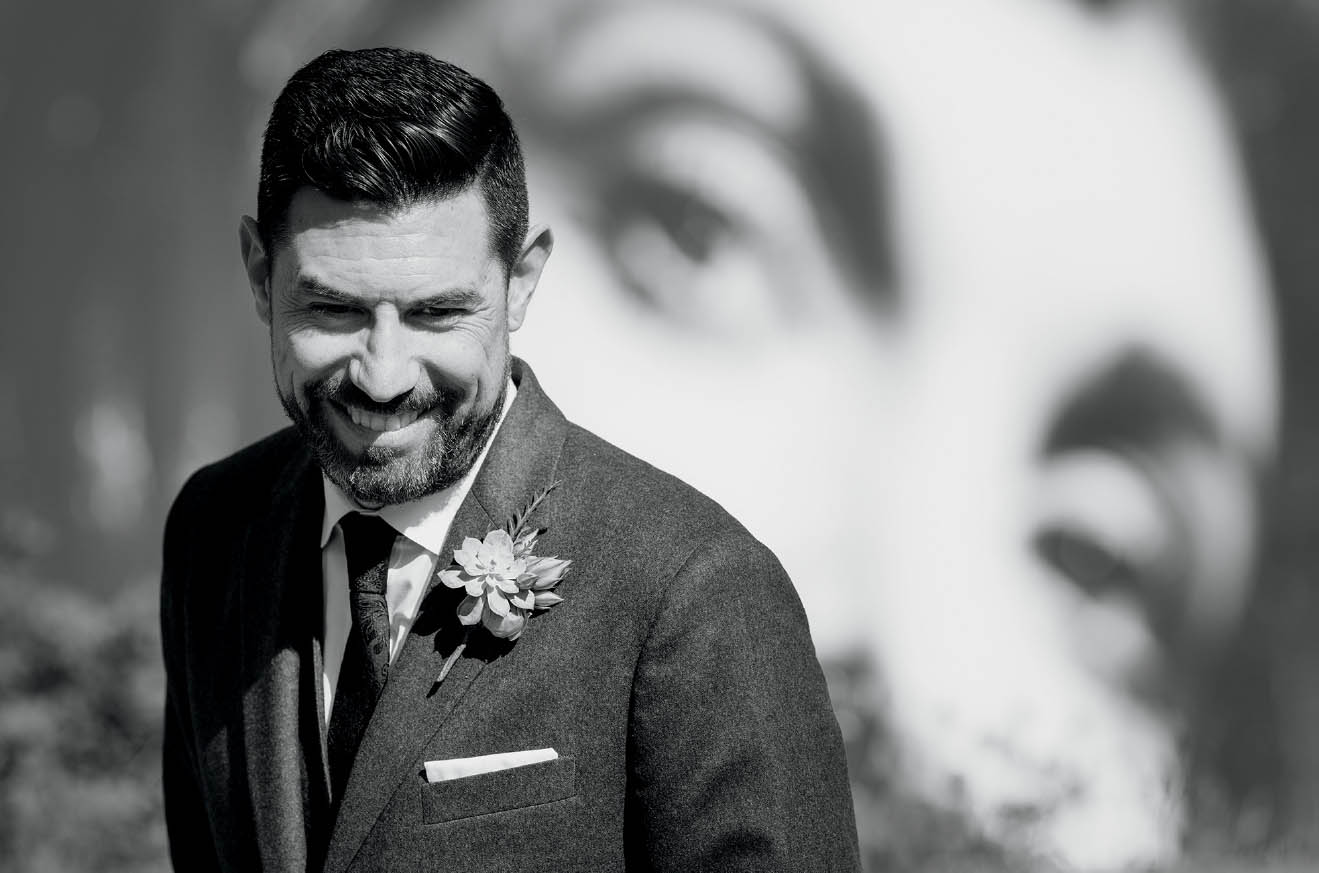
FIGURE 4.20
Figure 4.20: This is the result of using compression to remove context in a scene. If you refer back to Figure 4.18, you can see how far away that billboard is from the groom. However, all context has been removed and the billboard now appears to be right behind him. It is times like these when I really truly enjoy the challenges of wedding photography. This was a completely unexpected result right out of camera.
Figure 4.21: This photograph shows a typical street in the city of Bel-Air, California. There are rows of trees on both sides of the road. Photographically, it doesn’t matter how far the distance is from the camera to the long row of trees because a 200mm lens will completely compress that distance. The only consideration that matters is to make sure that the trees are lit at the same light levels, because once the trees are compressed, an evenly lit background is still necessary to avoid any single hotspot distractions.
Figure 4.22: By using a 70–200mm lens at 200mm, I was able to compress the row of trees into a completely different scene. I had to lie on the ground and shoot upward to avoid showing the street or the sidewalk in the photo. I wanted the viewer to feel lost while viewing this photograph and to keep wondering where the couple could possibly be? By removing all unwanted context, I achieved this goal.
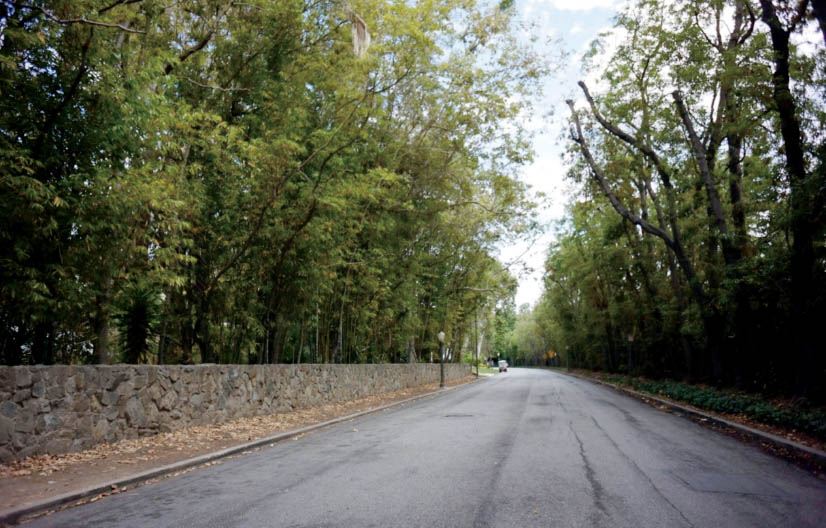
FIGURE 4.21
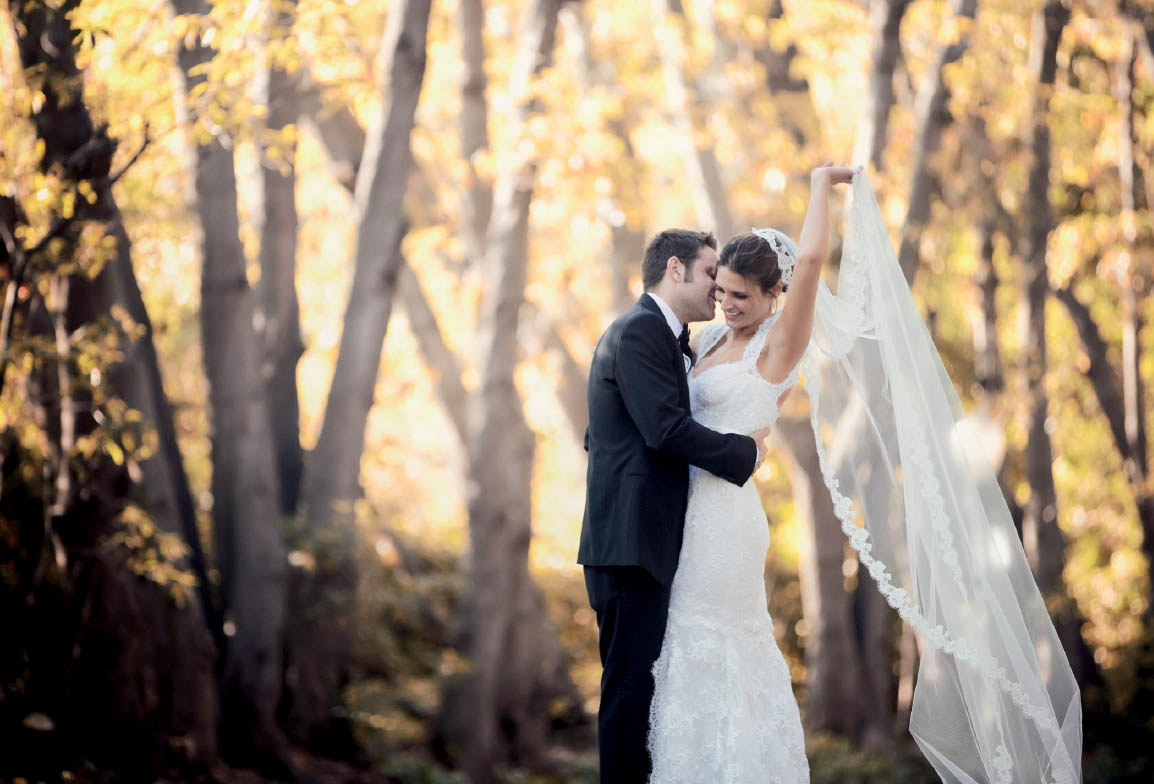
FIGURE 4.22