chapter 13
THE STORYTELLER’S APPROACH
During my years as a professional classical guitarist, I had the privilege of learning music and guitar techniques from some of the best in the industry. I would attend master classes, perform solo concerts, and listen to classical guitar competitions at the University of Arizona in Tucson. During those years, I had a guitar on my lap eight hours a day, including Sundays. I was hungry for knowledge, and I was determined to overcome the greatest obstacle facing any classical musician: “technical virtuosity.” That term almost drove me crazy in my quest to achieve it. But as I matured as a musician, I realized that it can never be truly achieved. There will always be a better guitarist than oneself, and there will always be a master’s opinion that contradicts another master.
When interpreting a piece of music, I encountered some of the most intense music purists who would condemn anyone who strayed from the exact music interpretation markers and timing of the notes that were written in the score. After such encounters, I tried to replay the sheet music with the precision of a computer. During that unfortunate phase, countless friends in classical guitar circles told me that I had lost my soul, and that I played like a robot. I decided to dump it all, and I went back to playing the way that resonated with me and my audience. I kept learning and attending masterclasses, but the information was used to complement my style of playing. Unknowingly, this experience as a musician prepared me a great deal for the peculiar world of wedding photography.
I hear photographers at conventions make their case about how the photojournalism (PJ) approach is the way weddings were always meant to be documented. Some hardcore PJ purists even go so far as to say that they document an entire wedding without ever intervening in any way, shape, or form. These photographers go on to say that they do not take family photos during a wedding because that would require the photographer’s intervention. My jaw drops in disbelief. No family photos? Not even a single portrait of the bride and groom? Really?
At the other extreme, I also sit through many seminars given by internationally well-known wedding photographers who treat a couple’s wedding as their personal playtime. These photographers schedule four hours or more just for the photos of the bride/groom, wedding party, and getting-ready portraits. These weddings turned into a daylong photo shoot so that the photographer can win photography competition awards and show off how talented he or she is at the expense of the couple’s wedding day.
Just as during my music career, there were all these extreme and opinionated experts, except that in wedding photography I wasn’t going to spend years learning the hard way. Extreme approaches very rarely work, if they work at all. After shooting more than 500 weddings in my career, I have learned that the more knowledge I have about all aspects of wedding photography, the better equipped I am to use my skillset as needed or at my own discretion.
This means that learning how to pose people well so that they look completely natural is a skill that could not possibly hurt you to learn. Even if your preferred style is photojournalism, there may come a time when you are asked to arrange some photos for the couple or for their families. At the very least, if you have the skill to arrange and pose clients well, you can accomplish it with ease. In my opinion, it is simply better to have the option to use the skills you have acquired rather than not have the option at all and appear unprepared or unprofessional. I consider some people to be true masters of wedding photojournalism. Interestingly, most of the people who are world-class wedding photojournalists have taken the time to learn posing, even if they don’t use it for most of their work.
Simply stated, a photographer who is well rounded in the five storytelling approaches covered in this chapter will be best prepared to deal with any situation that this profession can throw at him or her, and will also be best positioned for long-term financial success as a wedding photographer.
For example, during the getting-ready portion, you can photograph all the moments without saying a word. There are also plenty of opportunities to perhaps pose the bride for a quick portrait, or arrange a shot between the bride and her bridesmaids, or the bride and her parents. Any combination of these approaches is appropriate and advisable during this time.
Here are the five different approaches that a photographer can choose from during every phase of a wedding:
- •Photojournalism
- •Interactive photojournalism
- •Stylized aware posing
- •Stylized unaware posing
- •Story development
Obviously, during the ceremony, you are not going to be interrupting to pose the bride or groom, which is why the only approaches that are appropriate at this time are pure photojournalism and story development.
These five approaches are part of your toolset, which you can use to tell the wedding story. They are all distinct approaches, and they aptly fit different storytelling pieces of the puzzle. It is important that you become well aware of the unique characteristics of each of these five storytelling approaches, because they should all come together to beautifully complete the story. Let’s go over them one by one.
PHOTOJOURNALISM
The photojournalistic approach is implemented when the photographer quietly documents the wedding moments without any intervention, suggestions, or input. A highly skilled photojournalist draws attention to the intended story through clever use of circumstantial light and, most importantly, visually intriguing composition, such as framing, balancing, and the use of contrasting elements. The goal of this approach is to capture emotional moments that tug at the viewer’s heartstrings. Moments can be tender, sad, happy, or filled with pure joy. A great photojournalist captures this array of human emotions at their peak in order to achieve the highest impact in a photograph.
Figure 13.1: This is a photojournalistic photo showcasing a special moment when the father of the bride is helping his future son-in-law put on the traditional Sikh turban. Although this is a nice image that depicts two stories happening at the same time—the woman on the left is placing objects on an ironing board—the two stories are just not on the same level. The woman’s story is not powerful enough to distract from the true, main story of the two men. If she had actually been ironing clothes or getting ready herself, that would have been better, but simply placing something on the ironing board is a weak moment. It doesn’t tug at my heartstrings at all. It’s just an action, not a moment worth remembering.
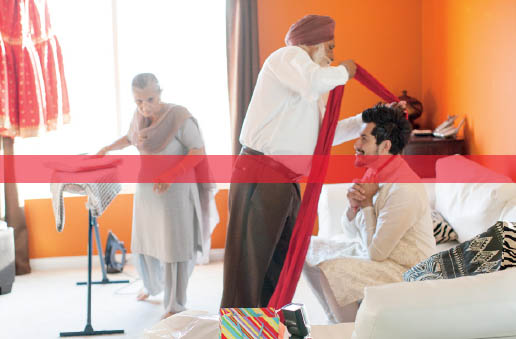
FIGURE 13.1
The Semantics of “Posing” in Wedding and Portrait Photography: From “Staging” to “Posing” to “Adjustments”
“Posing” is a word that has a negative connotation for most people. The only worse word that a photographer can use is “staged.” Even though I wrote an entire book about posing (Picture Perfect Posing), I rarely use the word when discussing with clients how I photograph a wedding. After interviewing hundreds of brides for my wedding business, as well as for this book, I realized that, although a great majority of couples say they prefer not to be posed for photos, they all agree that they still want to look great and have memorable photographs. Do you notice the contradiction? As it turns out, the culprit isn’t the actual act of posing; it is the word “posing.” Once I discovered this resistance, I simply replaced the word “posing” with the word “adjusting.”
I talk to the bride about making adjustments so that she looks beautiful. I even show her examples of photos in which a bride is putting on her shoes without any adjustments, and she is hunched over. They are not flattering photos! In the next photo, I show that I simply made some minor adjustments, and that same photo of the bride putting on her shoes looks absolutely beautiful. Suddenly, my client’s eyes light up, and she says, “Yes, I that is what I want! Please, feel free to make any adjustments you need, so I look great.” The irony here is that when a photographer is making adjustments to the subject’s body, they are posing that person! Adjusting is 100% posing. It is like saying “working out” instead of “exercising.”
These are the findings of my research. Most brides prefer that their entire wedding be photographed in a photojournalistic approach, but at the same time, they want to be flattered and feel beautiful in their photos. There is no compromise. To make brides look their best in the photographs, posing is absolutely required, though a bride’s or groom’s stomach turns at the very thought of being “posed.” They associate it with being fake, contrived, static, robotic, and unnatural. And if you use the words “staged photos” during your prospective client meeting, they will most likely walk away from you. But use the words “making adjustments” and they will admire you for it. They associate that phrase with being themselves but still looking wonderful.
Throughout this book, and especially in this chapter, I use the word “posing.” However, what I mean is to make simple adjustments to better flatter your clients. Who doesn’t want to look good in their wedding photographs? So keep in mind that when you read the word “posing” in this book, I mean adjusting. Implementing this special vocabulary in your client meetings will definitely help you with how a prospective client feels about your approach and whether or not they want to hire you.
Figure 13.2: In this photograph, I changed to a vertical crop to remove the woman on the left from Figure 13.1 out of the composition. This image is nicely balanced with the father of the bride on the left and the groom on the right. It’s a good moment, but we can do better.
Figure 13.3: Finally, I achieved the moment I was looking for, and this is the best of the three images. Remember, in photojournalism, the more effectively you draw the viewer’s eye to the story, the more skillfully crafted the PJ photo will be. In this case, I have removed all distractions from the intended story of the father of the bride helping his son-in-law with the turban. This moment is especially touching because the groom is of Latin descent, which suggests that he is experiencing a cultural difference between his and his father-in-law’s cultures. Also, two generations are depicted in this photo. Generations are highly respected hierarchies in most religions and cultures.
Next, by switching my shooting angle, I achieved a “rim light” effect that surrounds the groom’s face, creating a great separation between his face and the background. Lastly, we have balancing and framing. The photo is balanced by having the father-in-law on the left and the groom on the right. Best of all, by paying close attention and being prepared, I captured the exact moment when the father-in-law’s head and arms are perfectly framing the groom’s face and expression. This is what photojournalism is all about: the photographer’s use of light and unique composition captures amazing and highly emotional moments that the viewer is drawn to.
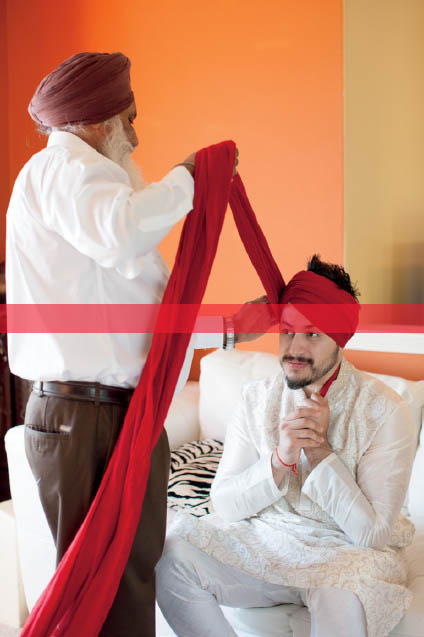
FIGURE 13.2
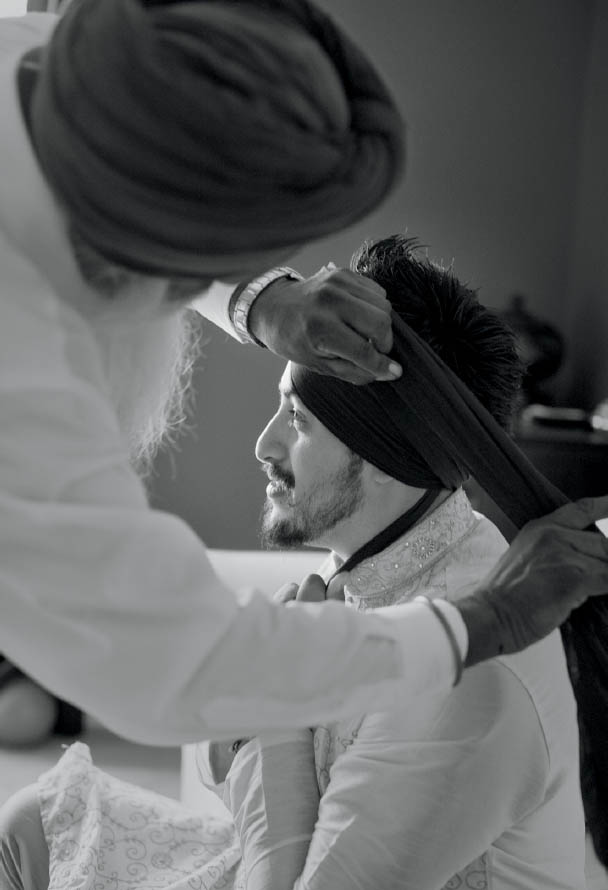
FIGURE 13.3
Recommended Camera Settings for Photojournalism
When shooting in PJ mode, I strongly recommend that you shoot in Aperture Priority and have your aperture set to a very wide aperture, such as f/2. These settings will highly increase your chances of capturing fleeting moments, and you’ll be able achieve separation between the subjects and the rest of the scene.
Also, don’t worry about high ISO settings when you are shooting PJ. In fact, most camera manufacturers have an auto ISO setting in which you can set your own minimum and maximum ISO parameters. This auto ISO setting, combined with Aperture Priority mode and a shallow aperture, is a very helpful way to not have to think about your camera at all, but instead focus on capturing the moments in front of you.
From an aesthetic point of view, shooting at a very wide aperture such as f/2 will be far more pleasing to the eye because the intended story will be the only element in focus. For this reason, when shooting in PJ mode, I almost always use my prime lenses and shoot with an aperture between f/1.2 and f/2. If you can nail the focus exactly where you want it, utilizing such shallow depth of field will elevate your photos and give them a much more elegant look and feel.
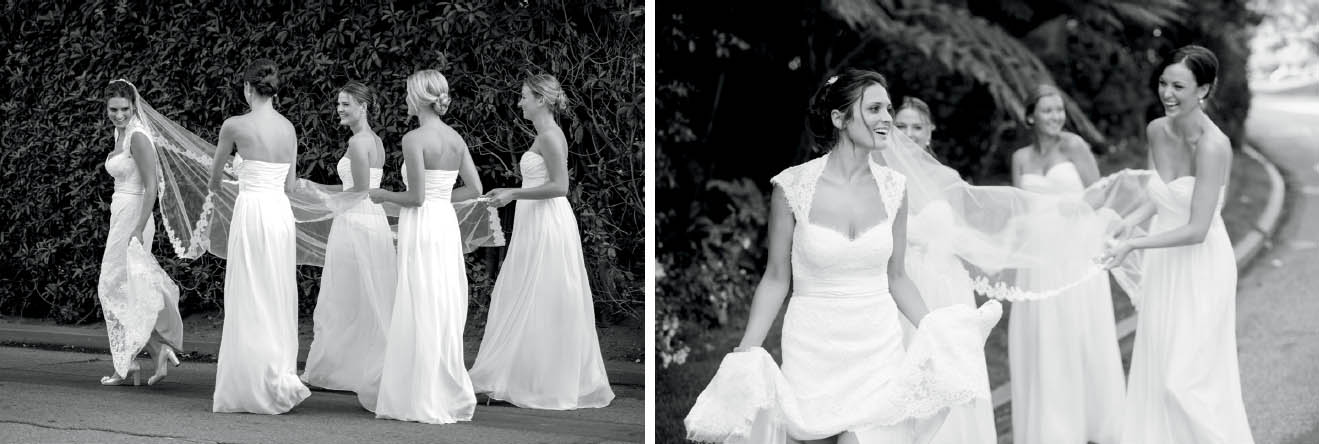
Figure 13.4: When shooting using a photojournalistic approach, it’s important to remain ready and alert for the small things that could happen. For example, in this situation, I kept my distance far enough away from the bride that as we walked outside to the car that would take her to the ceremony, I noticed the arched doorway. This was enough information for me to stand back and use it as a framing device. Before anything else happened, I instinctively changed my shooting mode to Aperture Priority and my aperture to f/2. Sure enough, seconds later, a strong gust of wind came by and swept the bride’s veil away.
I was able to capture this beautiful moment because I was ready. Had I not changed my camera to Aperture Priority mode, I would have had to adjust my settings from inside the mansion to outside where the bride was standing. It would have taken far too long, and the moment would have surely been missed. The framing of the door was another strong element that impelled me to stay behind and use it to frame any possible memorable moments.
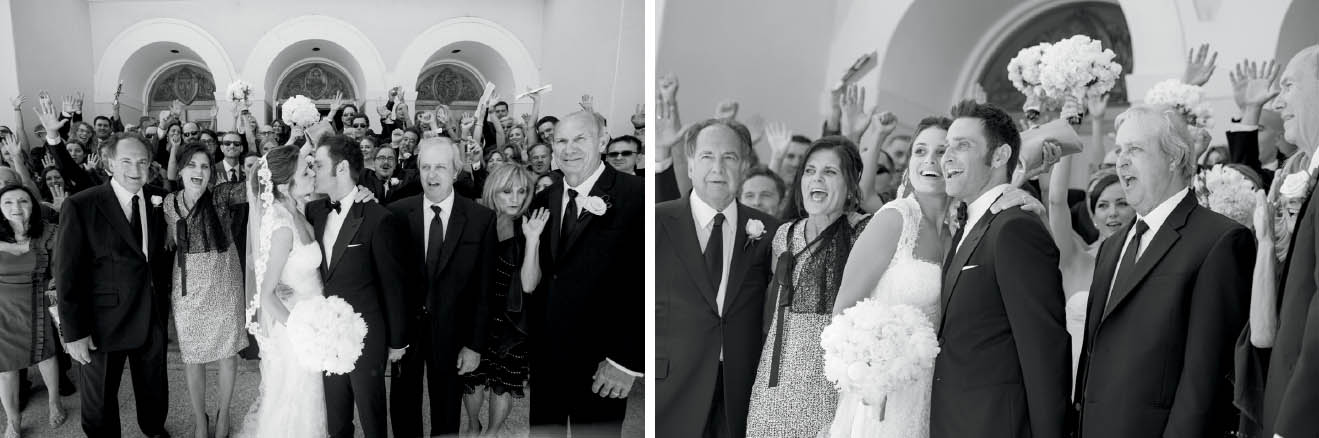
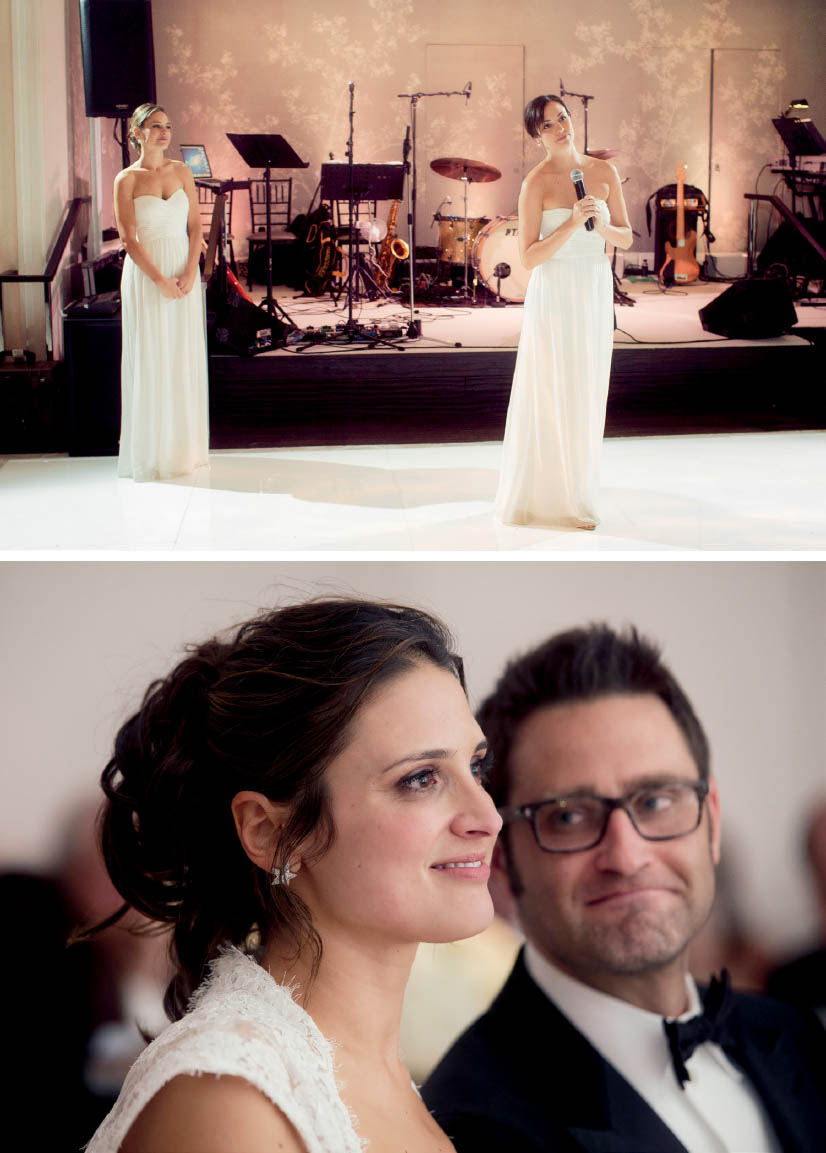
Figures 13.5 and 13.6: Search for the peak of emotion. That is precisely what should be on your mind when shooting PJ. You must capture that magical moment when human emotion is at its strongest. While you are holding up the camera to your eye, ready to fire, stay aware of your surroundings because it will help you anticipate powerful moments that will surely include emotions at their peak.
Notice how in both of these photos, I placed the couple on the right side of the frame and balanced the composition with guests on the left side of the frame. If you look closely at Figure 13.6, you will notice the bridesmaids’ emotional reaction to the powerful moment the bride is experiencing. Those expressions are part of the story, and they are what can propel a normal PJ photo to becoming a great one. So be ready with the closest focusing point on your camera to the main subject’s eyes—or whatever the story is about.
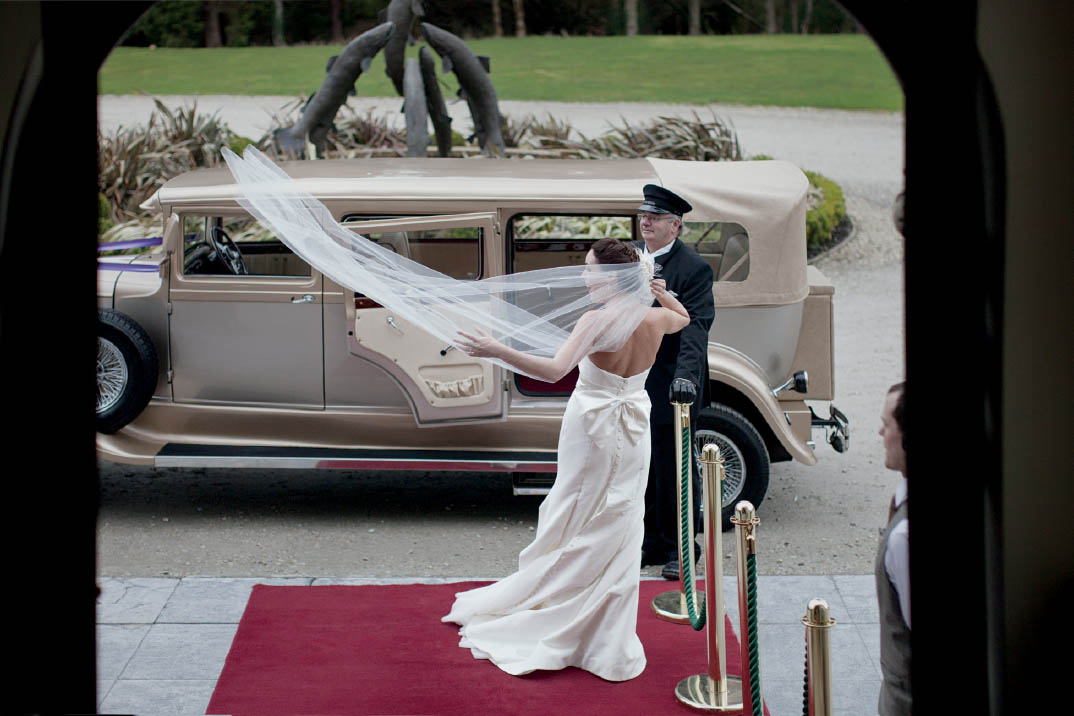
FIGURE 13.4
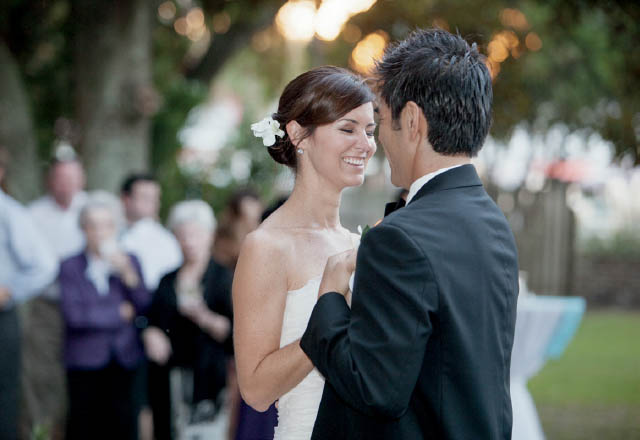
FIGURE 13.5

FIGURE 13.6
Figure 13.7: The story could be the body language. A wedding can take anywhere from many months to a couple of years to plan. Every detail is revised and thought about with microscopic precision. The days prior to the big day are full of emotions, family visits, and a great deal of activities planned with family and friends. All for this moment!
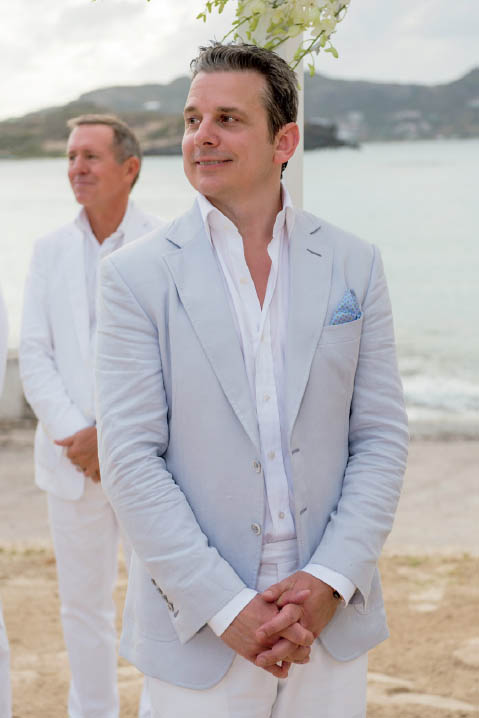
FIGURE 13.7
This photo represents a snapshot of the plethora of strong emotions going through the groom’s mind, as he sees the woman he has decided to spend the rest of his life with walk down the aisle as they become a brand-new family. That is a pivotal moment. In high emotionally charged moments such as this one, you must concentrate and be aware of what this moment represents. As the bride walks down the aisle, I take a couple quick photos of her at the very beginning of the aisle, but then I quickly turn to photograph the groom’s expression. I was shooting with a 24–70mm lens at 70mm for the images of the bride, but I quickly zoomed out to 60mm to include the groom’s hands in the shot. When a cascade of emotions goes through our minds, we instinctively manifest how we feel through our hands and body language without even realizing it. Notice how tense the groom’s hands are compared to his groomsman behind him. To me, that was the photo. Had I not zoomed out to include his hands, the photo would have still been a great capture because of the strong emotion on his face. But showing his eyes and capturing the tension in his hands made this shot much more special. Keep your eyes open for body language, not just facial expressions.
Figure 13.8: Be on the lookout for anything that could be used as a frame or reflection. In photojournalism, you must learn to react quickly! Anything you can use to your advantage will help. For example, as soon as I walked into this room, I noticed that the mirror had multiple decorative frames. Whether I used this mirror or not, the point is I was aware of it. To my surprise, the bride was doing a final touch-up, so I quickly moved to the left in order to position the bride directly in the middle of the left side of the two narrow vertical frames and fired the shot.
Figure 13.9: Expect the unexpected. I know it’s hard to stop ourselves from looking at the back of the camera to check out our photos. But during a wedding, the unexpected can happen in a split second, then the opportunity disappears. Concentrate on what you are shooting because great moments, such as this one, do not come with a warning. At the end of this ceremony, the rabbi announced that the groom could kiss the bride. At first, the groom did just that: he kissed the bride. After some time, he was still kissing the bride. The kiss’s length finally made everyone explode into laughter. I kept my eye in the viewfinder and had my shutter ready to go. I didn’t take the first photo of the kiss and then look at the back of my camera; if I had done that, I would have missed this amazing moment when the rabbi burst out laughing at the unexpected length of the kiss.
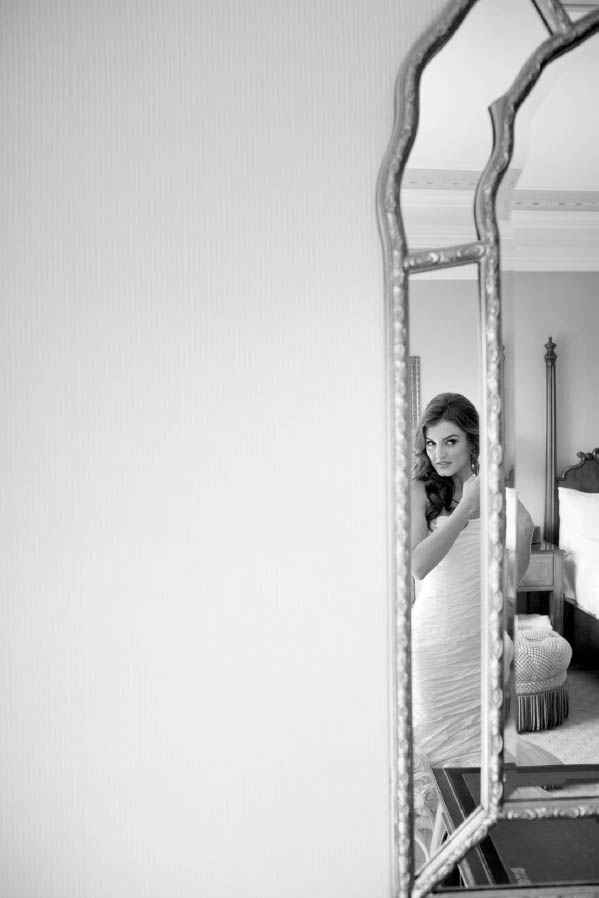
FIGURE 13.8
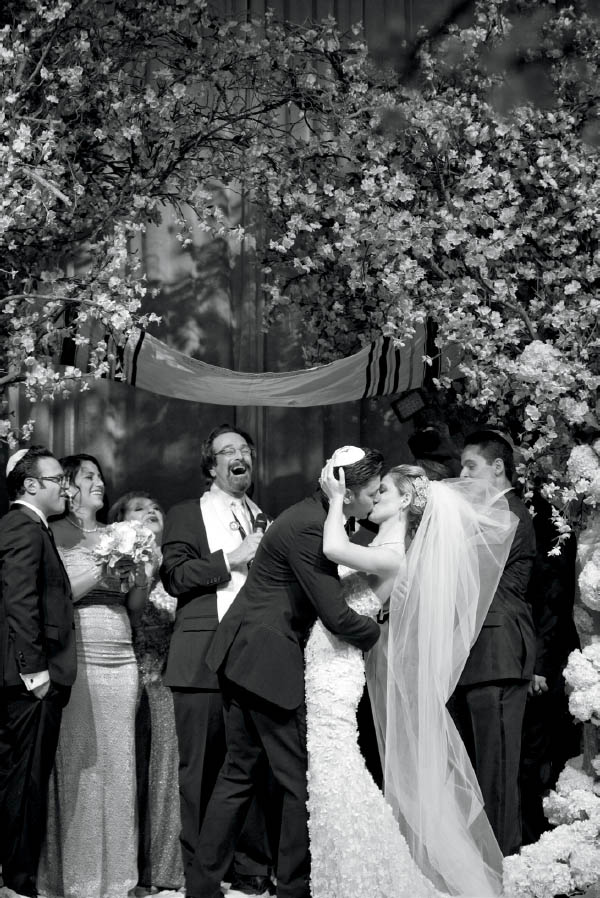
FIGURE 13.9
Figure 13.10: Explore different perspectives. One of the many traditions that occur during a Persian–Jewish reception is having the guests surround the couple, and when instructed by the DJ or MC, they throw rose petals at the bride and groom as they dance. This is a fun event, but it is a very important tradition, so the photographer must capture the energy and love at this moment. For this reason, I looked around and tried to find a better vantage point to capture this event in all its glory. I politely asked the band manager if I could jump onto the stage to gain a higher perspective. This angle allowed me to show not only the bride and groom surrounded by flower petals, but everyone around the couple actively taking part in this beautiful tradition. This photo has become one of the couple’s favorites. So, the next time something important is about to happen, think fast and find a better vantage point that will better portray the vitality of the moment.
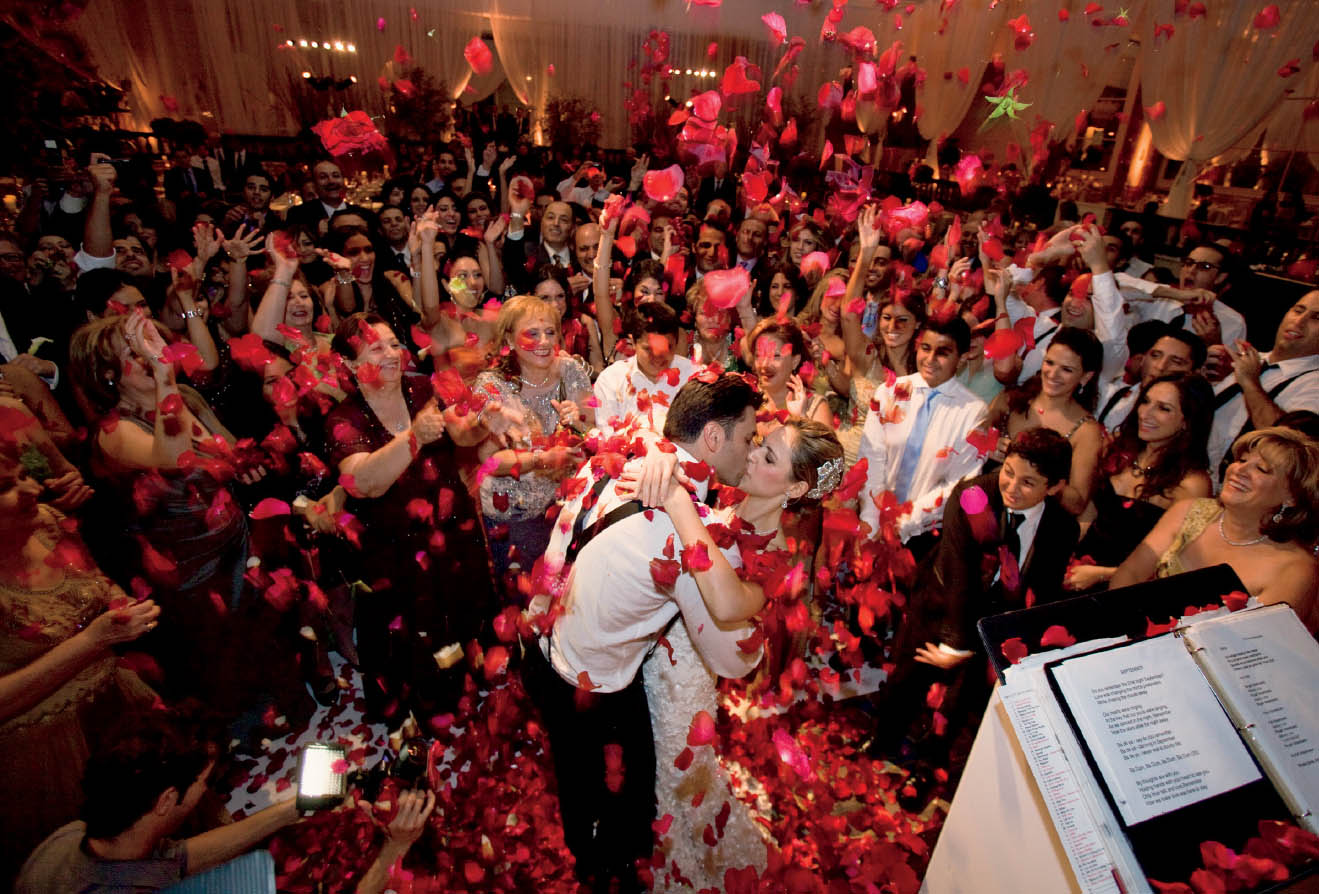
FIGURE 13.10
INTERACTIVE PHOTOJOURNALISM
A photographer is implementing “interactive photojournalism” when he or she arranges certain people together, makes adjustments, moves subjects to a location with better lighting, and/or strategically injects verbal inputs to coax the subjects to naturally react to the situation. Interactive photojournalism is activity-based, meaning that it centers around a natural action such as putting on the dress or adjusting earrings, etc. A highly skilled interactive photojournalist uses both circumstantial light and helper light to create the most flattering light on all subjects.
I understand that for many photographers out there, “interactive photojournalism” is an oxymoron; it’s either photojournalism or it’s not, and they take a hard line at this: if the photographer influences the scene, it’s not photojournalism. In contexts outside wedding photography—such as news or combat photography—I completely agree. But in wedding photography, it’s different because besides capturing the stories of the day, our job is also to do so in the most flattering way possible. People understand that you captured a moment as it happened, but if they look horrible in that moment, they might not appreciate it for the photojournalistic capture that it was. People spend a lot of money and time to look good at weddings. They will not mind if the photographer uses his or her expertise to help them look their best in the photos. For this reason, I strongly believe in the term “interactive photojournalism” as it relates to the many aspects of what it means to have great wedding coverage.
Team Interactive Photojournalism
One of the very best interactive photojournalistic techniques I implement is to work simultaneously with my second shooter. Here is how it works: The main photographer is actively interacting with the people being photographed and says something to obtain a reaction from them. As the main photographer is taking their photos, the second shooter is standing nearby, photographing their expressions from a different angle. The subjects are so focused on the main photographer that none of them is aware of the other camera. The second shooter’s different viewpoint provides a candid look and feel that your clients will absolutely love and did not expect!
I see very few wedding photographers implement this technique, which is too bad because this approach can yield truly amazing results. Also, note that you can always switch roles with the second shooter, if you want to be responsible or credited for the photos taken from the second angle.
Figure 13.11: Photos such as this one are what made me fall in love with wedding photography. My father passed away not long before my own wedding, so moments like this strike a chord with me that goes deep. This is such a simple photo, but it’s so meaningful. In this case, the father of the groom was helping his son adjust his tie so that it would look better.
As I mentioned in the photojournalism section, it’s important to be aware of all framing and reflection possibilities in any room you are working in. Many houses in the old city of Boston have large arched entryways from room to room that are perfect for framing! I politely asked the groom and his father if they could continue adjusting the tie but to do so in front of the couch. Now they were framed by the arched entryway. I simply let them continue without interruption and took this photograph. This captured moment is great on its own, but having the moment framed this way creates a feeling of isolation, and it gives the moment much more importance. What I would give to have a photo like this of my father on my wedding day!
Please note that the only difference between this photo and a purely photojournalistic photo is that I asked them to move to a place where I could frame them. That’s all. I did not tell them how to act, what to say, or even what to do. I just asked them to move a few steps. The clients appreciated that move because this photo became quite special for them, as well.
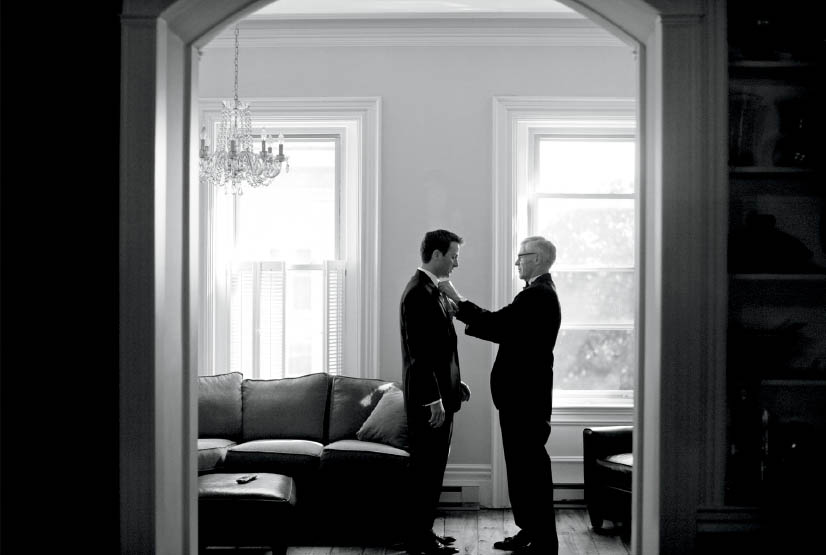
FIGURE 13.11
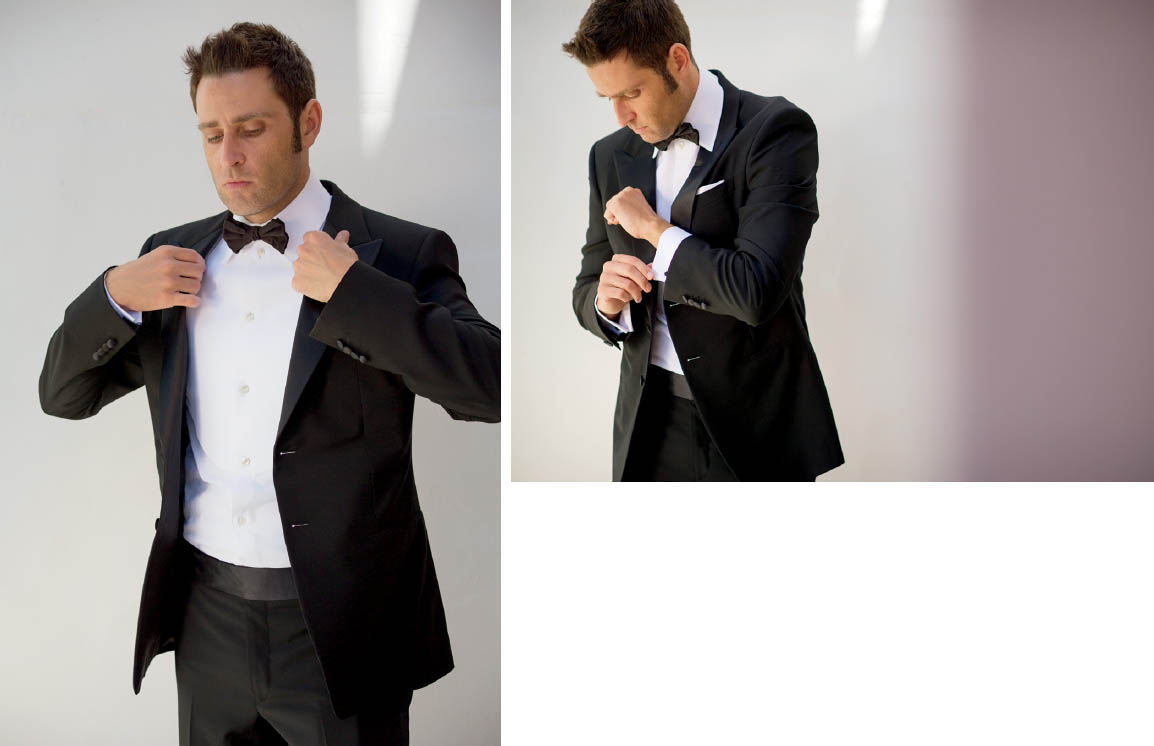
Figure 13.12: Remember that interactive photojournalism is “activity-based,” not “portrait-based.” The activity in this photo is similar to the previous image, with the groomsmen are completing the final touches on their suits and tuxedos. To capture this photo, I became more involved than in the previous example. This time, I asked all the groomsmen to stand on either side of the groom and his father. Once positioned, I just asked them to continue getting ready. Three men went to the left, and two of them chose to go to the right. Now the wedding party is framing the groom and his father.
If you don’t find structural frames, you can always use people to do the framing for you. Had I not said anything, the groomsmen would have been spread all over the room. This would have made it impossible to capture all of them getting ready together.
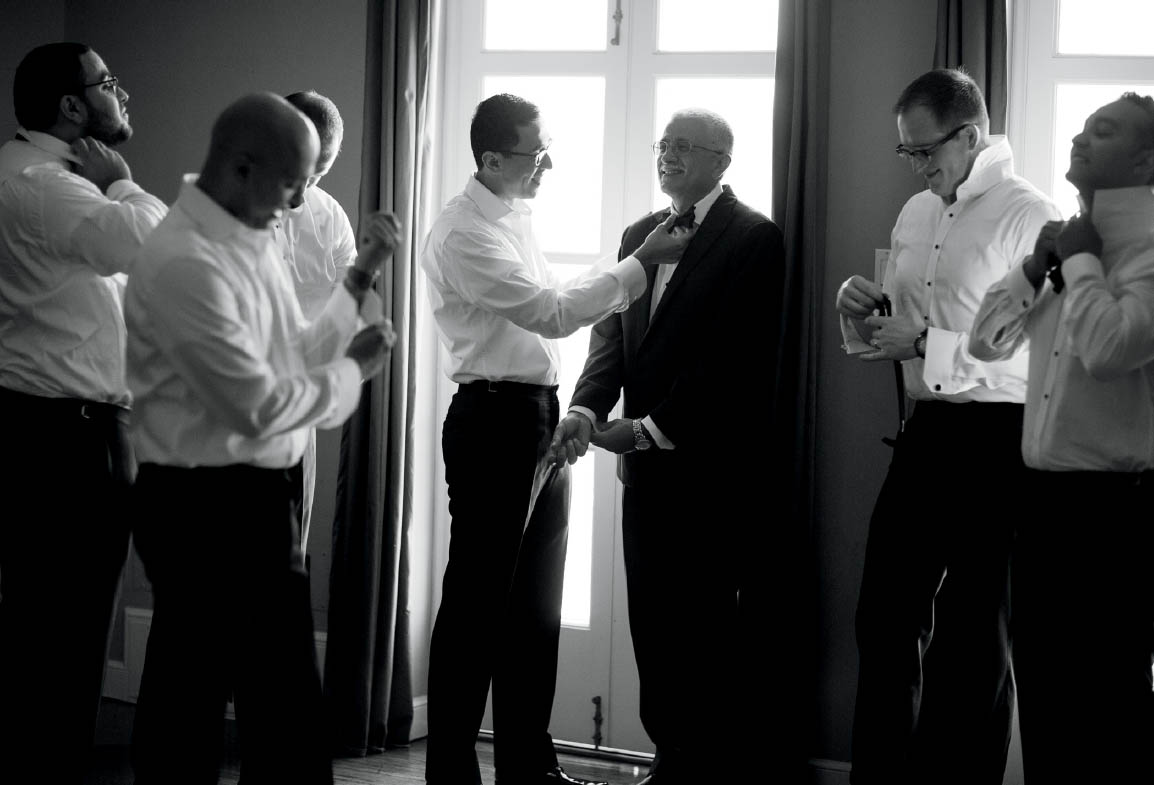
FIGURE 13.12
Figure 13.13: This is a prime example of interactive photojournalism. Naturally, the bride needs to put on her earrings, necklace, and other accessories as she gets ready. Unfortunately, mirrors in most hotel rooms are located at the back of the room, near the restroom. This photo is classified as interactive photojournalism because I asked the bride to move to the chair by the window for better lighting. Additionally, I moved the wedding dress and hung it in front of the window.
By strategically moving the dress, I accomplished three goals. First, the dress on the left creates a balance with the bride on the right side of the frame. Second, the dress covers some of the overwhelming white light coming in from the window, making it easier on the eyes. And third, the dress is an emotional object and symbol of a wedding. It shows how the bride is preparing for the important moment of finally putting on her wedding dress. I will talk more about this in the “expert components” section of the book. Once the bride sat down, I let her be. The only adjustment I made was to keep her elbows pointed toward the ground.
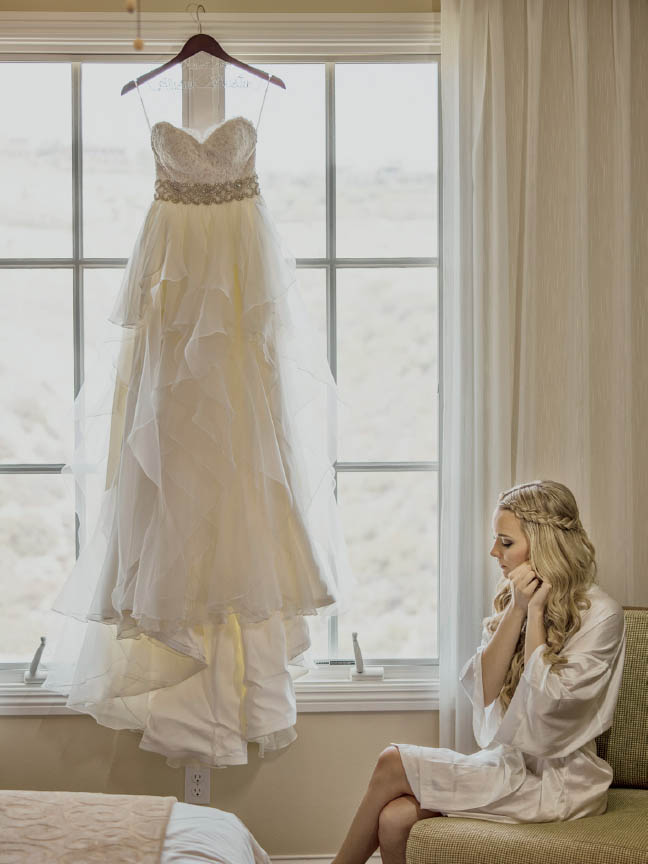
FIGURE 13.13
Figure 13.14: During this beautiful wedding near Malibu, California, I saw an opportunity to coax members of the bride’s new family to be more involved in the process of getting ready. I strategically positioned the chair near the large window to take advantage of the room’s circumstantial light. Instead of having the bride put on her shoes by herself, I asked the groom’s sister if she would help her soon-to-be sister-in-law with her shoes. This photograph brings members of both families together working as a unit.
When possible, and if the time is right, I try to choose a person who is close to the bride, such as her mother or maid of honor. However, I have learned that whenever I include a member of the groom’s family, the response is much more emotional because the two families begin to see themselves collectively as one.
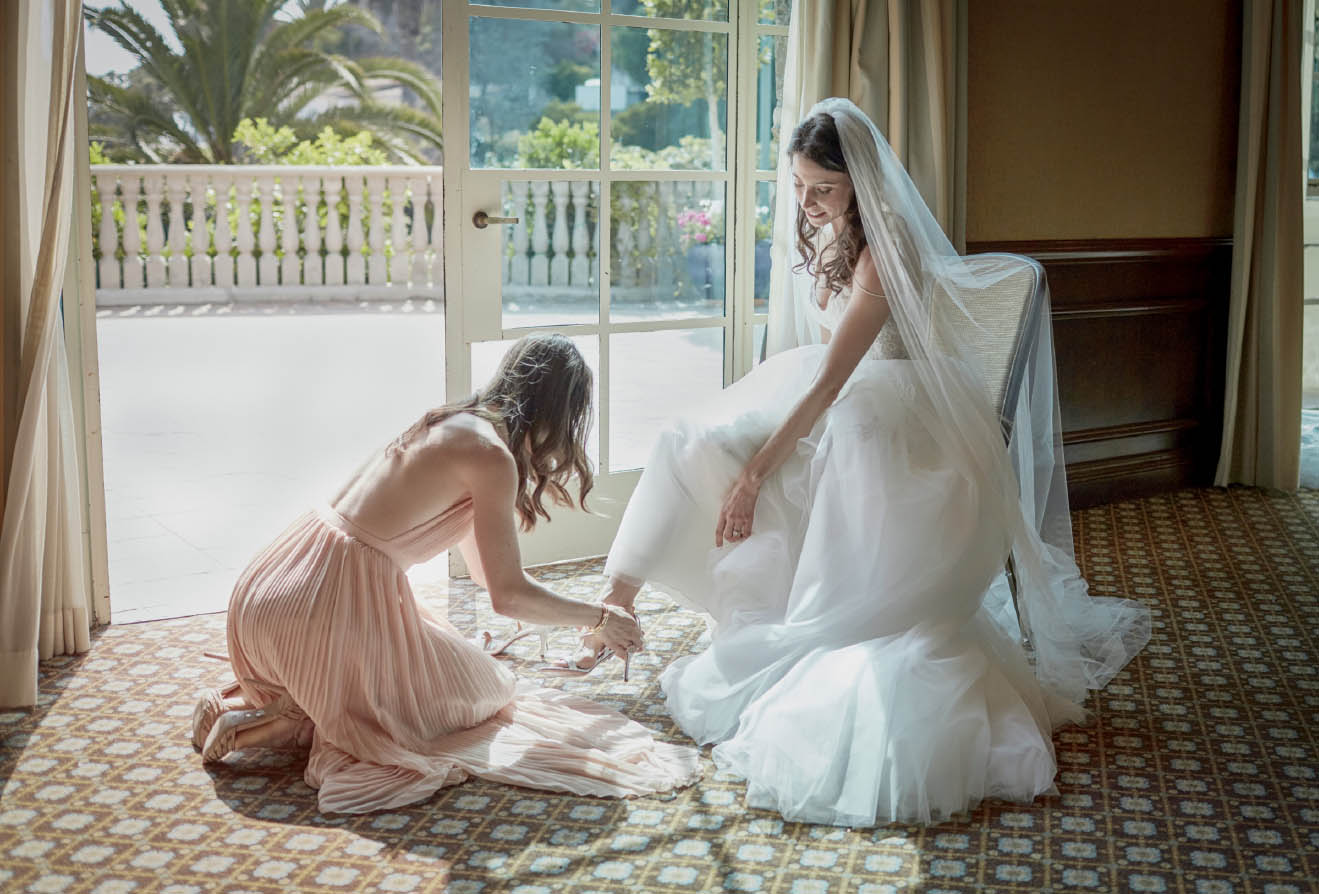
FIGURE 13.14
Team Interactive Photojournalism Examples
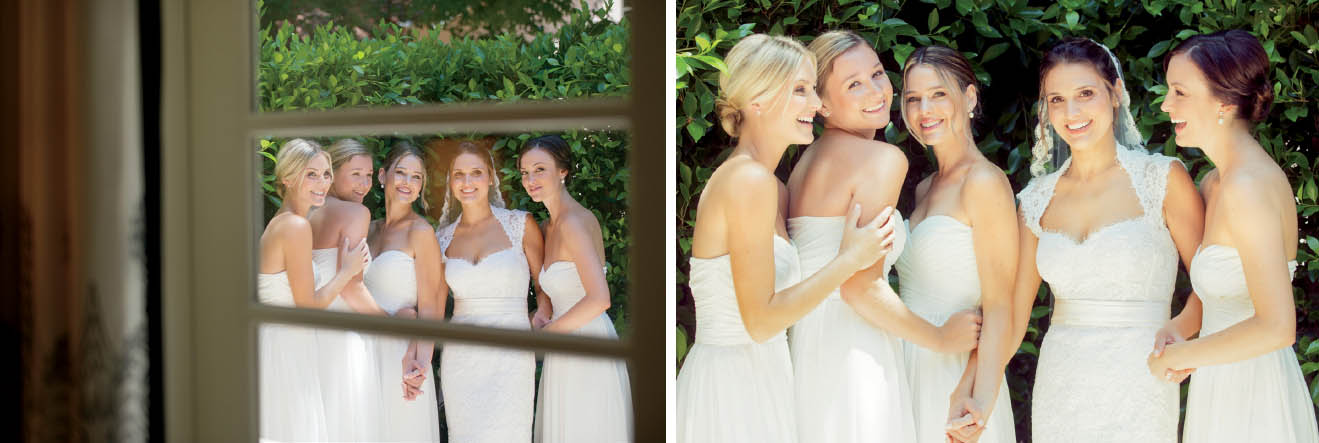
The following set of photos is displayed in pairs (Figures 13.15–13.26). These photos are simple examples of how the main photographer and the second photographer can work together simultaneously to capture finer expressions and reactions when the subjects least expect it. As I mentioned in the “Team Interactive Photojournalism” sidebar above, this is a coordinated effort with equally important parts. While the main photographer is actively taking photos and causing the subjects to react with verbal inputs, the second photographer is standing nearby at a different angle and capturing their expressions from that “unaware” perspective.
During my own weddings, sometimes I choose to be the main photographer and sometimes I choose to be the second shooter. It all depends on who the second photographer is, and if I believe he or she can handle the job. If the second shooter is not very experienced, I would never have them assume the role of the main photographer.
The photos below were all chosen from a single wedding shot by myself and the second photographer. As you can see from the examples, we used this technique throughout the entire wedding. The results are truly beautiful! Your second photographer should not just be someone with another camera working independently from you. To maximize your storytelling approach, you and your second shooter should work in unison with a strategic plan. When I am about to set up a shot with the wedding party or anyone else, I simply tell my second shooter, “Second angle,” and that’s the code for him or her to know what’s going on and what their purpose is in that moment. The second shooter allows me to interact with the subjects while he or she stands in position, ready to capture their expressions from a different perspective.

FIGURES 13.15–16
FIGURES 13.17–18
FIGURES 13.19–20
FIGURES 13.21–22
FIGURES 13.23–24
FIGURES 13.25–26
STYLIZED AWARE POSING
“Stylized aware posing” occurs when the photographer helps subjects look their best by suggesting how to adjust or position different parts of their bodies, all while they are making direct eye contact with the camera. This approach encompasses arranging, posing, and directing in order to take a subject’s portrait. Posing can also be used to execute an idea, mood, or feeling via the pose. During stylized aware posing, the subject is aware of the camera and looking straight at the lens. To maximize the overall impact of this approach, clever use of both circumstantial light and helper light is necessary to best flatter the subjects.
This approach is used for portraits when you want the viewer of the photograph and the subject to have a direct relationship with each other. For the following examples of this approach, I keep the explanations limited to the two core elements that need to be considered when shooting stylized aware posing portraits: feeling and lighting. Feeling is based on how the viewer feels when looking at the portrait. Feeling is determined by the different combinations of the collarbones, the chin, and the eyes’ position relative to the camera. (This is explained in detail in the Three-Point Check Combinations chapter [Chapter 4] of my posing book, Picture Perfect Posing.) Lighting is determined by a combination of circumstantial light and helper light, which includes the use of reflectors, video lights, or flashes.
Also, I chose mostly individual portraits to demonstrate this approach because there is more possible variety in that kind of shot. I did include one traditional but very important bride-and-groom portrait in which both subjects are looking at the camera.
Figure 13.27: Feeling: Straightforward with a painterly feel. Strong emphasis on his face and expression. Lighting: Window light on camera left and a reflector on camera right.
Figure 13.28: Feeling: Strong emphasis on her dress and eyes. Because her head is turned a bit to the side, there is a softer feel to this portrait. Lighting: Window light on camera left, wall reflecting light back on camera right.
Figure 13.29: Feeling: Relaxed with a sexy appeal by unbuttoning part of his shirt. Lighting: Window light on camera left.
Figure 13.30: Feeling: Highly dynamic portrait because the collarbones, the chin, and the eyes are all pointed in different directions. This creates a very striking feeling, almost mesmerizing. Lighting: Natural light coming from camera right. Wall on left reflecting light back to the right side of subject’s face. No helper light needed.
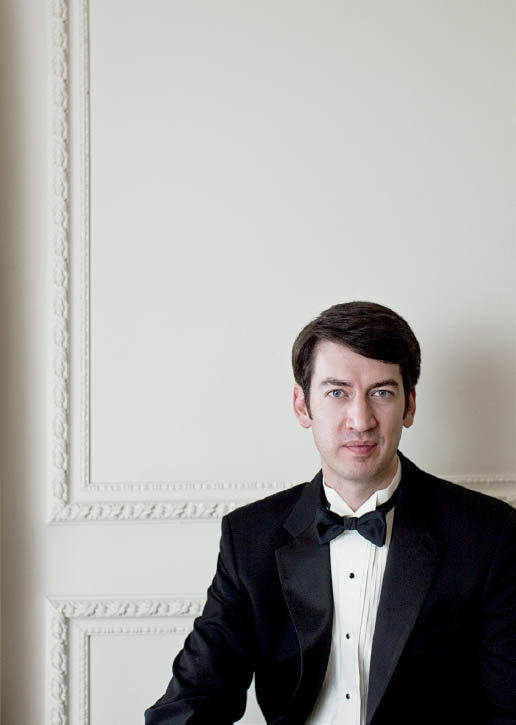
FIGURE 13.27
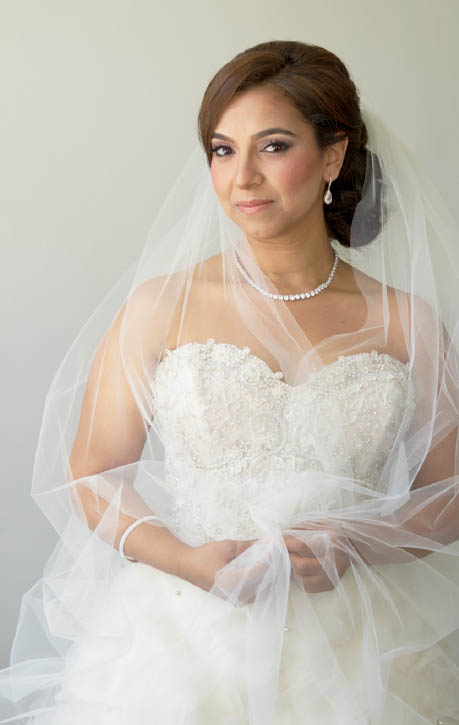
FIGURE 13.28
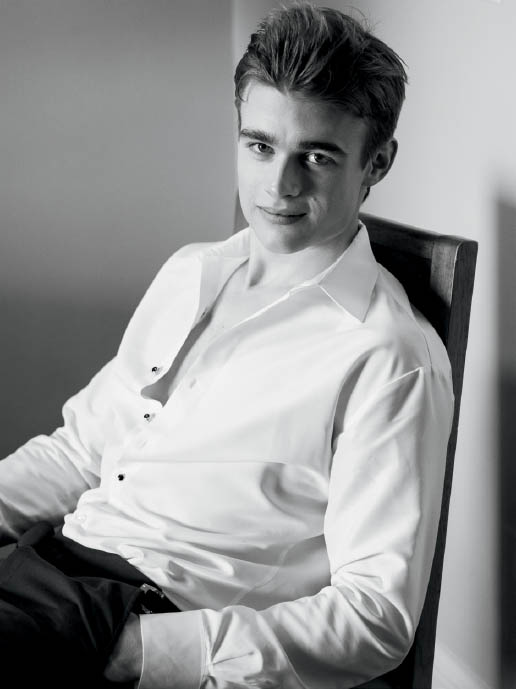
FIGURE 13.29
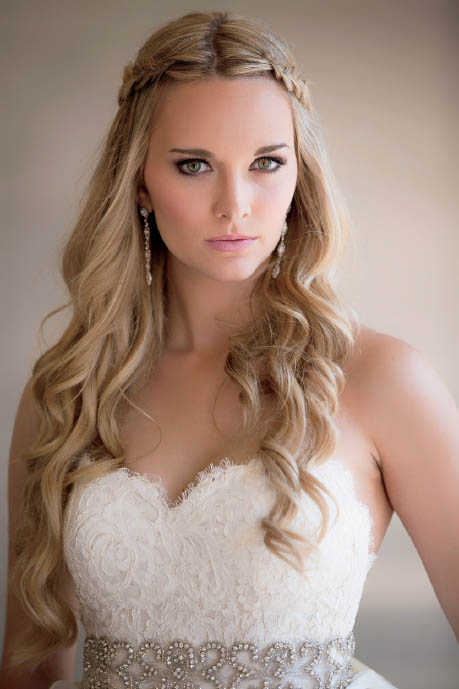
FIGURE 13.30
Figure 13.31: Feeling: Strong emphasis on his eyes. Serious but soft expression. Lighting: Direct sunlight slightly softened with a diffuser held approximately a meter over his head.
Figure 13.32: Feeling: Seductive and mesmerizing. Lighting: Flash through a diffuser on camera right, reflector on camera left.
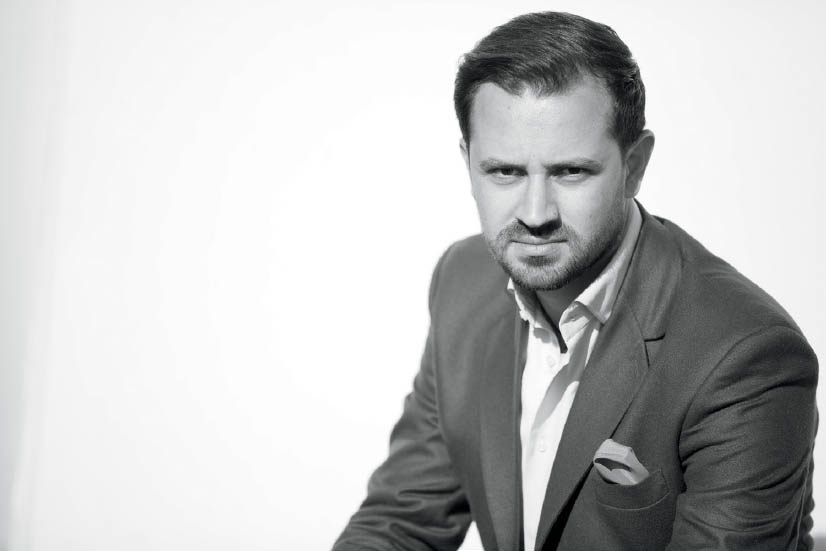
FIGURE 13.31
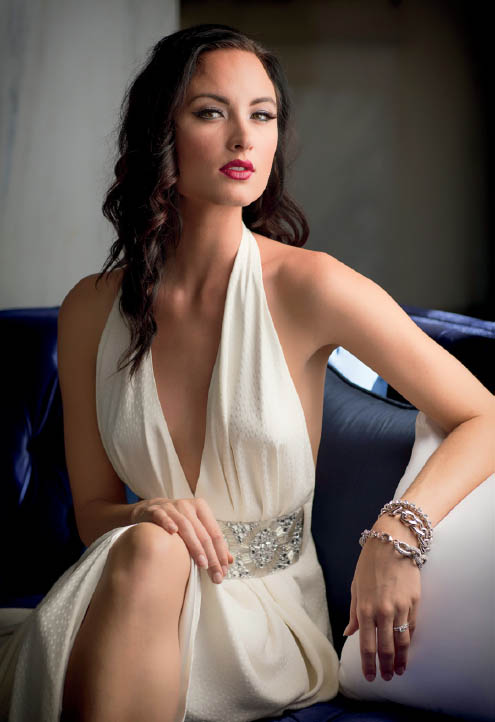
FIGURE 13.32
Figure 13.33: Feeling: Strong emphasis on his eyes. Soft but confident expression on his face. Lighting: Window light on camera right, video light on camera left.
Figure 13.34: Feeling: Traditional portrait of bride and groom looking at the camera. Lighting: Strong sun behind their heads. Strong reflected light from the smooth and light-colored sidewalk on the ground.
Note: Although this is not a creative photo, I find it to be one of the most important photos a photographer can take. To be sure, I actually take three to five of these traditional photos at different places. As simple as they are, people love them. If you don’t take this type of photo, the couple or the family will most likely ask you for it. They will be very disappointed if you tell them you didn’t take one.

FIGURE 13.33
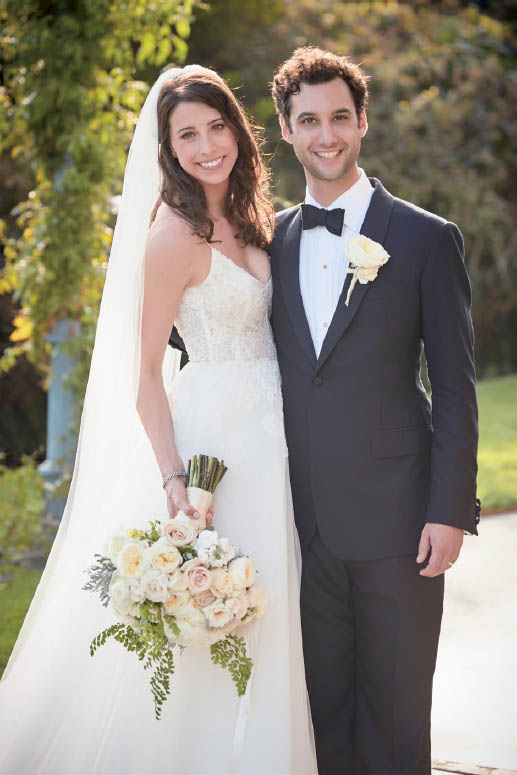
FIGURE 13.34
STYLIZED UNAWARE POSING
“Stylized unaware posing” is a form of posing where the subjects are not looking at the camera and appear to be unaware of being photographed. Unlike interactive photojournalism, which is activity-based, stylized unaware posing is portrait-based, meaning that the purpose of this approach is to pose and create an actual portrait of the subject. When the subjects are unaware of the camera, it gives viewers the sense that they are peeking through a window at that photographic moment.
Similar to stylized aware posing, a creative pose can also be used to reveal an idea, mood, or feeling via the pose, except that there will be an indirect relationship between the viewer of the photograph and the subject. This indirect relationship plays an important role in your storytelling because it gives the viewer of the photograph a unique ability to connect with the subject at a deeper level. The reason for that is because this approach keeps the viewer speculating about what the subject is gazing at or what they are thinking about when the photo was taken.
In broad terms, I see stylized aware posing as showing what a person looks like, while I consider stylized unaware posing to be a snapshot of the subject while they are in thought or interacting with something or someone.
A skilled photographer will finish the pose by specifically posing the subject’s eyes and injecting strategic verbal inputs that result in the desired reaction and expression while simultaneously using circumstantial light and helper light to create the most flattering light possible on the subject. If done correctly, the pose becomes invisible and believable, and the subject’s expression is completely natural and true to the subject’s personality. If executed badly, it appears obvious that the subject was only following the photographer’s instructions, and something will feel out of place or forced.
Figure 13.35: Feeling: Pensive, serious, and moody. By strategically posing the eyes, the subject doesn’t have to wonder where to look. By controlling the eyes, you can create a much more candid expression. Lighting: Window light spilling through a narrow gap between curtains.
Figure 13.36: Feeling: Reacting to something comical. Lighting: Natural light outside.
Figure 13.37: Feeling: Reacting to something charming with an elegant feel. Lighting: Window light on camera left and a white reflector on camera right.
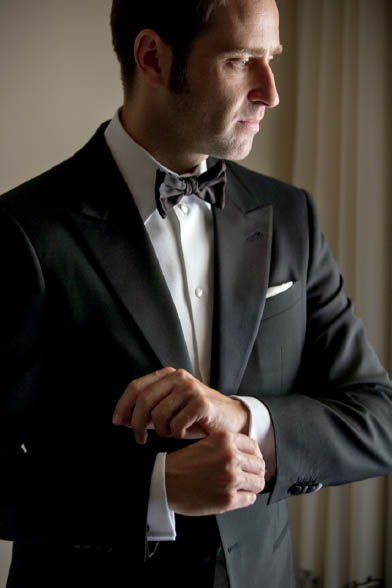
FIGURE 13.35
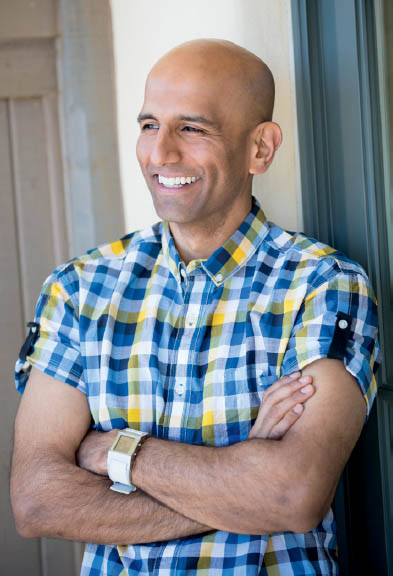
FIGURE 13.36
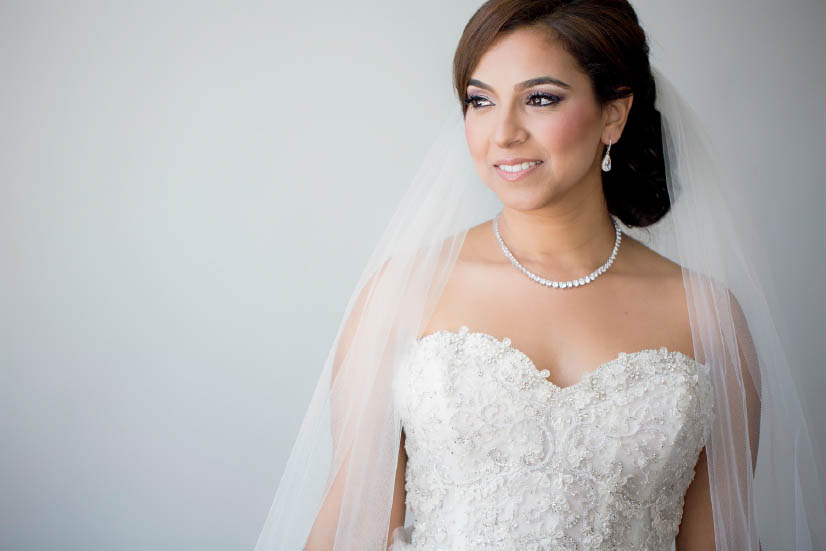
FIGURE 13.37
Figure 13.38: Feeling: Reacting to something beautiful with a contemplative feel. Lighting: Natural light with a manual flash fired through a diffuser to open up the shadows and improve lighting on her face and dress.
Figure 13.39: Feeling: 100% contemplative, serious, and moody. Lighting: Natural light with a manual flash fired through a diffuser to open up the shadows in the room and improve lighting on her face and dress.
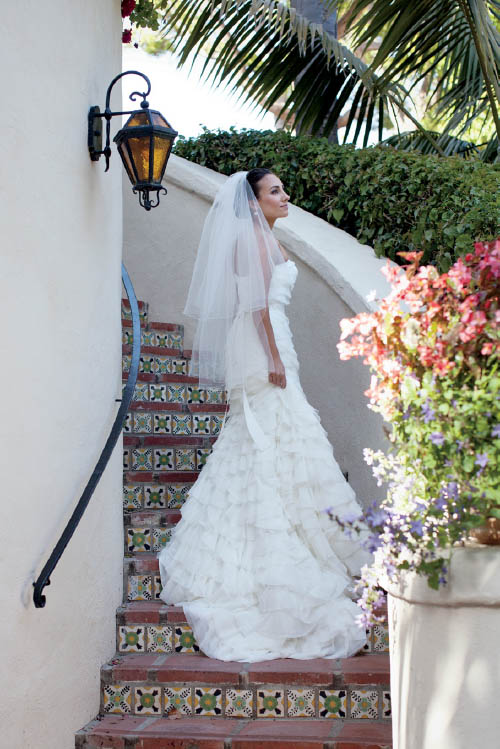
FIGURE 13.38
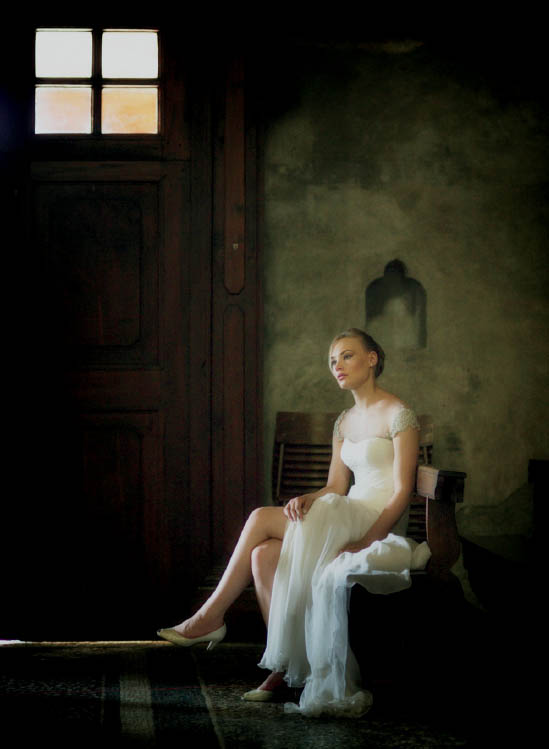
FIGURE 13.39
STORY DEVELOPMENT
Story development is a critical component of being a great wedding storyteller. Story development involves putting emotionally valuable people and/or objects of the bride or groom together to be photographed or to take part as a “supporting cast” in the “main story.” Story development happens when the photographer captures a main story and then finds other moments that complement the main story photo. This gives the viewer an idea of what else was happening when the main story photo was taken. It also gives the photographer a reason to keep moving and thinking, instead of standing static for long periods of time photographing numerous frames of the same moment.
For example, the photographer could take a large group portrait of the entire wedding party (main story), then follow that up by moving around and photographing individual close-up portraits of each of the wedding party members doing something slightly different and perhaps looking in different directions for variety (supporting cast). Together, the main story and supporting cast photographs tell a well-developed story that can be presented as a layout in a wedding album.
Figure 13.40: Before we begin with story development, look at this photo by itself. This photo was taken as the bride found a place to hang her dress in preparation for putting it on. Notice the delicate touch with which the bride holds the dress and the look in her eyes. To me, the look in her eyes indicates that a lot went into making the decision about that specific dress becoming her dress. Her future husband will see her in this dress, and she will marry in this dress. She has tried it on multiple times, had it adjusted multiple times, and has imagined how she would look wearing it on her wedding day. The simple gaze in the bride’s eyes says all of this to me. For this reason, I chose this photo to be the “main story” photo.
Now, I find ways to expand on this main story. I need the supporting cast. In the next example, you will see how the supporting photos complement the main story of the dress and the long-awaited moment of putting it on.
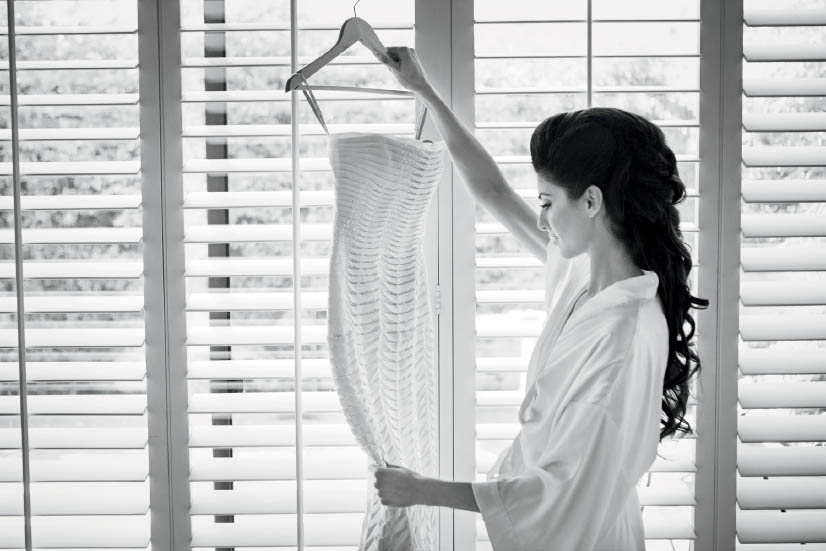
FIGURE 13.40
Figure 13.41: I had already taken the top photos on the right side of the layout earlier in the day. But they go together as part of the “dress story” perfectly. The photo at the top-left shows the dress by itself using a unique composition with the painting on the wall. The rest of these photos were taken for story development purposes. The photo on the top-right shows the bride doing the last-minute make-up check to make sure that everything is perfect before putting on the dress. The photo in the middle shows the moment before she finally takes the dress off the hanger and puts it on. The window blinds were used as a compositional element to enhance the feeling of peeking in at that moment. The blinds also guide your eye to the dress and back to the bride’s face. The bottom-left photo introduces the bride’s mother to further increase the emotional value as this story develops. The mother is an Emotionally Valuable Person (EVP) to the bride and the dress is an Emotionally Valuable Object (EVO) to the bride. This photo shows both working together in the same photograph. Finally, the photo on the bottom-right finishes the story with a strong exchange of emotions through their eyes as the bride tightly holds her mother’s hands.
Now that you have had a chance to see the main story photo by itself and compare it to the fully developed story, you can see how much more of an emotional impact this story has as a whole compared with any single photograph.
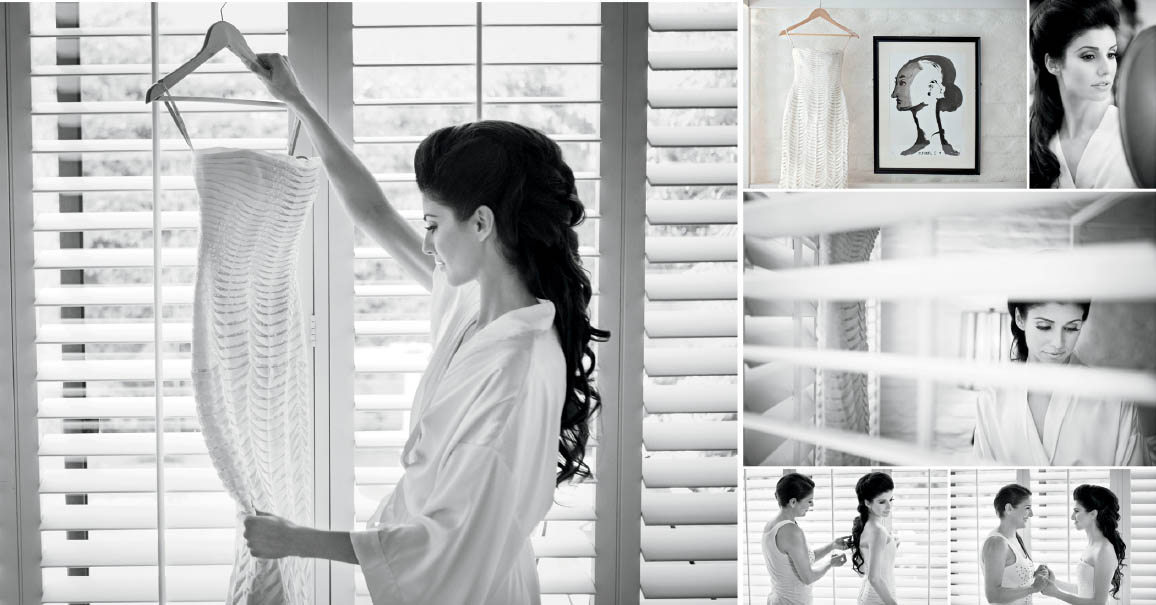
FIGURE 13.41
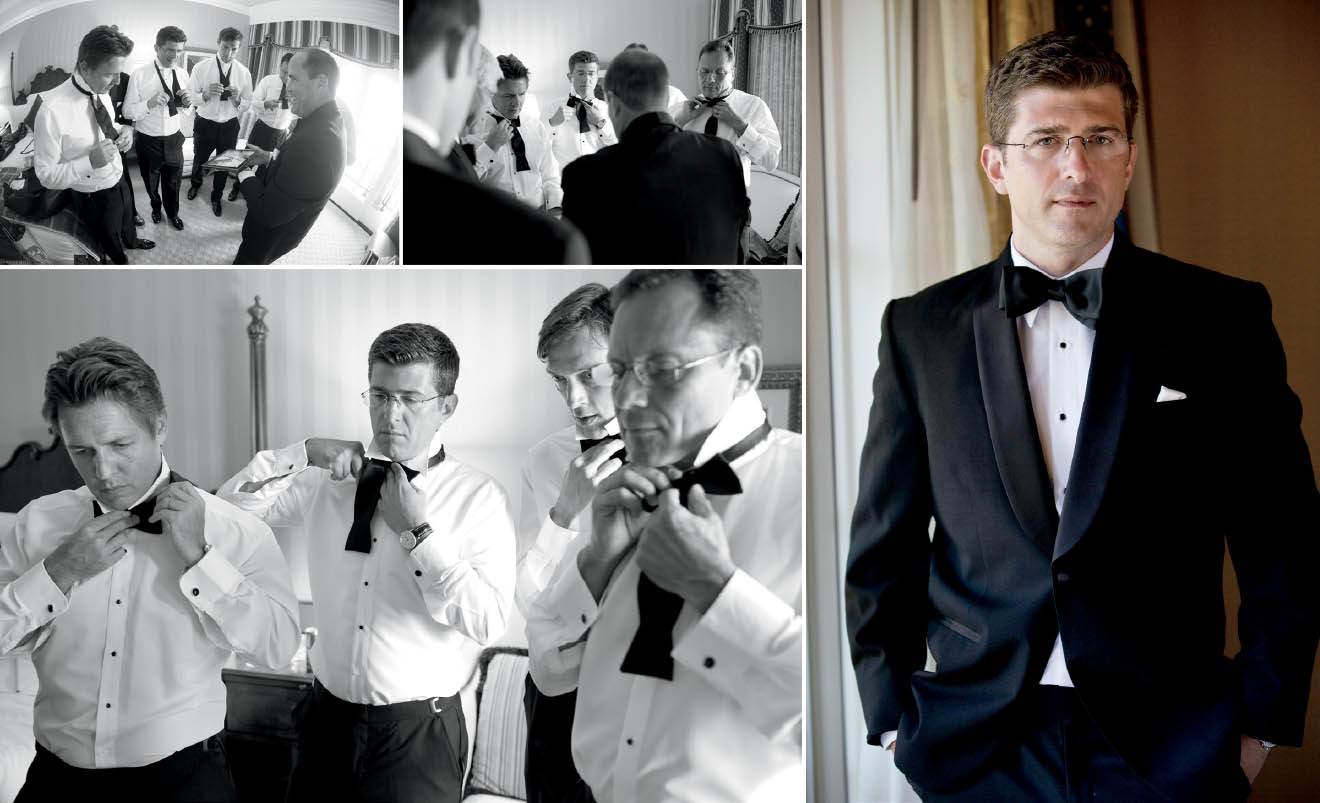
FIGURE 13.42
Figure 13.42: This story depicts the comical struggle experienced by all who put on a bow tie. Clearly, no one in this wedding party had a clue about how to tie a bow tie. One of the groom’s closest friends had to find a YouTube video on his iPad to help them. The three different angles go from ultra-wide (fish-eye) to medium to close-up. These three different perspectives keep the story development interesting and fun to look at. At last, when you see the final photo of the groom on the right, spruced up and perfect, now you have a deeper appreciation for the struggle they all went through and the team effort required to look as sharp as he does.
Figure 13.43: This is one of my favorite examples of why story development is so important for becoming a highly skilled storyteller. This story shows the younger flower girl completely missing the timing of her duties, throwing the flower petals on the ground at the wrong time. She is so innocent and adorable about it because clearly she is under the impression that she is doing the right thing in the middle of the ceremony. As her older sister looks on, the little flower girl, in her own small world, throws the flower petals on the floor, and upends the basket to make sure she threw all of them. She bends down to pick up the flowers, just to throw them back down on the floor again. People were chuckling at the adorable situation unfolding in front of them, including the bride and groom during the ceremony. The photo on the bottom was taken during the recessional. It clearly depicts the couple’s amused reactions to the flower girl situation as they walk by them.
When photographs connect to tell a story, the emotional impact and appreciation for your art as a great wedding storyteller will transform your clients into loyal followers, praising you wherever they go. Remember this: at any given time, a story could develop. If you are paying attention, you will notice it. As soon as you take the main photograph of the story, immediately move around and look around for supporting photos. I have had brides in tears and grooms give me hugs when we reminisce about their stories in their wedding book.

FIGURE 13.43
WEDDING STORYTELLER’S STYLE DEVELOPMENT
The following style development chart (Figure 13.44) shows the various approaches (from the five discussed) a photographer can choose to implement at any given segment of a wedding. For example, during the Bride and Groom Getting Ready segment, depending on your style, you may choose to include some of each of the approaches to tell that story. Or you may choose to include just two of the five approaches. During this segment, the opportunity to use all five approaches is there.
However, during the Ceremony segment, there are only two possible approaches that make sense. You are not going to be posing the couple while they are exchanging vows, right? Therefore, the only two logical approaches during the ceremony are photojournalism and story development.
The segments that include the word “portrait” in them, such as Wedding Party Portraits, Bride and Groom Portraits, and Family Portraits, don’t present the opportunity for a photojournalistic approach because the very meaning of the word “portrait” already excludes the possibility of a purely photojournalistic approach.
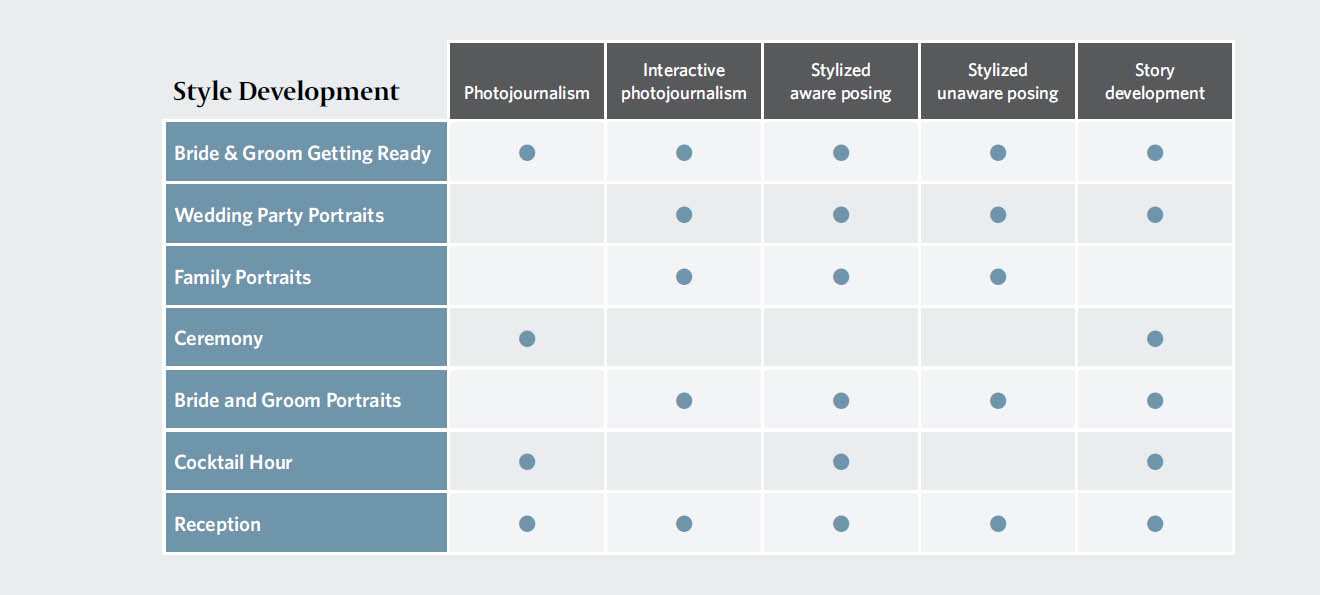
FIGURE 13.44
How to Use These Approaches to Develop Your Unique Style
In my own weddings, I choose the most well-rounded approach to storytelling, with a heavy emphasis on interactive photojournalism. I consciously try very hard to make sure that for each segment of a wedding, each of the storytelling approaches listed on these charts is represented. That does not mean that each approach must be represented equally, meaning that each approach would be equal to 20% of your total coverage. For example, looking back at some of the weddings I photographed over the last year, my usual breakdown of these approaches for the Bride and Groom Getting Ready segment was the following:
- •Photojournalism = 20%
- •Interactive Photojournalism = 35%
- •Stylized Unaware Posing = 15%
- •Stylized Aware Posing = 10%
- •Story Development = 20%
As you can see, my style for this segment relies very heavily on interactive photojournalism, with story development and photojournalism tied for second. I also seem to take more stylized unaware posing photos than stylized aware posing portraits.
This is my individual style. Yours will have different proportions for each approach and segment of the wedding. Through the years, my photographic style has changed more times than I can count. Six years ago, I didn’t even know about story development. Now, it is a major contribution to my style. Another major change in my style is how I photograph the Wedding Party Portraits segment. I used to simply assemble the wedding party, instruct them to look at the camera and smile, then take the picture. Now, I use all four approaches listed on the chart. The results have been better than I expected, and this effort has contributed to my booking higher-paying jobs and not having to discount myself to remain competitive. People love the variety they see in my work.
Furthermore, I have trained the second shooters who work with me at most weddings to help me achieve a variety of these approaches for every segment of the wedding. They should also utilize these approaches and do what they can to complement my work. We work as a true team with a common goal. If I am taking photos of the families, my second shooter should be looking for photos that would work for story development. Or as previously mentioned, if I am photographing with the interactive photojournalism approach, my second shooter is photographing my subjects’ reactions from a different angle to create the “team interactive photojournalism” approach.
At the end of the day, these are the five approaches we can use as tools to tell the story of our clients’ weddings. It is up to you how you use these tools. I have found success not by limiting myself to just a few approaches but by embracing them all. Wedding photography can be so repetitive because many photographers treat weddings like an assembly line. This book’s purpose is to elevate wedding storytelling. By implementing these approaches with your own unique proportions, you will deliver a much more profound product that is both true to your style and mindful of your clients’ wishes. Why settle for a decent job when you can blow your clients’ expectations out of the water?