chapter 6
COMPOSITIONAL ELEMENTS
The primary goal of compositional elements is to guide the viewers’ eyes toward the intended story in a photograph. The photographer has the option of conveying the story in a very straightforward manner, or he/she can tell the story subtly and imaginatively. For instance, when a photographer points the camera toward an urban scene, there will be cars, trees, sidewalks, people walking, buildings, windows, doors, and shops. These objects are the tools you use to create an out of the ordinary composition that draws the viewers’ eyes to precisely where you want them. By carefully posing your subjects with various elements in the scene, you can accomplish this goal.
KEY COMPOSITIONAL ELEMENTS
Some of the most popular techniques for creating an interesting composition include: framing, pointing, reflections, repetition, and balance. As your skills grow and mature, you will eventually be able to create impressive compositions almost instinctively.
Framing with Objects
Figure 6.1: For example, in this photo, I am clearly trying to showcase the bride’s dress. However, instead of just taking a photo of the dress by itself, I took an extra minute to look around and see how I could use the elements in the room to frame the dress. It did not take long before I noticed that the chairs had a square cut out of the backrest. I hung the dress in the middle of the room, and I placed the chair as a foreground element to frame the dress.
FIGURE 6.1
Figure 6.2: Because I used the chair’s backrest as a compositional element, the viewer would look straight at the dress. Due to time constraints, I left the paper hanger on the dress. I looked for a better option for a while but decided not to invest any more time and just took the photo. The next time you are at a wedding, take a minute to look around and see if you can find an item in the scene that can be used to frame or to effectively compose a photo.
Figure 6.3: Just before the bride was about to be driven to the ceremony, I asked the driver if he would wait a few seconds for me to take a quick photo. I noticed that the vintage car’s back window made a perfect frame, so why not use it? I asked the bride to sit in the right rear seat of the car and to look elsewhere. Now, the car’s window perfectly framed the bride’s smiling face, making this photo much more interesting. Had I not noticed this frame, I would have said nothing, the bride would have gotten into the car, and the driver would have sped away. There are so many ways this scenario could have played out, but remember that if you develop a keen eye for details in your surroundings, you will surely achieve much better photographs.
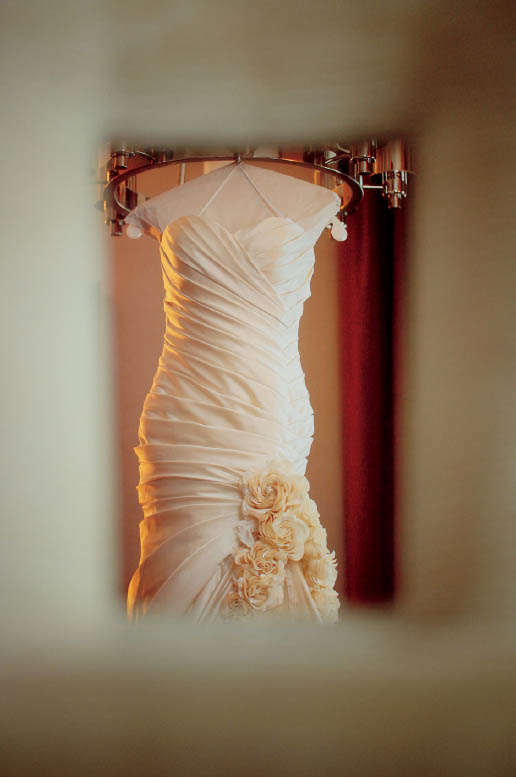
FIGURE 6.2
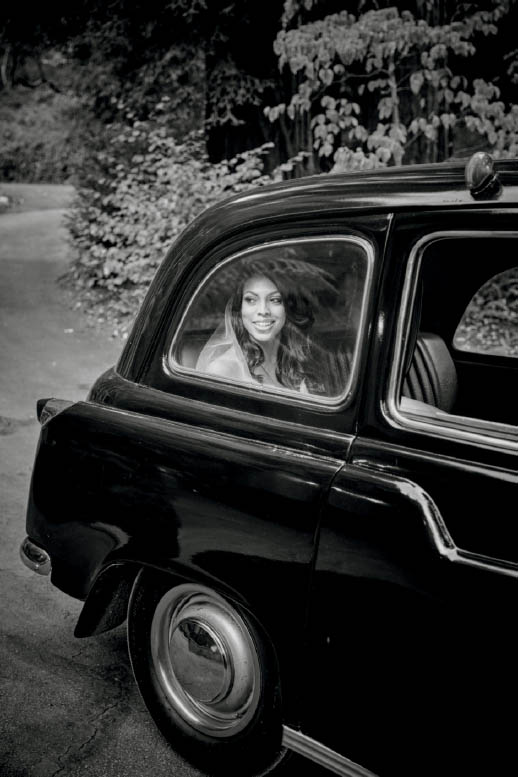
FIGURE 6.3
Framing Through Structures
Figure 6.4: It was drizzling at the time this photo was taken in Sarasota, Florida, and the bride and groom were understandably seeking shelter from the rain. Not only did this building provide shelter, it also had decorative arches that could be used as frames. I asked the couple to go inside that building on the right side, so I could frame them beneath the arches.
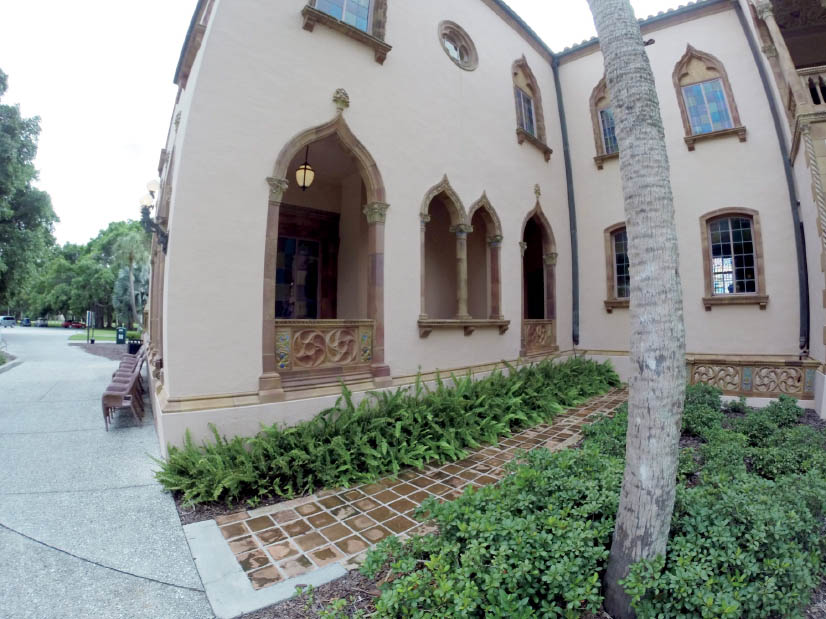
FIGURE 6.4
Figure 6.5: I chose the far right arch to frame the couple. To make the scene more dramatic, I used a flash with a color temperature orange (CTO) gel attached to it to mimic the orange light above them. Finally, I changed the exposure on the camera until the arches were no more than silhouettes. In a photo like this, it is very important to be aware of the horizon-tal line references. These horizontal lines at the bottom of the arches must be parallel to the bottom of the frame to keep the photo perfectly straight. Tilting the camera when there are strong horizontal or vertical references in the architecture would make it appear as if the whole building were falling down, which would be very distracting.
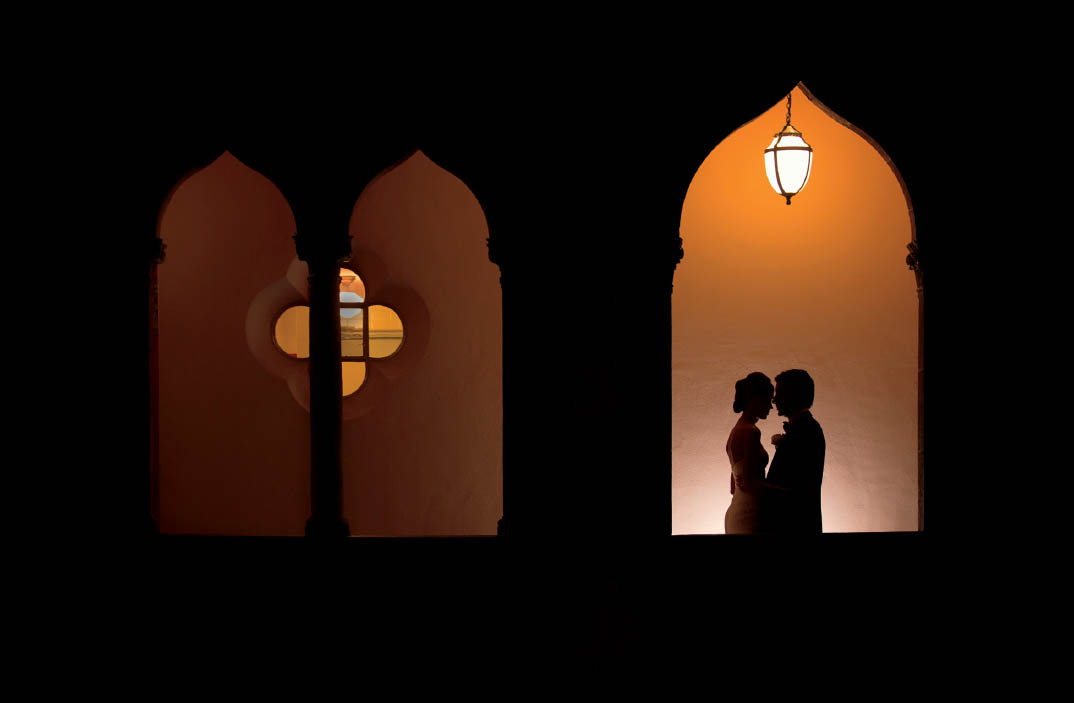
FIGURE 6.5
Figure 6.6: This is a bad photograph that shows what happens when the frame is chosen poorly and the horizontal or vertical lines are not parallel to the camera frame. When I took this photo, I thought I was being clever by framing the bride between the bar and the ceiling, but obviously that did not work. Also, the large, blurry ceiling light in the foreground is also extremely annoying.
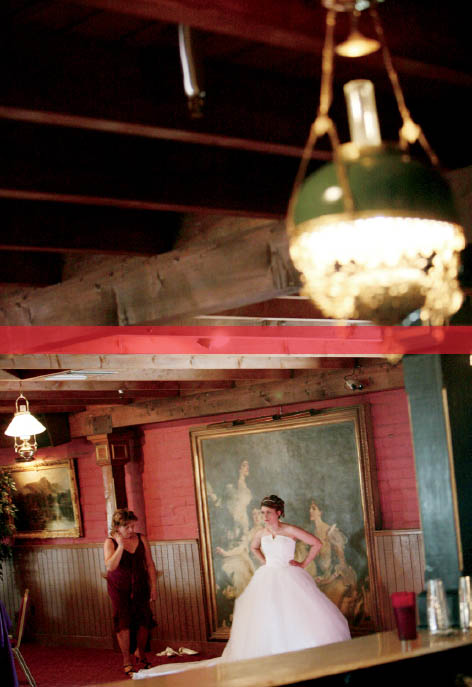
FIGURE 6.6
Figure 6.7: Inside hotel rooms or private homes, a photographer can close the window curtains a little to change the width of the window’s rectangular shape. In this case, I closed the sheers just enough to create a nice frame for the bride putting on her veil. To avoid the typical composition, I chose not to pose her perfectly in the center of the frame. Having the bride stand just a bit off-center can add a sense of realism to the photo.
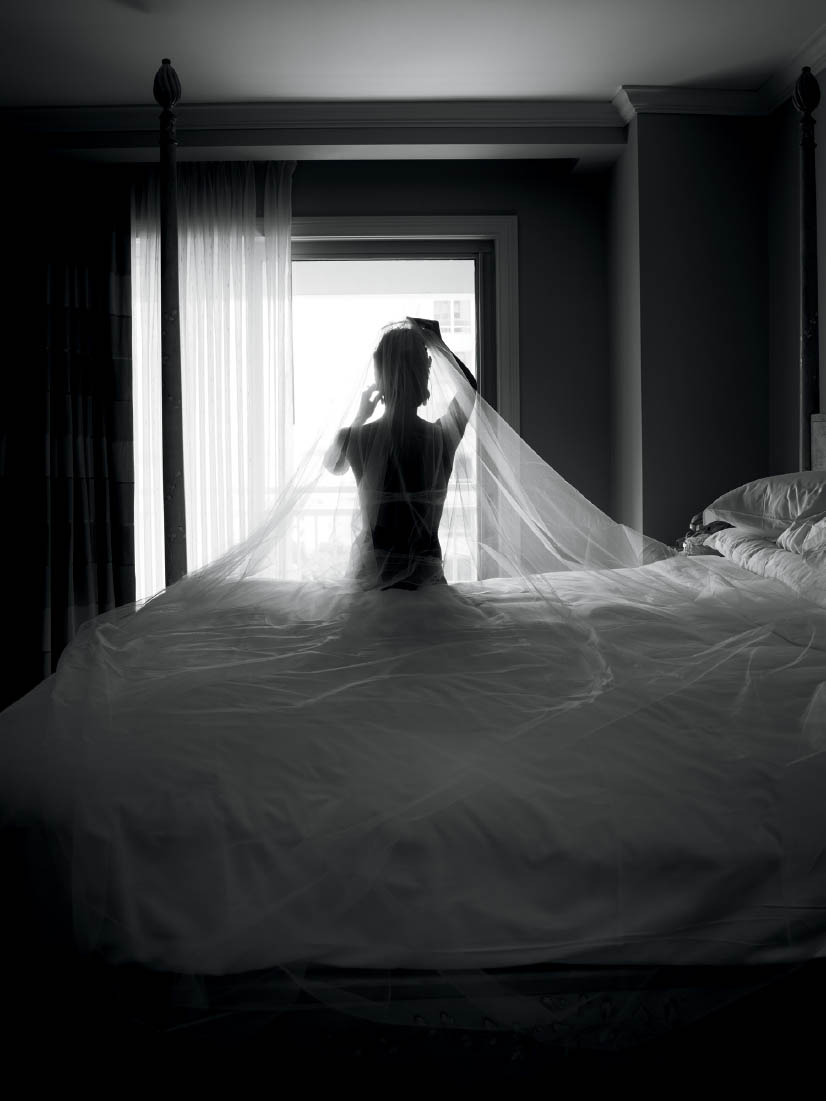
FIGURE 6.7
Figure 6.8: This is the same concept as Figure 6.7, but instead of using window sheers or curtains, I partially closed the door to the room to create a smaller rectangular frame. Sandwiching the story between the bedroom door and the wall created a sense of seeing the moment through voyeuristic eyes.

FIGURE 6.8
Double Frames
Figure 6.9: Early in my photography career, I tried to do something special with composition, but as you can see here, I clearly did not pay much attention to the fact that many elements must come together for a wedding photograph to look good. This photograph shows my failed attempt to achieve a double frame technique. The first frame is the open door under which the couple is standing. The second “frame” is a small hole through the thick foliage. The result is a total disaster. The viewer cannot see either the frames or the couple. Referencing back to Chapter 4, “Showing or Removing Context and Clutter,” the principal steps in that chapter would have shown me that a great photo in this location was not feasible.
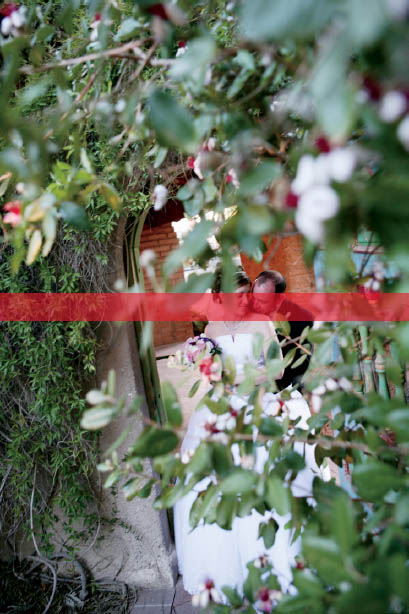
FIGURE 6.9
Figure 6.10: This photo also has two frames in the scene, but this composition was executed correctly. The first frame is the two doors behind and in front of the bride and her mother. The second frame is the arch in the background. Double frames are more difficult to find, but they are always there.
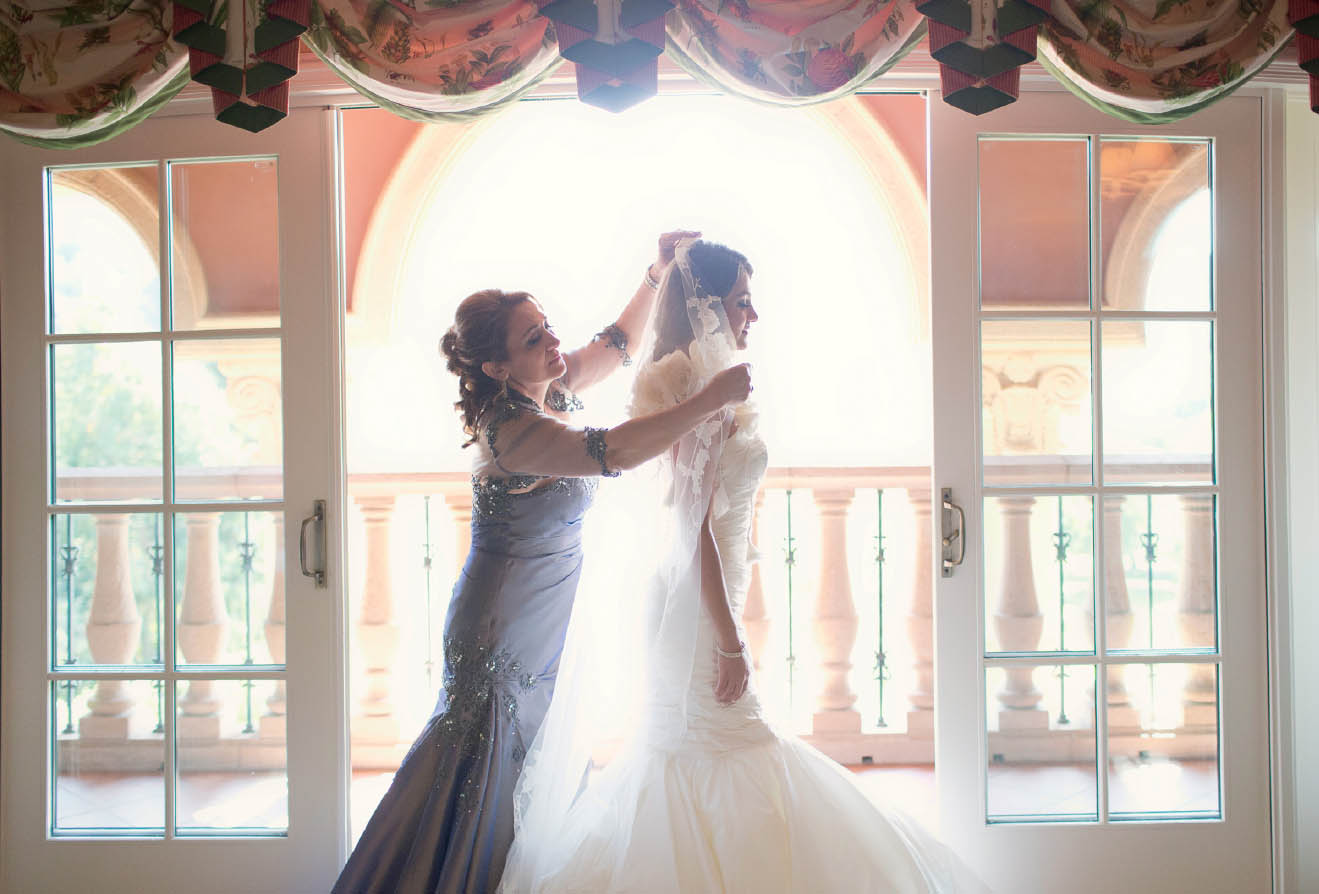
FIGURE 6.10
Figure 6.11: In this example, I used two door frames to two different rooms to frame two separate stories happening simultaneously. This is one of my favorite composition techniques for weddings. There are always so many stories happening at the same time that having structural shapes to frame these moments in one single exposure is a great way to take wedding photography to a high, artistic level.
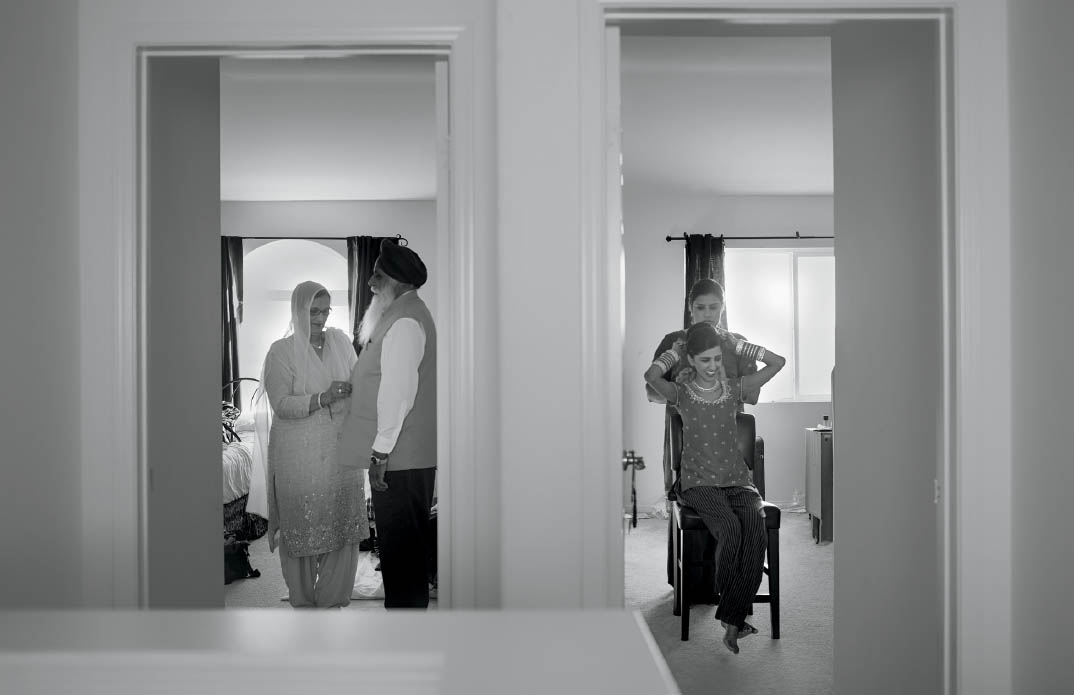
FIGURE 6.11
Pointing
There will be times when objects or graphics can be used to point the viewer to the intended story. For example, traffic arrows painted on the ground could be pointing toward a couple; if a photo was shot from a bird’s eye view, it would look very interesting. There are countless ways to use subliminal pointing techniques to force the viewer to look in a certain direction.
Figure 6.12: For this example, I did not see a painted arrow, but I did notice a framed sketch of a woman mounted on the wall. The woman is looking toward the left side of the camera frame. This gave me the idea to place the wedding dress alongside the sketch. In the resulting photo, it appears as if the woman in the sketch is looking at the dress, which also causes the viewer to look at the dress. Imagine this photo without the sketch. It would be boring.
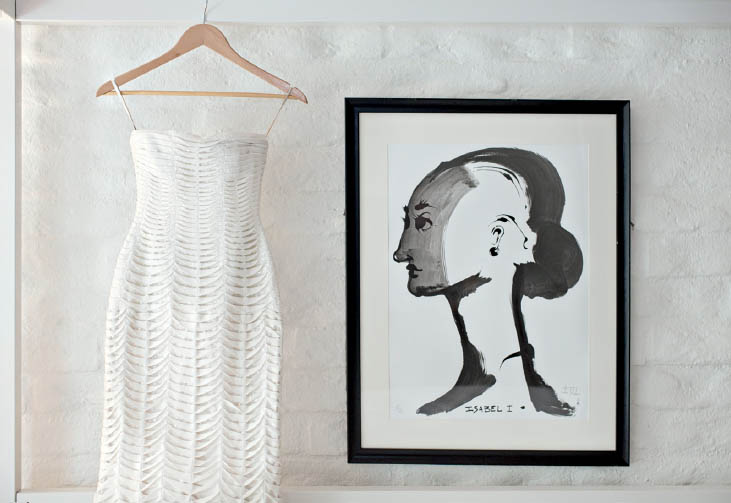
FIGURE 6.12
Reflections
Figure 6.13: This photograph of the bride adjusting her earrings combines two main compositional techniques: reflections and framing. Not only are you seeing a reflection of the bride, but the design of the mirror is also framing her. This is a more advanced technique, when a photographer begins to recognize a combination of compositional techniques and applies them in a single exposure.
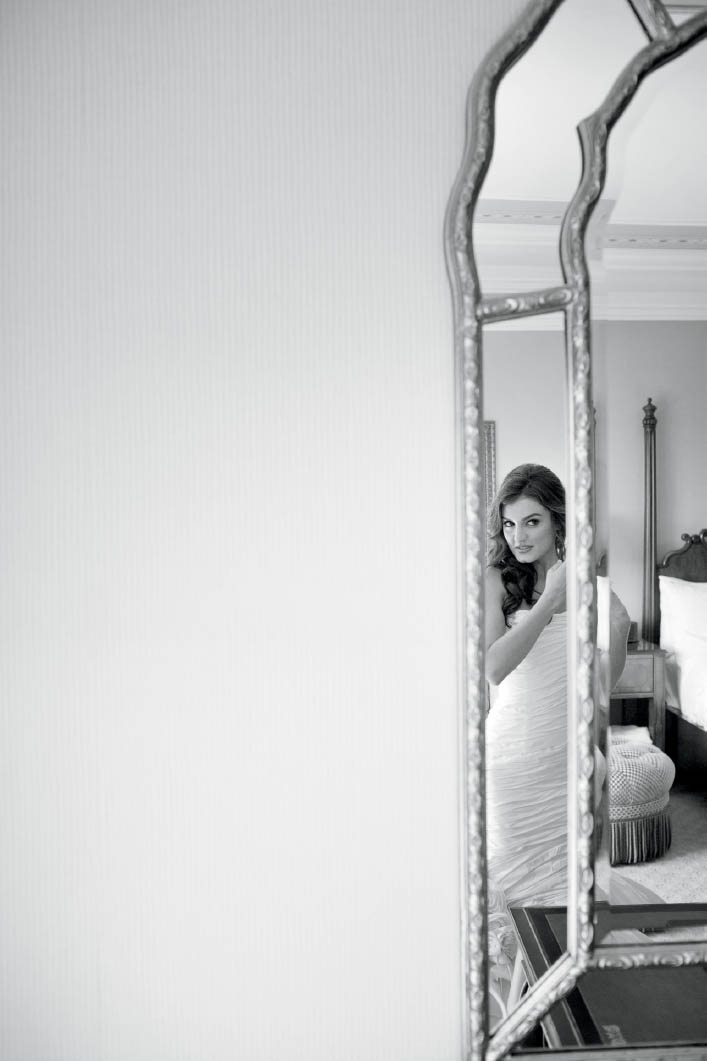
FIGURE 6.13
Figure 6.14: In this example, there was a mirror mounted on the wall. I placed my camera parallel to the mirror as close as possible to show the bride’s reflection and to achieve compositional balance on both sides of the frame.

FIGURE 6.14
Repetition
Using repetitive elements or shapes can be very effective for creating interesting compositions. But the technique must have a definite purpose. As you will see in the next example, just showing repeating objects is not enough to produce a successful photo.
Figure 6.15: There are many factors that contributed to the failure of this photograph. The repeating row of chairs was a good start to create composition through repetition, but it did not work. There is simply too much context and clutter in this photo. The groom is far away from the camera, which makes him appear small and unimportant. The palm tree on the top left of the frame is a vertical line reference, and it is tilted. For all of these reasons, the photo failed.
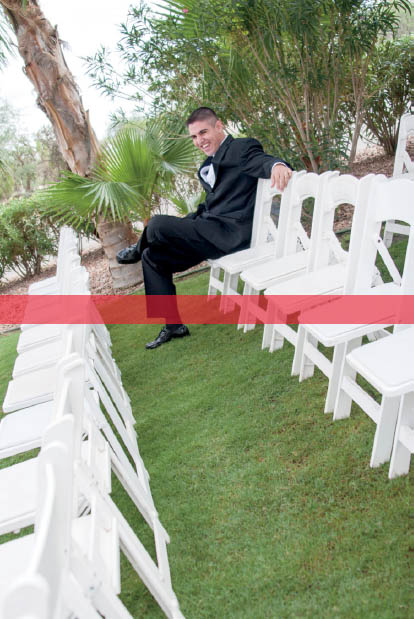
FIGURE 6.15
Figure 6.16: Inside the lobby of this hotel in San Diego, I noticed the rectangular wall with a repetitive design element. There were so many vertical and horizontal lines that it was crucial that I keep these lines parallel to the edges of the camera frame. I used a flash to illuminate the wall and give this photo a dynamic feel. Without the flash, this location wouldn’t have worked because it was too dark. If you see a special location or feature, such as this wall, remember that you can create the light if natural light is not working well enough on its own.
Figure 6.17: It was late afternoon, and the sun’s low position created this repetitive row of arches of light and shadow on the wall. Because I learned my lesson from Figure 6.15, I decided to place the groom in the foreground to make him appear more important from a compositional standpoint. The repeating arches direct your eyes to the groom, and they also create visual interest throughout the entire frame.
I must admit, it’s not easy to keep track of all of these different compositional techniques when photographing a wedding under pressure and time constraints. For this reason, we must practice our craft. The best way to work on your composition is to do some street photography. Take your camera and go for a long walk. Pay close attention to colors, light, shapes, frames, multiple frames, repeating patterns, and reflections. I find that practicing street photography is one of the most effective ways of fine-tuning your composition skills. These skills must be instinctive by the time you arrive at a wedding. Otherwise, you will miss many opportunities because you did not see them. If you do not train your brain to notice these things quickly, it will not.
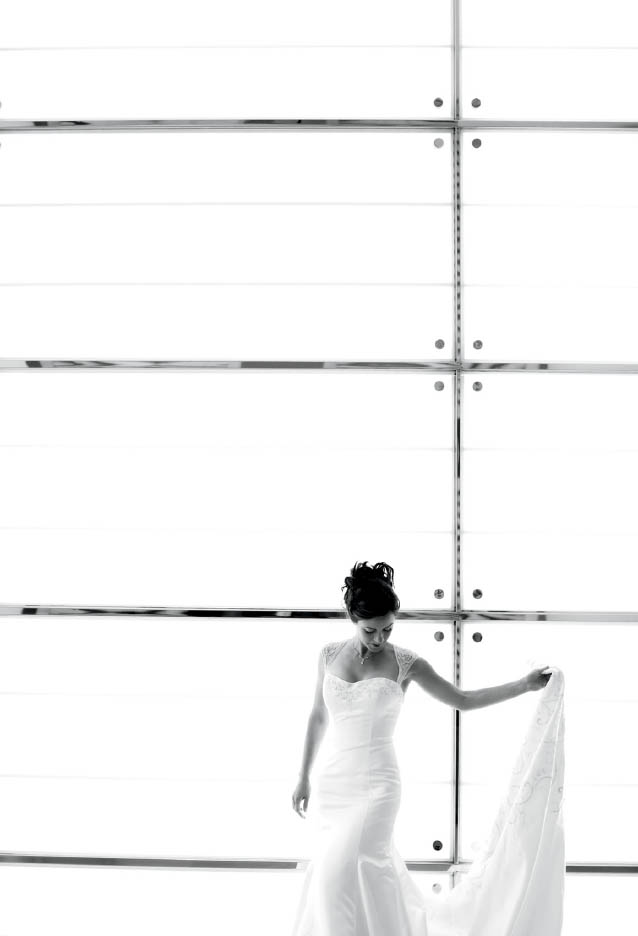
FIGURE 6.16
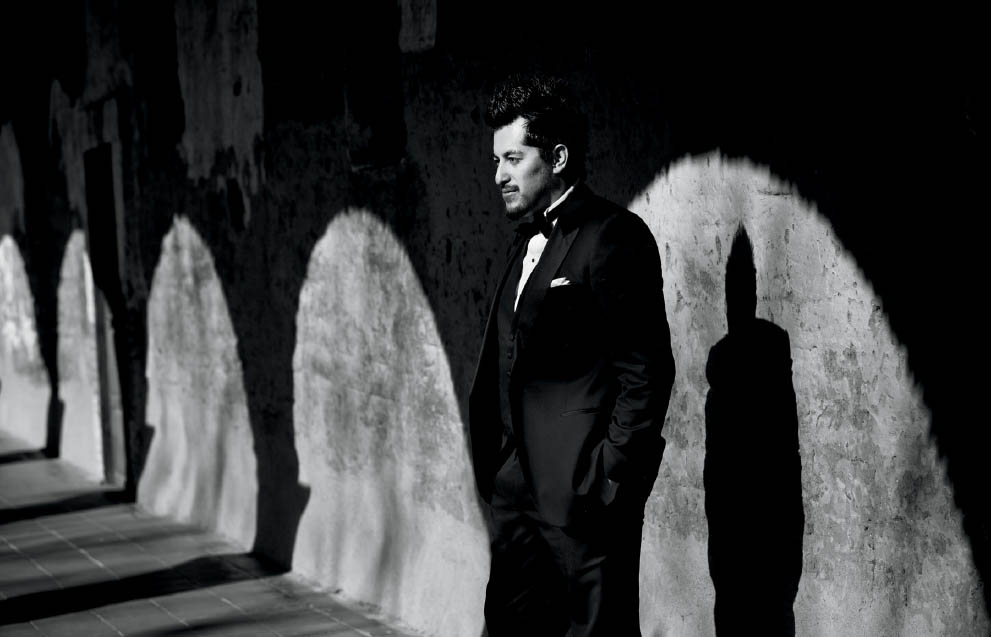
FIGURE 6.17