chapter 7
LUMINOSITY LEVELS AND CONTRASTS
Getting inside the head of any great wedding photographer is very much like understanding the thinking process of a gourmet chef. They both combine what is available to them with a deep knowledge of their craft, producing exquisite results that evoke enduring, sensual memories. Sometimes the product is simply made. Other times, it is more complex. More complexity is not necessarily better, but more knowledge definitely is.
The photojournalist (photo-taker) captures beautiful and emotional moments among people who are important to the bride or groom. In those moments, your primary job is to photograph quickly, regardless of the light or pose. If a crucial moment happens to occur in great light, then you are lucky. I believe that it is very important that all wedding photographers prioritize a touching moment over any technical, lighting, or posing technique. As I said at the beginning of this book, wedding photos do not need to be perfect.
However, when you are asked to take portraits of the family, wedding party, or the couple, it is advantageous for you to be knowledgeable about the impact that luminosity levels, contrasts, and colors have on your photography. For this kind of work, you are primarily a photo-maker. The focus of this chapter is for you to become comfortable and familiar with these concepts. All the chapters that cover the Wedding Storyteller Skill Components are building blocks that will help you produce higher-caliber wedding photos through knowledge, practice, and experience. That said, it is also possible that misunderstanding this chapter could have undesirable consequences.
The human eye is instinctively drawn to the brightest area in a scene. Think of the brightest point as a bullseye that forces your eyes to stare right at it. If you position that bright spot in a scene in the wrong place, the photo will suffer greatly. However, if you strategically place the brightest point in a scene, you may have enriched the photo in a way that will really set you apart from other photographers. In my experience, I seldom find photographers who naturally use the brightest point in a photo to guide the viewers’ eyes to precisely the right location in the frame. Why? In digital photography, many, if not most, photographers create the brightest point in the photograph in post-production, instead of while shooting. The most common post-production techniques to bring visual emphasis after the fact are dodging, burning, and of course, the vignette. These are all fine techniques, and they do the job. However, through careful analysis of the location, composition, and lighting, you can more naturally and skillfully place the brightest point in the scene, the intended story, or the location. There are four main characteristics of luminosity levels to keep in mind when doing this.
DISTRACTING LUMINOSITY LEVELS
It’s very important to be watchful of not only your subject(s) but also of everything else happening within the frame. When shooting with depth, it is especially imperative to watch for random spikes of luminosity levels around the frame. I say “especially imperative” because it is more difficult to notice hotspots in the background when you’re shooting with depth rather than, for example, shooting your subject in front of a wall, where your eyes will have an easier time identifying distracting hotspots on that wall. Let’s take a look at some examples of how these random hotspots in the scene can have damaging consequences in our photography.
Figure 7.1: In this photo, taken at the beginning of my career, I failed to notice the hotspot on the left side of the frame. This random, blown-out area by their heads makes it very difficult to notice the bride and groom without your eyes wandering toward the bright area behind them.
Figure 7.2: This is similar to the previous example. This time, though, the distracting highlight is on the grass on the left side of the frame, created by the sun directly illuminating that patch of ground. Highlights on the ground are incredibly common, and we have to be extremely diligent about making sure that we take a second to look for them and recompose accordingly.
Figure 7.3: Highlights on the ground can still occur on an overcast day. The light-colored sidewalk behind the bride’s torso is much brighter than the bride. It’s difficult to enjoy the photo when your eyes keep noticing that unpleasant, distracting, rectangular bar crossing the entire frame. I could have changed my shooting angle until that line was no longer visible in my frame. But due to my lack of experience, I did nothing about it.

FIGURE 7.1

FIGURE 7.2

FIGURE 7.3

FIGURE 7.4
Figure 7.4: At the time I shot this, it appeared to be a novel idea to frame the couple with tree branches to create depth in the background. That idea did not exactly pan out, did it? It is important to notice anything light colored in the background, because if the sun illuminates it, the object will become an automatic hotspot. There are multiple problem areas in this photograph. First, the sun is partially illuminating the bride’s right arm but not the rest of her body. That mishap puts visual emphasis on just her arm. Secondly, there is the bright spot on the ground to the right of the frame near the heads of the bride and groom. Next, the white gazebo is directly illuminated by the sun. Lastly, the white lamp near the groom’s head is also a luminosity level spike.
Figure 7.5: While covering the groom at a wedding in Hawaii, I was happily photographing him touching up the last details of his tuxedo. When reviewing the shots later, I noticed that the lamp to the right of the frame had been on the entire time I was photographing the groom getting ready. Worse yet, a person can’t even tell that it is a lamp. It just appears to be a random hotspot near the edge of the frame. Unfortunately, most of the photos of the groom in this scene had this distracting highlight. Since I did not notice it, I just kept on shooting. It is my hope that this chapter makes you more aware of these devious luminosity level spikes that only distract from the main subject and seem to sneak up on the photographer.

FIGURE 7.5
HIGH-CONTRAST LUMINOSITY LEVELS
“High-contrast luminosity levels” simply means that the main subject should be more than a stop of light brighter than the background. Placing someone near a doorway that faces outside is a quick way to accomplish this technique. The subject receives a great deal of ambient light from the sun, but he/she is still shielded by the ceiling from direct sunlight. Obviously, the inside of the room will be much darker due to the light illuminating the main subject. Any time the subject is in open shade and is still receiving light from the environment, reflectors, or flashes, you will achieve high-contrast luminosity levels. It is up to you to turn this higher-contrast situation into a flattering photograph.
Figure 7.6: This photo was taken under the shade of an open garage. I had the twins face outside, so that they would receive a great deal of light from the sunlight bouncing around at the scene. In this particular case, I was not satisfied with the intensity of light the twins were receiving from the sun, so I used a flash with a large umbrella to enhance the light intensity illuminating them.

FIGURE 7.6
Figure 7.7: In this photo, I used the window light coming into the room to strongly illuminate the wedding dress against a much darker background in the room. The closer the dress is to the window, the higher the contrast between the dress and the room will be. Because I used a high-contrast luminosity level technique, your eyes are immediately drawn to the dress, which was my intention.

FIGURE 7.7
Figure 7.8: This high-contrast situation was achieved by finding a location outside that was still partially under the cover of the building’s overhang. I placed the couple in the shade of the overhang but as closely as possible to the outside areas lit by direct sun. This created a beautiful high-contrast effect with soft and flattering light.

FIGURE 7.8
Figure 7.9: In this indoor scene, I loved the composition utilizing the repetitive arches, but there was not enough contrast in the scene to draw the viewers’ eyes to the bride. To remedy this situation, I had my assistant hold a flash behind the column to illuminate it and thus achieve a higher contrast between that column and the rest of the room.

FIGURE 7.9
EVEN LUMINOSITY LEVELS
Properly implementing even luminosity levels in wedding photography can have a very pleasing effect on the overall feel of the photograph. The human eye does not have to adjust for bright highlights and dark shadows. The entire scene is more or less lit by the same luminosity levels. This could be achieved in open shade or in direct sun. In most cases, you want to avoid having your subject darker than the background. I bring a reflector or flashes to improve the light on my subjects, if necessary, in order to balance it out with the background.
Figure 7.10: When looking at this photo, you can immediately appreciate how easy this image is on your eyes. The entire scene is close to the same range of luminosity levels. In situations such as these, I still try to put slightly more light on the main subject to give him/her greater importance than the rest of the scene. Otherwise, having even luminosity levels in open shade can appear flat.

FIGURE 7.10
Figure 7.11: This photograph presented a tricky situation, but there was an easy solution. The scene was lit by similar luminosity levels with the exception of a few scattered highlights on the ground and on the walls behind the group. If I had simply posed the bridal party in an area of open shade from one of the trees, the lighting on them would have be too low compared to the scattered highlights. Furthermore, the group is standing over grass, which further absorbs the light. To solve this dilemma, I knew I had to use flash to increase the light on the group, so that the light on the group and the light on the scattered highlights were more even. In situations like this, I always prefer to have both my camera and my flash in manual mode so that I can quickly make decisions and adjustments regarding how to achieve balance in the luminosity levels between the subjects and the background.

FIGURE 7.11
Figure 7.12: This recent photo was taken just minutes before the ceremony was to begin, so we were in a rush to finish the portraits with the bride and groom. Since we were shooting under direct sunlight outside, I had to find a background that did not have anything white; otherwise, it would have become a hotspot. I found a row of green bushes, which was good enough for me. I turned their heads away from the sun and noticed that the light on their faces was too dark compared to the bushes in the background. To even out the luminosity levels, I asked my assistant to use a white reflector to bounce light onto the couple’s faces. That increased the light levels on the couple, and it evened out the scene. If I had more time, I would have placed a diffuser over them to avoid direct sunlight from illuminating her back and the front of his jacket. But, as I say, during weddings, you have to problem-solve as best you can, even though the results may not always be perfect.

FIGURE 7.12
REFERENCE POINT LUMINOSITY LEVELS
This technique is about the highlight in the scene having a natural place in the viewer’s mind. The highlight needs to make logical sense for the viewer. For example, a random highlight coming from nowhere is far more distracting than if that highlight came from a window. If you can give the highlight a sense of place, then the viewer of the photograph deems it normal, and it won’t cause a distraction. Mastering how to give targeted luminosity levels a natural sense of place is an advanced technique. Correctly implementing this technique says a lot about the skill of the photographer.
Figure 7.13: In this room, clearly the windows are much brighter than the main subjects inside the room, but your brain sees that highlight as a window, and windows are normal in a room. Therefore, it is much less of a distraction.
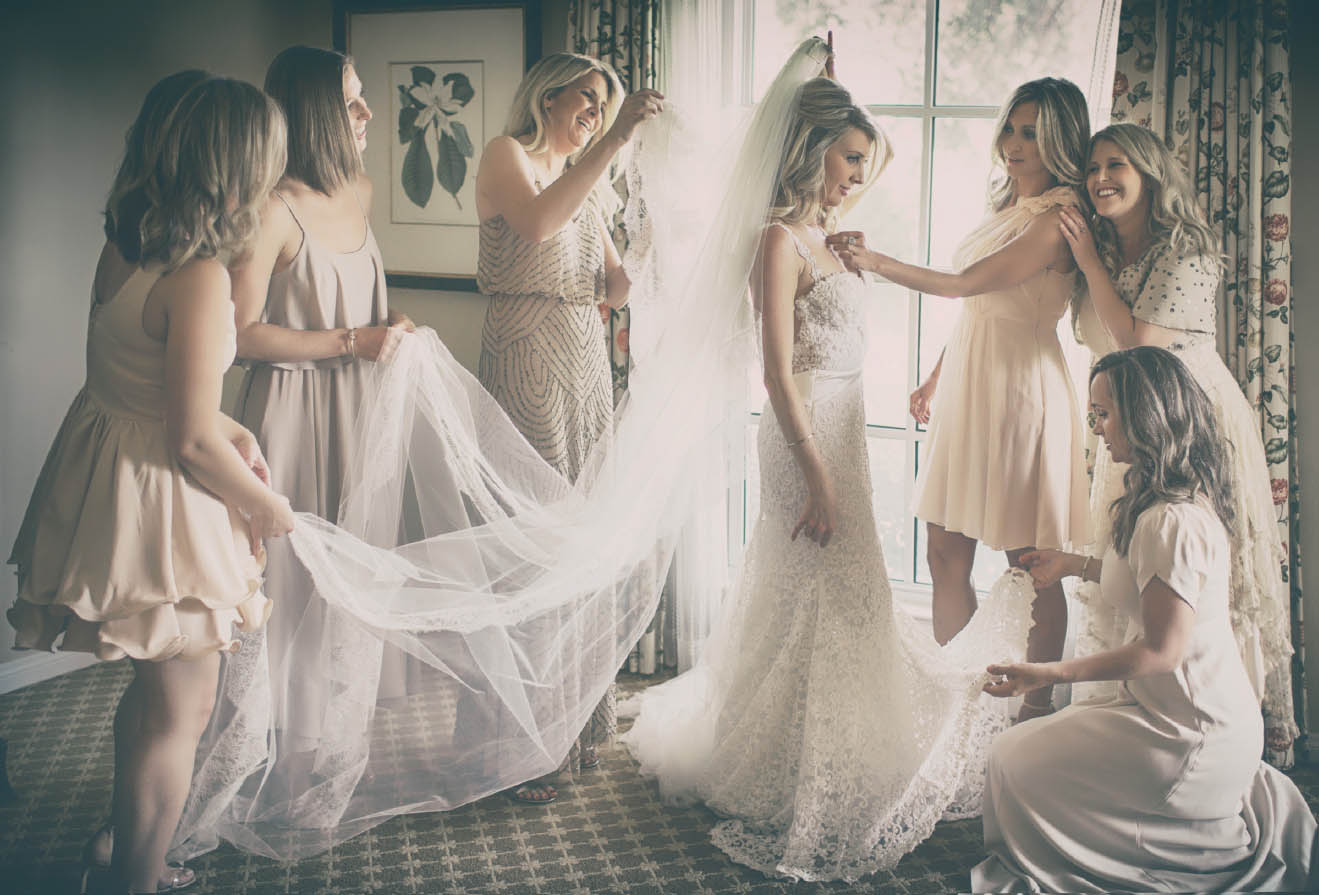
FIGURE 7.13
Figure 7.14: In this example, the arch in the background is definitely a distracting element, but because it appears to be part of the same architectural elements of the building, it has a sense of place. Ideally, that arch on the right side of the frame would not be there, but it’s good to know that the photo doesn’t suffer too much because that highlight occurs within the natural context of the scene.

FIGURE 7.14
Figures 7.15 and 7.16: In some cases, you have to use your judgment about how much of a highlight you want to show in your composition. Remember, the human eye is always drawn to the brightest point in the frame. Therefore, any highlight could potentially take away visual attention from your subject(s), even if the highlight has a reference point. As you can see in these examples, Figure 7.15 shows a bride illuminated by beautiful natural light coming in from the large doorway in front of her. However, I thought that there was too much doorway in my composition. Although this doorway is very much within the context of the hotel lobby in Hawaii, I decided that it was too much of a distraction. Therefore, I recomposed to remove much of the doorway in the photo. The result is Figure 7.16. I find this composition less distracting and easier on the eyes.

FIGURE 7.15

FIGURE 7.16