Let me introduce you to the LEGO MINDSTORMS programming software, NXT-G. Over the course of this book we are going to work closely with NXT-G to develop programs for your LEGO MINDSTORMS robot, so take some time to familiarize yourself with the NXT-G programming environment.
But before you do that, you need to understand what a “program” is. A program is a set of electronic instructions that are given to a computer to tell it what to do. In your case, the LEGO MINDSTORMS NXT brick is your computer, and it needs to hear from you what you want it to do and how you want it to perform a task. Your program will give the NXT a list of instructions to follow that will tell it exactly how you want it to act and respond.
The NXT-G graphical approach to programming allows you to create these instructions quickly and in a format that you, as a human, can understand. Once your program is completed, it will be translated into a language format that the NXT can understand. We will cover this process later in this chapter.
NXT-G has been around since 1998, but, just like you, it has grown significantly, becoming bigger and smarter. There are a few different versions of NXT-G available, but they all do the same thing—translate programs for the LEGO MINDSTORMS NXT.
Currently there are two versions of the NXT-G software available, NXT-G 2.0 Retail, which comes with the retail LEGO MINDSTORMS kits, and NXT-G 2.1 Educational version, which is available from LEGO Education. Both versions include similar functionality, and the lessons in this book apply to each.
Note Screen shots shown in this book of NXT-G will be from NXT-G 2.1 LEGO MINDSTORMS Education version. Your screens could look different if you are using a different version of NXT-G. To find the latest version of the NXT-G software available, check the LEGO MINDSTORMS website.
When you start the NXT-G software, you will be presented with a graphical environment for creating your programs; this is called the User Interface, or UI. Here you will see a variety of panels designed to help you create your program (Figure 1-1). Let’s review the panels individually to get a better understanding of what they do for you.
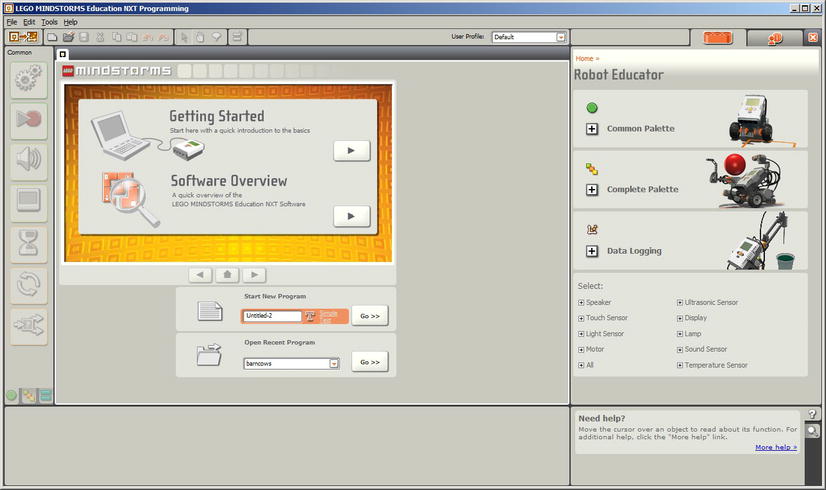
Figure 1-1. NXT-G Software User Interface when first started
The Startup Panel (Figure 1-2) has quick-start buttons for creating new programs or accessing programs you’ve worked on recently. The panel also includes access to some basic NXT-G tutorials.
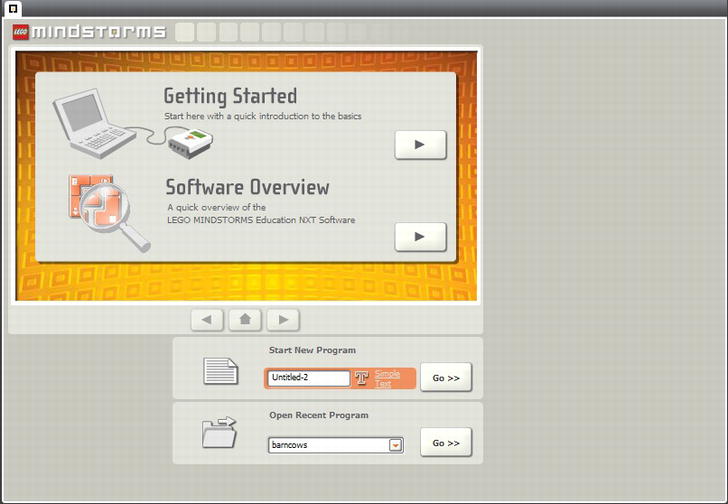
Figure 1-2. NXT-G User Interface startup panel
Program blocks are what we use to create our NXT-G programs. The blocks include instructions on how our NXT should act—everything from moving, checking sensors, making sounds, and displaying information on the NXT screen.
Think of blocks as your tools and the palette area as your toolbox, a place where you keep all your blocks sorted and organized.
The block palettes are divided into three sections: Common blocks, Complete blocks, and Custom blocks. The three tabs at the bottom of the palette area allow you to switch among the various palettes.
Our Common palette (Figure 1-3) includes seven blocks, five of which you’ll make good use of throughout further chapters. These are blocks that you will find yourself going to again and again. It’s nice to have them in their own palette so that you can find them quickly without having to do much searching around.
The five blocks from this palette that you’ll use most often are the Move, Display, Wait, Loop, and Switch. Don’t worry if you don’t know the purposes of these blocks at this time; we’ll cover each in more detail in future chapters.
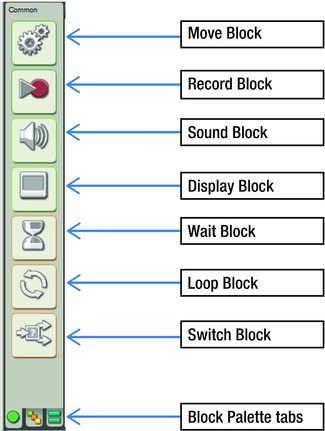
Figure 1-3. Common block palette
The Complete palette (Figure 1-4) offers six different palettes that have blocks organized by the type of functionality they offer: Common, Action, Sensor, Flow, Data, and Advanced.
Just based on their names, you get a good idea of what kinds of blocks are associated with each palette. As we progress and learn more about writing programs, we’ll cover many of the blocks found in each of these palettes.
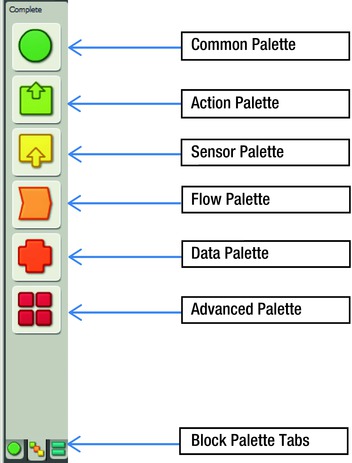
Figure 1-4. Complete block palette
Custom Palette (Figure 1-5) is just what the name implies. This is where you can store any blocks you have created yourself, My Blocks, or any blocks you have downloaded from the Internet. My Blocks is an important concept that we will study very shortly; the idea is that you can take any program you have written and create your own NXT-G block so that you can reuse the program without having to rewrite the same code. This can save time and memory on your NXT.
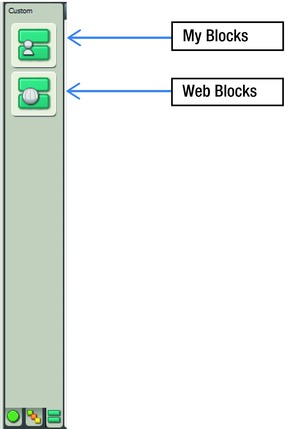
Figure 1-5. Custom block palette
The Worksheet panel is the area in the center of the screen (Figure 1-6). Here is where you will work with your blocks and actually develop your NXT-G program. The tabs across the top allow you to switch among different programs, and the square tab to the far left will return you to the Start-Up panel that you saw when you first started the NXT-G program interface.
In the Worksheet panel, you will find the sequence beam that you will build your program along. The program blocks will be put in the order of how you want them to run.

Figure 1-6. Worksheet panel
In the Properties panel you will be able to alter and adjust properties of your program blocks (Figure 1-7). Each block will have unique properties, so the look of this panel will change based on which block is selected in your current program.

Figure 1-7. Properties panel with the Move block properties displayed
If you have questions about any of the programming blocks, you can simply point to the block with your mouse and the Help panel will show a short description about the block and its use. For more detailed information, click on “More help>” link to open an extensive help file for the selected block. You can see an example of the help supplied for the Move block in Figure 1-8.

Figure 1-8. Help Panel displaying help for the Move block
The Robot Educator as seen in Figure 1-9 (or Robo Center in the retail NXT-G version ) gives you lots of sample robot designs and code. This is a good place for the beginner to learn some basics of NXT-G. I would encourage you to look through what is offered here and try some of the projects out for yourself. You can close this panel to give yourself more space in the Worksheet Panel by clicking on the “X” in the upper-right-hand corner.

Figure 1-9. Robot Educator panel
Using the Map panel (Figure 1-10) is a great way to navigate around large programs. Often you can create an NXT-G program that exceeds the viewable space in the Worksheet panel,and the Map panel will let you scroll quickly around your fill Worksheet area and make finding a particular part of your much easier.
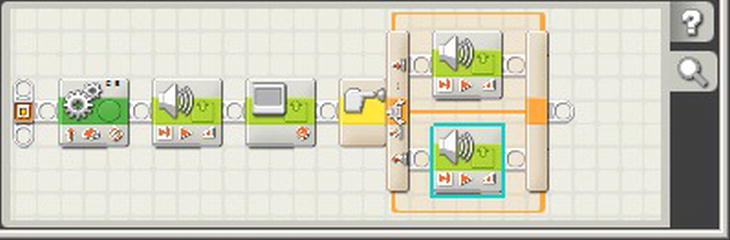
Figure 1-10. Map panel
The Controller, as seen in Figure 1-11, lives in the lower right corner of your Worksheet panel. This is what you will use to communicate and control your NXT brick. Most important, you will establish the connection to your NXT brick with the controller as well as download your program to the NXT. Later chapters examine the Controller in more detail.
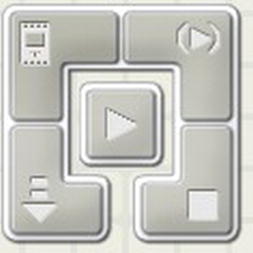
Figure 1-11. The Controller
The toolbar (Figure 1-12) lives at the top of the user interface. It gives fast access to many of the common functions you will use frequently while working with your programs.
![]()
Figure 1-12. Toolbar
There are two options for connecting your MINDSTORMS NXT brick to your computer and the NXT-G software, USB cable, and wireless Bluetooth. Each has advantages and disadvantages, depending on your situation.
Connecting the NXT to the computer with the USB cable is the simplest method. It simply requires you to connect the cable to the USB port on the NXT brick and then to an open USB port on your computer. The first time you do this, you will be prompted to install a MINDSTORMS NXT driver for your operating system. If this does not happen automatically, you can find the necessary drivers on your software install disk.
The limitation is that your NXT brick must be tethered to the computer every time you wish to download a new or revised program. This can be inconvenient if your computer is not located close to the area where you are working with your robot.
Setting up Bluetooth communication between your computer and the NXT brick can be tricky at times. I will explain the steps in getting Bluetooth enabled on the NXT but suggest that you consult your computer’s manufacturer for information on how to enable Bluetooth on your computer.
- Switch on the NXT by pushing the orange button on the NXT.
- Scroll to the Bluetooth icon on the NXT with the gray triangle button.
- Push the orange button.
- Scroll to “Visibility” and select “Visible” by pushing the orange button.
- Scroll to “On/Off” and select “On” by pushing the orange button.
When you connect your computer to the NXT brick via your operating system, you will be prompted for a “passkey.” The default is 1234. You can enter your own passkey if you want, but make sure you do so on both the computer and the NXT brick.
Once you have made the connection to the NXT via Bluetooth from the computer, the Controller in the NXT-G Software will allow you to select the connected NXT brick. If you have more than one, I recommend giving each a unique name to avoid confusion when making connections—you would hate to download programs to the wrong robot.
Note Bluetooth communication is not allowed at some LEGO robotics events, such as FIRST LEGO League. So if you’re used to using Bluetooth to download program updates, remember to bring a USB cable when you go to competitions.
If you are not using Bluetooth on your NXT brick, turn it OFF to save battery life. With Bluetooth ON, your NXT is using power trying to find systems to connect.
Firmware is a very small program that is stored on your computer or, in this case, the MINDSTORMS NXT brick. It tells the NXT how to handle very low-level operations and how to use instructions from your NXT-G programs. Firmware is a program that you do not change; once you load it onto the NXT brick, it will remain there until you override it with a newer version.
Within the NXT-G software Tools menu there is an option for “Update NXT Firmware.” The dialog box in Figure 1-13, will show you the current firmware versions loaded on your system and will allow you to check the LEGO MINDSTORMS website for any updates.
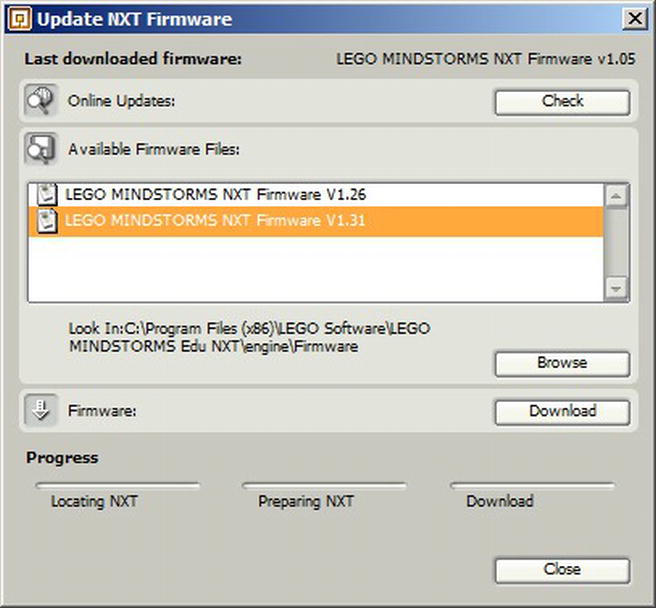
Figure 1-13. Firmware Dialog box
If you are programming your NXT for a robotics competition or similar event, avoid updating your firmware mid-season. Rarely will firmware upgrades cause issues with existing NXT-G programs, but there is no guarantee that you won’t run into trouble from an upgrade. Therefore, I advise checking for an update at the beginning of the season and then sticking with that version of the firmware unless there is a known issue with the version you are using.
Note You cannot do a firmware update via Bluetooth; you must use the USB cable connection.
Checking the LEGO MINDSTORMS website will alert you to any known issues with the current firmware versions available. In the Update Firmware Dialog box seen in Figure 1-13, the “Check” button will take you to the LEGO MINDSTORMS website and check for newer releases of the NXT firmware.
Summary
As you spend more time developing winning programs for your MINDSTORMS NXT robot, you will become more familiar with the NXT-G Software and its interface. This introduction only touches on some of the basic navigation; in the following chapters we will learn about more detailed functionality of many of the tools available to you in the NXT-G software.