The basics of writing a good NXT-G program were covered in the previous chapters. Most of the techniques that we discussed are all that a team would ever need to know to compete in a LEGO robotic event. But there may be times when your team wants to go beyond the “normal” and add something extra to your code. You may want to create a robot that can store information about the game field in an array for future use, or you may want to create a master program, also called a sequencer, to help your team switch between programs more quickly at an event.
Introducing more complex coding to your robot can add nice talking points when presenting your robot’s programs to technical judges. Be careful though. Don’t add unnecessary complexity just for the sake of making your programs complicated; doing so won’t impress the judges. But if you can effectively demonstrate why you wrote the code, and explain it proficiently, then the judges will enjoy seeing your more sophisticated programs.
An array is a collection of data normally referenced by an index value. To access the different values in an array, you reference the array definition and give it an index of the value you wish to read or write to. The concept is very common in most programming languages but not in NXT-G, so when there is the need for an array, you will have to simulate an array with a series of Variable blocks and a Switch block.
You may have a mission on your game field that requires the robot to act differently based on some field conditions, such as finding a ball and performing a particular action based on the color of that ball. In your array, you could store the actions needed based on the ball color. The ball color would become your array index and the action would be the value.
The example in Figure 11-1 shows a very simple ReadArray MyBlock that has four index values and contains a Text data type. For the code to work, there has to be four text Variables defined. If you need more values, then you will have to expand your Switch block and define extra Variable blocks as well.

Figure 11-1. Reading text values from a series of Variable blocks being used as an array by having a Switch block return values based on the index value
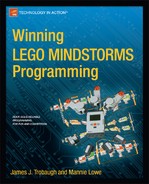
When used as shown in Figure 11-2, you simply pass in the index value of the data you wish to read and it is returned as the output of the My Block.
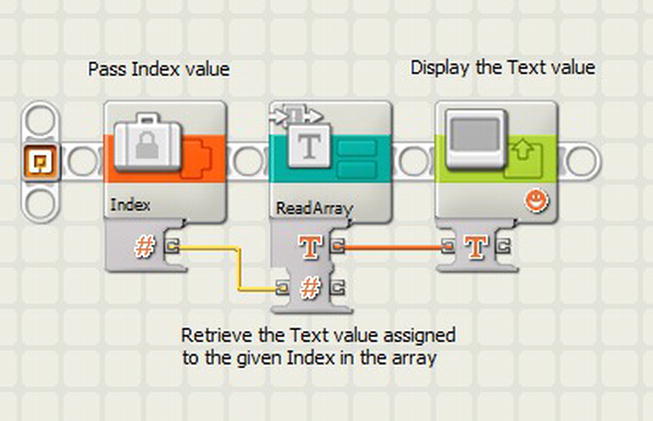
Figure 11-2. The ReadArray My Block used to display values on the NXT display screen based on the index value given
The concept would be very much the same for a WriteArray My Block. You would simply change the direction of the input and output values, as shown in Figure 11-3.

Figure 11-3. The WriteArray block takes in an index value and the text value assigned to the array in that index
With NXT-G, the ability to perform preemptive multitasking is desirable for a robot navigating a game field. Preemptive multitasking allows a robot to suspend one task while it focuses on another, and then return to the first task. For example, a robot might encounter an obstacle while navigating across the game field. You’ll want the robot to navigate around the obstacle, and then return to its primary task of moving to your target destination.
Preemptive multitasking isn’t built into the NXT-G language. But you can approximate it through the creative use of Switch blocks.
Let’s say your robot is on a mission to seek out and collect an object on the game field, but there is the possibility of an obstacle in the path. Furthermore, at the time you start the program, you do not know whether the obstacle is present. Thus, your robot must make a decision based on its sensor readings. Figure 11-4 illustrates a normal sequence—assuming there is nothing in the way of the robot.
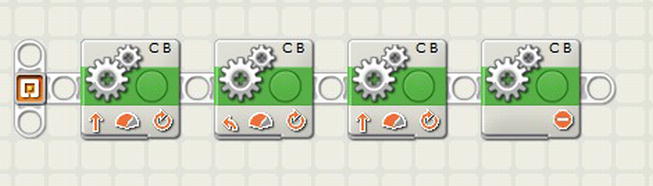
Figure 11-4. A simple program to allow the robot to move forward 8 inches and then turn right and travel 3 inches
What if your logic needs to change—or change “state”? How can you interrupt the current sequence? Here you take advantage of the Move block; one sequence beam can start a Move action while a second sequence beam can stop the Move block, thus giving you the ability to change state. A variable is added to keep track of the state the robot is currently in. To keep things simple, our example will only have four states: (1) move forward, (2) turn right, (3) turn left, and (4) stop. The Switch block in Figure 11-5 will decide which action needs to be taken, depending on the current value in the state Variable block. The state Variable block will also have the next state value set for the sequence.
Figure 11-5. A Switch block to control the actions of each state value. A value of (1) move forward, (2) turn right, (3) turn left, and (4) stop. The value starts out as a 1 to move forward and then cycles through each of the states
By adding a second sequence beam, the program can keep an eye out for obstacles in the path and change the state accordingly. In this example, the robot needs to turn left if it encounters anything in its way (state value = 3). In Figure 11-6, the logic is that if the Ultrasonic sensor detects an object, the robot stops its current task and changes its state to turn left. This is done by stopping the Move block and then setting the state Variable block to a value of 3.
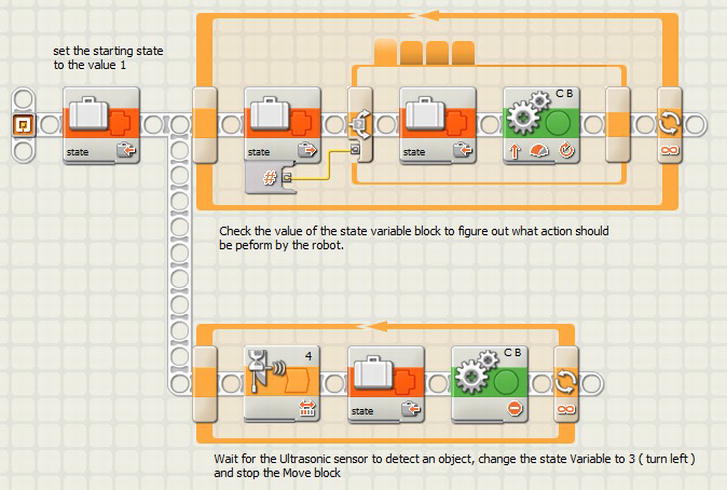
Figure 11-6. A second sequence beam to check the Ultrasonic sensor and change the robot’s state to 3 (turn left) if an obstacle is found
A winning robot is more than just a fancy robot chassis with some cool attachments. Your robot’s programs are essential to having a robot that performs well at a competition. Most teams develop a collection of programs to complete their missions. One of the biggest uses of time during a LEGO robotics event is the switching between each of these programs as the robot completes a mission. Even though the LEGO NXT brick provides a nice interface for switching between programs, it can be time-consuming to search through the list of programs and select the right one for the next mission.
To speed things up, the process of selecting the necessary program can be done with a master program, or sequencer. The concept is that you write each of the missions’ programs as subprograms, or My Blocks as they’re called in NXT-G. Then write a master program that will call each of the subprograms in the required order.
A simple master program cycles through the programs one after another. When each of the programs completes or a particular event has occurred—such as a pressed Touch sensor or other sensor event—then you can go to the other extreme and have a master program that not only advances automatically, but allows the user to navigate the list of programs and run a program out of order if needed. This idea builds upon data arrays—the subprograms are the values in the array sequenced by the State machine. Master programs can be simple or complicated—it just depends on what your team needs and wants to do.
I recommend having some form of a master program to help speed up the process for program selection; this can be a key factor in saving valuable time at an event. Also, having a master program can be one of the important programming items that judges look for during technical reviews. If you have developed a master program, be sure to point this out to your technical judges and be ready to explain how it works and why you have it.
For a master program to work, each of your mission programs needs to be saved as NXT-G My Blocks. My Blocks are really subprograms that can be accessed by other NXT-G programs. Don’t worry about turning your mission programs into My Blocks until you have the mission programs working as you desire. It’s much easier to debug and test the programs when they are still NXT-G programs. But even after a program is converted to a My Block, you are able to run it as an individual program for testing and debugging.
When writing your mission programs for a master program, it is important that they each have a defined start event and end event. The start event is simply the first action in the program—so that part is easy and already done. But a defined end is not always so easy. Many times, teams have their robot drive an unlimited amount of time and merely depend on a team remember to grab the robot when it crosses the base line and stop the program with the controls on the NXT.
You won’t have success when manual intervention is required. You do not want to press the Stop button on the NXT brick because doing so will actually stop your master program and not just the My Block that you’re currently running. Instead, your program should end with an event from a sensor or end when a particular duration is met, such as a particular number of motor rotations. This way, your program is not depending on someone to press the Stop button on the NXT brick to end the program’s execution.
A Touch sensor can be added to your robot so that once it is pressed, the program knows to stop. Figure 11-7 is an NXT-G program that runs a series of missions and then returns to base. Once the wall is detected, the program will know it has reached base and allow the program to stop. A program such as this makes a nice My Block.

Figure 11-7. NXT-G sample mission code
As noted in Chapter 3, adding a Motor Reset block to the beginning of each subprogram prevents the My Blocks from causing calculation issues with the NXT-G software tracking the rotations. Many times when you switch from various subprograms that all have code that relies on rotation calculations, the actual number of rotations can get out of sync—but again, the Motor Reset block can prevent this from happening.
The most common and easy-to-write master program is a simple sequence program. This master program will run the subprograms in a preprogrammed order. For most teams, this is a good start and meets the needs of the team. The drawbacks of such a program are when something has to change on the fly. Say, for example, you need to rerun a subprogram. If the master program has no way to navigate through the programs, then the user is forced to exit the master program and search for the subprogram using the standard NXT file menu system—thus costing valuable time.
Even though a simple master program has limitations, it’s a good place to start. Once the team has a good grasp of the purpose of such a program, they can continue to build onto it and add new features such as program navigation, display options, and program state memory. These concepts will be covered when advanced master programs are discussed later in the chapter.
A robot game that has a series of nine missions that the robot must complete in 2.5 minutes is a situation in which a master program is necessary. In our example, the team has written five programs that will complete all the missions. This means some of the programs will handle more than one mission. This is always a good thing and the first step in saving time. Whenever a team can combine missions into a single program, it is a more efficient use of time and resources.
The team has five programs that they will run in the same order each time they compete. The following is a list of the example programs that the team wants to run:
- Collect Scientist Minifigs
- Gather Core Sample and Stray Ball
- Deliver Simple Machine and Scientist Minifigs
- Deliver Car and Pallet of Power
- Go to Final Parking Place and Deliver Package
Note When naming your programs, it’s always a good idea to give them a name that describes what the program does. Names like Program1 or MyProgram don’t give the user an idea of what the program will actually do.
Looking at the program names in the list, you see that some of the programs have to be run in a particular order. For example, the program called “Collect Scientist Minifigs” needs to run before “Deliver Simple Machine and Scientist Minifigs” since we must first collect the Scientist Minifigs before we can deliver them. Other programs might not be dependent on previous programs, so their order is not as important. What is important is that you come up with an order and then practice running the robot in that order repeatedly. With each of these programs, the robot returns to base when completed. Any new attachments are then added and the next program is selected so that the robot can venture out again and attempt to complete the missions.
If you have worked with the NXT file menu system, you have learned that the NXT puts the loaded programs in FILO order (first in, last out). So as you load your programs into the NXT brick, the very first program you load will always be the very last program in the sequence as you navigate through the list of programs with the NXT file system navigation tools.
It is very time-consuming to flip through the programs each time the robot returns to base just to find the next program in your desired sequence. A simple sequencer program will resolve this issue and help the team quickly move forward during a competition.
One of the first things the team will need to do in our example is convert each of their programs into NXT-G My Blocks. To do this, make sure each program has a defined end point, as we discussed earlier. None of the programs should depend on the user pressing the Stop button on the NXT brick since this will not only stop the My Block program but will stop our master program as well.
To convert our programs into My Blocks, we simply select each program on the NXT-G programming screen. Make sure all the blocks and wires are selected. We don’t want to leave anything out. Then from the Edit menu, select Make a New My Block. Give your new My Block a name that will allow the user to understand what the My Block does without having to study the code. Ideally, a user should be able to read the name of the My Block to understand what the program does. My Blocks also allow the user to enter a brief description of the My Block. It is a good place for other users to better understand the code.
So now that we have the My Blocks for each of the programs created and we know the order we want to run them, we are ready to create a simple sequencer program to run the programs in order. In our NXT-G code, we will need a counter to keep track of where we are in the sequence of programs, and a Switch block to switch between each of the programs. Think about the State machine that you read about earlier in this chapter; this is the same concept. We will use the orange button on the top of the NXT brick as our trigger for switching between the programs. Every time the robot returns to base, one of the team members will simply press the orange button, increasing the counter in our master program by one. The Switch block will use the value of the counter to know which My Block to run next. This is much faster than a team member navigating the NXT file system to find the next desired program. It also eliminates the possibility of the user selecting the wrong program.
Looking at the Code
Let’s look at the code in Figure 11-8 in detail. At the start of our code, we set the counter to the value of 0. Even though we have five programs, they will be represented by the counter values 0 through 4. Since we are using a loop to rotate through the programs, we could use the counter value that is included with the Loop block, but as we build on the program, the Counter variable will become more useful.
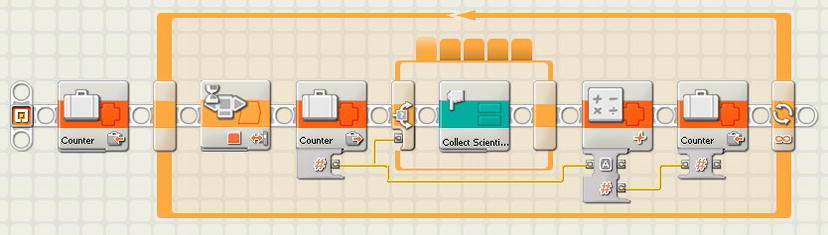
Figure 11-8. A simple sequencer master program
Once we enter the Loop block, the program stops at a Wait block until the orange button on the NXT brick is pressed. When this happens, the code moves to the Switch block. The Switch block is connected to our Counter variable, which executes whatever My Block we have associated with the counter sequence. Figure 11-5 shows that the My Block “Collect Scientist Minifigs” is the first tab on the Switch block. When the My Block in the Switch block is executed to completion, the Counter variable is incremented by 1 using the Math block. The new value is saved back into the Counter variable.
This program works as a master program in the simplest form. What can we do to improve it? First, it needs is some form of feedback that notifies the user which program is currently running. It also needs some kind of indication that the user has pressed the orange button. It is important that the user have feedback so that he knows what the robot is attempting to do next.
Figure 11-9 shows that a Sound block has been added after the Wait block so that when the orange button is pressed, a tone will sound to let the user know that the button press was received by the program. Before the Wait block, a Number to Text block was added to convert the value of the Counter to a text value so that it can be displayed on the NXT screen. This allows the users to know where they are in the sequence process.

Figure 11-9. A simple sequencer with feedback such as tones and displays
As you saw with our Simple Sequencer master program, the concept is very straightforward: run the program and then wait for the user to tell the master program to run the next program in the correct order. This is a big time-saver when trying to run a series of programs at a robotics competition. But what happens if you need to change things at the last minute? What if you need to rerun the same program before advancing to the next program?
Take the first program, Collect Scientist Minifigs, for example. Perhaps the robot missed collecting the minifigs and you need them for the second mission. You know if you run the program again, you might have a chance at collecting them, but your Simple Sequencer program has already advanced to the next program in your list. This is a case in which having advanced features such as program navigation in your program is helpful.
If we look at the code used for the Simple Sequencer master program, you see that the Counter variable is the value controlling which program is running. So if there was a way to change the value of the Counter variable in either forward or backward directions, we would have more control over which programs are run in what sequence. If we want to rerun the Collect Scientist Minifigs program, all we need to do is get the value of the Counter variable back to 0 since this program is the first in our sequence. In Figure 11-10, there is a new thread that has a Wait block. This Wait block is waiting for the Left Arrow button in the NXT brick to be bumped. Using Bumped instead of Pressed is important, because if we used Pressed, the value would decrement continuously until the button was released. When the left arrow is bumped, the value of the Counter variable is decremented by 1. In our example, this would put us back at 0, which is where we want to be to rerun the first program in our sequence.
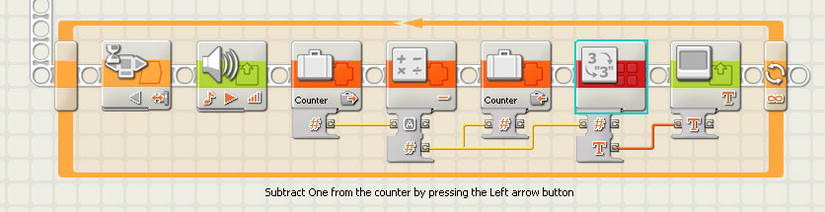
Figure 11-10. NXT-G code to navigate to previous programs in the sequence
There is also a new Display block and Number to Text block added so that the user can see which program in the sequence is next. If we build on this concept, we can add a third thread for the Right Arrow button to allow the user to increment the Counter variable and move forward in the sequence of programs. This would be useful if one of the programs needed to be skipped, for example. Figure 11-11 shows the addition of the third thread to include the Right Arrow button bump event.
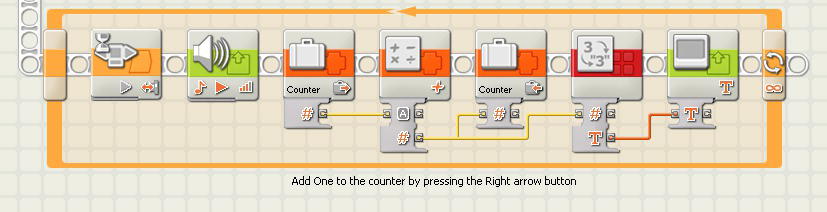
Figure 11-11. Navigation code to skip forward in the sequence
You might have noticed from the previous code samples that it wouldn’t take long before our Counter variable exceeds the number of programs in our sequence or goes to a negative number. It would be wise to add some code to prevent the Counter value from going below 0 or from going higher than the number of programs we will actually need to run in our sequencer.
We can add a new My Block to our code that will handle the math for us and not allow the value to go out of range. In our example, the sequence range is 0 through 4. We are currently using Math blocks to increment or decrement our Counter value. So all we need to do is create a new My Block called SequenceMath block. The code would look like Figure 11-12.
The logic for this new program is as follows:
- Input the current sequence value.
- Determine whether we are incrementing or decrementing the sequence value (True/False).
- Assign the current sequence value to the Sequence variable.
- If we are incrementing, then follow the True branch; otherwise, follow the False branch.
- In the True branch, add 1 to the Sequence variable.
- Check if the Sequence variable value is greater than the UpperLimit constant (a value of 4 in our example).
- If the Sequence value is greater than the UpperLimit, assign the LowerLimit to the value of the Sequence.
- In the False branch, subtract 1 from the Sequence variable.
- Check if the Sequence variable is less than the LowerLimit constant (a value of 0 in our example).
- If the Sequence value is less than the LowerLimit, assign the UpperLimit to the value of the Sequence.
- Output the Sequence variable value.

Figure 11-12. A NXT-G program to cause the sequence counter to roll over if it falls out of range
Follow the code in Figure 11-13 from the beginning. You’ll see that two input values are accepted: a number variable called Number 1 and a Logic variable called Increment. The Number 1 variable will be the current value of our Counter variable, and that value is saved in the SequenceNumber variable. The Increment variable tells the program if we want to increase or decrease the value of our SequenceNumber. The reason we assign the Number 1 variable to the Sequence variable is so that when we make it into a My Block, the Number 1 variable and the Increment variable will become input parameters for our new block.
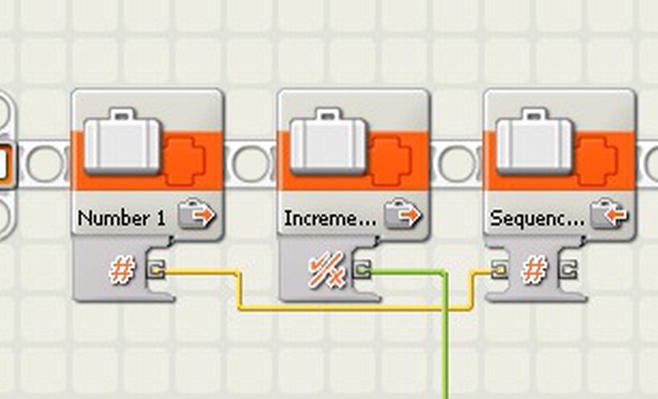
Figure 11-13. Setting up the input parameters
The Increment variable value is now passed to a Switch block in Figure 11-14. The True path will add 1 to the SequenceNumber value and the False path will subtract 1 from the SequenceNumber value.
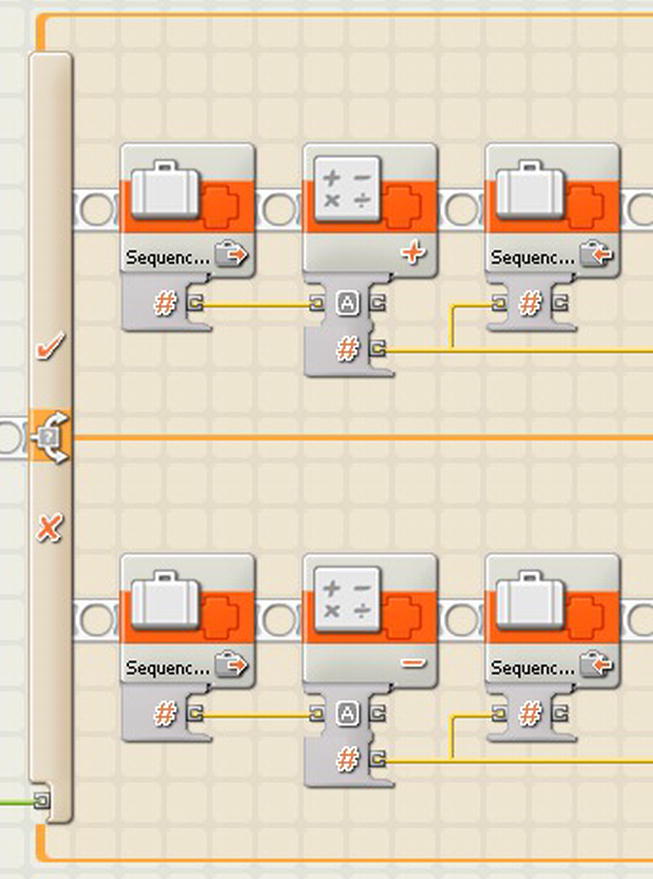
Figure 11-14. A Switch block to test if we need to add or subtract from the sequence value
After it has done the math on the SequenceNumber value, another Switch block will follow to see if you have exceeded our defined range of programs, as seen in Figure 11-15. This program has two constants defined: UpperLimit and LowerLimit. The UpperLimit is defined as 4 for our example and the LowerLimit is defined as 0. Remember, the range for our example is 0 through 4.
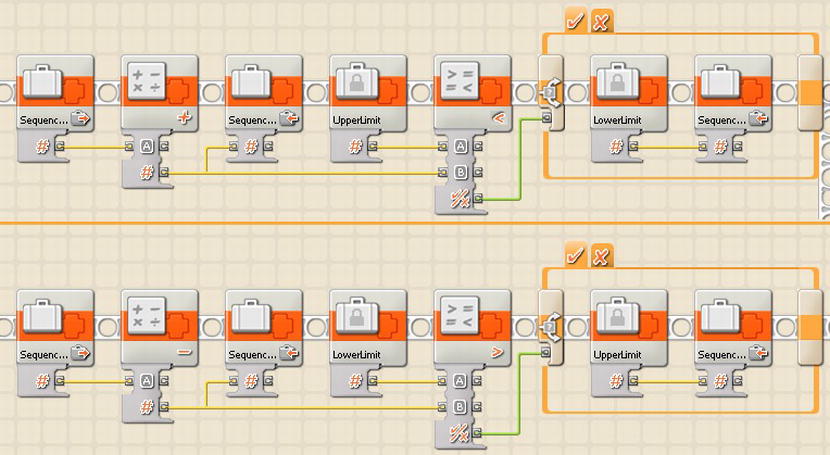
Figure 11-15. Checking the new value of the Sequence variable to see if it’s out of range of our upper and lower limits
If the Switch block finds that we have either exceeded the defined range or fallen under the range value, then it will simply reassign the SequenceNumber to the inverse limit value. For example, if our current SequenceNumber is 4 and then we add 1 to it, our SequenceNumber is now equal to 5. The value of 5 is outside the desired range, so we set the SequenceNumber to the LowerLimit of our range, 0. Now the SequenceNumber becomes 0. The opposite is true as well: if the SequenceNumber falls below the LowerLimit, the SequenceNumber will be reset to the UpperLimit of 4.
Now convert the program into a My Block called SequenceMath. The new My Block has two input parameters: Increment (True/False) and the Sequence In (Integer). There is also one output parameter named Sequence Out. The input parameters are seen in Figure 11-16.
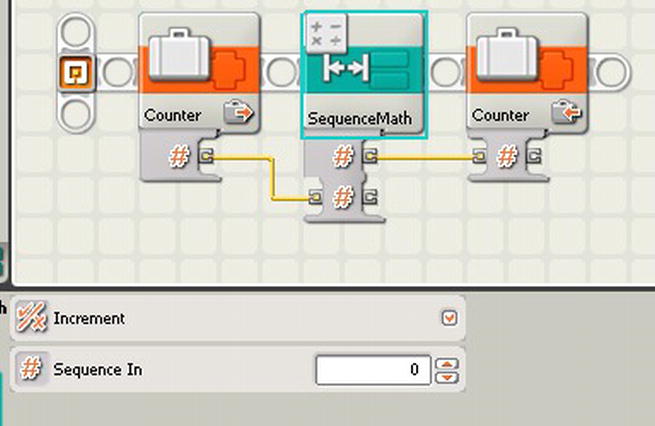
Figure 11-16. The SequenceMath My Block that was created from the code
Now we can replace the Math block in our current program with the new SequenceMath block. This will keep our program from placing our sequencer out of range. If the range changes for our programs, then all that you need to do is adjust the UpperLimit constant in the SequenceMath block. Figure 11-17 shows the revised master program with these changes in place.

Figure 11-17. Revised master program with the new SequenceMath block included
You may find that you don’t want the sequence to roll over when you get to the upper limit of your range. You may prefer that it just simply stop incrementing. To prevent incrementing beyond the limit, you simply assign the value of the UpperLimit constant to your sequence when you reach the limit. That way, any attempt to exceed the limit causes the limit to be reassigned to the variable.
The previous two versions of the sequencer will make great starting points for master programs. With very little effort, your team should be able to quickly add some nice user messages to the interface and perform well at any robotics event. If you want to add a little extra to your program, you could do something even more advanced.
Thus far, the master program, Better Sequencer, displays the program sequence number on the NXT screen. This is great if you have memorized the order of your programs and know that when you see 0 on the screen, it refers to the My Block named Collect Scientist Minifigs. But what if not everyone on your team is aware of this? Or what if you need to change the sequence and one of your team members forgets that 0 now equals the Deliver Car and Pallet of Power program? Sequence numbers can be confusing to people. When you’re running a robot under a high-pressure time frame, you want to make things as easy as possible.
The master program will be much more user-friendly if we add a method that displays the program name instead of the program sequence number. You will notice that in each of the code loops shown in Figure 11-17, there is a Number to Text block used to convert the integer value of the sequence to a text value so that we can display the value on the NXT screen. What if we changed our code to execute a block that converts the sequence number to a string value that displays the name of the program that is about to run?
In Figure 11-18, you see such a program. You might recognize this as the data array from earlier in the chapter. The variable called Sequence is passed into a Switch block that is very similar to the Switch block we have in the master program, but instead of having a My Block for each of our programs inside it, there is a Text variable. Each sequence value will write a text value to the Text 1 variable. This text value is hard-coded so that if the order of the programs is changed, then this Switch block will have to be changed—just like the Switch block in the master program. The nice thing is that when we turn this program into a My Block, you only have to make the change to the code once—and it will update all locations in the master program that the My Block is used.
The final step in the program is to write the value of the variable Text 1 to the text variable Program Name. The reason that this step is done this way versus hard-coding the value into the text variable Program Name will become a bit more obvious when we convert the program into our new My Block.
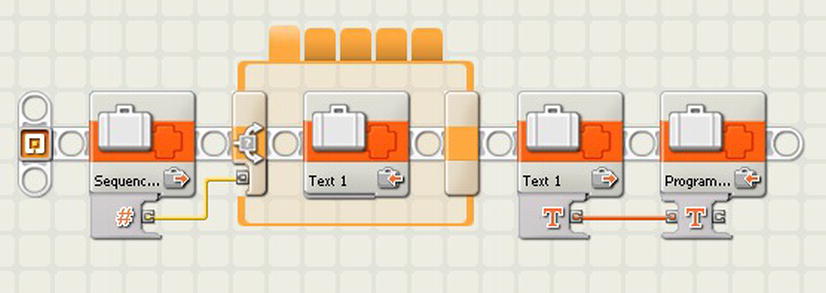
Figure 11-18. An NXT-G program to retrieve the program name associated with the given sequence number
We have this nice little program and we want to make it into a handy Sequence to Program Name My Block. To do this right, we select all the blocks between the first variable block and the last variable block. In doing so, don’t include the first and last block. Select the blocks as shown in Figure 11-19. By doing this, the new My Block will have an input parameter and an output parameter, as seen in Figure 11-20.
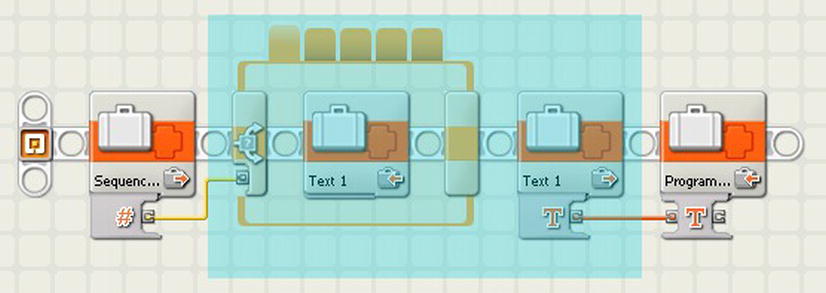
Figure 11-19. Code selection when making the new Sequence to Program Name My Block

Figure 11-20. The Sequence to Program Name My Block
Now that we have our new Sequence to Program Name block, we can go back into our master program and replace the Number to Text blocks with our new block. Figure 11-21 shows what this would look like. The new block would be used in three places in our current master program.
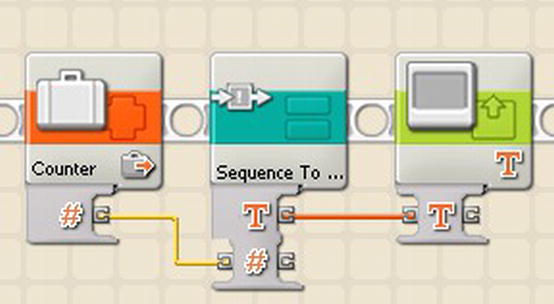
Figure 11-21. The Sequence to Program Name My Block in use
Our master program is getting pretty advanced. It keeps our programs in order, has smooth navigation features, and even displays the program we’re running (or are about to run).
What happens, though, if the master program gets accidentally shut off? When you start it up again, the sequence will start at the beginning. This isn’t much of a crisis since you can simply use the navigation buttons to move to the program that you want to run next. But what if, in all the confusion, you forget which program is next? Wouldn’t it be nice if the NXT could remember where it was in the sequence before the master program stopped?
The solution is to save the current state whenever it changes. To do that, we can keep a file on the NXT that stores the value of the current sequence order. So every time we change the sequence order, we update the file by writing the new value to it. Then, every time the master program starts up, it can read this file and remember where it was last.
Figure 11-22 shows sample NXT-G code that will read from a file when the program starts and pass the numeric value into our Number 1 variable. If the file does not exist on the system, then the value of 0 is placed in the Number 1 variable. This program will be available for download to help readability.

Figure 11-22. Sample NXT-G code for saving the state of a counter value
Now the code will loop continually, waiting for the NXT orange button press. This looping is similar to our sequencer code examples. Each time the NXT orange button is pressed, the variable Number 1 is incremented by 1. Then the file in which we are saving our state value is deleted so that we can re-create the file by writing the new value to the file. Before the loop starts over, we close the file. The reading, writing, deleting, and closing are all done with the NXT File Access block.
Adding logic such as this to the master program does not require much effort. It might not be necessary to do, but if you find yourself needing to save the state of your sequence, then a process such as this will work well.
Summary
A master program is not a requirement for any team, but most winning teams at the higher levels have some type of master program. It not only gives a team an advantage time-wise, it shows the technical judges that the team understands advanced programming concepts. So if you use such a program, be sure you understand why you’re using it and how it works.
The examples I have shown in this chapter are strictly examples to get you started. There are many different ways to build successful master programs, so don’t limit yourself to the ideas given in this chapter. All the examples can be expanded on and built into full-function sequencers with lots of user-friendly messages and quick-use instructions.