
Many times, you will want your NXT-G program to remember various values and conditions. These values are stored as data in your NXT and can be shared within your programs among the different blocks. This data can be intimidating to transfer, but with some practice, you will find that it’s not as difficult as it may seem.
Data wires give you the ability to transfer data between program blocks programmatically. You have seen that most blocks have a set of parameters that you can set or modify in the Properties panel. With data wires, however, you can access and change these values while the program is running (based on factors such as sensor readings or calculations). Many new programmers find data wires intimidating when first learning to program NXT-G programs, but by mastering the use of the data wires, you will find that your programs can become much more robust and effective.
Data wires send information from one data plug to another. Data plugs are located on the data hub of a block. When you click the bottom left of a block, the data hub will open to reveal the available data plugs used by that block, as seen in Figure 5-1. This is a toggle method, so clicking again will hide the block’s data hub. Figure 5-2, from the NXT-G Help file, shows how each different data type is represented as a data wire.

Figure 5-1. Expansion of the Display block’s data hubs
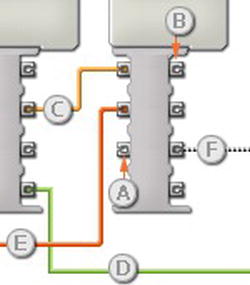
Figure 5-2. (A) Input data plug, (B) Output data plug, (C) Number (yellow), (D) Logic (green), (E) Text (orange), (F) Broken (gray)
For each property of a block, there will most likely be a data plug to represent it on the block’s data hub. If a value has been entered for a block in the Properties panel, the data wire value will override that value.
Data wires can carry three different data types: Number (yellow), Text (orange), and Logic (green). If a wire is broken or connected to an improper data type, the wire will be displayed as a dotted gray wire.
By simply clicking a “broken” data wire, the Help panel reveals the issue that is causing the wire to be reported as improper, as seen in Figure 5-3.
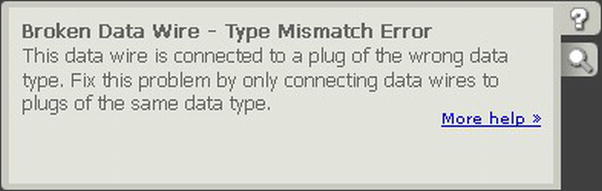
Figure 5-3. A broken data-wire message in the Help panel
To connect a wire, simply click the output data plug of the desired value. The cursor will change to look like a small spool of string (see Figure 5-4).
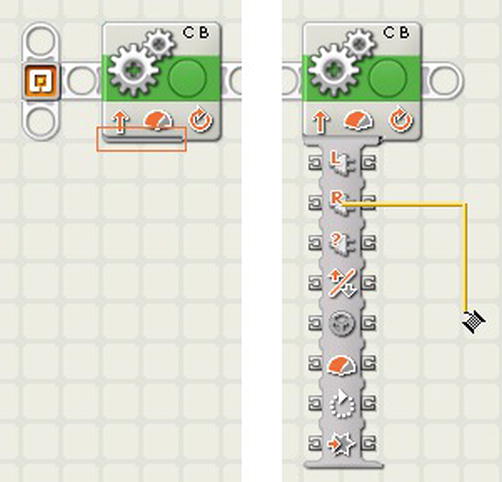
Figure 5-4. Data wire “spool” icon when dragging off a data hub
Now drag the wire to the input data hub of where you wish to connect the data wire. The data wires may seem a bit cluttered at first, but by simply closing and reopening a data hub, the autoalignment feature in the NXT-G will route the data wires so that they are more readable.
Tip If you just drag the destination to the source (or vice versa), the NXT-G will reformat the data wires around the other blocks for you. Don’t be surprised if the data wire comes from somewhere other than where you started it. If the data is shared among different blocks, the data wire may be rerouted from the shared block instead of the original block you chose.
Data wires can be removed simply by clicking them and pressing the Delete key. Also, when a block that has data wires connected to it is removed, the wires are removed as well. If you click the destination data plug, the connected wire is deleted as well.
As more advanced topics are covered in the following chapters, you will see the important role that data wires play in these programs.
Often in your programs, you will need to store a value of some type. The Variable block will allow you to do this; it gives you the ability to store a value to be used later in your program. Variables are commonly used for counters with number values for keeping track of whether things are on or off by using logic values.
The program in Figure 5-5 shows a simple program that will count the number of times a Touch sensor is pressed. The count value is stored in a Variable block called BtnCount. The steps for creating this program are explained in the section to follow.
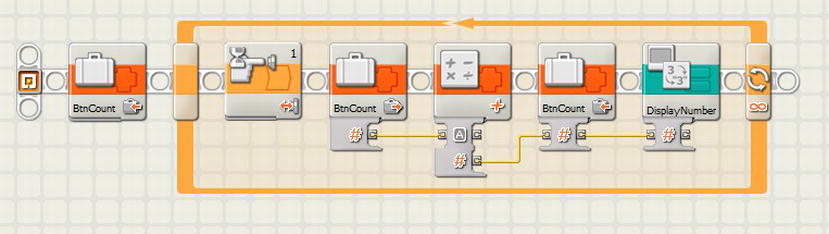
Figure 5-5. A simple program that counts the number of times the Touch sensor was pressed
Think of the Variable block as a storage box, or as the icons in Figure 5-5 show, a little suitcase to hold your data values until you need to access them again. You can simply store the data by “writing” a value into the Variable block, and then later you can retrieve it by “reading” it so that you can evaluate the data.
Before you can make use of the Variable block, you will have to define the variables that will be used in your program. Selecting “Define Variables” from the Edit menu opens the Edit Variables dialog box (see Figure 5-6).
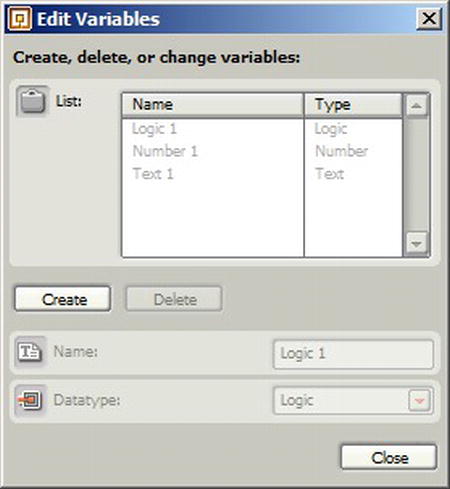
Figure 5-6. Edit Variables dialog box
You will have the ability to create new variables, name them, and define the data type that the variable will use. For example, to create a new variable for storing a counter of the number of times a Touch sensor was pressed, you start at the Edit Variables dialog box and then select the Create button. A new variable name will appear in the list of variables, as seen in Figure 5-7.
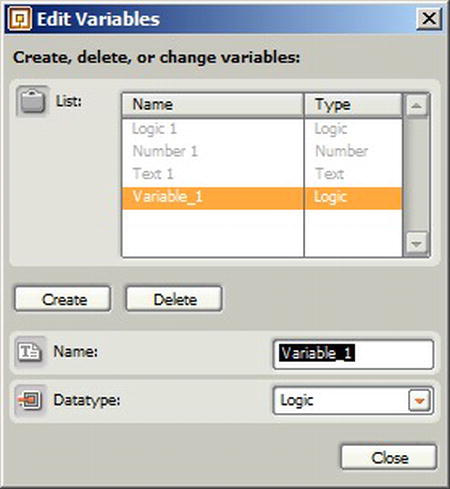
Figure 5-7. Creating a new variable
You can now give the variable a name and define the type of data that will be stored in this variable. There are three data types to choose from: Logic, Number, and Text (see Figure 5-8).

Figure 5-8. Variable data types
Note When naming a variable, select a name that makes it clear what kind of data the variable is going to store. Also keep in mind the length of your name: if it’s too long, it will be truncated and unreadable on the Variable block.
Besides being able to create new variables, the Edit Variables dialog box allows you to change an existing variable name or type. If you change the name, it is changed everywhere the variable is used in your program. The same thing is true for the data type. Be careful, however, because if you have a Variable block wired to another block, and then change the data type of the variable, the wire will become broken and cause your program to not compile (see Figure 5-9).

Figure 5-9. Broken wire after data type change
You can also delete a variable with the Edit Variables dialog box. If you try to delete a variable that is currently being used by a Variable block in your code, a warning message will appear, as shown in Figure 5-10.
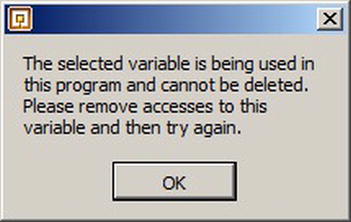
Figure 5-10. Variable-in-use warning message
Once you have a variable defined, you can reference it with the Variable block that is found on the Advance palette ![]() it looks like a little suitcase. When you add the Variable block to your sequence beam, the drop-down box lets you select the variable that will be used by the block. Also, the Variable block has two actions to choose from: Read or Write (see Figure 5-11).
it looks like a little suitcase. When you add the Variable block to your sequence beam, the drop-down box lets you select the variable that will be used by the block. Also, the Variable block has two actions to choose from: Read or Write (see Figure 5-11).
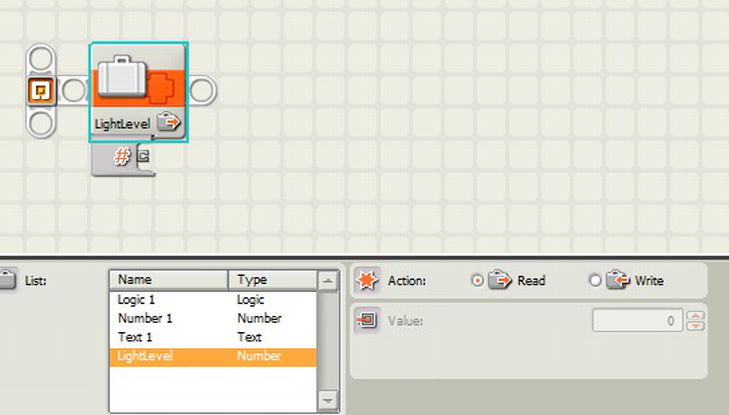
Figure 5-11. Variable block actions
In the next example, you will create a simple program that uses a number variable called Counter, which will keep track of the number of times the Touch sensor was pressed and display that value on the NXT screen.
Start a new program and call it Counter. Next, open the Edit Variable dialog box and create the new variable. Select the Create button and enter BtnCount as the variable and Number as the data type (see Figure 5-12).
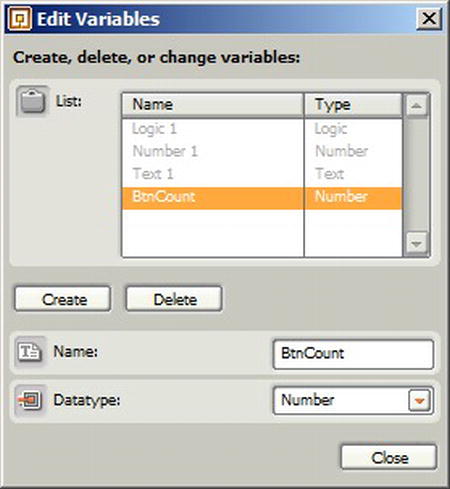
Figure 5-12. The Edit Variables dialog box for creating a new variable
From the Data palette, add a Variable block that uses the new BtnCount variable to the beginning of your sequence beam. Set the action to “Write” and the value to 0. It is assumed that any new variable is set to 0 already, but it is a safe practice to initialize the value at the beginning of your programs. This ensures the values start out as expected (see Figure 5-13).

Figure 5-13. Initializing the variable value at the start of the sequence
Next, add a Loop block next in the sequence beam. Inside the loop, add a Wait block with the control set to “Sensor,” the sensor set to “Touch Sensor,” and the action set to “Bumped,” as seen in Figure 5-14.
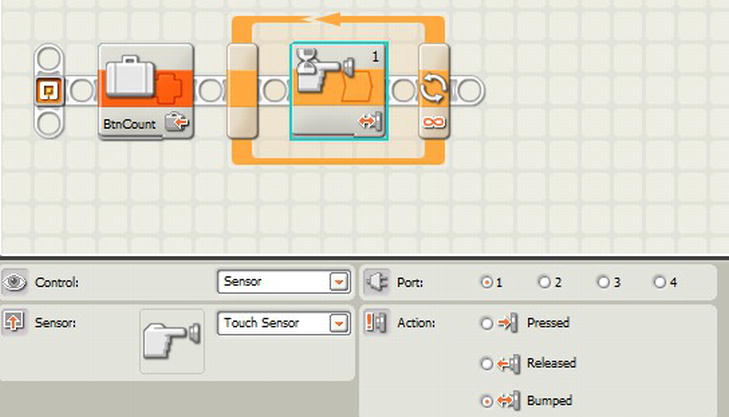
Figure 5-14. Touch sensor Wait inside the Loop
After the Wait block, add another Variable block that uses the BtnCount variable and the action set to “Read.” Follow that with a Math block found on the Data palette. The operation is set to “Addition” and the B value is set to 1 (see Figure 5-15).
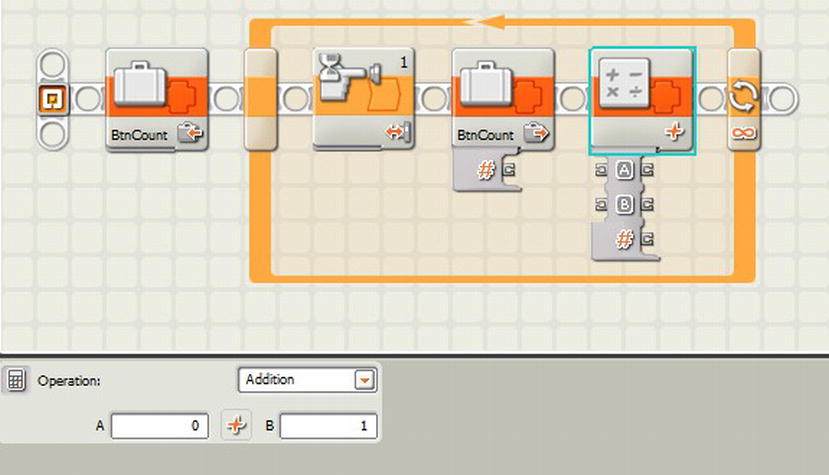
Figure 5-15. Math block added to the code
Include another copy of the Variable block, again set to the BtnCount variable and the action set to “Write.” Wire the number output from the Variable block into the A input of the Math block, and then the number output of the Math block into the preceding Variable block. You are bringing in the current value of the BtnCount to the Math block, adding 1 to it, and then writing that new value back into the variable each time the Touch sensor is pressed and released (see Figure 5-16).

Figure 5-16. Touch counter code sequence
If you add the DisplayNumber My Block that was created in the previous chapter, you can see the value that is stored in the BtnCount variable, as see in Figure 5-17. When this program is run, it will now display the number of times the Touch sensor has been pressed on the NXT screen. You could even add a Sound block if you want a tone to play each time.

Figure 5-17. DisplayNumber My Block added to the sample program
This program might not seem very useful as it is, but think about it in a bigger program, like one in which your robot needs to keep track of the number of times it has bumped into a wall or items on the game field. Or instead of a Touch sensor, it could be counting the number of times it sees a certain color with the Light sensor. The idea is that by using the Variable block, your robot can keep track of certain data, thus allowing it to make smart decisions based on things it has learned and observed from its environment. A robot that can learn as it performs a task can be very helpful in events such as FLL.
The scope of data refers to the context within a program in which data is valid and can be used. Most of the time, a variable definition is local to your current program, but if your program includes a My Block that contains a variable with the same name in the main program, it will be treated as the same variable, thus allowing the value to be shared among multiple programs.
If you make a My Block out of the incrementing part of our recent Counter program, for example, the BtnCount variable will be shared between the two programs. Remove the wire between the last Variable block and the DisplayNumber My Block, and select the three blocks that make up the actual counting of the program, as seen in Figure 5-18.

Figure 5-18. Select the counting logic
Create a My Block called Increment. Your code should now look like Figure 5-19.
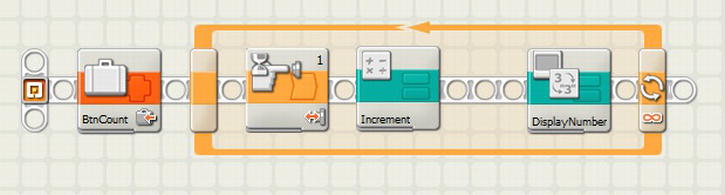
Figure 5-19. New Increment My Block
Add a Variable block that uses the BtnCount variable after the newly created Increment block, and connect the output to the DisplayNumber block (see Figure 5-20).

Figure 5-20. Wiring up the Increment My Block
If you run the program, you will see that you get the same results as you did prior to the My Block being added. This means that the BtnCount variable has global scope to the program. By opening the Increment My Block, you can see the BtnCount variable in place (see Figure 5-21).
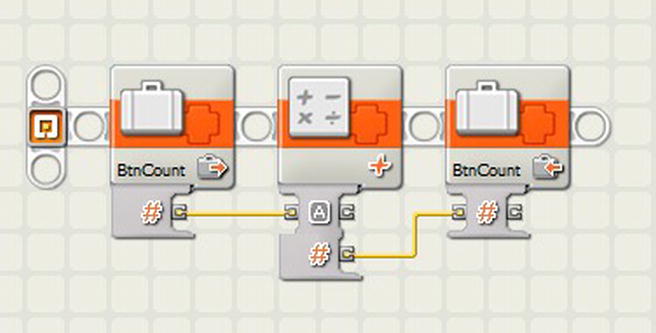
Figure 5-21. Increment My Block code
There are times when the values of your variables don’t change. If you use variables for settings, these values will most likely remain consistent throughout the running of your program. Variables that don’t change values are called constants. NXT-G 2.0 supports constants with the addition of the Constant block, which works similar to a Variable block but it doesn’t have a “write” action, only the ability to be “read.”
An interesting thing about constants in NXT-G is that when you define a new constant in the Edit Constants dialog box, the constant is available for any programs created on that computer. This is similar to My Blocks. For example, you have a constant called “WheelInch” that defines the number of rotations needed to turn your robot’s wheels one inch forward. Every program that you write for your robot can reuse this constant when you need to move the robot forward a particular distance. If you decide to change the wheel size on your robot, the WheelInch value will need to change to hold the corrected number of degrees to move the robot forward an inch. The great thing is that if you change the defined value, the value will be changed in all the programs that reference this constant—and you don’t have to search through all your programs to make the change in various places.
Note For the value of a changed constant to be recognized, you have to open the referencing program and resave it. Also, unlike a variable, if you change the name of an existing constant, the name change will not be reflected by any program that references that constant.
Defining a Constant
To write a sample program that makes use of a constant, start by creating a new program. From the Edit menu, select Define Constants. This will cause the Edit Constants dialog box to appear.
Just as in the Edit Variables dialog box, you will have a list of defined constants and Create, Edit, and Delete buttons. Select the Create button, and then input WheelInch as the Name, Number as the data type, and 2.6 as the value. The dialog box should look like Figure 5-22.
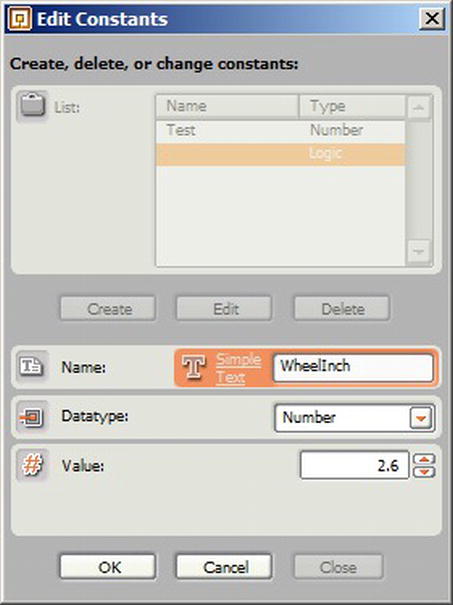
Figure 5-22. Edit Constants dialog box
Now add a Constant block from the Data palette. It will look like a suitcase with a padlock on it. In the Constant block properties, set the action to “Choose from list” and select the WheelInch constant in the list (see Figure 5-23).
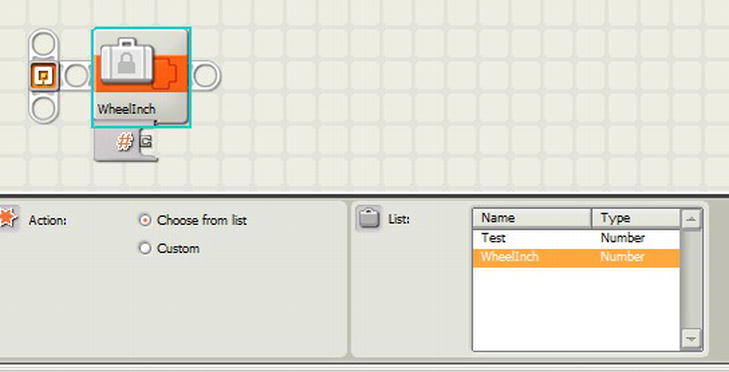
Figure 5-23. Constant block icon
Add a Math block afterward, followed by a Move block. The Math block should have its operation set to “Multiplication” and the B value set to 3. Wire the number output of the Constant block to the A input of the Math block, and then the number output of the Math block to the Duration property of the Move block. Figure 5-24 shows how things look when done.

Figure 5-24. Sample program to move forward three inches
If you follow the logic of this code, it will take the value saved in the 2.6 constant (the number of rotations needed to move the robot one inch), then multiply it by 3, and pass that value to the Move block. This will make the robot move forward three inches. Later, if the diameter of the robot’s wheels is changed, you only have to change the value of the WheelInch constant to match the number of rotations needed to move one inch. Recompile this program. The robot should move forward by the desired distance without any code having to be changed.
The Constant block properties have two actions: “Choose from list” and “Custom”. The Custom action allows you to define a constant locally within your program. When the custom action is selected, the properties of the Constant block will allow you to define the name, type, and value of the constant without having to use the Edit Constants dialog box. Be aware that constants defined this way are not available to other programs; the definition stays local within your program.
Note In the Edit Constants dialog box, if you create a new constant that has the same name as one defined with the custom action in a Constant block, the newly defined constant will override the value in the custom-action Constant block.
Also, if you delete a defined constant from the Edit Constants dialog box, any references to that constant will be replaced with a custom-action Constant block. Or if you transfer an NXT-G program from one computer to another, and the definition for a constant is not present on the new computer, it will be converted to a custom-action Constant block as well.
For example, let’s say Laura has a program that she has written on her computer and she gives the program to Lee. If Laura’s program has a Constant block that references a constant called LightLimit, but Lee’s computer does not contain the same definition, the Constant block will be converted to a custom action instead of a reference to the constant. The values, type, and name will remain the same however (see Figures 5-25 and 5-26).
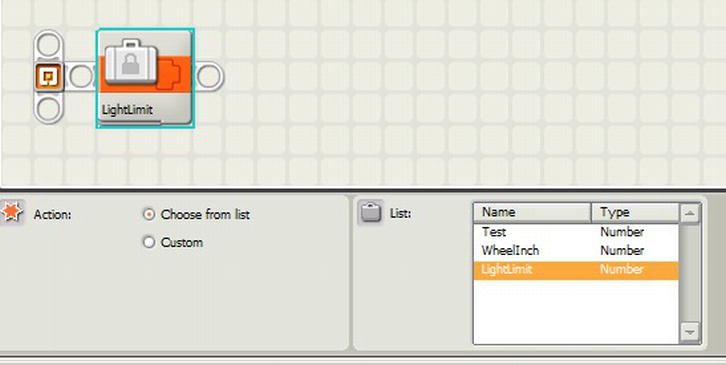
Figure 5-25. Constant block with defined constant

Figure 5-26. Constant block with custom action
Summary
Giving your program the ability to adjust and think for itself is critical to making a smart and winning program. Transferring and saving data throughout the program is the first step in writing “smarter” programs for your robots.
In future chapters, this concept will help your robot’s program investigate and adapt to its environment, giving it an edge over programs that contain hard-coded values and that do not have the flexibility to think for themselves.