
The NXT-G software comes with a large variety of useful blocks to help you build your programs, but it also includes the ability for you to create your own custom blocks, called “My Blocks.” My Blocks contain collections of NXT-G software blocks that create subprograms or functions that you can reuse within other NXT-G software programs. The Common and Complete palettes contain the predefined NXT-G software blocks; the Custom palette is where My Blocks are accessed. In Figure 3-1, the blue block is the My Block that is included in the sequence.
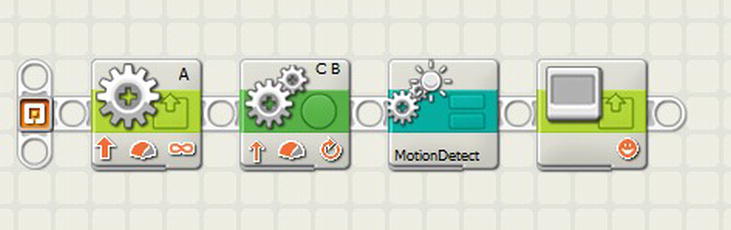
Figure 3-1. My Blocks are easy to spot in a sequence—they are colored blue
There are multiple reasons to make use of My Blocks in your programs. The first is the re-usability of common code. If you have a sequence of blocks that you find yourself using over and over in your programs, you can create a My Block that contains the common sequence. Then you simply add the My Block to your program whenever you need that particular sequence of blocks. Second, there is a limited amount of memory available on your LEGO MINDSTORMS NXT brick, so anything that helps you use less memory is helpful. Using My Blocks allows you to reuse code without requiring extra memory because the My Block uses only one location of memory no matter how many times you reference it. Last, My Blocks allow you to break up larger programs into smaller, more manageable pieces of code. When programs grow large, it can be hard to keep track of the logic, so when you group the different parts of logic into My Blocks, the code not only becomes easier to understand but it also can be much simpler to manage and debug. Even if you don’t plan on reusing the My Blocks in other programs, they offer a good way to keep your large NXT-G programs organized.
Let’s work on creating a My Block called “DelaySequence” that plays a tone, displays an hourglass icon, and waits for four seconds. Creating this sequence will require only four NXT-G software blocks. The block can be used over and over to cause a program to pause for four seconds before continuing to process the program sequence.
To start out, put together an NXT-G program that includes the blocks that will be included in the DelaySequence My Block. In Figure 3-2, you can see the blocks that will make up the DelaySequence block highlighted in blue. Your program can contain other blocks as well, but only the highlighted blocks will be part of the new My Block.
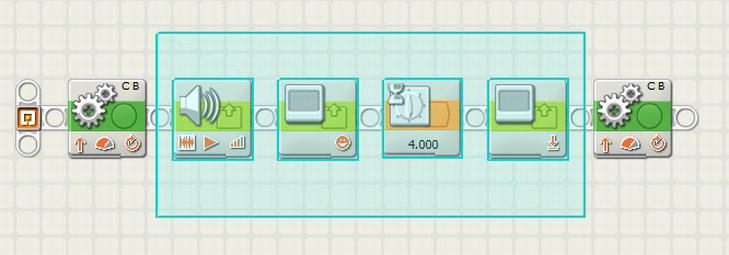
Figure 3-2. Highlighted blocks will make up the new My Block
Before the My Block is created, the code should be tested “as is” to confirm that it works as desired. It is much easier to test My Block code sequences when they’re still in their native code sequence. In the code sequence, notice that the blocks highlighted are:
- A Sound block to play an alert tone
- A Display block that will show an hourglass on the NXT screen
- A Wait block that will pause the program for four seconds
- And finally, another Display block to clear the hourglass off display screen.
If you run the complete program seen in Figure 3-3, you will notice that the B and C motors run forward for five rotations, then wait for four seconds, and then run backward for five rotations. Once you are satisfied with how the program performs, you’re ready to create the DelaySequence My Block.
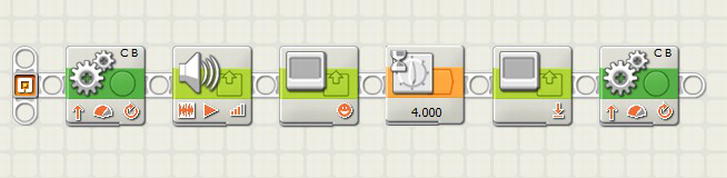
Figure 3-3. NXT-G code without a My Block
Start out by highlighting the blocks you want to include in the new My Block and then select the Create My Block button on the toolbar (Figure 3-4) or select “Make A New My Block” under the Edit menu item. The My Block Builder dialog box will launch with the four blocks you selected inside, as seen in Figure 3-5.
The highlights in Figure 3-4 are a tad difficult to see in black and white. You will see them on screen as cyan-colored borders surrounding each of the four blocks.
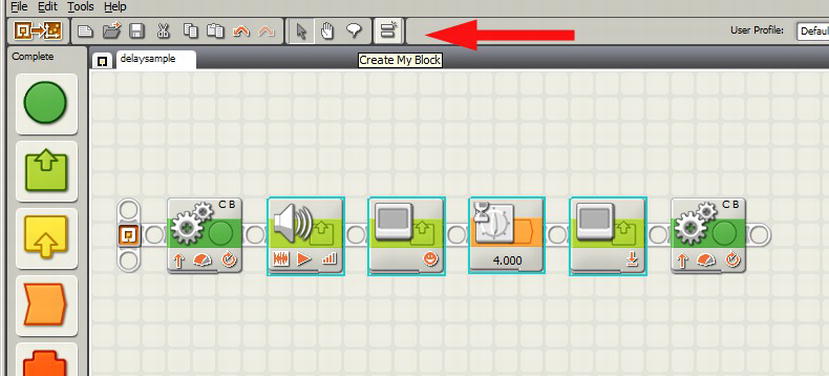
Figure 3-4. Selected blocks to make new My Block. Notice the cyan borders around the selected blocks
Try to give the block a name that describes its functionality to make it easier for others to know what the My Block does. We will name the new block DelaySequence. Don’t make the name too long; even though the text box will allow long names, only the first 13 characters will be displayed on the My Block icon. The Description box gives you room to enter longer explanations of what the block does and how it will work.
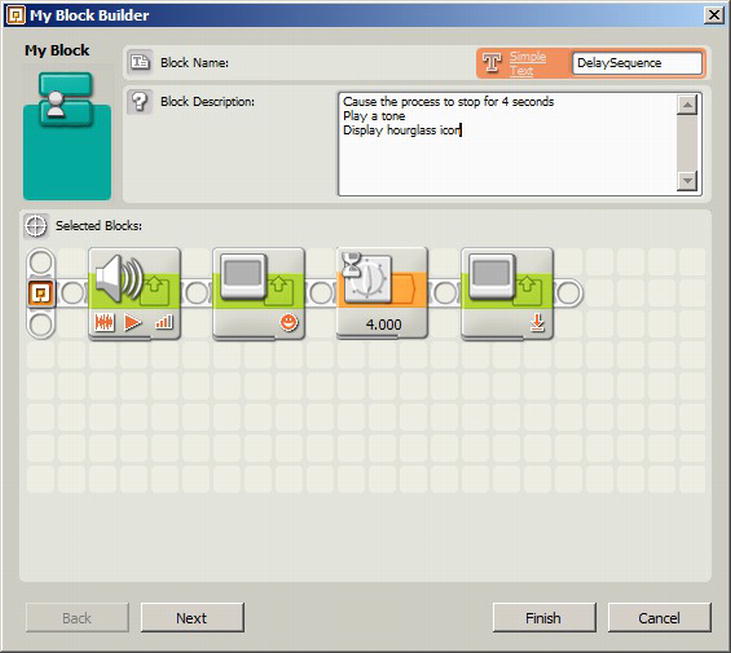
Figure 3-5. Create My Block Builder dialog
When you select the “Next” button in the My Block Builder dialog, you will select an icon to represent your new My Block. If no icon is selected, the generic My Block icon will be used. On the icon-selection screen, you can pick any of the icons and drag them into the icon editor display. Multiple icon graphics can be selected and combined in the icon editor. Also, you can resize the icon image by selecting the little black squares that show up when you select the icon. In Figure 3-6, you can see that a custom icon has been created by adding the StopWatch, Music Note, and Play arrow icons.

Figure 3-6. My Block icon builder
Press the “Finish” button and your new My Block, DelaySequence, has been created. Notice that your code now has the original four blocks replaced with the newly created My Block, as seen in Figure 3-7.
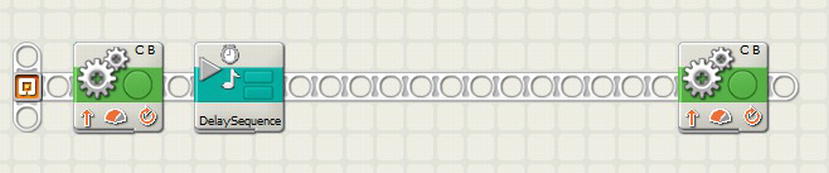
Figure 3-7. Code now including the new DelaySequence My Block
You may have some extra empty space on your sequence beam where the original blocks were located. By placing your cursor on the sequence beam and holding it down, you can drag the beam to the left to remove the empty space,as seen in Figure 3-8.

Figure 3-8. Sequence tighten up with extra space removed
The blocks you used to create the new DelaySequence block are no longer visible in your program, but they are not gone. In order to view and edit the code inside of a My Block, simply double click on the block or highlight the block and select “Edit Selected My Block” from the Edit menu. This will cause a new tab to open on the workspace that will include the code sequence that is defined in the My Block. You will notice that the code tab has an icon with two blue bars that indicate that this tab represents code inside of a My Block versus a regular program. Figure 3-9 shows the DelaySequence My Block opened in the workspace.
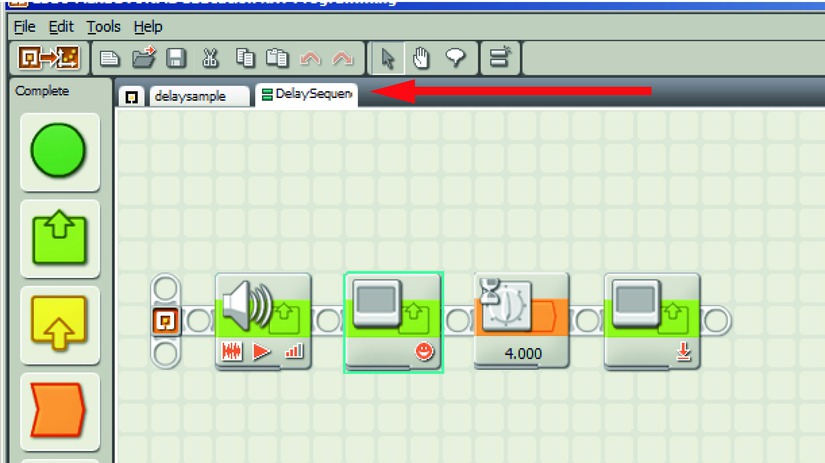
Figure 3-9. Delay sequence opened in the workspace
You can change the code blocks in the My Block workspace just as you do with any other NXT-G program. Remember, though, that any changes you make will affect all instances of the DelaySequence My Block, so be aware of everywhere you make use of this My Block and think of the consequences such use will have. This also has the advantage of the change being reused in other programs. For example, say you have a special My Block written for controlling the navigation of your robot by controlling the rotation of the motors. When you originally wrote this My Block, you were using 3-inch-diameter wheels. Now you change those wheels to ones with a 2.5-inch-diameter. By changing the necessary values in the navigation My Block, all of your programs that use the My Block will pick up this change next time they are compiled and reloaded to the NXT.
Note All programs that use the My Block must be recompiled and loaded into the NXT for the change to be used by existing code.
You only had to change the code once, but it corrects the value in multiple programs. This can be very important at robot competitions, where you will have multiple programs being used on your robot for the day’s event. It allows for quick changes with a minimum amount of work and risk.
MY BLOCK SAVES THE DAY
At one event, a team I was coaching realized that the placement of an Ultrasonic sensor on its robot was interfering with an attachment included on the robot. The team needed to move the Ultrasonic to a different location on the robot’s chassis. By doing this, the distance values being used in its programs were going to be wrong because the sensor was now about an inch further back from the front of the robot chassis.
The nice thing was that the code used to read the Ultrasonic sensor’s values was condensed into a single My Block and reused throughout the various programs the team was using. By changing the distance values in the My Block, the team could simply recompile all the programs that used this My Block and quickly get back on track with little risk or effort.
Now that you have created this DelaySequence My Block, how do you take advantage of it in your programs? You will be able to use this new block just as you do any other blocks in the NXT-G software. If you go to the Custom palette, select the My Block palette, and expand I,t you will now see the new My Block you created (Figure 3-10).
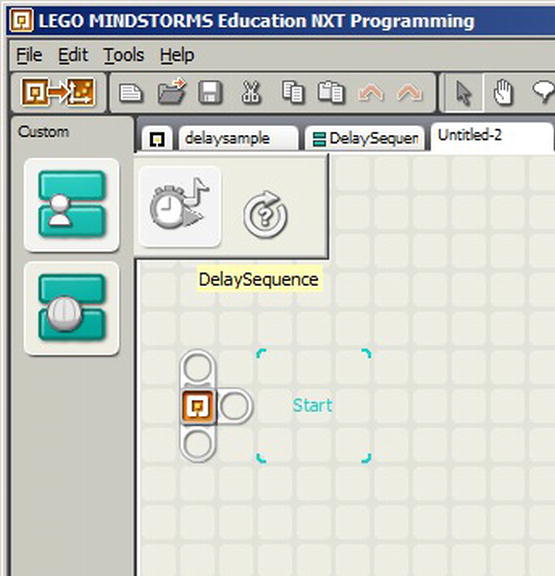
Figure 3-10. Custom My Block palette
To use it, simply drag the My Block to your sequence bar just as if it were a normal block. It can be added multiple times if you want to create more than one delay within your code, as in Figure 3-11.

Figure 3-11. Code sequence using multiple My Blocks
You will notice that many of the blocks that come with the NXT-G software have property values, or inputs, that show up in the Property panel when selected, as seen with the Motor block in Figure 3-12. Properties can be added to My Blocks as well to make them more flexible and useful in diverse situations.
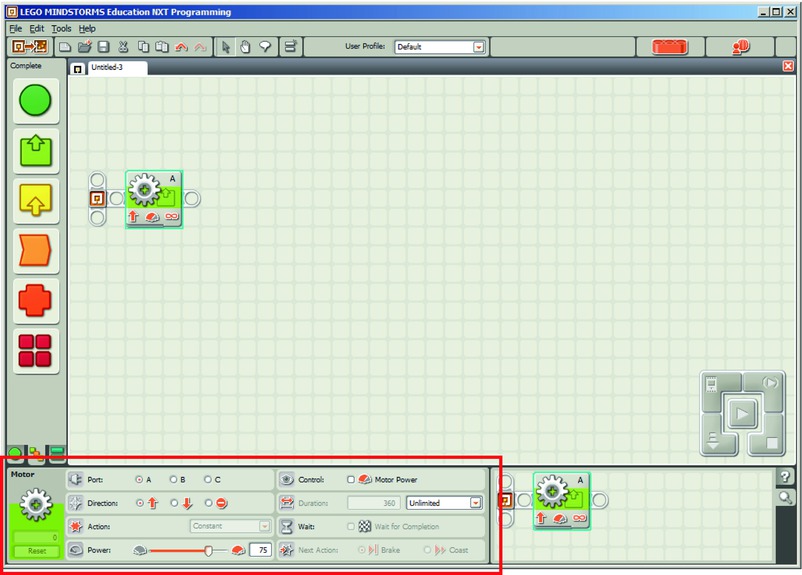
Figure 3-12. Motor block properties
For example, say you have a My Block called TouchDown for lowering an attachment arm when the Touch sensor is pressed. Most of the time, the values in this block would not change. If you changed the design of the attachment arm, the rotation degrees needed to lower the arm correctly would possibly change.
In Figure 3-13, you can see the TouchDown My Block with hardcoded values for the number of degrees the Motor A will move to lower the attachment arm when the Touch sensor is pressed.

Figure 3-13. TouchDown My Block with hardcoded duration value on the Motor block
It would be nice to have a property value associated with the My Block to allow the value for the degrees moved to be adjusted. To do this, you will need to use Data Wires—this is how the NXT-G software transfers data between blocks, data such as numbers for power or speed values, logic values such as true and false and even text values that can be used for screen displays. Data Wires will be covered in more detail in Chapter 5.
In the case of the TouchDown My Block, the value for the Motor Rotate would need to be adjustable. First, we will have to start by recreating the My Block; property values cannot be added or removed after the My Block is created. This is a good reason to spend some time designing your My Blocks before creating them. Knowing ahead of time what properties your blocks will need can save you time spent to re-creating them every time you decide you need a new property.
In Figure 3-14, you can see the sequence of blocks used in the original TouchDown My Block, but there is a new block present as well. This is a Constant block. A Constant block holds a value, such as a number, logical (true or false), or text. In this example, it will be a number Constant that is connected to the Motor block’s Duration property with a Data Wire. The idea is that whatever value is stored in the Constant will be the number of degrees that the Motor block is turned. The default will be 90 degrees, so the Constant block holds a numeric value of 90.
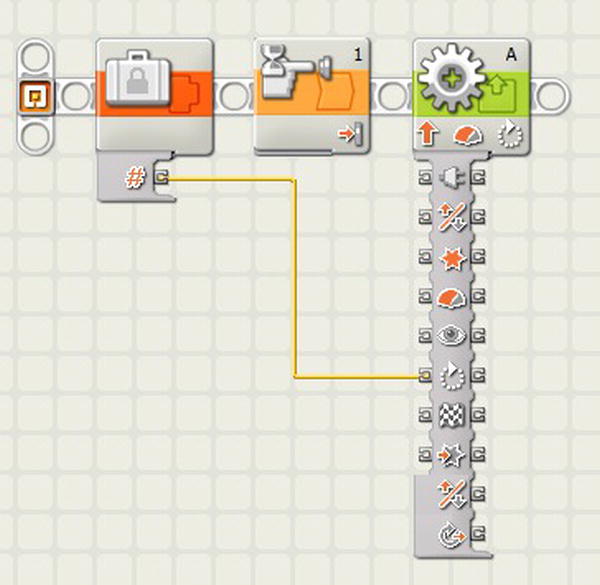
Figure 3-14. Constant block wired to the Duration value of the Motor block
To have the Duration value a property of the TouchDown My Block, you will highlight the original two blocks in the sequence that you had before leaving the new Constant block outside the selection. Since the selection will cross the Data Wire, the values outside the selection connected to the wires will become the properties of the new My Block. Highlight the desired blocks and select the Create My Block button on the tool bar as seen in Figure 3-15.

Figure 3-15. New blocks selected for the TouchDown My Block. The Constant is left out of the selection
In the My Block Builder dialog, you will notice that even though the Constant block is not part of the My Block definition, there is a Data Wire still that goes to a Data connector. This Data connector will become the property that is available on the newly created My Block. Step through the rest of the My Block Builder by naming the My Block TouchDown and select an appropriate icon for the My Block. Once the My Block has been created, you will see the new TouchDown block inserted into your program. There will be a Data Wire connecting the new My Block to the Constant block, as seen in Figure 3-16.
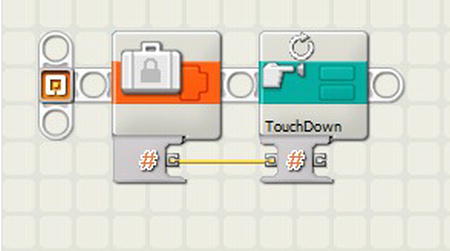
Figure 3-16. New TouchDown My Block connected to Constant block
When you select the TouchDown block, it now has a property associated with it. The property is currently labeled Duration, since that is where the Data Wire is connecting on the Motor block, as seen in Figure 3-17.

Figure 3-17. TouchDown My Block with the new property
If you want to change the name of the property, simply double click on the TouchDown block to edit the values. On the Data connector, you will notice the “Duration” label above the connector. If you cannot see the value, click on the Data connector and drag it so that you can see the label more clearly, as in Figure 3-18.
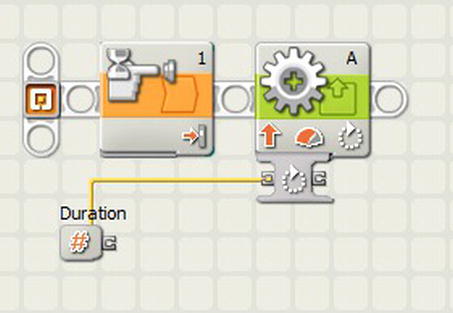
Figure 3-18. TouchDown block with property label
By highlighting just the label above the Data connector, you can change the value by typing whatever you wish for the property to be labeled as in your My Block definition. In Figure 3-19, the value is changed to “Arm Rotation Degrees.”

Figure 3-19. Property label renamed
When the TouchDown block is added to a program, it will now have the property Arm Rotation Degrees displayed in the property pane when selected, as in Figure 3-20. This property can be set either from the property pane or programmatically by using a Data Wire within your program’s code.
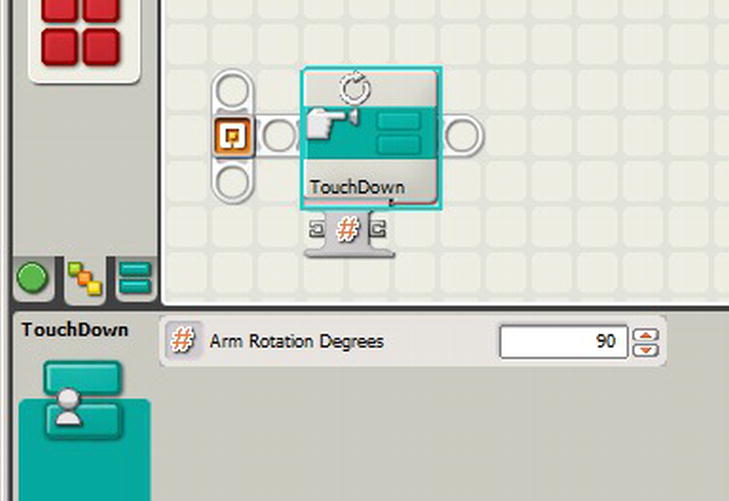
Figure 3-20. TouchDown My Block with the property labeled “Arm Rotation Degrees”
Often you will want to add more than just one property to a My Block, giving it more flexibility. Remember to plan the blocks out in advance, because once you add a property, it can be renamed but not removed or added.
Adding more than one property works the same as when you create a single property. You just need to make sure that your Data Wires are configured correctly so that when you make the selection of blocks to include in your new My Block that the Data Wires that represent the properties is located outside of the selection area.
As you can see in Figure 3-21, the code includes two Data Wires, one for the duration and one for the direction of the motor. The duration is connected to a numeric Constant block, and the direction is using a logic Constant block. But notice how the blocks are positioned on the sequence beam; there is no way to select the desired blocks (Wait Touch, and Motor) without including one of the Constants.
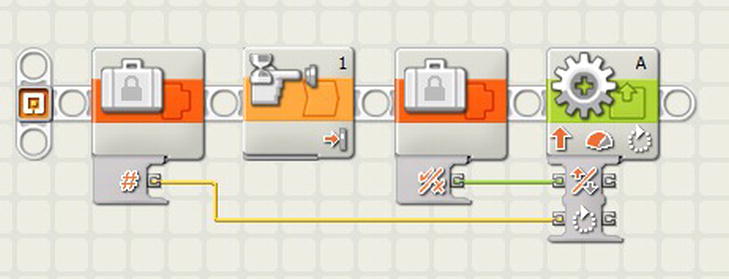
Figure 3-21. Block sequence to be used to create multiple-property My Block with Constants in wrong position
To fix this, you will need to reposition the Constants so that they are outside of the desired selection area, as seen in Figure 3-22.
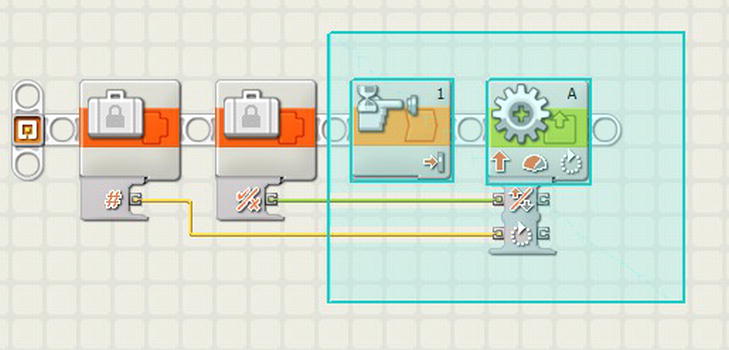
Figure 3-22. Block sequence with Constants outside of the desired selection area
Now you can select the desired blocks and create the new My Block. In the Create My Block dialog you will see the two Data Wires for your properties. Again you can double click on the labels an name the properties as desired.
Another way to get data values into My Blocks is by using Variables. My Blocks maintain their own collection of Variables separate from the program that is using the My Block, but if you give a Variable the same name in your main program and the My Block, the Variable memory location will be shared between the two, thus allowing you to share values. So if you set the value of a Variable in your main code, it can be accessed by the code inside the My Block as well.
Managing and Sharing My Blocks
There will be times when you want to copy a block and reuse it. For example, the TouchDown My Block moves the Motor A so that it lowers the attachment arm on the robot when the touch sensor is pressed. What if you want a My Block that raises the attachment arm when the Touch sensor is released? That would use the very same blocks that are used in the TouchDown My Block but would just need a few minor changes. We can make a copy of the TouchDown My Block and create a new one called TouchUp.
To make the copy, select “Manage Custom Palette” from the Edit menu. A file dialog will open that shows you the contents of the My Blocks folder on your system. You will see the TouchDown My Block program listed. Just highlight it and select Copy from the Edit menu. Then select Paste from the Edit menu, and you will see a new file appear in the list. Highlight the new file and right-click on it (or press F2 on your keyboard) to rename the file TouchUp, as seen in Figures 3-23 and 3-24.
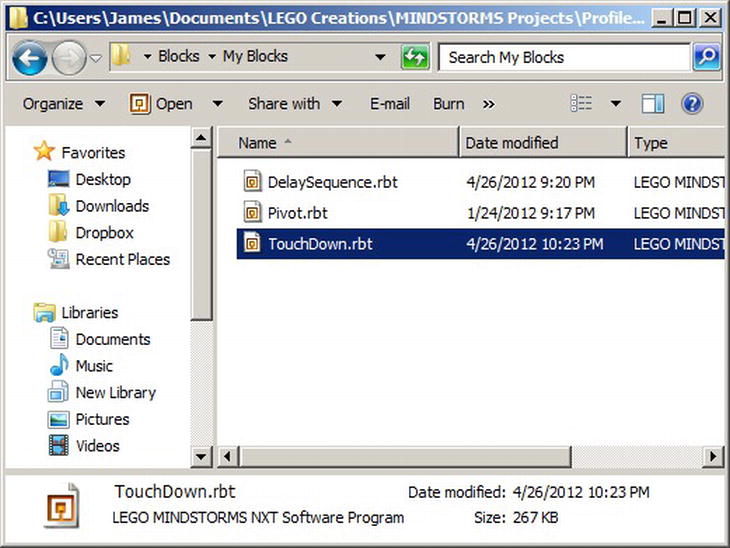
Figure 3-23. My Blocks folder with existing My Blocks
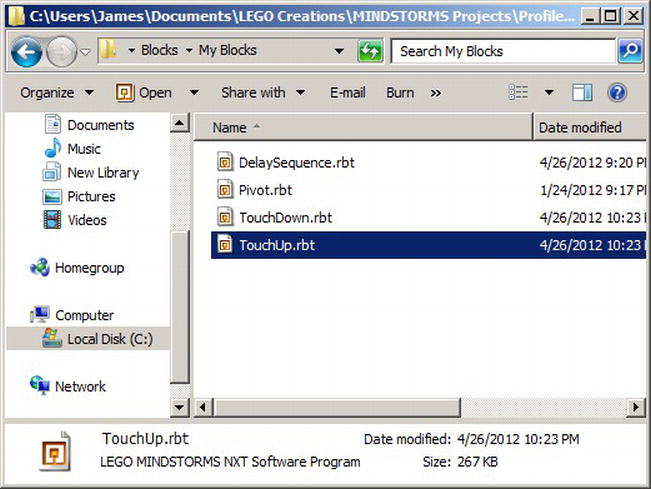
Figure 3-24. TouchDown block copied and named TouchUp
Now you can open the new TouchUp My Block so that you can change the code. When you first open it, you will notice that it has the same code as you had in the TouchDown program, as seen in Figure 3-25

Figure 3-25. Block sequence in the TouchUp My Block
Change the Wait block to wait for the Touch sensor-release event and then change the direction on the Motor block. Once you make these changes, just save the program. You will now have a new TouchUp block on your My Blocks palette, as seen in Figure 3-26.

Figure 3-26. TouchUp My Block listed in the Custom My Blocks palette
You can also create a copy of a My Block by simply opening the code as you would for editing and then selecting the “Save As” option from the File menu. Be careful doing this, because anywhere the current My Block is referenced will update to use the new My Block name, and this may not be what you want.
When a My Block is being reference by a program, the My Block is not included in the actual program. It simply makes a reference to the My Block file. If this file is not present where the NXT-G software expects it to be, the My Block will be shown with a “crack” down the middle, as seen in Figure 3-27.

Figure 3-27. Broken My Block
This happens most often when a program is being shared between multiple computers. So when you copy the program from one machine to another, the My Blocks must be copied as well.
NXT-G 2.0 has a tool that will help you transfer an NXT-G program between different computers. If you select “Create Pack and Go” from the Tools menu, you will be presented with the Create Pack and Go dialog box, seen in Figure 3-28. The dialog will show you a list of items associated with your program, such as the NXT-G program, My Blocks, and sound and image files. Give the Pack and Go package a name—make it something that reflects what the program does—then select OK. Now you have a nice package that you can give to someone else so she can load your program successfully onto her system.
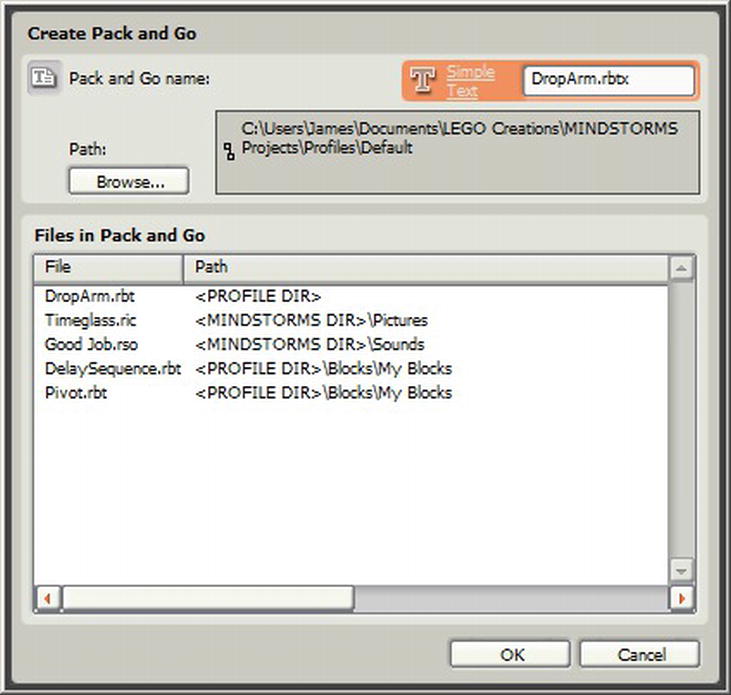
Figure 3-28. Simple NXT-G code created from pseudo code
Summary
My Blocks can be a powerful tool in creating dependable and effective programs. They will give you the ability to better manage your code and to make changes quickly to your programs. Both of these points can be important at a robotics event.
With well-managed code, not only does it make it easier for you to understand, but it also will help the Technical judges understand. If a program is long and drawn out, the logic can be lost in the clutter, but if you break the code into logical My Blocks, everyone will understand what your program is doing.
Making changes quickly can be critical when you’re under a short time frame at an event. Often a simple change to the robot design can create nightmares in your code if you must find everywhere you need to modify your code to reflect the hardware change. If your logic is broken into organized My Blocks, then, by making a few changes to the My Blocks, all of your code can be updated with little effort.