
Tips and Tricks
The previous chapter covered programming pitfalls but it is equally helpful to have several tips and tricks, especially for competitions. These techniques can assist you with programming and debugging, as well as moving within the NXT-G environment.
Understanding how an NXT-G program works with respect to the NXT brick is very important. Program flow is the way that a program runs on your NXT, including any delays or changes. Normally, you read (and the NXT executes) an NXT-G program from left to right, following the onscreen technic beam. Understanding each block on the beam is very important. One of the first secrets you learned in programming is that Move Unlimited does not do what it says. Take the following one-block program shown in Figure 14-1, for example.
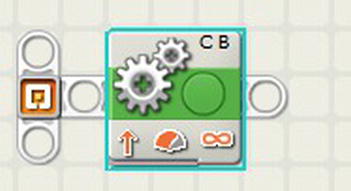
Figure 14-1. Move Unlimited program
A beginning robot programmer will look at this program and think that the robot will drive forever or until it runs out of batteries. But in reality, the program flow is dictated by a block’s property values, as shown in Figure 14-2.
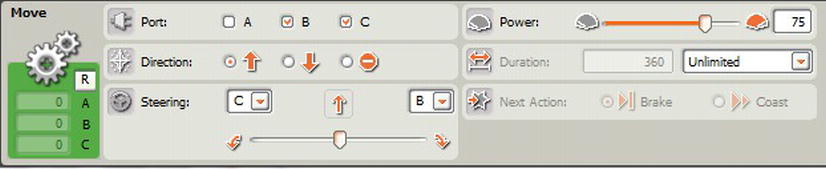
Figure 14-2. The Move Unlimited properties window
An NXT-G program will move through the program from left-to-right, one block at a time, until the program ends. When the program ends, the NXT shuts everything off (i.e., turns off all motors). That is why when you run this particular example program, the robot drives forward for about one second and then stops. The Duration section of the Move block properties helps determine program flow. The program is on the Move Unlimited block for less than one second. Then the program moves immediately to the next block. Given that there is no next block, the program ends.
The Duration on the Move block changes the program flow. If the Move block was changed from Unlimited to 3 Rotations, the NXT will interpret that as “Reset the motor rotation sensor. Turn the motors on. Drive until the motor rotation sensor counts to 1080 (the internal mechanism for the motor rotation sensor is in degrees). Stop motors.” Three rotations are equal to 3×360 or 1080.
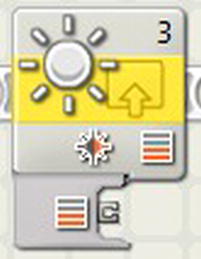
The orange blocks are a full set of blocks that act on program flow, which is why the name of the menu is “Flow” (see Figure 14-3). Not only do the blocks change the direction on the technic beam that the code gets executed (Switch and While blocks), but they also change the duration that the program sits on a block (Wait block).

Figure 14-3. Flow menu
Your program can wait for a specific time (seconds) or on the actions of a sensor input (e.g., the Touch sensor is pressed or the Sound sensor reaches a certain level). There is also the Stop block, which halts the execution of the running program as soon as the block is read.
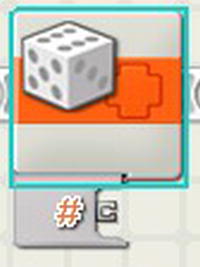
Switch loops change program flow by having the program go in one of two (or more) logical lines, and While loops bring the program flow back to the start of the loop. Consider this example, as seen in Figure 14-4.

Figure 14-4. Switch Loops change program flow
The program simply generates a random number between 1 and 4 and passes it to the Switch block, which determines what to show on the display and which sound file to play. The Switch block is highlighted on the example to show that there are multiple paths that the program can go (four of them). This program also has a fifth path. It is controlled by the While loop. Once the sound is played, the program returns to the beginning of the loop (the Random block) and reruns the Switch based on the value returned from the Random block. When downloaded and run on the NXT, this program will constantly play numbers and change the display very quickly (1-3-2-1-4-4-2-1) until the user stops the program by pressing the dark gray button on top of the NXT.
Another part of this program has an effect on program flow. It is in the Play Sound block. In the lower-right corner of the Play Sound properties window shown in Figure 14-5, there is a check box that will wait for the sound to finish playing before moving to the next block (in our example, the end of the While loop). This can change program flow by putting small delays into the program while it waits for the completion of the block. So the sounds coming out of the NXT are decipherable—rather than the numbers running together and sounding like one muddled number (1-2-4-2-1 vs. 12421). Another block that has this Wait for Completion step is the Motor block. It will only become active if you choose Rotations or Degrees as the Duration parameter.

Figure 14-5. Play Sound properties window
NXT-G blocks generally have two items to look for: Action (what will the NXT do when it runs the block?) and Flow (where does the program go next and does it have to wait for something to occur?). The following lists a few blocks and their actions and flow graphs.
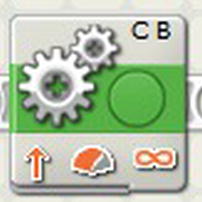 |
Move Unlimited block Action: Turn motors B & C on Flow: Go to next block immediately |
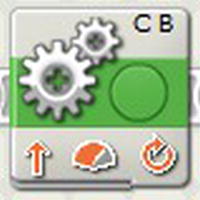 |
Move Rotations block Action: Turn motors B & C on Flow: Wait for number of durations to complete before going to next block |
 |
Wait for Touch Sensor block Action: Nothing Flow: Wait for Touch sensor to be pressed before going to next block |
 |
Move Stop block Action: Turn motors B & C off Flow: Go to next block immediately |
 |
Read Light Sensor block Action: Output the value read from the Light sensor Flow: Go to next block immediately |
 |
Random Number block Action: Output a number between the two values Flow: Go to next block immediately |
Like program flow, data flow is the way data travels from block-to-block by way of the wires that you place in the program. Data flow and program flow coexist without contention. Generally, data doesn’t move in a program. Instead, it is generated at a specific time and is ready to be used by other blocks, usually faster than program flow. For example, let’s say you want to drive as fast as the value you read from the Light sensor after waiting five seconds. You might think the two programs shown in Figure 14-6 are identical. Let’s see why they are not.
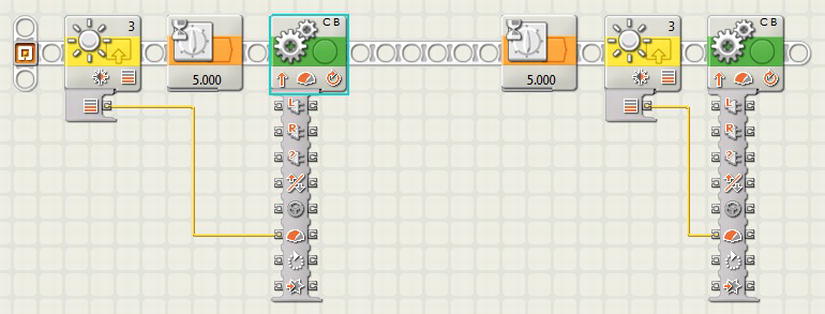
Figure 14-6. Data flow examples
The three blocks on the left side of Figure 14-6 are one way of handling the program; the three blocks on the right are another way. Let’s walk through the data flow and program flow for each program:
- The first thing that the program on the left does is read the value of the Light sensor and immediately has that information available for the Move block to use. The program flow immediately goes to the Wait block, where it waits five seconds before actually running the motors for three rotations.
- What would happen if the light changes while the robot is waiting for the five seconds? In the program on the right, the first thing the program does is wait five seconds. Then it reads the value of the Light sensor, immediately sends the data to the Move block, and immediately goes to the next block to drive the robot.
The difference between the two approaches is that the value of the Light sensor can be different, thus causing the motors to move at different speeds. The statement “drive as fast as the value you read from the Light sensor after waiting five seconds” is ambiguous.
The tip to follow from this example is to be as precise as possible when you specify your requirements for writing a program. What you may think is the correct way of writing the program could turn out to be incorrect—so it should be looked at closely.
Debugging Tips
The two preceding sections discussed “how to think like the NXT” and gave you an understanding of program flow and data flow. This section will give you tips on other ways to debug your programs, including breaking down a problem to figure out what went wrong.
Know What You Mean
Foremost, you should know and undertand what you want your robot to do. Write a program, for example, to drive your robot for two seconds, then have it turn until its Touch sensor is pressed, and then stop the robot. Figure 14-7 shows a program that tries to solve this challenge—yet the robot never turns. Why is that?

Figure 14-7. Drive, then turn example (error)
Let’s recall what you really meant the robot to do (broken down into steps):
- Drive for 2 seconds.
- Turn until the Touch sensor is pressed.
- Stop.
The first two blocks of the program drive for two seconds. But you are missing a block.
What are your motors doing after you’ve waited two seconds and are about to move motor C? Let’s think like the NXT. Both motors B and C are moving, so the Move Motor C block unlimited does nothing. The robot keeps driving straight until the Touch sensor is pressed and then stops.
Figure 14-8 has a fix to this program. Notice a new third block that adds a Motor Stop block after the two-second Wait block. It ensures that the B motor is not turning when you start the second half of the program (turn until the Touch sensor is pressed).

Figure 14-8. Drive, then turn example (fixed)
Listen to Your Robot
Another debugging technique is to sprinkle Sound blocks throughout your code to audibly verify that each step has executed. A way to do this is by playing the scale at each step so that you can hear that your program is running in the right order. Figure 14-9 shows the Sound block (and its properties) that plays a tone.
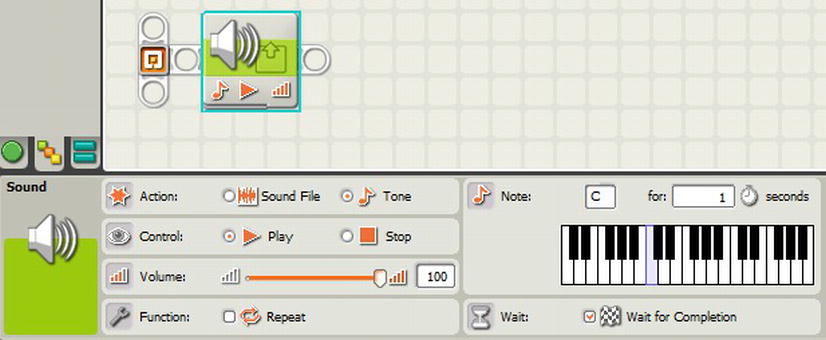
Figure 14-9. Play Sound block and properties window
If something doesn’t sound right, then you know that you have a fault in your logic. Make certain that your sounds are played long and loud so that you can hear them. Also, be careful not to place the Sound block after a simple action block that doesn’t have a wait. For example, do not play a sound after a Move Unlimited because the Play Sound/Wait for Completion may cause an unintended side effect on your code. During a competition, remember to remove the Play Sound blocks because you won’t need them during the action, and you might not even hear them over the competition noise and excitement going on around you.
Figure 14-10 shows an example of a good My Block that you can use to help you debug your code. It uses a global variable to count the number of times it is used to play the right note in a C-major scale. When it gets to the end of the scale (tone B), it resets the global variable to 0 in order to start the scale again.
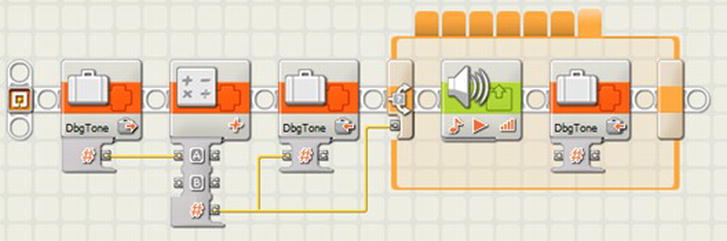
Figure 14-10. DebugTone My Block code
Figure 14-11 shows where you can place this new My Block in your code to help you debug it. Having the My Block at various points in the code will let you hear the scale as each step is played. To restart the scale at the C tone, just set the variable DbgTone to 0.

Figure 14-11. Use of DebugTone My Block
It is common for NXT robots to move wheels for a specific amount of time or move an arm when a sensor is triggered, and then stop. Regardless of whether the movement is driving the robot or moving an arm, and independent of the trigger (time or sensor), you will typically do this type of code in three blocks: Move, Wait For, and Stop. Another way to look at this design pattern is “Turn it on. Wait. Turn it off.” The following are a few examples:
- Drive until 3 inches from wall.
- Move arm until Touch sensor is pressed.
- Move arm 3 rotations.
Because these code fragments are very common in a program, we will call them the “Move Until” design pattern. A design pattern is a generally reusable solution to a commonly occurring situation. It is not a finished design that can be transformed directly into code. It is a description of or a template for how to solve a problem. It can be used in many different situations. So the Move Until design pattern can always be implemented in three blocks. Figure 14-12 shows the code fragments for our examples.

Figure 14-12. Design pattern examples
Let’s discuss that last block (Move arm 3 rotations). Even though it is one block, it is performing the same as a three-block design pattern. Figure 14-13 shows the properties window of the Move Arm block and the equivalent three-block program (which is not part of the program).
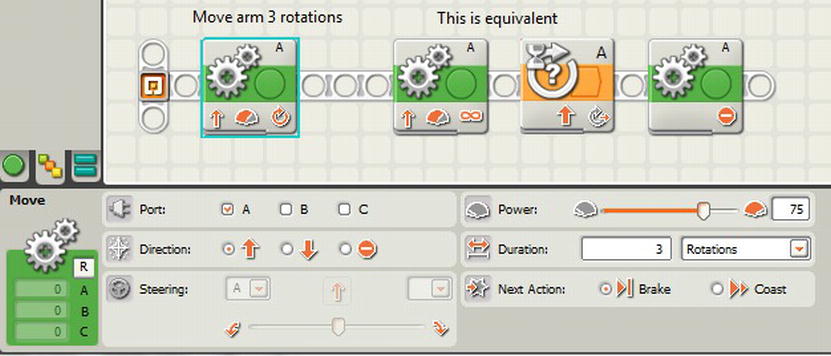
Figure 14-13. One block equals three
In the properties of the single-move block, the Duration is waiting for three rotations, and the Next Action is set to Brake (stop the motor immediately). The single block is equivalent to the three blocks and can be considered part of the same design pattern.
Another design pattern at our disposal is a variation of the Wait Until; however, you are actually waiting for two things at once. For example, you have to write a program to start moving when you clap your hands once, and then stop moving when you clap a second time. Figure 14-14 shows an initial attempt for this program.

Figure 14-14. It’s hard to control a robot by clapping
The first block waits for the Sound sensor to be above a certain threshold. The second block drives unlimited until the third block, which—like the first block—is waiting for the Sound sensor to be above a threshold, and then the robot stops. Download and run the program, and then clap once. What happens? Your robot doesn’t move at all. You did everything you were supposed to do. Why is this happening to you?
Let’s really take it apart, combining the inputs as well as the program. What is a clap? It is a loud noise coming from your hands when you strike them together quickly. But how long does the clap last? Since the NXT can operate instructions at microsecond levels, this program runs to completion at the sound of the first clap. The clapping noise lasts a long time with respect to the robot. So you wait for the clap, but the Move Unlimited block runs quicker than the clap quiets down. So the clap is still heard at the third block, which immediately goes to the next block, which stops the motors and the program ends.
How can we tell? The NXT-G software also includes a data-logging tool that can graph the sound of a clap. Figure 14-15 shows a one-second period of the Sound sensor “hearing” a clap. Time is on the x axis and the Sound sensor value is on the y axis. Let’s say we set our threshold for the clap to be 50. The length of time that the Sound sensor registers above 50 is from 0.15 seconds to 0.35 seconds. In those 0.2 seconds, the NXT can run thousands of instructions. That is why the robot never drives and the program ends almost immediately.
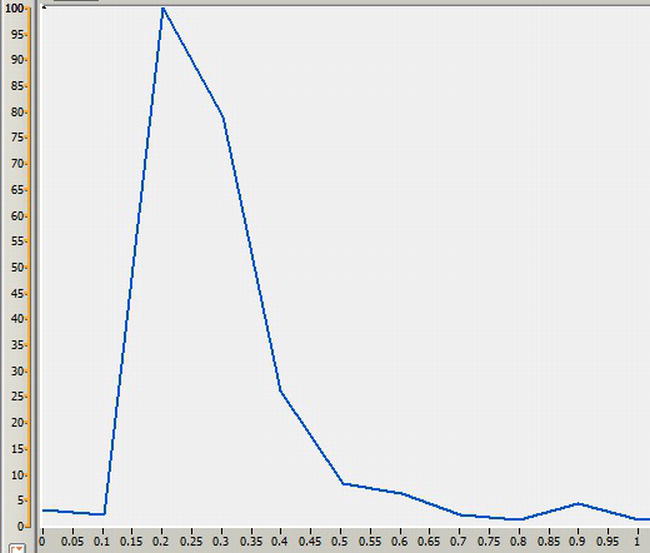
Figure 14-15. The length of a clap sound
How are we going to fix this? Let’s change our definition of a clap. It is a loud noise immediately followed by little to no noise, which signifies the end of the clap. In our data-logging tool, the clap lasted 0.2 seconds. So programmatically, we need to change our design pattern to wait for one thing, immediately followed by a wait for the opposite to mark the end of it. The program to do this is shown in Figure 14-16.

Figure 14-16. Corrected control of a robot by clapping
Now you get to try it. Write a program to measure the distance between two black lines. At the end of the chapter, we’ll show you one way to write this program.
Understand What You Wrote
The three laws of programming are to comment, comment, and comment your code. You never know when you’ll get pulled away in the middle of programming, and when you return to it, you forgot what you were trying to do. A good way to prevent this is to write a small paragraph that explains what the whole program is doing. Write it at the top of the program. Then, write a one-line or two-line comment around each block or section of blocks explaining what you want to do with that block. Something like this is shown in Figure 14-17.
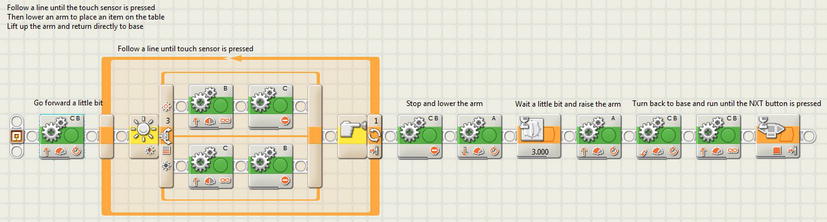
Figure 14-17. Use of comments example
Keep your comments updated. If you have to use the robot’s arm to pick up an object rather than drop it, change the comment when you change the code. Don’t forget to change the leading paragraph as well. If they don’t agree, you’ll never remember what you really wanted to do.
Know How to Navigate Your Program
When you are hard at work getting ready for a competition or even at the competition, you sometimes have to make changes to a program rather quickly. If your program is large, you have to find the place in your program where you want to make an update. You will find that you have to scroll left and right to follow what is occuring before and after the part of the code that you are studying. One way of doing this is to select an empty point in the program area and click-and-drag to the right or left, as shown in Figure 14-18.

Figure 14-18. Moving around the screen by scrolling
There is an easier way to scroll through the window. When you first launch the NXT-G program, the area in the lower-right corner shows a context help window like that shown in Figure 14-19.

Figure 14-19. Default mode of lower-right corner
When you click the magnifying glass tab on the far right, you get a scrollable view of the programming window, with the current area in the programming window highlighted as shown in Figure 14-20.
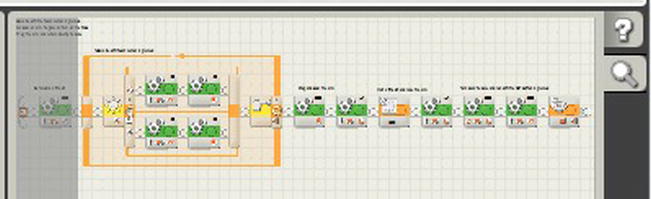
Figure 14-20. Scrollable display of your program
You can place your cursor on the miniscreen and click to have the screen center to where you click. Or you can scroll your mouse along the miniscreen to get the most advantageous view of the area of the program you want to look at.
We do not recommend drawing a loopback to change the main technic beam so that you can see an entire program on a screen (see Figure 14-21).

Figure 14-21. Incorrect use of the main technic beam
The NXT-G editor may not handle this reliably. You can sometimes lose blocks from the main sequence beam.
Hardware Tips That Help the Software
There’s a tendency to think of hardware and software as separate problem domains. This is not the case. Decisions you make in building a robot can influence the ease and reliability of programming that robot. The following sections provide quick tips for robot building, which will help you achieve consistent results from your software.
Manage Lighting Conditions Around the Light Sensor
Ambient light in the facility where you are competing may cause variable results with your Light sensor, even if you are using the “generate light” setting on the block. This is especially true if you are following a line and making several runs at different times of the day. If sunlight creates direct or indirect light on your table, your runs will not be the same. A good way to avoid this inconsistency is to build a light guard around the Light sensor. Add technic beams or flat plates around the sensor to shield it from ambient light. This will help make your Light sensor readings consistent, regardless of the lighting conditions in the arena.
Avoid Pointing Ultrasonic Sensors at Each Other
If you are using more than one Ultrasonic sensor on your robot—or if another robot running near you is using an Ultrasonic sensor—and the sensors happen to be pointing at each other, your distance readings may be compromised. This is due to the way the Ultrasonic sensor is made. One of the sensor’s “eyes” emits the ultrasonic wave that bounces off an object, and the result is read by the other “eye.” If your robot’s Ultrasonic sensor is “looking” at the Ultrasonic sensor on another robot (or a second sensor on your robot), then you will get readings that are not true because the sound is coming from the other sensor, rather than bouncing off an object.
There is no great fix for this, but we recommend that you only use an Ultrasonic sensor in a competition as a last resort and as little as possible. Another suggestion is to aim the sensor down a little so that it does not pick up a direct reading from the sensor on another robot. Try not to aim it too far down because you won’t get readings from items on top of the table. If you do use an Ultrasonic sensor, practice for all kinds of scenarios prior to going to your competition so that you have consistent results.
With the possibility of using all three motors and all four sensors on the NXT, you could have a lot of wires going around your robot. These wires may get in the way of manipulators, motors, or areas of the robot that may interfere with how it moves around the table and mission models. Since some competitions forbid the use of non-LEGO parts on robots, you should make one or more containers out of LEGOs to help you organize your wires and keep them out of your way. We call these containers, shown in Figure 14-22, “wire barrettes” because they look like old-fashioned hair barrettes.
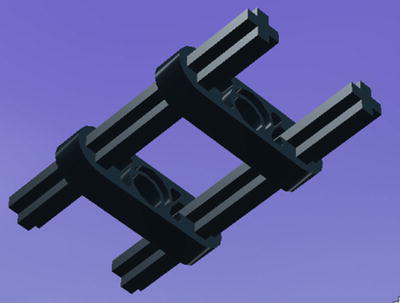
Figure 14-22. A wire barrette
To make a wire barrette, you need two small axles (4- or 5-length) and two cross-axle technic levers. You put the two axles into one of the cross-axle levers and then route the wires between the two axles. You would then close the barrette with the second cross-axle lever and squeeze them together to lock the wires in place. You can find a way to attach the barrettes to other areas on your robot to keep the wires secure if necessary. And you can use more than one barrette around the wires as needed.
Consolidate Logic into My Blocks
You were introduced to My Blocks in Chapter 3 and we’ve been using them throughout this chapter. Why is it good to use them? First, they reduce the space needed to run programs on your NXT. Memory is sometimes at a premium on your NXT during a competition. My Blocks make your programs use less memory.
Second, the use of My Blocks promotes the good programming habit of writing reusable code fragments. Making a change in one program will automatically update the other programs that use the same My Block.
Third, use of My Blocks makes a program more readable by reducing the number of blocks in the program. For example, we suggest writing a bunch of the Wait For design-pattern code fragments as My Blocks. Figure 14-23 shows three blocks that make up a MoveTilTouch My Block.

Figure 14-23. Wait For Touch code and My Block
Block names such as MoveTilTouch, MoveTilSound, MoveTilDark, and MoveTilDistance are a lot more readable and understandable than having the three blocks repeated in your program. Name it well, and you’ll know at a glance what a given My Block does in the context of an executing program.
Keep Your NXT Firmware Updated
Firmware is the permanent software that resides on your NXT. It understands how to communicate to the motor and sensor ports and how to manage the memory on the NXT. While it is not updated often, it is important to keep your NXT updated with the latest version of Firmware. As of this writing, the latest version of Firmware is 1.31. You can download the latest version from the LEGO MINDSTROMS web page at http://mindstorms.lego.com/en-us/support/files/default.aspx .
Finally, take advantage of the plethora of software blocks available on the Internet to help you write your programs. Teams and individuals kindly place their programs out there for you to use and learn from. If you do use the code, make sure you attribute it to the author (or web site) to give credit where credit is due.
Summary
Having a bag of tricks at your disposal is a great way to write working programs quickly and consistently. It also allows you to program faster, which may be important when you are in the middle of a competition or under lots of pressure from your teammates. Understanding how to debug programs, learning how to streamline your code, and using common design patterns will help you succeed at your tournament. Keep these tips and tricks handy—you never know when you will need to turn to them to help you out.
Oh, and the answer to the programming challenge for measuring the distance between two black lines is shown in Figure 14-24.

Figure 14-24. Measuring the distance between two black lines