
The previous chapters of this book presented several programming techniques that you should use for competitions. They will help you produce reliable, maintainable, and successful programs that are easily understood. This chapter will cover programming pitfalls to avoid. Awareness of these potential pitfalls will prevent you from falling behind when you are under pressure or on tight deadlines. This chapter and the next (which offers tips and tricks) will help you become an expert NXT-G programmer in no time.
Both beginner and advanced NXT-G programmers run into the trap of thinking faster than their fingers or mouse can move. In particular, they run into the issue of blocks that have default settings. An example of this is seen in Figure 13-1. The code intended to have the robot move until the Touch sensor is pressed.

Figure 13-1. Move until the Touch sensor is pressed?
When you run this program, however, depending on how far the robot is from the object that presses the Touch sensor, either the robot stops before the Touch sensor is pressed or the motors keep spinning after the Touch sensor is pressed.
The problem with the code in Figure 13-1 is located in the default setting of the Move block. You see this in Figure 13-2, which shows that the Duration value is 1 rotation—the default when you drop a Move block into your program.

Figure 13-2. Move block defaults
You need to show care with many other blocks that have default settings. Figure 13-3 shows the Wait block default. With Wait blocks, make sure that the default is to wait for the Touch sensor. Always check that your Wait blocks are waiting upon the control you intend them to be.
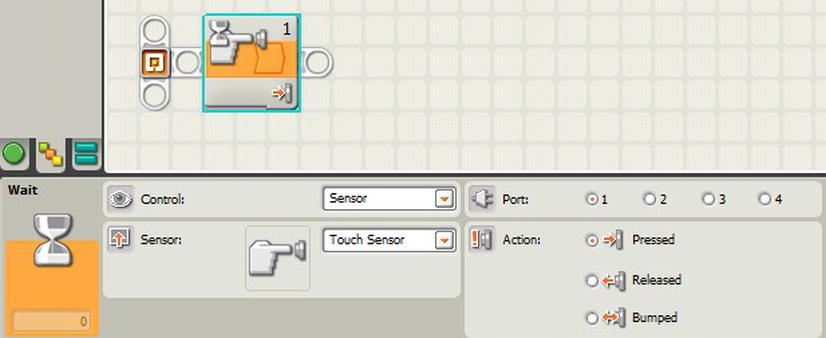
Figure 13-3. Wait block defaults
Figure 13-4 shows the Display block default settings. The issue to be aware of here is that Display blocks default to showing an image. Perhaps you want to display text or a Drawing object (point, line, or circle). Be sure to specify which option you want to show.

Figure 13-4. Display block defaults
Loop blocks can be particularly troublesome. They default to looping forever. You can see that in Figure 13-5. Sometimes you really do want to loop forever—or at least until some event happens and you specifically execute a statement from within the loop to break out of the loop. Other times, you may want to loop a specific number of iterations, or for a specific amount of time, or until a given sensor returns a specific result. In these cases, be sure that you’ve configured your Loop block away from the default setting of an infinite loop!
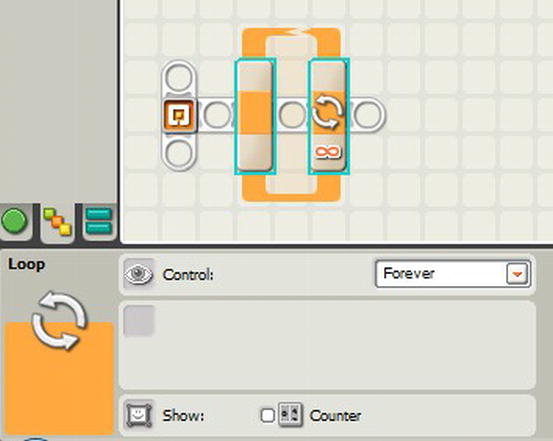
Figure 13-5. Loop block defaults
Figure 13-6 shows the Switch block. It defaults to testing whether the Touch sensor is pressed. There are many other conditions that you should test before a competition. Double-check your Switch blocks to be certain that you’ve not inadvertently left any at their default setting.
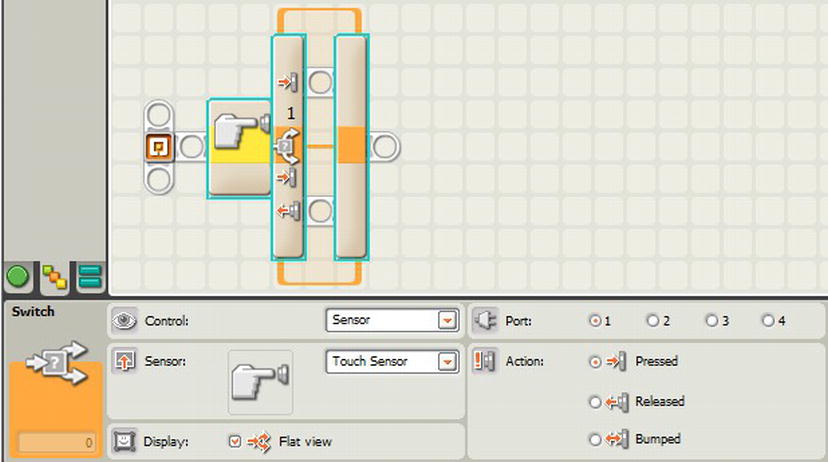
Figure 13-6. Switch block defaults
The Sound block, shown in Figure 13-7, defaults to playing the “Good Job” sound file. It probably wouldn’t be the end of the world if that sound were played instead of the one you intended. Still, it might be confusing in the heat of competition to hear the wrong sound.

Figure 13-7. Play sound block defaults
Figure 13-8 shows a Logic block. It defaults to an Or operation. If you actually intend to have an And operation, the Or default can pave the road to failure in competition. At first glance, your block will even look correctly wired. Take special care to double-check the operation specified for any Logic blocks in your program.
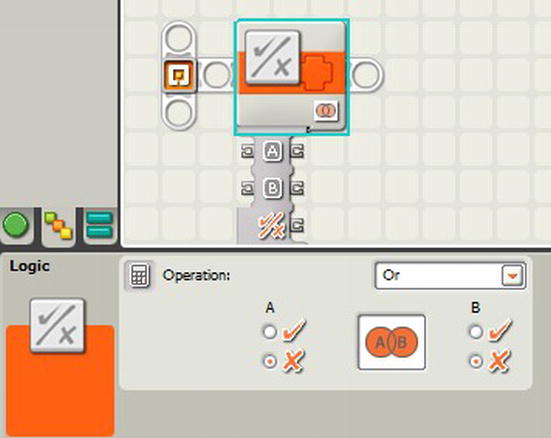
Figure 13-8. Logic block defaults
Finally, there is the Range block, shown in Figure 13-9. The Range block defaults to the Inside Range of 25 to 75. Why that range? We really don’t know. It is just a nice-looking range that someone in LEGO chose to use when designing the product. It’s probably not the right range for whatever you are doing, however. Change it. Make sure to specify a range that works for the program you are writing.

Figure 13-9. Range block defaults
One final default that you need to be aware of is not under a programming block, but is a part of the NXT-G program itself. To create a variable, select Define Variables under the Edit menu. This brings up the Edit Variables dialog box shown in Figure 13-10. When you click the Create button, you will create a new variable that always defaults to a Logic variable, which happens to be one of the least useful of the different types. Don’t accept that default without a second look. You will probably want to change it to a Number variable more often than not.
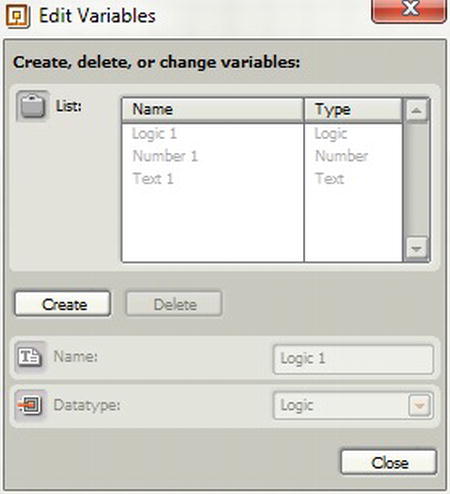
Figure 13-10. Define variables dialog box
Defaults are helpful. They aren’t all a bad thing. Well-chosen defaults keep things moving and make it easier for beginners to just drag and drop program blocks without being overwhelmed by complexity. On one side of the sword, defaults cut complexity. At the other edge, you can easily default to the wrong choice if you aren’t paying attention. So pay attention!
Likewise, you need to pay attention to the port default values for each sensor to make sure you have the right one selected. Many times, a programmer will think a Light sensor is broken when it is actually plugged into a port other than the default port number 3. The default port numbers for each of the sensors are as follows:
- Touch sensor: port 1
- Sound sensor: port 2
- Light sensor: port 3
- Ultrasonic sensor: port 4
Sensors are very important and should be used as much as possible during competitions. If you have trouble remembering these ports, here’s a mnemonic to help you remember the port numbers: The Sensors Lead Us.
The first letters are TSLU: Touch (1), Sound (2), Light (3), Ultrasonic (4). Use the order of the letters to help you remember which sensor defaults to which port number.
Color can lead to trouble. LEGO NXT-G uses color and shapes as means to differentiate blocks. The Wait For and Read sensor blocks shown in Figure 13-11 have similar shapes. It’s common for NXT-G programmers to get the two blocks mixed up. These blocks are colored yellow and orange, respectively, so the error of confusing the two is commonly referred to as The Yellow-Orange Error.

Figure 13-11. The yellow and orange Read and Wait For sensors
The first block (colored yellow) in Figure 13-11 is a Read sensor block for the Touch sensor. Its purpose is to read the value of the Touch sensor at the exact moment the block is executed and write the value of whether the Touch sensor was Pressed, Not Pressed, or Bumped on the output data wire.
If you find that your sensors are not behaving as they should, you might have made The Yellow-Orange Error. For example, Figure 13-12 shows a program intended to have the robot drive until it is five inches from the wall, and then turn left and drive for three rotations. The program is actually incorrect due to The Yellow-Orange Error.
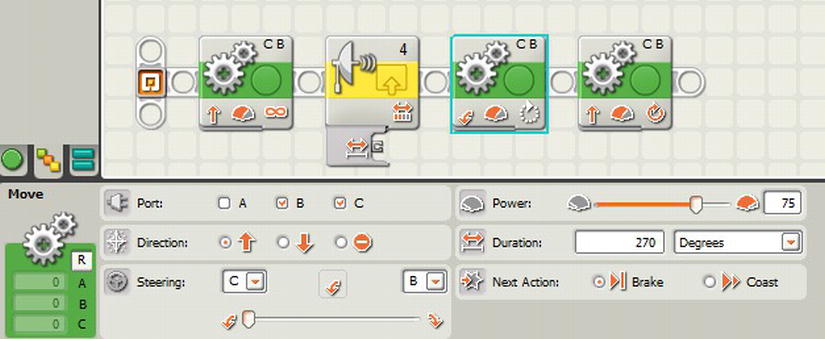
Figure 13-12. Example of The Yellow-Orange Error
The code in Figure 13-12 will actually drive the robot forward for about one second, and then it will turn left and drive forward for three rotations. The reason is that the second block is reading the Ultrasonic sensor exactly one time (doing nothing with the data) and then the program control moves immediately to the third and fourth blocks.
The correct solution to the problem appears in Figure 13-13. The program waits on the second block, where the Ultrasonic sensor comes into the distance specified in the Properties, before program control moves to the third and fourth blocks.

Figure 13-13. Corrected use of The Yellow-Orange Error
In electrical terms, wiring gets old and worn out. You don’t need to worry about wear from electron flow. What you do need to worry about is wear from rough handling and bending of the cables. Even with normal and careful handling, wires inside your cables sometimes break. Breaks often occur at the point where a cable melds to a connector, but can occur anywhere.
In NXT-G programming, data wires are used to pass data from one block to another—sometimes several blocks later in the program. Good data wires are seen when the data being passed from one block matches the type expected by the receiving block. Good data wires are yellow (number data), green (logic data), or orange (text data). Bad data wires are shown in the code as a gray dashed line (see Figure 13-14).
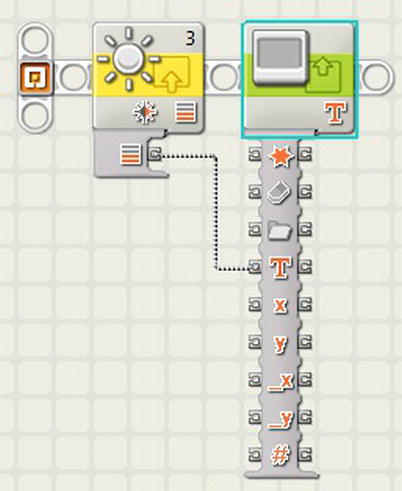
Figure 13-14. An example of a bad data wire
Bad wires won’t allow your program to download to the brick. You get a bad wire if you try to feed data from one block to another without converting that data to a type that is expected by the target block. For example, if you want to display the value of the Light sensor on the screen, you cannot just wire the output of the Light sensor as input to the Display block.
Figure 13-14 shows such an attempt. It shows a Light sensor output wired directly to a Display block. Figure 13-15 shows the error message you’ll receive when you try to download the erroneous program. The error message is due to the bad wire.
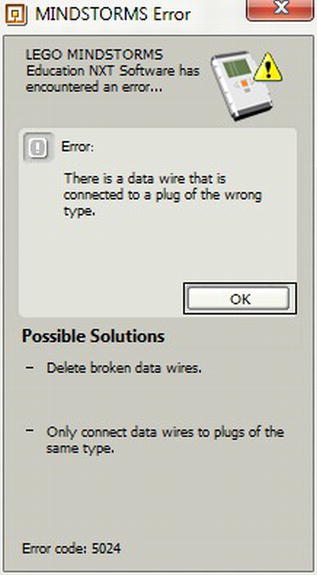
Figure 13-15. Bad wire error message
To make the program work, you have to convert the data from the Light sensor to Text in order to be displayed on the NXT Brick’s display. If at any time in your program you see a dotted data wire (sometimes called the “marching ants”), then you have a bad wire that must be fixed. Figure 13-16 shows a corrected version of the program.
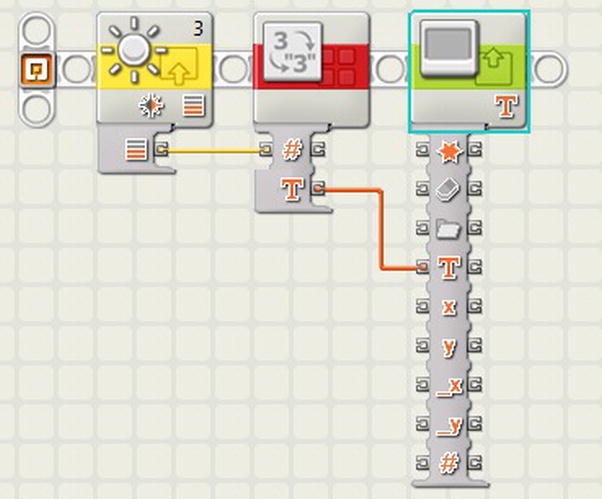
Figure 13-16. Correction to a bad data wire
Use of Stop Block Instead of Stop Motors
Another trap that some programmers fall into is the incorrect use of the Stop block. They make the mistake of seeing the block with that familiar octagon to mean stop moving the motors, but it actually stops executing the program.
Presume a program is written for the robot to move forward until the Touch sensor is pressed, and then it turns left and moves forward for five rotations. Figure 13-17 shows an attempt at writing such a program. The attempt makes the mistake of using the Stop block when the intention is to stop the motor—not the program.

Figure 13-17. Use of the Stop block
When the program executes, the fourth block in Figure 13-17 (which turns the robot to the left) will never execute. It will never execute because the preceding Stop block stops the program and returns the NXT to the Program menu. If you change the third block to a Motor block with the direction set to Stop, then the program will work correctly.
So what is a Stop block good for? Since you are shutting the program down, the best use of a Stop block is to exit out of a program based on a certain value or sensor trigger within the loop, while waiting for another value or sensor to trigger the end of the loop.
Another problem that programmers (as well as robot designers) make is to write a program not matching the way the robot is built. For example, a common mission that robots perform is to deliver something from one place to another. This usually involves loading the cargo on the bot, driving to a location, moving an arm (or other manipulator) to drop the cargo, and then returning to the original point. That sequence is represented by the program shown in Figure 13-18.

Figure 13-18. Deliver cargo
A problem may be encountered in this example: the fifth block (the A Motor block) that lowers the arm never completes its motion because it is blocked by something (the table, the mission model, or something on the robot itself). Likewise, the sixth block that raises the arm might be blocked and unable to finish its execution, therefore not letting the robot return home.
The solution to the blocked arm problem involves adding another Touch sensor to act as a Limit switch (described in Chapter 9) to prevent the arm from getting blocked. When the Touch sensor is engaged, you can see how far the motor has moved by saving the number of degrees the rotation sensor counted. You can move the arm back to where it started so it doesn’t get in the way of any other missions. Figure 13-19 shows this solution in the form of a My Block that you can use in your own programming.
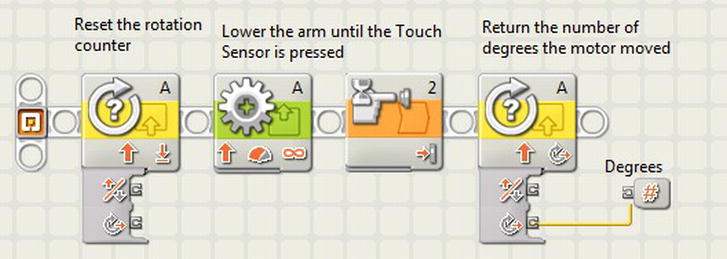
Figure 13-19. My Block to move an arm using a Touch sensor as a Limit switch
It is very important to reset the rotation counter at the beginning of the My Block, as seen in Figure 13-19. Doing so resets the motor encoder value to zero, to accurately give you the number of degrees that the A motor moves before the arm presses the Touch sensor.
Figure 13-19’s program uses a second Touch sensor (port 2) to control the arm. The robot needs to be built to allow the arm to lower to the correct position without having the Touch sensor pressed too soon. This is where the robot designer and programmer need to work closely together (if they are separate people).
Figure 13-20 shows an updated version of the sequence shown in Figure 13-18. The new program uses the My Block from Figure 13-19. Notice that the My Block has an output value that equals the number of rotations that the A motor has to move to return to its original starting position. Combining the Touch sensor with tracking motor rotation makes an elegant solution to the challenge of dropping cargo and returning to home base.

Figure 13-20. The new Deliver Cargo program (with My Block)
Similar to the defaults used on most of the blocks, you also must watch out for changing the units of measure. NASA famously lost the Mars Climate Orbiter in 1999 due to this precise issue. In NASA’s case, the unit changes were metric to English measurement systems.
As you fine-tune your programs, you may find that you frequently change the units of measure in Move or Sensor blocks. Consider the settings for the two Move blocks in Figure 13-21, for example.
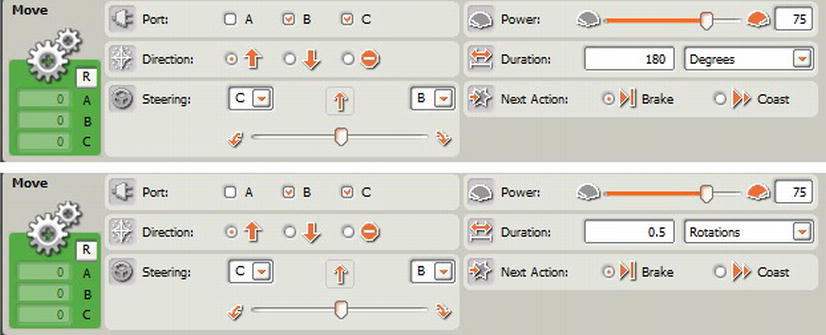
Figure 13-21. Two Move blocks that operate identically
The first Move block runs the B and C motors for 180 degrees. The second runs the same motors for 0.5 rotations. Since one rotation equals 360 degrees, the two Move blocks give the same result—a one-half rotation.
A typical trap that programmers fall into occurs when adjusting the settings of a Move block (usually when turning the robot). You sometimes forget the unit you are programming in—and then assume the wrong one. For example, instead of moving the motors 180 degrees, you want to move them just a little more (e.g., 190 degrees). You change the value to 190 in the Properties block. However, you worked too quickly and you actually set the Move block to run for 190 rotations. That’s a long distance.
Another unit mistake that programmers commonly make is with the Ultrasonic sensor. You can set it to be less than or greater than a number of inches or a number of centimeters. In Figure 13-22, the robot is supposed to move to within one inch of the wall, then stop. However, the properties of the Distance value on the Ultrasonic sensor block state one centimeter. Obviously, one centimeter is a lot less than one inch—and you are puzzled when the robot gets too close to the wall. In NASA’s case, they lost a $125,000,000 orbiter.
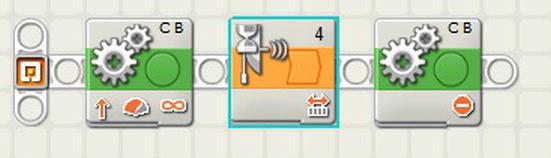
Figure 13-22. Unit problem with inches/centimeters
Work carefully when there are different units of measure such as degrees and rotations, or inches and centimeters. Keep in mind that it’s not just mixing up these units that you need to worry about. Be diligent. Guard against this type of mistake.
Forgetting What You Meant
In the heat of the competition season, you will make many changes to the programs that you write. Consider the following scenario:
- What started out as a simple program to move forward for 4.5 rotations, turn left, lower an arm to collect an object, and then return to base changes to a something more complicated as you perform other missions and challenges planned for the competition.
- When you originally wrote the program, as a good programmer, you documented it and added comments to the code. Now that you are under pressure, you just make changes and additions to the program, and you forget to add to or update comments.
- A week or two later, you have to fix the code, and even worse, explain to the judges what the program does. Your comments do not match the code! How will you remember what the code does?
To avoid this trap, always update the comments (you’ve already added them, right?) when you update the code. Yes, it takes time to do both, but in the long run, you will better remember what the program does and you will be glad that you did the work. Updating comments will also force you to take your time in programming. Simply comparing your blocks with the comments that you revise will help you catch any errors that you might make.
Conclusion
There are several traps that you should avoid as you program your robots for competition. Several are listed in this chapter, along with advice and solutions. Work slowly and steadily to make certain that you avoid traps. If you discover that your program doesn’t do what it should, take a step back to see whether you’ve made one (or more) of the errors mentioned in this chapter. Know how to identify them quickly and fix them. Your teammates will consider you an expert NXT-G programmer in no time.