3. Correcting and Printing Documents
With your basic verbiage in place, you might think you are ready to share your work with others. But before you do so, consider whether there might be a few spelling and grammar errors that might have slipped past you. In this chapter, you discover how to correct spelling and grammatical errors using Word’s built-in proofreading tools. You also find out how to manage automatic corrections, use online dictionaries and research tools, and how to print your work to share with others who might not have computer access to your documents.
Correcting Spelling and Grammatical Errors
Word has a built-in automatic spelling and grammar checker that compares every word and sentence to a built-in dictionary and grammar guide and then lets you know which words, phrases, and sentences are questionable—not necessarily wrong, but worthy of a second look.
There are two ways of checking spelling and grammar in a document. You can check individual words and phrases on a case-by-case basis, or you can run a complete spelling and grammar check of the entire document. Each technique is explained separately in the following sections.
Checking the Spelling of an Individual Word
In an open text document, a wavy red or blue underline (nonprinting) indicates a word that Word cannot identify. It might be misspelled, or it simply might not be in Word’s dictionaries for some reason.
The difference between the red and the blue underlines is context. A red underlined word is not in the dictionary at all. For example, in the following sentence, luse would be red underlined:
You’ve got nothing to luse.
A blue underline represents a word that is in the dictionary but might be used improperly in its current context. For example, in the following sentence, loose would be blue underlined:
You’ve got nothing to loose.
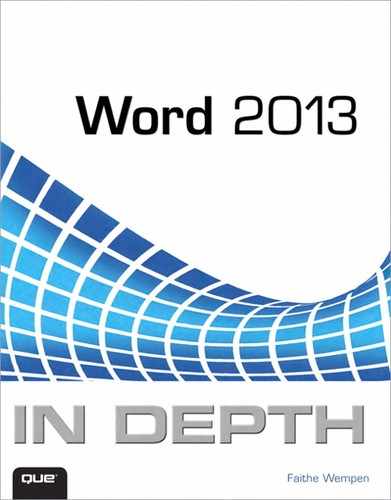
Right-click a red-underlined word to see a menu, as shown in Figure 3.1, that contains these options:
• Spelling corrections—These are suggestions for the spelling correction. Click a suggestion to apply it. If the correct spelling for the word does not appear on the list, you can manually edit the word, as you would any other text in the document.
• Ignore All—Ignores this and all other instances of the word within the current document only. The word is still flagged in other documents.
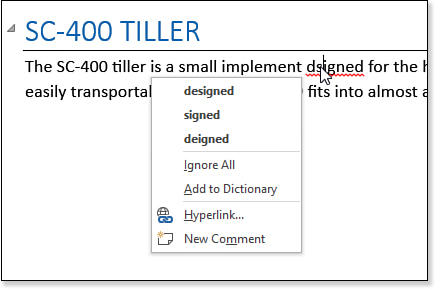
Figure 3.1. Right-click a red-underlined word to get spelling assistance for it.
![]() Note
Note
Earlier versions of Word had an Ignore command on this menu, for ignoring one instance only of the misspelling. It is no longer present, but you can still access Ignore through the Spelling and Grammar feature in Word, on the Review tab.
 Word Marks Passages of Text as the Wrong Language
1. Select the entire document.
2. On the Review tab, choose Language, Set Proofing Language.
3. In the Language dialog box, choose the desired language—in this case, English (United States).
4. Click the Set As Default button. A confirmation box appears.
5. Click Yes to confirm that you want the chosen language to be the default.
6. Clear the Detect Language Automatically check box.
7. Click OK.
• Add to Dictionary—Adds the word to the custom dictionary so that it is not flagged in future documents (or in any instances in the current document).
• Hyperlink—Opens the Insert Hyperlink dialog box, where you can convert the flagged word to a live hyperlink.
![]() To learn more about hyperlinks, see “Working with Hyperlinks,” p. 594 (ch15) and “Creating Hyperlinks,” p. 825.
To learn more about hyperlinks, see “Working with Hyperlinks,” p. 594 (ch15) and “Creating Hyperlinks,” p. 825.
• New Comment—Attaches a new comment to the flagged word, so you can communicate with others about the validity of the word.
![]() To learn more about comments, see “Working with Comments,” p. 776.
To learn more about comments, see “Working with Comments,” p. 776.
Note that a red-underlined word is not always wrong. It’s just not in any of the dictionaries that Word consulted. It could be a proper name, such as the name of a person or product, or it could be a model number, serial number, or some other type of code.
Fixing Individual Grammatical Errors
A possible error in grammar or punctuation appears with a blue wavy underline. Word finds many types of grammatical errors, ranging from double punctuation (such as two commas in a row) to a lack of subject/verb agreement.
Right-clicking a blue-underlined phrase produces a shortcut menu with one or more grammar suggestions or options. The exact content of the menu depends on the type of error, but as shown in Figure 3.2, here are some of the options you might see:
• Grammar corrections—These are suggestions for the grammar correction. Click a suggestion to apply it. In Figure 3.2, there is only one suggestion: is.
• Ignore Once—Ignores the grammar rule in this instance but continues to check for this grammar rule elsewhere in the document.
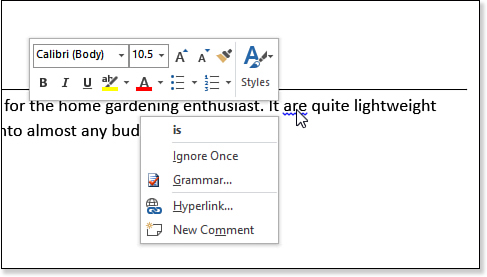
Figure 3.2. Right-click a blue-underlined phrase to get grammar help.
• Grammar—Opens the Grammar task pane, described in the next section.
• Hyperlink—Opens the Insert Hyperlink dialog box, where you can convert the flagged word or phrase to a live hyperlink.
• New Comment—Attaches a new comment to the flagged word so that you can communicate with others about the validity of the usage.
Word is good at finding possible errors and suggesting corrections, but it can’t substitute for a human proofreader. Grammar is a lot more subjective than spelling, and Word makes more mistakes with grammar. In some cases, it even suggests changes that will make the grammar out-and-out wrong. If you don’t know whether something is grammatically correct, don’t take Word’s word for it; look it up or ask a friend.
Performing an Interactive Spelling and Grammar Check
An interactive spelling and grammar check can save some time when you have a large document to check. It uses a task pane interface to jump to each possible spelling and grammatical error, one by one, so you don’t have to scroll through the document looking for the red and blue underlines.
To perform an interactive check, follow these steps:
1. Display the Review tab and click Spelling & Grammar to open the Spelling task pane or Grammar task pane, depending on which type of error it finds first. (Pressing F7 is a shortcut.)
2. If a spelling error is found, examine the word that appears at the top of the Spelling task pane and is highlighted in the document (see Figure 3.3). Then, do one of the following to respond to it:
• Click Ignore to skip this instance but continue to flag other instances in the current document.
• Click Ignore All to ignore this and all instances of the word in the current document.
• Click Add to add the word to the custom dictionary.
• Click a word on the suggestions list and then click Change to change this one instance only to the chosen word, or click Change All to change all instances.
Figure 3.3. Check spelling via the Spelling task pane.
3. If a grammatical error is found, examine the phrase that appears highlighted in the document (see Figure 3.4) and then do one of the following to respond to it:
• Click Ignore to skip this instance but continue to flag other instances in the current document.
• Click a suggestion in the suggestions list and then click Change to change this instance as recommended. If no automatically applicable suggestion is available (for example, if the suggestion is to revise the sentence so that it is no longer a fragment), the Change button is unavailable.
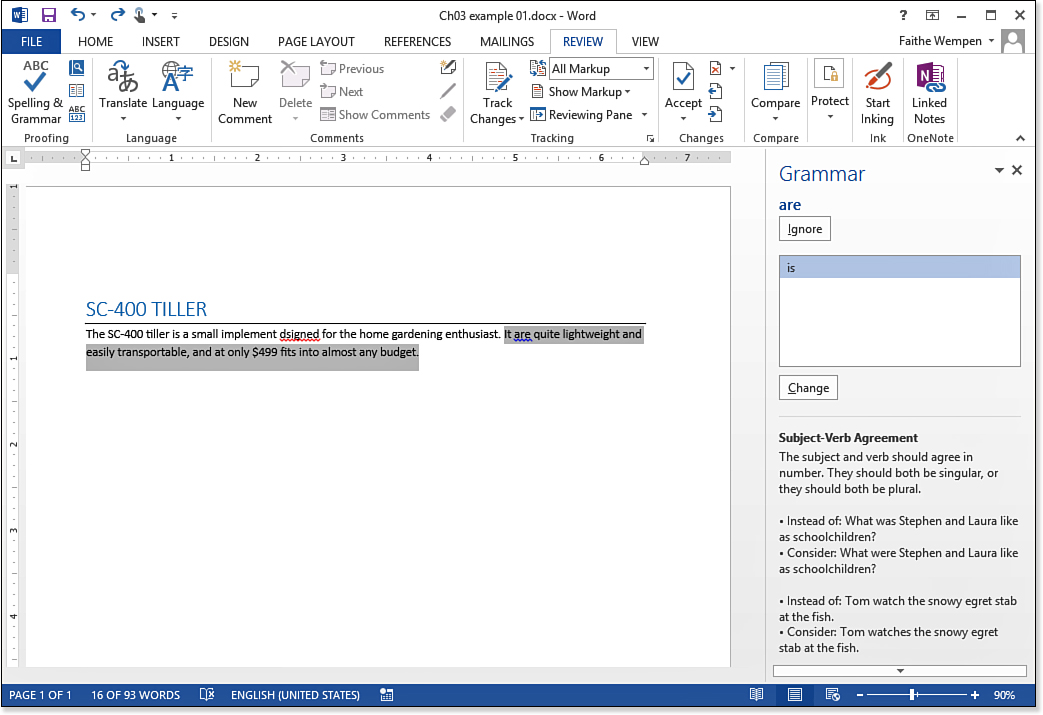
Figure 3.4. Check grammar via the Grammar task pane.
4. Continue the spelling and grammar check until you’ve checked the entire document, or close the task pane to end the check early.
Finding Proofing Errors
When a document contains one or more spelling errors, the Proofing Errors icon appears in the status bar, as shown in Figure 3.5. Click that icon to jump to the first error (starting at the current insertion point position) and display a shortcut menu with suggestions of how to deal with it. It’s like doing a Search for red and blue wavy underlines.

Figure 3.5. Click the Proofing Errors icon on the status bar to jump to an error and see suggestions for correcting it.
When no more proofing errors exist in the document, the button changes to a No Proofing Errors one (a blue check mark).
Customizing Spelling and Grammar Options
The spelling and grammar checker is customizable. For example, you can choose not to check certain types of words (such as words in all uppercase or those that contain numbers), you can turn the wavy red and blue underlines on and off, and much more. You can even specify a level of “strictness” for the grammar checker to enforce.
To access the spelling and grammar options, choose File, Options and then click Proofing (see Figure 3.6).
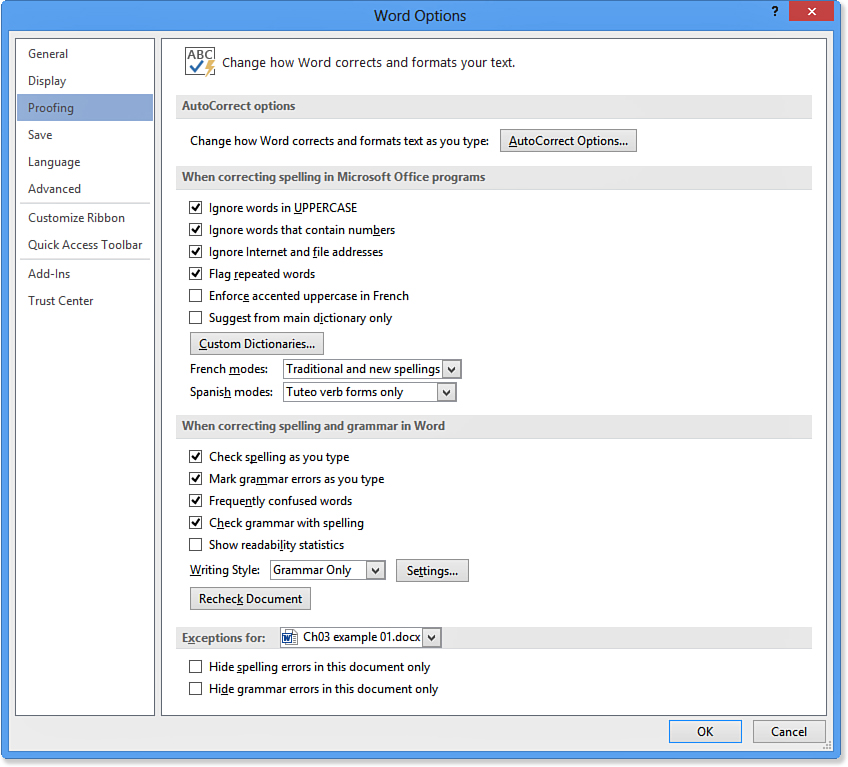
Figure 3.6. Control spelling and grammar settings in the Word Options dialog box.
Basic spelling options are in the When Correcting Spelling in Microsoft Office Programs section. These are applied globally in all Office applications (Word, Excel, PowerPoint, and so on):
• AutoCorrect Options—Click this button to change the automatic corrections that Word makes.
![]() To learn more about AutoCorrect settings, see “Automating Corrections with AutoCorrect,” p. 107.
To learn more about AutoCorrect settings, see “Automating Corrections with AutoCorrect,” p. 107.
• Ignore Words in UPPERCASE—This refers to words that are all uppercase, not just words that begin with a capital letter.
• Ignore Words That Contain Numbers—This refers to words that contain digits, such as BR549, not words that spell out numbers, such as sixteen.
• Ignore Internet and File Addresses—This excludes URLs, email addresses, and file paths (such as C:Windows) from being checked.
• Flag Repeated Words—This marks a possible error when the same word appears twice in a row.
• Enforce Accented Uppercase in French—This marks a possible misspelling in text marked as French when uppercase letters that normally require accents do not have them.
• Suggest from Main Dictionary Only—This confines the Suggestions list to the words found in Word’s main built-in dictionary. Any words you have added to the custom dictionary are not suggested.
• Custom Dictionaries—This opens the Custom Dictionaries dialog box.
![]() To work with custom dictionaries, see “Managing the Spelling Dictionaries,” p. 100.
To work with custom dictionaries, see “Managing the Spelling Dictionaries,” p. 100.
• Modes—You can customize French and Spanish modes via their corresponding drop-down lists.
![]() To learn how to mark a passage of text as French or any other language, see “Checking Spelling and Grammar in Multiple Languages,” p. 106.
To learn how to mark a passage of text as French or any other language, see “Checking Spelling and Grammar in Multiple Languages,” p. 106.
The When Correcting Spelling and Grammar in Word section’s options are specific to Word only:
• Check Spelling As You Type—Turn this off to stop Word from checking spelling (and red-underlining words) on-the-fly. To check spelling when this is turned off, you must use the interactive spelling and grammar check (F7).
• Mark Grammar Errors As You Type—Turn this off to stop Word from checking grammar (and blue-underlining words and phrases) on-the-fly. To check grammar when this is turned off, you must use the interactive spelling and grammar check (F7).
• Frequently Confused Words—Turn this off to stop Word from blue-underlining words that are in the dictionary but might be used improperly in the current context.
• Check Grammar with Spelling—Turn this off to stop Word from checking grammar when using the Spelling task pane.
• Show Readability Statistics—Turn this on to display a box with readability information at the end of a spelling and grammar check.
• Writing Style—Set the level of grammar check you want here; you can have it check for grammar only, or also check stylistic conventions. Examples of style issues include contractions, clichés, commonly misspelled words, and unclear phrasing. (To fine-tune these settings, see the next section.)
• Recheck Document—Click this button to run the spelling and grammar check again after changing the grammar settings to see if any additional errors or concerns are flagged.
The Exceptions For section enables you to select any open document from the drop-down list and then set these options:
• Hide Spelling Errors in This Document Only—This does not turn off the spell checking as you type, but it does prevent the wavy red underlines from appearing onscreen.
• Hide Grammar Errors in This Document Only—Same thing. It does not turn off the grammar checking as you type, but it suppresses the blue underlines.
Customizing Grammar and Style Rules
It can be really annoying when Word insists on marking a certain grammatical or stylistic convention as “wrong” when you know it’s right. To avoid situations like that, you can adjust the grammar and style rule application settings to match the way you want to write.
The grammar settings are controlled from the Proofing tab of the Word Options dialog box, which you saw in Figure 3.6. Choose File, Options, click Proofing, and then scroll down to the When Correcting Spelling and Grammar in Word section, and click the Settings button. The Grammar Settings dialog box appears, as in Figure 3.7.
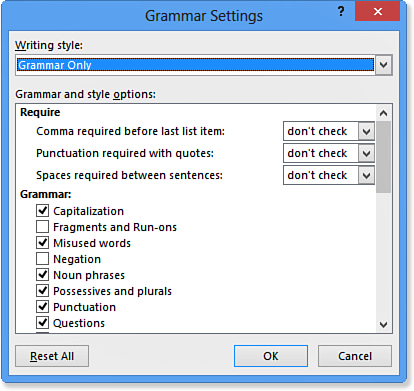
Figure 3.7. Fine-tune the grammar and style settings to your specifications here.
In the Grammar Settings dialog box, open the Writing Style list and select the writing style to customize—either Grammar Only or Grammar & Style.
Then, in the Require section, turn on any of the checks you want to use:
• Comma Required Before Last List Item—This is called the “serial comma” in the professional editing world. When you have three or more items in a list, some writing styles (such as in academic writing) prescribe a comma between the last two, like this: bread, butter, and milk. In other writing styles (such as journalism), the comma is omitted, like this: bread, butter and milk. Because style conventions vary, Word’s default is not to check this. Your other choices are Always and Never.
• Punctuation Required with Quotes—Some writing styles prescribe that punctuation should fall within the quotation mark when both occur at the end of a sentence, like this: Tom is “angry at his father.” In other writing styles, the punctuation falls outside the quotes. Your choices here are Don’t Check, Inside, and Outside. (Inside is the more common convention.)
• Spaces Required Between Sentences—Some writing styles prescribe one blank space between sentences; others prescribe two. (Generally speaking, in monospace fonts such as Courier, two spaces is used, whereas with proportionally spaced fonts, one space is used.) You can choose 1 or 2 here to make Word enforce one convention or the other.
In the Grammar section, clear the check boxes for any of the options you don’t want, and mark any that may not be already checked.
In the Style section, mark or clear check boxes as desired. They are almost all marked if you chose Grammar & Style as the writing style setting; they are all cleared if you chose Grammar Only.
After making the changes to the settings, click OK to close the Grammar Settings dialog box. Then, back in the Word Options dialog box, click the Proofing tab and click Recheck Document to check it using the new settings you just specified.
Managing the Spelling Dictionaries
The main dictionary in Word is not editable, so when you add words to the dictionary, those words have to be stored somewhere else. That’s where custom dictionaries come into the picture.
The default custom dictionary is a plain text file called RoamingCustom.dic, stored in the C:UsersusernameAppDataRoamingMicrosoftOffice15.0numberProofing where username is your Windows account and number is an 8-digit hexadecimal number (which can include digits 0 through 9 plus letters a through g). One example might be 89bd0643. folder. Because it is stored in the folder set for the individual user logged into the PC, the default custom dictionary is available only to that one user; each user has his own. New in Word 2013, the default dictionary “roams” with you, so if you use Word on different computers that are running Windows 8, your custom dictionary is accessible no matter which computer you are using, provided you are logged in to Windows with the same email address.
In Office 2007 and 2010, the default custom dictionary was Custom.dic, stored in C:UsersusernameAppDataRoamingMicrosoftUProof, and this custom dictionary is still available in Office 2013. And, if you happen to have a custom.dic file in the C:UsersusernameAppDataRoamingMicrosoftProof folder (that’s Proof, not UProof), it’s a leftover file from Word 2003 or earlier.
If you upgraded to Word 2013 from an earlier Word version, the custom dictionary file in Word 2013 was automatically modified to include words that were in any earlier-version dictionary files, so you no longer need those old dictionary files unless you still use one of those older Word versions on the same PC. However, if you need to share a custom dictionary with Office 2007 or 2010 applications, you should continue to use custom.dic as your default. See “Setting the Default Custom Dictionary” later in this chapter.
Adding Flagged Words to the Custom Dictionary
To add a word that has been identified as a possible error to your custom dictionary, right-click the red-underlined word and choose Add to Dictionary, or in the Spelling task pane, click Add.
Editing a Custom Dictionary’s Word List
You can also add words to a custom dictionary without the words appearing in the document. Here’s how to do this:
1. Choose File, Options.
2. Click Proofing.
3. Click Custom Dictionaries.
4. Select the desired custom dictionary from the list. As shown in Figure 3.8, the default dictionary is RoamingCustom.dic.
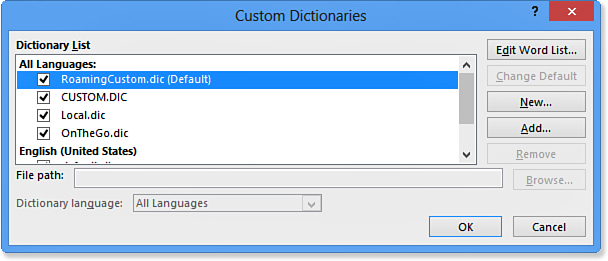
Figure 3.8. Edit custom dictionaries from the Custom Dictionaries dialog box.
5. Click Edit Word List. A dialog box appears listing all the words currently in that dictionary. Remember, these are just the words that have been added to the custom dictionary, and not every word in the main dictionary.
6. To add a new word, type it in the Word(s) box and click Add. Words can be no longer than 64 characters.
![]() Caution
Caution
Type only one word per entry; multiword entries are accepted but are entered that way in the list, and spellings consisting of only part of the entry are not recognized. For example, you could enter Roberto Sanchez, but the spell checker would not recognize Roberto or Sanchez by itself. However, if you enter them as separate words, Word accepts them either separately or together.
7. To delete a word, select it and click Delete. To clear the entire dictionary, click Delete All.
8. Click OK three times to close all open dialog boxes when you have finished editing the custom dictionary.
Changing the Associated Language for a Custom Dictionary
By default, a custom dictionary’s language is set to All Languages, meaning that Word uses it no matter what language is specified for the text. You can limit a dictionary’s use to a certain language by changing its Dictionary Language setting in the Custom Dictionaries dialog box (refer to Figure 3.8). This setting is not available for RoamingCustom.dic, which remains preset for All Languages.
![]() To specify the language to be used when checking a block of text, see “Checking Spelling and Grammar in Multiple Languages,” p. 106.
To specify the language to be used when checking a block of text, see “Checking Spelling and Grammar in Multiple Languages,” p. 106.
Adding Many Words at Once to a Custom Dictionary
The procedure in the preceding section adds only one word at a time. If you have a lot of words to add, the process can be really tedious. You might instead prefer to manually edit the custom dictionary file from outside of Word. Dictionary files are plain text files with one word per line, so they are easy to edit in the Windows Notepad. You can even combine two or more dictionary files into a single file by copying and pasting lists of words between them.
To manually edit a dictionary file, follow these steps:
1. Exit Word and use File Explorer (Windows 8) or Windows Explorer (Windows 7) to browse to the folder containing the dictionary file to edit:
RoamingCustom.dic: C:UsersusernameAppDataRoamingMicrosoftOffice15.0numberProofing
Custom.dic: C:UsersusernameAppDataRoamingMicrosoftUProof
2. Right-click the dictionary file to edit and choose Open. (If needed, select Notepad as the program with which to open it.) The file opens in Notepad (see Figure 3.9). The word list will differ from what’s shown in Figure 3.9 depending on what words you have added.
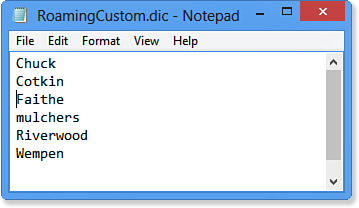
Figure 3.9. If you have a lot of words to add or delete, you can often edit custom dictionary files more expediently in Notepad.
3. Edit the list, deleting and adding words as desired. Copy words from other files if needed.
4. Choose File, Exit. When prompted to save your changes, click Yes (or Save).
Creating a New Custom Dictionary
A custom dictionary can contain a maximum of 5,000 words and can be no larger than 64KB in file size. If you need a larger custom dictionary, create another dictionary.
You might also want to create additional custom dictionaries to keep sets of words separate for different projects. For example, suppose you are doing work for a client that uses an alternative spelling for certain words. You don’t want those words marked in documents for that client, but you do want them marked in documents for all other clients. You can create a custom dictionary just for that client and then enable/disable that dictionary as appropriate for the current document. You might even write a macro that enables and disables that custom dictionary, and you can assign a shortcut key combination to it.
![]() To enable or disable a dictionary, see “Enabling and Disabling Custom Dictionaries,” p. 104. To record a macro, see “Recording a Macro,” p. 858.
To enable or disable a dictionary, see “Enabling and Disabling Custom Dictionaries,” p. 104. To record a macro, see “Recording a Macro,” p. 858.
Follow these steps to create a custom dictionary:
1. Choose File, Options.
2. Click Proofing and then click Custom Dictionaries.
3. Click New.
4. When the Create Custom Dictionary dialog box appears, navigate to the location where you want to store the dictionary. Here are some recommendations:
• To make the dictionary accessible to all users of the PC, store it in C:Program FilesMicrosoft OfficeOffice15Dictionaries. If the folder does not already exist, create it. This location is just a suggestion; you can store the file anywhere that is accessible to all users of the computer.
• To make the dictionary accessible to only the current Windows user, store it in C:UsersusernameAppDataRoamingMicrosoftUProof. Again, this is just a suggestion; you can store the file anywhere within the user’s folder (C:Usersusername) to make it accessible only to that user.
5. Type a name for the dictionary in the File Name box.
6. Click Save.
The new dictionary now appears on the Dictionary List in the Custom Dictionaries dialog box.
![]() To add someone else’s dictionary file to your copy of Word, see “Adding an Existing Custom Dictionary to Word,” p. 105.
To add someone else’s dictionary file to your copy of Word, see “Adding an Existing Custom Dictionary to Word,” p. 105.
Enabling and Disabling Custom Dictionaries
All spell checks use the main dictionary plus all the dictionaries that are selected on the Dictionary List. To disable a certain dictionary from being used, clear its check box in the Custom Dictionaries dialog box (refer to Figure 3.8).
Setting the Default Custom Dictionary
All enabled custom dictionaries are checked automatically during the spell-checking process, but newly added words are placed only in the default custom dictionary. To set the default dictionary, select a custom dictionary in the Custom Dictionaries dialog box and then click the Change Default button.
Using an Exclusion Dictionary
With an exclusion dictionary, you can specify words that appear in the main dictionary that you nevertheless want to be flagged as possible misspellings. An exclusion dictionary is the opposite of a custom dictionary, in that it forces normally correct words to be considered incorrect.
For example, perhaps your company has a product with an unusual spelling that’s similar to a common word in the dictionary, like Tek. Because your employees commonly forget about the unusual spelling and write Tech instead, you might add Tech to the exclusion dictionary so Word will flag it as a potential misspelling. That way the writer can take a second look at each instance to ensure that it is correct.
The default exclusion dictionary is named ExcludeDictionaryEN0409.lex (for U.S. English versions). If you delete this file, Word re-creates it the next time you start the program. By default, the file is empty, but you can add words to it as follows:
1. From Windows, navigate to C:UsersusernameAppDataRoamingMicrosoftUProof.
2. Open ExcludeDictionaryEN0409.lex in Notepad. (See the following sidebar for help with that if needed.) If you haven’t already modified this file, it is empty.
3. Type the words you want to exclude, one per line.
4. Save and close the file.
Adding an Existing Custom Dictionary to Word
You can download new dictionaries from the Microsoft Office website and also buy them from third-party sources. For example, you can purchase dictionaries for medical, pharmaceutical, legal, and academic writing, sparing you the trouble of adding the many words unique to that profession individually to custom dictionaries.
When you get a new dictionary, you must then integrate it into Word. You must also do this for each Word user if you want to share a dictionary among multiple users. For example, log in as one local Windows user, make the change in Word, log out, log in as someone else and repeat, and so on.
To add an existing dictionary to Word, follow these steps:
1. Outside of Word, copy the custom dictionary file where you want it. If only one user should be able to access it, copy it here:
C:UsersusernameAppDataRoamingMicrosoftUProof
If it should be accessible to multiple users, copy it to C:Program FilesMicrosoft OfficeOffice15Dictionaries. (If the folder is not already there, add it.)
2. In Word, choose File, Options.
3. Click Proofing and then click Custom Dictionaries.
4. Click Add. The Add Custom Dictionary dialog box opens.
5. Navigate to the folder containing the dictionary to be added and select it.
6. Click Open. The dictionary appears on the Dictionary List in the Custom Dictionaries dialog box.
To remove a custom dictionary from the list, select it and click Remove. This does not delete the dictionary file; it only removes it from the listing in Word.
Checking Spelling and Grammar in Multiple Languages
By default, the spelling and grammar check is performed in the native language for your copy of Word. For example, if you bought your copy of Word in the United States, English (U.S.) is the default language.
The country designation is significant because many languages have slightly different spelling and grammar rules in other countries. For example, in the United Kingdom (U.K.), words such as realize and customize are spelled with an s instead of z (realise and customise). Word has default AutoCorrect entries that change those words (and others) to the U.S. spellings, so if you specifically need the U.K. spellings, you need to mark the text as being in a different national language. To do so, follow these steps:
1. Select the text that should be checked in a different language.
2. On the Review tab, click the Language button and then click Set Proofing Language.
3. In the Language dialog box, select the desired language. Languages for which support is installed on your PC are indicated by a check mark icon, as shown in Figure 3.10. (The English-language versions of Word include support for all variants of English, Spanish, and French; you can buy additional language packs separately.)
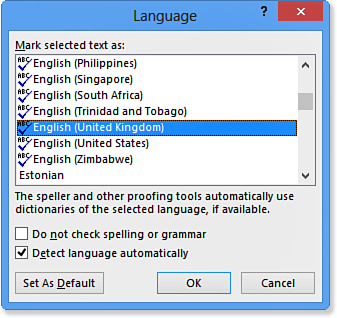
Figure 3.10. Choose a language to be made available for spell checking.
4. (Optional) If you want Word to simply ignore the selected text, mark the Do Not Check Spelling or Grammar check box. Otherwise, Word attempts to check the text using the rules defined for the chosen language.
![]() Caution
Caution
Detect Language Automatically sounds like a good idea, but Word makes mistakes in identification. If you find that passages in U.S. English are not getting properly checked because Word is misidentifying them as some other variant of English, for example, you might want to turn that option off.
5. (Optional) If you want Word to try to detect languages and mark text passages with the correct language automatically, leave the Detect Language Automatically check box marked.
6. (Optional) To make a different language the default for future spell checks (including those in all new documents based on the Normal.dotm template), select it and click the Set As Default button.
7. Click OK.
The text is now marked as being in the chosen language.
Automating Corrections with AutoCorrect
AutoCorrect is a service that automatically replaces all instances of a certain text string with another. There are many uses for AutoCorrect. For example, you can quickly insert symbols with AutoCorrect, such as by typing (r) for the ® symbol. AutoCorrect also works with the spelling checker to automatically fix common misspellings.
AutoCorrect isn’t a command you need to explicitly issue; it happens automatically. You can set its options or turn it off, though, and you can manage the list of AutoCorrect entries.
Rejecting an Automatic Correction
When an automatic correction occurs, you can undo it (if you catch it right away) by pressing Ctrl+Z, or by clicking the Undo button on the Quick Access toolbar.
![]() To permanently prevent an automatic correction, see “Changing or Removing an AutoCorrect Entry”, p. 110.
To permanently prevent an automatic correction, see “Changing or Removing an AutoCorrect Entry”, p. 110.
A small blue box appears when you rest your mouse pointer near the text where the automatic correction occurred. Point to the blue box, and an AutoCorrect Options button appears. Click that button, and a menu opens, as shown in Figure 3.11. From here, you can do the following:
• Click Undo Automatic Corrections to change back to the original usage for this instance only.
• Click Stop Automatically Correcting to reject the correction and add the word or phrase to the Exceptions list, covered in the next section.
• Click Control AutoCorrect Options to open the AutoCorrect Options dialog box, also covered in the next section.
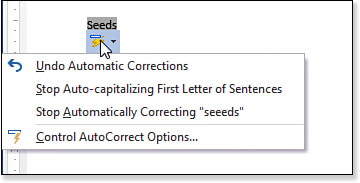
Figure 3.11. The AutoCorrect Options button appears next to an automatic correction in the document.
You might see other options too, depending on the type of correction that was made.
There are also shortcut keys you can use for rejecting an automatic correction. They all appear to do the same thing, but there is a difference:
• Ctrl+Z (Undo) undoes the correction, but Word does not remember that preference.
• Backspace or the left-arrow key undoes the correction and adds it to the Exceptions list.
For Backspace or the left-arrow key to add items to the Exceptions list, you must mark the Automatically Add Words to List check box in the AutoCorrect Exceptions dialog box on the tab for the applicable error type. You learn about this in the next section.
Setting AutoCorrect Options
To access the AutoCorrect options (see Figure 3.12), choose File, Options. Click Proofing and then click the AutoCorrect Options button.
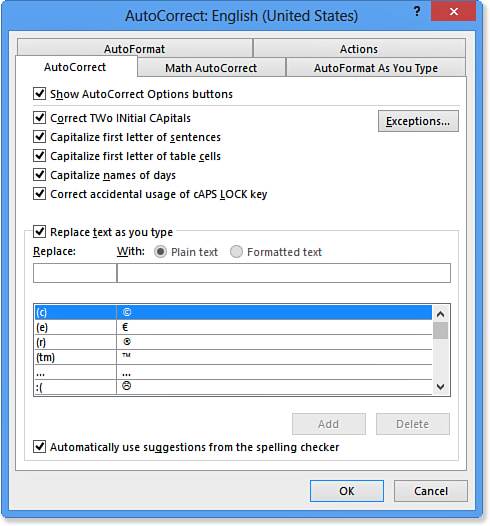
Figure 3.12. The AutoCorrect dialog box enables you to define your own automatic corrections.
The bottom part of the AutoCorrect tab contains a list of AutoCorrect entries. Word comes with a large list of common spelling corrections and symbol insertions. You can add or remove entries from it on your own as well, as the following sections explain.
The top portion of the AutoCorrect tab contains check boxes for enabling or disabling certain features:
• Show AutoCorrect Options Buttons—Clear this to prevent the AutoCorrect Options button from appearing after an AutoCorrect action (as in Figure 3.11).
• Correct TWo INitial CApitals—In a word that starts out with two capital letters and then switches to lowercase, AutoCorrect lowercases the second letter.
• Capitalize First Letter of Sentences—AutoCorrect capitalizes the first letter of the first word that comes at the beginning of a paragraph or after a sentence-ending punctuation mark.
• Capitalize First Letter of Table Cells—AutoCorrect capitalizes the first letter of the first word in each table cell.
• Capitalize Names of Days—AutoCorrect capitalizes days of the week, such as Monday, Tuesday, and so on.
• Correct Accidental Usage of CAPS LOCK Key—When this feature is enabled, AutoCorrect notices when you have left the Caps Lock on; it turns it off and corrects the text that was erroneously capitalized.
To set up exceptions to some of the features, click the Exceptions button. The AutoCorrect Exceptions dialog box opens (see Figure 3.13).
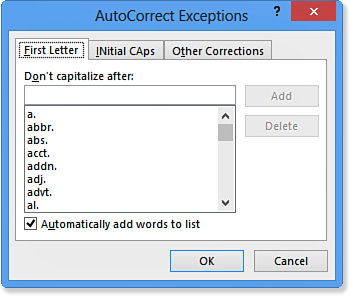
Figure 3.13. Manage the exceptions list for automatic corrections.
For each tab, use Add and Delete to manage the list of exceptions. You can type new words or phrases and click Add, or you can select existing items on the lists and click Delete.
• First Letter tab—Sometimes, the first letter after a sentence-ending punctuation mark (such as a period) should not be capitalized. For example, you would not always want a capitalized first letter after an abbreviation such as etc.
• INitial CAps tab—Sometimes, two initial caps in a row should be left alone. For example, when talking about student IDs, it is perfectly proper to capitalize the first two letters.
• Other Corrections tab—These are words that Word should not automatically correct, even though they appear on the Replace Text as You Type list. For example, perhaps you want to accept U.K. spellings of certain words as well as U.S. spellings.
For each tab, mark or clear the Automatically Add Words to List check box. When this is marked, words are added to the appropriate list whenever you press Backspace or the left-arrow key to undo an AutoCorrect operation immediately after it occurs.
Changing or Removing an AutoCorrect Entry
Most of the time, the AutoCorrect entries that come with Word are useful, but occasionally, you might find one that interferes with your writing. For example, by default, (c) is the AutoCorrect entry for the copyright symbol, but some book publishers use (c) to indicate a heading in a manuscript. Someone working for that publisher would want to remove or change the copyright symbol’s AutoCorrect entry.
To edit an entry, open the AutoCorrect dialog box, as you learned in the preceding section, and then scroll through the Replace Text as You Type list to locate the desired entry. (You can type the first few letters of the entry in the Replace box to jump to that portion of the list quickly.) When the entry appears in the Replace and With boxes, you can edit the text in either box to change the entry. To remove an entry entirely, select it and click the Delete button.
An AutoCorrect entry can consist of plain text (which takes on the formatting of the surrounding text when inserted), formatted text, or a graphic. The following sections explain how to handle each type of entry.
Adding a Plain Text AutoCorrect Entry
To create a new AutoCorrect entry, start in the AutoCorrect dialog box, on the AutoCorrect tab, as shown in Figure 3.12. Type the text into the Replace box, deleting anything that might already be there, and type the desired replacement into the With box (also deleting what is already there, if anything). Then, click Add to add the entry to the list. This type of entry is a plain text one and is limited to 255 characters.
![]() Tip
Tip
You can use AutoCorrect not only for simple spelling corrections but also for inserting blocks of text that you type frequently. For example, you could set up an AutoCorrect entry that replaces your initials in parentheses with your full name. You don’t have to use the parentheses, but they help prevent regular typing from unintentionally triggering the automatic correction.
Adding a Formatted or Graphical AutoCorrect Entry
When typing text directly into the With box for an AutoCorrect entry, there’s no way to include formatting, graphics, or line/paragraph breaks. However, using an alternative method, you can create formatted entries that include all these things, plus special characters and symbols that you cannot directly type into the With box.
Follow these steps to create a formatted entry:
1. In a document, type the full text that you want to paste into the With box in an AutoCorrect entry.
2. Select the text (and graphics if desired). There’s no need to copy it to the Clipboard.
3. Open the AutoCorrect dialog box (File, Options, Proofing, AutoCorrect Options). The text you selected appears in the With box, as formatted text. (If the Formatted Text option button is not already selected, select it.) In some cases, you might not be able to see the text in the With box (for example, if there are blank lines in the block of text you selected), but it is there.
4. In the Replace box, enter the code that should represent the selection. (Avoid using anything that you might type for other reasons.)
5. Click Add.
Configuring Math AutoCorrect
Word 2013 has a whole separate AutoCorrect database for mathematical entries. These entries serve as shortcuts for creating various math-related symbols. For example, instead of hunting around in the Symbol dialog box for the not-equal-to symbol (≠), you could simply type eq, and Word would automatically AutoCorrect it into that symbol.
To work with math AutoCorrect options, click the Math AutoCorrect tab in the AutoCorrect dialog box (see Figure 3.14).
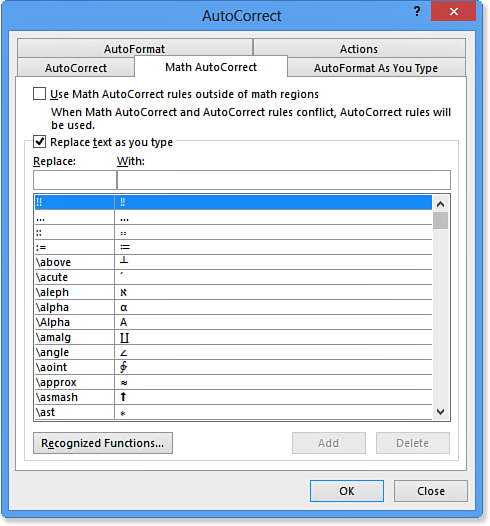
Figure 3.14. Math AutoCorrect is a separate set of AutoCorrect entries that create math symbols.
By default, Math AutoCorrect is in effect only within what Word calls math regions, which are areas the Equation Editor creates. You can change this behavior so that Math AutoCorrect entries are universally applied by marking the Use Math AutoCorrect Rules Outside of Math Regions check box. This would be useful, for example, if you were writing a document on the subject of mathematics and needed to discuss certain principles in sentence form.
You can add and remove entries from the Math AutoCorrect tab in the same way you do on the regular AutoCorrect tab.
![]() For more information about the Equation Editor, see “Creating Math Formulas with the Equation Editor,” p. 542.
For more information about the Equation Editor, see “Creating Math Formulas with the Equation Editor,” p. 542.
Within the Equation Editor, any text you type is assumed to be a variable and is therefore italicized. When you are referencing a function, however, you won’t want that automatic italicizing to occur. Word maintains a list of recognized functions that are not italicized when they appear as text in an equation. To edit that list, click the Recognized Functions button on the Math AutoCorrect tab. Then in the Recognized Math Functions dialog box (see Figure 3.15), add or remove functions from the list. To add a function, type it and click Add. To remove a function, select it and click Delete.
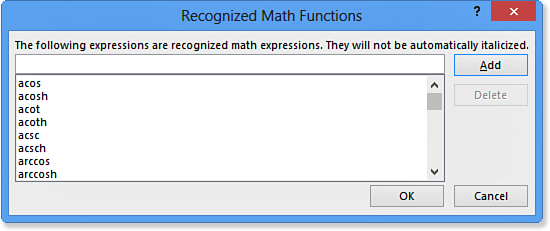
Figure 3.15. Add or remove function names from the list. Items on this list are not italicized when used in the Equation Editor.
Working with Actions
An action is an activity you can perform on certain types of selected text in a document. Depending on the text, Word might offer to perform any of a variety of services on that text, such as looking up an address, scheduling a meeting, or getting a stock quote. Actions were called Smart Tags in Office 2007 and earlier.
Here are some of the types of data that can have actions assigned:
• Addresses—You can add a contact to Outlook or display a map or driving directions.
• Dates and times—You can schedule a meeting in Outlook or display the Outlook calendar.
• People—You can send email or instant messages, schedule meetings, open contact information in Outlook (or create new contact information), and insert addresses.
• Places—You can display a map or driving directions.
• Telephone numbers—You can add a phone number to an Outlook Contact list entry.
Other Office applications also use actions, but the same actions may not be available in all apps. For example, in PowerPoint 2013, only Measurement Converter and Date are available by default.
Performing an Action
When you right-click some text, an Additional Actions command appears at the bottom of the context menu. Point to that command to see a fly-out menu that tells you whether any actions are available for that text. For example, in Figure 3.16, a person’s name has been right-clicked and Word offers a variety of actions suitable for a person.
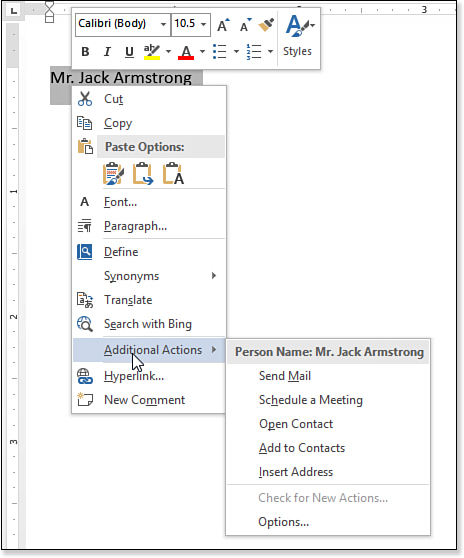
Figure 3.16. Right-click some text and choose Additional Actions and then choose the appropriate action.
Configuring Action Settings
The specific actions displayed are controlled via the AutoCorrect dialog box. Here, you can choose what types of recognizers to use. A recognizer is a type of data, such as date, place, and so on. Follow these steps to configure action settings:
1. Choose File, Options.
2. On the Proofing tab, click AutoCorrect Options.
3. In the AutoCorrect dialog box, click the Actions tab.
4. To turn the action labels on or off as a whole, mark or clear the Enable Additional Actions in the Right-Click Menu check box. (It is off by default.)
5. Place a check mark next to each recognizer type you want to use (see Figure 3.17).
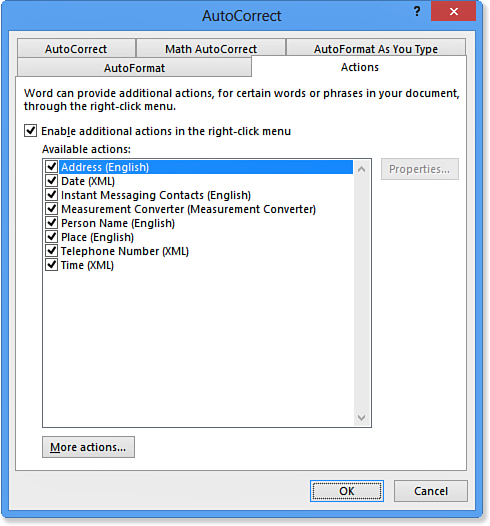
Figure 3.17. Choose which recognizers you want to use as actions in your documents.
6. Click OK two times to close both dialog boxes.
Using Research Tools
In addition to the spelling- and grammar-checking features, Word has a variety of research and translation features that can help you improve your document. These tools are significant because they represent a shift from mechanics to meaning. Word is not only helping you with the mechanics of your document (such as spelling and punctuation) but also actually helping you write stronger and more accurate content by helping you choose the right words and present accurate facts and figures.
Most of Word 2013’s research tools, including the dictionaries, rely on the Internet for their data; these tools do not work very well (or at all in some cases) unless you are online.
Checking a Word’s Definition with a Dictionary
Word’s research tools include your choice of free dictionaries, which you can use to look up quick definitions of words.
First, you must choose a dictionary. On the Review tab, in the Proofing group, click Define, or press Ctrl+F7. The first time you do so, a Dictionaries task pane appears, and you are prompted to choose a dictionary to download and use. (See Figure 3.18.) For example, you might choose Merriam-Webster. Click Download to acquire your choice of dictionaries. After you do so, the task pane is customized for the dictionary you chose.
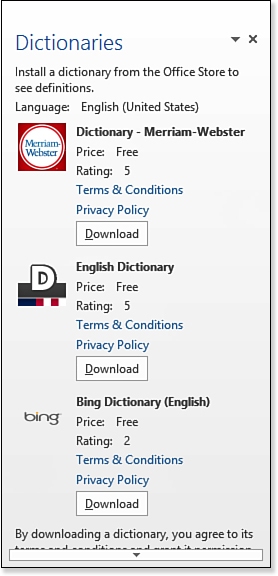
Figure 3.18. Select the dictionary you prefer.
After choosing a dictionary, follow these steps to look up a word:
1. Select the word in the document. If you select more than one word, the dictionary looks up only the first one.
2. On the Review tab, click Define, or press Ctrl+F7.
Information about the word appears, including its definition, its pronunciation, and its hyphenation, as shown in Figure 3.19.
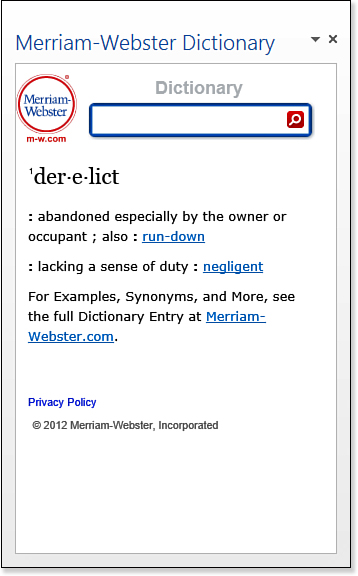
Figure 3.19. The selected word’s definition appears.
3. (Optional) If you want to look up another word, type it in the search box in the task pane and press Enter. Otherwise, close the task pane.
Finding Words with a Thesaurus
A thesaurus is a book (or service) that lists the synonyms and antonyms of common words to help you improve and diversify your word choices. A synonym is a word that means roughly the same thing as another word (such as happy and glad); an antonym is a word that means the opposite of another word (such as happy and sad).
![]() Note
Note
The thesaurus service in Word is provided by the same company as provides the dictionary you chose in the preceding section. If you have not yet chosen a dictionary, the first time you use the thesaurus feature, you may be prompted to select a dictionary.
One way to look up a synonym is to right-click it and use the shortcut menu. To look up a word from your document in the thesaurus, follow these steps:
1. Select the word.
2. Right-click the word and point to Synonyms. A quick list of synonyms for the word appears (see Figure 3.20).
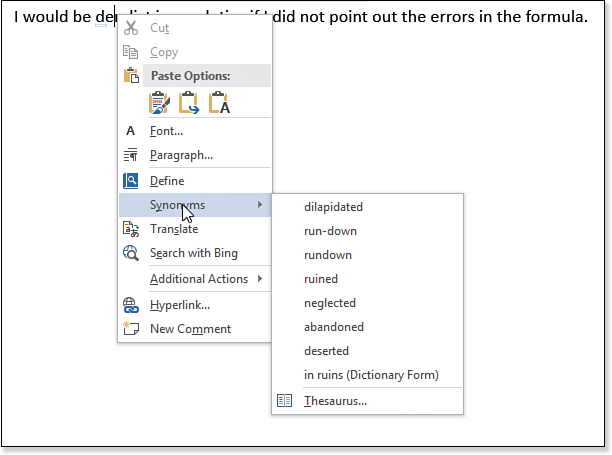
Figure 3.20. Get quick synonyms.
3. To substitute any of the found words for the selected word, click the desired word.
Another way to look up a synonym is with the Thesaurus pane:
1. Select the word.
2. On the Review tab, click Thesaurus or press Shift+F7.
The Thesaurus pane appears to the right of the document, with synonyms and antonyms for the word, as shown in Figure 3.21. (Antonyms are clearly marked as such, if they appear.)
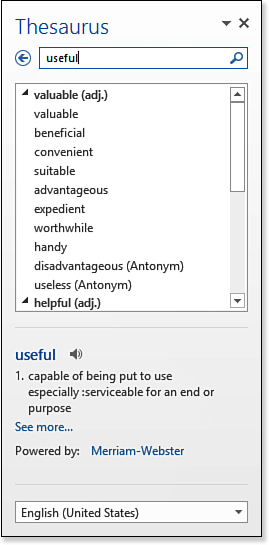
Figure 3.21. Look up synonyms and antonyms in the thesaurus.
3. (Optional) To replace the instance in the document with one of the found words, right-click the found word and click Insert.
4. (Optional) To copy the word to the Clipboard, right-click the found word and click Copy.
5. (Optional) To look up synonyms and antonyms for one of the found words, click it. (Use the Back button on the Thesaurus pane to return to the results for the previous word.)
You can choose which language’s thesaurus to use by selecting the desired language from the Language drop-down list at the bottom of the Thesaurus task pane. The languages that appear on that list are the ones you have enabled in the Language Preferences (File, Options, Language).
Translating Text into Other Languages
Word 2013 can translate from almost any language to almost any other language, a real boon for those who need to communicate internationally. Of course, the translation won’t be as good as if a real person did it, and it might even be unintentionally hilarious to its recipient! But in most cases, you can at least make yourself understood.
Word has two different means of translation available, depending on the languages you are translating to/from. The U.S. English version of Word has built-in bilingual dictionaries and translates word for word between English and several languages, including French, Spanish, Italian, German, Japanese, Chinese, and Korean. More languages are being added periodically, so by the time you read this, even more may be available.
For all other language pairs, Word uses online machine translation by Microsoft Translator or a website called WorldLingo. Using this service, Word can translate between less-common languages such as Arabic, Hebrew, Czech, Polish, Danish, Dutch, Swedish, Greek, and Thai.
The Translate button on the Review tab has a drop-down menu, from which you can select one of these options:
• Translate Document—This translates the entire document using the most recently selected To and From languages. See “Translating the Entire Document,” later in this chapter.
• Translate Selected Text—This translates only the text you have selected, and it does so in the Research pane, as explained in the next section.
• Mini Translator—This is an on/off toggle for a feature that provides a quick translation for an individual word or phrase in the document when you point at it.
Setting the Translation Language
Some of the translation features, such as the Translate Document command, assume certain To and From languages.
To specify the languages to use, click Review, Translate, Choose Translation Language. In the Translation Language Options dialog box that appears (see Figure 3.22), select the languages you want. There are two sections: one for the Mini Translator and one for general translation.
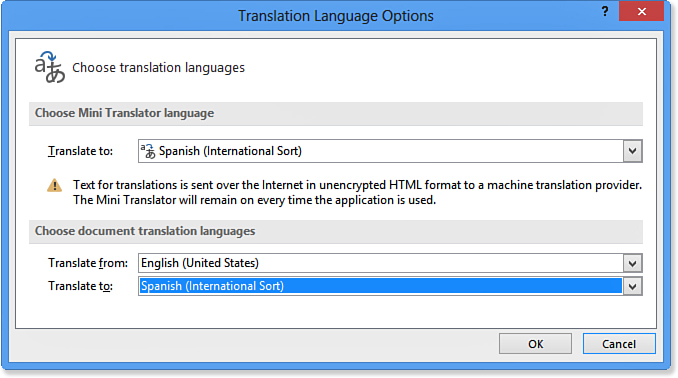
Figure 3.22. Choose the languages you want to use.
Translating the Entire Document
When you translate the entire document, your document is sent via the Internet to a translation service on a website. You must then manually copy and paste it back into Word. Follow these steps:
1. On the Review tab, choose Translate, Choose Translation Language. Choose the languages you are going from and to, and click OK.
2. On the Review tab, click Translate and then click Translate Document.
3. A warning box appears. Click Send. A web page opens, showing the translated text.
4. (Optional) Select the translated text, copy it (Ctrl+C), and paste it into Word (Ctrl+V).
Translating with the Research Pane
The Research pane provides full-service access to the translation services in Word. From there, you can choose different languages, set translation options, and more.
There are two ways of opening the Research pane and displaying the Translation services:
• Right-click a selected word or phrase and select Translate from the shortcut menu.
• Select the word or phrase to translate, and then on the Review tab, click Translate, Translate Selected Text.
When the translation services are displayed, you can select the desired From and To languages, and the translation appears in the Research pane (see Figure 3.23). Depending on the languages you choose, the translation appears from the bilingual dictionaries in Word or from the Microsoft Translator or WorldLingo service.
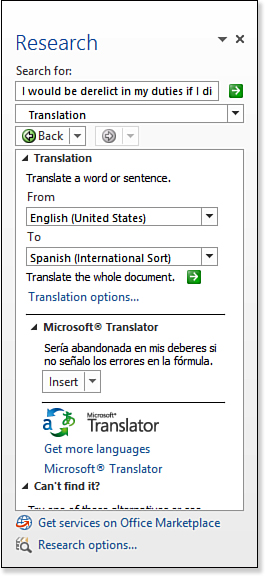
Figure 3.23. Translate text into any of several language choices.
Using the Mini Translator
You can set up the Mini Translator to pop up a ScreenTip containing a quick translation for whatever word (or whatever selected phrase) you point at.
First, make sure the Mini Translator is set for a language other than the one the document is written in. See “Setting the Translation Language,” earlier in this chapter. For example, if the document is primarily in English, you might want the Mini Translator to show certain words in French.
Then, choose Review, Translate, Mini Translator to turn on the feature. From that point on, you can simply point at a word to see a pop-up translation. The toolbar in the pop-up box has a Play button (right-pointing triangle); clicking this plays an audio clip of the word so that you can learn its pronunciation (see Figure 3.24). To turn off the feature, choose Review, Translate, Mini Translator again.
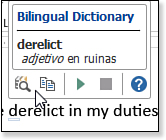
Figure 3.24. The Mini Translator pops up a quick translation of a word or phrase.
Setting Translation Options
Click the Translation Options hyperlink in the Research pane to see a list of dictionaries and services available, as shown in Figure 3.25.
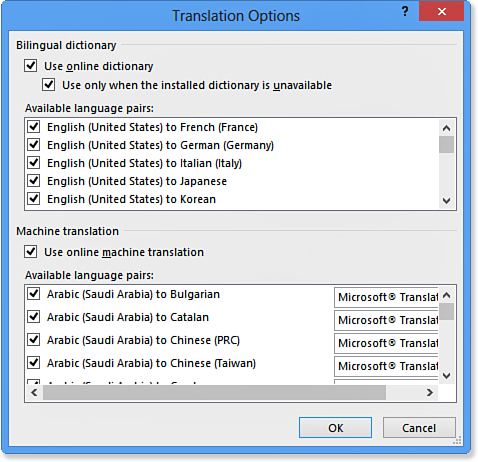
Figure 3.25. Select dictionaries and translation services for each language pair.
In the Bilingual Dictionary section, you have these options:
• Use Online Dictionary—Enables Word to access the web for dictionary lookups.
• Use Only When the Installed Dictionary Is Unavailable—Uses local dictionaries whenever possible, relying on the web version only when the local dictionary is not available.
• Available Language Pairs—Each bilingual dictionary installed in Word is listed here. Clear the check box for a dictionary to disable it. Doing so forces Word to use machine translation (such as WorldLingo or Microsoft Translator) for that language pair.
In the Machine Translation section, you can choose whether to use online machine translation when bilingual dictionaries are not available (or when you are translating more than a few words at a time). Mark or clear the check box for each language pair as desired.
By default, Word is set up to access only two translation services: Microsoft Translator (the default) and WorldLingo (which was the default in earlier Word versions). You can choose which service should be employed for each language pair by changing its drop-down list setting to the desired service. Some language pairs offer only one of the two options.
Looking Up Information at a Research Site
You saw the Research pane at work doing translation in the previous section, but the Research pane is also a full-featured tool that enables you to access online searches, encyclopedias, and more.
You can access the Research pane at any time by holding down Alt as you click the word you want to look up. (Or, if you just want to use the Research pane in general, just Alt+click anything to open the pane.)
Word offers several very good research sites at no additional charge to users:
• Factiva iWorks—A Dow Jones/Reuters service with business news and information collected from more than 9,000 authoritative sources. This is a good source of accurate, up-to-date information.
• HighBeam Research—A research library of more than 3,000 library publications, including 35 million magazines, journals, and other resources you might find at an academic library.
• Bing—This is the web search engine associated with the popular MSN portal. (Note that data from a search engine is not authoritative or even necessarily correct; it just finds what’s out there on the Web.)
All of these require Internet connectivity for use.
To look up a word or phrase at one of these sites, follow these steps:
1. Alt+click the word or phrase in the document. The Research pane opens.
2. Open the drop-down list under the Search For box and choose any site within the All Research Sites portion of the list (see Figure 3.26).
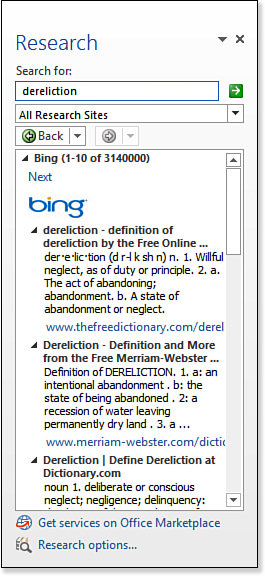
Figure 3.26. Look up a word or phrase with a research tool.
Customizing and Extending the Research Tools
The Research tools in Word are fully customizable. You can choose exactly which services you want to use. You can even add new services and implement parental control limits.
Enabling or Disabling Research Services
Some research services are not enabled by default because they are for some other language or nationality. For example, you might have access to the North American version of Encarta Dictionary by default, but not the U.K. version. You can enable any of these additional services by following these steps:
1. From the Research pane, click Research Options.
2. In the Research Options dialog box, mark the check boxes for any additional services you want to use.
3. Clear the check boxes for any services you don’t want.
4. Click OK.
Adding and Removing Research Providers
One thing that really separates Microsoft Word from the competition is the full array of tools included with it. At no extra charge, you get access to valuable research and reference services such as HighBeam Research, Factiva iWorks, dictionaries, translation services, and more. No other word processor offers anywhere near that much.
Even with all these tools, however, there’s still more to wish for. For example, legal offices might want to add FindLaw, an online version of the West Legal Directory, and LexisNexis’s lexisONE research service, covering state and federal case law and other legal news. Many third-party research tools are available for academic, business, and professional use.
Typically, these for-pay providers have their own setup utility that copies the needed files to your hard disk and sets up the link to the Research pane in Office. After running the setup utility for a tool, restart Word, and the new tool appears on the list of services in the Research pane. In some cases, however, you need to point Word to the new service. To do so, follow these steps:
1. From the Research pane, click Research Options.
2. In the Research Options dialog box, click Add Services.
3. Type the URL of the provider in the Add Services dialog box. (The service provider should have given you this information when you signed up for the service.)
4. Click Add.
5. Follow the prompts that appear for the selected service.
You can also remove a provider from the list. Removing a provider removes all the research services from that provider; you can’t pick and choose. (However, you can enable or disable individual services, as you’ll learn in the next section.)
Here’s how to remove a provider:
1. From the Research pane, click Research Options.
2. In the Research Options dialog box, click Update/Remove.
3. Select a provider. All the services for that provider are automatically selected. Not all of the providers can be removed. For example, Translation and Thesauri cannot be removed.
4. Click Remove and then follow the prompts for removal.
Updating Installed Services
Sometimes, a service provider adds or changes its service offerings. To get the latest information and set up any additional services that might be available, do the following:
1. From the Research pane, click Research Options.
2. In the Research Options dialog box, click Update/Remove.
3. Select a provider. Word automatically selects all the services for that provider.
4. Click Update. Word checks for updates via the Web, downloads them, and offers to install any updates or additions it finds.
5. Follow the prompts to update the service. When the update is complete, click OK at the confirmation message.
Printing a Document
Even in this age of electronic communication, the best way to distribute a document is still often the hard-copy printout. Most legal contracts are valid only when printed and signed, for example, and printouts help you reach audiences that don’t have computer access.
Printing a document can be as simple or as complex as you make it. You can do a quick print job with default settings with just a single mouse click, or you can delve deep into the print setup options to get special effects, custom ranges, and more.
Printing Quickly with Default Settings
For a quick printout consisting of a single copy of the entire active document on the default printer, choose File, Print, and click the Print button without making changes to the settings.
![]() Tip
Tip
If you often print with the default settings, add a Quick Print button to the Quick Access toolbar. To do so, click the down arrow to the right of the Quick Access toolbar, and on the menu that appears, click Quick Print.
You can also do a quick print from outside of Word. In Windows, browse to the folder containing the document to print and then right-click the document and choose Print. The document opens in Word, prints, and then closes again, all in the blink of an eye.
Printing the Current Document
To specify basic properties of the print job, such as number of copies, page range, printer to use, and so on, choose File, Print. Then change any print settings desired before clicking the Print button. (see Figure 3.27).
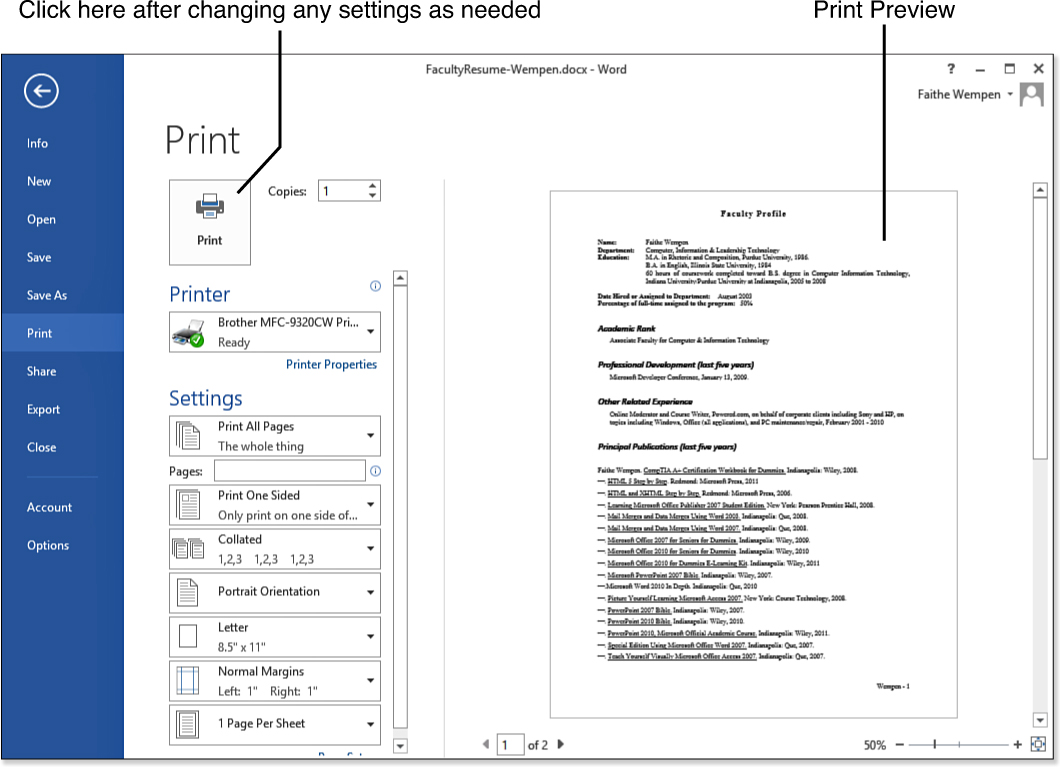
Figure 3.27. Use the Print settings in Backstage View to specify how you want the document to be printed.
Several shortcut key combinations open Backstage View with the Print settings displayed: Ctrl+P, Ctrl+F2, and Ctrl+Alt+I all work. The latter two were for displaying Print Preview in early versions of Word, but in Word 2010 and later, Print Preview is integrated into the printing options section of Backstage View. Therefore, all three key combinations now go to the same place.
Selecting the Printer
The default printer appears under the Printer heading. To choose a different printer, click the current printer to open a drop-down list of available printers, and pick one. For example, you might have a color printer that has a rather expensive per-page cost of ink, so for drafts you might want to print instead to a monochrome laser printer.
The default printer gets that designation from Windows, not from Word. To change the default printer, follow these steps:
• In Windows 8—From the Start screen, type Control Panel and then click the Control Panel tile that appears. Choose View Devices and Printers (under Hardware and Sound). Right-click a printer and choose Set as Default Printer.
• In Windows 7—Choose Start, Control Panel. Choose View Devices and Printers (under Hardware and Sound). Right-click a printer and choose Set as Default Printer.
Choosing Copies and Collation
The number of copies defaults to 1; you can type a value here or increment the current value up or down with the arrow buttons.
If you set the number of copies to greater than 1, collation becomes an issue. When collation is off, all the copies of page 1 print, followed by all the copies of page 2, and so on. When collation is on, full sets print, ready to be stapled. Change this setting with the Collated button under Settings.
Choose What to Print
In the first list under the Settings heading (Print What), the default setting is Print All Pages. You can click the default setting to open a menu from which you can instead specify some other print range:
• Print Selection—The content that was selected when you opened the Print section of Backstage View. If no content was selected beforehand, this option is unavailable.
• Print Current Page—The page in which the insertion point lies.
• Custom Print—A page range that you specify. Choose Custom Print and then enter the page numbers in the Pages text box:
• For a contiguous page range, use a hyphen between the first and last number, as in 1-4.
• For noncontiguous pages or ranges, separate them by commas, as in 2, 5, 7-10.
• For sections, precede the number by an s to indicate you are talking about sections, not pages, as in s2-s4.
• For pages within sections, use p for page and s for section, as in p1s2.
• Document Info—Instead of the document itself, you can print any of several information sheets about the document by selecting them from the list, as in Figure 3.28.
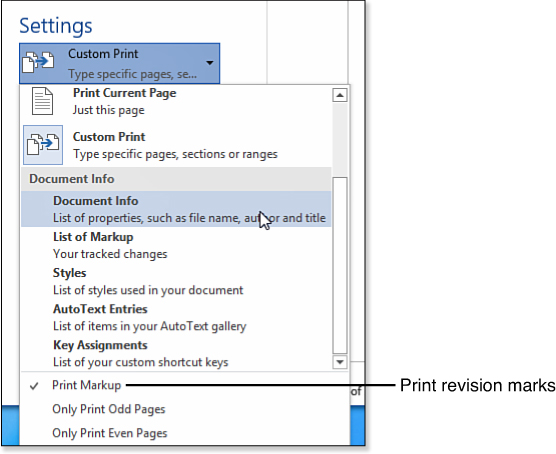
Figure 3.28. Choose what to print.
• Document Info—Prints the property information such as author, title, subject, keyword, date created, and so on.
• List of Markup—Prints only a list of marked changes to the document (done with the Track Changes feature). Note that this does not print the marked-up document. If you want to print the marked-up document, open the menu to choose what to print and make sure that the Print Markup option is enabled (see Figure 3.28).
• Styles—Prints a list of the styles in use in the document.
• AutoText Entries—Prints the AutoText entries available in this document.
• Key Assignments—Prints a list of the custom shortcut key assignments saved with this document.
• Print Markup—Select this option to print the marked-up document.
• Only Print Odd Pages—Select this option to print only the odd pages.
• Only Print Even Pages—Select this option to print only the even pages.
![]() Caution
Caution
Printing AutoText entries prints not only your own entries you’ve created, but all the entries provided in Building Blocks.dotx, so it takes many pages to print them all.
![]() To learn about sections, see “Working with Section Breaks,” p. 250.
To learn about sections, see “Working with Section Breaks,” p. 250.
![]() To learn about document properties, see “Working with File Properties, p. 41.
To learn about document properties, see “Working with File Properties, p. 41.
![]() To learn about markup with the Track Changes feature, see “Using Revision Tracking,” p. 773.
To learn about markup with the Track Changes feature, see “Using Revision Tracking,” p. 773.
![]() To learn about styles, see “Understanding Styles,” p. 213.
To learn about styles, see “Understanding Styles,” p. 213.
![]() To learn about building blocks, see “Working with Building Blocks,” p. 86.
To learn about building blocks, see “Working with Building Blocks,” p. 86.
![]() To learn how to set custom shortcut key assignments, see “Defining Shortcut Keys,” p. 894.
To learn how to set custom shortcut key assignments, see “Defining Shortcut Keys,” p. 894.
Printing on Both Sides of the Paper
Most printers can print on only one side of the paper, so if you need two-sided printouts, you must reinsert the printed pages for printing on the second side. This is known as manual duplexing. Word enables you to specify whether you want two-sided printing, and if so, whether the printer should do the flipping itself (if it is capable) or whether you will flip the paper yourself.
![]() Tip
Tip
The trick to manual duplexing is making sure you understand how paper feeds into your printer. One good way to determine this is to draw an up-pointing arrow on a blank page with a marker or pencil, and then insert it into the paper tray face-up, with the arrow facing into the printer. Then, print the first page of your document on it. This shows you the relationship between how the paper goes in and how the printout is made. You can then adjust the paper orientation accordingly to make sure you are printing the second side of your duplex job on the correct side, and that it’s not upside-down on the second side.
Click the Print One Sided entry under Settings, and select one of the following from its menu:
• Print on Both Sides—Flip pages on the long edge (available only if the chosen printer has duplex capability).
• Print on Both Sides—Flip pages on the short edge (available only if the chosen printer has duplex capability).
• Manually Print on Both Sides—Reload the paper when prompted to print on the second side.
If you use the latter option, to manually print on both sides, only the odd-numbered pages print, and a message appears onscreen telling you to reinsert the pages and click OK. Do so, and Word prints the reverse sides of the pages.
An alternative to manual duplexing is to print only the odd- or even-numbered pages from the Print What list (Figure 3.28, at the bottom of the menu). Printing only the odd or even pages might be helpful if you eventually want to do a duplex print but you want to wait until later to print the second half of the job.
Collation
When printing a multipage document, you can choose how you want the copies collated. The default collation is for each copy to print as a whole. For example, in a three-page document, if you were printing two copies, the pages would print like this: 1, 2, 3, 1, 2, 3. The alternative, called Uncollated, prints them in this order: 1, 1, 2, 2, 3, 3.
Orientation
Choose between Portrait Orientation and Landscape Orientation for the print job. The default is whatever the document itself is set up for (from the Orientation button on the Page Layout tab).
![]() To learn about page orientation, see “Setting Page Orientation,” p. 255.
To learn about page orientation, see “Setting Page Orientation,” p. 255.
Paper Size
You can quickly change the paper size before printing. The choices are the same as with the Size button on the Page Layout tab. The default is Letter.
You can also scale the printout to fit a particular paper size, even if the document is not set up for that paper size. For example, perhaps all you have is legal-sized paper at the moment, but you want to print a document that will eventually be copied onto letter-sized paper with a copier. To set a scale, click the 1 Page per Sheet setting, and on the menu that appears, point to Scale to Paper Size and choose the paper you want to use.
![]() To learn about paper sizes, see “Setting Paper Size,” p. 256.
To learn about paper sizes, see “Setting Paper Size,” p. 256.
Margins
You can change the margins before printing, too. The choices mirror the ones from the Margins button on the Page Layout tab.
![]() To learn about margins, see “Changing Page Margins,” p. 252.
To learn about margins, see “Changing Page Margins,” p. 252.
Pages per Sheet
To get multiple pages per sheet, simply set the number of Pages Per Sheet to the desired value in the Print section of Backstage View. The pages are shrunk to fit automatically; you do not have to specify a shrinkage amount.
Using Print Preview
Print Preview helps you save paper—and wear and tear on your printer—by showing you onscreen exactly how the printout will appear on paper. It’s great for catching unattractive page breaks, awkward placement of headings and artwork, inconsistent indentation, unbalanced columns, and more.
In Word 2013, Print Preview is built in to the Print section of Backstage View. Your document appears previewed on the right side of the screen, and the print options appear along the left side. Figure 3.29 points out the controls available:
• Page—Use the right-arrow and left-arrow keys to move between the pages.
• Zoom—Drag the slider to increase or decrease the zoom on your view of the pages.
• Zoom to Page—Click this button to change the zoom so that one page exactly fits in the allotted space.
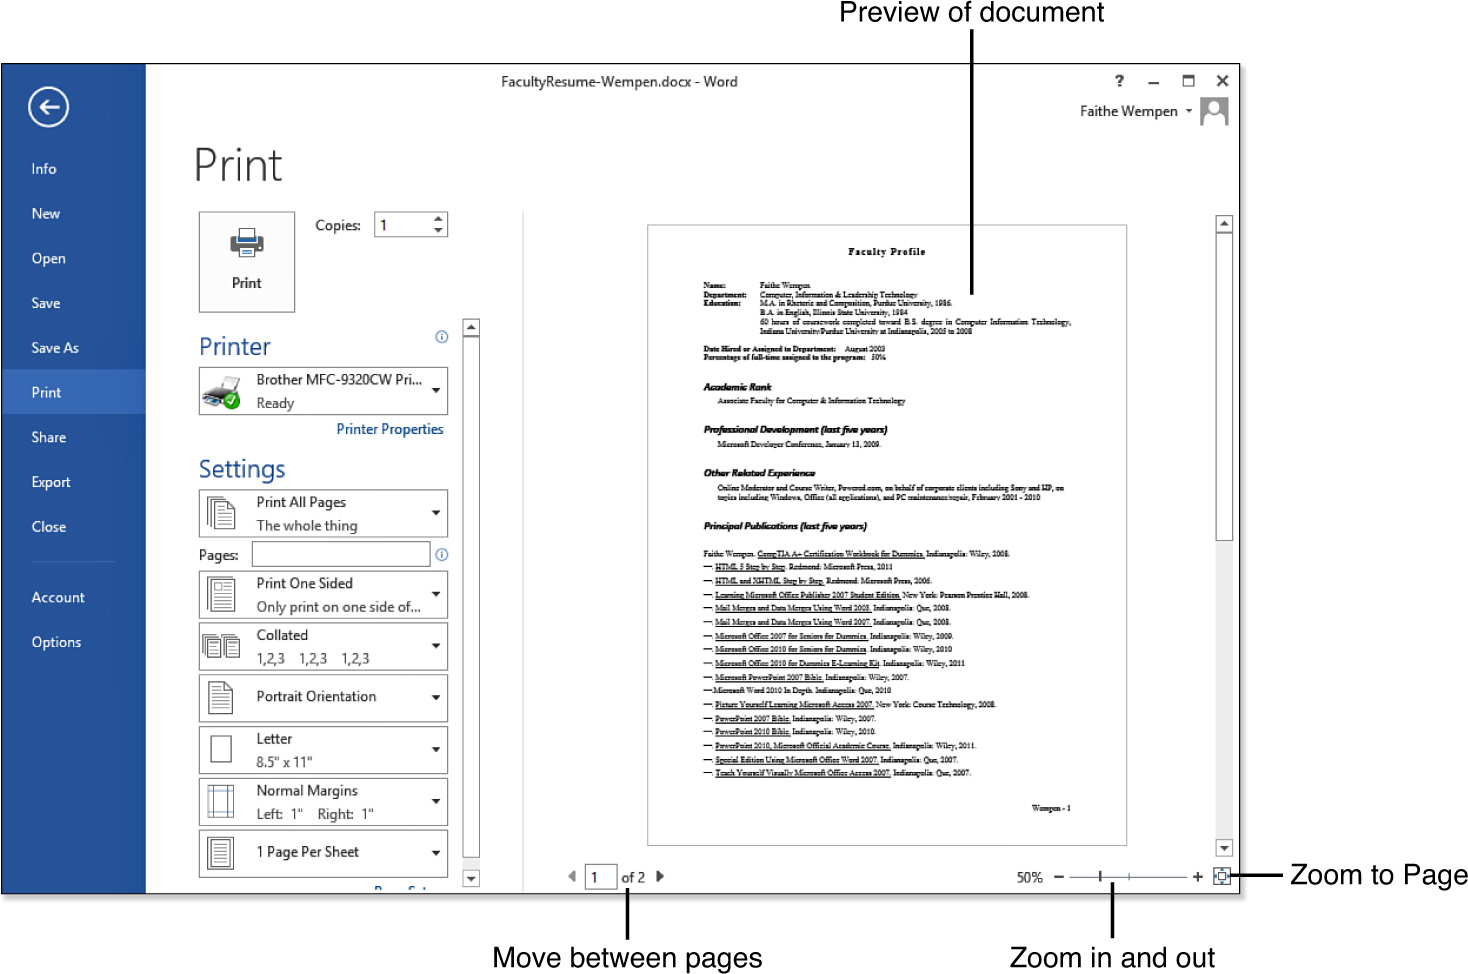
Figure 3.29. Use Print Preview to see how the document will look when printed.
Setting Print Options for Word Documents
The settings in the Print section of Backstage View apply only to the current document. To set options that affect all documents printed in Word, choose File, Options and click Display. At the bottom are printing options. Mark or clear any of these check boxes to control what happens when you execute the Print command:
• Print Drawings Created in Word—This option includes drawings created using Word’s drawing tools, including AutoShapes, in the printout. They are printed by default. The option to exclude them is available because sometimes people use those drawing tools to create annotations (circles, arrows, and so on) that they don’t want to print.
• Print Background Colors and Images—A dark page background that looks great onscreen can look terrible on a printout, especially a black-and-white one. Background colors and images are not printed by default for this reason.
• Print Document Properties—When this is marked, the document properties print in addition to the document. (This is in contrast to the Print What setting in the Print section of Backstage View, through which you can choose to print the document properties or the document.)
• Print Hidden Text—One of Word’s text-formatting options is the Hidden attribute. You can set hidden text to be displayed or hidden onscreen, independent of its print setting. Here, you can choose whether to print hidden text as well.
• Update Fields Before Printing—This is applicable only if the document contains fields (which are covered in Chapter 16, “Working with Fields and Forms”). It ensures that the fields contain the most recent values available.
![]() Caution
Caution
In some cases, you might not want links and fields updated. For example, if you are reprinting an archival copy of a memo that used a date field code, you would not want the date updated to today when printing the document; you would want the field value to stay at its original value.
• Update Linked Data Before Printing—This is applicable only if the document contains links (covered in Chapter 15, “Copying, Linking, and Embedding Data”). It retrieves a fresh copy of the linked data before printing.
Additional printing options are on the Advanced tab of the Word Options dialog box. Click Advanced, scroll down to the Print section, and configure these controls:
• Use Draft Quality—Prints the document at a lower resolution, resulting in a smaller, faster print job.
• Print in Background—Returns control to Word after you’ve started a print job, enabling you to continue working while you are waiting for it to finish. If you disable this option, Word is locked up until the print job has finished spooling.
• Print Pages in Reverse Order—This is useful for printers that spit out the pages face-up rather than face-down; it ensures that the printout pages will be in the same order as in the document.
![]() Caution
Caution
Don’t reverse the page order both in Word and in the printer’s driver properties; otherwise, the two settings will cancel each other out. (The reverse of the reverse is the same as the original.)
• Print XML Tags—When you’re working with an XML document, this option includes the tags in the printout. They are hidden by default.
• Print Field Codes Instead of Their Values—When you’re working with a document containing fields (Chapter 16), by default the values in those fields print. Marking this option makes the field codes print instead of the values.
• Allow Fields Containing Tracked Changes to Update Before Printing—When you have combined change tracking with field codes, this allows them to update.
• Print on Front of the Sheet for Duplex Printing—Enables printing on the front of a sheet on a printer that supports duplex.
• Print on Back of the Sheet for Duplex Printing—Enables printing on the back of the sheet on a printer that supports duplex printing.
• Scale Content for A4 or 8.5×11 Paper Size—Scales the document content to the appropriate size if the printer paper doesn’t match the paper size specified in Word.
• Default Tray—This setting specifies which paper tray to use for the document, if more than one is available. For example, for a letter, you might want the tray that contains your letterhead stationery.
These last two options are applicable only for individual documents. Select the document from the When Printing This Document list and then mark or clear these check boxes:
• Print PostScript over Text—This option enables watermarks or other PostScript-specific content to be printed. When this option is not selected, PostScript overlays are printed beneath the text rather than on top of it. This option is applicable only when printing on a PostScript-compatible printer.
• Print Only the Data from a Form—This setting is applicable only if the document contains form controls (covered in Chapter 16). When this option is marked, only the data from the filled-in fields appears on the printout. When cleared, both the text labels and the data print.
Setting Options for a Certain Printer
Each printer has its own set of properties in Windows. These properties affect all print jobs from all applications, not just Word. You can access these properties from within Word, but it’s important to remember that these are not Word settings.
To access a printer’s properties, first select the printer from the Printer list in Backstage View and then click the Printer Properties hyperlink. A dialog box for that printer appears. If you don’t see the properties you’re interested in, look for an Advanced button, which may open an additional dialog box.
Figure 3.30 shows one example of an Advanced Options dialog box for a printer, but there is little standardization in these dialog boxes because the printer’s manufacturer (or whoever wrote the printer driver) provided options specific to your printer. Color printers have different options from black-and-white; ink-jet printers have different options from lasers; PostScript printers have different options from non-PostScript.

Figure 3.30. Each printer has its own set of properties you can adjust.
Here are a few settings that almost all printers have, though:
• Copies—Like the setting in the Print section of Backstage View, this controls the number of copies of the print job. Be aware, however, that this is a separate setting, and it functions as a multiplier with the Copies value in the Print section of Backstage View. If you set them both to 2, for example, you end up with four copies.
• Orientation—This switches between portrait and landscape modes. The orientation set in Word overrides the orientation set here. This setting is applicable mainly in programs that don’t enable you to set the orientation.
• Paper Size—Choose the paper size that’s in the printer’s input tray. For printers that have multiple trays, you can choose which tray to pull paper from, or you can leave it set to Automatically Select. (In Figure 3.30, there’s a Paper/Quality tab for this and the next two options.)
• Paper Type—Most printers have a paper type setting, but it’s an important issue mostly on ink-jet printers, which print at different resolutions depending on the paper type. On such printers, setting a paper type also sets the print quality.
• Print Quality—If the printer has a separate setting for this from the paper type, specify a value in dots per inch (dpi). The lower the dpi (down to about 300 dpi), the faster the printing; the higher the dpi, the better the quality.
• Color Adjustment—Most color printers have color adjustments you can make, such as color correction, balance, and matching.
• Utilities (or Tools)—Ink-jet printers typically have utilities built in to their printer drivers for cleaning and aligning the print heads. Unless you are experiencing color problems, such as stripes or missing colors, you can ignore these.
Do your own quality comparison. Print a page containing both text and graphics at various dpi settings that your printer supports. (You won’t notice much difference on the text; the graphics are usually the deciding factor.) If you can’t tell a difference between them, go with the lower setting and get faster printing.
Storing Different Properties for a Single Printer
What Windows calls a “printer” is actually a printer driver. You can have multiple drivers installed that refer to the same printer, making it possible to quickly switch among printer settings. For example, if you have a color laser printer, you could have two copies of its driver—one that prints in black-and-white only and one that prints in color. Then depending on the demands of the print job at hand, you could choose one or the other.
To set up additional drivers for a printer that is already installed, use the Add Printer Wizard in Windows (from the Devices and Printers window). Do not automatically detect the printer, though; instead, select it from the list provided or insert the driver disk that came with the printer. After setting up a duplicate copy of the same printer, change the properties for one of the copies.
Printing Iron-On Transfers
Iron-on transfer paper is available at any office supply or computer store. It enables you to create your own transfers for T-shirts, hats, tote bags, and anything else made of cloth. There’s just one gotcha, though: Everything on a transfer is backward, a mirror image of the final design.
What you need, then, is a way to create a mirror image of your design in Word. If your printer supports mirroring (flipping), that’s the easy way to go. Open the Printer Properties dialog box for the printer (File, Print, and then click the Printer Properties hyperlink near the top) and look for a Mirror Image (or similar) check box.
If your printer does not have a Mirror feature, but your design is graphics-only (no text), you can flip it by selecting all the objects and then using the Flip Horizontal command in Word. This doesn’t work with text, though, because Word does not mirror text. (It does work with WordArt, however.)
![]() To learn how to flip objects, see “Rotating and Flipping Objects,” p. 431.
To learn how to flip objects, see “Rotating and Flipping Objects,” p. 431.
If having text on your transfer is important, consider using some other application to create the transfer, such as Photoshop or Paint Shop Pro. These programs let you create text as a graphic; then you can rotate or flip it as freely as you would any other graphic.
Managing a Print Queue
Each printer installed in Windows has its own print queue, in which documents wait their turn to be printed (from all applications, not just Word). Although this is not part of Word per se, it does affect your work in Word. A print spooler service in Windows manages this queue.
The print spooler accepts the print job from Word and holds it in the queue until the job can be sent to the printer. The spooler communicates with the printer and sends the job as quickly as the printer can accept it. If the printer reports a problem, it tells the print spooler, which in turn displays a message to you in Windows. The print spooler relieves the applications of the responsibility of ensuring that the print job has completed, so the application can be freed up to continue working. If the print spooler did not exist or were turned off, Word would lock up until the document had finished printing.
Most of the time, the print spooler does its job in the background, and users don’t even notice it’s there. You might notice a printer icon flash briefly in the notification area in Windows, as the job enters and exits the queue. It’s only when a problem occurs that the print queue gets attention.
When there is a problem with a print job, an icon appears in the notification area (by the clock) indicating that the printer is waiting for help. Usually it is a printer icon with a question mark on it. A pop-up balloon is usually also present, reporting an error condition.
To open a print queue, double-click its icon in the notification area. Or, if the icon does not appear there, open Devices and Printers from the Control Panel and double-click the printer in question.
The print queue window lists the jobs that are waiting to be printed. Normally jobs come and go quickly here—almost instantaneously—so most of the time when you open the print queue window, it is completely empty.
If you want to get a good look at a print job, pause the print queue and then submit a print job. To pause the queue, choose Printer, Pause Printing. Figure 3.31 shows a print queue that has been paused. To resume the queue, choose Printer, Pause Printing again.
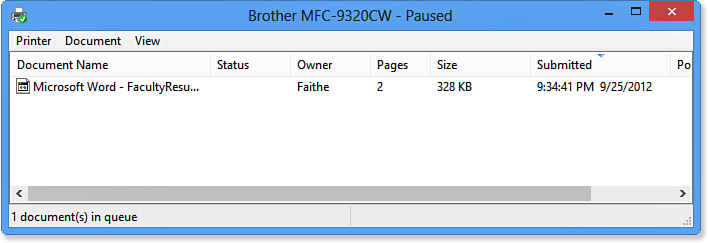
Figure 3.31. A paused print queue with one job waiting to be printed.
When an error occurs, the job’s status shows Error. Usually you cannot recover from such an error; you need to delete the print job. To do so, select the print job and press the Delete key, or choose Document, Cancel.
However, sometimes deleting a print job can leave extraneous codes in the printer that also doom all the print jobs coming after it to pages of gibberish. Therefore, when other jobs are waiting to be printed behind the one with the error, it’s best to pause those other jobs until the problem can be cleared. To pause a print job, select the job and choose Document, Pause. To resume it, repeat this selection.
To delete all the print jobs in the queue, choose Printer, Cancel All Documents. This is a quick way to delete all jobs at once instead of canceling each one individually.
Have you ever accidentally printed a huge document? Rather than eating up all that paper unnecessarily, cancel the print job. To do so, first take the printer offline. (Click its Online button, or pull out the paper tray to interrupt it.) Then, cancel the print job from the print queue. Finally, on the printer itself, use its LED panel (if it has one) to issue the command to cancel the current print job, or just unplug it, wait a few seconds, and plug it back in.
Faxing Documents
For quick document delivery, faxing is an attractive alternative to mailing a hard copy. (So is email, discussed in Chapter 22, “Developing Online-Delivered Content.”)
Faxing is an old technology, but it’s still viable. The standard fax method is to use a fax modem on both ends of the conversation, connected via a dial-up telephone connection. The sending and receiving fax machines send codes that negotiate a mutually acceptable speed and protocol, and then the pages are transferred. With standard faxing, the pages are black-and-white only (no grayscale, no color), and herein lies the primary drawback of faxing. Because all colors and gray tones are reduced to either black or white (whichever they are nearest to), most artwork ends up as shapeless blobs. Color and grayscale-compatible fax machines and services are available, but the machines at both ends need to have that capability.
There are also Internet-based faxing services that can deliver black-and-white or color faxes to any fax machine (or any other Internet faxing service) without your having to actually own a fax modem.
Faxing a Document with a Fax Modem
A fax modem is the same thing as a regular dial-up modem that you might use for a dial-up Internet connection. Faxing services have been included with dial-up modems for more than a decade now, so if you have a dial-up modem, you have a fax modem. However, if you have a cable or DSL modem, you do not have faxing capabilities built in to it. These are not really modems, but rather terminal adapters that connect you to Internet services.
Most fax modems come with basic faxing software that you can install in Windows. Windows also has a faxing client you can use.
Faxing with Windows
A Windows Fax and Scan utility is built in to Windows; you do not have to do anything special to set it up. A fax driver is automatically installed as a printer; just print to it to start faxing.
The first time you print to the fax driver, a Fax Setup dialog box opens; work through the prompts provided to set up your fax account.
After you set up the fax account, start printing normally, but choose Fax as the printer. A New Fax window opens with the current document shown as an attachment. Create your cover sheet in the New Fax window by filling in the fields provided, and then click Send to send the fax (see Figure 3.32).
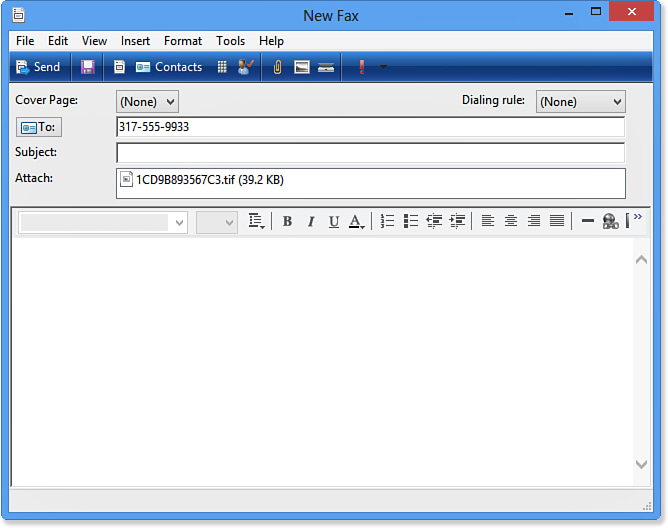
Figure 3.32. Use the New Fax window to prepare and send a fax in Windows.