
Segues
An empty single-view project starts with one scene. It has an arrow pointing into it, indicating that it’s the initial scene. You can set this option with the “Is Initial View Controller” check box in the Attributes Inspector (⌥⌘4) for the scene’s view controller.
You can add another scene to the storyboard by dropping a view controller on the storyboard, but it sits there, unconnected to the first scene. In fact, building a project in such a state will produce a warning that the scene is unreachable. To correct this problem, you need to either give it an identifier (so it can be created programmatically with UIStoryboard’s instiantiateViewController(withIdentifier:)), or you need to connect it to the first scene.
The obvious way to connect it to the first scene is with a segue. Chances are you’ve used one of the simple techniques for creating segues. For example, if the first scene has a button, you can control-drag from the button to the new scene to create a segue that shows the new scene when the button is tapped. Similarly, if you have a table view or collection view, control-dragging from one of its cells to the new scene creates a segue that shows the new scene when the cell is tapped.
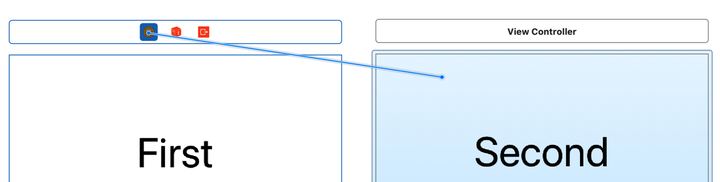
You can even drag from the first view controller’s icon to the second to create a programmatic segue, as shown in the following figure. Assuming you then give the segue an identifier string in the Attributes Inspector, you can perform the segue in code by calling the performSegue(withIdentifier:sender:) method of UIViewController.
Immediately prior to performing a segue, the source view controller receives two delegate callbacks. First, shouldPerformSegue(withIdentifier:sender:) gives the source an opportunity to consider a segue that’s about to be performed and veto it if needed. If approved (or if that method isn’t implemented), the source gets a callback to prepare(for:sender:). Since this method provides the UIStoryboardSegue object itself, the source view controller can get the destination view controller and pass data to it prior to the segue actually happening.
Actually, segues go way deeper—and frankly, get way weirder—than this.
Unwind Segues
Let’s say you have a navigation controller with segues between several scenes, as shown in the figure. This kind of thing is common in “drill-down” scenarios. For example, your app’s “on-boarding” experience might walk the user through screens for picking their username and password, agreeing to legal terms, creating an avatar, and all the other things your app needs to do.
Thanks to the navigation controller in the beginning of this flow, every scene automatically has a navigation bar with a back button, so the user can go back to the previous step. But what if you get to the end of this flow and you want to go all the way back to the beginning? For example, what if the user cancels out of on-boarding, or they complete it and we want to get back to the login screen? You certainly don’t want to programmatically go back through each scene one at a time, right?
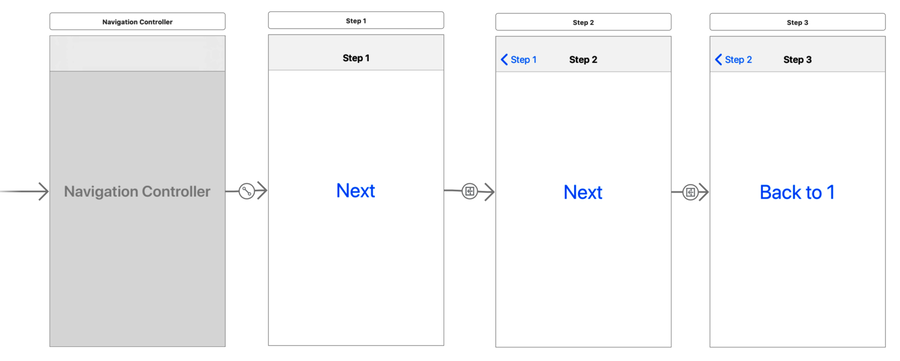
Fortunately, this is where you can use one of those buttons up on the scene’s dock: the exit button. This allows you to create a new kind of segue, the unwind segue.
An unwind segue allows you to return to any earlier scene in the current navigation flow. However, you don’t indicate the destination by naming the scene you go to. Instead, you have to implement a special unwind method in the view controller of the scene in which you want to return.
An unwind method needs to take a single UIStoryboardSegue parameter, and it must be marked with the @IBAction annotation. In Swift, it works better to also suppress the label of the parameter by using _ for its outer name:
| | @IBAction func unwindToStep1ViewController(_ segue: UIStoryboardSegue) { |
| | } |
As you can see, the method doesn’t actually have to do anything, it only needs to exist. That said, if you want to pull values out of the view controller that was exited, you can inspect the segue’s source property.
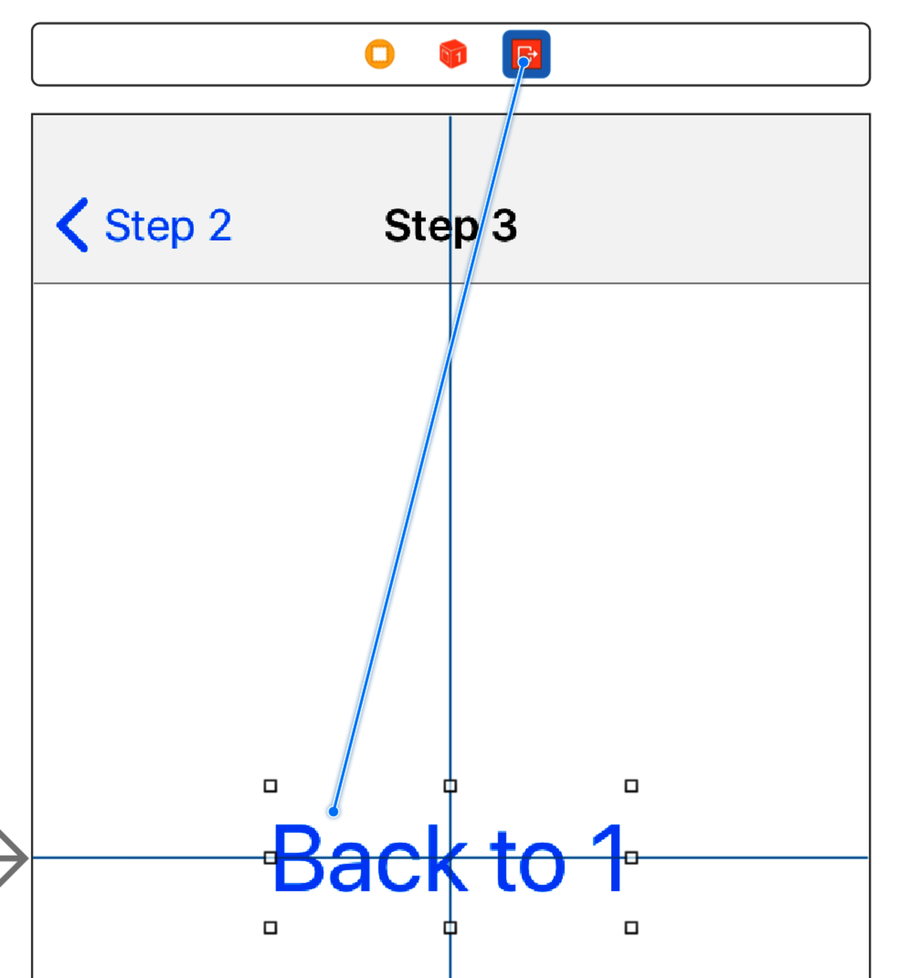
Now, you can control-drag from a button, cell, or even a view controller to the dock’s exit icon to create an unwind segue. When you release the click on the exit icon, a list of connectable methods appear—these are all of the methods that match the unwind pattern described before. If you choose unwindToStep1ViewController, it’ll create a segue that unwinds to the scene with that method, namely the first scene.
Unwind segues are a little weird at first, but they’re useful in apps with deep navigation.
Modal Segues
Aside from the scene-to-scene transitions of segues in a navigation flow, the other most common use of segues is in presenting modal scenes. These are scenarios where a new view controller is presented and must be explicitly dealt with before the app can continue. In a windowed environment like macOS, modals appear as sheets or dialogs on top of the window they’re blocking.
On iOS, the story is a little different. By default, if you create a modal segue, the destination view controller will slide in from the bottom of the screen, as opposed to navigations that slide in from the right.
The modal scene doesn’t come equipped with a back button, like it would in a navigation flow, so you need to explicitly provide some way out for the user. Often, this will be an exit segue, either wired to a button, or called programatically. You can also programmatically find the view controller that presented the modal scene, and tell it to dismiss the modal, like this:
| | @IBAction func handleManualDismissTapped(_ sender: Any) { |
| | presentingViewController?.dismiss(animated: true, completion: nil) |
| | } |
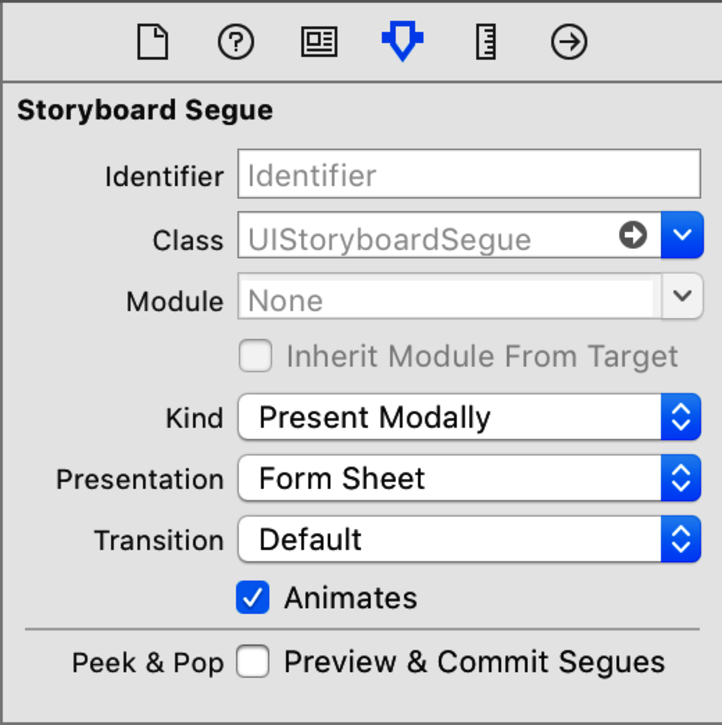
By default, modal segues work the same on the iPhone and iPad. That can be weird on the iPad, since modal scenes are often short interactions like logins or preferences that don’t need the full screen space of an iPad. One affordance for this is the form sheet. Click a modal segue and bring up its Attributes Inspector to see how this works. If you change the “Presentation” from “Full Screen” to “Form Sheet”, you’ll get the special behavior on the iPad. On the iPhone, this will continue to be a bottom-up, full-screen modal as usual. But on the iPad, the modal view will now take up only a portion of the middle of the screen, as shown in the figure.

This is still a modal, so you still need to provide a way to dismiss the view controller via an exit segue or equivalent, just like on an iPhone. Clicking on the gray area outside the form sheet doesn’t do anything.
By default, the system will choose a size for a form sheet—currently 540 x 620, regardless of the iPad model—but it’s always possible that could change to accommodate much larger or much smaller iPads in the future, so it’s smart to use Auto Layout for the contents of the modal scene and be willing to adjust. Or, if you’re certain a specific size will work for the contents, you can also enable “Use Preferred Explicit Size” in the modal scene’s Attributes Inspector to set a fixed size.
Size Classes in Form Sheets | |
|---|---|
|
|
If you use size classes in your Auto Layout or app logic, be aware that the values inside a form sheet may not be what you expect. The horizontal size class is compact, and the vertical is regular, as if the view controller were being shown on a portrait-orientation iPhone. Oddly, this is the case even if the iPad is in a landscape orientation. If this isn’t the behavior you want, you may need some other technique for iPad-specific behavior, like looking at the userInterfaceIdiom in UIDevice. |
Pop-Over Segues
Another option for showing small interactions above the current scene is to use the pop-over idiom. In some ways, a pop-over is a lot like a form sheet modal, with the added bonus that the user can tap outside the pop-over to dismiss it. Like the form sheet, you can (and usually should) set an explicit size for it in the Attributes Inspector.
To create a pop-over segue in a storyboard, choose the “Present As Popover” option when control-dragging from the button to the destination scene. You can also turn a segue into a pop-over by selecting the segue, bringing up the Attributes Inspector, and changing the “Kind” to “Present As Popover”. On an iPad, the result looks like the following figure:


Unlike a form sheet, which is centered horizontally and vertically on screen, pop-overs are placed relative to an anchor object. If you create the pop-over segue with a control-drag from a button, the button will be the anchor, but you can change this in the segue’s Attributes Inspector. You can also use the Attributes Inspector to control from which directions the pop-over will point to the anchor, which in turn will dictate where and how the pop-over can appear.
On the iPhone, the pop-over will be presented as if it were a full-screen modal. This means that if the app runs on both iPads and iPhones, you’ll need to present a button or some other UI to use an exit segue or programmatically dismiss the pop-over.
On the other hand, if the pop-over is small, you can make it work as a pop-over on the phone too. To do so, you need to do three things in code:
-
Explicitly declare that the UIModalPresentationStyle is popover.
-
Set a delegate on the view controller’s popoverPresentationController.
-
Implement the UIAdaptivePresentationControllerDelegate method adaptivePresentationStyle(for:) to return none.
You can set up the presentation style and assign the delegate inside the view controller’s init(coder:):
| | private let showAsPopoverOnPhone = true |
| | |
| | required init?(coder decoder: NSCoder) { |
| | super.init(coder: decoder) |
| | if showAsPopoverOnPhone { |
| | self.modalPresentationStyle = .popover |
| | self.popoverPresentationController?.delegate = self |
| | } |
| | } |
Assigning the delegate will produce an error until you extend the class to implement the UIPopoverPresentationControllerDelegate protocol. This looks a little odd because you don’t need to implement any methods from that protocol. However, the adaptivePresentationStyle(for:) method you need is in its superprotocol, so this is where you override it to return the none style:
| | extension PopoverSceneViewController: |
| | UIPopoverPresentationControllerDelegate { |
| | |
| | func adaptivePresentationStyle(for controller: UIPresentationController) |
| | -> UIModalPresentationStyle { |
| | return .none |
| | } |
| | } |
Run this on an iPhone, and now the pop-over works like it does on an iPad, as seen in the figure. And with a small enough pop-over, it’ll look just fine in portrait or landscape. As a bonus, now that you inherit the pop-over behavior of dismissing by tapping outside the pop-over, you can even remove the explicit dismiss button.
