
On-Demand Resources for tvOS
So now that you’ve seen iOS, macOS, and watchOS, what do you make of tvOS? tvOS apps are kind of weird because Apple TV as a computing platform is weird. It’s a box that’s always plugged in—and thus has no energy consumption or battery use concerns—yet has the CPU and storage characteristics of a mid-tier iPhone. Moreover, unlike a Mac or an iPhone, which still has some functionality without a network connection, the Apple TV is assumed to always be connected to a network, and is nearly useless otherwise.
Being always connected means a tvOS app is in some ways akin to a browser app. In fact, tvOS apps were originally limited to 200 MB in size (though this restriction was eliminated in 2017), with the assumption that apps could download additional content once they’re installed and running. This idea is still essential to the Apple TV experience: rather than simply running out of storage like a Mac or iOS device would, the Apple TV will purge unneeded resources to free up space… although this means apps will have to re-download those resources later if they’re needed again.
The way this works is with a system of on-demand resources, which are well supported by Xcode.
Not Just for tvOS | |
|---|---|
|
|
While on-demand resources are primarily aimed at tvOS apps, they’re also available on iOS. If you write an iOS app that uses a lot of large resources, but uses each one only for a limited time (like a level-based game, or episodic content), on-demand resources may make sense for you too. They’ll allow your user to save time and money by not downloading unused assets, and make your app less of a multi-gigabyte target for deletion when your user runs out of storage. |
Developing an On-Demand Strategy
To use on-demand resources, you need to do some planning up front. Think about the following:
-
What kinds of resources can be loaded on-demand? Pretty much anything other than executable code can be an on-demand resource. In general, you probably want to think about large files like images, textures, shaders, audio, video, and perhaps scripting-language code.
-
When will you need them? An image used everywhere in your app might as well be in your app bundle (though it can still be made an on-demand resource to make the initial App Store download smaller). Instead, you need to strategize about things that may be needed in certain situations, long after the app has been run for the first time. For example, if you have a game that starts off as a romantic comedy but turns into a sci-fi war epic, you can put off downloading the giant robot graphics until after the player reaches the big twist.
-
Which resources go together? Depending on your app, resources might be groupable by a specific part of the app (like different levels in a game), or by how it’s used (maybe you have certain sounds that are only used in 1-player or 2-player modes, for example). Keep in mind that any asset can belong to multiple groups, and can be loaded when any group requires it.
-
Can the disruption of the download be minimized? Downloading resources will take time, and rather than slamming the door on the user while resources download, you may want to think about how to get resources loaded just in time. For example, you can load a game’s main resources in the background while the player is working through a tutorial mode, or load the level 3 data while they’re fighting the level 2 boss.
Setting Up On-Demand Resources
The first thing you need to do to use on-demand resources is to opt into using them. You do this by going to your target’s build settings and looking in the “Assets” group for “Enable On Demand Resources”, as seen in the figure. It’s set to “Yes” by default for tvOS and iOS projects, but it’s always worth a quick look to be sure:

Next, prepare your resources. You might think that to make resources available on demand, you’d have to put them on a website somewhere. But actually, you put your resources in the Xcode project itself, and then mark them as being on-demand. For images, this has the additional advantage of working with the asset catalog system for supporting multiple Retina resolutions: provide 1x, 2x, and 3x versions of your images, and the right one will be sent to the user at runtime.
The download code has a sample project, TVResourcesDemo that reworks the example from Embedded Scenes, which showed a list of videos by title and description, and let the user drill down into them. On Apple TV, the descriptions aren’t enough to fill the screen and make it interesting, so this sample adds a background image for a little visual flair. These background images are the on-demand resources, and are collected in an asset catalog called Images.xcassets. The following figure shows the app running in the tvOS simulator:

The two videos available in the sample code are the same as before: the “bip bop” test for HTTP Live Streaming, and an Apple WWDC keynote. Imagine that these are the first of two groups of videos the app will make available: diagnostic videos (to test your connection), and event videos like keynotes. Those will be the two groups of resources: any time the user watches a diagnostic video, the app will load a test pattern background behind the description, and when they watch an event video, they’ll see a WWDC audience image.
The way to “tag” an image (or any other file in your project) is to select the top-level project file in the Project Navigator, select the target, and select the Resource Tags tab. This is where you create resource tags and select which files (or members of asset catalogs) will get those tags.
The resource tag editor either shows all resources, or categorizes them by behavior. Switch to “Prefetched” to show the categories, which represent different behaviors for resources:
-
Initial Install Tags: These resources are downloaded with the app itself, and count toward its size on the App Store. However, they can be purged locally if the system needs to free up filesystem space.
-
Prefetched Tag Order: These resources start downloading after the app is installed. The order in which tags are arranged in this category determines the order in which they are downloaded.
-
Download Only on Demand: These resources are only downloaded when explicitly requested by the app. This is the default category.
To create a new resource tag, click the plus (+) button at the top of this view, next to the “Prefetched” button. By default, this will create a new table titled “New” in the “Download Only on Demand” group. “New” is the name of the resource tag—which you should immediately change to something meaningful—and the table shows all the resources tagged with that name.
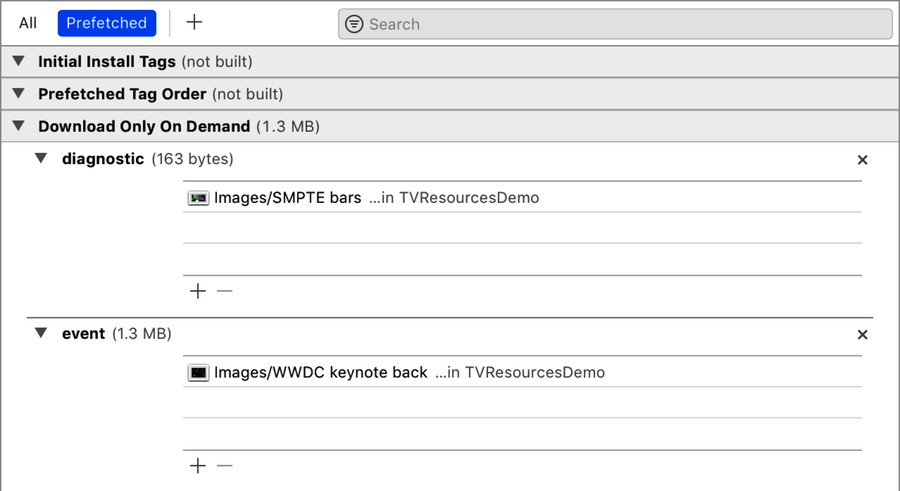
To add a file to a tag, click the plus (+) button at the bottom of that table and select a file from the sheet that appears. If you add an asset catalog, all images in the catalog are added to the tag, but you can selectively remove images you don’t want the tag to apply to. In the following figure, two tags have been created—diagnostic and event—each containing one image from Images.xcassets:
Once you add a resource (such as an image or a file) to a resource tag, its attributes inspector will show all of the tags that apply to it. For example, selecting the WWDC picture in Images.xcassets shows that it has the event tag:

Also, if you have moved any tags into the Initial Install Tags or Prefetch Order categories, these will be listed in the Assets group of your target’s build settings.
Downloading On-Demand Resources
Once you’ve set up your on-demand resources, the last step is to actually use them. With an on-demand resource, you can’t just immediately call it up with UIImage(named:) or by search for it in the app bundle, because you can’t assume it’s even there.
Instead, you need to work with the NSBundleResourceRequest class. You create an instance of this class with a set of tag names, and the request object coordinates your use of resources that use those tags. You can ask the request if the tagged resources are already downloaded, start downloading resources that aren’t yet on the device, and mark the tagged resources as no longer being needed.
In its simple form, this is a two-step process: call conditionallyBeginAccessingResources to see if the tagged resources have already been downloaded. This method takes a completion handler that receives a Bool parameter indicating whether the resources are already downloaded. If true, you can load the resources from the app bundle as you normally would.
If the completion handler gets a false parameter, you will need to call beginAccessingResources to start downloading. This call takes another completion handler, which will be called when the download completes. Its parameter is an optional Error, where nil means there was no error and the resources downloaded successfully.
The sample code combines both of these steps into a convenience class called ResourceManager, with a single method called loadTag. This method takes a single tag name and a completionHandler parameter, which will be called immediately if the resources are already downloaded, or once the download completes or fails with an error:
| | func loadTag(named name: String, |
| | completionHandler: @escaping (Error?) ->Void) { |
| | let tags: Set<String> = [name] |
| | let request = NSBundleResourceRequest(tags: tags) |
| | request.conditionallyBeginAccessingResources { success in |
| | if success { |
| | print ("already had (name)") |
| | completionHandler(nil) |
| | } else { |
| | print ("beginning access for (name)") |
| | request.beginAccessingResources() { errorOrNil in |
| | completionHandler(errorOrNil) |
| | } |
| | } |
| | } |
| | } |
Then, when the view controller that shows a clip’s description needs the background image, it calls this method with the name of the image’s resource tag, along with a completion handler to load the image and set it on a background UIImageView:
| | ResourceManager.shared.loadTag(named: backgroundImageTag) { |
| | [weak self] errorOrNil in |
| | if errorOrNil == nil, let strongSelf = self { |
| | DispatchQueue.main.async { |
| | strongSelf.backgroundImageView.image = |
| | UIImage(named: backgroundImageName) |
| | } |
| | } |
| | } |
This example does nothing to mitigate the user experience during the download; the user will get a black background until the resource is downloaded, and then the background image will just pop in. Depending on your needs, you may need to explicitly show the user some sort of “downloading…” UI while they wait. Fortunately, the NSBundleResourceRequest object has a progress property that you can use to update a progress bar or some other indication of how far the download has progressed.
Tags Can Overlap | |
|---|---|
|
|
Keep in mind that a given resource can appear in any number of tags; if an image was tagged as both diagnostic and event, then requesting either of those tags will download the image. |