Adding Test Targets
When you first create a project, Xcode asks if you want to create unit test and UI test targets to go with it. These are shown as check boxes while configuring the project (you’ll also get the option to create test targets when you add frameworks, app extensions, and other kinds of code targets within the project):

But what happens if you chose not to create test targets, and then need them later? Fortunately, this is easy to deal with. Select the project from the top of the Project Navigator, and at the bottom of the Projects and Targets list, press the plus (+) button to create a new target (you can also use the menu item Editor > New Target…). This brings up the usual sheet of target templates. Making sure you’ve selected the right tab for your current platform (iOS, macOS, or tvOS; automated tests are not supported on watchOS), scroll down to the “Testing” group and select either the UI Testing Bundle or the Unit Testing Bundle:

After you choose a test target type, the sheet shows you various options for your test target, including the usual metadata like a name and organization identifier, but also what language you want to write your tests in. You also need to select which project and target within the xcodeproj the tests will work with. This is how you can test a framework target independently of any app or app extension targets that use it:

Once added, the test target will have its own Info.plist metadata file, and a single test file with a few trivial tests, and comments on how to build out the test suite further. You can run individual unit tests by clicking the diamond icon in the left gutter next to the test method name, or run all tests in a file by clicking the diamond next to the test class declaration. Usually, though, you’ll create many test files, and you can run all of them with the menu item Product > Test (⌘U).
Once you have a significant number of tests, you’ll probably want to stop looking so much at individual test source files and instead at the Test navigator (⌘6). This shows a hierarchy of all the test targets for the current app target, organized by test class and test methods within them. You can mouse over any test method or class to expose a run button. But usually the main purpose of this navigator is to review test results, particularly if you ran all of the tests with ⌘U. Passed tests will show a green diamond icon with a white checkmark, failed tests will show a red diamond with an X. The following figure shows a small group of tests that have all passed:

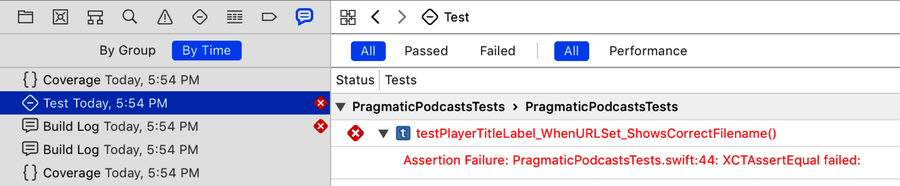
If a test fails, just double-clicking the failed test in the Test navigator won’t show you the reason for the failure; instead, it takes you to that test’s source. The source editor will show an error overlay with a summary of the error, but the message often gets truncated. If you don’t understand why a test failed, you need to go to the Report Navigator (⌘9), and in the list of reports (which includes build logs, test logs, and run logs), click the most recent test. As seen in the figure, this shows the tests in the editor area, and lets you expand failed tests to see a full log of the problem: