
Editor Extensions
Xcode extensions use the XcodeKit framework, which contains protocols for extensions to implement, and data types sent to and from extensions. As of Xcode 9, the only extension point is the ability to add commands to the Editor menu while editing source code. The extension can access the contents of the file being edited, as well as the current text selection.
That’s not a lot, but you can do interesting things with it. For example, some developers have used extensions to perform code formatting and other niceties. As a simple version of this, you can create an app extension to replace escape sequences for emoji with their actual emoji characters, like how Slack or Discord will replace :thumbsup: with the thumbs-up emoji.
Xcode extensions use the existing App Extension system. You create a macOS app, and then implement the extension as an app extension target. Xcode will find the app extension and integrate it into its menus.
Creating and Configuring the Editor Extension
To create the app extension target, select the project from the File Navigator, and click the plus (+) button at the bottom of the projects and targets list. This brings up a sheet (seen in the figure) with the many types of targets you can add. The type needed for this is “Xcode Source Editor Extension”:

This adds a new group with the extension’s default files to the project. There are two source files, SourceEditorExtension and SourceEditorCommand, which implement the protocols XCSourceEditorExtension and XCSourceEditorCommand respectively. There’s also an entitlements file that sandboxes the app. This limits the extension’s access to sensitive data and features like the filesystem or the network. If there’s a good reason for the extension to get out of the sandbox, you’ll need to add entitlement keys to this file.
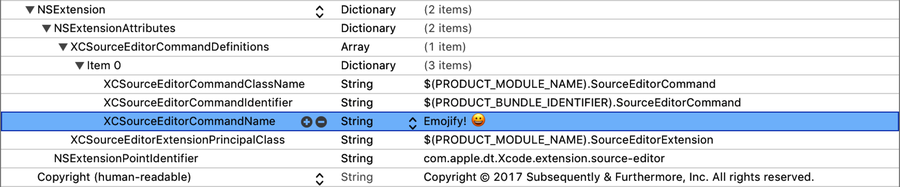
The final file in the group is an Info.plist specific to the extension. It has a group of settings under NSExtension that define how the extension works, such as what the class names are (meaning this file must be updated if you change the extension class names). One entry that you’ll always want to change is XCSourceEditorCommandName, which provides a name for the menu item that will be added to Xcode for your extension:
Coding the Editor Extension
The two source files implement two protocols from XcodeKit. The SourceEditorExtension class is for lifecycle events, like overriding values from the Info.plist and getting a callback to indicate that the extension has loaded and launched.
The simple extension you’re building here doesn’t need either of those, so instead, edit SourceEditorExtension. This has a single method, perform(with:completionHandler:), which is called when our menu item is invoked. It passes in a XCSourceEditorCommandInvocation, which is our access point to the text editor, and provides a completion handler that we call when we’re done.
The invocation object has a XCSourceTextBuffer property named buffer. This is where you get access to the text buffer currently being edited. You can either get the completeBuffer as a single String, or iterate over its lines. You can also get the current selection as an array of XCSourceTextRanges, and get indentation information—for example, if the current file uses tabs or spaces, and how wide the indentation is.
For this extension, you just need to go through a list of replacement strings, and replace text in the buffer. First, you’ll define the replacements as a private array inside the class (we’ve reproduced this code listing an image, since we can’t be sure all the ebook readers out there support emoji):

One other thing that the invocation provides is a cancellationHandler. If the extension runs too long (currently about 3 seconds), a banner slides down from the top of the editor area, letting the user cancel the extension, as seen in the figure:

If they cancel it, this closure will be executed. As a simple implementation, you’ll create a flag property named isCancelled to track this closure:
| | private var isCancelled: Bool = false |
Now you’re ready to code the perform(with:completionHandler:) method. It’s a short listing, but it does a bunch of steps, which will be explained afterward:
| 1: | func perform(with invocation: XCSourceEditorCommandInvocation, |
| - | completionHandler: @escaping (Error?) -> Void ) -> Void { |
| - | |
| - | invocation.cancellationHandler = {[weak self] in |
| 5: | NSSound.beep() |
| - | self?.isCancelled = true |
| - | } |
| - | |
| - | var buffer = invocation.buffer.completeBuffer |
| 10: | for (escapeString, emoji) in replacementStrings { |
| - | if isCancelled { |
| - | completionHandler(nil) |
| - | return |
| - | } |
| 15: | buffer = buffer.replacingOccurrences(of: escapeString, |
| - | with: emoji) |
| - | } |
| - | invocation.buffer.completeBuffer = buffer |
| - | completionHandler(nil) |
| 20: | } |
-
Start on lines 4--7 by setting up the cancellationHandler. If called, it simply beeps, and sets isCancelled to true. If this happens, you’ll use the isCancelled value later.
-
Line 9 copies the invocation’s text buffer to a local variable named buffer, allowing you to mutate it.
-
The for loop on lines 10--17 is where you really do the work, iterating over each of the possible substitutions. First, on lines 11--14, you check isCancelled each time through the loop, and if it has been set by the cancellation handler, you call the completion handler and do an early return. Keep in mind that the completion handler must always be called whether the extension succeeds, fails, or is cancelled.
On the other hand, assuming all is well, lines 15--16 do a string substitution of the escape string for its matching emoji.
-
After the loop, you write the modified buffer object back to the invocation (line 18). And then you wrap up by calling the completion handler (line 19), passing in nil to indicate that no error has occurred.
That’s it! You’ve extended Xcode’s source editor. Now to take your emojifier out for a spin!
Running the Editor Extension
To run the editor extension, check the scheme selector and make sure the extension is selected and not the app, as seen in the figure. When you first created the extension target, Xcode asked if it should activate the extension’s scheme, so if you clicked “Activate”, you’re all set. Otherwise, you need to change the scheme now.

When you click Run (⌘R), a sheet slides out asking which app should launch and host the extension. The recommended choice is Xcode, and of course this is the only option that makes sense, so you should approve it. This launches a second instance of Xcode, separate from the one you’re already working in, indicated by using a dark gray icon:

This second instance of Xcode works just like the original, but with one difference: the Editor menu now has a “EmojifierExtension” menu item. Inside is one submenu with the “Emojify!” command you created.
You can open a project, edit a file, and then use the menu item to convert all of the :emoji-name: escapes into their corresponding emoji. Furthermore, you can use Xcode’s Preferences pane to add an Xcode-only keyboard shortcut for this menu item, making emoji goodness just a keystroke away.
Sure, it might be nicer if the extension can run on a timer or after every keystroke—so you can instantly replace the escape strings like Slack and Discord do—but it’s still a nice start. And this kind of editor extension is particularly well suited to editor commands you might only run occasionally, like escape-encoding, syntax-cleaning, coding style enforcement, and so on.