
Creating and Cloning Git Repositories
In SCM, your code, storyboards, images, and all other assets are stored in a repository. The repository, or repo for short, tracks the history of every file—when they were created, renamed, deleted, modified (where you added or deleted lines), and so on. The distinctive feature of Git is that it is a distributed source control system, meaning that instead of having a single canonical repository on a server somewhere, everyone working with the codebase has their own, and shares update history amongst themselves.
Subversion Subverted | |
|---|---|
|
|
Xcode’s SCM features are designed to be implementation-agnostic; in fact, earlier versions also supported the older Subversion source control system. However, Apple has removed most support for Subversion in Xcode. It’s still possible to use Subversion-controlled projects with Xcode, but all the source control will need to be performed from the command line or with a separate Subversion application. |
Creating a Repository
Creating a Git repository in Xcode is straightforward: it’s one of the options when you create a new project. When the file dialog appears asking where to save the project (as shown in the figure), there’s a check box for the option “Create Git repository on my Mac”. This option will create a Git repository just for that project in that folder.

The repo won’t be publicly visible to the internet or even to other Macs on your network, but it will allow you to track history as you start work on your project. Plus, you can always use this local repository as the basis of a shared repo later, so there’s almost no reason not to go ahead and create the repo along with your new project.

If this is your first time creating a repo with Xcode, you may get a request to access your Contacts. This happens because every commit you make will have your name and email associated with it. If you use multiple email addresses or prefer to work under a different name, and you later make this project public, this might disclose information you’d rather keep private. To prevent this, you can explicitly set your name and email for Git. Prior to creating your project, enter the following commands in Terminal:
| <= | git config --global user.email "[email protected]" |
| | git config --global user.name "My Name" |
These commands will apply to all future Git projects you create or import. You can also do this for a single repository. Using Terminal, cd to the project’s top-level directory and issue the same commands as shown here, just without the --global flag.
Cloning Repositories
Actually, creating a repository isn’t nearly as common as using a repo someone else has created. For example, you may have started a new job and need to check out the existing code, or you want to try out an open source project.
By far, the most popular host of Git repositories is GitHub.[12] Xcode 9 builds GitHub integration right into the app. To use it, start in Xcode’s Preferences and go to the Accounts tab. When you click the plus (+) button at the bottom-left to add an account, it shows four options, one of which is GitHub. When you select it, Xcode asks for your GitHub username and password—create these on GitHub’s website if you haven’t already. Once you’ve entered them, Preferences shows your account details, as shown in the following figure:

GitHub uses secure connections to exchange code, so you’ll need to choose an existing SSH key, or generate a new one now. If you’ve ever used GitHub on this Mac—from the command line or the GitHub app, for example—you’ll already have an SSH key in the hidden .ssh folder in your home directory, typically named id_rsa. Click the appropriate button in the right pane to either create a new key or choose an existing one.
Once your GitHub account is set up in Preferences, you can download and use any GitHub project of which you’re a member. The basic idea in Git is that you clone a repository, capturing its state and a reference back to the original repo, and copy it to your system. Use the Source Control -> Clone… to bring up a dialog with all the GitHub projects of which you’re a member. The following figure shows some of my projects; to clone one, select it and click “Clone”:
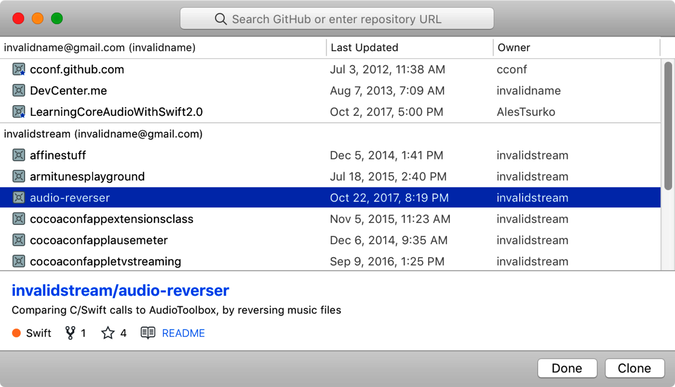
On the other hand, if you’re not officially a member of a project, it won’t show in the list. But maybe there’s an open source GitHub project you want to clone and try out. Even if you’re not a member, you can check it out by just pasting its full URL (ending in git) into the search bar at the top of the Clone window.
You can also clone a Git project from the Terminal. cd to the directory where you want to clone the project, and just type git clone and the URL of the project, as indicated on the GitHub web page. For example, to clone the audio-reverser project from the earlier figure, you would type:
| <= | git clone https://github.com/invalidstream/audio-reverser.git |
This copies the repository to your system, and when you open the Xcode project inside this folder, it will work just as if you’d cloned it from the Source Control menu. This is also the technique you’ll need to use if your project is hosted on a Git server other than GitHub, like an in-house company server.