
Working with type
In Adobe Photoshop, you create and edit type directly on-screen (rather than in a dialog box) and quickly change the font, style, size, and color of the type. You can apply changes to individual characters and set formatting options for entire paragraphs. In this part of the lesson, you’ll learn about working with type by adding text to your logo.
When you click in an image with the type tool (![]() ) to set an insertion point, you put the type tool in edit mode. You can then enter and edit characters on the currently targeted layer; however, you must also commit your editing in the layer or reject them before you can perform other operations, which you can do in several ways.
) to set an insertion point, you put the type tool in edit mode. You can then enter and edit characters on the currently targeted layer; however, you must also commit your editing in the layer or reject them before you can perform other operations, which you can do in several ways.
If you select another tool in the toolbox, this automatically commits your text changes. Or, on the tool options bar, you can click the Commit Any Current Edits button (![]() ) to accept the text edits or click the Cancel Any Current Edits button (
) to accept the text edits or click the Cancel Any Current Edits button (![]() ) to reject them. Any of these actions takes the type tool out of edit mode.
) to reject them. Any of these actions takes the type tool out of edit mode.
Adding type to the image in edit mode
Your first editing task is to enter formatted text into the image.
1. | Select the type tool ( |
In the Character palette, select the following options:
| |
3. | |
4. | In the toolbar, make sure that the foreground color is white. |
5. | Click the type tool just below the “horizon” (where the blue rectangle meets the gradient green background) and slightly to the left of center. Then type the following three lines, pressing the Return key so that the lines break as shown: the full moon pro-am |
6. | |
7. | Choose File > Save.
|


Stylizing and warping text
In keeping with the spirit of the tournament, you’ll distort the text so that it suggests a full moon. After you warp the text, you can continue to edit it with the type tool, as needed. Before you begin, make sure that the “the full moon pro-am” text layer is still targeted.
1. | |
2. | In the Style pop-up menu, select Inflate and then click OK to close the dialog box, leaving the other settings at the default values.
|
3. | Drag the type tool to select the words full and moon. |
4. | In the Character palette or the tool options bar, select Bold as the font style. |
5. | Double-click the word full to select it (but not the word moon). |
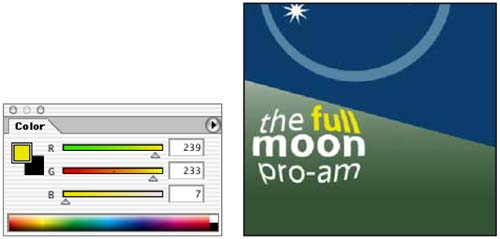
6. | In the Color palette, select a bright yellow color by entering the following values: R=239, G=233, B=7.
|
7. | In the tool options bar, click the Commit Any Current Edits button ( |
8. | Choose File > Save. When you select the Commit Any Current Edits button, you deselect the text. However, that doesn’t mean the text has to be absolutely final. You can still reselect it later with the type tool and make additional edits. |


Adding a new text layer
You’ll get a little more practice using text by adding another word to your poster.
1. | In the Layers palette, select Layer 1. |
2. | With the type tool ( |
3. | In the Character palette, select the same sans serif font that you used to type the full moon pro-am, select Roman as the font style, 36 as the font size, and 28 as the leading. |
4. | Click anywhere in the upper area of the poster (so that it is clearly separated from the area of the warped “full moon” text) and type invitational. The word appears in black text in the image window. In the Layers palette, a new, active layer, named Layer 2, is above Layer 1. |
5. | Select the move tool ( Notice that the layer name changes from “Layer 2” to “invitational” in the Layers palette. |
6. | Close the Character palette group. |
7. | Choose File > Save.
|

Creating work paths from text
Currently, the word invitational appears on a type layer, not as a work path. That’s about to change. After you use the type layer to create a work path, you can save the work path and manipulate it like any other path. Because it is a vector path instead of rasterized, the characters maintain their sharp edges.
Before you begin, compare the position of the word invitational in the 10End.psd sample file to your file and make sure that it is sized, spelled, and positioned exactly the way you want it to be. After you create the work paths, you won’t be able to change the position easily and may have to start the process over if you aren’t satisfied with the results.
1. | In the Layers palette, make sure that the “invitational” type layer is selected, and then choose Layer > Type > Create Work Path. On the Paths palette, notice that a new Work Path listing appears, including a thumbnail of the “invitational” text.
|
2. | In the Layers palette, select the “invitational” text layer and drag it to the Delete Layer button ( Now, only the grainy outlines of the work path remain to represent the word invitational.
|


Creating work paths from a type layer leaves the original type layer intact and fully editable as text—that is, you can still use the type tool to select and alter it. However, you are going to use just the work paths to manipulate the shape of the text. You don’t want to keep the “invitational” text layer because it would appear in the poster and visually compete with what you’re going to create from the work path.
Altering the appearance of the work paths
You can now start working with the new work path as vector shapes. You’ll use the direct selection tool, which can be used to edit any path.
1. | Zoom in to 200 or 300% so that you can easily see the details in the letter L of the word invitational and at least an inch of the blue shape directly above it. |
2. | In the toolbox, select the direct selection tool ( |
3. | In the image window, click the “L” part of the work path. |
4. | Select the two path points at the top of the L subpath by clicking one of the points and then Shift-clicking the other. (The points appear solid when selected and hollow when not selected.) |
5. | Start dragging the two points upward and then hold down Shift to constrain the movement, stopping when the L extends to about the level of the lower edge of the shape you created from two circles. The L is now about five or six times as tall as it was originally.
|
6. | |
7. | Choose File > Save. |


Adding a gradient layer
Right now, your “invitational” element is merely a work path, not something that would show up in print. To start the process of making it appear in the poster, you’ll create a gradient layer that you can combine with the work path in the procedure following this one.
1. | In the Layers palette, click the New Layer button ( |
2. | In the toolbox, select the gradient tool ( |
3. | Set the foreground to white and the background to black, by pressing D to set the default colors (black and white) and then pressing X to reverse them (white and black). |
4. | In the tool options bar, click the pop-up arrow to open the gradient picker. |
5. | Select the second gradient option in the top row (Foreground to Transparent), and then press Enter.
|
6. | Shift-drag the gradient tool from left to right across the image.
|


Applying a work path to a layer as a vector mask
Your “invitational” work path is not yet applied to any layer. Now, you’ll use it to create a vector mask for the gradient layer, limiting the visible area of the gradient fill to the insides of the letter shapes.

Creating a flag image and more text
In this section, you’ll create a light red triangular shape for a flag in one layer and text in a separate layer. Before you begin, make sure that Layer 1 is selected in the Layers palette.


Merging and distorting layer combinations
By merging layers, layer paths, vector masks, linked layers, or adjustment layers, you can combine several layers into one and keep your file size manageable. Typically, you want to be sure that you’ve finalized the characteristics and position of the layer contents before you merge the layers, so make sure that you’re satisfied with the appearance of the flag and the date text before starting this procedure.
1. | With the “oct 2nd” layer selected, open the Layers palette menu and choose Merge Down. The “oct 2nd” layer and polygon shape layer are now merged into a single layer, Layer 3. From now on, you can no longer use the type tool to edit the “oct 2nd” graphic.
|
2. | |
3. | Drag the upper right handle slightly down and the lower right handle slightly up to further enhance the effect of a perspective view.
|
4. | Press Enter (Windows) or Return (Mac OS) to apply the transformation. |
5. | Select the move tool ( |
6. | Choose File > Save. |

