Automating a multi-step task
An action is a set of one or more commands that you record and can play back to apply that series of commands to a single file or a batch of files. In this section of the lesson, you’ll see how the Actions palette can help you save time by applying a multi-step process to the four images you’ll use in this project.
Using actions is one of several ways that you can automate tasks in Adobe Photoshop and Adobe ImageReady. To learn more about recording actions, see Photoshop 7.0 online Help.
Opening and cropping the files
You’ll start by opening and resizing four files. Since this part of the task involves aesthetic choices about where and how much of the image to crop, you’ll do these steps manually rather than recording them with the Actions palette.
1. | Choose File > Open, and select the 12Start.jpg file, which is in the Lesson 12 folder on your hard disk.
|
2. | In the toolbox, select the crop tool (  ). Hold down Shift and drag a square selection marquee around the pears. (Holding down Shift constrains the selection to a square.)
|
3. | If necessary, make any adjustments to the selection so that the pears are centered in the cropping marquee and fit fairly snugly inside it:
- To move the marquee, click inside it and drag until it is positioned properly.
- To resize the marquee, hold down Shift and drag one of the corners to make the marquee larger or smaller.
|
4. | Press Enter to crop the image. Or, to start over without using this cropping marquee, click any tool in the toolbox and click Don’t Crop when a message appears; then start the cropping process again.
Dragging the cropping marquee

Cropped image

Because you’re working with a number of files, you’ll rename the 12Start.jpg file with a descriptive name so that it will be easy to identify.
|
5. | Choose File > Save As, and save the cropped image as Pears.jpg in your Lesson 12 folder. If a dialog box appears with options for image quality, click OK to accept the default settings.
|
6. | Repeat steps 1 through for each of the Leaves.jpg, Dandelion.jpg, and Sand.jpg images, all of which are in your Lesson 12 folder.
|
Note
It is not necessary to make all the cropped images the same size. You will adjust their sizes again later in this lesson.
Cropped versions of the Leaves, Dandelion, and Sand JPEG files

Leave all the newly cropped files open for the next procedures.
Preparing to record an action
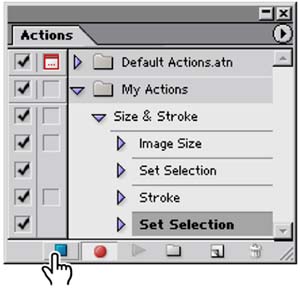
You use the Actions palette to record, play, edit, and delete individual actions. You also use the Actions palette to save and load action files. You’ll start this task by opening a new document and preparing to record a new action in the Actions palette.
1. | Choose Window > Actions to bring the Actions palette forward in its palette group.
|
2. | In the Actions palette, click the New Layer Set button (  ) at the bottom of the palette. Or, you can create a new set by choosing New Set on the Actions palette menu (opened by clicking the arrow button (  ) in the upper right corner of the palette).
|
3. | In the New Set dialog box, type My Actions, and click OK.

|
4. | Choose Window > Documents > Dandelion.jpg to make that file active.
|
Recording a new action set
For this project, you want the images to be identical sizes and for each to be surrounded by a narrow white border. You’re now ready to perform those tasks on the dandelion image, which you’ll do by setting the image dimensions to a specific number of pixels and by setting a stroke and stroke properties that will surround the image. As you work, you’ll set the Actions palette to record each step of the process.
Note
It is important that you finish all the steps in this procedure without interruption. If you become distracted and need to start over, skip ahead to step 9 to stop the recording. Then you can delete the action by dragging it into the Delete button ( ) in the Actions palette, and start again at step 1.
1. | In the Actions palette, click the New Action button (  ) or choose New Action on the Actions palette menu.
|
2. | In the New Action dialog box, type Size & Stroke in the Name option and make sure that My Actions is selected in the Set pop-up menu. Then click Record.
Note
Take all the time you need to do this procedure accurately. The speed at which you work has no influence on the amount of time required to play a recorded action.
|
3. | Choose Image > Image Size.
|
4. | Make sure that both the Constrain Proportions and the Resample Image check boxes are selected at the bottom of the Image Size dialog box. Then, for the Width, type 275 and make sure that pixels is selected as the unit of measurement. Then click OK.

|
5. | Choose Select > All.
|
6. | Choose Edit > Stroke.
|
7. | In the Stroke dialog box, make sure that the following options are selected, or select then now:
- In the Width option, leave the value at 1 pixel.
- In the Color swatch, use white, or select it by clicking the swatch to open the color picker, selecting white (C, M, Y, and K = 0), and clicking OK to close the color picker.
- Under Location, leave Center selected.
- Under Blending, leave Mode set to Normal and Opacity set at 100%.
- Then click OK to close the Stroke dialog box.
|
8. | Choose Select > Deselect.
Stroke dialog box settings and close-up of resulting border on image

|
9. | In the Actions palette, click the green Stop button (  ) at the bottom of the palette to stop recording steps. Save your work.
|
Your action is now saved in the Actions palette. You can click the arrows to the left of the My Actions set, the Size & Stroke action, and beside each step of that action to expand and collapse them at your convenience. With these expanded, you can examine each recorded step and the specific selections you made. When you finish reviewing the action, click the arrows to collapse the steps.
Playing an action on an individual file
Now that you’ve recorded the process of setting the image size and stroke characteristics for the dandelion image, you can use the action as an automated task. You’ll apply the Stroke & Size action to one of the other three image files you cropped earlier in this section.
1. | If the Leaves.jpg, Pears.jpg, and Sand.jpg files are not still open, choose File > Open and open them now.
|
2. | Choose Window > Document > Sand.jpg to make that image active.
|
3. | In the Actions palette, select the Size & Stroke action in the My Actions set, and then click the Play button (  ), or choose Play on the Actions palette menu.

The Sand.jpg image is automatically resized and given a stroke so that it now matches the Dandelion.jpg image for these properties.
|
4. | Choose File > Save.
|
Batch-playing an action
Applying actions is a time-saving process for performing routine tasks on files, but it can streamline your work even further by applying actions to all open files. You have two more files in this project that need to be resized and given strokes, so you’ll apply your automated action to them simultaneously.
1. | Close the Dandelion.jpg and Sand.jpg files. Make sure that only the Pears.jpg and Leaves.jpg files are open.
|
2. | Choose File > Automate > Batch.
|
3. | Under the Play section of the Batch dialog box, make sure that My Actions is selected for Set and that Size & Stroke is selected for Action.
|
4. | In the Source pop-up menu, select Opened Files.
|
5. | Leave Destination set as None, and click OK.
The action is applied to both the pears and leaves images, so that the files have identical dimensions and strokes surrounding them.
|
6. | Choose File > Save and then File > Close for each of the two files.
In this exercise, you batch-processed only two files instead of making all the same changes in each of them; this was a mild convenience. But creating and applying actions can save significant amounts of time and tedium when you have dozens or even hundreds of files that require any routine, repetitive work.
|
