Optimizing a JPEG image

In this lesson, you will optimize files in both JPEG and GIF formats. You can use either Photoshop or ImageReady to compress files in either format.

Currently, the 14Start1.psd file size is too large for use on a Web page. You’ll compare different file-compression formats to see which one gives you the most compression without sacrificing too much image quality.

Using the Save For Web dialog box

The Photoshop Save For Web dialog box has all of the optimization capabilities of ImageReady. You can compare two or more versions of a file as you work, so that you can adjust optimization settings until you have the best possible combination of file size and image quality.

1.
With the 14Start1.psd file open and active in Photoshop, choose File > Save for Web.

2.
In the Save For Web dialog box, click the 4-Up tab to view four versions of the image.

Photoshop automatically generates three different sets of optimization settings, besides the original image. Notice the information listed under each view of the image, including the file size and the number of seconds required to download the image. The first pane shows the original file. The second, third, and fourth panes show different combinations of optimization settings for the image, including the file format (such as GIF or JPEG) and color-reduction algorithm (such as Selective, Perceptual, or Web).

3.
In the lower-left corner of the Save For Web dialog box, select 200% or higher from the Zoom Level pop-up menu so that you can see the details of the image, and then click the preview at the upper right to deactivate the zoom option.

Compare the preset views of the different optimization settings.

4.
Hold down the spacebar, so that the pointer becomes a hand, and drag the image so that the Tropical Rainforest text (in the center of the image, over the green parrot) is visible in all four views of the image. Again, examine the details closely so that you can see the differences among the optimized views.

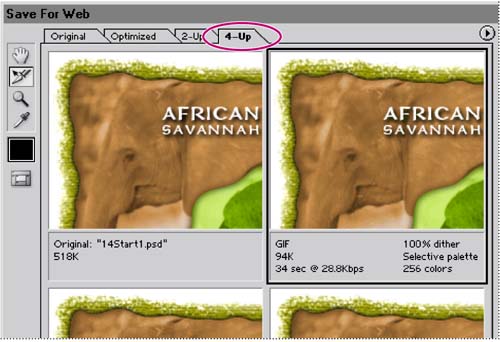
Comparing optimized GIF, JPEG, and PNG formats

You can customize any of the optimized views in the Save For Web dialog box. To do this, you select one of the optimized image previews, and then select settings for it on the right side of the dialog box. By experimenting with different combinations of settings, you can get a good idea of which settings will best suit your purpose.

Before you begin, make sure that the optimized preview at the upper right is selected.

1.
In the Settings pop-up menu on the right side of the Save For Web dialog box, select GIF 128 Dithered (if it is not already selected).

The information listed below the selected image preview changes.

Notice the dark group of pixels around the text and on the parrot’s beak. (You may need to hold down Shift and drag the image again to see the beak.)

You’ll use the two bottom versions of the image to compare GIF 128 Dithered optimization with JPEG and PNG optimization.

2.
Click the lower-left version of the image to select it, and select the following JPEG options, one at a time, on the Settings pop-up menu:

  • JPEG Low. Notice that the image details and text are unacceptably choppy.

  • JPEG High.The image quality improves, but the file size increases significantly.

    JPEG Low

    JPEG High

  • JPEG Medium. At this setting, the image quality is acceptable and the file size is lower than either the JPEG High version or the GIF version.

Note

You can select other intermediate levels of quality for JPEG files by typing or dragging the Quality slider option on the right side of the Save For Web dialog box.

Now that you’ve tried different GIF and JPEG settings, you’ll use the fourth image preview to try another format.

3.
Select the lower-right version of the image, and then use the Settings menu to select PNG-8 128 Dithered.

Although this results in a smaller file size than the original image, the image quality is not as good as the JPEG Medium version, which also has a smaller file size. Furthermore, many older browsers cannot read the PNG format. To make this image compatible with older browsers, you will save this file for the Web using the JPEG Medium optimization.

4.
Select your JPEG Medium version of the optimized image (in the lower-left corner of the dialog box), and then select the Progressive check box.

Note

When Progressive is selected, any download of the image occurs in several passes, each of which increases the image quality.

The Progressive JPEG download

5.
Click Save. In the Save Optimized As dialog box, use the default name 14Start1.jpg, and save the file in the same folder as the original Photoshop file.

6.
Choose File > Close, and don’t save your changes.

..................Content has been hidden....................

You can't read the all page of ebook, please click here login for view all page.
Reset
18.219.213.27