
Animating by hiding and showing layers
In the Layers palette, any visible layer appears with an eye icon (![]() ) beside it.
) beside it.
Perhaps the simplest way to create a two-step animation is by toggling the visibility of two layers. For example, you can make an animated character alternate between different expressions or make an object move back and forth in a simple pattern.
To define an animation, you use the Layers palette in conjunction with the Animation palette. On the Animation palette, you add new frames, update existing frames, change the order of frames, and preview the animation.
Creating a simple animation
In this part of the lesson, you’ll animate the shaking of a cartoon juice blender. The blender image is built in several layers. You’ll create animation frames that alternate between hiding and showing two of those layers, representing different positions of the blender pitcher.

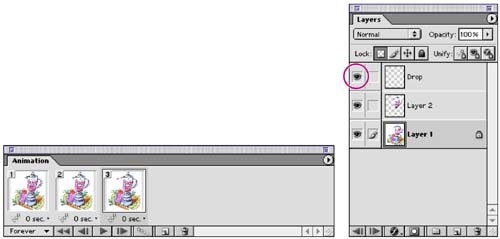
1. | Choose File > Open, and open the file Blender.psd from the Lessons/Lesson16 folder on your hard drive. In the Animation palette, a single default frame appears, showing the current state of the image. The frame is selected (outlined with a border), indicating that you can change its content by editing the image. In the Layers palette, an eye icon (
|
2. | In the Animation palette, click the Duplicate Current Frame button (
|
3. | In the Layers palette, click the box for the Layer 2 eye icon to display this layer in the image. (Because Layer 2 sits above Layer 1 in the stacking order, it completely blocks the view of Layer 1.)
|
4. | In the Animation palette, make sure that Forever is selected in the Looping pop-up menu in the lower left corner of the palette. |


Navigating animation frames and previewing the animation
You can use a number of techniques to preview and scroll through your animation frames. Understanding the controls available on the Animation and Layers palettes is essential to mastery of the animation process.
A. Looping pop-up menu B. First Frame button C. Backward button D. Play button E. Forward button F. Tween button G. Duplicate Current Frame button H. Trash I. Selected frame

1. | |
2. | Click the second thumbnail. Now Layer 2 is also visible. |
3. | In the Animation palette, click the Backward button ( |
4. | |
5. | Click the Play button ( Now you’ll preview the animation in a Web browser. |
6. | Choose File > Preview In > and choose a browser application on the Preview In submenu. You can also do this step by pressing Ctrl+Alt+P (Windows) or Command+Option+P (Mac OS) to launch a browser preview quickly, or clicking the browser button on the toolbox. Note To use the Preview In command, you must have a browser application installed on your system. For more information, see “Previewing an image in a browser” in Photoshop 7.0 online Help (in ImageReady, choose Help > ImageReady Help). |
7. | When you have finished previewing the animation, quit the browser window, and return to Adobe ImageReady. |
8. | Choose File > Save Optimized As, name the image Blender.gif, and click Save.
|

Preparing layer copies for an animation
Now you’ll begin to animate a different element in the blender image, adding to the existing animation. In this procedure, you’ll use the same basic technique—hiding and showing layers in different frames—to create your animation, but this time, you’ll also create the different layers by copying and transforming a single layer.
Before adding layers to an image that already contains an animation, it’s a good idea to create a new frame. This step helps protect your existing frames from unwanted changes.
1. | In the Animation palette, select frame 2 and click the Duplicate Current Frame button ( |
2. | In the Layers palette, make the Drop layer visible.
|
3. | In the Animation palette menu, click the New Layers Visible in All States/Frames command to deselect it (remove the checkmark), if necessary.
|
4. | In the Layers palette, select the Drop layer and drag it to the New Layer button ( |

Note
The duplicate layers would be visible in all three frames in the Animation palette if New Layers Visible in All States/Frames was not deselected in the Animation palette menu.

Moving and transforming layers for an animation
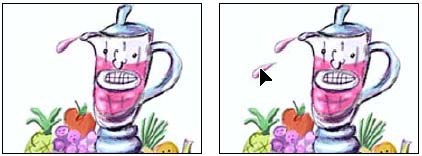
Now that you’ve prepared the layer duplicates in the Blender.psd file, you’ll transform the two copies so that the drop appears to fall in a smooth trajectory as it escapes the blender.
1. | In the Layers palette, select the Drop copy layer, and then select the move tool ( |
2. | |
3. | |
4. | Position the pointer outside the bounding box so that the pointer becomes a curved double arrow (
|
5. | |
6. | |
7. | Choose File > Save to save the image with the layers you’ve just created. |


In ImageReady, the Save command saves the layered .psd file, including all of the animation and optimization information.
Creating the simultaneous animations
Now you’ll define the falling-drop animation by successively hiding and showing the layers of the Blender.psd file. You’ll also build in the shaking-blender animation as the drop falls. All of this is done by coordinating settings in the Layers and Animation palettes.
1. | In the Animation palette, make sure that frame 3 is selected, or select it now. |
2. | |
3. | In the Animation palette, click the Duplicate Current Frame button ( |
4. | With frame 4 selected in the Animation palette, click eye icon boxes in the Layers palette as needed so that only Drop copy, Layer 2, and Layer 1 are visible. Hide the Drop layer and Drop copy 2 layer.
|
5. | Click the Duplicate Current Frame two more times, and then use the Layers palette eye icons to change the layer visibility as follows:
|


You can now use one of the navigation techniques you learned earlier to step through your animation. As the animation moves from frame to frame, the blender moves back and forth with each step. In each full cycle, the drop flies from the blender and falls in a three-step sequence.
If your results are different than described here, review the visibility settings on the Layers palette for each successive frame and make any necessary corrections.
Setting and previewing the timing sequence
Now you’ll set a delay for playing each frame in the animation, and then play it.


You’ve finished your work on the blender animation.