
Working with palettes
Palettes help you monitor and modify images. By default, they appear in stacked groups. To show or hide a palette as you work, choose the appropriate Window > [palette name]. A checkmark by a palette name on the Window menu indicates that the palette is shown now in the front of its palette group. No checkmark means that the palette is either closed or hidden behind another palette in its palette group.
Changing the palette display
You can reorganize your work space in various ways. Experiment with several techniques:
- To hide all open palettes, the toolbox, and the tool options bar, press Tab. Then press Tab again to reopen them.
- To hide or display the palettes only (but not change the toolbox or tool options bar displays), press Shift+Tab.
- To make a palette appear at the front of its group, click the palette tab.

- To move an entire palette group, drag the title bar to another location.
- To separate a palette from its palette group, drag the palette tab beyond the existing group.


- To move a palette to another group, drag the palette tab inside that palette group so that a black highlight appears inside the group, and then release the mouse button.
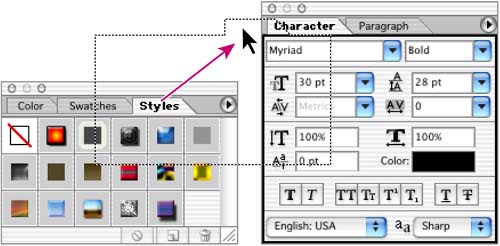

- To dock a palette in the palette well on the Photoshop tool options bar, drag the palette tab into the palette well so that the palette well is highlighted.
Note
Palettes are considered hidden when stored in the palette well. Clicking on the title of a palette stored in the well temporarily opens the palette until you click outside the palette or click the palette tab a second time.
Using palette menus
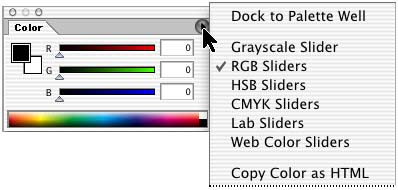
Most palettes (including pop-up palettes), pickers, and a few dialog boxes have attached menus with commands that affect the available options or related options for that palette or dialog box. These menus are sometimes referred to as fly-out menus because of the way they open out from the palettes. (However, this book consistently refers to these as palette menus.)
To display a palette menu, click the round arrow button in the upper right corner of the palette. You can then move the pointer to the command you want to choose.
Expanding and collapsing palettes
You can also resize a palette to see more or fewer of the available options it contains, either by dragging or by clicking to toggle between preset sizes.
- To change the height of a palette, drag its lower right corner.
- To return a resized palette to its default size, click the minimize/maximize box (Windows) or the resize box (Mac OS). (A second click collapses the palette group.)
A. Mac OS 10 B. Mac OS C. Windows

Note
You cannot resize the Info, Color, Character, and Paragraph palettes in Photoshop, or the Optimize, Info, Color, Layer Options, Character, Paragraph, Slice, and Image Map palettes in ImageReady.
- To collapse a group to palette titles only, Alt-click the minimize/maximize box (Windows) or click the resize box (Mac OS). Or, double-click a palette tab.
Notice that the tabs for the various palettes in the palette group and the button for the palette menu remain visible after you collapse a palette.
Setting the positions of palettes and dialog boxes
The positions of all open palettes and movable dialog boxes are saved by default when you exit the program. However, you can always start with default palette positions or restore default positions at any time:
- To reset palettes to the default positions, choose Window > Workspace > Reset Palette Locations.
- To always start with the preset palette and dialog box positions, choose Edit > Preferences > General (Windows, Mac OS 9) or Photoshop > Preferences > General (Mac OS 10), and deselect the Save Palette Locations check box. The change takes effect the next time you start Adobe Photoshop or Adobe ImageReady.