
12 Using Actions (Acrobat Pro)
Lesson overview
This lesson requires Acrobat Pro. In this lesson, you’ll do the following:
Run an action.
Create an action.
Create an instruction step for an action.
Set options in steps so the user doesn’t need to provide input.
Prompt the user for input on specific steps.
Share an action.
This lesson will take approximately 45 minutes to complete. Download the project files for this lesson, following the instructions in the Getting Started section under “Accessing the lesson files and Web Edition,” if you haven’t already done so. As you work on this lesson, you’ll preserve the start files. If you need to restore the start files, download them from your Account page.

Actions in Adobe Acrobat DC Pro automate tasks and make processes more consistent. You can use the actions that come with Acrobat or create your own to use and share.
About actions
In Adobe Acrobat DC Pro, you can use actions to automate multistep tasks and share processes with others. An action is a collection of steps: Some steps, such as adding tags to a document, can be performed automatically by Acrobat. Some steps, such as removing hidden information, require input as to which information to remove or add, or which settings to use. Other steps, such as adding bookmarks, cannot be done automatically because you need to use human discretion to create and name the bookmarks; in those cases, an action includes instructions for the user to perform the necessary step before the action continues.
Acrobat Pro includes several actions in the Action Wizard tool. You can use these actions to perform common tasks, such as preparing documents for distribution or creating accessible PDFs. You can also create your own actions, assembling steps in the order that works for your process, and including informational steps where appropriate for the people who will be using each action.
Actions that contain automated steps are particularly useful for tasks you perform frequently. Actions in general are handy for tasks you perform less frequently, but which require the same steps each time. Using actions, you can ensure that critical steps are included in the process.
Using predefined actions
To use an action, open the Action Wizard tool, and select the action in the Actions List in the right-hand pane. In this exercise, you’ll use the Prepare For Distribution action to prepare a document before posting it on an external website.
Start Acrobat Pro, and choose File > Open. Navigate to the Lesson12/Assets folder, select Aquo_CEO.pdf, and click Open.
The Aquo_CEO.pdf document is a biography of the chief executive of a fictitious beverage company.
Click Tools in the main toolbar, scroll to the Customize category, and then click Action Wizard to open it.

Select Prepare For Distribution in the Actions List in the right-hand pane.
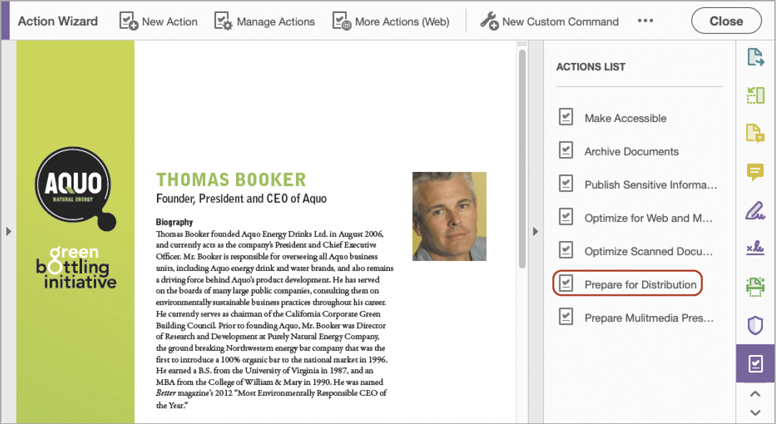
The action steps and information appear where the Actions List was. The action pane names the files to be processed, lets you add files if you want to, and then lists the steps and information for the action itself.
Review the steps for this action. When you’ve read the information, click Start to proceed to the first step.
The Start button changes to a Stop button, which you can click at any time to stop the action. The Remove Hidden Information dialog box appears, and that step is highlighted in the action pane.
Click OK in the Remove Hidden Information dialog box to accept the default selections.

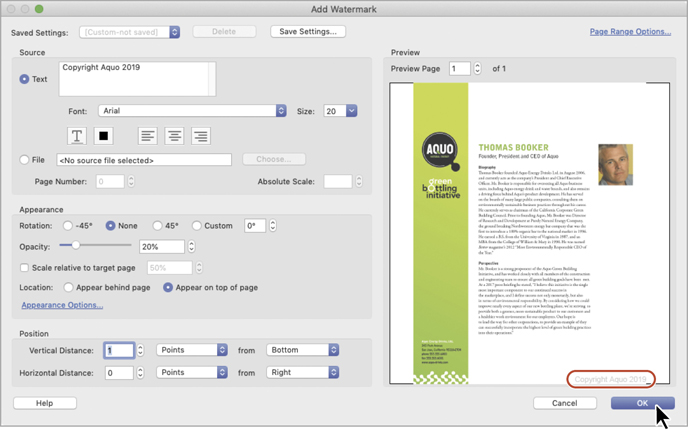
In the Add Watermark dialog box, do the following:
Click an insertion point in the Text box, and type Copyright Aquo 2019.
Select 20 for the font size
Set the Opacity to 20%.
In the Position area of the dialog box, choose Points, and enter 1 for the Vertical Distance. Then choose Bottom from the From menu.
Choose Right from the From menu for Horizontal Distance.
The watermark should appear in the lower right corner of the document in the Preview pane.
Click OK to accept the watermark.
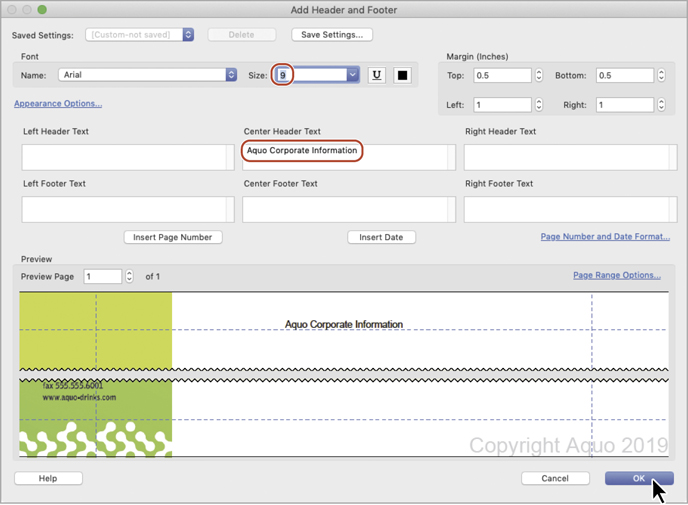
In the Add Header And Footer dialog box, click an insertion point in the Center Header Text box, and then type Aquo Corporate Information. Change the font size to 9. The header appears in the preview area. Click OK to add the header and close the dialog box.
![]() Tip
Tip
To add a header or footer when you’re not using an action, open the Edit PDF tool, and choose Header & Footer > Add.
In the Save As PDF dialog box, name the document Aquo_CEO_dist.pdf, save it to the Lesson12/Finished_Projects folder, and click Save.
![]() Note
Note
By default, Acrobat saves the new file to the folder that contains the original file. You can specify a different location.
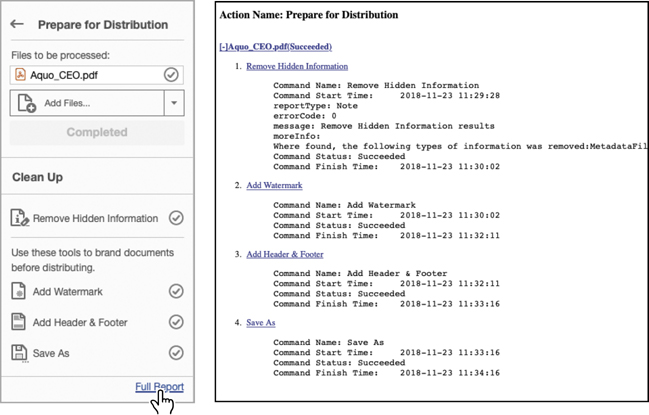
The action pane now shows the word Completed where the Stop button was.

Click Full Report at the bottom of the action pane to see an itemized list of the tasks performed by the action. The report opens in a browser window. When you’re done reviewing it, close the browser.
In Acrobat Pro, leave the Action Wizard tool and the document open.
Creating an action
You can create your own actions, assembling Acrobat steps and instructional steps to automate a process or to make it more consistent. Before you create an action, consider the steps involved and the logical order for those steps. For example, encrypting a document with password protection should be among the last steps in an action.
You’ll create an action for preparing a multimedia presentation in Acrobat DC Pro. The steps you’ll include are adding a header or footer to visually link the pages to each other, adding video files, creating page transitions, setting the file to open in Full Screen mode, and then adding a password to the document to prevent others from making changes.
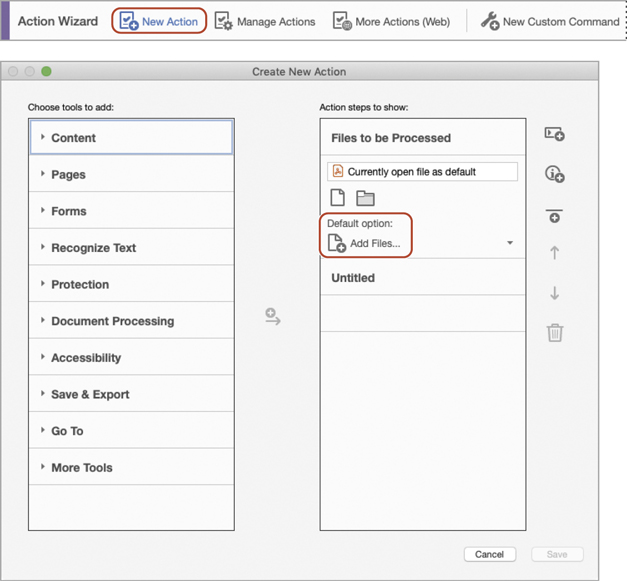
In the Action Wizard toolbar, click New Action.
The Create New Action dialog box is divided into two panes. The left pane displays tools that you can include in the action (arranged by category). In the right pane of the dialog box are options for files to be processed and the steps you’ve added to the action. Use the buttons on the far right to design the action’s appearance; you can add dividers, panels, and instructions.
In the Create New Action dialog box, make sure Add Files is chosen from the Default Option menu.
You can apply an action to an open file, or the action can prompt the user to select a file or folder, require the user to scan a document, or open a file from cloud storage.
Adding steps to an action
Now you’re ready to add the steps.
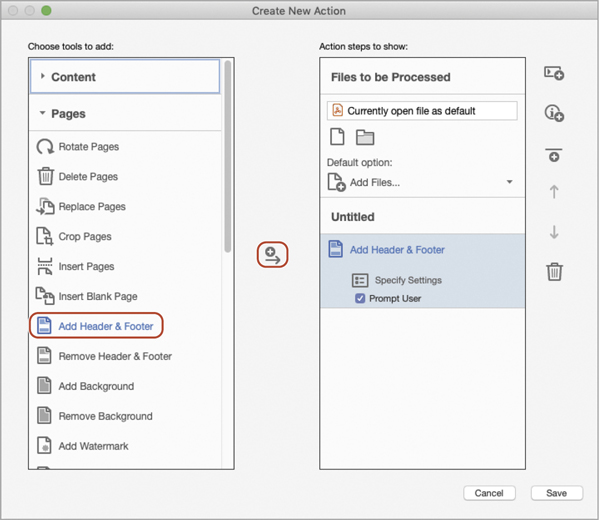
Expand the Pages category in the left pane of the dialog box, and select Add Header & Footer.
Click the Add To Right-Hand Pane button (
 ) in the middle of the dialog box. The Add Header & Footer step appears in the panel in the list on the right.
Make sure Prompt User is selected for the step. When the action runs, the user can customize the header or footer for the presentation.
![]() Tip
Tip
If you change your mind about a step, you can delete it. Select the step, and then click the Remove button (![]() ) on the right side of the dialog box. To change the order of steps, use the Move Up and Move Down buttons.
) on the right side of the dialog box. To change the order of steps, use the Move Up and Move Down buttons.
The next step is to add video files. There is no Add Video step available in the Create New Action dialog box, so you’ll add an instruction step for the user.
Click the Add Instruction button (
 ) on the right side of the dialog box.
In the Add Or Edit Label dialog box, type Add video files as appropriate. To add a video, click Add Video in the Rich Media toolbar, drag a box on the page, and select the video file and any settings. Then click Save.
You can add as much or as little information as you want in an instruction step. If you’re sharing your action with people who are less familiar with Acrobat, consider providing detailed steps. If you’re creating an action for yourself, a reminder to perform the step, such as “Add video,” may be enough.
Click Pause for the step you created to give the user time to read your instructions.

While an action is running, you can’t access the Tools pane or the Tools Center. So if you need users to access a tool, add a Go To step. In this case, you want the user to use the Add Rich Media tool to add a video.
Expand the Go To category, and double-click Add Rich Media.

Expand the Document Processing category in the left pane, and double-click Page Transitions.
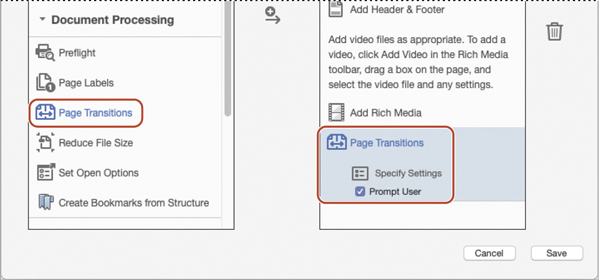
When you double-click an option on the left side, it’s automatically added as a step on the right.
Click the Specify Settings button in the Page Transitions step.
Choose Dissolve from the Transition menu, and then choose Medium from the Speed menu. Then click OK.
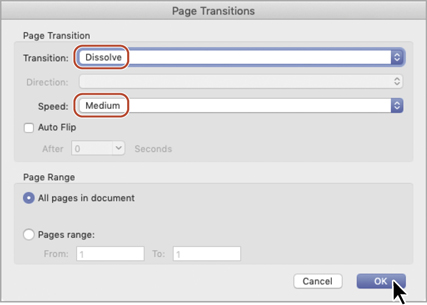
Deselect Prompt User in the Page Transitions step.
Acrobat will automatically apply the options you select for the Page Transitions step, without prompting the user.
In the left pane, double-click Set Open Options in the Document Processing category.
Deselect Prompt User, and then click the Specify Settings button for the new step. In the Set Open Options dialog box, choose Yes from the Open In Full Screen Mode menu, and then click OK.

Expand the Protection category, and then double-click Encrypt. Make sure that Prompt User is selected in the Encrypt step so that each user can set an individual password.

Saving an action
When you’ve added all the steps, confirmed that they’re in the appropriate order, and specified the options you want, save and name the action.
Click Save.
Name the action Prepare Multimedia Presentation.
For the action description, type Add video, headers, transitions, and a password to a presentation. Then click Save.

Give actions names that help you remember what the actions do. It’s usually a good idea, especially if you’ll be sharing the action, to describe the product of the action or when you should use it, such as when you’re preparing documents for a particular client or purpose.
Testing an action
Now you’ll test-drive your action to ensure it works the way you expect. You’ll create a multimedia presentation for a fictitious beverage company.
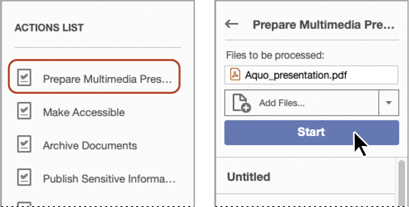
Choose File > Open, and open the Aquo_presentation.pdf file in the Lesson12/Assets folder.
Click Tools, and then open the Action Wizard tool.
In the Actions List, select Prepare Multimedia Presentation. The action steps replace the Actions List, and the open document is the default file to be processed.
Click Start to proceed to the first step in the action.
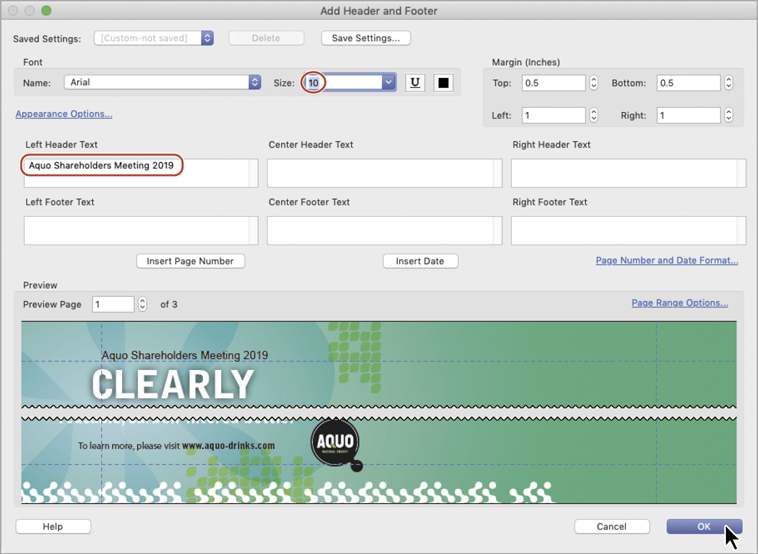
In the Add Header And Footer dialog box, click an insertion point in the Left Header Text box, and then type Aquo Shareholders Meeting 2019. Change the font size to 10, and then click OK.
The instruction step you created appears on the screen. Because you selected the Pause option for the step, the user must click Click To Proceed in order to continue working through the action. You’ll add a video.
Click Click To Proceed in the instruction box. Acrobat opens the Add Rich Media tool and presents another informational message at the bottom of the application window.

Click Add Video in the Add Rich Media toolbar. Drag a box over the right half of the bottle ad page (the first page in the document). Click Browse or Choose, select the Aquo_T03_Loop.mp4 file from the Lesson12/Assets folder, and click Open. Then click OK.
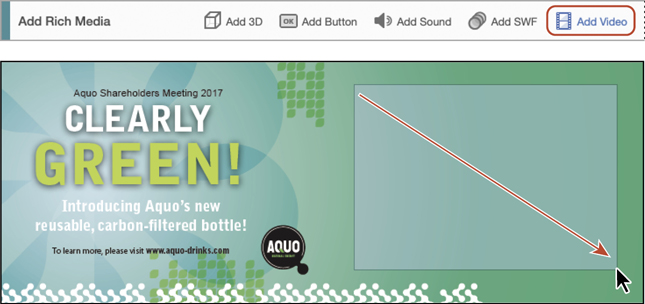
Click the Play button to preview the video file. When you’re done, click the Pause button to stop it. Then click Click To Proceed in the informational box to proceed to the next step.
![]() Note
Note
Adobe Flash Player is required to insert and play the video. You may be prompted to install Adobe Flash Player if it’s not on your system.
Acrobat automatically performs the next two steps—adding page transitions and setting the presentation to open in Full Screen mode—because no input is required. The final step is adding a password, which does require input.
![]() Note
Note
Acrobat reports how secure your password is when you create it. To help you work through the action quickly, we’re using a very simple password with only a Medium rating. When you create passwords, strive for a Strong rating.
In the Document Security dialog box, choose Password Security from the Security Method menu. In the Permissions area of the Password Security – Settings dialog box, select Restrict Editing And Printing Of the Document. In the Change Permissions Password box, enter Aquo1234 as the password. Then click OK.
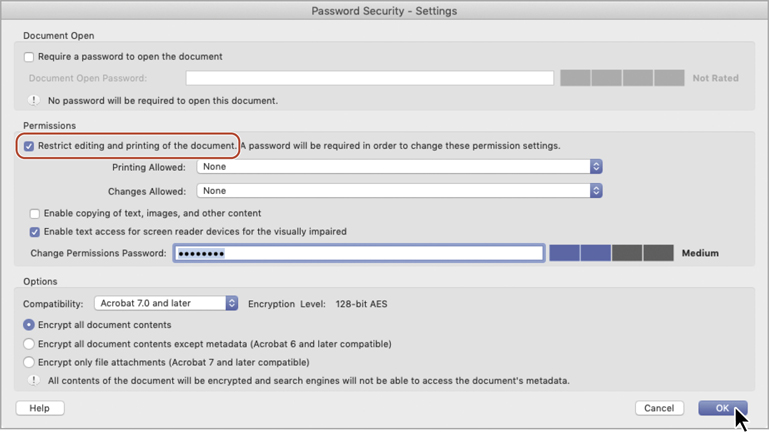
Click OK in the informational dialog box, enter the password again when prompted, and then click OK. Click Close to close the Document Security dialog box.
The Action Wizard pane shows that the Prepare Multimedia Presentation action has been completed.
Choose File > Save As, name the presentation file Aquo_meeting.pdf, save it to the Lesson12/Finished_Projects folder, and then click Save.
Close the document. If you want to see the presentation open in Full Screen mode with its header and page transitions, open the Aquo_meeting.pdf file in Acrobat. When you’re done, press the Esc key to exit Full Screen mode, and then close the file.
Sharing actions
You can share actions you create or edit with other users.
![]() Tip
Tip
You can edit actions after you create them: Click Manage Actions. In the Manage Actions dialog box, select the action name, and click Edit.
If you’re using macOS, open a PDF file so that you can access tools.
Open the Action Wizard tool.
Click Manage Actions in the Action Wizard toolbar.
Select the Prepare Multimedia Presentation action, and click Export.
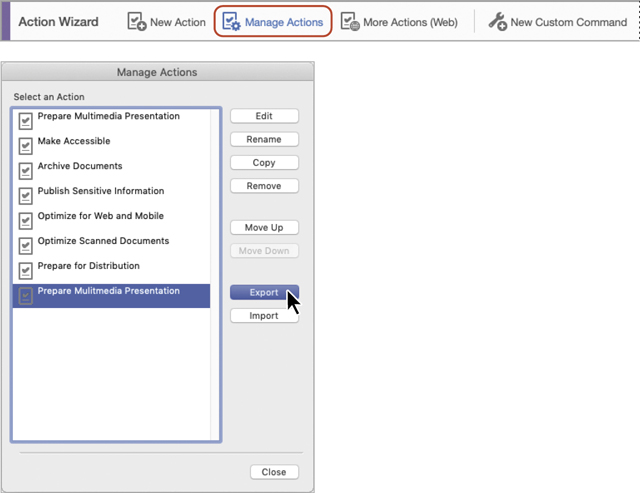
Name the action Prepare Multimedia Presentation (the default name), save it in the Lesson12/Finished_Projects folder, and click Save.
The action file is saved with the .sequ extension. You can copy .sequ files or email them to other users. To open an .sequ file that someone has sent you, click Import in the Manage Actions dialog box, and select the action file.
Click Close to close the Manage Actions dialog box. Then close any open documents, and quit Acrobat.
Review questions
What is an action in Acrobat DC Pro?
How can you create a step in an action if the step isn’t available in the left pane of the Create New Action dialog box?
How can you share an action with others?
Review answers
An action is a collection of steps: Some steps, such as adding tags to a document, can be performed automatically by Acrobat. Some steps, such as removing hidden information, require input as to what to remove or add, or which settings to use. Other steps, such as adding bookmarks, cannot be done automatically, because you need to use human discretion to create and name the bookmarks.
To include a step that isn’t predefined in Acrobat, click the Add Instruction button, and then type instructions to the user.
To share an action, click Manage Actions in the Action Wizard toolbar, select the action you want to share, and click Export. Then send the resulting .sequ file to the person you want to share the action with.