
3 Reading and Working with PDF Files
Lesson overview
In this lesson, you’ll do the following:
Navigate an Adobe PDF document.
Change how a PDF document scrolls and displays in the document window.
Search a PDF document for a word or phrase.
Fill out a PDF form.
Print all or a portion of a PDF document.
Explore the accessibility features that make it easier for users with vision and motor impairments to use Acrobat.
Add tags and alt text to a PDF document.
Share a document with others electronically.
This lesson will take approximately 60 minutes to complete. Download the project files for this lesson, following the instructions in the Getting Started section under “Accessing the lesson files and Web Edition,” if you haven’t already done so. As you work on this lesson, you’ll preserve the start files. If you need to restore the start files, download them from your Account page.

Get the most out of the PDF documents you create and read using navigational aids, accessibility features, search tools, and more.
About the onscreen display
The magnification shown in the toolbar does not refer to the printed size of the page, but rather to how the page is displayed onscreen. At 100% view, each pixel in the page is represented by one screen pixel on your monitor.
How big the page appears onscreen depends on your monitor size and resolution setting. For example, when you increase the resolution of your monitor, you increase the number of screen pixels within the same monitor area. This results in smaller screen pixels and a smaller displayed page, since the number of pixels in the page itself stays constant.
![]() Tip
Tip
To see the printed size of your page, move your pointer into the lower left area of the document pane.
Reading PDF documents
Acrobat provides a variety of ways for you to move through and adjust the onscreen magnification of a PDF document. For example, you can scroll through the document using the scroll bar at the right side of the window, or you can turn pages as in a traditional book using the Next Page and Previous Page buttons in the main toolbar. You can also jump to a specific page.
Browsing the document
You can move to different pages in a document using a variety of navigation methods.
In Acrobat, choose File > Open, navigate to the Lesson03/Assets folder, and select the Fall Hiking.pdf file. Click Open.
Choose View > Zoom > Actual Size to resize your page.
Select the Hand tool (
 ) from the toolbar, and then position your pointer over the document. Hold down the mouse button. Notice that the pointer changes to a closed hand when you hold down the mouse button.
Drag the closed hand up and down in the window to move the page on the screen. This is similar to moving a piece of paper around on a desktop.

Press Enter or Return to display the next part of the page. You can press Enter or Return repeatedly to view the document from start to finish in screen-sized sections.
Choose View > Zoom > Zoom To Page Level, or choose Fit One Full Page from the Fit pop-up menu (
 ) in the toolbar. Click the Previous Page button (
 ) in the toolbar as many times as necessary to return to page 1.
Click once in an empty portion of the scroll bar. Or, in Windows, you can also position the pointer over the down arrow in the scroll bar and click.
The document scrolls automatically to display all of page 2. In the next few steps, you’ll control how Acrobat scrolls and displays PDF pages.
You can also access the Actual Size, Zoom To Page Level, Fit Width, and Fit Visible commands by clicking the arrow to the right of the magnification pop-up menu in the toolbar.
Choose Fit To Width Scrolling from the Fit menu (
 ) in the toolbar, and then use the scroll bar to scroll to page 3 of 4.

The Enable Scrolling option displays pages end to end, like frames in a filmstrip.
Choose View > Page Navigation > First Page to go back to the beginning of the document.
Choose Fit One Full Page from the Fit menu (
) in the toolbar to return to the original page layout.
You can use the page number box in the toolbar to move directly to a specific page.
Type 3 to replace the current page number, and press Enter or Return.
Acrobat displays page 3.
The scroll bar also lets you navigate to a specific page.
Begin dragging the scroll box upward in the scroll bar. As you scroll, a page preview box shows you the current page number. When you see page 2 of 4, release the mouse.

The second page is displayed.
Changing the page view magnification
You can change the magnification of the page view using controls in the toolbar and commands in the View menu.
Choose View > Zoom > Actual Size. The magnification changes to 100%.
Click the Next Page button (
 ) to move to page 3. Notice that the magnification remains the same.
In the toolbar, click the arrow to the right of the magnification text box to display the preset magnification options. Choose 200%.

You can also type in a specific value for the magnification in the text box.
Click the arrow to the right of the magnification box, and choose Actual Size to display the page at 100% again.
Next, you’ll use the Zoom In button to magnify the view.
Select the page number, type 4, and press Enter or Return to go to page 4.
In the toolbar, click the Zoom In button (
 ) once.
Click the Zoom In button again to further increase the magnification.
Each click on a Zoom button increases or decreases the magnification by a set amount.
Click the arrow to the right of the magnification box, and choose Zoom To Page Level to see the entire page.
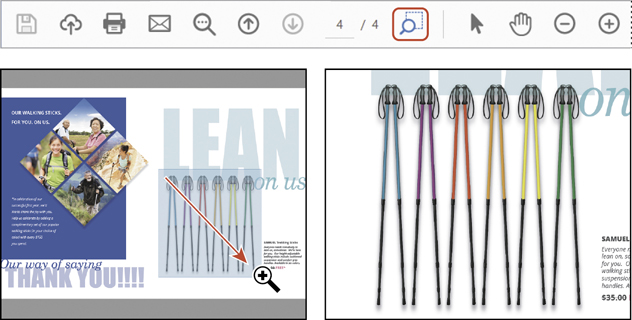
Now you’ll use the Marquee Zoom tool to magnify the image. The Marquee Zoom tool is hidden by default, so you’ll add it to the main toolbar.
Choose View > Show/Hide > Toolbar Items > Show Select & Zoom Tools > Marquee Zoom to display the Marquee Zoom tool in the main toolbar.
Select the Marquee Zoom tool (
 ). Position the pointer near the upper left corner of the image of the colorful walking sticks, and drag to the lower right corner of the walking sticks image.
![]() Tip
Tip
You can show or hide other tools in the main toolbar by choosing View > Show/ Hide > Toolbar Items, selecting a category, and then selecting the tool you want to display or hide.
The view zooms in on the area you enclosed.
Choose View > Zoom > Zoom To Page Level again.
Using the Dynamic Zoom tool
The Dynamic Zoom tool lets you zoom in or out by dragging the mouse up or down.
Choose View > Show/Hide > Toolbar Items > Show Select & Zoom Tools > Dynamic Zoom to add the Dynamic Zoom button to the main toolbar.
Select the Dynamic Zoom tool (
 ).
).Click in the document pane. Drag upward to zoom in, and drag down to zoom out.
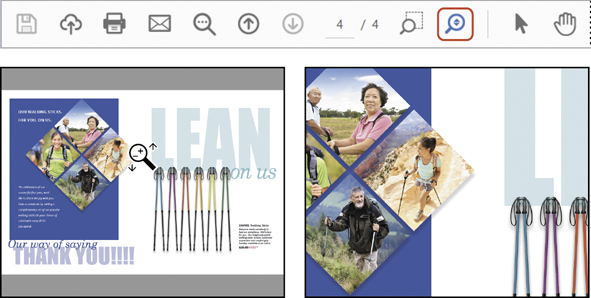
When you’re finished, select the Hand tool to deselect the Dynamic Zoom tool, and then choose Zoom To Page Level from the magnification box menu in the toolbar to see the entire page again.
Following links
One benefit of working with electronic documents is that you can convert traditional cross-references into links, which let users jump directly to the referenced section or file. For example, you can make each item in a table of contents a link that jumps to its corresponding area in the document. You can also use links to add interactivity to traditional book elements such as glossaries and indexes.
First, you’ll add some navigational tools to the main toolbar.
Choose View > Show/Hide > Toolbar Items > Show Page Navigation Tools > Show All Page Navigation Tools.
Now you’ll use an existing link to move to a specific area in the document.
Click the First Page button (
 ) in the main toolbar to return to the first page.
Move the pointer over the special offer medallion. The Hand tool changes to a pointing finger, indicating the presence of a link. Click to follow the link.

This link sends you to page 4.
Click the Previous View button (
 ) to return to your previous view of page 1.
You can click the Previous View button at any time to retrace your viewing path through a document. The Next View button reverses the action of your last Previous View.
To restore the default toolbar configuration, choose View > Show/Hide > Toolbar Items > Reset Toolbars.
Searching PDF documents
You can quickly search for a word or phrase in a PDF document. For example, if you wanted to find occurrences of the word boot in this document, you can use either the Find feature or the Search feature to locate that information. The Find feature locates a word or phrase in the active document. The Search feature locates a word or phrase in one document, across a selection of documents, or in a PDF Portfolio. Both features search text, layers, form fields, and digital signatures.
First, you’ll use the Find command to find specific text in the open document.
Choose Edit > Find. In the text box in the toolbar that appears in the upper right corner of the application window, type performance.
To see the options available with the Find feature, click the arrow on the right side of the text box. You can refine your search, looking for whole words only or specifying uppercase or lowercase letters, and you can also include bookmarks and comments in the search. A check mark next to an option indicates that it is enabled (on).
Click Next to start the Find operation.
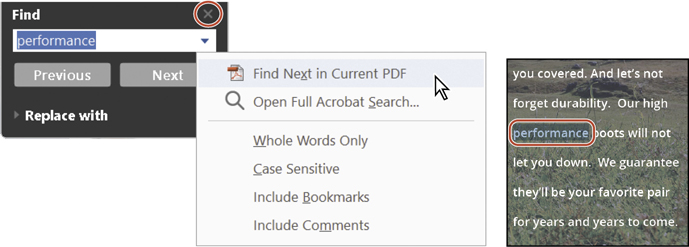
The first occurrence of performance is highlighted on page 2 of the document.
Click the Next button in the Find panel to find the next occurrence of the word. Acrobat reports that it found no more matches. Click OK to close the dialog box, and then close the Find panel.
Next, you’ll perform a more sophisticated search of the document using the Search feature. In this exercise, you’ll search only one document, but you can use the Search feature to search all documents in a folder as well as all documents in a PDF Portfolio. You can even search non-PDF files in a PDF Portfolio.
Choose Edit > Advanced Search.
To search only the open document, select In The Current Document.
In this search, you’ll find references to trekking.
In the Search text box, enter trek.

Click the Show More Options link at the bottom of the Search pane.
From the Return Results Containing pop-up menu, choose Match Any Of The Words. This ensures that the search will return all results for “trek,” including words that contain additional letters, such as “trekking.”
Click Search.
![]() Tip
Tip
You can also save your search results in Acrobat DC: Click the Save icon next to the New Search button in the Search pane, and then choose either Save Results To PDF or Save Results To CSV.
The search results are displayed in the Search pane.
Click any search result to go to the page that contains that information.

You can check any of the other search results in the Search pane by clicking them.
When you’re finished, close the Search pane.
In addition to text in the document, the Search feature searches object data and image metadata. When you search multiple PDF documents, Acrobat also looks at the document properties and XMP metadata. If any of your PDF documents have attachments, you can also include those attachments in the search. If you include a PDF index in your search, Acrobat searches indexed structure tags. To search an encrypted document, you must first open the document.
Printing PDF documents
Many of the options in the Acrobat Print dialog box are similar to those you’d find in the Print dialog boxes of other popular applications. For example, you can select a printer and set up parameters such as paper size and orientation. However, Acrobat also gives you the flexibility to print only the current view (that is, what is displayed on the screen at that moment), a selection, a specific page, selected pages, or a range of pages within the PDF file.
You’ll instruct Acrobat to print pages you select in the Page Thumbnails panel, a particular view, and discontiguous pages.
In the Fall Hiking.pdf document, click the triangle on the left side of the window to open the navigation pane. Then click the Page Thumbnails button in the navigation pane.
Click three thumbnails to select the pages you want to print. You can Ctrl-click (Windows) or Command-click (macOS) page thumbnails to select contiguous or discontiguous pages.

Choose File > Print. Select the name of the printer you want to print to. Because you selected pages in the Page Thumbnails panel, the Selected Pages option is selected automatically in the Print dialog box.
![]() Tip
Tip
In Windows, you can also access the Print dialog box by choosing Print from the context menu.

Click OK or Print to print your selected pages. Click Cancel if you don’t want to print.
If you need help troubleshooting a printing issue, click the Help link in the upper right corner of the Print dialog box to go to the Adobe website for the latest printing tips and information.
After the pages print (or the Print dialog box closes, if you opted not to print), click an empty area of the Page Thumbnails panel to deselect all thumbnails, and then close the Page Thumbnails panel.
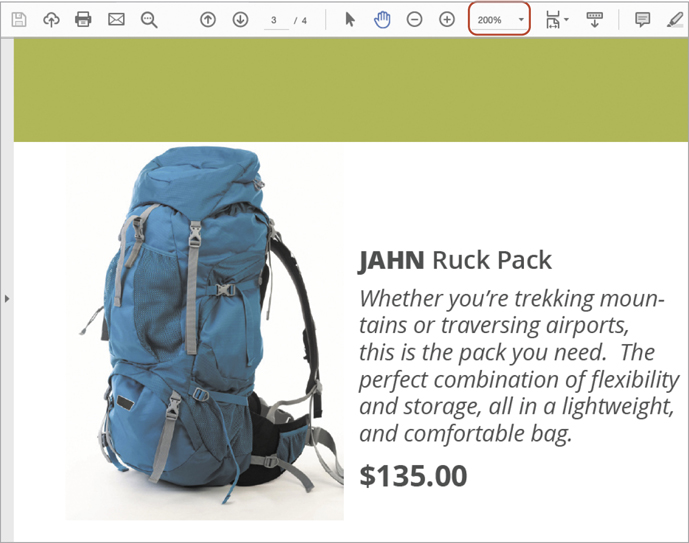
Go to page 3 of the document.
Zoom in to 200%, and then use the Hand tool (
) to shift the page so that you see the Jahn Ruck Pack.
Choose File > Print, and select the name of the printer you want to print to.
In the Pages To Print area, click More Options. Then select Current View. The preview changes to represent what is currently visible in the document pane. Click Fit in the Page Sizing & Handling area if it isn’t already selected.
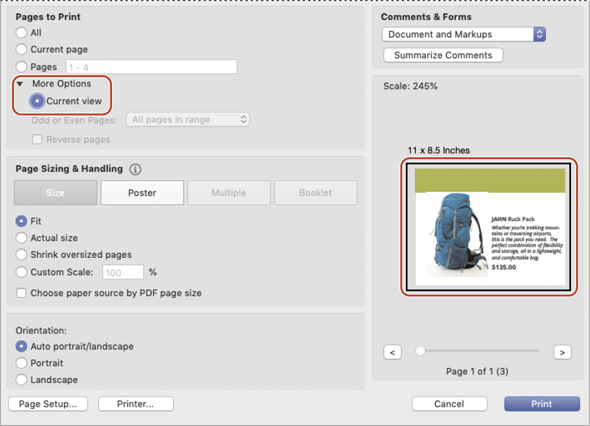
If you print with Current View selected, Acrobat prints only the contents of the document pane. However, you’ll select pages to print instead.
In the Pages To Print area, select Pages.
In the Pages text box, type 1, 3-4. If you click OK or Print now, Acrobat will print pages 1, 3, and 4. You can enter any set of discontiguous pages or ranges of pages, using commas, in this text box.
If you want to print the pages you’ve selected, click Print or OK. If you don’t want to print, click Cancel.
Choose File > Close to close the Fall Hiking.pdf document.
For information on printing comments, see Lesson 10, “Using Acrobat in a Review Cycle.”
If your PDF file contains odd-sized pages, you can use the Size options in the Page Sizing & Handling area of the Print dialog box to reduce, enlarge, or divide pages. The Fit option scales each page to fit the printer page size; pages in the PDF file are magnified or reduced as necessary. The Poster options let you tile oversize pages, printing portions of them on several sheets of paper that can be assembled to reproduce the oversize image. In Windows, you can also specify that the paper source be determined by the document’s page size.
Printing booklets
If your printer supports duplex printing, you can print a 2-up, saddle-stitched booklet from Acrobat. Booklets comprise multiple pages that are arranged so that they can be folded to present the correct page order. In a 2-up, saddle-stitched booklet, two side-by-side pages, printed on both sides, are folded once and fastened along the fold. The first and last pages print on the same sheet, the second and next-to-last pages print on the same sheet, and so on. When you collate, fold, and staple the double-sided pages, you create a single book with correct pagination.
To print a booklet from Acrobat:
Choose File > Print, and select your printer.
In the Pages To Print area, specify which pages to print.
In the Page Sizing & Handling area of the Print dialog box, click Booklet.

Choose additional page-handling options. You can auto-rotate pages, specify the first and last sheet to print, and select the binding edge. The Preview image changes as you specify options. For information about the options, see “Printing booklets” in Adobe Acrobat DC Help.
Filling out PDF forms
PDF forms can be interactive or noninteractive. Interactive PDF forms (also called fillable forms) have built-in form fields and behave in much the same way as most forms that you encounter on the web or that are sent to you electronically. You enter data using the Selection tool or Hand tool in Acrobat or Acrobat Reader.
![]() Tip
Tip
You can fill out PDF forms on a tablet or phone using the Acrobat DC mobile apps. For more information, see Lesson 6, “Using Acrobat on Mobile Devices.”
Noninteractive PDF forms (flat forms) are pages that have been scanned to create a facsimile of a form. These pages do not contain actual form fields; they contain only the images of form fields. Traditionally, you would print out these forms, fill them out by hand or using a typewriter, and then mail or fax the hard copy. With Acrobat, you can fill out these noninteractive or flat forms online using the Fill & Sign tool or the Add Text tool.
For information on creating and managing interactive forms, see Lesson 11, “Working with Forms in Acrobat.”
You’ll fill out fields in an interactive form, and then add information where there is no field using the Add Text tool.
Choose File > Open, and navigate to the Lesson03/Assets folder. Select the Contact Update.pdf file, and click Open.
When it opens the document, Acrobat highlights the form fields.
Click in the Address field. Enter an address. The text appears in the font and type size chosen by the form creator.
Enter an email address and phone number.

The person who created this form forgot to create an interactive field for the name. You’ll add text without requiring a field.
In the Tools pane, click the Edit PDF tool to open it. Then click Add Text in the Edit PDF toolbar.
Click next to the word Name. The pointer is an I-beam.
Type your name.

You can use the Add Text tool to add text to any PDF file, unless security settings applied to the document prohibit it. You can customize the text formatting using options in the Format area of the right-hand pane.
Close the Edit PDF tool.
Choose File > Save As, and save a copy of the form in the Lesson03/Finished_Projects folder, naming the file Contact Update complete.pdf.
You can open the saved file if you wish to verify that all your data was saved.
Choose File > Close to close the form.
About flexibility, accessibility, and structure
The accessibility and flexibility of your Adobe PDF files determine how easily vision- and motion-impaired users and users of handheld devices can access, reflow, and—if you allow it—reuse the content of your files. You control the accessibility and flexibility of your Adobe PDF files through the amount of structure you build into the source file and the method you use to create the Adobe PDF file.
By making your PDF documents more accessible to users, you can broaden your readership and better meet government standards for accessibility. Accessibility in Acrobat falls into two categories:
Accessibility features that help authors create accessible documents from new or existing PDF documents. These features include simple methods for checking accessibility and adding tags to PDF documents. With Acrobat Pro, you can also correct accessibility and reading-order problems in PDF files by editing the PDF file structure.
Accessibility features that help readers who have motion or vision limitations to navigate and view PDF documents more easily. Many of these features can be adjusted by using a wizard, the Accessibility Setup Assistant.
For Adobe PDF files to be flexible and accessible, they must have structure. Adobe PDF files support three levels of structure—tagged, structured, and unstructured. Tagged PDF files have the most structure. Structured PDF files have some structure, but are not as flexible or accessible as tagged PDF files. Unstructured PDF files have no structure. (As you will see later in this lesson, you can add limited structure to unstructured files.) The more structure a file has, the more efficiently and reliably its content can be reused.
Structure is built into a document when, for example, its creator defines headers and columns, adds navigational aids such as bookmarks, and adds alternate text descriptions for graphics. In many cases, documents are automatically given logical structure and tags when they are converted to Adobe PDF.
When you create PDF documents from Microsoft Office files or from files created in later versions of Adobe FrameMaker®, InDesign, or Adobe PageMaker®, or when you create Adobe PDF files from websites, the resulting PDF files are tagged automatically.
In Acrobat Pro, if your PDF documents don’t reflow well, you can correct most problems using the Accessibility panel or the TouchUp Reading Order tool. However, this is not as easy as creating a well-structured document in the first place. For an in-depth guide to creating accessible PDF documents, visit www.adobe.com/accessibility/products/acrobat.html.
Working with accessible documents
If you’re working with Acrobat Pro, you’ll examine a tagged PDF document. In either Acrobat Standard or Pro, you’ll see how easy it is to reflow the document and extract content.
Checking for accessibility (Acrobat Pro only)
It’s always a good idea to check the accessibility of any Adobe PDF document before you distribute it to users. The Accessibility Checker panel tells you if your document has the information necessary to make it accessible. At the same time, it checks for protection settings that would prohibit access.
First, you’ll look at the accessibility and flexibility of a tagged PDF file that was created from a Microsoft Word file.
Choose File > Open, navigate to the Lesson03/Assets folder, and double-click the Tag_Wines.pdf file.
Choose File > Save As, and save the file as Tag_Wines1.pdf in the Lesson03/Finished_Projects folder.
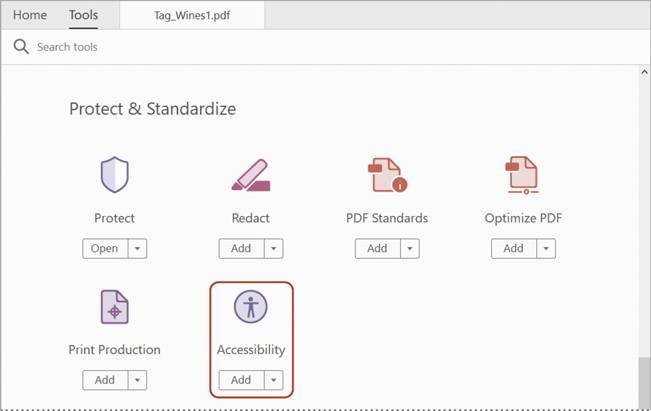
In the Tools pane, click the Accessibility tool. If the Accessibility tool isn’t listed, click Tools in the main toolbar, and navigate to the Accessibility tool in the Protect & Standardize category. Then, choose Add Shortcut from the pop-up menu beneath the Accessibility tool, and click the Accessibility tool in the Tools pane.
![]() Tip
Tip
By default, Acrobat displays only some of the tools in the Tools pane. To select which tools appear in the list, click Tools in the main toolbar, and then choose Add Shortcut or Remove Shortcut beneath each tool.
You’ll use the Accessibility tool several times in this lesson, so it’s handy to have it in the Tools pane. You can remove a tool from the Tools pane at any time by choosing Remove Shortcut from the menu beneath the tool in the Tools Center.
Accessibility options appear in the right-hand pane.
Click Full Check in the right-hand pane.
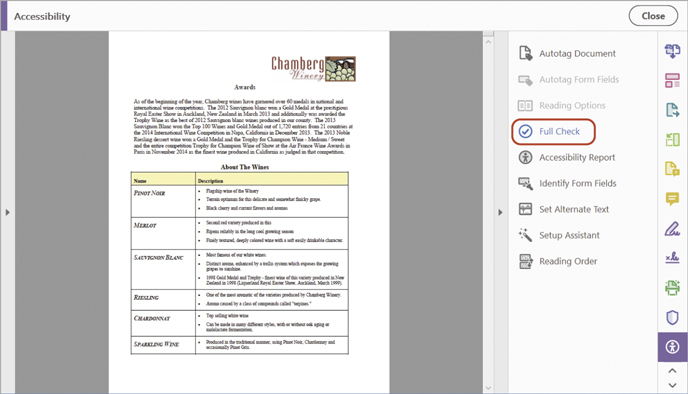
Accept the defaults in the Accessibility Checker Options dialog box, and click Start Checking.
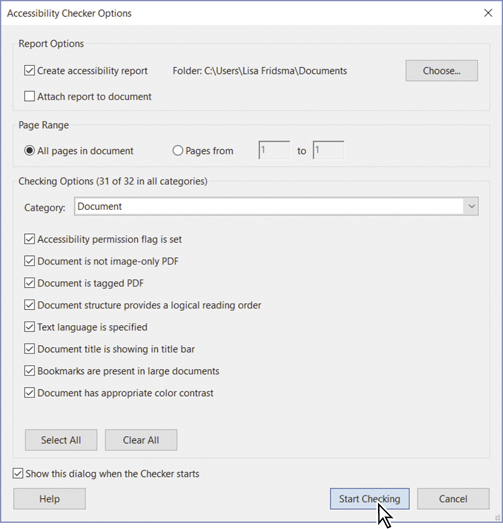
Acrobat quickly checks the document for accessibility issues and displays the interactive Accessibility Checker panel in the navigation pane. There are some issues with this document.
Expand the Document category. It lists three issues. Two of those issues are items that require you to look at the document to determine whether there’s a problem (Logical Reading Order and Color Contrast). The third issue is the Title, which failed.

In an accessible document, the document title should be included and set to display automatically in the title bar. You can learn what each item in the Accessibility Checker panel refers to by choosing Explain from the options menu at the top of the panel.
Right-click or Control-click the Title item, and choose Fix.

The panel changes to show that the title passed, after Acrobat changed its settings. Had there not been a title already in the document, you’d have been prompted to enter the document title. You can quickly fix most accessibility issues in a document using the interactive Accessibility Checker panel.
Close the Accessibility Checker panel and the Accessibility tool.
You can add security to your PDF files and still make them accessible. The encryption offered by Acrobat DC prevents users from copying and pasting text from a PDF file, while still supporting assistive technology.
Reflowing a flexible PDF file (Standard and Pro)
Now you’ll take a quick look at how flexible a tagged PDF file is. You’ll reflow the PDF file so that you can easily read it at different screen widths.
First, you’ll adjust the size of your document window to mimic the smaller screen of a handheld device.
Choose View > Zoom > Actual Size to display the document at 100%.
Resize the Acrobat window to about 50% of the full-screen display. In Windows, click the Maximize/Restore Down button if the window is currently maximized; if the window isn’t maximized, drag a corner of the application window to reduce it. In macOS, resize the document pane by dragging a corner.
Your goal is to resize the Acrobat window so that the ends of the sentences in the document pane are cut off.
Choose View > Zoom > Reflow.

The content of the document is reflowed to accommodate the smaller document screen, and you can now read an entire line of text without using the horizontal scroll bar.
When you reflow text, artifacts such as page numbers and page headers often drop out because they are no longer relevant to the page display. Text is reflowed one page at a time. You cannot save the document in the reflowed state.
Now you’ll examine how the display changes when you change the magnification.
Choose 400% from the magnification menu in the toolbar.
Scroll down the page to see how the text reflows. Again, because the text is reflowed, you don’t have to use the horizontal scroll bar to move back and forth across the page to read the enlarged text. The text is automatically contained within the document pane.

When you’ve finished viewing the reflowed text, restore the Acrobat document window to its usual size, and close the file.
You can save the contents of a tagged document in a different file format for reuse in another application. For example, if you save this file as accessible text, you’ll see that even the contents of the table are saved in an easy-to-use format.
With Acrobat, you can even make some unstructured documents more readily accessible to all types of users. You can add tags to a PDF document using the Add Tags To Document command in any version of Acrobat. However, to correct tagging and order errors, you must be using Acrobat Pro.
Making files flexible and accessible (Acrobat Pro only)
Some tagged Adobe PDF documents may not contain all the information necessary to make their contents fully flexible or accessible. For example, your file may not contain alternate text for figures, language properties for portions of the text that use a language other than the default language for the document, or expansion text for abbreviations. (Designating the appropriate language for different text elements ensures that the correct characters are used when you reuse the document for another purpose, that the word can be pronounced correctly when read out loud, and that the document will be spell-checked with the correct dictionary.)
![]() Note
Note
You can add tags and alternate text using tools in the Accessibility panel in Acrobat Standard.
If you’re using Acrobat Pro, you can add alternate text and multiple languages using the Tags panel. (If only one language is required, it is easier to choose the language in the Document Properties dialog box.) You can also add alternate text using the TouchUp Reading Order tool.
Using the Make Accessible action
If you’re using Acrobat Pro, you can systematically ensure your PDF document is accessible using the Make Accessible action. You’ll use the action to set document properties, set the tab order, add tags, and add alternate text to the document.
The Make Accessible action is one of the default actions in the Action Wizard in Acrobat Pro. You’ll learn more about using and creating actions in Lesson 12, “Using Actions.”
First, you’ll check the accessibility of a page of a user guide. This document was designed to be printed, so no attempt was made to make it accessible.
Choose File > Open, and open the AI_UGEx.pdf file in the Lesson03/Assets folder.
Click the Accessibility tool in the Tools pane to open it.
Click Full Check, and click Start Checking.
The Accessibility Checker panel indicates that the document isn’t tagged (in the Document category). You’ll let Acrobat tag the document and add other accessibility features for you.
Close the Accessibility Checker panel.
Click Tools in the toolbar, and then click the Action Wizard tool in the Customize category.

Click Make Accessible in the Actions List pane.
The Actions List pane is replaced by the Make Accessible action pane, which lists the steps included in the action. The action automates steps when possible, and guides you through the steps you need to perform to make your document accessible.
Verify that the file in the Files To Be Processed box is AI_UGEx.pdf.
Click Start.

The first section of the Make Accessible action helps you prepare your document settings for flexibility and accessibility.
![]() Tip
Tip
The Recognition Report is a temporary file and can’t be saved. The Full Check feature generates an accessibility report that you can save.
In the Description dialog box, deselect Leave As Is in the Title area, change the title to User Guide, and click OK.
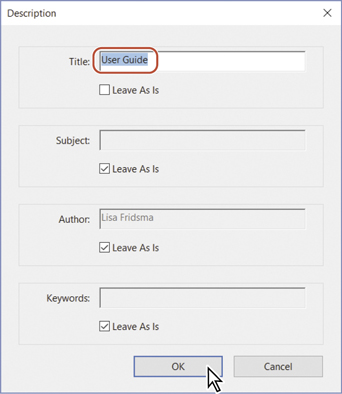
The title in the Description dialog box will appear in the title bar when the document is opened. After you click OK, Acrobat performs the next step automatically, setting the appropriate Open options for the document.
Accept the default settings in the Recognize Text - General Settings dialog box, and click OK.
These settings determine how OCR is applied to recognize text for screen readers.
When asked whether this document is intended to be a fillable form, click No, Skip This Step.
If you had clicked Yes, Acrobat would detect the form fields.
Click OK in the Set Reading Language dialog box to accept English as the reading language.
Acrobat automatically performs the next step, adding tags to the document.
Click OK when alerted that Acrobat will display any figures with missing alternate text.
Screen readers use alternate text (often called alt text) to describe non-text elements such as images or figures to a visually impaired person. Acrobat examines your document to ensure that every image has alternate text assigned to it, and prompts you to assign text where it’s missing.
In the Set Alternate Text dialog box, type Page Tool as the alt text for the selected image. Then click Save & Close.
Click Start Checking in the Accessibility Checker Options dialog box to confirm that the document is now accessible.
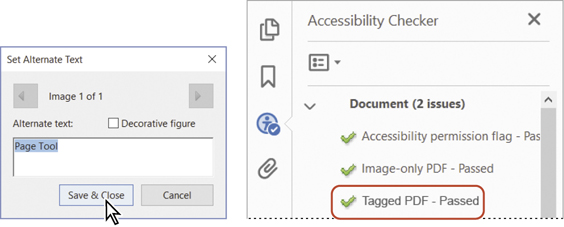
The Accessibility Checker panel now shows only two issues under the Document heading, both items that you would need to confirm manually.
Close the Accessibility Checker panel and the Action Wizard tool. Then close the AI_UGEx.pdf document.
Using Acrobat accessibility features (Standard and Pro)
Many people with vision and motor impairments use computers, and Acrobat provides a number of features that make it easier for them to work with PDF files. Such features include:
Automatic scrolling
Keyboard shortcuts
Support for several screen-reader applications, including the text-to-speech engines built into Windows and macOS platforms
Enhanced onscreen viewing
Using the Accessibility Setup Assistant
Both Acrobat DC and Acrobat Reader include an Accessibility Setup Assistant. In Windows, the Accessibility Setup Assistant launches automatically the first time the software detects a screen reader, screen magnifier, or other assistive technology on your system. In macOS, choose Edit > Accessibility Setup Assistant to open it. (You can also launch the Assistant manually at any time by selecting Setup Assistant in the Accessibility tool in Acrobat.) The Accessibility Setup Assistant walks you through setting the options that control how PDF documents appear onscreen. You can also use it to set the option that sends print output to a Braille printer.
A full explanation of the options you can set in the Accessibility Setup Assistant is available in Adobe Acrobat DC Help. The options available depend on the type of assistive technology you have on your system. The first panel of the Accessibility Setup Assistant requires you to identify the type of assistive technology you use:
Select Set Options For Screen Readers if you use a device that reads text out loud or sends output to a Braille printer.
Select Set Options For Screen Magnifiers if you use a device that makes text appear larger on the screen.
Select Set All Accessibility Options if you use a combination of assistive devices.
Click Use Recommended Settings And Skip Setup to use the settings Adobe recommends for users with limited accessibility. (Note that the preferred settings for users with assistive technology installed are not the same as the default Acrobat settings for users who are not using assistive technology.)
In addition to the options you can set using the Accessibility Setup Assistant, you can select a number of options in the Acrobat or Acrobat Reader preferences that control automatic scrolling, reading-out-loud settings, and reading order. You may want to use some of these options even if you don’t have assistive technology on your system. For example, you can set your Multimedia preferences to show available descriptions for video and audio attachments.
If you opened the Accessibility Setup Assistant, click Cancel to exit the dialog box without making any changes.
About automatic scrolling
When you’re reading a long document, the automatic scrolling feature saves you keystrokes and mouse actions. You can control the speed of scrolling, scroll backward and forward, and exit automatic scrolling with a single keystroke.
Now you’ll test the automatic scroll feature.
Choose File > Open, and open the Fall Hiking.pdf file. If necessary, resize the Acrobat window to fill your desktop.
Choose View > Page Display > Automatically Scroll.

You can set the rate of scrolling using the number keys on your keyboard. The higher the number, the faster the rate of scrolling. Try pressing 9, and then pressing 1, for example, to change the rate of scrolling. To exit automatic scrolling, press the Esc key.
Close the Fall Hiking.pdf file.
About keyboard shortcuts
For some common commands and tools, the keyboard shortcut is displayed next to the command or tool name. A list of keyboard shortcuts is available in Adobe Acrobat DC Help.
You can also use the keyboard to control Acrobat within a web browser. If the focus is on the web browser, any keyboard shortcuts you use act according to the web browser settings for navigation and selection. Pressing the Tab key shifts the focus from the browser to the Acrobat document and application, so navigation and command keystrokes function normally. Pressing Ctrl+Tab or Command+Tab shifts the focus from the document back to the web browser.
Modifying onscreen elements
You can smooth text, line art, and images to improve onscreen readability, especially with larger text sizes. If you use a laptop or if you have an LCD screen, you can also choose a Smooth Text option to optimize your display quality. Set the options to smooth text in the Page Display preferences.
You can change the color of the background or text displayed on your monitor using the Accessibility Preferences in Acrobat. Color changes affect only the onscreen display, not the printed page or the saved PDF file.
You can increase the text size used in bookmark labels by choosing Text Size > Large from the options menu of the Bookmarks panel.
You may want to experiment with screen-display options and other accessibility controls to find a combination that best suits your needs.
Setting screen reader and reading-out-loud preferences
After you have installed your screen reader or similar application and set it up to work with Acrobat, you can set the screen reader preferences in Acrobat. You set these preferences in the same panel in which you set the Read Out Loud feature preferences that control the volume, pitch, and speed of the speech; the nature of the voice; and the reading order preferences.
Newer systems (both Windows and macOS) have built-in text-to-speech engines. Although the Read Out Loud feature can read the text of a PDF file out loud, it is not a screen reader. Not all systems support the Read Out Loud feature.
In this exercise, you’ll look at the preferences that affect how Adobe PDF documents are read out loud. Unless you have text-to-speech software on your system, you do not need to set these preferences.
Choose File > Open, and open the Tag_Wines.pdf file.
If your system has text-to-speech software, choose View > Read Out Loud > Activate Read Out Loud.
After you have activated the Read Out Loud feature, choose View > Read Out Loud > Read This Page Only. Acrobat reads the page that is currently displayed. To stop the reading, press Ctrl+Shift+E (Windows) or Command+Shift+E (macOS).
You can experiment with the reading options.
Choose Edit > Preferences (Windows) or Acrobat > Preferences (macOS), and select Reading from the list on the left. Experiment, if you like.
You can control the volume, pitch, speed, and voice used.
If your system has limited memory, you may wish to reduce the number of pages Acrobat reads before data is delivered page by page. The default value is 50 pages.
Click OK in the Preferences dialog box to apply any changes that you make. Or click Cancel to exit the Preferences dialog box without making any changes.
To test the settings you changed, choose View > Read Out Loud > Read This Page Only.
To stop the reading, press Ctrl+Shift+E (Windows) or Command+Shift+E (macOS).
Sharing PDF files
You can share a PDF document with other people in many ways, including posting it on a website, copying it to a flash drive, or sending it as an email attachment. Acrobat makes it easy to distribute a PDF document to others by attaching the document to an email message or sharing a link to the document on Document Cloud.
With the Tag_Wines.pdf file open, click the Share Files button (
 ) in the main toolbar. Acrobat displays options for sharing the document.
If you invite people to view or review the document, Acrobat uploads the document to Document Cloud and emails a link to the document. If you select Send As Attachment, Acrobat emails the PDF file as an attachment using your email account.
Click Send As Attachment, and then select either Default Email Application or Webmail. If you select Webmail, choose a webmail service from the pop-up menu, and then add the account.
Once you’ve added a webmail account, it appears in the pop-up list so you can select it directly.
Click Continue.
If you’re using a webmail account, sign in, and grant access to Acrobat if prompted.
Your email application or webmail program opens with a blank message that has the file attached to it. If you’re using Gmail, you may need to click Drafts to see the draft message.
Enter email addresses, a subject line, and a brief message.
Send the message.
Close the document, and close Acrobat.
Review questions
Name three methods you can use to navigate to a different page within a document in Acrobat DC.
Name two ways to change the view magnification in a PDF file.
How can you determine whether a PDF document is accessible when you’re working with Acrobat Pro?
How can you print pages that are not next to each other (that is, discontiguous pages) from Acrobat?
Review answers
You can move to a different page by clicking the Previous Page or Next Page button in the main toolbar; dragging the scroll box in the scroll bar; entering a page number in the page box in the toolbar; or clicking a bookmark, page thumbnail, or link that jumps to a different page.
You can change the view magnification by choosing View > Zoom, and then choosing a view; dragging the Marquee Zoom tool; choosing a preset magnification in the toolbar; or entering a specific percentage in the magnification text box in the toolbar.
To determine whether a PDF file is accessible in Acrobat Pro, open the Accessibility tools, and then click Full Check.
To print discontiguous pages, either select the page thumbnails, and then choose File > Print, or, in the Print dialog box, select Pages, and then enter the page numbers or ranges you want to print, separated by commas.