
13 Using Acrobat in Professional Printing
Lesson overview
In this lesson, you’ll do the following:
Create Adobe PDF files suitable for high-resolution printing.
Preflight an Adobe PDF file to check for quality and consistency (Acrobat Pro).
View how transparent objects affect a page (Acrobat Pro).
Configure color management.
Use Acrobat to generate color separations.
This lesson will take approximately 60 minutes to complete. Download the project files for this lesson, following the instructions in the Getting Started section under “Accessing the lesson files and Web Edition,” if you haven’t already done so. As you work on this lesson, you’ll preserve the start files. If you need to restore the start files, download them from your Account page.

Acrobat Pro provides professional printing tools, including preflighting and transparency previews, to help you achieve high-quality output.
Creating PDF files for print and prepress
As you learned in Lesson 2, there are many ways to create a PDF file from your original document. No matter which method you choose, however, you need to use the appropriate PDF preset for your intended output. For high-resolution, professional printing, specify the Press Quality PDF preset or a custom PDF preset provided by your printer.
About Adobe PDF presets
A PDF preset is a group of settings that affect the process of creating a PDF file. These settings are designed to balance file size with quality, depending on how the PDF file will be used. Most predefined presets are shared across Adobe Creative Cloud applications, including Adobe InDesign, Adobe Illustrator, Adobe Photoshop, and Acrobat. You can also create and share custom presets to meet your own needs.
Presets that include “(Japan)” in their names are specifically designed for Japanese print workflows. For more detailed descriptions of each preset, see Adobe Acrobat DC Help.
High Quality Print creates PDFs for quality printing on desktop printers and proofing devices.
Oversized Pages creates PDFs suitable for viewing and printing engineering drawings larger than 200 by 200 inches.
PDF/A-1b (CMYK and RGB) standards are used for the long-term preservation (archival) of electronic documents.
PDF/X-1a standards minimize the number of variables in a PDF document to improve reliability. PDF/X-1a files are commonly used for digital ads that will be reproduced on a press.
PDF/X-3 files are similar to PDF/X-1a files, but they support color-managed workflows and allow some RGB images.
PDF/X-4 has the same color-management ICC color specifications as PDF/X-3, but includes support for live transparency.
Press Quality creates PDF files for high-quality print production (for example, for digital printing or for separations to an imagesetter or platesetter).
Smallest File Size creates PDF files for displaying on the web or an intranet, or for distribution through an email system.
Standard creates PDF files to be printed to desktop printers or digital copiers, published on a CD, or sent to a client as a publishing proof.
Creating the PDF file
You can create a PDF file from any application using the Print command. Because we do not know which applications you use, we have not included a file for this exercise. You can use any existing document or create a new document. The following steps are appropriate for most applications.
Open any document in its original application.
Choose File > Print.
Do one of the following:
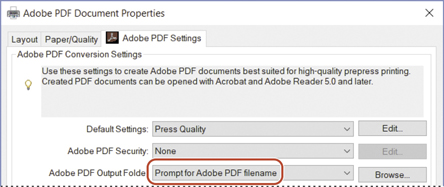
In Windows: Choose Adobe PDF from the list of available printers. Then click Properties, Preferences, Printer Properties, or Setup, depending on the application. Choose Press Quality or a custom PDF settings file.

In macOS: Click PDF, and choose Save As Adobe PDF from the menu. Then, in the Save As Adobe PDF dialog box, select the Press Quality settings file or a custom settings file from the Adobe PDF Settings menu, and click Continue.
In Windows, choose Prompt For Adobe PDF Filename from the Adobe PDF Output Folder menu, and then click OK. If you do not select this option, the Adobe PDF printer saves the file in the My Documents folder. (In macOS, you will be prompted for a filename and location automatically.)
In Windows, click Print or OK.
Specify a filename and folder for the PDF file when prompted, and click Save.
Close the PDF file and the original document.
![]() Note
Note
Some applications don’t use the standard Print dialog boxes to create PDF files. For example, to save a PDF file from Adobe InDesign, use the Export command.
For more information about selecting presets, see Adobe Acrobat DC Help.
Preflighting files (Acrobat Pro)
Before you hand off a PDF file to a print service provider, preflight it to verify that the document meets the criteria for print publishing. Preflighting analyzes a document against the criteria listed in the preflight profile you specify; in addition to identifying potential issues, many preflight profiles contain fixups that can correct problems for you.
Ask your print service provider which preflight profile to use to accurately preflight your document. Many print service providers provide custom preflight profiles to their customers.
You’ll preflight a file to determine whether it’s ready for digital printing.
In Acrobat Pro, choose File > Open, and navigate to the Lesson13/Assets folder. Select the Profile.pdf file, and click Open.
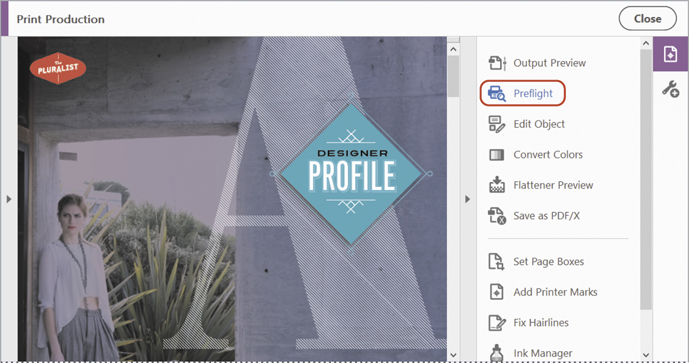
Click Tools to open the Tools Center. Then, choose Add Shortcut in the menu beneath the Print Production tool (in the Protect & Standardize category) to add the tool to the Tools pane if it’s not already there. You’ll use the tool multiple times in this lesson.
In the Tools pane, click Print Production.
Click Preflight in the right-hand pane.
The Preflight dialog box lists the available preflight profiles, grouped into categories that describe the tests they perform.
Click the triangle next to Digital Printing And Online Publishing to expand the category.
Select the Digital Printing (Color) profile.
When you select the profile, Acrobat displays its description.
Click Analyze And Fix.

In the Save As PDF dialog box, name the fixed file Profile_fixed.pdf, save it to the Lesson13/Finished_Projects folder, and click Save.
Because the profile applies fixups, it makes changes to the file. Saving the file to a different name ensures that you can return to the original if you need to.
Review the results of the preflight.
Acrobat displays the results of the preflight in the Results pane. In this file, Acrobat performed several fixups, applying compression, color conversion, and transparency flattening, as well as other changes.
The Results pane also notes that a white object is not set to knock out. If you were professionally printing this document, you might want to contact your print service provider to ensure that any factors reported in the Results pane won’t cause problems when your document is printed.
Click Create Report.
Navigate to the Lesson13/Finished_Projects folder, and then click Save to save the report with the default name Profile_fixed_report.pdf.
Acrobat creates the preflight summary report as a PDF and opens it in Acrobat.

Close the Preflight dialog box, and review the preflight summary report.
You can send the preflight summary report to your print service provider if you have any questions about preparing the file. Note that there are five pages to the report: The first page provides a summary of fixups and errors. The summary page is followed by the document itself, with comments identifying where errors occur.
![]() Tip
Tip
You can hide or show individual layers that were created in the authoring application, and determine which ones will print. To learn about showing, hiding, and printing layers, see Adobe Acrobat DC Help.
Choose File > Close to close the preflight summary report, and then choose File > Close again to close the Profile_fixed.pdf file.
Working with transparency (Acrobat Pro)
Adobe applications let you modify objects in ways that can affect the underlying artwork, creating the appearance of transparency. You may create transparency by using an opacity slider in InDesign, Illustrator, or Photoshop, or by changing the blending mode for a layer or selected object. Transparency also comes into play whenever you create a drop shadow or apply feathering. Adobe applications can keep transparency “live,” or editable, as you move documents from one application to another, but transparency must typically be flattened before printing. In Acrobat Pro, you can see which areas of your document are affected by transparency and how those areas will print.
Previewing transparency
When you print to most printers, transparency is flattened. The flattening process separates overlapping areas of artwork into discrete sections that are converted either into separate vector shapes or rasterized pixels to retain the look of the transparency.
![]() Note
Note
If your print service provider is using a RIP (raster image processor) that includes the Adobe PDF Print Engine, you may not need to flatten transparency.
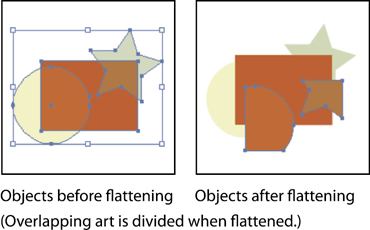
Before flattening occurs, you can determine how much of the transparent area remains vector, and how much becomes rasterized. Some effects, such as drop shadows, must be rasterized in order to print correctly.

If you receive a PDF file created by someone else, you may not know if or where transparency has been applied. The Acrobat transparency preview shows you where transparency is used in a document. This feature can also help you determine the best flattener settings to use when printing the document.
![]() Tip
Tip
In Acrobat DC Pro, you can quickly see whether a PDF file includes transparency: Select Output Preview in the right-hand pane of the Print Production panel. At the bottom of the Output Preview dialog box, Acrobat reports whether the page has transparency. If it doesn’t, there’s no need to flatten it.
You’ll preview transparency in the Profile.pdf file.
Open the Profile.pdf file from the Lesson13/Assets folder.
Navigate to page 1 of the document. If the entire page is not visible, choose View > Zoom > Zoom To Page Level.
Open the Print Production tool, and then click Flattener Preview in the right-hand pane.
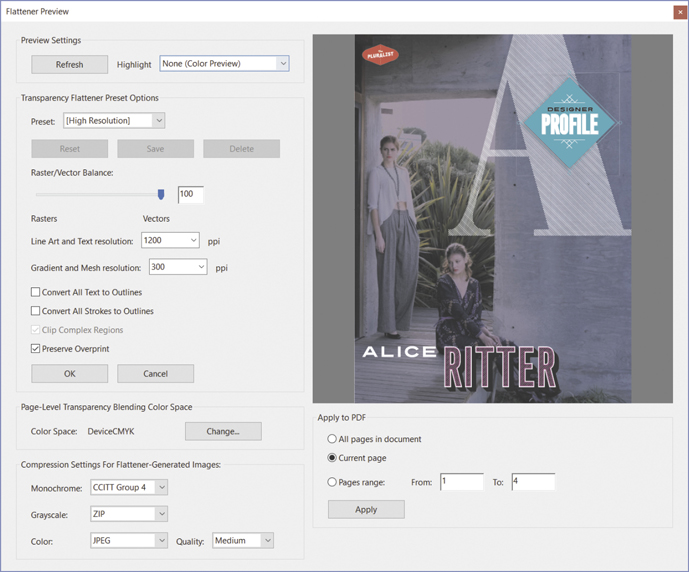
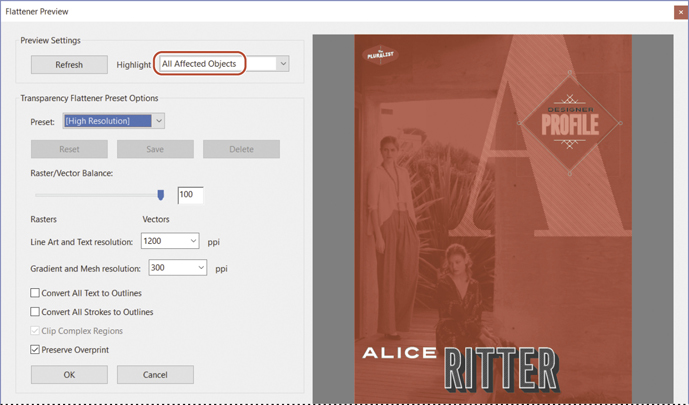
The Flattener Preview shows a preview of page 1 of the document on the right side of the dialog box.
Specifying flattener preview settings
You can select different settings to preview different aspects of the way transparency interacts with objects in the document.
In the Flattener Preview dialog box, choose All Affected Objects from the Highlight menu. Nearly the entire page is highlighted in red, indicating that the objects themselves have transparent properties or interact with objects that have transparent properties. Only a few items, including the text at the bottom of the page, are not affected by transparency.
Choose High Resolution from the Preset menu in the Transparency Flattener Preset Options area. The preset determines how much of the artwork remains vector and how much is rasterized. For professional printing, use the High Resolution preset unless your print service provider advises you differently.
What is rasterization?
Rasterization is the process of changing vector objects, including fonts, into bitmap images to display or print them. The number of pixels per inch (ppi) is referred to as the resolution. The higher the resolution in a raster image, the better the quality. When flattening occurs, some objects may need to be rasterized, depending upon flattening settings.

Click the left end of the Raster/Vector Balance slider, or type 0 in the box. Then click Refresh in the Preview Settings area, and choose All Affected Objects from the Highlight menu. Everything on the page is highlighted in red, indicating that everything would be rasterized at this setting.

Make other selections to see how the settings affect the document. When you are finished, click the close button in the upper right (Windows) or upper left (macOS) corner of the window to close the Flattener Preview window without applying your settings.
![]() Tip
Tip
You can find more information about printing transparency on the Adobe website at www.adobe.com.
If you want to use the selected transparency flattener settings when printing, click Apply in the Flattener Preview dialog box.
Setting up color management
Using color management can help you achieve consistent color throughout your workflow. Color profiles describe the characteristics of each device. Color management uses those profiles to map the colors possible for one device, such as a computer monitor, with the colors possible on another device, such as a printer.
Choose Edit > Preferences (Windows) or Acrobat > Preferences (macOS), and select Color Management from the list on the left.
From the Settings menu, choose North America Prepress 2. With this setting, Acrobat displays colors as they generally appear when printed using North American printing standards.

![]() Note
Note
You can synchronize color management settings for all the Adobe Creative Cloud applications in Adobe Bridge, which is available as part of a Creative Cloud membership. See Bridge Help for more information.
The setting you select determines which color working spaces are used by the application and how the color management system converts colors. To view a description of a setting, select the setting, and then position the pointer over the setting name. The description appears at the bottom of the dialog box.
ACE (Adobe Color Engine) is the same color management engine used by other Adobe graphics software, so you can be confident that color management settings applied in Acrobat will mirror those applied in your other Adobe applications.
Click OK to close the Preferences dialog box.
Previewing your print job (Acrobat Pro)
You’ve already previewed how transparency will print. Now you’ll preview color separations and verify the resolution of individual objects. You’ll also perform a soft proof—that is, you’ll proof the document on the screen without having to print it.
Previewing color separations
To reproduce color and continuous-tone images, printers usually separate artwork into four plates, called process colors—one plate for each of the cyan, magenta, yellow, and black portions of the image. You can also include custom pre-mixed inks, called spot colors, which require their own plates. When inked with the appropriate color and printed in register with one another, these plates combine to reproduce the original artwork. The plates are called color separations.
You will preview color separations from this document using the Output Preview dialog box.
Make sure you’re viewing page 1 of the document, and that the Print Production tool is open.
Click Output Preview in the right-hand pane.
Choose Separations from the Preview menu.

The Separations area of the dialog box lists all the inks that are included in this document for printing. There are four process inks (cyan, magenta, yellow, and black) and two spot colors (TOYO 0349 and TOYO 0343).
Drag the Output Preview dialog box to the side so that you can see the document. Then, in the Output Preview dialog box, deselect every ink except TOYO 0349. The items that remain on the page use the selected ink.

Deselect TOYO 0349, and select Process Magenta. Only those items that would print on the magenta plate appear.

Select all the inks again.
![]() Tip
Tip
If you wanted to remap a spot color to a process color in order to limit the number of plates, and thus the expense, of a print job, you could use the Ink Manager, also available in the Output Preview dialog box.
Soft-proofing your document
You can use the Output Preview dialog box to soft-proof a document, so that you can see onscreen how your document will look when printed. Use the simulation settings to approximate the color.
As you change the profile chosen in the Simulation Profile menu, color shifts on the monitor. When you soft-proof a document, select the simulation profile that matches your output device. If you use accurately calibrated ICC profiles and have calibrated your monitor, the onscreen preview should match the final output. If you haven’t calibrated your monitor or your profiles, the preview may not provide an exact match. For information about calibrating your monitor and profiles, see Adobe Acrobat DC Help.
![]() Note
Note
If you’re working with a PDF/X or PDF/A file, the color profile that is embedded in the file as its output intent is automatically selected.
Inspecting objects in a PDF file
You can take a closer look at individual graphics and text in a PDF file using the Object Inspector. The Object Inspector displays the image resolution, color mode, transparency, and other information about the selected object.
You’ll check the resolution of the image on page 2.
Choose Object Inspector from the Preview menu in the Output Preview dialog box.
Scroll to page 2, and click the image of the woman.
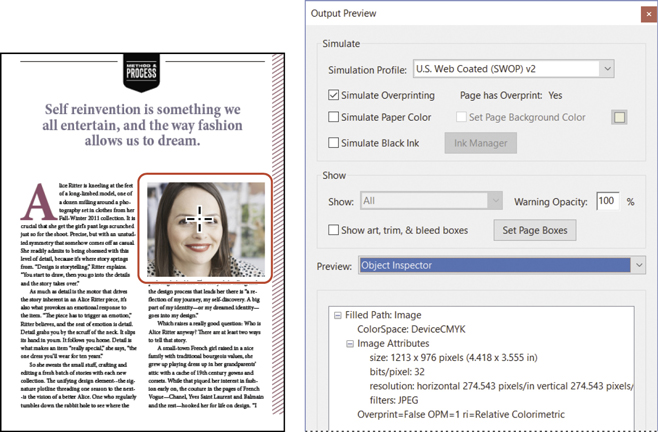
The Object Inspector lists attributes of the image you clicked, including the image resolution: 274.543 by 274.543 pixels.
![]() Tip
Tip
You can document the information the Object Inspector reports for easy access later. Shift-click an area to create a comment with that information.
Click the body text on the page. The Object Inspector displays information about the text, including the font and type size.
Close the Output Preview dialog box, and then close the Print Production tool.
Advanced printing controls
You’ll use the advanced printing features of Acrobat DC Pro to produce color separations, add printing marks, and control how transparent and complex items are imaged.
![]() Tip
Tip
Overprinting is automatically displayed accurately in PDF/X files in all versions of Acrobat DC and Acrobat Reader DC. You can change the settings to display overprinting accurately for all files in the Page Display pane of the Acrobat Preferences dialog box.
Choose File > Print.
In the Print dialog box, choose a PostScript printer. In Windows, if you do not have a PostScript printer available, you can choose Adobe PDF.
Some advanced printing options, including color separations, are available only for PostScript printers. The Adobe PDF printer uses a PostScript printer driver, so it provides access to the options covered in this exercise.
In the Pages To Print area, select All.
In the Page Sizing & Handling area, select the Size tab, and then select Fit.
The Fit option reduces or enlarges each page to fit the paper size.
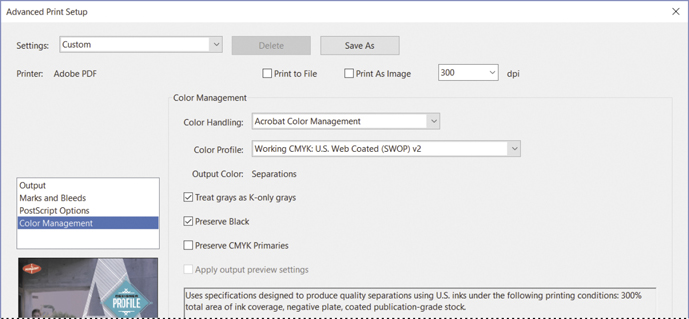
Click Advanced near the top of the Print dialog box.
There are four options on the left side of the dialog box: Output, Marks And Bleeds, PostScript Options, and Color Management.
Select Output, and then choose Separations from the Color menu.
Click the Ink Manager button in the Ink Manager area.
In the Ink Manager dialog box, select the icon to the left of TOYO 0349. The icon changes into a CMYK color swatch, indicating that this color will be printed as a process color, using the cyan, magenta, yellow, and black plates.
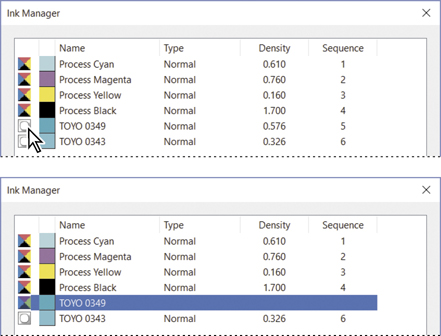
Acrobat will mix cyan and black to simulate the dedicated ink that is used to produce the TOYO 0349 spot color. In many cases, it is more cost-effective to use a mixture of CMYK inks than to add an entirely new spot color ink.
To globally convert all spot colors to their CMYK equivalents, select Convert All Spots To Process.
Click OK to close the Ink Manager dialog box.
In the Advanced Print Setup dialog box, select Marks And Bleeds from the list on the left. Select All Marks to enable trim marks, bleed marks, registration marks, color bars, and page information to print on each plate, outside the edges of the document.

Select Color Management from the list on the left.
Choose Acrobat Color Management from the Color Handling menu.
Choose Working CMYK: U.S. Web Coated (SWOP) v2 from the Color Profile menu.
![]() Note
Note
If you’ve chosen a printer that does not support CMYK printing, the Working CMYK profile will not be available in the Color Profile menu. In that case, choose the Working RGB profile instead.
The color profile you select should match the device you will be printing to.
Click Save As at the top of the Advanced Print Setup dialog box, and save your settings using the name Profile. Then click OK.
Saved settings are added to the settings menu, so you can reuse them for future print jobs without having to re-enter the settings for recurring publications or specific output devices.
Click OK to exit the Advanced Print Setup dialog box. Then either click Print to print this document, or click Cancel if you prefer not to print at this time.
Close the document, and quit Acrobat.
Review questions
What is a PDF preset?
How can you select a settings file when you create a PDF using the Print command in macOS?
What problems can Preflight detect within a PDF?
What is a spot color, and how can you remap it to a process color when you print color separations?
Review answers
A PDF preset is a group of settings that affects the process of creating a PDF file. These settings are designed to balance file size with quality, depending on how the PDF file will be used.
To change the settings file in macOS, first choose Save As Adobe PDF from the PDF menu in the Print dialog box. Then choose a preset from the Adobe PDF Settings menu.
Use the Preflight command to check for all areas of concern within a PDF. For example, if you are sending a PDF file to a professional printer, preflight the document to verify that fonts are embedded, graphics have the appropriate resolution, and colors are correct.
A spot color is a special premixed ink that is used instead of, or in addition to, CMYK process inks, and that requires its own printing plate on a printing press. If absolute color accuracy is not critical, and it is not practical to print a spot color plate as well as CMYK plates, you can remap the spot color to a process color for printing using the Ink Manager. In the Advanced Print Setup dialog box, select Separations, and then click Ink Manager. In the Ink Manager, click the icon to the left of the spot color to remap it to a process color for the print job.