
2 Creating Adobe PDF Files
Lesson overview
In this lesson, you’ll do the following:
Convert a TIFF file to Adobe PDF using the Create PDF tool.
Convert a file to Adobe PDF using the authoring application’s Print command.
Convert multiple documents into a single PDF file.
Explore the Adobe PDF settings used to convert files to Adobe PDF.
Reduce the size of a PDF file.
Scan a paper document into Acrobat.
Convert scanned images into searchable text.
Convert web pages to Adobe PDF from Acrobat and directly from a web browser.
This lesson will take approximately 60 minutes to complete. Download the project files for this lesson, following the instructions in the Getting Started section under “Accessing the lesson files and Web Edition,” if you haven’t already done so. As you work on this lesson, you’ll preserve the start files. If you need to restore the start files, download them from your Account page.

You can easily create PDF files from existing files, such as Microsoft Word documents, web pages, scanned documents, and images.
About creating Adobe PDF files
You can convert a variety of file formats to Adobe PDF, preserving all the fonts, formatting, graphics, and color of the source file, regardless of the application and platform used to create it. You can create PDF files from images, document files, websites, scanned paper documents, and clipboard content.
![]() Tip
Tip
If you have an Acrobat or Creative Cloud subscription, you can convert Microsoft Office and image files to PDF using the Acrobat DC mobile app. To learn more, see Lesson 6, “Using Acrobat on mobile devices.”
If the document you want to convert to PDF is open in its authoring application (for example, a spreadsheet is open in Excel), you can usually convert the file to PDF without opening Acrobat. But if Acrobat is already open, you don’t have to open the authoring application to convert a file to PDF.
When you create a PDF file, consider file size and quality (image resolution, for example). When such factors are critical, use a method that allows you to control conversion options. Dragging and dropping files on the Acrobat icon to create PDF files is fast and easy, but if you want more control over the process, use another method, such as using the Create PDF tool in Acrobat or the Print command in the authoring application. After you specify conversion settings, the settings apply across PDFMaker and Acrobat until you change them.
![]() Note
Note
When you’re creating a PDF from within Acrobat, you must have the application that created the original file installed on your system.
Lesson 7, “Using Acrobat with Microsoft Office Files,” describes how to create Adobe PDF files directly from a variety of Microsoft Office applications. Lesson 8, “Combining Files,” covers the conversion of multiple file types as you combine files into a single PDF document. In Lesson 13, “Using Acrobat in Professional Printing,” you’ll learn how to create press-quality PDF files.
If the security settings applied to an Adobe PDF file allow it, you can also reuse the content of the document. You can extract content for use in another authoring application, such as Microsoft Word, or you can reflow the content for use with handheld devices or screen readers. The success with which content can be repurposed or reused depends very much on the structural information contained in the PDF file. The more structural information a PDF document contains, the more opportunities you have for successfully reusing the content, and the more reliably a document can be used with screen readers. (For more information, see Lesson 3, “Reading and Working with PDF Files.”)
Using the Create PDF tool
You can use the Create PDF tool in Acrobat to convert a variety of file types, including both image and non-image files, to Adobe PDF. You’ll convert a single TIFF image to an Adobe PDF file.
Start Acrobat, if it’s not already open.
Click Tools to open the Tools Center.
Click the Create PDF tool in the Create & Edit category.

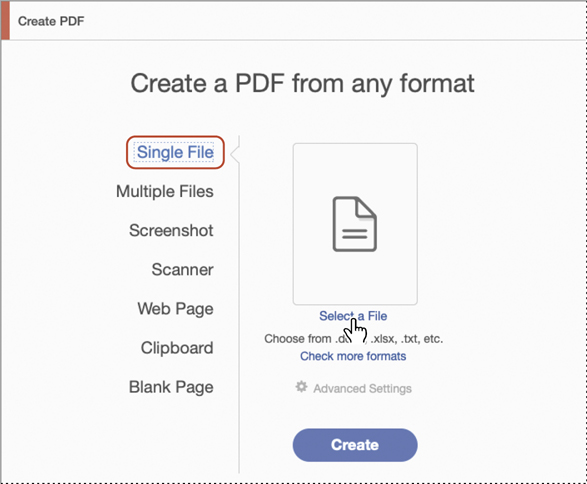
Acrobat displays a list of options for creating a PDF file. Using the Create PDF tool, you can create a PDF document from one or multiple files, a screenshot, a scanned image, a website, clipboard contents, or a blank page. All your options are easily accessible here. Single File is selected by default.
With Single File selected, click Select A File.
In the Open dialog box, navigate to the Lesson02/Assets folder on your hard drive, and select the GC_VendAgree.tif file. Then click Open.
A thumbnail image of the selected file appears, with the filename beneath it.
Click Advanced Settings.
![]() Note
Note
If the Advanced Settings option is dimmed, there are no additional settings available for that file type.
The settings options vary depending on the file type you’ve selected. For a TIFF image, the Adobe PDF Settings dialog box includes options for scan optimization, image compression, and color management.

You can also review and edit the settings used to convert your files to PDF in the Convert To PDF panel of the Preferences dialog box.
Click Cancel to leave the settings unchanged for this document.
Click Create.
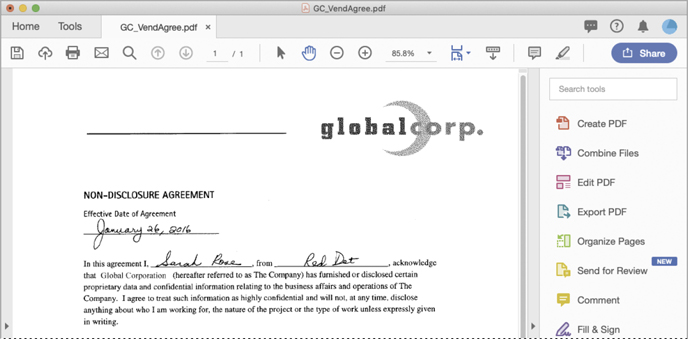
Acrobat converts the TIFF file to Adobe PDF and opens the PDF file automatically.
Choose Fit One Full Page from the Fit pop-up menu (
 ) on the Page Controls toolbar so that you can see the entire agreement.
![]() Note
Note
The Fit pop-up menu icon changes to reflect the current view.
Notice that the handwritten note that the signer of the agreement has added is preserved in the Adobe PDF file.

Choose File > Save As, name the file GC_VendAgree.pdf, and save it in the Lesson02/Finished_Projects folder. Then choose File > Close to close the PDF file.
Saving PDF files to cloud accounts
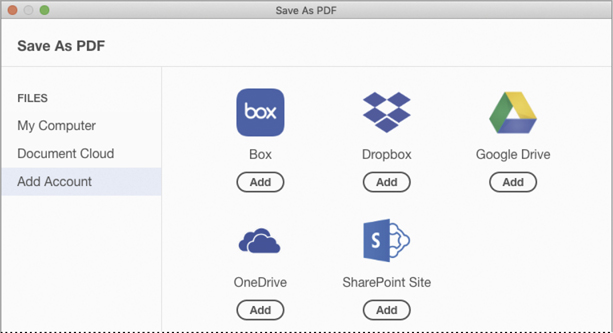
You can save PDF files directly to your Box, Dropbox, Google Drive, OneDrive, or Sharepoint account. In Acrobat DC, choose File > Save As, and then click Add Account in the pane on the left. Click Add beneath the type of account you want to add, and then sign in and agree to share access with Acrobat. Once you’ve added an account, it appears among the storage options on the left side of the Save As PDF dialog box. To save the current PDF file directly to your account, choose File > Save As, select the account, name the file, and click Save.
Dragging and dropping files
You can also create Adobe PDF files from many documents simply by dragging the file onto the Acrobat icon or into the document pane in Acrobat (Windows). Acrobat uses the conversion settings you specified the last time you converted a file.
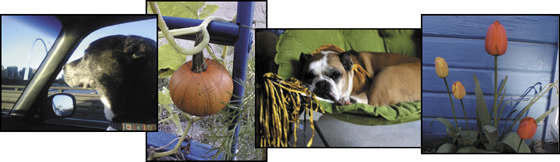
Experiment with dragging the RoadieDog.jpg, Pumpkin.jpg, LoyalFan.jpg, and Tulips.jpg files from the Lesson02/Assets folder into the Acrobat document pane (Windows), onto the Acrobat icon on your desktop, or onto the Acrobat icon in the Dock (macOS). Close any open PDF files when you are finished. You can save the newly created PDF files or close them without saving.
Converting different types of files
You can use the Multiple Files option in the Create PDF tool to easily convert different types of files to Adobe PDF and combine them into one PDF file. If you’re using Acrobat Pro, you can also assemble multiple documents into a PDF Portfolio. You’ll learn more about combining files and creating PDF Portfolios in Lesson 8, “Combining Files.”
Now, you’ll convert a file to Adobe PDF and combine it with several other PDF files.
Assembling the files
First, you’ll select the files you want to combine, and specify which pages to include. You’ll combine a JPEG image file with several PDF files, but you’ll include only a single page from one of the PDF documents.
In Acrobat, click Tools, and then click the Create PDF tool in the Create & Edit category.
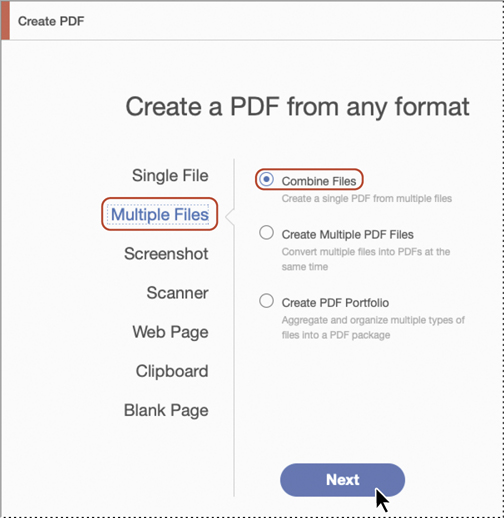
Select Multiple Files, and then select Combine Files, and click Next.
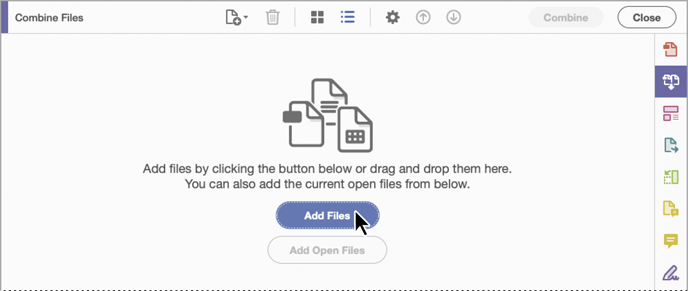
Acrobat opens the Combine Files tool so that you can assemble your documents.
Click the Add Files button.
Now you’ll select the files that you want to convert and combine. The types of files that you can convert will vary depending on whether you are working in Windows or macOS.
In the Add Files dialog box, navigate to the MultipleFiles folder in the Lesson02/Assets folder. Make sure that All Supported Formats is selected in the Show menu. (In macOS, click Options to see the Show menu.)
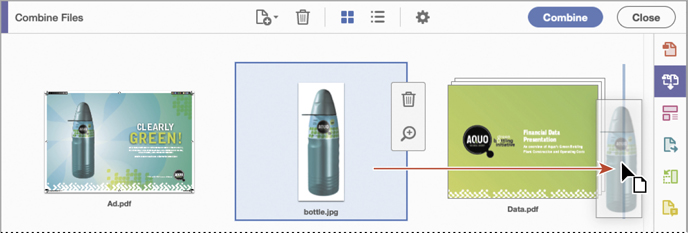
Select the Ad.pdf file. Then Shift-click the Data.pdf file to select the bottle.jpg and Data.pdf files, too.

Click Open (Windows) or Add Files (macOS).
You can add files in any order, because you can rearrange them in the Combine Files window. You can also use the Remove button to remove any unwanted files.
If you see a list of files, click the Switch To Thumbnail View icon in the Combine Files toolbar. Then drag the thumbnail of the bottle.jpg file to the right of the Data.pdf file.
You can convert all pages in a file, or you can select a specific page or range of pages to convert.
Hover the mouse over the Data.pdf file, and then click the Expand 8 Pages button (
 ) to see thumbnails of each page in the file.
Select the first page, and click the Remove button in the Combine Files toolbar.
 Note
NoteThe Combine Files toolbar includes labels in Windows, but displays only icons in macOS. The macOS version is shown here.
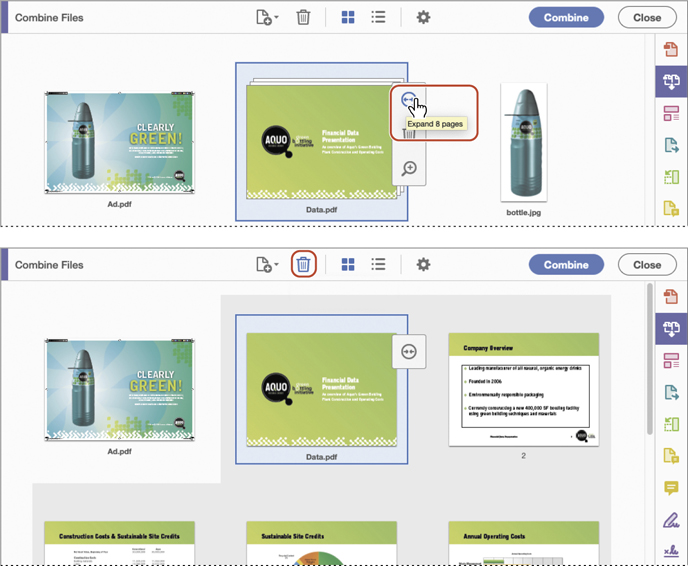
Remove pages 2, 4, 5, 6, and 7 of the Data.pdf file, so that you’re left with four thumbnails: Ad.pdf, Data.pdf pages 3 and 8, and bottle.jpg.
Click the Options button (
 ) to specify settings for the PDF file conversion.

In the Options dialog box, make sure the middle icon (Default File Size) is selected for File Size and that Save As PDF Portfolio is not selected. Then click OK.
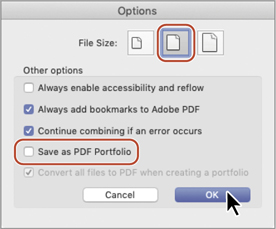
The Default File Size option produces a PDF file suitable for viewing and printing business documents. The Smaller File Size option optimizes files for web distribution. Use the Larger File Size option to prepare documents for high-quality printing.
Click Combine.
Acrobat converts any native files into PDF and then consolidates all the selected files into a single file, named Binder1.pdf. The file opens automatically.

Use the Next Page (
 ) and Previous Page (
 ) buttons to page through your consolidated documents.
Choose File > Save As. Save the file to the Lesson02/Finished_Projects folder, and rename the file Aquo.pdf. Click Save.
Without leaving Acrobat, you have converted a JPEG file to Adobe PDF and combined it with other PDF files.
Choose File > Close to close the file.
Inserting a blank page
In Acrobat, you can insert blank pages into a PDF file, which makes it easy to create a transition page or a notes page.
In Acrobat, open the Aquo.pdf file you created, and click the Organize Pages tool in the Tools pane.
Choose Insert > Blank Page. In the Insert Pages dialog box, choose After from the Location menu, and select Last in the Page area of the dialog box. Then click OK.
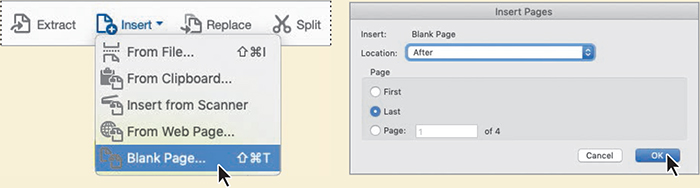
Acrobat adds a blank page, matching the dimensions of the page that preceded it.
Choose Edit PDF from the Tools menu on the left side of the Organize Pages toolbar.
The blank page is displayed in the document pane; editing tools are available in the right-hand pane.
Click Add Text in the Edit PDF toolbar.
Move the pointer over the page; it turns into an I-beam. Click an insertion point at the top of the page.
In the Format area of the right-hand pane, change the font (we used Adobe Garamond Pro Bold).
Type Notes. Use the Format options to change text attributes, including font size and color.

Close the file. You can save your changes if you want to.
Using PDFMaker
When you install Adobe Acrobat DC, the installer adds Acrobat PDFMaker buttons or menu commands to supported applications, including Microsoft Office applications, Google Chrome (Windows), Mozilla Firefox, Autodesk AutoCAD, and others. PDFMaker options vary from one application to another, but they always give you the ability to quickly create a PDF file from the source application file. Depending on the application, you can also use PDFMaker to add bookmarks, tag the PDF document to make it more accessible, add security features, or include layers in the PDF file.
For specific information about using PDFMaker in Office, see Lesson 7, “Using Acrobat with Microsoft Office Files.” To use PDFMaker in web browsers, see “Converting web pages to Adobe PDF” later in this lesson.
Using the Print command to create Adobe PDF files
As you saw earlier in this lesson, you can easily create Adobe PDF files using the Create PDF tool in Acrobat. However, you can also create an Adobe PDF file from almost any application by using the application’s Print command with the Adobe PDF printer (Windows) or the Save As Adobe PDF option (macOS).
Printing to the Adobe PDF printer (Windows)
The Adobe PDF printer isn’t a physical printer like one that might sit in your office. Rather, it is a simulated printer that converts your file to Adobe PDF instead of printing it to paper. The printer name is Adobe PDF.
You can use this technique from almost any application, regardless of whether the application has built-in features for creating PDF files. You should be aware, however, that the Adobe PDF printer creates untagged PDF files. (A tagged structure is required for reflowing content to a handheld device and is preferable for producing reliable results with a screen reader.)
The Adobe PDF printer is an easy and convenient way to create a PDF file from almost any document. However, if you’re working with Microsoft Office files, the Create Adobe PDF buttons or the Acrobat ribbon (both of which use PDFMaker) let you create tagged documents and include bookmarks and hypertext links.
You’ll convert a text file to Adobe PDF using the Print command with the Adobe PDF printer. Steps may vary depending on the application and which version of Windows you are using.
Open WordPad, a text editor that comes with Windows. You can choose the application from your Start menu (it’s in the Windows Accessories group in Windows 10), or type WordPad in the search bar, and then double-click the file.
In WordPad, click the menu or File tab, and choose Open.
Navigate to the Lesson02/Assets folder, and double-click the Memo.txt file.
In WordPad, click the menu or File tab, and choose Print.
Choose Adobe PDF from the list of printers. You may need to scroll to see it.
To change the settings used to convert the text file to Adobe PDF, click Preferences in the Print dialog box or Properties in the Page Setup dialog box. For more information, see the “Adobe PDF Presets” sidebar later in this lesson.
Click Print.

Save the file using the default name (Memo.pdf) in the Lesson02/Finished_Projects folder, and click Save in the Save PDF File As dialog box.
If the PDF file doesn’t open automatically, navigate to the Lesson02/Finished_Projects folder, and double-click the Memo.pdf file to open it in Acrobat. When you have reviewed the file, close it, and quit WordPad.
Close any open files.
Printing with the Save As Adobe PDF option (macOS)
In macOS, use the Save As Adobe PDF option in the PDF menu in the Print dialog box to print from any application.
From your desktop, navigate to the Lesson02/Assets folder, and double-click the Memo.txt file.
The text file opens in a text editor such as TextEdit.
Choose File > Print. It doesn’t matter which printer is selected.
Click the PDF button at the bottom of the dialog box, and choose Save As Adobe PDF.

In the Save As Adobe PDF dialog box, choose an Adobe PDF Settings file, and choose Adobe Acrobat from the After PDF Creation menu to open the PDF file in Acrobat.
Click Continue.
In the Save dialog box, accept the default name of Memo.pdf, and save the file to the Lesson02/Finished_Projects folder.
Click Save.
![]() Note
Note
In some applications, such as Adobe InDesign CC, click Printer in the Print dialog box to see the PDF menu.
The PDF file opens automatically, because you chose Adobe Acrobat from the After PDF Creation menu.
Review the file, close it, and quit the text editor application.
You have just converted a simple text document to an Adobe PDF document using the authoring application’s Print command.
Close any open files.
Reducing file size
The size of a PDF file can vary dramatically depending on the Adobe PDF settings used to create it. For example, files created using the High Quality Print preset are larger than files created using the Standard or Smallest File Size presets. Regardless of the preset used to create a file, you can often reduce the file size without having to regenerate the PDF file.
You’ll reduce the size of the Ad.pdf file.
In Acrobat, choose File > Open, navigate to the Lesson02/Assets/MultipleFiles folder, and open the Ad.pdf file.
Choose File > Save As Other > Reduced Size PDF.
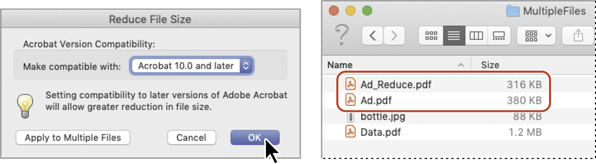
Select Acrobat 10.0 And Later for file compatibility, and click OK.
Be sure to choose a version of Acrobat that your intended audience is likely to have.
Name the modified file Ad_Reduce.pdf. Click Save to complete the process.
It is always a good idea to save a file using a different name so that you don’t overwrite the unmodified file.
Acrobat automatically optimizes your PDF file, a process that may take a minute or two. Any anomalies are displayed in the Conversion Warnings window. If necessary, click OK to close that window.
Minimize the Acrobat window. Use Windows Explorer (Windows) or the Finder (macOS) to open the Lesson02/Assets/MultipleFiles folder and view the size of the Ad_Reduce.pdf file. The file size is smaller than that of the Ad.pdf file.
You can repeat steps 1–5 using different compatibility settings to see how they affect file size. Note that some settings might actually increase the file size.
Optimizing PDF files (Acrobat Pro only)
Many factors affect file size and file quality, but when you’re working with image-intensive files, compression and resampling are important. In Acrobat DC Pro, PDF Optimizer gives you greater control over file size and quality.
To access PDF Optimizer, choose File > Save As Other > Optimized PDF.
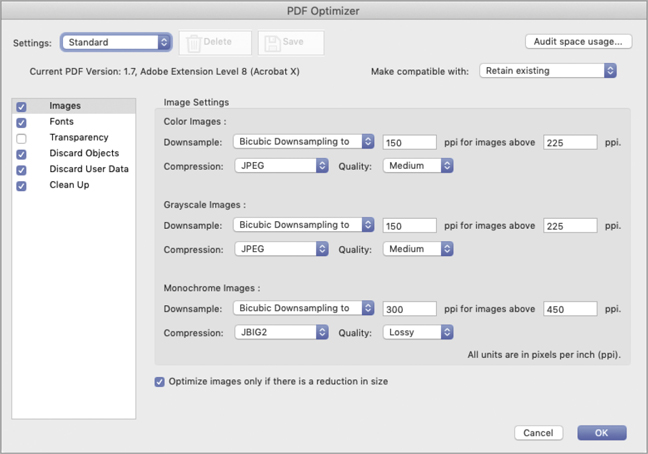
In the PDF Optimizer dialog box, you can choose from a variety of file compression methods designed to reduce the file space used by color, grayscale, and monochrome images in your document. Which method you choose depends on the kind of images you are compressing. The default Adobe PDF presets use automatic (JPEG) compression for color and grayscale images and CCITT Group 4 compression for monochrome images.
In addition to choosing a compression method, you can resample bitmap images in your file to reduce the file size. A bitmap image consists of digital units called pixels, whose total number determines the file size. When you resample a bitmap image, the information represented by several pixels in the image is combined to make a single larger pixel. This process is also called downsampling, because it reduces the number of pixels in the image. (When you downsample or decrease the number of pixels, information is deleted from the image.)
Neither compression nor resampling affects the quality of text or line art.
Scanning a paper document
You can scan paper documents to PDF from a broad range of scanners, add metadata while scanning, and optimize your scanned PDF. In Windows, you can choose presets for black and white, grayscale, and color documents, as well as color images. These presets optimize the quality of your scanned documents. You can also define your own conversion settings.
![]() Note
Note
If Acrobat does not recognize your scanner, refer to your scanner documentation for setup instructions, or contact your scanner manufacturer for troubleshooting help.
If you do not have a scanner connected to your system, skip this exercise.
Insert any one-page document into your scanner, and do one of the following in Acrobat:
In Windows: Open the Create PDF tool, select Scanner, select the scanner you’re using, and then select a preset for your document or accept the default. To customize the settings, click the Settings icon next to the preset you choose, and make changes. Click Scan.
In macOS: Open the Create PDF tool, select Scanner, select the scanner you’re using, and click Next. Then select options in the Acrobat Scan dialog box, and click Scan.
The scan occurs automatically.
When prompted, click OK to confirm that the scan is complete.
The PDF of the scanned document appears in Acrobat.
Choose File > Save, and save the scan in the Lesson02 folder as Scan.pdf.
Choose File > Close to close your document.
Scan using mobile devices
Use your mobile phone or tablet as a scanner. The free Adobe Scan app uses your device’s camera to scan a receipt, business card, or other document, automatically detecting borders, removing shadows, and recognizing text. It creates a PDF of the scan, saved to Adobe Document Cloud, so you can access it from anywhere.

Making scanned text editable and searchable
When you convert a file from an application such as Microsoft Word or Adobe InDesign to PDF, the text is fully editable and searchable. However, text in image files, whether scanned documents or files saved in an image format, is not editable and searchable. Using OCR (optical character recognition), Acrobat analyzes the image and replaces portions of it with discrete characters. It also identifies characters it may have analyzed incorrectly.
![]() Tip
Tip
Acrobat can perform OCR automatically when you scan images. Just make sure Recognize Text (OCR) is selected in the scanner preset (Windows) or Acrobat Scan dialog box (macOS) before you scan.
You’ll apply OCR to the PDF document you created from a TIFF image.
Choose File > Open, navigate to the Lesson02/Finished_Projects folder, and open the GC_VendAgree.pdf file that you saved earlier.
Move the pointer over text in the document. You can select areas in the document, but Acrobat does not specifically select any of the text.
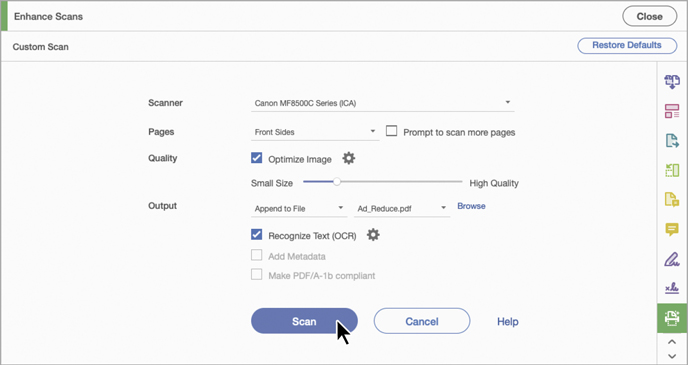
In the Tools pane, click Enhance Scans, and then choose Recognize Text > In This File.

A toolbar with text recognition options appears below the Enhance Scans toolbar.
Click Settings to edit the settings for the conversion.
In the Recognize Text dialog box, choose Editable Text And Images from the Output menu. Click OK to close the dialog box.
Click Recognize Text in the secondary toolbar.
 Note
NoteBy default, Acrobat converts the document into a searchable image. You can use this setting to convert documents, but the Editable Text And Images option often provides more robust, accurate text conversion.
Acrobat converts the document.
Select a word on the page. Acrobat has converted the image to editable, searchable text.

Choose Recognize Text > Correct Recognized Text. Acrobat searches the document and identifies any words that may have been converted incorrectly. If it finds any suspect words, you can examine them and correct them as needed. If it doesn’t contain any suspects, click OK.
Close the Enhance Scans tool.
Choose File > Save As. Navigate to the Lesson02/Finished_Projects folder, and save the file as GC_VendAgree_OCR.pdf. Then close the file.
![]() Note
Note
You may also need to use the Edit PDF tool to address issues with spacing.
Converting web pages to Adobe PDF
You can convert or “capture” an entire web page or several levels of a multipage website. You can define a page layout, set display options for fonts and other visual elements, and create bookmarks for web pages that you convert to Adobe PDF. The HTML file and all associated files—such as JPEG images, cascading style sheets, text files, image maps, and forms—are included in the conversion process, so the resulting PDF behaves much like the original web page.
Because converted web pages are in Adobe PDF, you can easily save them, print them, email them to others, or archive them for your own use.
Converting web pages from within Acrobat
Because web pages are updated on a regular basis, when you visit the web pages described in this lesson, the content of the pages may have changed, and you may have to use links other than those described here. However, you should be able to apply the steps in this lesson to virtually any links on any website. If you are working inside a corporate firewall, for example, you might find it easier to complete this exercise substituting an internal site for the Adobe Press site or the Peachpit site.
Before you can download and convert web pages to Adobe PDF, you must be able to access the web.
Now you’ll use the Create PDF tool to convert some web pages.
In Acrobat, open the Create PDF tool. (Click Tools to access tools if you’re in Home view.)
Select Web Page, and then enter the address of the website you’d like to convert. (We used the Adobe Press website at www.adobepress.com.)
Select the Capture Multiple Levels option.
You control the number of converted pages by specifying the levels of site hierarchy you wish to convert, starting from your entered URL. For example, the top level consists of the page corresponding to the specified URL, the second level consists of pages linked from the top-level page, and so on. Consider the number and complexity of pages you may encounter when downloading more than one level of a website at a time. A complex site can take a very long time to download. Therefore, we don’t recommend selecting Get Entire Site for most websites. Keep in mind that the time it takes to download pages depends on the speed of your Internet connection.
Make sure that the Get option is selected, and that 1 is selected for the number of levels.
Select Stay On Same Path to convert only pages that are subordinate to the URL you entered.
Select Stay On Same Server to download only pages on the same server as the URL you entered.
Click Create.

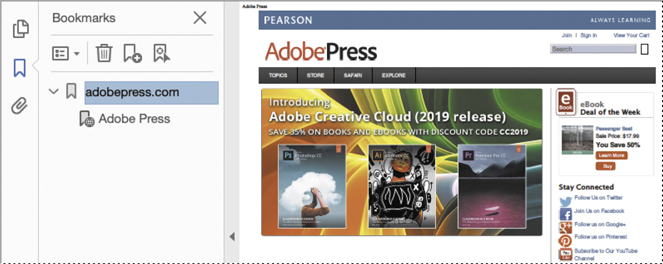
The Download Status dialog box displays the status of the download in progress. When downloading and conversion are complete, the converted website appears in the Acrobat document window, with bookmarks in the Bookmarks panel.
In Windows, if you’re downloading more than one level of pages, the Download Status dialog box moves to the background after the first level is downloaded.
If Acrobat cannot download any linked material, it returns an error message. Click OK to clear any error message.
Expand the navigation pane, and then click the Bookmarks button to see the bookmarks Acrobat created for the page.
Choose Fit One Full Page from the Fit pop-up menu (
) on the Page Controls toolbar to fit the view of the converted web page to your screen.Use the Next Page (
) and Previous Page () buttons to move through the pages if more than one page was created.
![]() Note
Note
The Adobe Press website changes its content frequently, so your PDF probably won’t match ours.
The converted website is navigable and editable just like any other PDF document. Acrobat formats the pages to reflect your page-layout conversion settings as well as the look of the original website.
Choose File > Save As, name the file Web.pdf, and save it in the Lesson02/Finished_Projects folder.
Downloading and converting linked pages
When you click a web link in the Adobe PDF version of the web page that links to an unconverted page, you can download and convert that page to PDF, attaching it to the PDF document you created.
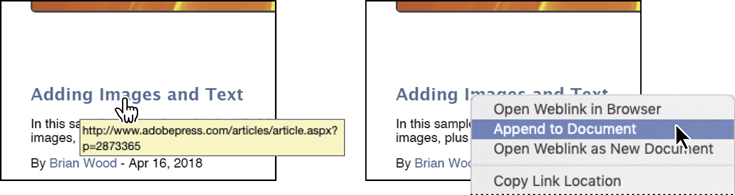
Navigate through the converted website until you find a web link to a page that wasn’t included in your original conversion. We used the title of an article. (The pointer changes to a pointing finger when positioned over a web link, and a tooltip displays the URL of the link.)
Right-click (Windows) or Control-click (macOS) the link, and choose Append To Document from the context menu.
The Download Status dialog box appears again. When the download and conversion are complete, Acrobat displays the linked page, and adds a bookmark for the page to the Bookmarks list.

Choose File > Save As, rename the file Web1.pdf, and save it in the Lesson02/Finished_Projects folder.
When you’re finished looking at your converted web pages, close the PDF file.
Now you’ll convert web pages directly from a browser.
Converting web pages in a web browser
If you’ve ever had the frustrating experience of printing a web page from your browser only to discover portions of the page missing, you’ll appreciate the Acrobat feature that lets you create and print an Adobe PDF version of the web page without ever leaving your browser. You can use PDFMaker in Internet Explorer (Windows), Chrome (Windows), or Firefox (Windows or macOS) to convert the currently displayed web page to an Adobe PDF file. When you print a converted web page from Acrobat, the page is reformatted to a standard page size, and logical page breaks are added.
First, you’ll explore the preferences used to create Adobe PDF pages from your web pages, and then you’ll convert a page.
Open Firefox, Chrome (Windows only), or Internet Explorer (Windows only), and navigate to a favorite web page. We opened the Peachpit Press home page at www.peachpit.com.
Click the arrow next to the PDF button (
 ) in Internet Explorer; click the PDF button in Firefox or Chrome. Then choose Preferences from the menu. You can create bookmarks, include headers and footers, add tags, and change page layout features such as orientation.
![]() Note
Note
In Firefox for macOS, preferences open in Acrobat.

If you don’t see the PDF button in Internet Explorer, click the Tools icon, choose Manage Add-ons, and then make sure the Adobe Acrobat Create PDF Toolbar is enabled. In Firefox, choose Tools > Add-ons, and make sure the Adobe Acrobat DC - Create PDF 15 extension is enabled; you may also need to activate the Adobe Acrobat NPAPI plug-in. In Chrome, click the menu button, choose Tools > Extensions, and make sure the Adobe Acrobat - Create PDF extension is enabled. How PDFMaker is enabled may differ depending on your browser and the version of your operating system.
![]() Note
Note
PDFMaker add-ons are installed with Acrobat. If you install a browser application after installing Acrobat, reinstall Acrobat to install the add-on.
Click Cancel to exit the dialog box without making any changes.
Now you’ll convert the web page to Adobe PDF.
Depending on your browser, click the PDF button, or click the arrow next to it to display the PDF menu. Then choose Convert Webpage To PDF.
In the Save As dialog box, navigate to the Lesson02/Finished_Projects folder. Enter a filename (we used PeachpitHome.pdf). Then click Save.
The default filename used by Acrobat is the text used in the HTML tag <TITLE>. Any invalid characters in the web page filename are converted to an underscore when the file is downloaded and saved.
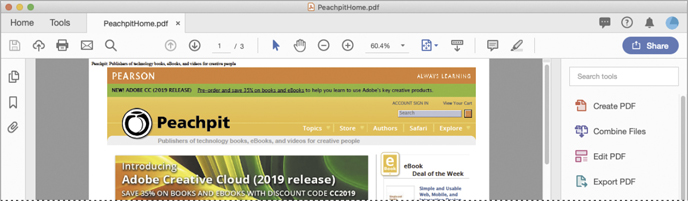
The first level of the website is converted to PDF; the file opens in Acrobat.
When you are finished, close the browser, any open PDF files, and Acrobat.
Review questions
Name three ways to create a PDF file.
How do you print to PDF from an application in Windows?
How do you print to PDF from an application in macOS?
How can you convert an image file to searchable text?
Review answers
You can use the Create PDF tool to create a PDF file from almost any format, from a scanned document, from a web page, or from clipboard data. You can use PDFMaker to create a PDF file from within a supporting application, such as Microsoft Office for Windows. You can use the Print dialog box to create a PDF from almost any application.
To print to PDF from an application in Windows, select the Adobe PDF printer in the Print dialog box, specify your settings, and click Print.
To print to PDF from an application in macOS, click the PDF button in the Print dialog box, and then choose Save As Adobe PDF. Specify your settings, and click Save.
To convert an image file to searchable text, open the Enhance Scans tool, and then choose Recognize Text > In this File. Then click Recognize Text.