
Chapter Ten. 3-D Effects
3-D effects are some of the most powerful and fun (and by the way, some of the most resource-consuming) features in Illustrator. From a simple semicircle you can generate a globe. From two-dimensional text you can extrude 3-D perspective.
When you generate a 3-D object, a sphere from a semicircle for example, you can map objects onto that 3-D object. You can visualize this process by thinking about drawing a picture on a balloon, and then inflating the balloon. The drawing is analogous to the mapped object on a 3-D effect.
3-D effects are . . . effects. They are applied to a curve, but they are not permanent objects. This means that when you edit the underlying path from which a 3-D object was generated, you reshape the generated 3-D effect.
All this will become clearer as you work through this chapter. I’ll explain how to apply 3-D effects: extrusion, revolved effects, and rotation.
#88. 3-D Extrusion Effects
Extrusion transforms selected objects so they appear to diminish as they approach a vanishing point. Beveling is similar to extrusion but is usually applied to shapes or curves to transform them into 3-D objects.
Extruded type, for example, is often used to create a dynamic “comin’ at ya” effect (Figure 88a).

To generate a 3-D object by extruding a shape, follow these steps:
- Select the object to be extruded and choose Effect > 3D > Extrude & Bevel.
Note
Type works well for this effect.
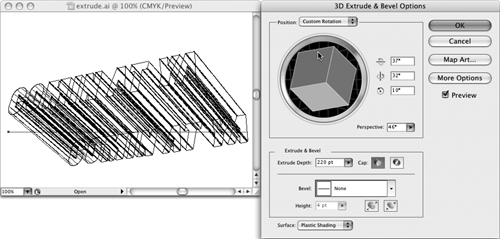
- Rotate the cube in the Position area to define the direction of extrusion, changing the vanishing point (Figure 88b).
Figure 88b. Rotating the position cube to change an extrusion vanishing point.
- Change the value in the Extrude Depth dialog to define the amount of extrusion.
- Click Preview to see how the extrusion will look. Change the Extrude Depth value and the Position cube to experiment with different effects.
- When you achieve a desired effect, click OK to apply the effect and close the dialog.
You can change the appearance of objects to which extrusion has been applied by editing the original path. You can also change the appearance of the effect by changing the stroke and/or fill of the original path.
#89. 3-D Rotation and Revolve Effects
Arguably, the most powerful single feature of Illustrator is the ability to generate 3-D rotation and revolve effects. It’s not the most useful, most used, or most productive feature, but in terms of taking a simple path and making it into something entirely different, nothing is more dramatic than applying 3-D rotation or revolve effects.
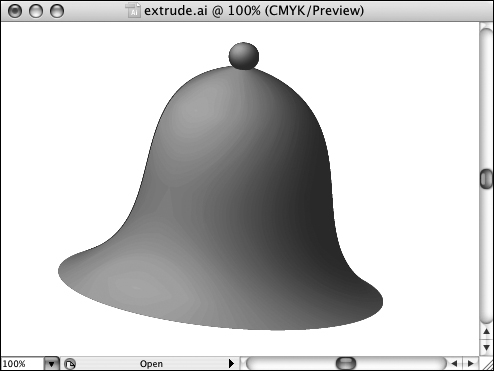
A simple and basic example is revolving an angled straight line to make a cone or rotating a simple curve to generate a bell (Figure 89a).
Figure 89a. A bell revolved from a curve.
To generate a rotated 3-D object, follow these steps:
- Draw a curve that will be rotated or revolved to generate the 3-D effect. It takes some experience and trial and error to get the hang of visualizing two-dimensional paths translating into 3-D effects. Get comfortable with the concept by rotating simple curves (Figure 89b).
Figure 89b. A simple s-shaped curve will revolve into a bell.
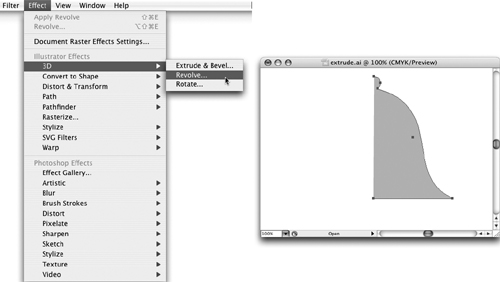
- With your artwork selected, choose Effects > 3D > Revolve to open the 3D Revolve Options dialog.
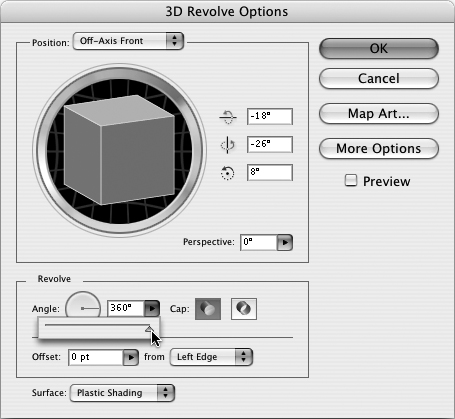
- Select the Preview check box and move the dialog if necessary so you can see the selected object on the artboard.
- In the Revolve area of the dialog, set the Angle to the default value of 360 degrees to generate a fully rotated revolved object (Figure 89c).
Figure 89c. Rotating a curve 360 degrees.
Note
Are there times when you might rotate an object less than 360 degrees? Not many, but one example would be if you wanted to show a bell or cone with a section cut out.
- Click and drag on the cube to define all three axes (X—horizontal, Y—vertical, and Z—front to back).
- You can further skew an applied 3-D rotation by changing the Perspective setting from the default of zero degrees.
- When you achieve the desired effect, click OK to apply the effect and close the dialog.
#90. Mapping Symbols onto 3-D Effects
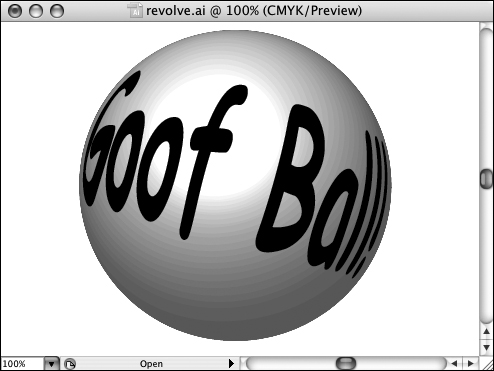
Mapping artwork onto a 3-D effect is like drawing on a balloon and then blowing it up. As the balloon expands or changes shape, the artwork you drew changes as well. Mapped artwork on 3-D effects stretches in complex ways corresponding to the generated 3-D effect (Figure 90a).
Figure 90a. Type mapped on a sphere.
Only symbols can be mapped onto 3-D effects. For a full discussion of creating, using, and editing symbols, see #91, “Creating Symbols and Applying Instances.” For the purposes of mapping artwork on a 3-D effect, you need to know that artwork, including vectors and type, can be dragged into the Symbols panel, turning it into a symbol. Once you have placed the artwork you want to map in the Symbols panel, follow these steps to map the artwork on a 3-D effect:
- Create a 3D Rotation or Extrude & Bevel effect. But do not OK the effect dialog.
Note
To create 3-D rotation and revolve effects, see #89, “3-D Rotation and Revolve Effects.”
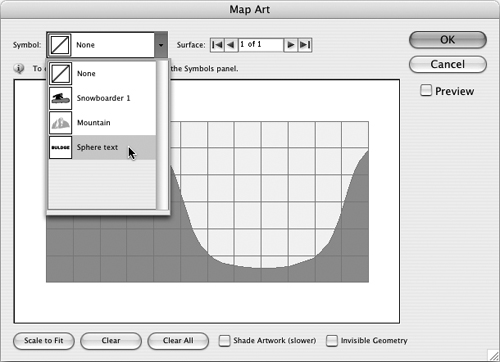
- Click the Map Art button in the 3D Rotation and Revolve dialog. The Map Art dialog opens.
- Use the Surface navigation buttons to navigate to a selected surface. Surfaces are defined based on the number of paths and anchors in a selected object. Applied strokes count as surfaces, so in general you should avoid applying any attributes (including color) to the strokes in artwork you plan to use for 3-D mapping. The selected surface is highlighted on the artboard (Figure 90b).
Figure 90b. Selecting a surface on which to map artwork.

- From the Symbol pop-up menu, choose a symbol to map (Figure 90c).
Figure 90c. Choosing a symbol to map on a selected surface.
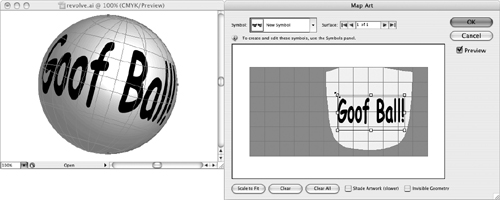
- Resize and/or move the mapped symbol. Click the Preview check box to see the mapped artwork on the artboard (Figure 90d).
Figure 90d. Locating and sizing mapped artwork.
- When the mapped artwork displays correctly, click OK twice to close both the Map Art and 3D Revolve Options dialogs, and apply the effect.