
Chapter Four. Editing Paths
Since Illustrator is all about paths, there are all kinds of ways to edit paths in Illustrator. You can select an entire path and reshape, rescale, rotate, skew or distort it, and so on. Or, you can select a path segment—the section of the path between two anchors—select just some path segments, or select a set of anchors.
You can also group more than one path and edit the group as you would an individual object. Selecting objects within groups has always been a bit sticky in Illustrator, but CS3 has a new group isolation feature that makes this process easier.
Illustrator CS3 also allows you to align anchors. This means, for example, that you can vertically align a group of selected anchors so they are all on a horizontal plane.
In this chapter, I’ll show you how to use all these selection and editing techniques. And, I’ll provide a basic overview for how to use Illustrator’s powerful pathfinder tools, which combine and divide combinations of paths in just about any conceivable way.
#30. Selecting Path Segments and Paths
Illustrator paths are made up of anchors with path segments connecting them. You can select, and edit, an entire path when you want to move or resize the path. You can select either an anchor or a path segment to reshape an object.
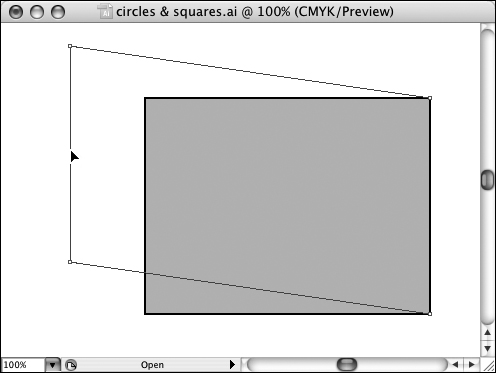
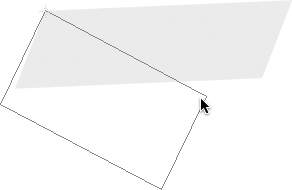
You can select path segments by clicking on (or within three pixels of) the segment with the Direct Selection tool. Use Shift+click with the Direct Selection tool to select additional path segments. You can also use the Lasso tool to select multiple path segments. After you select a path segment, you can reshape an object by moving that segment (Figure 30).
Figure 30. Moving a selected path to reshape a rectangle with the Direct Selection tool.
The Selection tool is used for selecting entire paths and groups of objects. The Direct Selection tool can select individual anchor points, path segments, or entire objects. To select an object or group with the Selection tool, just click on the path. If the object has a fill, you can click on that as well.
Note
If you prefer to select objects only by clicking the path (never the fill), you can edit that property of the Selection tool by choosing Illustrator (Mac) or Edit (Windows) > Preferences > Selection & Anchor Display, and then selecting the Object Selection by Path Only check box.
You can add objects to or remove objects from a selection set by holding down the Shift key as you click with the Selection tool. This works with path segments or anchors selected with the Direct Selection tool as well.
Note
When you have either the Selection or Direct Selection tool selected, you can quickly toggle between selection tools by holding down (or releasing) the Command (Mac) or Control (Windows) key.
#31. Defining, Selecting, and Isolating Groups
Because Illustrator documents can become overloaded with paths, it is often useful to group objects. Groups can be resized and rotated. You can edit the stroke and fill of groups. For example, if 30 objects are grouped and you change the fill color of the group, the fill color of every object within the group changes.
To group objects, select them using the Selection or Lasso tool and choose Object > Group. You can nest groups by combining several groups into another group. To ungroup objects, select the group and choose Object > Ungroup.
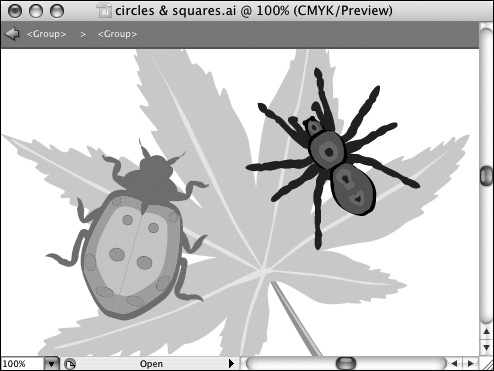
Selecting and editing elements within a group has always been something of a hassle. Illustrator now makes that process a little more intuitive. With a group selected, click the Isolate Selected Group tool in the Control panel. With the group isolated, you are prevented from editing any other elements on the page, but you can select any element within the group the way you normally would using the various selection tools (Figure 31).
You can unisolate a group by double-clicking outside the group.
Tip
You can also group objects by selecting them and pressing Command (Mac) or Control (Windows) + G. Ungroup objects by selecting a group and pressing Shift + Command (Mac) or Control (Windows) + G.
#32. Selecting and Editing Anchors
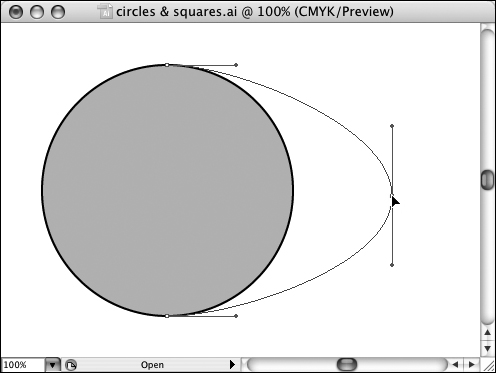
You select an anchor point when you want to reshape an object. For example, you can turn a circle into an oval by selecting an anchor point and dragging it (Figure 32a).
Figure 32a. Moving a selected anchor.
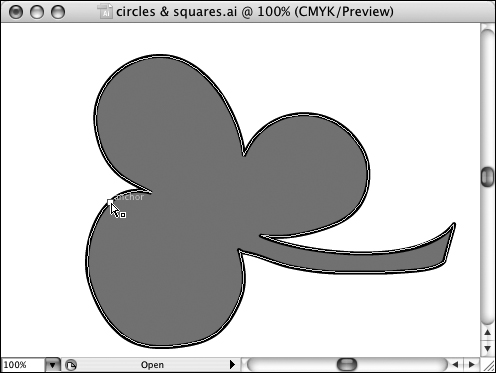
To select an anchor point, move the Direct Selection tool over a path. As you do, the anchors will become visible (Figure 32b).
Figure 32b. Identifying anchors in a path with the Direct Selection tool.
To select a single anchor, click on it. To select multiple anchors, you can:
• Draw a marquee with the Direct Selection tool.
• Use Shift+click to select multiple anchors.
• Draw a marquee with the Lasso tool around the anchors (hold down the Shift key to draw additional Lasso tool marquees).
#33. Aligning Anchors
New to Illustrator CS3 is the useful ability to align anchors within a path. So, for example, if you’ve drawn a waveform and you want all the tops of the waves to align vertically, you can do that.
To align anchors, first select a set of anchors. You always select at least two anchors if you are going to align them.
Tip
For instructions on how to select anchors, see #32, “Selecting and Editing Anchors.”
With the anchors selected, use the alignment tools in the Control panel to align them (Figure 33a).
Figure 33a. Anchor alignment tools in the Control panel.
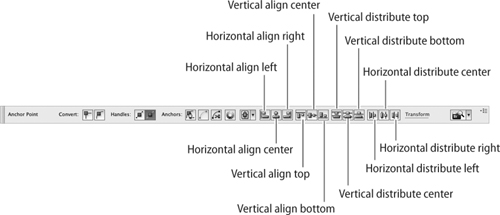
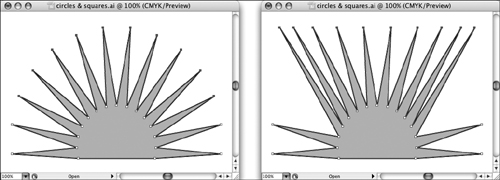
Horizontal and vertical alignment lines up all selected anchors, either horizontally or vertically. Distribution creates even spacing between anchors. By default, anchors align along the bounding box—the rectangle that defines the selected group of anchors. So, for example, if you choose to align anchors vertical top, they align along the top of the bounding box (even with the top selected anchor) (Figure 33b).
Figure 33b. Aligning selected anchors vertical top.
#34. Selecting Similar Objects
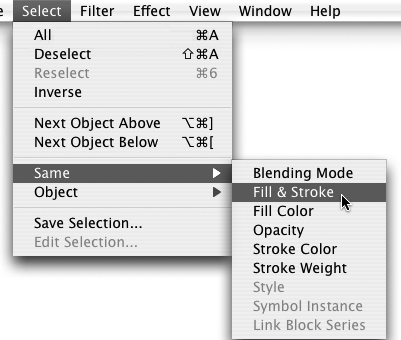
Illustrator CS3 lets you choose from a list of same objects that you can quickly select. For example, if you want to select all objects that, for instance, have the same fill and stroke as a selected object, choose Select > Same > Fill & Stroke (Figure 34a).
Figure 34a. Selecting objects with the same fill and stroke.
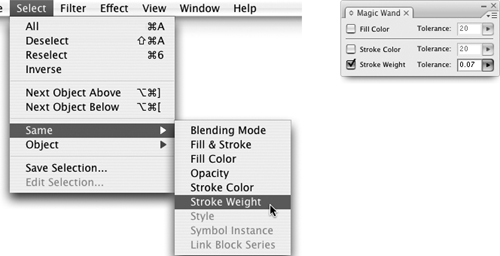
In addition to selecting all objects with the same stroke and fill, you can select objects with the same blending mode, fill color, opacity, stroke color, and stroke weight. There are other, more esoteric attributes that you can use to filter selections with as well. The Select Same options overlap somewhat with the Magic Wand tool. So, you could select all objects with similar stroke weight using either approach (Figure 34b).
Figure 34b. Selecting objects with similar stroke weight using the Magic Wand and the menu.
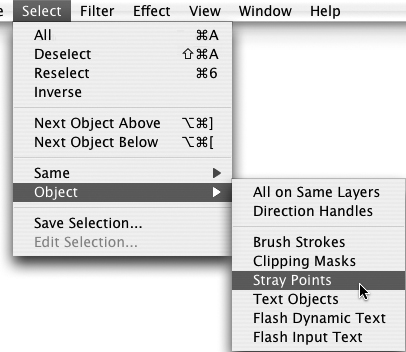
You can also use the Object submenus (Select > Object) to select all of a variety of objects. One of the most useful options on this menu is Stray Points. This feature provides you with the ability to select (and then delete) stray anchors. It is easy to create stray anchors unintentionally—for instance, when you click with the Pen tool and don’t end up creating a path. Stray anchors unnecessarily increase file size and your print area. Detect them by choosing Select > Object > Stray Points (Figure 34c).
Figure 34c. Detecting stray points.
#35. Editing with the Bounding Box
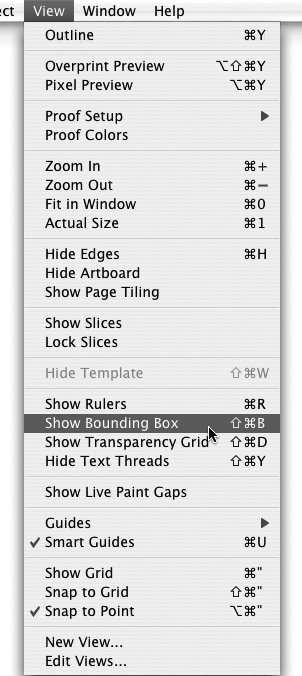
You can quickly and easily resize, reshape, and rotate any object (or group of objects) using that object’s bounding box. If the bounding box is not displayed, you can make it visible by choosing View > Show Bounding Box. With the bounding box turned on, a rectangular frame appears around selected objects, displaying four corner handles and four side handles (Figure 35a).
Figure 35a. Displaying a bounding box for a selected object.
You can quickly rescale any selected object by dragging on a bounding box handle. Resizing an object with the bounding box expands or contracts the object using the selected handle (Figure 35b).
Figure 35b. Resizing an object with the bounding box.
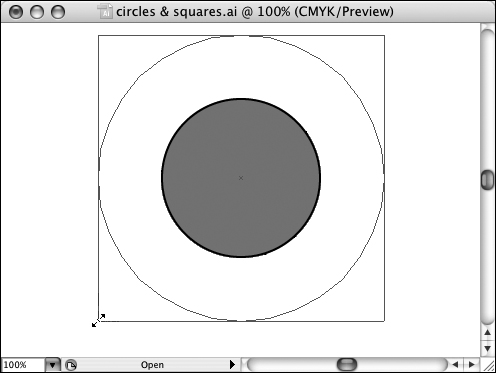
Hold down the Shift key as you rescale to maintain the original height-to-width ratio. Hold down the Option (Mac) or Alt (Windows) key as you resize using a bounding box to make the center point instead of a bounding box handle serve as the anchor (Figure 35c).
Figure 35c. Resizing a bounding box while maintaining the original center point.
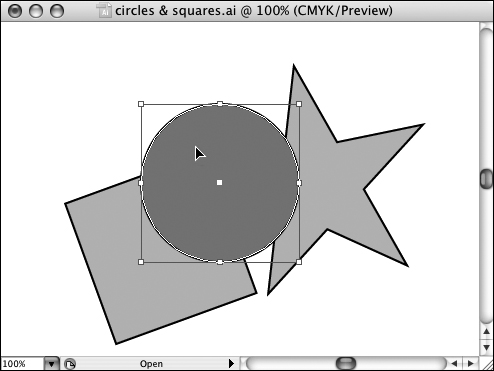
Moving the Selection tool near an anchor in a bounding box turns the Selection tool into a rotation tool. Hold down the Shift key as you rotate to constrain rotation to 45-degree angle increments (Figure 35d).
Figure 35d. Rotating a star using the bounding box.
#36. Duplicating
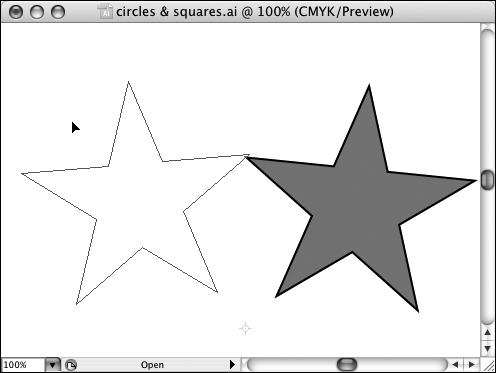
There are many ways to duplicate objects in Illustrator. The simplest is to select an object (or objects), hold down the Option (Mac) or Alt (Windows) key, and click and drag. When you release your mouse button, you place a copy of the selected paths on your artboard (Figure 36a).
Figure 36a. Copying with the Alt or Option key.
Note
When you press the Option (Mac) or Alt (Windows) key, a white arrow appears underneath your selection tool, indicating that you are copying.
You can also copy and paste selected objects by choosing Edit > Copy from the menu. There are three paste options available from the menu. In addition to the regular Edit > Paste, you can also paste in front or in back.
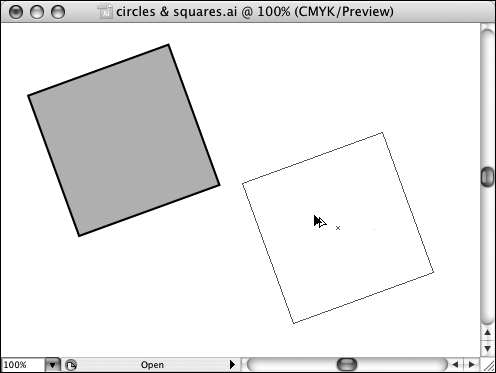
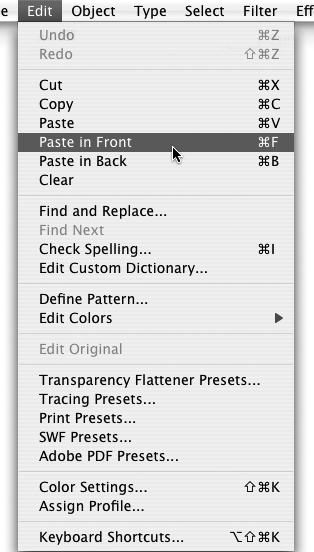
Illustrator allows you to manage stacking order as you paste. Edit > Paste in Front stacks pasted objects on top of other objects, and Edit > Paste in Back stacks pasted objects below other objects (Figure 36b).
Figure 36b. Pasting an object in front of other objects.
You can use the Copy and Paste commands to transfer objects in and out of Illustrator. Copying and pasting through the clipboard is more reliable if you are transferring files to or from other CS3 applications, like Flash or Photoshop.
#37. Scaling
The quick-and-dirty way to rescale any object is to select it, view the bounding box, and rescale (resize) using the Selection tool. To do that, first select the object. If the bounding box is not displayed, choose View > Show Bounding Box (Figure 37a).
Figure 37a. Displaying a bounding box.
With the bounding box displayed, click and drag on any of the corner or side handles in the bounding box to resize the selected shape. Hold down the Shift key as you resize to maintain the height-to-width aspect ratio of the original size as you rescale. Hold down the Command (Mac) or Alt (Windows) key as you rescale to maintain the original center point of the object. Or, hold down the Shift + Option (Mac) or Shift + Alt (Windows) keys to maintain the original aspect ratio and the original center point as you rescale (Figure 37b).
Figure 37b. Rescaling while maintaining the original center point.
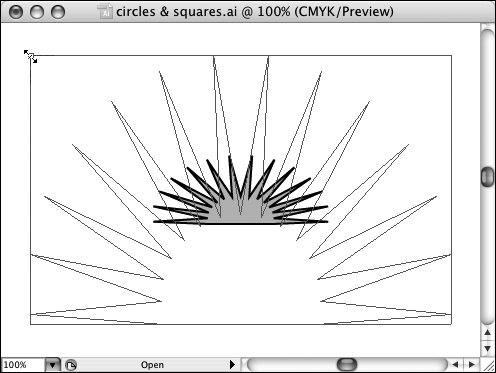
The Scale tool has a couple advantages over sizing freehand with a bounding box or the Free Transform tool. The Scale tool allows you to resize to an exact percentage. For instance, you can resize an object to 200 percent, doubling the size of the original object exactly.
Resizing an object using the Scale tool interactively is hardly intuitive. Instead of clicking and dragging on an anchor or on a path, you click and drag anywhere on the artboard. It takes some practice (Figure 37c).
Figure 37c. Rescaling with the interactive Scale tool.
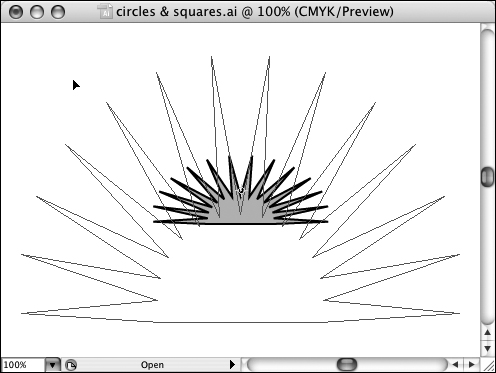
If you hold down the Shift key as you resize with the Scale tool, you can click and drag at about a 45-degree angle from a corner handle to maintain the height-to-width ratio of the original drawing. If you hold down the Shift key and drag up or down, you will only change the height. Hold down the Shift key and drag sideways to change only the width of the selected object.
By default, when you resize a selected object with the Scale tool, the center of the object is used as the point from which the object is enlarged or compressed. You can change that point by clicking within a selected object with the Scale tool. Then, when you resize the object, the newly selected point is the pivot and hub from which the object is resized, as shown in Figure 37d.
Figure 37d. Resizing from a selected pivot anchor.
The Scale dialog allows you to rescale an object digitally (defining exact percentages for horizontal and vertical resizing). It also allows you to define how stroke thickness and pattern sizing are affected by scaling.
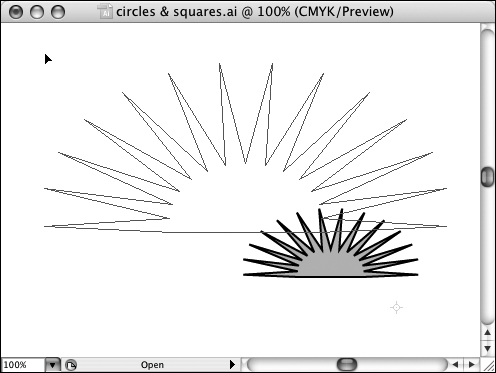
If you maintain the original stroke thickness when you rescale, the relationship between the stroke thickness and the object changes. If you rescale strokes (and effects), the stroke (or effect) changes in accordance with the rescaled object (Figure 37e).
Figure 37e. Maintaining original stroke thickness while rescaling.
Similarly, when you rescale with the Scale dialog, you can maintain a pattern fill at its original size, or you can rescale it in sync with the resized object. In addition, you can elect to apply scaling only to a pattern fill, with interesting results: With this technique, you stretch or shrink only a fill pattern while the object containing the pattern remains unchanged (Figure 37f).
Figure 37f. Rescaling only the pattern fill in an object.
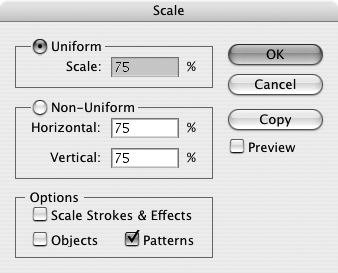
To resize with the Scale dialog:
- Select the object(s) to be rescaled.
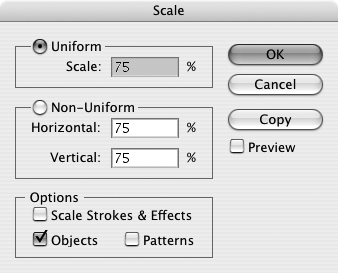
- Double-click the Scale tool. The Scale dialog appears. Enter a value in the Scale area of the dialog to resize both height and width to a uniform percentage. Or, to rescale without maintaining the same height-to-width ratio, enter separate values in the Horizontal and Vertical boxes in the Non-Uniform section of the dialog.
- Click the Preview check box to see the object interactively resize on the artboard as you change values.
- Click the Scale Strokes & Effects check box if you want to proportionally resize strokes and effects.
- If you have an object with a pattern fill, you can click the Objects check box to resize objects. You’ll almost always want to select this option; otherwise, the object won’t resize.
- Click the Patterns check box to proportionally resize patterns within a shape. When your object is correctly resized, click OK.
#38. Rotating
You can quickly rotate any selected object interactively by viewing the object bounding box and rotating with the Selection tool.
Note
See #35, “Editing with the Bounding Box,” for discussion of how to edit with the bounding box.
With the bounding box displayed, you simply hover near a corner or side point of an object’s bounding box (with the Selection tool). As you do, the Selection tool cursor turns into a double-headed, curved arrow. Click and drag clockwise or counterclockwise to rotate the selected object (Figure 38a).
Figure 38a. Rotating a selected object.
The Rotate tool rotates objects with more precision and control than you get by simply using the Selection tool. To rotate a selected object precisely with the dialog, double-click the Rotate tool. The Rotate dialog appears. Enter a value in the Angle area of the Rotate dialog to set the degree of rotation. The Copy button in the Rotate dialog allows you to create a second, rotated version of your selected object while leaving the original unchanged.
The Preview check box allows you to view changes on the artboard as you make them in the dialog before you click OK (Figure 38b).
Figure 38b. Previewing rotation.

The most powerful and fun application of the Rotate tool is to rotate objects using a selected anchor point as the rotation pivot. To do that:
- Select the object (or objects) to be rotated.
- Click the Rotate tool.
- Click to define the rotation pivot point.
Note
Usually, you’ll want to click on the path you are rotating to define a pivot point, but the pivot point can be anywhere in the document.
- Click and drag anywhere in the document to rotate the object around the selected point (Figure 38c).
Figure 38c. Rotating around a selected pivot anchor.
#39. Shearing (Skewing)
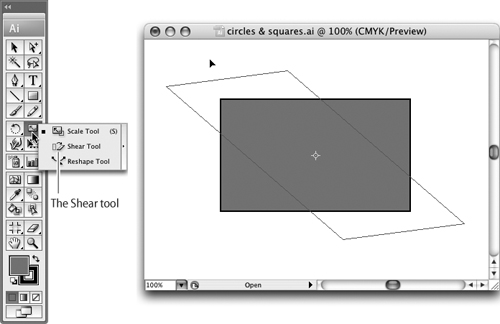
Shearing (or skewing—they’re the same thing) is a hard process to describe in words, but it’s something you’ll often want to apply to a shape. In general, skewing distorts the relationship between opposite sides of an object. A simple example would be converting a rectangle into a parallelogram with 30-degree angles instead of right (90-degree) angles. You can do this by selecting a path segment and moving it with the Shear tool (Figure 39a).
Figure 39a. Shearing a rectangle into a parallelogram.
When you shear (skew), the affected object distorts around the center point of the object. To skew around an anchor point instead, first click with the Shear tool to set an anchor point. In this case, the anchor point is fixed while the rest of the object shears (Figure 39b).
Figure 39b. Shearing with a fixed anchor.
#40. Distorting with Envelopes
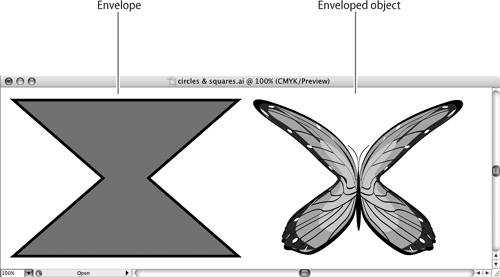
A quick, easy, and fun way to edit paths is to place an object in an envelope. Visualize an elephant stuffed into a triangle. Ouch! It may be better to visualize something more humane and less painful. The point is you can distort any object to fit into an outline created by a second object. That second object is the envelope (Figure 40a).
Figure 40a. An envelope and an enveloped object.
Choose Object > Envelope Distort to access three types of distortion. Use Make with Warp to apply preset warps. Meshes are grids with editable anchors that define how colors merge and blend within the mesh.
To use your own, custom-designed envelope, select two objects, with the object that will be the envelope on top of the object to be distorted. Then choose Object > Envelope Distort > Make with Top Object.
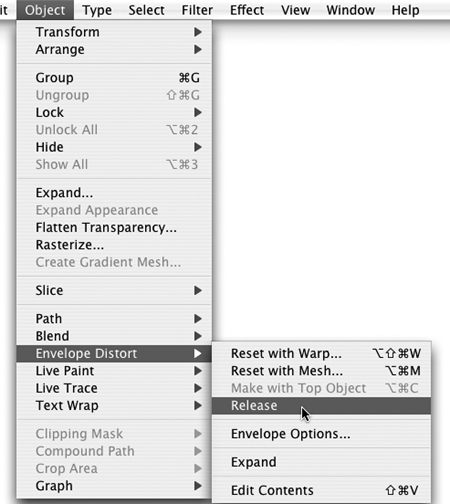
To release a warp into its two components (the warp shape and the warped object), choose Object > Envelope Distort > Release (Figure 40b).
Figure 40b. Releasing an object from an envelope.
#41. Using Pathfinders
Combining and splitting paths in Illustrator is managed by the ten tools in the Pathfinder panel. These tools combine or divide two or more intersecting paths. The tools in the Pathfinder panel are essentially shortcuts to processes you could accomplish equally well, but with much more hassle, by selecting and deleting anchor points.
For example, you could cut a circle out of the corner of a square by creating new anchors on the square and deleting the path segments between those new anchors. A quicker and easier way is to use the Divide pathfinder tool. Open the Pathfinder panel by selecting Window > Pathfinder. The ten Pathfinder tools are displayed (Figure 41a).
Figure 41a. The Pathfinder tools.
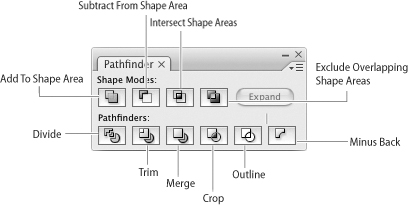
The Pathfinder panel has two rows: the Shape Modes and the Pathfinders. The Shape Mode tools generate new shapes from intersecting shapes:
• Add To Shape Area combines selected objects into a single shape.
• Subtract From Shape Area deletes the top shape from the bottom shape.
• Intersect Shape Areas removes everything but overlapping areas of selected shapes.
• Exclude Overlapping Shape Areas deletes shared areas of two overlapping selected objects.
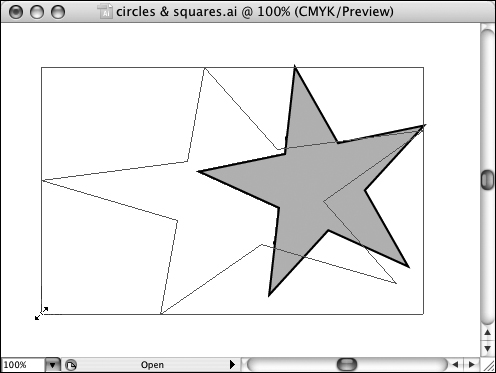
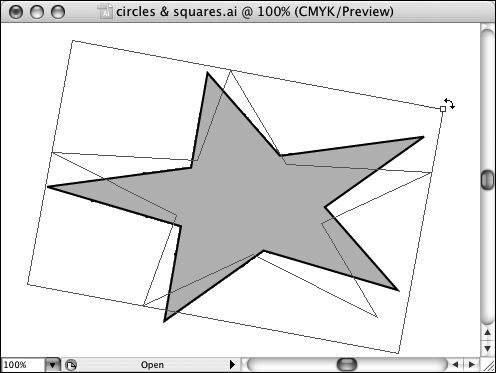
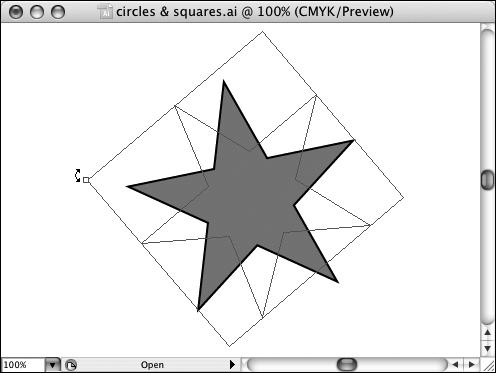
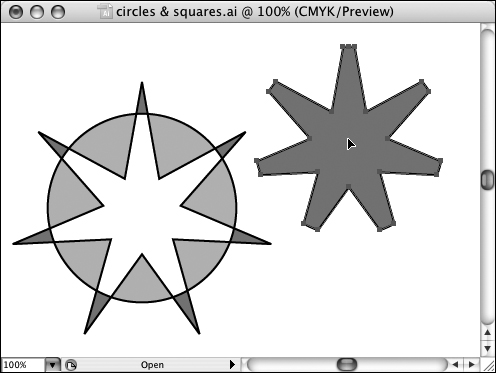
The tools in the second row of the Pathfinder panel are used to combine and cut intersecting paths. The Divide pathfinder is perhaps the most widely used and most useful. You can use it to cut one object out of another, as you would use a cookie cutter to cut dough. To divide two objects, place one on top of the other. Make sure the “cutting” object is on top. With the two objects selected, click the Divide tool in the Pathfinder panel. After you divide the objects, you can ungroup them and separate them (Figure 41b).
Figure 41b. Using a star to cut out a piece of a pattern.
While the Divide tool is probably the most effective and useful, you’ll find the other bottom-row pathfinders helpful as well:
• Divide splits selected objects into individual objects created by intersecting paths.
• Trim deletes the covered portion of the bottom shape.
• Merge is similar to the Trim tool, but it merges contiguous shapes that have the same color fill and removes stroke attributes.
• Crop uses the top object like a cookie cutter to cut away parts of the bottom object that do not fit within it.
• Outline converts fills to outlines; the color of the fill becomes the color of the outline stroke.
• Minus Back uses the bottom object as a cookie cutter to strip away intersecting areas from the front object.