Chapter One. Getting Started
Adobe Illustrator CS3 is an amazing, powerful, and truly fun program. Illustrator is essential for projects ranging from technical illustration to poster design. Book covers, architectural renderings, and anatomical illustrations (such as the bone structure or circulatory system charts you see at the doctor’s office) are done almost exclusively with Illustrator. Illustrator is the preferred tool for logo and packaging design. It dominates map drawing, and a good percentage of CD covers are designed with Illustrator.
Illustrator’s vector-based artwork differs in many ways from the bitmap or raster-based artwork that is the specialty of Photoshop. Vector-based artwork is scalable; that is, it can be resized without distortion. The magic of vectors is the heart and soul of Illustrator. It also means that Illustrator has a different logic than Photoshop.
You’ll learn to draw vector-based artwork in Chapter 2, “Drawing Lines and Shapes,” but it will be helpful to familiarize yourself with vector logic now. For example, when you create a Photoshop file, it’s important to define the resolution—the pixel-per-inch value of the file. If the illustration is destined for the Web, a low-resolution setup is appropriate. If that Photoshop illustration is to be printed, you need to create a high-resolution file. Generally, resolution is less important in Illustrator. You don’t need to be concerned with resolution unless you export the file or embed raster images within the file.
The techniques in this chapter provide a basic overview of what you need to have in place before you begin drawing illustrations. One of the nice things about defining a document setup in Illustrator is that you can easily adjust on the fly if you need to change the document setup. For example, if you are designing a low-resolution logo for the Web using dimensions based on monitor pixels and it turns out that your design will be used on a billboard and sized in meters, you can rescale after your design is finished.
With that knowledge as your insurance policy, let’s look at how Illustrator CS3 documents are defined and created, and tour the essential elements of the Illustrator interface.
#1. Creating a New Document
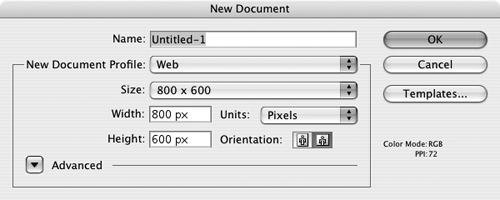
It is a multi-environment world, and Illustrator CS3 accommodates this by allowing you to choose a display environment when you create a new document. When the welcome screen appears for Illustrator CS3 or when you choose File > New, you have the choice of creating a document for six different profiles (Figure 1a).
Figure 1a. Choosing a Web document with dimensions of 800 x 600 pixels.
The six profiles are
• Print document: Use this for a printed document. The Print profile provides preset page sizes including letter, legal, and tabloid.
• Web document: Use this for illustrations destined for the Web or digital display. Preset sizes include popular Web page dimensions.
• Mobile and Devices document: Includes nine preset sizes for mobile device screens. You can click the Device Central button that appears in the dialog for the Mobile and Devices profile to choose a profile for one of dozens of mobile devices and mobile environments (like several versions of the Flash Lite viewer). For more discussion of Device Central, see #93, “Previewing in Device Central.”
• Video and Film document: Provides preset crop areas sizes for different digital video environments.
• Basic CMYK document: Assigns the CMYK (cyan, magenta, yellow, black) color mode to the document, which is appropriate for print output. The Size pop-up allows you to choose from frequently used print and Web page sizes.
• Basic RGB document: Assigns the RGB (red, green, blue) color mode to the document, and like the CMYK document profile, provides a set of preset sizes for print and Web output.
After you open the New Document dialog, you can define specifications for your document with or without using the preset profiles. To name your document, enter a filename in the Name field of the New Document dialog.
When you define a size for your document, you define the size of the Illustrator artboard. The artboard area is the printable area of your Illustrator file. If objects in your illustration extend beyond the edge of the defined artboard, those elements will not print. And the artboard defines the region of your artwork that, by default, is exported to other formats, like web-compatible graphic files. You can choose from several artboard size and orientation presets in the Size drop-down menu in the New Document dialog. Or you can define your own dimensions using the Width and Height boxes. The unit of measurement you choose from the Units drop-down menu determines how units of measurement display in rulers (if you display them) or in dialogs.
When you click the Advanced button in the New Document dialog, you access color mode and resolution options. Normally, illustrations destined for digital (including Web) output are created using RGB color mode, and projects that will be sent to commercial (four-color) presses are created using CMYK color mode. RGB mode corresponds to how monitors generate colors by mixing (adding) percentages of red, green, and blue. CMYK mode corresponds to four-color printing processes that use cyan, magenta, yellow, and black (indicated with the traditional printing press K for black) to generate a range of colors.
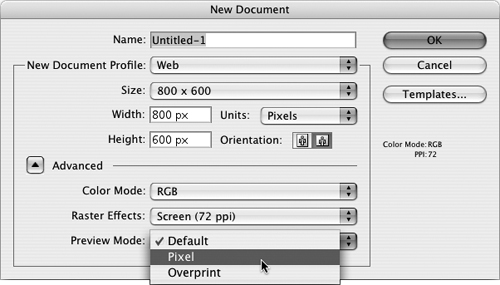
The Advanced section of the New Document dialog also allows you to choose Raster Effects resolution and Preview mode. If you are creating illustrations for the Web, you can set Raster Effects to 72 dpi (dots per inch), a typical resolution of digital viewing devices. If you choose Pixel Preview Mode, you can display illustrations as low-resolution images, imitating how they will appear in Web pages and other digital display (Figure 1b).
Figure 1b. Choosing RGB color mode, 72 dpi resolution, and Pixel preview mode for a Web illustration.
Illustrator ships with hundreds of templates. To create a document using a template, choose File > New from Template or choose File > New and click the Templates button in the New Document dialog. The New From Template dialog opens.
Two folders are available in the New From Templates dialog. Open the Basic folder to see sets of blank templates. These templates have preset dimensions and other preferences, but do not have actual design content. Browse the Inspiration folder to use Illustrator’s predesigned templates and get a head start on designing projects. For example, if you are creating a set of illustration projects for a band, the Band folder includes illustrations you can customize to create buttons, bumper stickers, a CD cover, a newsletter, a poster, a T-shirt, and so on. You can change the text and the colors, and edit the artwork to create an instant set of promotional tools for your band. The only drawback is that your artwork will not be original.
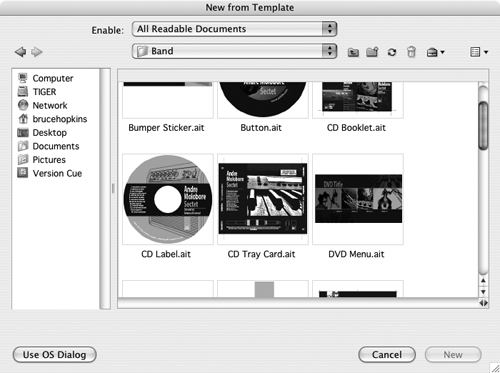
The Blank Templates folder includes template files that are very useful for odd-sized projects. Several templates are provided for different CD elements (booklet, book sleeve, disc label, tray card, and more). You’ll save time using these templates, because you won’t have to define custom artboard sizes for these elements. The CD disc label template, for example, includes a blank circle in which you can create a label type (Figure 1c).
Figure 1c. Previewing the CD disc label template in the New from Template dialog using the Adobe Dialog to see thumbnails.
Note
See #59, “Creating Area Type,” for instructions on how to create area type within a shape.
Other useful blank templates provide presized artboards for business cards, envelopes, postcards (club cards), and other frequently used projects with odd-sized dimensions.
#2. Defining Preferences
As with other CS3 applications, Illustrator Preferences set defaults for many settings that control the working environment.
Because Illustrator is used for such a wide variety of projects, every designer has his or her own workspace and interface requirements. Artists who design primarily for the Web will want units of measurement (pixels), artboard sizing (often 800 pixels wide), and color settings (RGB) that correspond to the demands of Web design. Artists who create print projects requiring precise print control will want to define how many recently used fonts to make accessible in the Fonts menu, what kind of horizontal and vertical spacing defaults to apply, and how to preview fonts in the menu if desired.
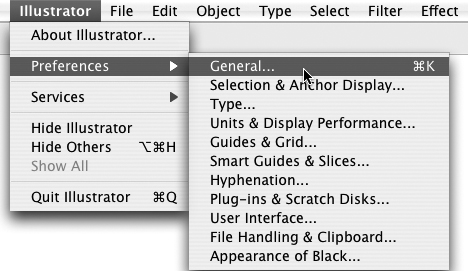
To access Illustrator Preferences, choose Illustrator (Mac) or Edit (Windows) > Preferences and then choose from one of the 11 Preference categories (Figure 2).
Figure 2. Choosing General Preferences.
The significance of some of the options in the Preferences dialog will only become clear as you learn more about Illustrator. Remember that the Preferences dialog sets defaults for Illustrator. Those application-wide defaults can always be changed for a specific Illustrator document.
Once you are in the Preferences dialog, you can go to any part of the Preferences panel using the drop-down menu.
The most useful categories in the Preferences panel are
• General: Used to set keyboard increments to define how much you move an object when you press direction keys and to define selection options, tool display, tool tip visibility, and scaling options.
• Selection and Anchor Display: This new feature in Illustrator CS3 allows you to customize how you select anchors and objects.
• Type: Used to define keyboard shortcuts for typographic adjustments, the size at which the type greeks (turns into gray blocks), and how fonts preview in the menu.
• Units & Display Performance: Used to define default units of measurement that will appear in dialogs. However, you can still enter any unit of measurement into a dialog. For example, if your default units are points and you want to enter .25 inches in a dialog, just type .25 in and Illustrator will convert your value to points. You can also adjust the Hand slider to improve performance on your computer. (Scrolling with the Hand tool using full-quality screen refreshing can stress system resources, so setting this option to Faster Updates will improve system performance.)
As you explore other elements of the Illustrator environment, you’ll see the usefulness of defining other Preferences options. For example, the Guides & Grid option defines spacing between gridlines, a feature you’ll learn about in #5, “Creating and Using Grids,” and the Smart Guides & Slices option creates default settings, which you’ll learn about in #11, “Relying on Smart Guides.”
#3. Controlling the Workspace
Accompanying Illustrator CS3’s massive array of features is an almost overwhelming set of panels. Panels provide access to features ranging from highly useful (Color, Gradient, Stroke, Type) to obscure. As you learn about the techniques in this book, you’ll be introduced to the corresponding panels.
You can open or close panels by selecting (or deselecting) them from the Windows menu. An open panel can be dragged around the screen by its tab, which resembles a file folder tab and displays the name of the panel. Panels can be grouped by dragging the tab of one panel to the middle or top of another panel (Figure 3a).
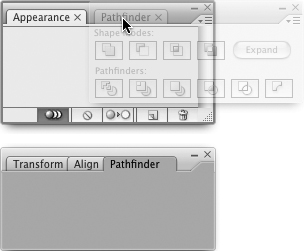
Panels can also be docked—attached to each other top-to-bottom. To dock a panel, drag its tab to the bottom of another panel (Figure 3b).
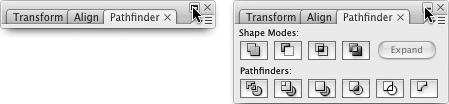
Docked and grouped panels share a common title bar, with a zoom icon (Mac) or a minimize/maximize icon (Windows), and a close icon. You can toggle between expanding or contracting individual panels, grouped panels, or docked panels by using the zoom (Mac) or minimize/maximize (Windows) icons, or simply by clicking anywhere on the panel title bar (Figure 3c).
While Illustrator’s panels generally provide control over existing objects, you need to use the toolbox to create artwork. #9, “Finding Tools,” explains how to find and use tools and tool options in the toolbox.
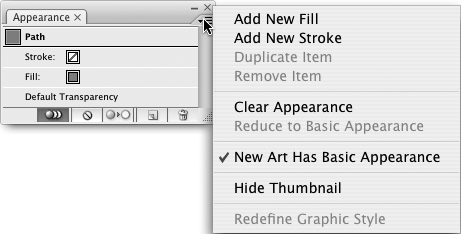
Panel menus offer access to additional panel options. Throughout this book, you’ll see references to various panel menus. You can access panel menus by clicking the small right-facing triangle at the top of the panel (Figure 3d).
Figure 3d. Opening a panel menu.
Note
You can also dock panels to the side of your computer screen by dragging them to the right or left edge of your screen. Those docked panels can be expanded or collapsed as well by clicking the double arrows in the panel title bar.
#4. Defining Guides
Illustrator’s highly customizable guides are a tremendous timesaver for quickly creating illustrations that have to match set dimensions. While Illustrator offers detailed alignment features in the Align panel, it’s often quicker and easier to align the tops or bottoms of objects using guides.
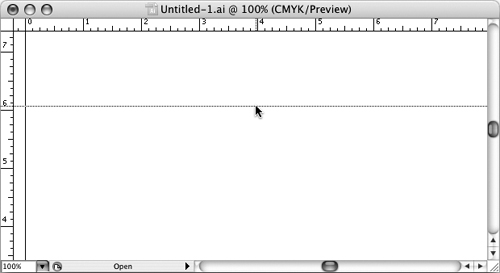
Guides are most easily created by first displaying rulers. To do this, press Command (Mac) or Control (Windows) + R. Then you can create a guide by dragging your mouse from a horizontal or vertical ruler onto the artboard (Figure 4).
Figure 4. Creating a horizontal ruler.
Note
You can grab from either the vertical or horizontal ruler to create either horizontal or vertical guides. By pressing Option (Mac) or Alt (Windows) on your keyboard, you change the orientation of the guide.
While guides are handy, you often want to preview your printed artwork without seeing the guides. You can hide the guides by choosing View > Guides > Hide Guides.
Guides can be locked. When guides are locked, you can’t move or delete them. To lock guides, choose View > Guides and select Lock Guides. To unlock guides for moving or individual deletion, choose View > Guides and deselect Lock Guides.
Note
You can clear all guides by choosing View > Guides > Clear Guides.
#5. Creating and Using Grids
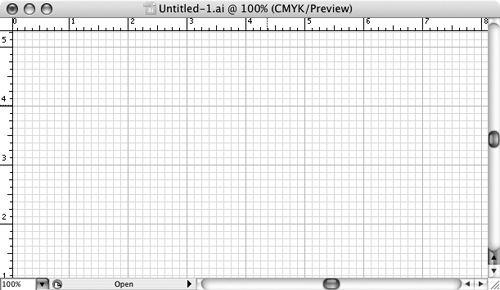
Along with guides, grids can help you quickly align and space the elements in an illustration. You can define spacing and the number of subdivisions in a grid, or you can make a grid “magnetic” and snap objects to it. To display grids, choose View > Show Grid. Gridlines appear by default as thick, light-colored lines with thinner lines indicating fractional subdivisions (Figure 5a).
Figure 5a. A document with grids displayed.
To toggle the Snap feature on or off, choose View > Snap to Grid. When Snap to Grid is on, you can drag an object within two pixels of a gridline (including subdivision lines), and the object will jump to that gridline.
To define the display, grid spacing, and subdivisions, choose Illustrator (Mac) or Edit (Windows) > Preferences > Guides & Grid (Figure 5b).
Figure 5b. Changing the grid display.

You can define spacing in the Gridline every box. Although there is a default unit of measurement, you can choose the units you want to define. If you want to define spacing in pixels, type a value followed by px (for example, 72 px). To define units in inches, type a value followed by in (for example, .5 in).
The number of subdivisions you select in the Grid section of the Guides & Grid menu determines how many fractional increments will display. For example, if you select eight subdivisions and you defined a gridline every inch, a gridline appears every inch with subdivisions every eighth of an inch. The Color drop-down menu allows you to choose the color of the gridlines. The Style drop-down menu allows you to choose whether the grid appears as lines or dots.
#6. Saving Files
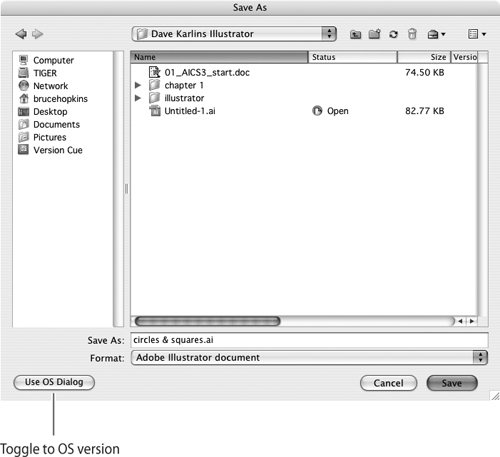
If you are simply saving files to retrieve later, it is easy to do in Illustrator. Choose File > Save. The first time you save a file the Save As dialog opens. From the Format drop-down menu, you can save files as an Illustrator, PDF, or EPS document. Navigate to a folder and enter a filename in the Save As box. The PDF, SVG, and EPS formats preserve full editability (as does the native AI format). With PDF files, however, you need to make sure the optional Preserve Illustrator Editing Capabilities check box is selected. Otherwise, the file loses Illustrator edit capability and is saved as a regular PDF file.
The Save As dialog has two versions: the default OS (operating system) version and the Adobe version. You can switch between them using the button in the lower-left corner of either version of the Save As dialog (Figure 6a).
Figure 6a. The Adobe version of the Save As dialog.
If you are saving to the Illustrator format, after you click Save in the OS dialog (or Save As in the Adobe dialog), the Illustrator Options dialog opens (Figure 6b).
Figure 6b. Options for saving Illustrator files.

Note
If you save to another format (like PDF), a different dialog opens with options appropriate to that format.
In the Illustrator Options dialog, use the Version drop-down menu to choose a version of Illustrator. If you’re saving the file for your own use, choose the Illustrator CS3 format. If you plan to share an Illustrator file with someone who is using an older version of Illustrator, choose the older version.
Note
If you save to an older version of Illustrator, your image will look the same; that is, you won’t lose appearance attributes in most cases. However, you will lose the ability to edit some of the effects and elements of the illustration.
In the Fonts section of the Illustrator Options dialog, note that the default value is 100%. The associated text means that this setting will embed your fonts if you use any type. This is the safest way to share files containing type that needs to be edited.
Note
If you are sending a file to someone who will not be editing the text, you should convert the type to outlines (see #67, “Outlining Type”).
After completing this second dialog, click OK to save the file.
What about exporting files to other formats? Illustrator treats saving and exporting as two very different processes. As opposed to Photoshop, for example, where you can open files in many formats and edit them, Illustrator can no longer edit files exported to (saved to) raster file formats.
The vector universe in which Illustrator resides has its own laws and file formats. If you want to embed your illustration in a Web page, for instance, you often need to export your file to a Web-friendly raster file format, such as GIF, JPEG, or PNG. (There are other options as well, including exporting to a vector-based Flash file format.) Even many print environments require that files be submitted in raster format, usually TIFF. Here, again, you’ll export your file.
Note
See #95, “Exporting Vector Files,” for instructions on exporting to other vector formats. See #97, “Exporting to Raster Formats,” for instructions on how to save Illustrator files for digital and Web display.
#7. Printing Files
Most Illustrator files are not printed as Illustrator files. Drawings, designs, technical illustrations, logos, and maps often end up in books, magazines, publications, or on Web sites, billboards, postage stamps, or cereal boxes. For this, they are generally embedded into publishing software (such as InDesign or QuarkXPress), Web design software (such as Dreamweaver), or animation software (such as Flash).
Even when your file is destined for another printing environment, you’ll want to print a proof to see a hard copy version. As Illustrator makes its way into the offices of professionals and the homes of nonprofessionals, many people will want to print displays, posters, flyers, signs, and other one-page projects. Select File > Print to open the Print dialog box (Figure 7).
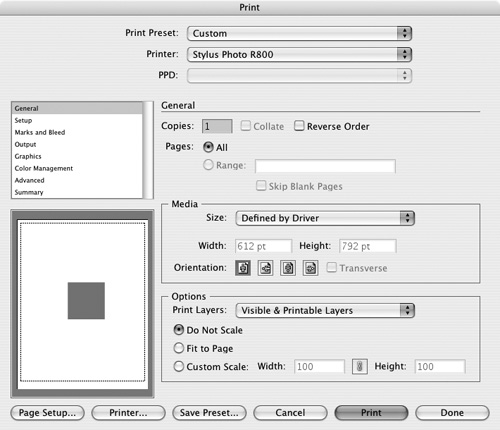
The left side of the Print dialog has eight categories. Only some of these categories are essential for printing on your desktop printer. The important elements of the Print dialog categories are
• General category: Overlaps with your operating system’s Print dialog. Use it to define basic print features such as selecting a printer and scaling.
• Setup category: Allows you to adjust cropping options. By default, illustrations are cropped to the artboard. Alternately, you can choose to crop to the artwork bounding box (the rectangle around the actual artwork in your document) or to crop marks. The Tiling drop-down menu provides different ways to print large illustrations on a desktop printer in pieces that are later put together to make a larger image. (You create crop marks by drawing a rectangle around your document and choosing Object > Crop Area > Make.)
• Marks and Bleed category: Allows you to define whether you print any trim marks, registration marks, or other marks used for commercial printing.
• Output category: Allows you to print separate sheets for separated colors. Printing separate color sheets simulates the plates that a commercial printer works with.
• Graphics category: Use the Flatness slider to manually define flatness. Use maximum Quality for distortion-free curves. Moving the slider to the Speed end of the slider improves output speed but reduces curve quality.
• Color Management category: Reflects color settings you set in your document.
• Advanced category: Allows you to set printer resolution to high, medium, low, or custom settings.
• Summary category: Lists your settings. You can save them as a text file by clicking the Save Summary button.
#8. Using the Control Panel
New in Illustrator CS3 is the Control panel, replacing the Control palette that appeared in Illustrator CS2. The improved Control panel provides a large set of options for a selected object.
Most of the time, the Control panel will be in Path mode, providing options for a selected path (object). This will be true if you have selected a path or you have selected a tool. If nothing is selected—no object or tool—the Control panel defines settings that apply to any artwork you draw next. The Path mode (determined by what is selected) is indicated on the left side of the Control panel (Figure 8a).
Figure 8a. The Control panel in Path state.
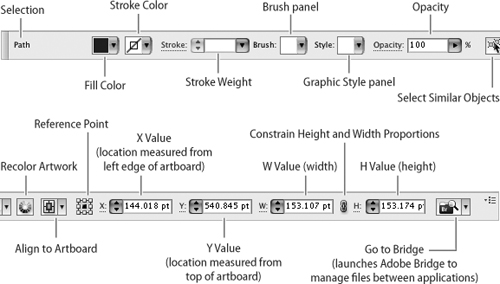
To easily apply a fill color to a selected path, for example, simply choose a color from the Fill Color panel in the Control panel (Figure 8b).
Figure 8b. Assigning a fill color to a selected path using the Control panel.
Some Control panel options (like Stroke and Opacity for selected paths) provide both a pop-up menu and a link. Links generally open panels, providing more detailed options than the pop-up menu. For instance, the Stroke pop-up menu allows you to choose a stroke color for a selected object, whereas the Stroke link opens the Stroke dialog that controls color, as well as stroke weight (width), and defines attributes such as cap (end) and join appearance.
Along with the Control panel and individual panels, the toolbox provides access to most of the features you’ll use in Illustrator.
#9. Finding Tools
You can identify tools easily by hovering your mouse over them and reading the tool tips and keyboard shortcuts (Figure 9a).
Figure 9a. Hovering over a tool to display the tool name and keyboard shortcut.
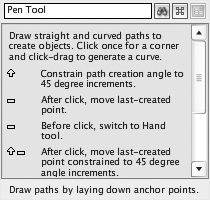
In Illustrator CS3, Adobe has introduced an experimental panel called the knowhow panel. Among other tricks, this panel displays a quick explanation of how to use any selected tool. To display the knowhow panel, choose Window > Adobe Labs > knowhow. Expand the panel by choosing Options from the knowhow panel menu. As you select a tool, an explanation of and tips on how to use that tool are displayed in the knowhow panel (Figure 9b).
Figure 9b. Displaying information about the Pen tool in the knowhow panel.
You don’t need to memorize the layout of the toolbox. You’ll be introduced to most of the tools in the various examples in this book. However, you should familiarize yourself with how the tools work.
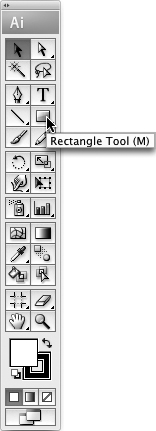
Illustrator packs many more tools into the toolbox than are visible. Most tools have subsets of tools associated with them, indicated by a tiny triangle. Click the triangle to reveal the whole gallery of associated tools (Figure 9c).
Figure 9c. Opening a tool gallery.

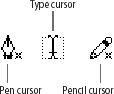
Many tools display unique cursors. The Pen tool, for example, displays a penlike cursor. The Type tool displays a vertical-bar text cursor. The Pencil tool cursor looks like a pencil (Figure 9d).
Figure 9d. Distinctive cursors for different tools.
#10. Applying Stroke and Fill Colors
As you begin to draw artwork (and that is the point of all this preparation!), the stroke and fill colors you define in advance are applied to your path.
There are many ways to define stroke and fill color. Here are the two easiest ways:
• Choose stroke and fill colors in the toolbox.
• Define stroke and fill colors in the Control panel.
Note
Are you looking for help with changing stroke and fill colors for already existing artwork? The quick way is to select the object and then choose a fill or stroke color as discussed in this section. For more discussion of stroke and fill color and patterns, see Chapter 5, “Creating Fills and Strokes.”
The Stroke and Fill swatches at the bottom of the toolbox display currently selected colors. The upper-left swatch defines fill color, and the lower-right swatch defines stroke color. Before selecting a color, choose either the Fill or Stroke swatch to focus on either fill or stroke.
With either the Fill or Stroke swatch selected, you can select the default gradient fill, or no color, directly from the toolbox (Figure 10a).
Figure 10a. Choosing a gradient fill.

Clicking the double-headed arrow to the right of the Fill and Stroke swatches in the toolbox reverses the fill and stroke colors. Clicking the tiny icon to the left of the Fill and Stroke swatches reverts to the default colors, which are a white fill with a black stroke (Figure 10b).
Figure 10b. Reverting to default fill and stroke colors.

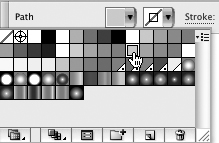
When you click either the Fill or Stroke swatch in the toolbox, the Color panel opens. Use the Color menu to display color-definition options or to choose a different color mode (CMYK or different RGB color modes). Click a color in the Color panel to apply that color to either the stroke or fill. The process is very similar when you choose a color from the Control panel. The Fill and Stroke drop-down panels allow you to choose colors for fill and stroke. If you Shift+click on the Fill or Stroke drop-down panel, you can define a color using color sliders or the eyedropper (Figure 10c).
Figure 10c. Using Shift+click in the Control panel to define a color.

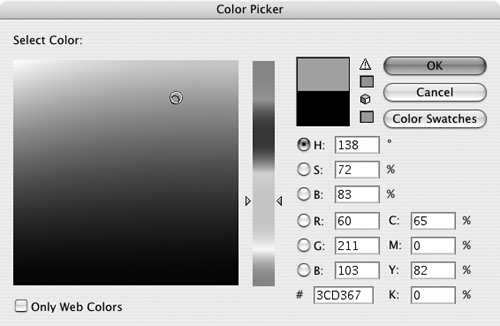
For more powerful color definition, double-click either the Fill or Stroke color swatch in the toolbox to open the Color Picker dialog. Here you have full access to many ways of defining colors. If you know the CMYK, RGB, HSB, or hexadecimal values for any color, you can enter those values in the Color Picker dialog (Figure 10d).
Figure 10d. Choosing a color in the Color Picker dialog.
#11. Relying on Smart Guides
Using Smart Guides is like having a friend advise you while you work in Illustrator. Turn on Smart Guides by selecting View > Smart Guides.
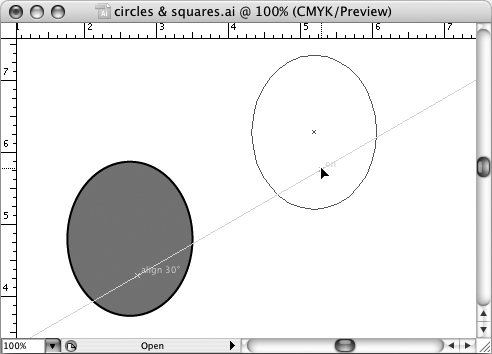
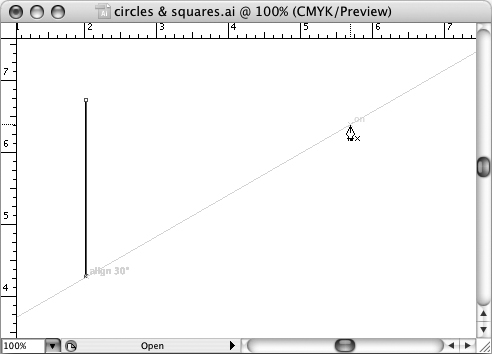
Smart Guides won’t help you until you start drawing, but you’ll almost always want this feature turned on when you start to draw. For example, when you draw a line that begins at the end of another line, Smart Guides will indicate when your path is at a set angle (Figure 11a).
Figure 11a. Drawing a 30 degree line from an anchor using Smart Guides.
You can control the kind of help you get from Smart Guides in the Smart Guides & Slices panel of the Preferences dialog. Open the dialog by choosing Illustrator (Mac) or Edit (Windows) > Preferences > Smart Guides & Slices (Figure 11b).
Figure 11b. Setting Smart Guide options.
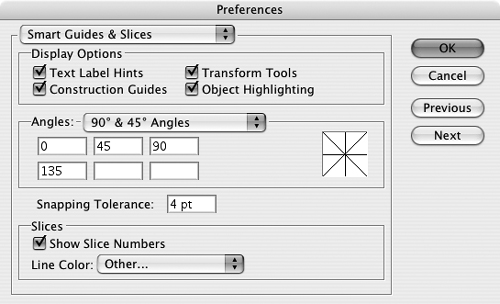
The four Display Options check boxes in the Smart Guides & Slices panel define what kinds of onscreen tips will display as you draw.
• Select the Text Label Hints check box to display tips that identify what element of a path you are hovering over (such as an anchor point that defines a path, or a path itself).
• Select the Construction Guides check box to display temporary guides for drawing that will be generated based on what Illustrator “thinks” you might be trying to draw.
• Select the Transform Tools check box to display information when changing the size, rotation, or location of an object. For example, when you move an object, this option tells you when you are moving it at a selected angle.
• Select the Object Highlighting check box to make an object below the cursor visible as you hover your mouse over the path of an object.
The Snapping Tolerance value defines the sensitivity of the Smart Guides. Higher values activate Smart Guides more quickly as your cursor approaches an object.
Smart Guides actually function as guides (see #4, “Defining Guides”). However, they appear only as needed and disappear after you finish drawing (or transforming) an object. Smart Guides, therefore, are very helpful when you draw a path at a defined angle. They also appear when you move an object relative to the point on the object that you clicked when you began to move it (Figure 11c).
Figure 11c. Using Smart Guides to control the placement of a moved object.