
Chapter Eleven. Managing Illustration Workflow
Once you create an illustration, you’ll usually pass it to the next phase of an illustration workflow—sending the file to be integrated into a publication, integrated in a Web or other digital display, or incorporated into an animation (such as a Flash movie).
In many cases, this means exporting an Illustrator file to another format that fits into the next phase of the workflow. This chapter explores your options for doing this.
Other techniques in this chapter show you how to use symbols and actions that make Illustrator files easier and quicker to edit or update. Symbols also reduce file size. In addition, you’ll learn how to share Illustrator files with other designers.
#91. Creating Symbols and Applying Instances
Symbols are objects that display as instances in a document. A single symbol can be deployed as many instances in an Illustrator document. Each instance can be placed, resized, reshaped, and edited in various ways. But each instance retains essential qualities of the original symbol.
Actions are preset groups of commands. You can record and play your own actions, or use the helpful set of predefined actions that ship with Illustrator.
Available symbols display in the Symbols panel. The buttons at the bottom of the panel define and use the available symbols (Figure 91a).
Figure 91a. The Symbols panel.
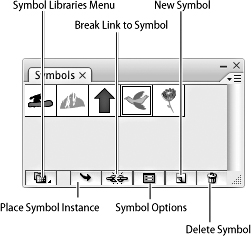
To create a symbol, create some artwork. With the artwork selected, click the New Symbol icon in the Symbols panel or simply drag the artwork onto the Symbols panel (Figure 91b).
Figure 91b. Creating a symbol.

When you create a new symbol, the Symbol Options dialog opens. In the Symbol Options dialog, you can enter a name for the symbol in the Name box. The other features in the Symbol Options dialog define attributes used when the symbol will be copied into a Flash movie.
To place a symbol instance on the artboard, select the symbol from the Symbols panel and click the Place Symbol Instance button at the bottom of the Symbols panel. Or, drag the symbol from the panel onto the artboard.
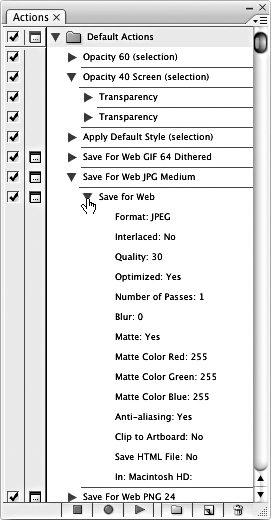
Actions save time and finger wear and tear by collecting batches of keystrokes for execution. The Actions panel (Window > Actions) includes sets of steps that apply many useful sets of procedures, ranging from saving a selected object as a JPEG file for the Web to applying a Gaussian blur. Actions are listed in the Actions panel. To reveal all the steps the action performs, expand the action by clicking the triangle next to it (Figure 91c).
Figure 91c. Revealing the steps in a selected action in the Actions panel.
To create an action, click the Create New Action button at the bottom of the Actions panel. The New Action dialog appears. Enter a name for your action, and choose a Set where it will reside. Normally, you can leave the Set at the default, Default Actions. After you name an action, click the Record button. The new action will capture all of your keystrokes. After you perform (and record) all the keystrokes you want to save, click the Stop Playing/Recording button at the bottom of the Actions panel. The new action is now added to your Actions panel.
To save a set of actions, choose Save Actions from the Actions panel menu. Enter a file name in the Save As field in the Save Set To dialog. You can save a set of actions to any folder.
#92. Editing Symbols
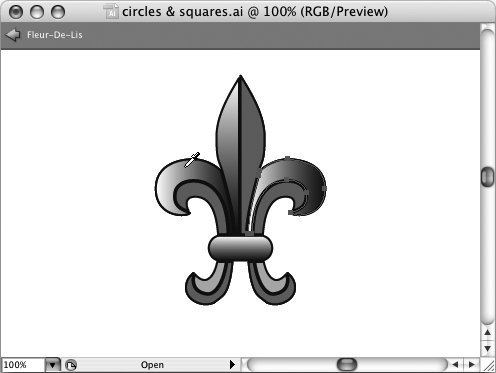
After you place symbol instances in a document, you can modify the symbol and, in the process, edit all the placed instances. To edit a symbol, double-click the symbol in the Symbols panel. The symbol opens in Isolated Group mode. Edit the symbol in Isolation Mode, and click the Exit Isolated Group icon to save changes to the symbol (Figure 92).
Figure 92. Editing a symbol in Isolated Group mode.
#93. Previewing in Device Central
Device Central is a previewing environment packaged with CS3 applications including Illustrator. Device Central allows illustrators to preview how their artwork will look in a variety of mobile devices including cell phones.
If you are designing for a cell phone or other mobile device, a convenient way to work with Device Central is to begin work with a document configured for the device you are designing for. To do this, choose File > New, and in the New Document dialog choose Mobile and Devices from the New Document Profile pop-up. Then click the Device Central button in the dialog to open the Adobe Device Central window. Choose from one of the available devices (Figure 93a).
Figure 93a. Choosing a device in Device Central.
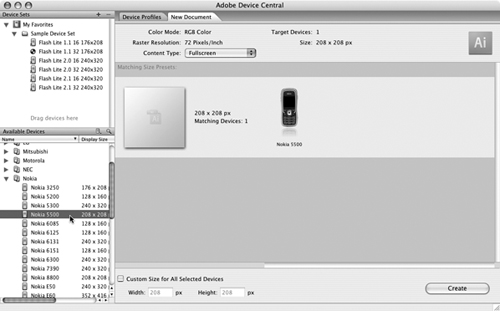
After you select a device in Device Central, click the Create button in the lower-right corner of the window to return to Illustrator. Illustrator opens with an artboard that is scaled to match the display size of the selected device.
To see how artwork will look in a mobile device using a Web-compatible format, follow these steps:
- Create a new document using Device Central to define the artboard dimensions.
- After you create artwork that will be displayed on the screen of a device like a cell phone, choose File > Save for Web & Devices.
- In the Save for Web & Devices dialog, choose one of the Preset options for exporting to Web-compatible graphics.
Note
For a full explanation of how to use the Save for Web & Devices dialog, see #98, “Saving for the Web.”
- Click the Device Central button in the bottom-right corner of the Save for Web & Devices dialog. Device Central opens.
- In Device Central, choose a mobile device from the list on the left side of the window. Click the Emulator tab to see your artwork previewed in the selected device (Figure 93b).
Figure 93b. Previewing artwork in Device Central.
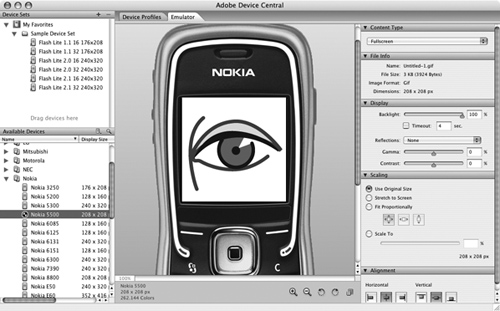
The panels on the right side of the Device Central window provide options for viewing your artwork in different states of the device operation. In the Content Type panel, you can choose between modes like Fullscreen or Wallpaper. In the Display panel, you can simulate different viewing conditions, like different backlight intensity or reflection (Figure 93c).
Figure 93c. Previewing a cell phone display with outdoor reflection and 50% backlighting.
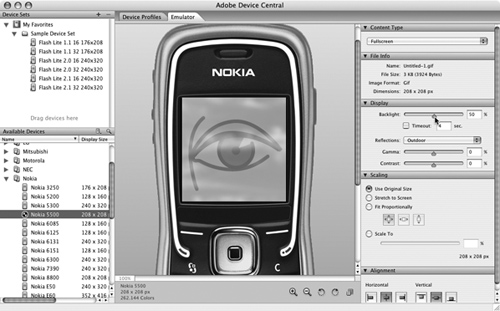
The Scaling panel allows you to scale or stretch the artwork, and the Alignment panel moves your artwork around the screen depending on the selected alignment.
#94. Sharing Editable Illustrator Files
Most Illustrator files end up being sent to other applications. In most cases, the person responsible for the next step in the process will give you the exact parameters for how the file should be saved in order to fit it into the next phase of the workflow.
You can export Illustrator files to many file formats. But if you want to retain editing capability, there are four main output options, each with sets of suboptions:
• Illustrator’s native AI format
• Illustrator PDF (Portable Data Format)
• Illustrator EPS (Encapsulated PostScript)
• SVG (Scalable Vector Graphics)
Note
The available SVG Compressed (SVGZ) format is similar to SVG but is more compressed in size and lower in quality.
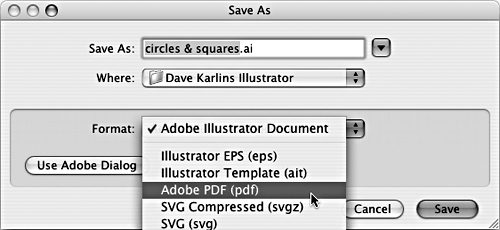
To save to any of the editable formats, choose File > Save As, and then choose a file format from the Format (Adobe and Mac dialog) or Save as Type (Windows dialog) drop-down menu in the Save As dialog (Figure 94a).
Figure 94a. The Save As dialog.
Each file format has specific optimization settings.
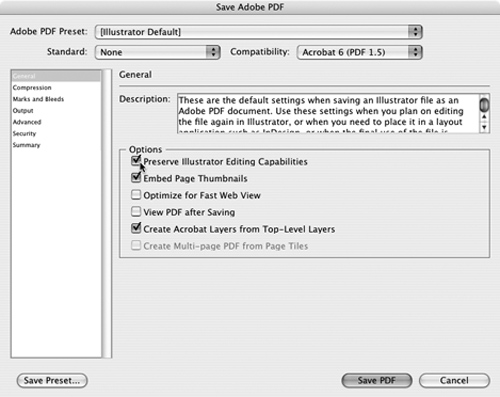
All four Save As options allow you to save your file as an editable Illustrator file. Obviously, files saved to Illustrator format will be editable in Illustrator. You can also preserve Illustrator editing capability when you save to PDF, EPS, and SVG (or SVG Compressed) formats. To do this for PDF, SVG, and SVG Compressed files, you must select the Preserve Illustrator Editing Capabilities check box in the options dialog for a save format (Figure 94b).
Figure 94b. Preserving Illustrator editing capability while saving a file to PDF format.
After you name a file in the Save As dialog and click OK, the next dialog defines properties specific to the format to which you are saving.
#95. Exporting Vector Files
You can save Illustrator files to four vector formats and retain full editability. (For a discussion of the four Illustrator editable formats, see #94, “Sharing Editable Illustrator Files.”) You can export Illustrator files to many raster formats (see #97, “Exporting to Raster Formats”). Also, there are additional vector-based graphic file formats, and you can export files from Illustrator to those formats.
When you export Illustrator files to other vector formats, you lose full editability if you reopen the file in Illustrator. For this reason, you will usually want to save files both in Illustrator CS3 format and in the export file format.
To export Illustrator files to other vector formats, choose File > Export, and then choose a file format from the Format (Mac) or Save As Type (Windows) drop-down menu in the Export dialog (Figure 95).
Figure 95. Exporting an Illustrator file.
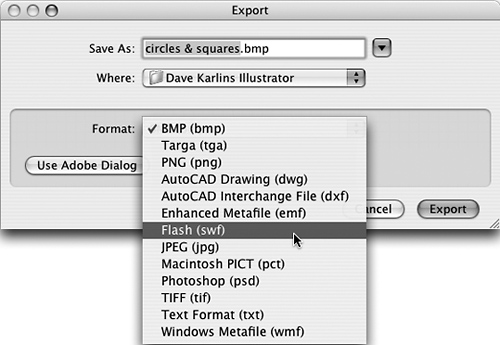
Other vector-based file formats that Illustrator exports to include:
• AutoCAD Drawing (DWG) and AutoCAD Interchange File (DWF) formats are used by AutoCAD-compatible programs for architectural design.
• Enhanced Metafile (EMF) format is used by Windows applications such as Word and PowerPoint to share vector-based illustrations.
• Flash (SWF) format is used for Flash movies. (See #99, “Exporting to Flash,” for more details on exporting vector files from Illustrator to Flash.)
• Windows Metafile (WMF) format is an older version of Enhanced Metafile format. It is widely supported by Windows applications but does not reproduce vector graphics as well as EMF files.
#96. Managing File Size
Illustrator’s vector-based logic is a rational and economical way to save files. However, you might find yourself unpleasantly surprised by how large some of your files end up.
Here are a few tricks and techniques for reducing file size:
• Use symbols. They reduce file size by relying on a single symbol to store data that is displayed in many instances. (See #91, “Creating Symbols and Applying Instances,” for more information about using symbols.)
• Save to Illustrator AI CS3 format. Older formats require generating additional paths to compensate for unsupported effects and other features. Saving to PDF or EPS format requires storing more data.
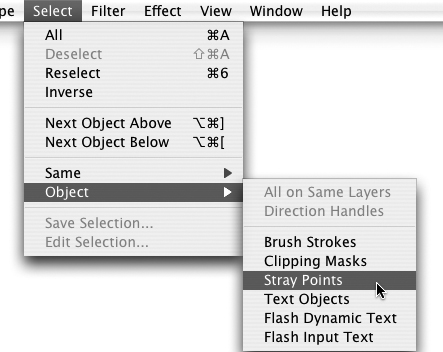
• Don’t save stray anchors. Use the Stray Points menu option (Select > Object > Stray Points) to track down (and then delete) stray anchors that make the saved file unnecessarily large (Figure 96).
Figure 96. Cleaning up stray anchors before saving.
#97. Exporting to Raster Formats
You have two basic options for Illustrator files that will be displayed in Web pages. You can save them to a Web-supported vector format, such as Flash’s SWF format, or SVG (Scalable Vector Graphics) format. Or, you can save to a more widely supported raster format such as GIF, JPEG, or PNG.
If you are saving a file for the Web, all five of the previously mentioned options (SVG, SWF, GIF, JPEG, and PNG) are available from the Save for Web & Devices dialog.
Note
To export to Flash, see #99, “Exporting to Flash.”
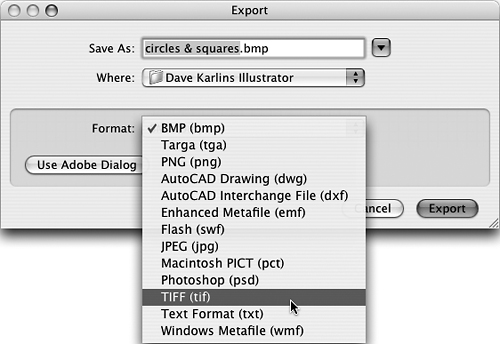
Sometimes you need to save files destined for print output to a raster format. The TIFF file format is a widely supported format that retains data better than JPEG or GIF formats and is the favored raster format for print output.
To export to TIFF or any other raster format, choose File > Export, and then choose a file format from the Format (Mac) or Save as File Type (Windows) drop-down menu in the Export dialog (Figure 97).
Figure 97. Exporting to TIFF format.
#98. Saving for the Web
There are three main Web-compatible raster formats. Each has its particular uses:
• JPEG is best for online photos.
• GIF is best for images in which the background must be transparent, because it allows the Web page background to show through behind the illustration.
• PNG combines good color support with transparency but is not as widely supported by browsing environments such as JPEG or GIF.
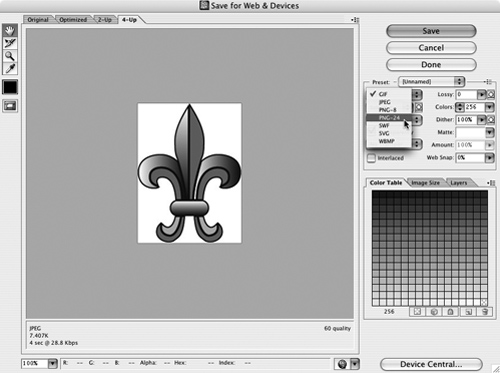
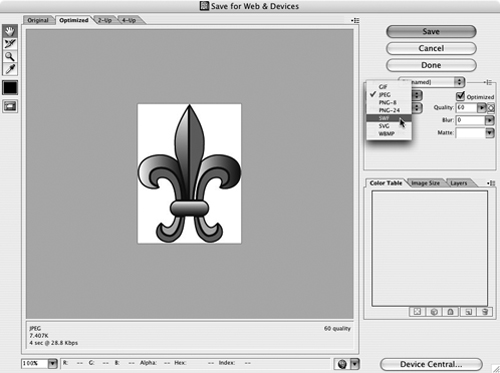
To save to any Web-compatible format, choose File > Save for Web & Devices to open the Save for Web & Devices dialog. Then choose a format from the Optimized File Format pop-up menu (Figure 98a).
Figure 98a. Choosing the PNG-24 preset for a Web image.
After choosing one of the preset options for exporting to a Web image, you can tweak the export settings for the particular format you chose. The following options are most essential for configuring Web graphics and are available for JPEG, GIF, and PNG formats:
• Transparency (not available for JPEG) assigns a color to “knock out” and make invisible, allowing the Web page background color or image to show through.
• Interlacing (for GIF and PNG) or Progressive (for JPEG) allows images to “fade in” as they download to a browser, reducing the annoyance of waiting for images to appear on a page.
• Quality (for JPEG and Curve Quality SWF images) defines how much compression will be applied to reduce file size. Higher quality requires a larger file size. You can preview quality on the left side of the Save for Web & Devices dialog. If you choose the 2-Up or 4-Up options from the tabs at the top of the dialog, you can preview and compare file formats and compressions (Figure 98b).
Figure 98b. Previewing both a low-quality and high-quality JPEG.

#99. Exporting to Flash
You can export Flash files to the Flash SWF format by choosing File > Save for Web & Devices. In the Save for Web & Devices dialog, choose SWF from the Optimized File Format pop-up (Figure 99a).
Figure 99a. Choosing SWF format from the Optimized File Format pop-up in the Save for Web & Devices dialog.
Use the Flash Player Version pop-up to choose which version of the Flash Player to save for. Choosing an older version makes it more likely that the SWF file can be played in browsers and on devices. Choosing the latest version ensures that every feature available is supported when your illustration is rendered on a device or in a browser. Generally speaking, Illustrator artwork can be saved to older versions of SWF format (like 6, 7, or 8) without losing any quality.
Higher Curve Quality settings preserve curves with fewer jagged edges but increase file size. The Compressed check box further reduces file size. The Preserve Appearance check box creates very limited editability when the file is placed in Flash. The Protect File check box prevents the file from being opened in any application other than the Flash viewer or Flash. The Text As Outlines check box converts text to curves. Use this option for better quality images, but do not use it if the text is to be edited in Flash.
Note
Frame Rate and Looping only apply to Flash animation.
In addition to preserving scalability, Flash files can transform Illustrator layers into animation frames.
To convert Illustrator layers into frames of a Flash animation, follow these steps:
- Select File > Save for Web & Devices to open the Save for Web & Devices dialog.
- From the Optimized File Format pop-up menu, choose SWF.
- From the Type of Export drop-down menu, choose Layers to SWF Frames (Figure 99b).
Figure 99b. Choosing the Layers to SWF Frames option.

- Set Curve Quality (as noted earlier, higher Curve Quality values create more accurate curves and increase file size).
- In the Frame Rate pop-up menu, set a Frame Rate for the animation.
Note
Twelve frames per second is a widely used animation setting.
- Select the Loop check box to cause the Flash movie to repeat indefinitely. Deselect the check box to play the animation only once.
- Select the Compressed check box to further reduce file size.
- Click the Save button in the Save for Web & Devices dialog to export the file as a Flash movie, converting layers to Flash frames.
- In the Save Optimized As dialog, navigate to the folder with your Web site media files and enter a file name. Click Save again to save the file as an SWF in your Web site folder.
#100. Exporting HTML Pages
Illustrator’s Save for Web & Devices feature allows you to save files in Web-friendly JPEG, GIF, SWF, PNG, and other file formats. But the Save for Web & Devices dialog not only translates your Illustrator illustrations to Web-compatible file formats, it can also save your entire document as an HTML Web page. This page can easily be opened and edited in any HTML page editor, including Adobe Dreamweaver CS3 (or any other environment for editing Web pages).
By default, Illustrator will save all objects on your page as a single illustration, and then embed that single image file in an HTML Web page when you create an HTML page. If you (or a Web design associate) will be editing your page in Dreamweaver or another Web page editor, it is better to first slice the illustration. Slices can then be saved as individual Web-compatible images.
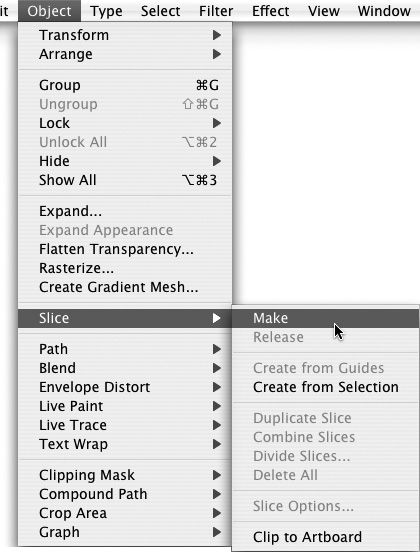
To create a slice from selected objects, choose Object > Slice > Make. You can do this for any number of selected objects (Figure 100a).
Figure 100a. Creating a slice from selected objects.
To create a single slice that includes more than one object, select the objects and choose Object > Slice > Create from Selection. As you generate slices, Illustrator displays a grid on the page.
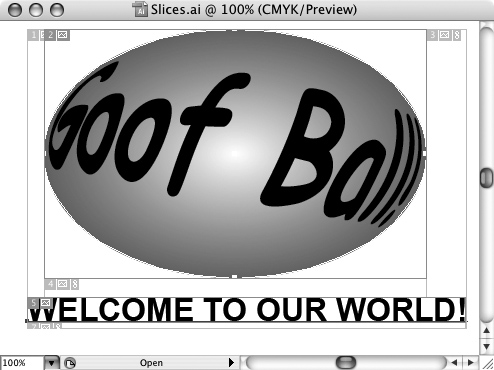
When you define slices, grids appear on the artboard. Those gridlines represent table rows and columns that will generate when you save the document as an HTML page (Figure 100b).
Figure 100b. Slices are displayed on the artboard in Illustrator.
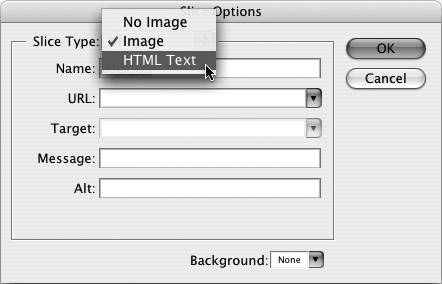
After you create a slice, you can configure it as an image slice or a text slice. Text slices (that were created by selecting text and creating a slice from that text object) export to HTML pages as editable type. To change a selected slice to a text slice, choose Object > Slice > Slice Options. Choose HTML Text from the Slice Type pop-up menu (Figure 100c).
Figure 100c. Defining a text slice.
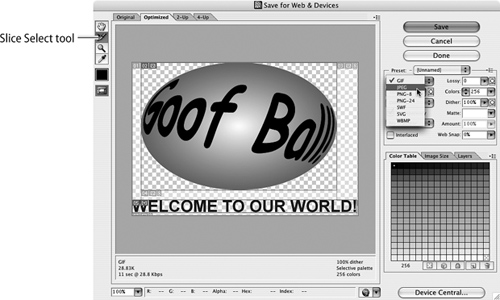
After you create and modify slices, save your page and images (and text) as an HTML page by choosing File > Save for Web & Devices. In the Save for Web & Devices dialog, click the Select Slice tool, and then click a slice. With a slice selected, choose a file format for that slice (Figure 100d).
Figure 100d. Choosing a file format for a selected slice in the Save for Web & Devices dialog.
After you define file types and attributes for all images in your document, click the Save button in the Save for Web & Devices dialog. This opens the Save Optimized As dialog. In the Save as Type pop-up menu, choose HTML and Images. Navigate to the folder to which you save Web pages and enter a file name in the File Name box. Then click Save to save the HTML Web page, along with the embedded images and type (if any).