
Chapter Six. Working with Layers
Layers are both an organizing and an editing tool in Illustrator. Layers help organize your work by segregating sets of paths into layers that can be hidden, locked, or displayed for editing. Organizing complex projects into layers makes life infinitely less stressful because you can isolate some paths while hiding or locking others.
Layers serve as an editing tool in several ways. But most important, you can use layers to move elements of a project in front of or behind other layers.
Can’t you do that by changing stacking order of paths within a layer? Yes, you can, and it’s helpful to think about layers as a kind of macro or more overall, efficient way to move whole sets of paths in front of or behind other paths. But layers are a more powerful way to manage stacking. Layers can be named. Layers can be designated printing or nonprinting. They can be hidden (or locked). And they can be generated automatically.
Layers can also have editing attributes. For instance, layers can be used to mask (reveal only part of) another layer. Or, you can assign transparency to a layer.
Note
See #80, “Applying Transparency,” for an explanation of transparency.
In addition to exploring layers, this chapter covers embedded or linked raster (bitmap) objects, explaining how nonvector objects from your digital camera, Photoshop, or some other nonvector source integrate into Illustrator projects.
And, the final technique in this chapter covers one of Illustrator CS3’s most remarkable innovations—Live Trace, which allows you to convert raster illustrations to vector paths.
#52. Organizing Projects into Layers
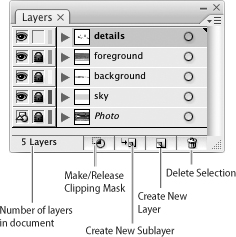
The Layers panel is used to create new layers, to move objects between layers, or to apply attributes (like transparency) to a layer. To view the Layers panel, choose Window > Layers or press the F7 function key. Icons on the bottom of the Layers panel tell you how many layers you have in your document and allow you to:
• Make/Release Clipping Mask: Used when one layer acts as a clipping mask to reveal only part of an underlying layer.
• Create New Sublayer: Defines a layer within the selected layer.
• Create New Layer: Creates a layer at the same level as the selected layer. So, for instance, if you click this icon with a sublayer selected, you create a new sublayer (not a sublayer of the sublayer). To create a new top-level layer, you must first select a layer (not a sublayer) and click this icon.
• Delete Selection: Dragging a layer into this icon deletes the entire layer, including sublayers (Figure 52a).
Figure 52a. The Layers panel with several defined layers.
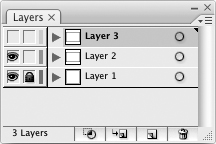
You can rename a layer by double-clicking on the layer name in the Layers panel and entering a new layer name in the Layer Options dialog. There are two columns to the left of each layer. The first column toggles visibility, allowing you to display or hide the selected layer. This column displays an eye icon when the layer is visible, and clicking on the eye icon makes the layer nonvisible. The second column toggles locking, which either allows you to edit a layer (unlocked), or it prevents you from editing a layer (locked). A lock icon displays when a layer is locked, and clicking the lock icon unlocks a layer (Figure 52b).
Figure 52b. Layer 1 is locked and visible. Layer 2 is visible but not locked. Layer 3 is not visible.
By dragging a layer or sublayer up or down in the Layers panel, you change the stacking order of that layer. Move layers (or sublayers) by clicking and dragging on a layer within the Layers panel.
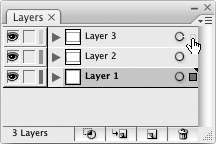
Within each layer, paths (and other objects, like raster objects) are represented by thumbnails. Selected art is indicated by filled squares on the right of the path. You can drag objects from one layer to another by selecting them and dragging them within the Layers panel (Figure 52c).
Figure 52c. Moving a path from one layer to another.
You can edit layer attributes by double-clicking on a layer. In the Layer Options dialog, in addition to renaming a layer and setting lock and visibility attributes (features that you can do in the Layers panel), you can also define the selection display color for a layer, define template (locked, nonprinting) layers, toggle printing on or off, toggle preview on or off, and dim images on the selected layer to a set percentage of full opacity.
You can identify selected objects in the Layers panel because they are indicated with a color box—the colored square that appears to the right of a Layer name in the Layers panel. The color of the square matches the color associated with a layer (this can be changed in the Layer Options dialog by double-clicking on a layer). If a layer includes both selected and unselected objects, the color box next to a layer name is small. If all objects in a layer are selected, the color box is full size.
#53. Viewing and Isolating Layers
In Chapter 4, “Editing Paths,” I introduced you to isolating groups. To review very quickly, if you double-click on a selected group, all the other objects in your document are locked and cannot be edited. This new feature in Illustrator CS3 makes it easy to edit some elements of your illustration while making sure you don’t mess up other objects by accident.
Tip
For a full explanation of groups and isolating groups, see #31, “Isolating Groups.”
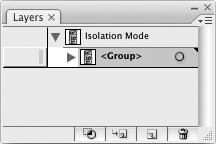
You can see and exit Isolation Mode in the Layers panel. When you double-click on any group and place the objects in that group in Isolation Mode, an indicator appears in the Layers panel (Figure 53).
Figure 53. Selected objects in Isolation Mode are displayed in the Layers panel.
To exit Isolation Mode in the Layers panel, choose Exit Isolation Mode from the Layers panel menu.
You can also assign Isolation Mode to a sublayer in the Layers panel. Select a sublayer in the Layers panel and choose Enter Isolation Mode from the Layers panel menu. All objects not in the selected sublayer will be locked to prevent editing until you exit Isolation Mode.
#54. Finding Objects in Layers
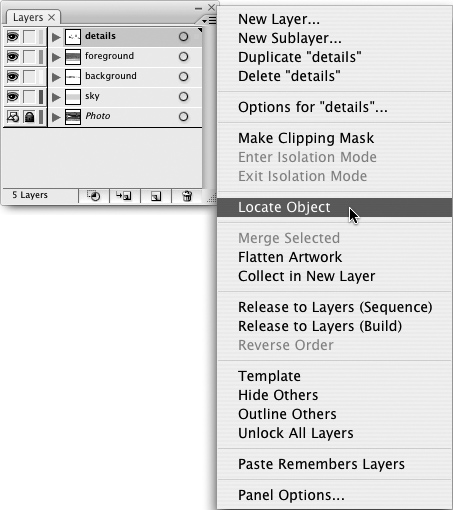
Since layers provide a powerful way to organize paths, it’s helpful to be able to locate objects with the Layers panel. This is easier said than done, particularly when you are working with a large, complex illustration with dozens of layers.
You can quickly and easily locate any object in the Layers panel by selecting the object in the artboard, and then choosing Locate Object from the Layers panel menu (Figure 54).
Figure 54. Tracking down an object in the Layers panel by selecting it in the artboard.
Outlining other layers converts nonselected layers to outlines where only a thin line indicates the paths on those nonselected layers.
To hide, outline, or lock layers, select one layer (or sublayer), and choose Hide Others, Outline Others, or Lock Others from the Layers panel menu. To undo hiding, outlining, or locking other layers, choose Show All Layers, Preview All Layers, or Unlock All Layers from the Layers panel menu. Available options appear in the menu.
#55. Using Layers for Transparency or Clipping
Editing can be applied through layers. This process can get rather complex, but applying transparency and defining a clipping mask are two highly useful examples of how this works.
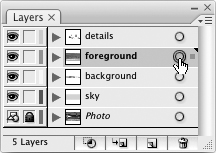
Targeted layers can have effects and transparency applied to them. To apply transparency to an entire layer, target the layer by clicking the ring icon for a layer in the Layers panel (Figure 55a).
Figure 55a. Targeting a layer.
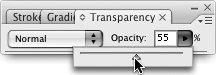
With a layer targeted, apply transparency from the Transparency panel. The setting applies to all fills within the layer (Figure 55b).
Figure 55b. Applying transparency to a layer.
Note
See #80, “Applying Transparency,” for a discussion of applying transparency.
#56. Placing and Editing Raster Images
Especially before the advent of Live Trace, raster (bitmap) images were often placed in Illustrator documents as tracing template layers. Rasters are still sometimes used for tracing, particularly when you want to trace only a part of a photo or when you are using a photo not for direct tracing but more for inspiration.
You can also place raster images into an Illustrator file and leave them as rasters. These placed raster images cannot be edited with most of the tools and effects that work with vectors. For instance, you cannot select or edit paths in a placed raster because raster images are just maps of bits of data (thus the name bitmap), not defined vectors. But there are times when your illustration will combine vector and raster objects, so you will place a raster image in an Illustrator file.
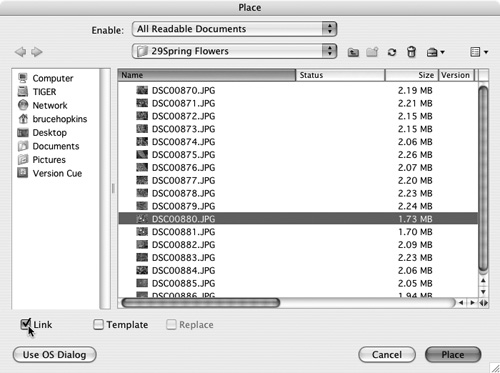
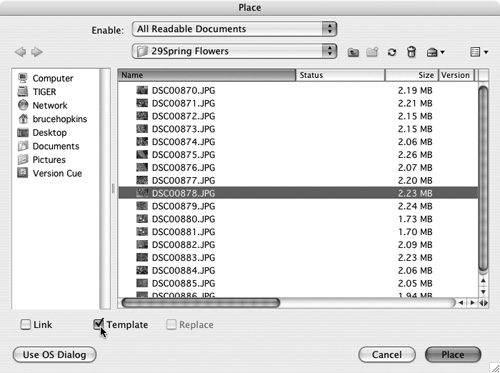
To place a raster image in an open Illustrator file, choose File > Place. The Place dialog opens.
Note
The Place dialog has two versions: Use the Use Adobe Dialog/Use OS Dialog button in the lower left to toggle between the Adobe version and your operating system’s Place dialog. The Adobe dialog sometimes previews a wider set of raster images than your operating system dialog.
In the Place dialog, navigate to the file you want to place. The Link check box links an image, creating an interactive bond between the file and its appearance in the Illustrator file (Figure 56a).
Figure 56a. Linking a placed image.
You can also import a placed image as a template layer. Template layers are noneditable and display at 50% opacity (Figure 56b).
Figure 56b. Importing an image as a template layer.
Placed raster images can be edited using some, but not all, of the editing techniques you use on vectors. You can:
• Apply some filters and effects
• Organize raster images in layers
• Organize raster images into groups, including in combination with vector objects
• Cut, copy, and paste (and duplicate) rasters
• Scale, rotate, and reflect raster objects
• Place rasters in a Swatch panel
#57. Using Live Trace
It has always been much more difficult to convert a raster image to a vector than vice versa. Vector images can always, accurately, “deconstruct” into a set of defined mapped bits of data. On the other hand, defining a logic for defined curves out a group of dots is a much more difficult challenge.
That challenge is an important one, since once you convert a raster image to a vector image, you open up the possibility of using all of Illustrator’s vector editing tools and effects.
The process of bringing raster artwork into the vector world became qualitatively easier with the introduction of Live Trace.
To convert a placed raster image to a vector image, follow these steps:
- Select the placed raster image on the artboard.
- Choose Object > Live Trace > Options to open the Tracing Options dialog. Choose one of the many presets from the Preset menu to optimize the resulting traced object (Figure 57).
Figure 57. Choosing a Live Trace preset.
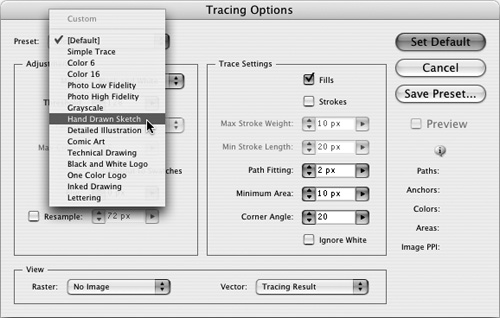
- Click the Preview button in the Tracing Options dialog to see the result of your preset. If the results don’t look good, try another preset.
- To generate vectors and leave the original raster, choose Original Image from the Raster pop-up menu in the View area of the dialog. Or, to get rid of the original raster, choose No Image from the Raster pop-up.
- From the Vector pop-up in the View area, choose either Tracing Result, Outlines, or Outlines with Tracing to define the generated vectors (use the Preview check box to compare these options on the artboard).
- When you find a preset that delivers the best results and select raster and vector output, click the Trace button to generate a vector from your placed raster file.