Chapter Five. Creating Fills and Strokes
In this chapter I explain the basic techniques for assigning colors in Illustrator, and beyond that, the most useful ways to take advantage of Illustrator’s wide array of color palettes and color tools.
Illustrator CS3’s jack-of-all-trades Swatches panel allows you to apply any color, pattern, or gradient as an object fill. Those fills can be applied to closed paths (paths where the first anchor is also the last), or open paths (paths where the first and last anchors are different), or Live Paint regions. Several of the techniques in this chapter explain how to create, organize, and use swatches.
Stroke attributes define how the outline of an object (or the edges of a Live Paint region) display. Stroke attributes include color, thickness, and pattern (like normal or dashed lines).
One of the more dynamic additions to Illustrator CS3 is the Color Guide panel, which creates the ability to choose from interactively generated sets of colors that automatically harmonize with the colors in your illustration. Along with the Color Guide panel, the new Live Color dialog allows you to adjust the harmonizing rules that generate interactive color schemes. These new tools are explored here as well.
The examples in this chapter provide a compressed, but pretty complete, introduction to defining and applying fills and strokes. The most adventurous techniques in this chapter explore applying multiple strokes and fills to the same path.
#42. Using Color and Pattern Swatches
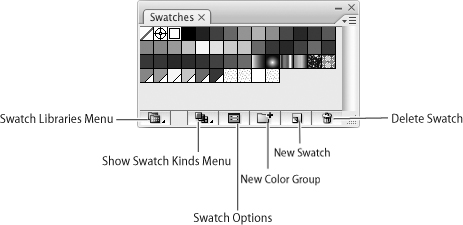
The Swatches panel is an all-purpose repository of colors, gradients, and patterns. With a vast number of available colors for print and digital output, the Swatches panel helps organize colors into convenient sets so you don’t have to search through thousands of colors to find the ones you need.
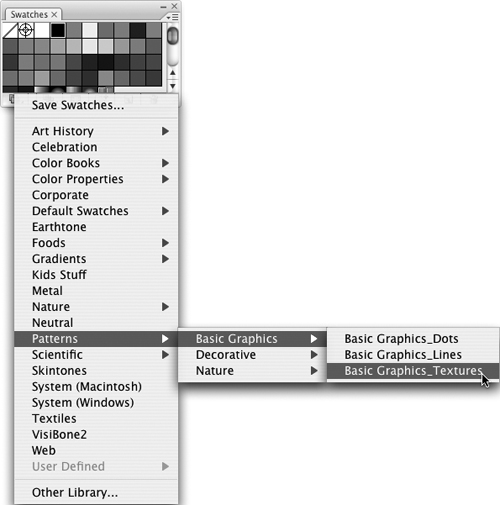
You display the Swatch libraries by clicking the Swatch Libraries button on the bottom of the Swatches panel (Figure 42a). There are many Swatch color panels, which are accessible by choosing Window > Swatch Libraries, and then selecting from dozens of preset color panels. Those color sets include themes (like Earthtone), color types (like Web), or processes (like CMYK for hard copy printing or RGB for digital output) found in the Default Swatches submenu.
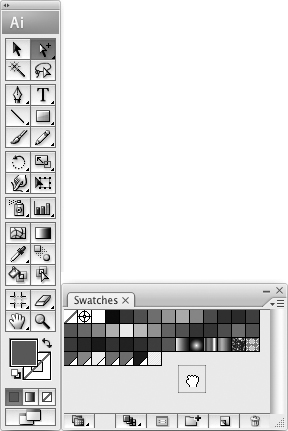
Figure 42a. The Swatches panel.
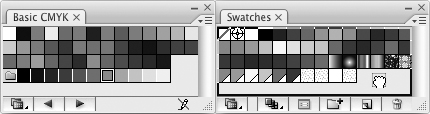
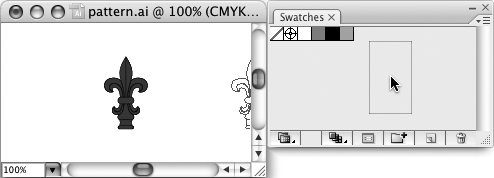
You can transfer colors from one panel to another by dragging them from one panel into another. So, for example, you can pull colors out of various color panels and drag them into the default Swatches panel. When you save an Illustrator file, the default Swatches panel is saved along with the file, so the colors you organize into the panel are available for easy access (Figure 42b).
Figure 42b. Adding a swatch from the CMYK default panel to the Swatches panel for an illustration.
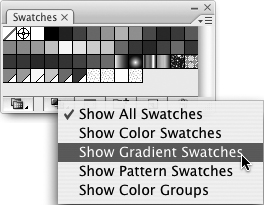
You can quickly filter the set of displayed swatches to display only colors, gradients, patterns, or color groups using the Show Swatch Kinds button on the bottom of the panel (Figure 42c).
Figure 42c. Choosing from swatch types.
Note
See #43, “Using Color Guides and Live Color,” for an exploration of color groups and how they work with color guides—a design element new to Illustrator CS3.
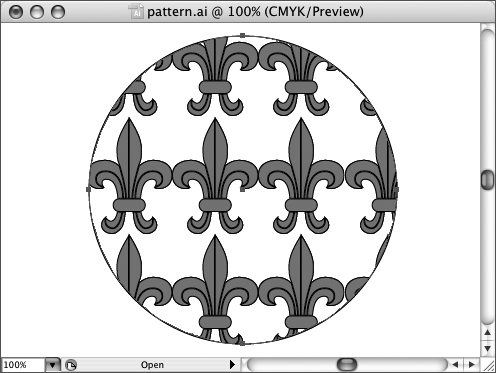
Pattern swatches allow you to design custom fills and then apply those fills to any path. These custom fills, saved as pattern swatches, can be used for anything from bricks to bubbles (Figure 42d).
Figure 42d. Custom fill swatches.
Note
Pattern swatches can be applied to strokes—not just fills.
Follow these steps to create your own design to use as a fill:
- Draw a small illustration—about a half inch square is a good place to start.
- With the small illustration selected, drag it into the Swatches panel (Figure 42e).
Figure 42e. Dragging a pattern into the Swatches panel.
- Draw a shape (an ellipse, rectangle, or star will work fine). Or get creative.
- With your newly drawn shape selected, select the Fill focus in the toolbox (not the Stroke focus), and click on your new pattern fill in the Swatches panel. The pattern is applied to the object fill (Figure 42f).
Figure 42f. Applying a pattern fill.
#43. Using Color Guides and Live Color
One of the more interesting new features in Illustrator CS3 is the Color Guide panel. The Color Guide panel generates a set of color swatches that go with the color scheme in use in your illustration. The set of colors available in the Color Guide adjusts, chameleon-like, as you add (or delete) colors from your illustration. So, as you assign new colors, the Color Guide panel changes. The Live Color dialog is a whole color-definition environment, but here I will focus on the most important and dynamic features—the ability to generate, edit, and apply harmonic sets of colors based on the colors in a document.
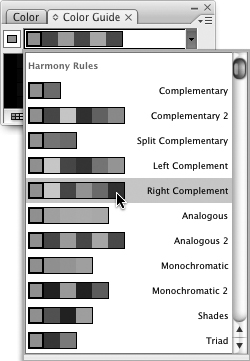
To view the Color Guide panel, choose Window > Color Guide. The Color Group is the smaller set of colors displayed on top of the Color Guide panel. This group can be adjusted using the pop-up at the right edge of the Color Group (Figure 43a).
Figure 43a. Choosing a Color Group.
Different color groups are generated using different harmony rules. These are essentially different ways of generating complementary colors to the set of selected colors based on applying different mathematical calculations to numeric representations of colors.
Tip
An exploration of color theory and the relationship between how we see color and the physical components of color is beyond the scope of this book. But there are many good online resources for exploring the dynamics and aesthetics of color—search under “color theory.”
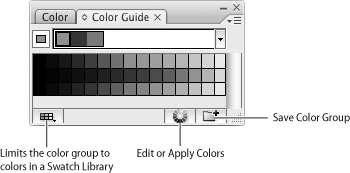
The Color Guide panel has three tools: The first limits the colors that display in the Color Guide to a subset of colors in one of the swatch libraries. The Edit or Apply Colors tool opens the Live Color dialog where you can dynamically adjust the way colors are generated for the Color Guide. The Save Color Group to Swatch Panel tool adds the set of colors at the top of the Color Guide to the document Swatch panel. This panel is saved along with the document (Figure 43b).
Figure 43b. Color Guide tools.
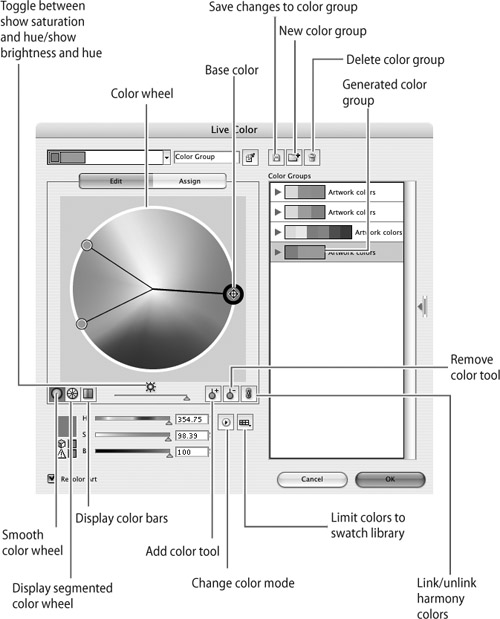
When you click the Edit or Apply Colors tool in the Color Guide panel, you launch the Live Color dialog. The Live Color dialog displays a color wheel that corresponds to the set of colors in your current color group. The Live Color dialog has two tabs, Edit and Assign. In either the Edit or Assign tab, you can select from the displayed list of Color Groups to recolor selected artwork.
Caution
If you select objects before launching the Live Color dialog, changes in the base color will be applied to selected artwork. You can toggle the Recolor Art check box in the Live Color dialog to see the effect of changes in your document.
The Edit tab provides more control over fine-tuning how color groups are defined. Tools at the top of the Live Color dialog allow you to save changes to a color group, add a color group, or delete a (selected) color group. Tools below the color wheel define how colors display: as a smooth wheel, as segmented (distinct) colors, or as color bars. You can toggle between displaying saturation and hue or brightness and hue. And you can add or remove colors. The Link Harmony Colors tool enables, or disables, color harmonization; when this is disabled, you move each color independently of the base color (the larger circled color).
In the Edit tab, you can generate new color groups or edit existing color groups using either defined harmony rules or the interactive color wheel. In the color wheel, you can drag on the base color or complementary colors to adjust the set of colors in the color group (Figure 43c).
Figure 43c. Dragging the base color in the color wheel to adjust the color group.
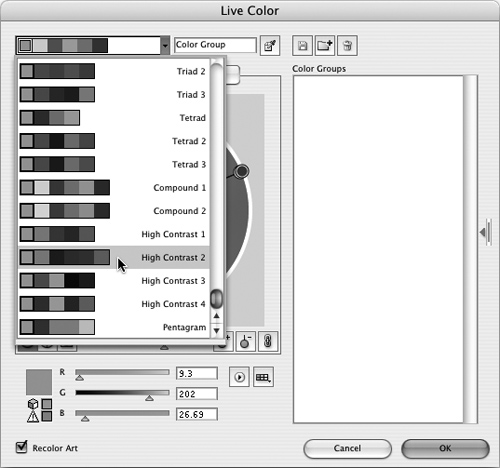
To use the Harmony Rule menu to adjust the colors in the color group, click the Color Group pop-up menu and choose a harmony rule (Figure 43d).
Figure 43d. Choosing a high-contrast harmony rule to generate a new color group.
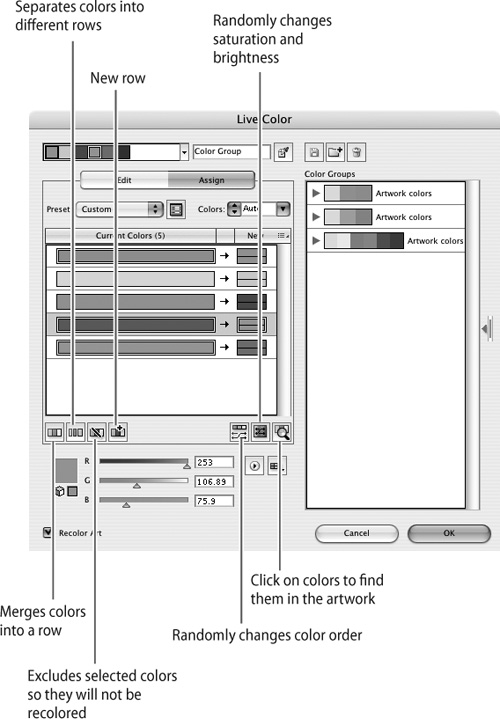
The Assign tab in the Live Color dialog provides more control over how colors are replaced in a document. One of the most useful features of the Assign tab is the ability to select one or a set of colors in your document and exclude them from recoloring. Do this by clicking a color from your document that displays in the list of Current Colors in the Assign tab, and then clicking the Excludes Selected Colors So They Will Not Be Recolored tool.
Tip
When you exclude a selected color from being recolored, you can see the results directly on the artboard—objects with the selected color revert to their original color. The display in the Live Color dialog may be a bit disorienting; the selected color is “whited out” in the Current Colors list and added as a color bar at the end of the color list.
The Assign tab also has tools that control how colors are grouped and displayed. To use these tools, click to select a color (Shift+click to select multiple colors), and then use one of the tools to organize, group, ungroup, or exclude colors from change (Figure 43e).
Figure 43e. Tools for displaying and excluding colors from change.
#44. Grabbing Colors with the Eyedropper
With dozens of preset Swatches color panel libraries available, ranging from color schemes like Beach to functional sets like Web, you might well find that the set of colors needed for your project is already available.
Or, you might want to create your own set of swatches or customize the color swatches in the default set for your file. You can drag any color swatch from any swatch library into the default Swatches panel. You can also drag the currently focused color for either fills or strokes from the toolbox into the Swatches panel (Figure 44a).
Figure 44a. Dragging the current fill color into the Swatches panel.
To extract colors from a photo, place the photo in your file (see #56, “Placing and Editing Raster Images”). Then select the Eyedropper tool. With the Eyedropper tool, click on one of the colors you want to extract from the placed artwork (Figure 44b).
Figure 44b. Extracting color from placed artwork.
When you extract a color with the Eyedropper, that color is displayed in the Fill (or Stroke) focus area of the toolbox. Drag the extracted color from the toolbox into the Swatches panel to add it to the panel library.
#45. Defining Gradients
Gradients are created by blending two or more colors. The simplest gradient fills involve just two colors and transition from one color to another. Gradient fills can be linear (top to bottom or right to left) or radial (from the outside of an object to the inside).
A gradient fill that is selected from the Swatches panel (or another Swatch library) displays in the Fill focus swatch in the toolbox. Gradient fills are applied to paths just like same colors (or pattern fills) are. With a path selected (and the Fill focus selected in the toolbox), click on the gradient in the Swatches panel or in a Swatch library.
Illustrator comes with several preset gradient fills. To view them in the Swatches panel, click the Show Gradient Swatches icon at the bottom of the Swatches panel.
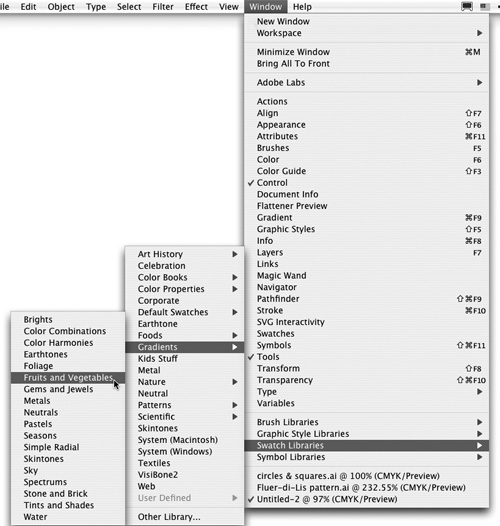
There are also many preset gradient libraries. To open them, choose Window > Swatch Libraries > Other Library. The Select a Library to Open dialog appears. Navigate to the Swatches folder and open any of the swatch library folders to see sets of swatches. Double-click on any of the libraries (they have AI filename extensions) to open them in your Illustrator document. Once opened, you can apply any of these swatches to selected objects (Figure 45a).
Figure 45a. Using the Fruits and Vegetables gradient library to fill in some fruits and vegetables.
If the dozens of preset gradient fills aren’t enough for you, you can mix up your own gradient fills. To define a linear fill, you define a fill angle that determines whether your fill transitions from top to bottom, from right to left, or something in between. This angle setting is inoperative with radial fills since the fill goes from inside an object to outside (or vice versa).
Follow these steps to define a linear two-color gradient fill:
- Open the Gradient panel by selecting Window > Gradient or by double-clicking the Gradient tool in the toolbox. Choose Show Options from the panel menu.
Tip
Expand the Gradient panel if necessary by clicking on the panel title bar.
- From the Type pop-up menu, choose Linear or Radial.
- To facilitate assigning colors to gradient stops, view the Color panel (Window > Color) and choose a color mode (like RGB) from the Color panel menu. Then click on the first (left) gradient stop and click on a color in the Color panel (Figure 45b).
Figure 45b. Assigning a color to a gradient stop.

- Click the next gradient stop and select a second color from the Color panel. The fill is previewed in the bar that runs between the two gradient sliders.
- Continue to add new colors to existing gradient stops. To create new stops, hold down the Option (Mac) or Alt (Windows) key and drag one stop along to the right or left to copy it. To delete a gradient stop, drag it out of the Gradient panel.
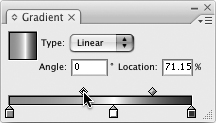
- After you create gradient stops and apply colors to them, you can adjust the gradient fill by changing the location of the diamond-shaped midpoints between each color stop (Figure 45c).
Figure 45c. Adjusting the location diamond between two gradient fill color stops.
- For linear gradients, rotate the fill by changing the angle setting. You won’t see the effect of changing the rotation of a fill until you apply it.
Your defined gradient fill appears in the Fill focus swatch in the toolbox. Drag the gradient into your Swatches panel to save it for future use in your illustration.
You can apply a gradient by selecting a path, and then clicking on the gradient in the Swatches panel. For even more control, select an object, and then click the Gradient tool in the toolbox. Click and drag over the selected object to apply the fill interactively (Figure 45d).
Figure 45d. Applying a gradient fill to a selected path using the Gradient tool.
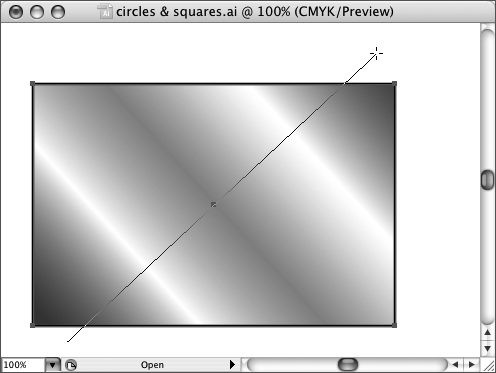
#46. Formatting Strokes
Illustrator paths can be filled with colors, gradients, patterns, and more. But strokes, as well, can be dressed up. The Stroke panel defines stroke weight (thickness) and style, along with how lines end and how they join (connect) other lines.
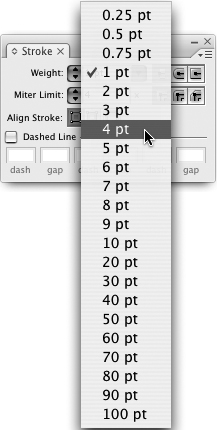
Choose Window > Stroke to view the Stroke panel. View all stroke formatting options by choosing Show Options from the Stroke panel menu. To define the weight of a selected line, choose a value from the Weight pop-up menu (Figure 46a).
Figure 46a. Assigning a stroke weight of four points.
Cap and Join styles can be applied to selected paths (or set as defaults if no path is selected). Cap and Join styles are selected from the set of six icons in the Stroke panel (Figure 46b).
Figure 46b. Cap and Join styles are defined in the Stroke panel.
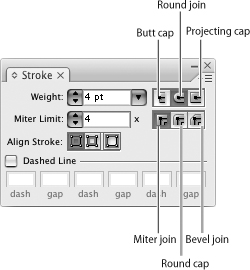
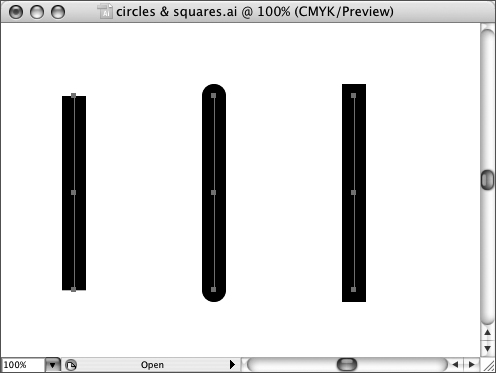
Cap styles define how path segments end. Butt style caps end at an anchor point, round style caps have a rounded end, and projecting caps stick out past the anchor point (Figure 46c).
Figure 46c. Butt (left), round (center), and projecting stroke caps.
Miter joins create sharp corners. Round joins create smooth corners, and bevel joins cut off corners at 45-degree angles (Figure 46d).
Figure 46d. Miter (left), round (center), and bevel stroke joins.
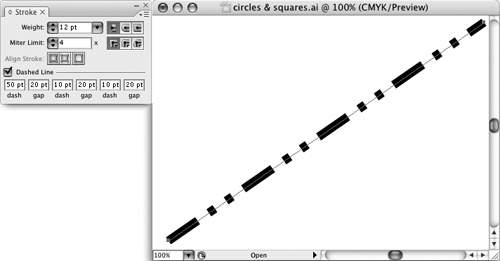
To assign basic dashed lines to selected line segments, click the Dashed Line check box in the Strokes panel. To define custom dashed lines, use the gap area(s) to define spacing between dashes. The Dash boxes allow you to define a dash of a set length (like “12 pt” for a 12 point dash). The gap areas can be defined in length as well (Figure 46e).
Figure 46e. Defining a custom dashed line to use as a freeway lane illustration.
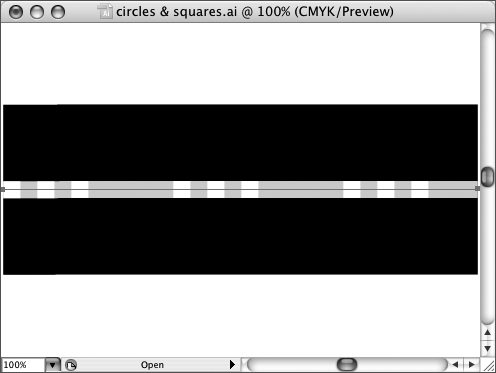
#47. Stacking Strokes in the Appearance Panel
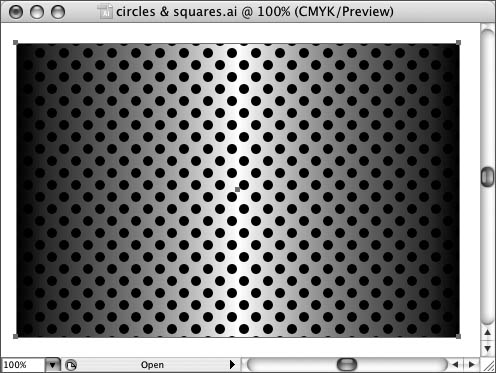
A powerful, and underrated, feature of Illustrator CS3 is the ability to stack multiple strokes onto a single path in the Appearance panel. Envision a thick ribbon of highway split by a solid yellow line with reflector bumps along the way. All those attributes can be assigned to a single stroke using the Appearance panel (Figure 47a).
Figure 47a. Three stacked stroke attributes combine to create this ribbon of highway.
To create a set of stacked strokes in the Appearance panel, follow these steps:
- Select a path to which the strokes will be applied.
- View the Appearance panel (Window > Appearance).
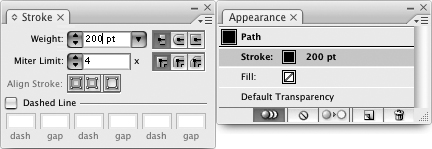
- Select the Stroke row in the Appearance panel. Use the Strokes panel to define the weight and other attributes that will apply to this stroke (Figure 47b).
Figure 47b. Defining stroke weight.
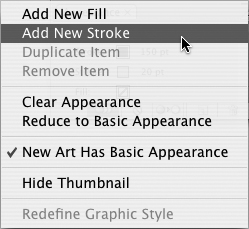
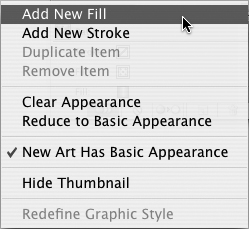
- From the Appearance panel menu, choose Add New Stroke (Figure 47c). Define stroke attributes for this stroke in the Stroke panel as well.
Figure 47c. Adding a second stroke to a path.
- Define additional strokes the same way.
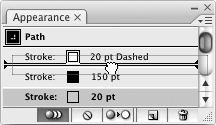
- Click and drag in the Appearance panel to change the stacking order of the strokes (Figure 47d).
Figure 47d. Changing stacking order of strokes applied to a single path.
#48. Stacking Fills in the Appearance Panel
You can stack fills in the Appearance panel in a way very similar to stacking strokes (see #47, “Stacking Strokes in the Appearance Panel”). For example, you can create a pattern fill and stack it on top of a solid color (or gradient) fill, and apply both fills to the same path (Figure 48a).
Figure 48a. A pattern fill on top of a gradient.
To create a set of stacked fills in the Appearance panel, follow these steps:
- Select a path to which the fills will be applied.
- View the Appearance panel (Window > Appearance).
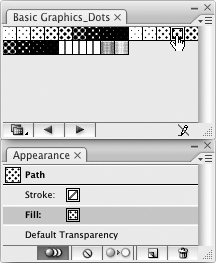
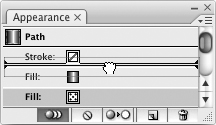
- Select the Fill row in the Appearance panel. Choose a fill for this path from a Swatch panel. A pattern fill that was created with a bounding box with no fill will work well (Figure 48b).
Figure 48b. Assigning a pattern fill to a path.
- From the Appearance panel menu, choose Add New Fill (Figure 48c). Select this second path in the Appearance panel and apply a fill from a Swatch panel or the Color panel. A solid color fill or a gradient will work well as an underlying fill.
Figure 48c. Adding a second fill to a path in the Appearance panel.
- Define additional fills the same way if you wish.
- Click and drag in the Appearance panel to change the stacking order of the fills (Figure 48d).
Figure 48d. Changing stacking order of fills applied to a single path.
#49. Creating and Merging Live Paint Groups
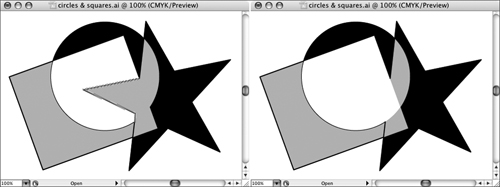
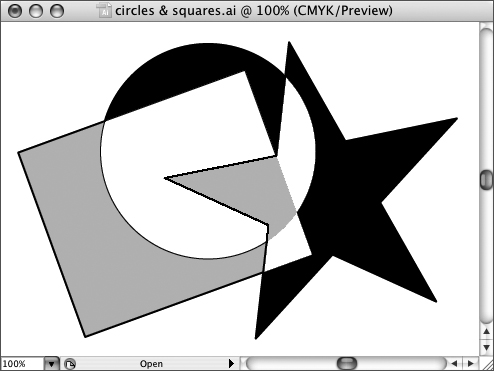
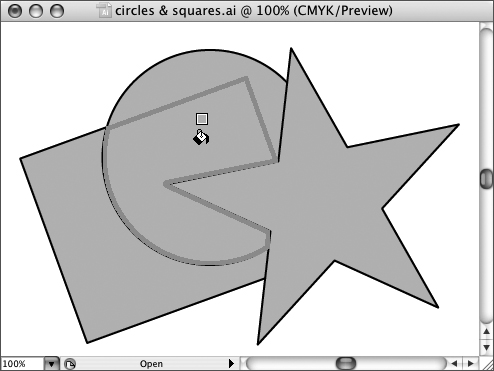
In the world of Live Paint, every intersecting path forms an editable path, and the regions formed by these paths can be filled individually (Figure 49a).
Figure 49a. Coloring applied to a Live Paint region.
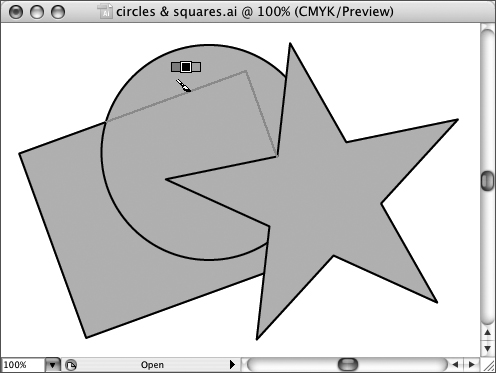
Before you can edit Live Paint edges or fill in Live Paint faces, you need to convert existing paths to Live Paint groups. Here’s how:
- Use any selection tool (you’ll likely want to draw a marquee with the Selection tool) to select all the paths you want to convert to a Live Paint group.
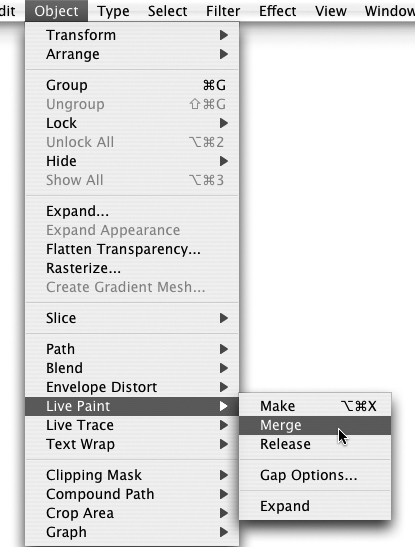
- Choose Object > Live Paint > Make.
To convert back to normal Illustrator paths, choose Object > Live Paint > Expand.
You can merge selected Live Paint groups by choosing Object > Live Paint > Merge individually (Figure 49b).
Figure 49b. Merging two Live Paint regions.
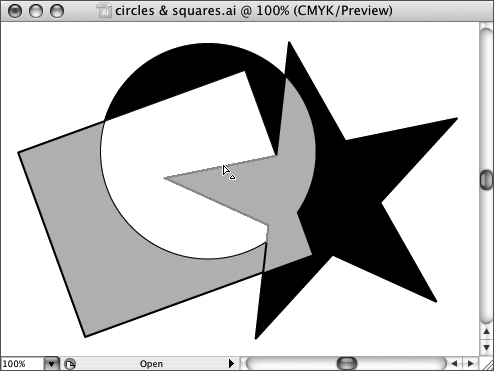
#50. Applying Color to Live Paint Faces and Edges
In a Live Paint group, every intersecting line creates a discrete edge (a separate line). That edge can be edited (see #51, “Editing Live Paint Edges”). Edges and faces can be painted with the Live Paint Bucket tool, which takes on different appearances when applied to an edge or a face (Figure 50a).
Figure 50a. Painting Live Paint group faces.

Just as with normal Illustrator paths, the colors you apply are defined in the toolbox. For Live Paint groups, the Stroke swatch in the toolbox becomes the Edge swatch, and the Fill swatch defines the face color.
To apply edge and face attributes to all objects in a Live Paint group, follow these steps:
- Click on the Stroke swatch in the toolbox and define edge attributes (including color, width, and so on).
- Click on the Fill swatch in the toolbox and define face attributes for all objects in the Live Paint group (color or pattern fills).
To apply edge and faced attributes to selected faces in a Live Paint group, follow these steps:
- Select the Live Paint Bucket tool. As you hover over a Live Paint group, that face is highlighted (Figure 50b).
Figure 50b. Selecting a Live Paint group face.
- Click to apply the defined fill attributes to the selected face.
- Before you apply edge color, double-click the Live Paint Bucket tool to open the Live Paint Bucket Options dialog. Select the Paint Strokes check box if it is not selected to enable formatting for strokes. Then click OK.
- As you hover over a selected edge in a Live Paint group, the Live Paint Bucket tool icon changes to a brush. Click to apply defined stroke attributes to the selected edge (Figure 50c).
Figure 50c. Selecting a Live Paint group edge.
#51. Editing Live Paint Edges
If you want to select (and edit) paths in a Live Paint group, you can use tools like the Direct Selection tool, the Pencil tool (see #18, “Drawing with the Pencil Tool”), or the Pen tool (see #19, “Drawing with the Pen Tool”). But you can also select edges with the Live Paint Selection tool.
The difference is that the Live Paint Selection tool treats every line segment formed by intersecting lines as a separate line that can be selected, moved, or deleted.
This can come in handy, for instance, if you’re editing scanned artwork and need to be able to easily select line segments. Or, if you simply find it more intuitive and rational to think of every line segment as a distinct line (Figure 51a).
Figure 51a. Selecting a Live Paint group edge with the Live Paint Selection tool.
If you plan on doing much edge editing in Live Paint groups, you might find it handy to configure the Live Paint Selection tool to select only strokes (edges). To choose that option, double-click the Live Paint Selection tool to open the Live Paint Selection Options dialog. Deselect the Select Fills check box, leaving only the Select Strokes check box selected.
When you delete a stroke (edge) between two Live Paint faces, the paint flows into newly expanded faces (Figure 51b).
Figure 51b. Before (left) and after (right) deleting a Live Paint edge between two differently colored faces.