
Chapter 13. Advanced VBA Techniques
IN THIS CHAPTER
- Why This Chapter Is Important
- What Are User-Defined Types, and Why Would You Use Them?
- Working with Constants
- Working with Arrays
- Understanding Advanced Function Techniques
- Working with
EmptyandNull - Creating and Working with Custom Collections
- Handling Files with Low-Level File Handling
- Understanding and Effectively Using Compilation Options
- Importing and Exporting Code Modules
- Working with Project Properties
- Practical Examples: Putting Advanced Techniques to Use
Why This Chapter Is Important
The Visual Basic for Applications (VBA) language is extremely rich and comprehensive. I cover VBA throughout this book as it applies to different topics, but this chapter focuses on some advanced application development techniques. These topics include user-defined types, arrays, advanced function techniques, and VBA compilation options. Mastering these topics will help to ensure your success as a VBA programmer.
What Are User-Defined Types, and Why Would You Use Them?
A user-defined type, known as a struct or record, allows you to create a variable containing several pieces of information. You will often use user-defined types to hold information from one or more records in memory. You can also use them to hold related information that you would otherwise store in several unrelated variables. Because you can instruct each element of a user-defined type to hold a particular type of data, you can define each element in the type to correspond to the type of data stored in a specific field of a table. A user-defined type might look like this:
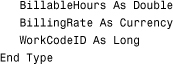
This user-defined type stores time-card information for an employee. Notice that the code explicitly declares the type of data stored in each element. The code declares the element containing the string WorkDescription with a length of 255. User-defined types make code cleaner by storing related data as a unit. A user-defined type exists only in memory and is, therefore, temporary. It’s excellent for information that needs to be temporarily tracked at runtime. Because it’s in memory, it can be quickly and efficiently read from and written to.
Note
The code snippets shown in the previous example are located in the basDataHandling module on the sample code website that accompanies this book. They are in the database called CHAP13EX.ACCDB.
Declaring a User-Defined Type
You declare a user-defined type by using a Type statement that must be placed in the module’s Declarations section. You can declare types as Public or Private within a standard module. You can use types in Form and Report modules, but you cannot declare them there.
Creating a Type Variable
A Type variable is an instance of the type in memory; you must declare it before you can use the type. To declare a Type variable, create a Local, Private, Module-Level, or Public variable based on the type. Depending on where you place this declaration and how you declare it (using keywords Dim, Private, or Public), you determine its scope. The same rules for any other kind of variable apply to Type variables. The Dim statement in the code that follows creates a variable called mtypTimeCardData. If you place this Dim statement in the module’s General section, it’s visible to all routines in that module (notice the m, indicating that it is declared at the module level). If you place it in a subroutine or function, it’s local to that particular routine:
Dim mtypTimeCardData As TimeCardInfo
Note
For more information on the scoping and visibility of variables, see Chapter 8, “VBA: An Introduction.”
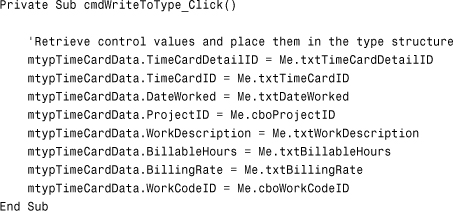
Storing Information from a Record in a Form into a Type Variable
After you have declared a Type variable, you can store data in each of its elements. The following code in the frmTimeCardHours form stores information from the form into a Type variable called mtypTimeCardData. The code declares the Type variable as a Private variable in the General Declarations section of the form. The code declares the Type structure in basDataHandling:
Note
You can find the code for this chapter in the CHAP13EX.ACCDB database on the book’s sample code website.
The advantage of this code is that, rather than creating eight variables to store these eight pieces of related information, it creates one variable with eight elements. This method keeps things nice and neat.
Retrieving Information from the Elements of a Type Variable
To retrieve information from your Type variable, simply refer to its name, followed by a period, and then the name of the element. The following code displays a message box containing all the time card hour information:
Note
In Chapter 17, “Error Handling: Preparing for the Inevitable,” an exercise shows a user-defined type used to hold pertinent error information. The example replaces the user-defined type with properties of a custom error class. Although user-defined types are still useful and are, in fact, necessary for many Windows API function calls, custom class modules have replaced much of their functionality.
Working with Constants
A constant is a meaningful name given to a number or string. You can use constants only for values that don’t change at runtime. A tax rate or commission rate, for example, might be constant throughout your application. There are three types of constants in Access:
- Symbolic
- Intrinsic
- System-defined
Symbolic constants, created by using the Const keyword, improve the readability of your code and make code maintenance easier. Instead of referring to the number .0875 every time you want to refer to the tax rate, for instance, you can refer to the constant MTAXRATE (M indicating that it is a module-level constant). If the tax rate changes and you need to modify the value in your code, you’ll make the change in only one place. Furthermore, unlike the number .0875, the name MTAXRATE is self-documenting.
Intrinsic constants are built into Microsoft Access; they are part of the language itself. As an Access programmer, you can use constants supplied by Microsoft Access, Visual Basic, and ActiveX Data Objects (ADO). You can also use constants provided by any object libraries you’re using in your application.
Only three system-defined constants are available to all applications on your computer: True, False, and Null.
Defining Your Own Constants
As mentioned previously, you declare a symbolic constant by using the Const keyword. You can declare a constant in a subroutine or function, or in the General section of a Form, Report, or Class module. You can strong-type constants, meaning that you can declare them with a data type. There are several naming conventions for constants. One of them is to use a suitable scoping prefix, the letter c to indicate that you’re working with a constant rather than a variable, and then the appropriate tag for the data type. The declaration and use of a Private constant in the previous tax-rate example would look like this:
Private Const mccurTaxRate As Currency = .0877
I prefer using a scoping prefix and typing the name of the constant in all uppercase. Following this convention, the example given previously is changed to appear as follows:
Private Const MTAXRATE as Currency = .0877
This code, when placed in a module’s Declarations section, creates a Private constant called MTAXRATE and sets it equal to .0875. Here’s how the constant is used in code:
![]()
This routine multiplies the curSaleAmount, received as a parameter, by the constant MTAXRATE. It returns the result of the calculation by setting the function name equal to the product of the two values. The advantage of the constant in this example is that the code is more readable than TotalAmount = curSaleAmount * .0877 would be.
Scoping Symbolic Constants
Just as regular variables have scope, user-defined constants have scope. In the preceding example, you created a Private constant. The following statement, when placed in a module’s Declarations section, creates a Public constant:
Public Const GTAXRATE As Currency = 0.0877
Because this constant is declared as Public, it can be accessed from any subroutine or function (including event routines) in your entire application. To better understand the benefits of a Public constant, suppose that you have many functions and subroutines, all referencing the constant GTAXRATE. Imagine what would happen if the tax rate were to change. If you hadn’t used a constant, you would need to search your entire application, replacing the old tax rate with the new tax rate. However, because you declared your Public constant in one place, you can easily go in and modify the one line of code where you declared this constant.
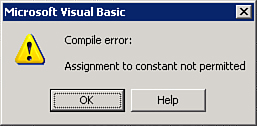
By definition, you cannot modify the values of constants at runtime. If you try to modify the value of a constant, you get this VBA compiler error:
Compile error: Assignment to constant not permitted
Figure 13.1 illustrates this message box. You can see that an attempt was made to modify the value of the constant called GTAXRATE, which resulted in a compile error.
Figure 13.1. An error message resulting from trying to modify the value of a constant.
If you must change the value at runtime, you should consider storing the value in a table rather than declaring it as a constant. You can read the value into a variable when the application loads and then modify the variable if needed. If you choose, you can write the new value back to the table.
Working with Intrinsic Constants
Microsoft Access declares a number of intrinsic constants that you can use in Code, Form, and Report modules. Because they’re reserved by Microsoft Access, you can’t modify their values or reuse their names; however, you can use them at any time without declaring them.
You should use intrinsic constants whenever possible in your code. Besides making your code more readable, they make your code more portable to future releases of Microsoft Access. Microsoft might change the value associated with a constant, but it isn’t likely to change the constant’s name. All intrinsic constants appear in the Object Browser; to activate it, simply click the Object Browser tool on the Visual Basic toolbar while in the Visual Basic Editor (VBE). To view the constants that are part of the VBA language, select VBA from the Object Browser’s Project/Library drop-down list. Click Constants in the Classes list box, and a list of those constants is displayed in the Members of ‘Constants’ list box (see Figure 13.2).
Figure 13.2. Using the Object Browser to view intrinsic constants.
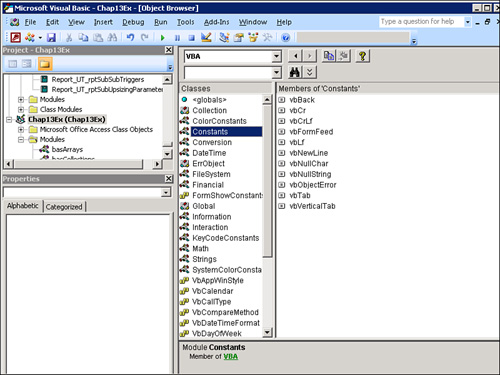
All VBA constants are prefixed with vb; all ActiveX Data Object constants, with ad; all Data Access Object (DAO) constants, with db; and all constants that are part of the Access language, with ac. In Figure 13.2, all the constant names begin with vb. To view the Access language constants, select Access from the Project/Library drop-down list and Constants from the Classes list box. To view the ActiveX Data Object constants, select ADODB from the Project/Library drop-down list. The constants are categorized by their function into various classes (for example, LockTypeEnum and ExecuteOptionEnum). Select the appropriate class from the Classes list box, and its members appear in the Members Of list box.
Another way to view constants is within the context of the parameter you’re working with in the Code window. Right-click after the name of a parameter and select List Constants to display the constants associated with the parameter. This feature is covered in detail in Chapter 8 in the section titled “VBA: An Introduction.”
Working with Arrays
An array is a series of variables referred to by the same name. You differentiate each element of the array by using a unique index number, but all the elements must be of the same data type. Arrays help make coding more efficient. It’s easy to loop through each element of an array, performing some process on each element. Arrays have a lower bound, which is zero by default, and an upper bound, and array elements must be contiguous.
The scope of an array can be Public, Module, or Local. As with other variables, the scope depends on where the array is declared and whether the Public, Private, or Dim keyword is used.
Declaring and Working with Fixed Arrays
When declaring a fixed array, you give VBA the upper bound and the type of data that it will contain. The following code creates an array that holds six string variables:
Dim astrNames(5) As String
Fixed means that you cannot alter this array’s size at runtime. The following code gives an example of how you can loop through the array:
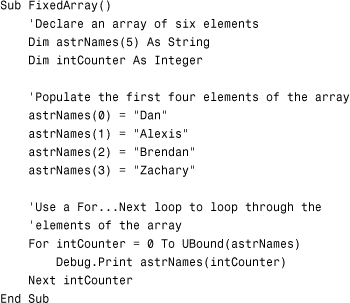
This code starts by storing values into the first four elements of a six-element array. It then loops through each element of the array, printing the contents. Notice that the For...Next loop starts at zero and goes until the upper bound of the array, which is (5). Because the array is made up of strings, the last two elements of the array contain zero-length strings. If the array were composed of integers, the last two elements would contain zeros.
Another way to traverse the array is to use the For Each...Next construct. Your code would look like this:
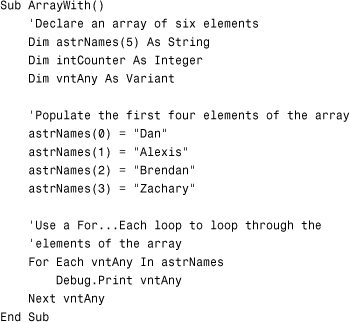
This code declares a Variant variable called vntAny. Instead of using a loop with Ubound as the upper delimiter to traverse the array, the example uses the For Each...Next construct.
Note
Many people do not like the fact that, by default, the elements of an array are zero-based. Fortunately, the VBA language allows you to declare both the lower bound and the upper bound of any array. The syntax looks like this:
Dir astrNames(1 to 6)
Declaring and Working with Dynamic Arrays
Often, you don’t know how many elements your array needs to contain. In this case, you should consider declaring a dynamic array, which you can resize at runtime. Using this type of array can make your code more efficient because VBA preallocates memory for all elements of a fixed array, regardless of whether you store data in each of the elements. However, if you aren’t sure how many elements your array will contain, preallocating a huge amount of memory can be quite inefficient.
To create a dynamic array, you declare it without assigning an upper bound. You do this by omitting the number between the parentheses when declaring the array, as shown in this example:
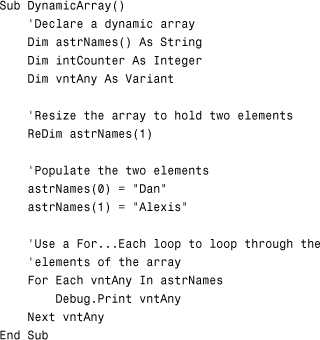
However, there’s a potential problem when you try to resize the array:
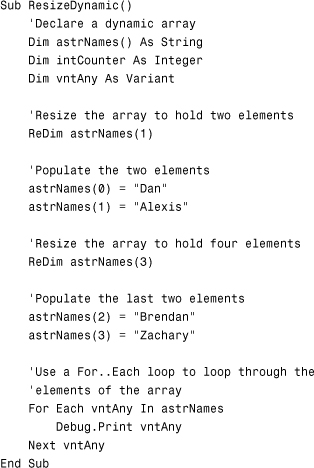
You might expect that all four elements will contain data. Instead, the ReDim statement reinitializes all the elements, and only elements 2 and 3 contain values. You can avoid this problem by using the Preserve keyword. The following code behaves quite differently:
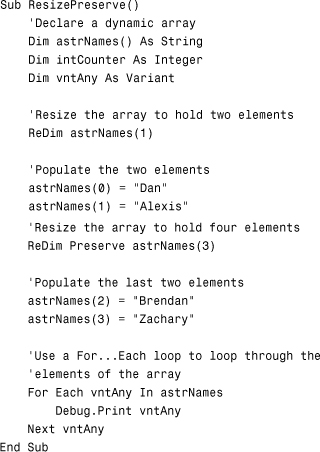
In this example, all values already stored in the array are preserved. The Preserve keyword brings its own difficulties, though. It can temporarily require huge volumes of memory because, during the ReDim process, VBA creates a copy of the original array. All the values from the original array are copied to a new array. The original array is removed from memory when the process is complete. The Preserve keyword can cause problems if you’re dealing with very large arrays in a limited memory situation.
Tip
Each type of array complements the other’s drawbacks. As a VBA developer, you have the flexibility of choosing the right type of array for each situation. Fixed arrays are the way to go when the number of elements doesn’t vary widely. Dynamic arrays should be used when the number varies widely, and you’re sure you have enough memory to resize even the largest possible arrays.
Passing Arrays as Parameters
Many people are unaware that you can pass an array as a parameter to a function or subroutine. The following code provides an example:
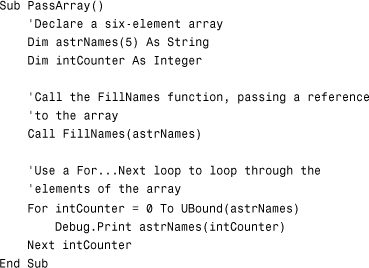
The code begins by declaring a fixed array called astrNames. The code calls the FillNames routine. It receives the array as a parameter and then populates all its elements. The PassArray routine is then able to loop through all the elements of the array that was passed, displaying information from each element. The FillNames routine looks like this:
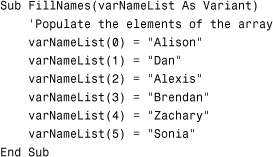
Notice that the routine receives the array as a variant variable. It then populates each element of the array.
Understanding Advanced Function Techniques
The advanced function techniques covered in the following sections allow you to get the most out of the procedures you build. First, you learn the difference between passing your parameters by reference and passing them by value, and see that the default method of passing parameters isn’t always the most prudent method.
Next, you learn how to work with optional parameters, which help you build flexibility into your functions. Whereas optional parameters allow you to omit parameters, named parameters help you to add readability to your code. Named parameters also shelter you from having to worry about the order in which the parameters must appear. After reading these sections, you will be able to build much more robust and easy-to-use functions.
Passing by Reference Versus Passing by Value
By default, parameters in Access are passed by reference. This means that a memory reference to the variable being passed is received by the function. This process is best illustrated by an example:
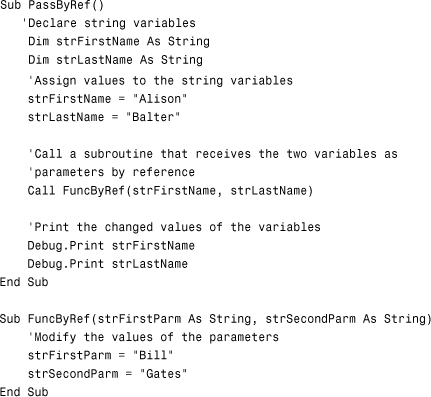
You might be surprised that the Debug.Print statements found in the subroutine PassByRef print "Bill" and "Gates". The reason is that strFirstParm is actually a reference to the same location in memory as strFirstName, and strSecondParm is a reference to the same location in memory as strLastName. This code violates the concepts of black-box processing, in which a variable can’t be changed by any routine other than the one it was declared in. The following code eliminates this problem:
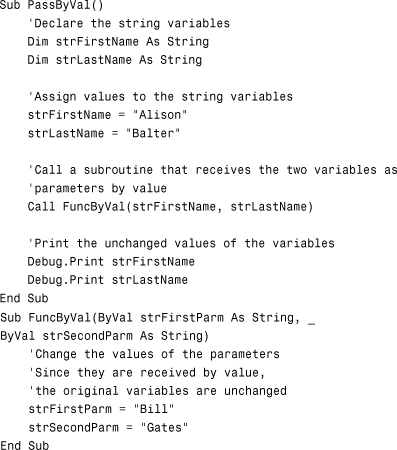
This FuncByVal subroutine receives the parameters by value. This means that the code passes only the values in strFirstName and strLastName to the FuncByVal routine. The strFirstName and strLastName variables, therefore, can’t be modified by the FuncByVal subroutine. The Debug.Print statements print "Alison" and "Balter".
The following example illustrates a great reason why you might want to pass a parameter by reference:
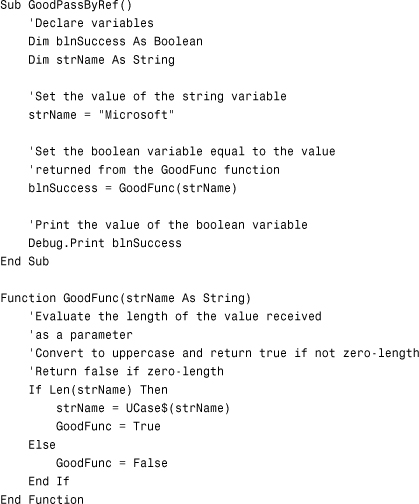
In essence, the GoodFunc function needs to return two values. Not only does the function need to return the uppercase version of the string passed to it, but it also needs to return a success code. Because a function can return only one value, you need to be able to modify the value of strName within the function. As long as you’re aware of what you’re doing and why you’re doing it, there’s no problem with passing a parameter by reference.
Tip
I use a special technique to help readers of my code see whether I’m passing parameters by reference or by value. When passing parameters by reference, I refer to the parameters by the same name in both the calling routine and the actual procedure that I’m calling. On the other hand, when passing parameters by value, I refer to the parameters by different names in the calling routine and in the procedure that’s being called.
After reading this section, you might ask yourself whether it is better to pass parameters by reference or by value. Although in terms of black-box processing it is better to pass by value, code that involves parameters passed by reference actually executes more quickly than those passed by value. As long as you and the programmers that you work with are aware of the potential problems with passing parameters by reference, in general, in VBA, I feel that it is better to pass parameters by reference.
Optional Parameters: Building Flexibility into Functions
The VBA language allows you to use optional parameters. In other words, you don’t need to know how many parameters will be passed. The ReturnInit function in the following code receives the last two parameters as optional; it then evaluates whether the parameters are missing and responds accordingly:
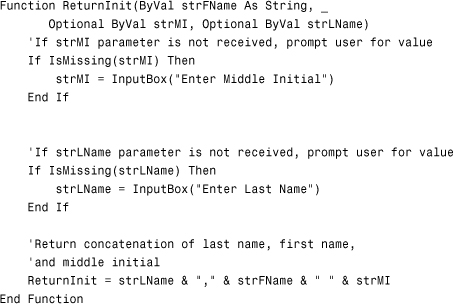
This function could be called as follows:
strName = ReturnInit("Bill",,"Gates")
As you can see, the second parameter is missing. Instead of causing a compiler error, this code compiles and runs successfully. The IsMissing function, built into Access, determines whether a parameter has been passed. After identifying missing parameters, you must decide how to handle the situation in code. In the example, the function prompts for the missing information, but here are some other possible choices:
- Insert default values when parameters are missing.
- Accommodate for the missing parameters in your code.
Listing 13.1 and Listing 13.2 illustrate how to carry out these two alternatives.
Listing 13.1. Inserting Default Values When Parameters Are Missing
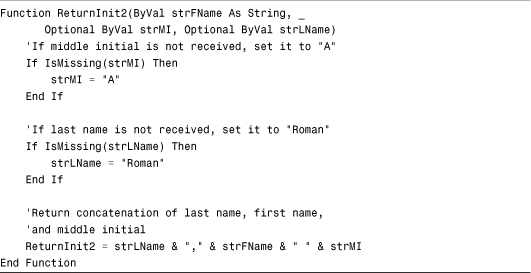
This example uses a default value of "A" for the middle initial and a default last name of "Roman". Now look at Listing 13.2, which illustrates another method of handling missing parameters.
Listing 13.2. Accommodating for Missing Parameters in Your Code
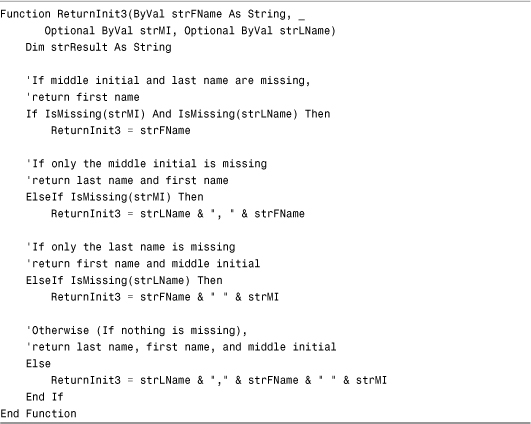
This example manipulates the return value, depending on which parameters it receives. If neither optional parameter is passed, just the first name displays. If the first name and middle initial are passed, the return value contains the first name followed by the middle initial. If the first name and last name are passed, the return value contains the last name, a comma, and the first name. If all three parameters are passed, the function returns the last name, a comma, a space, and the first name.
You can easily modify the declaration of the ReturnInit3 function shown in Listing 13.2 to provide default values for each optional parameter. The following declaration illustrates this:
![]()
ReturnInit4 has three optional parameters. The declaration assigns a default value to each parameter. The function uses the default value if the calling routine does not supply the parameter.
Note
The IsMissing function works only with parameters that have a data type of Variant. The reason is that the IsMissing function returns True only if the value of the parameter is empty. If the parameter is numeric (for example, an integer), you will need to test for zero. If the parameter is a string, you will need to test for a zero-length string ("") or against the VBA constant vbNullString.
Named Parameters: Eliminate the Need to Count Commas
In all the examples you’ve seen so far, the parameters of a procedure have been supplied positionally. Named parameters allow you to supply parameters without regard for their position, which is particularly useful in procedures that receive optional parameters. Take a look at this example:
strName = ReturnInit3("Bill",,"Gates")
Because the second parameter isn’t supplied, and the parameters are passed positionally, a comma must be used as a placemarker for the optional parameter. This requirement can become unwieldy when you’re dealing with several optional parameters. The following example greatly simplifies the process of passing the parameters and also better documents what’s happening:
strName = ReturnInit3(strFName:= "Bill",strLName:= "Gates")
As shown in the following example, when you pass parameters by name, the order that the parameters appear doesn’t even matter:
strName = ReturnInit3(strLName:= "Gates",strFName:="Bill")
This call to the ReturnInit3 function yields the same results as the call to the function in the previous example.
Note
When you use named parameters, each parameter name must be exactly the same as the name of the parameter in the function being called. Besides requiring intimate knowledge of the function being called, this method of specifying parameters has one important disadvantage: If the author of the function modifies a parameter’s name, all routines that use the named parameter will fail when calling the function.
Recursive Procedures
A recursive procedure is one that calls itself. If a procedure calls itself over and over again, it will eventually render an error because it runs out of stack space. Here’s an example:

There are practical reasons why you might want to call a function recursively. Here’s an example:
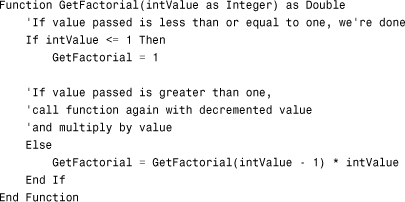
The code receives an input parameter (for example, 5). The value is evaluated to see whether it is less than or equal to 1. If it is, the function is exited. If the value is greater than 1, the function is called again but is passed the previous input parameter minus 1 (for example, 4). The return value from the function is multiplied by the original parameter value (for example, 4*5). The function calls itself over and over again until the value that it passes to itself is 2 minus 1 (1), and the function is exited. In the example where 5 is passed to the function, it multiplies 5*4*3*2*1, resulting in 120, the factorial of 5.
Using Parameter Arrays
Using a parameter array, you can easily pass a variable number of arguments to a procedure. Here’s an example:
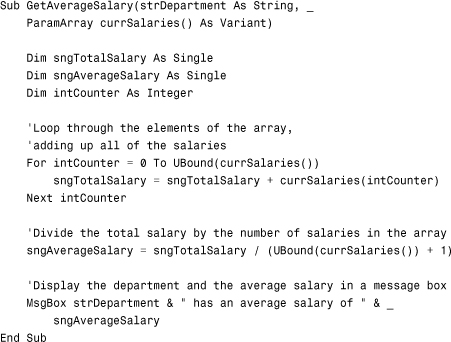
The routine is called like this:
Call GetAverageSalary("Accounting", 60000, 20000, 30000, 25000, 80000)
The beauty of the ParamArray keyword is that you can pass a variable number of parameters to the procedure. In the example, a department name and a variable number of salaries are passed to the GetAverageSalary procedure. The procedure loops through all the salaries that it receives in the parameter array, adding them together. It then divides the total by the number of salaries contained in the array.
Working with Empty and Null
Empty and Null are values that can exist only for Variant variables. They’re different from one another and different from zero or a zero-length string. At times, you need to know whether the value stored in a variable is zero, a zero-length string, Empty, or Null. You can make this differentiation only with Variant variables.
Working with Empty
Variant variables are initialized to the value of Empty. Often, you need to know whether a value has been stored in a Variant variable. If a Variant has never been assigned a value, its value is Empty. As mentioned, the Empty value is not the same as zero, Null, or a zero-length string.
Your ability to test for Empty in a runtime environment is important. You can do this by using the IsEmpty function, which determines whether a variable has the Empty value. The following example tests a String variable for the Empty value:
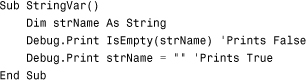
The Debug.Print statement prints False. This variable is equal to a zero-length string because the variable is initialized as a String variable. All String variables are initialized to a zero-length string. The next example tests a Variant variable to see whether it has the Empty value:
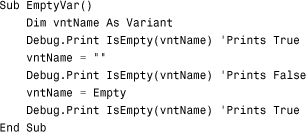
A Variant variable loses its Empty value when any value has been stored in it, including zero, Null, or a zero-length string. It can become Empty again only by storing the keyword Empty in the variable.
Working with Null
Null is a special value that indicates unknown or missing data. Null is not the same as Empty; in addition, one Null value is not equal to another one. Variant variables can contain the special value called Null.
Often, you need to know whether specific fields or controls have never been initialized. Uninitialized fields and controls have a default value of Null. By testing for Null, you can make sure fields and controls contain values.
If you want to make sure that all fields and controls in your application have data, you need to test for Nulls. You can do this by using the IsNull function:
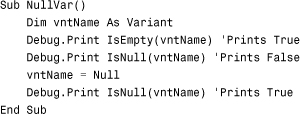
Notice that vntName is equal to Null only after you explicitly store the value of Null in it. It’s important to know not only how variables and Null values interact, but also how to test for Null within a field in your database. A field contains a Null if data hasn’t yet been entered in the field, and the field has no default value. In queries, you can test for the criteria "Is Null" to find all the records in which a particular field contains a Null value. When dealing with recordsets (covered in Chapter 15, “What Are ActiveX Data Objects, and Why Are They Important?”), you can also use the IsNull function to test for a Null value in a field. Here’s an example:
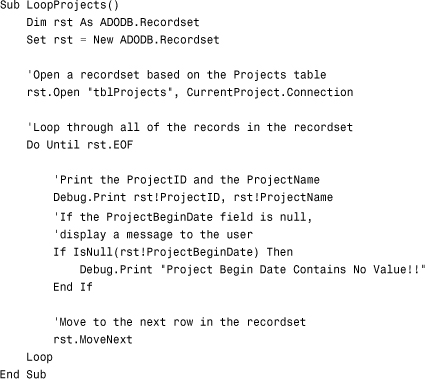
Alternatively, you could use the more compact Nz function to detect Nulls and print a special message:
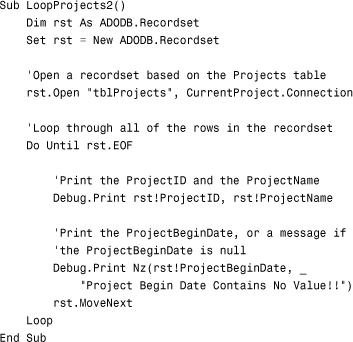
Chapter 15 covers all the concepts of recordset handling. For now, you need to understand only that this code loops through each record in tblProjects. It uses the IsNull function to evaluate whether the ProjectBeginDate field contains a Null value. If the field does contain a Null, the code prints a warning message to the Immediate window. Here is another example:
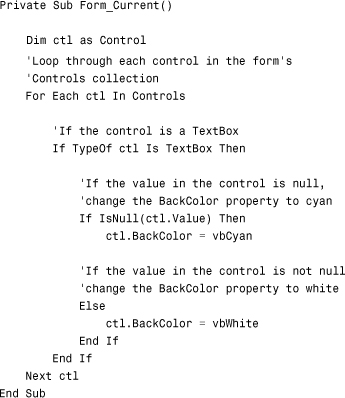
The code in this example (found in the frmProjects form in CHAP13EX.ACCDB) loops through every control on the current form. If the control is a text box, the routine checks to see whether the value in the text box is Null. If it is, the BackColor property of the text box is set to Cyan; otherwise, it’s set to White. If the control is not a text box, the code ignores it and moves to the next control.
You should know about some idiosyncrasies of Null:
- Expressions involving
Nullalways result inNull. (See the next example.) - A function that’s passed a
Nullusually returns aNull. Nullvalues propagate through built-in functions that return variants.
The following example shows how Null values are propagated:
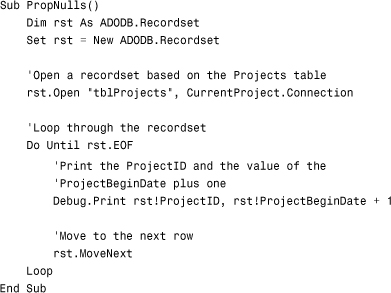
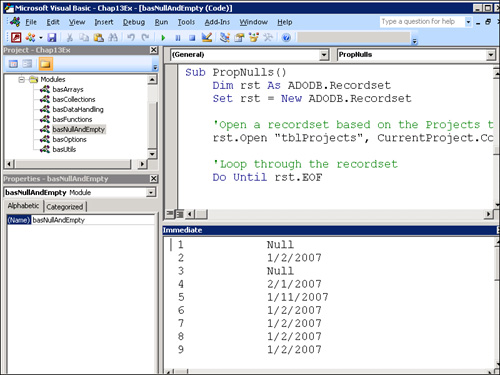
Figure 13.3 illustrates the effects of running this routine on a table in which the first and third records contain Null values. Notice that the result of the calculation is Null for those records because the Null propagated within those records.
Figure 13.3. The result of running the PropNulls routine.
Notice the difference from the previous example if the value in the field is Empty:
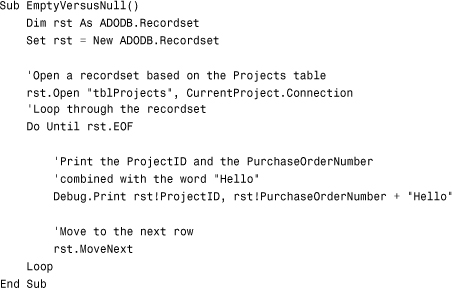
In this example, the tblProjects table has many records. The PurchaseOrderNumber for the first record contains a Null; for the third record, it contains an Empty. Notice the different effects of the two values, as shown in Figure 13.4.
Figure 13.4. The result of running the EmptyVersusNull routine shows the propagation of the Null value.
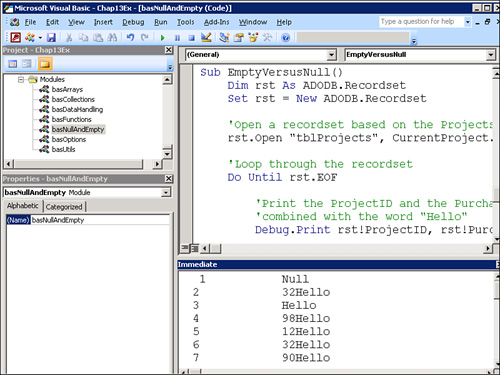
Looking at Figure 13.4, you can see that Null printed for the first record, and Hello printed for the third record.
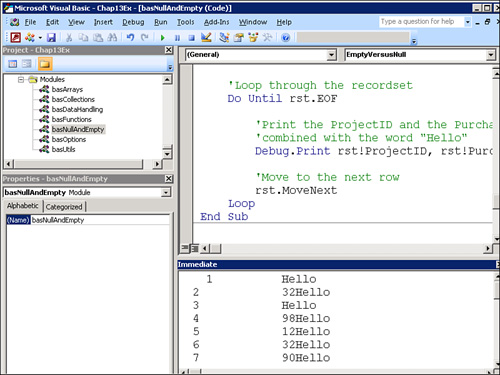
The EmptyVersusNull routine uses a numeric operator (+). As discussed, the effect of Null used in a calculation is a resulting Null. In text strings, you can use an ampersand (&) instead of a plus (+) to eliminate this problem. Figure 13.5 illustrates the same code with an ampersand to concatenate rather than add. You can see that no Null values result from the concatenation.
Figure 13.5. The result of changing plus (+) in the EmptyVersusNull routine to an ampersand (&).
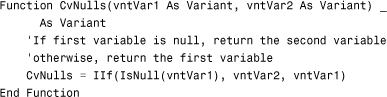
It’s common to create a generic routine that receives any value, tests to see whether it’s Null, and returns a non-Null value. An example is the CvNulls function:
You would call this routine as follows:
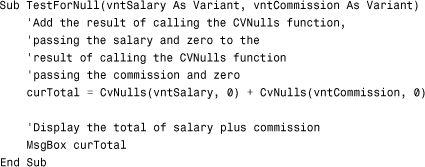
The TestForNull routine receives two parameters: salary and commission. It adds the two values to determine the total of salaries plus commissions. Ordinarily, if the value of either parameter is Null, the expression results in Null. The code eliminates the problem with the CvNulls function, which also receives two parameters. The first parameter is the variable being tested for Null; the second is the value you want the function to return if the first parameter is determined to be Null. The routine combines the Immediate If (IIf) function and the IsNull function to evaluate the first parameter and return the appropriate value.
Note
If you simply want to substitute a value for a Null, you can use the built-in function NZ instead of a user-defined function. The user-defined function offers more functionality, when necessary.
Creating and Working with Custom Collections
Earlier in this chapter, I discussed the problems associated with arrays. If you are unsure of the number of elements that the array will contain, fixed arrays can take up large amounts of memory unnecessarily. On the other hand, the resizing of dynamic arrays is rather inefficient. Finally, all the elements of an array must be contiguous, and the arbitrary identifier for the array element is meaningless. The answer—custom collections. Custom collections can contain values and objects. You can easily add items to, and remove items from, a collection. VBA identifies each element in the collection by a meaningful unique key.
In summary, custom collections are similar to arrays, but they offer several advantages:
- Collections are dynamically allocated. They take up memory based only on what’s in them at a given time. This is different from arrays, whose size you must either predefine or redimension at runtime. When you redimension an array, Access actually makes a copy of the array in memory, taking up substantial resources. By using custom collections, you can avoid this consumption of extra resources.
- A collection always knows how many elements it has, and you can easily add and remove elements.
- Each element of a collection can contain a different type of data.
- You can add elements into any element of a collection.
Note
You can find the code examples in this section in the basCollections module of the CHAP13EX.ACCDB database.
Creating a Custom Collection
You create a collection using a Collection object. After you declare the Collection object, you can add items to the collection. The code necessary to create a custom collection looks like this:
Dim colNames as Collection
Adding Items to a Custom Collection
You use the Add method of the Collection object to add items to a custom collection. The Add method receives a value or object reference as its first parameter and a unique key to that element of the collection as its second parameter. The Add method appears as follows:
colNames.Add "Alexis", "Alexis"
The code shown previously adds the name Alexis to a collection called colNames. The key to the item in the collection is the name Alexis. In the following code example, the collection colNames is first declared and instantiated. The code then adds several names to the custom collection colNames:
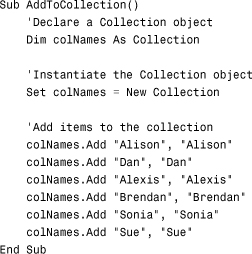
Caution
Unlike almost every other array or collection in VBA, custom collections are one-based rather than zero-based. This means that the element numbers begin with one rather than zero. This is a big change if you’re used to thinking of arrays and collections as always zero-based.
Accessing an Item in a Custom Collection
After you have added items to a collection, you use the Item method to access them via either their ordinal position or the key designated when you added them. Accessing an item in a collection using the ordinal position looks like this:
Debug.Print colNames.Item(1)
Because the Item method is the default method of the Collection object, you can shorten the code to this:
Debug.Print colNames(1)
I usually prefer to refer to an item in a collection using its unique key. The code appears as follows:
Debug.Print colNames("Alexis")
Removing Items from a Custom Collection
You use the Remove method of the Collection object to remove items from a collection. The syntax looks like this:
colNames.Remove 2
The preceding syntax would remove the second element of the collection. Using the key, you can change the code to this:
colNames.Remove "Sonia"
You can easily remove all the elements of a collection in two ways:
Set colNames = New Collection
or
Set colNames = Nothing
Iterating Through the Elements of a Custom Collection
You use the For...Each loop to iterate through the items in a collection. The code looks like this:
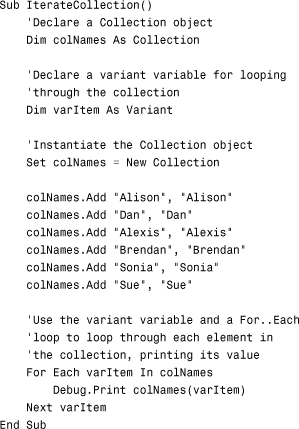
Notice that in addition to the declaration of the Collection variable, the code declares a Variant variable. The code uses the Variant variable in the For...Each loop to loop through each item in the collection. The Variant variable is the subscript within the For...Each loop for accessing a particular item within the collection.
Handling Files with Low-Level File Handling
On occasion, you need to write data to or read data from a text file. This is often referred to as low-level file handling. Three types of file access exist: sequential, random, and binary. This text covers only sequential access. You use sequential access to read and write to a text file, such as an error log. You use the Open keyword to open a text file. You use the Input # keyword to read data. Likewise, you use the Write # keyword to write data. Finally, you use the Close keyword to close the file. The subroutine LogErrorText provides a practical example of why you may need to use this technique. It writes error information to a text file. Here’s how it works:
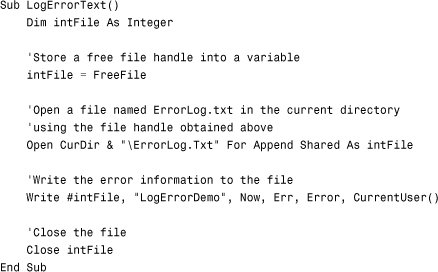
The code uses the FreeFile function to locate a free file handle. The Open keyword opens a file with the name ErrorLog.txt located in the current directory. The code opens the file in shared mode and for append, using the file handle returned by the FreeFile function. The code then uses the Write # keyword to write error information to the text file. Finally, the Close keyword closes the text file.
Note
This example is taken from Chapter 15. The sample code is located in the CHAP15EX.ACCDB database.
Understanding and Effectively Using Compilation Options
Microsoft Access gives you a few alternatives for compilation. Understanding them can help you to decide whether compilation speed or trapping compilation errors is more important to you.
Compile on Demand
By default, VBA compiles your code only when the code in the module changes or when a procedure in one module is called by another module. Although this default setting can dramatically speed the compilation process, it can leave you wondering whether you have a hidden time bomb lurking somewhere in your application.
Here’s a typical scenario: You open a form, make some simple changes, save the changes, and close the form. You repeat this process for a few additional forms. You also open a couple of modules to make some equally simple changes. During the testing process, you forget to test one or more of the forms and one or more of the modules. With the Compile On Demand option set to True (its default value), you won’t identify the errors until your users access the offending code!
To disable the Compile On Demand feature, choose Tools, Options from the VBE. Click the General tab and remove the check from Compile On Demand. You might notice some degradation in performance each time your code compiles, but this is time well spent.
Importing and Exporting Code Modules
The Access 2007 VBE allows you to import code or form modules into and export code modules from a database. To export a form or code module, take the following steps:
- Activate the VBE.
- Within the Project Explorer window, right-click the object you want to export.
- Select Export File. The Export File dialog box appears (see Figure 13.6).
Figure 13.6. The Export File dialog box allows you to export a VBA module.
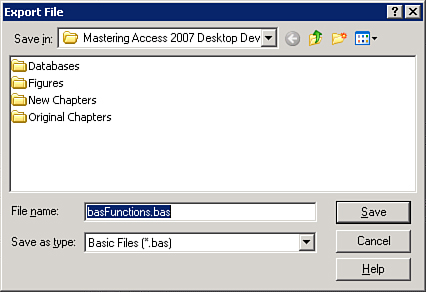
- Select a location and name for the exported file and then click Save.
When you export a module, it is exported as an ASCII text file. You can import the text file into another Microsoft Access database, into any other Microsoft Office product (for example, Microsoft Excel), or into a Visual Basic project.
Note
If you export a Form module from the VBE, Access exports only the Class module behind the form. It does not export any visual aspects of the form.
Just as you can export a text file, you can import a text file. Consequently, you can add an existing module or form to a project. Access copies the file and imports it into the database. It does not affect the original file. To import a file into your Access database, follow these steps:
- Activate the VBE.
- Within the Project Explorer window, right-click and select Import File. The Import File dialog box appears (see Figure 13.7).
Figure 13.7. The Import File dialog box allows you to import a text file into your database.
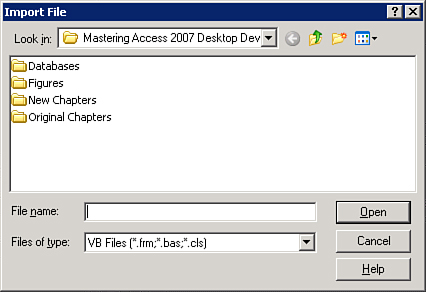
- Locate and select the file you want to import and then click Open.
Working with Project Properties
Every database project has user-definable properties. They include the following:
- The project name
- A description of the project
- The name of the help file associated with the project
- The help context ID associated with the project
- Conditional compilation arguments
- A password associated with the project
To view or modify project properties, follow these steps:
- Activate the VBE.
- Select Tools, <project name> Properties. The Project Properties dialog box appears (see Figure 13.8).
Figure 13.8. The Project Properties dialog box.
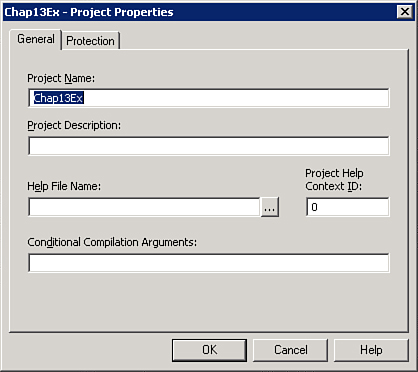
- Click the General tab, where you can designate or change any of the general project properties.
- Click the Protection tab, where you can specify a password for the VBA project.
- Click OK to close the dialog box, accepting the options you have set. You must close the database and reopen it for any security options to take effect.
The Protection option deserves special attention. If you click to select Lock Project for Viewing, the VBA project cannot be viewed or edited by someone who does not have the correct password. If you do not select Lock Project for Viewing, anyone can view the VBA project, but only someone with the correct password can change the project properties.
Practical Examples: Putting Advanced Techniques to Use
The examples in the following sections put into practice all that you have learned throughout this chapter. Concepts covered include the use of Null, intrinsic constants, and type structures.
Examples of Null, the DoCmd Object, and Intrinsic Constants
The following event routine illustrates how you could view all the projects associated with the selected client. It illustrates the importance of the ability to work with Null values and intrinsic constants:
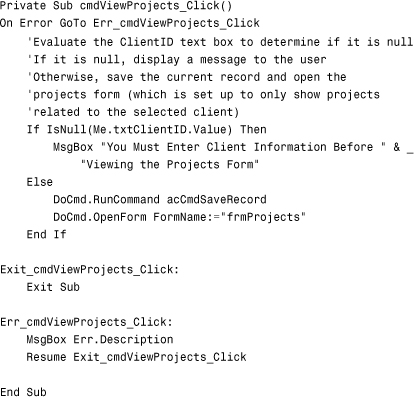
The routine first invokes error handling (discussed in Chapter 17) and then uses the IsNull function to test whether the user has entered a ClientID. The IsNull function returns True if the value in the txtClientID control is Null. If it is, the code displays an error message. If the txtClientID control contains a non-Null value, the code performs two methods on the DoCmd object.
The first method performed on the DoCmd object is the RunCommand method. This method receives the constant associated with the name of the menu command you want to execute. The use of intrinsic constants makes this code more readable, and the RunCommand method makes it much easier to call menu commands from code. The second method performed on the DoCmd object is OpenForm, which opens the frmProjects form. The code programmatically sets the RecordSource property of the frmProjects form to a query that displays only projects associated with the currently selected customer.
An Example of Using a Type Structure
If many parts of an application require the same information that is stored in a specific table, reading the data from this table each time the application needs it would be inefficient. A much more efficient approach would be to read this data once, when the application loads, and store it in a type structure. Because it remains in memory at all times, you can efficiently retrieve it whenever needed. The type structure is defined, and a Public Type variable based on the type structure is declared in a module’s Declarations section. It looks like this:

You must build a subroutine that is invoked when your startup form is first loaded. This routine populates all the elements of the type structure. The routine looks like this:
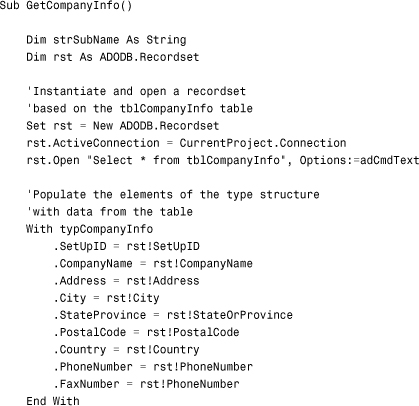
Don’t be concerned with the recordset handling included in this routine. Instead, notice that the code loads the value from each field in the first (and only) record of the tblCompanyInfo table into the elements of the Global Type variable. Here’s an example of how the code uses the Type variable:
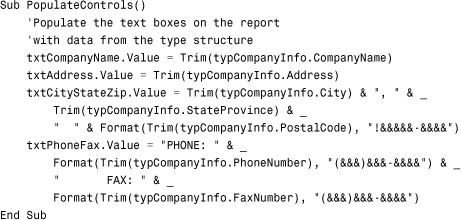
This routine populates four different controls on a form with the company information retrieved from the elements of the Global Type variable.
Summary
As an Access developer, you spend much of your time writing VBA code. Knowing the tricks and tips of the trade and understanding the more advanced aspects of the language will save you much time and help you streamline your application code.
This chapter showed you tricks and tips you can use to effectively navigate the VBA environment. It delved into more advanced aspects of the VBA language, such as user-defined types, constants, and arrays. You have seen the important difference between passing parameters by reference and passing them by value, and learned about other advanced function techniques, such as optional and named parameters. Other important topics covered in this chapter included collections, Empty versus Null, and compilation options. Understanding these valuable aspects of the VBA language will help you get the most out of the code you write.