For Arduino, we will use the language processing. Quoting from www.processing.org, Processing is a flexible software sketchbook and a language for learning how to code within the context of the visual arts.
Processing is an open source programming language and integrated development environment (IDE). Processing was originally built for designers and it was extensively used in electronics arts and visual design communities with the sole purpose of teaching the fundamentals of computer sciences in a visual context. This also served as the foundations of electronic sketchbooks.
From the previous example of gift wrapping, you noticed that before you need to bring in the paper and other stationery needed, you had to see the size of the problem at hand (the gift).
In computer language, the stationery needed to complete your task, is called Library. A library is a collection of reusable code that a programmer can reuse instead of writing everything again.
Now imagine if you had to cut a tree, make paper, then color the paper into the beautiful wrapping paper that you used, when I asked you to wrap the gift. How tiresome would it be? (If you are inventing a new type of paper, sure, go ahead chop some wood!)
So before writing a program, you make sure that you have called all the right libraries.
Please remember, that libraries are also made up of code! As your next activity, we will together learn more about how a library is created.
During the times before the two-way mobile communication, people used a one-way communication called the Morse code. The following image is the experimental setup of a Morse code. In 1836, Samuel Morse demonstrated the ability of a telegraph system to transmit information over wires. The information was sent as a series of electrical signals. Do not worry; we will not get into how you will perform it physically, but by this example, you will understand how your Arduino takes in instructions. We will show you the bigger picture first and then dissect it systematically so that you understand what a code contains.

The Morse code is made up of two components short and long signals. The signals could be electric form, like the way Samuel Morse did, or as a light pulse or sound. The following image shows how the Morse code looks like. A dot is a short signal and a dash is a long signal:
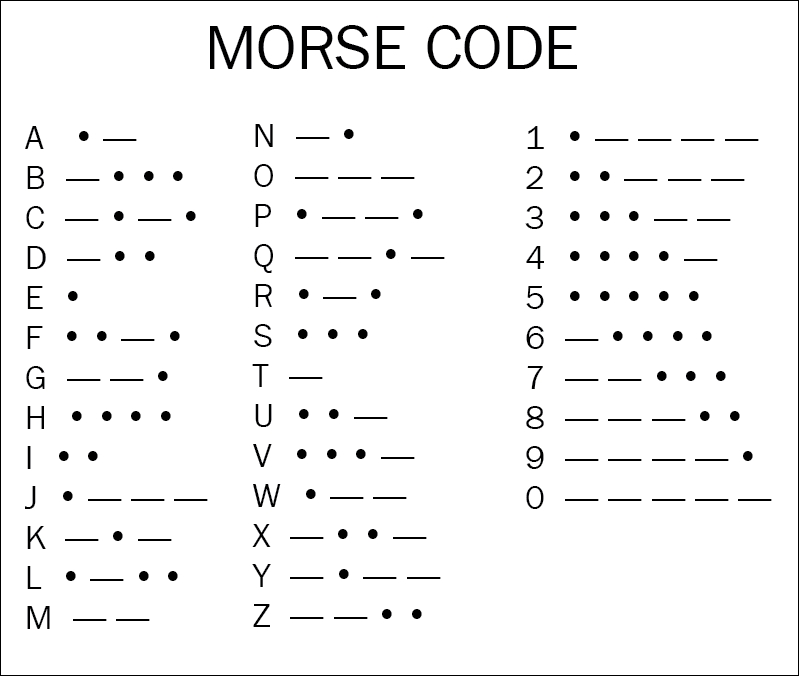
Interesting, right? Try encrypting your message for your friend with this dots and dashes. For example, HELLO would be:

The image below shows how the Arduino code for Morse code will looks like.

The piece of code in dots and dashes is the message SOS that I am sure you all know, is an urgent appeal for help.
SOS in Morse goes: dot dot dot; dash dash dash; dot dot dot.
Since this is a library, which is being created using dots and dashes, it is important that we define how the dot is read as a dot, and dash is read as a dash in the first place! The following sections will take smaller sections or pieces of main code and explain you how they work. As you follow along, we will also introduce some more interesting concepts.
Functions have instructions in a single line of code, telling the values in the bracket how to act. Let us see which one is the function in our code. Can you try to guess from the following screenshot?
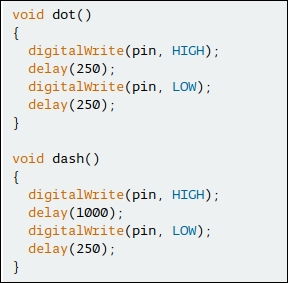
No? Let me help you! digitalWrite() in the preceding code is a function, that as you understand, writes on the correct pin of the Arduino.
delay is a function that tells the controller how frequently it should send the message. The higher the delay number, the slower will be the message (Imagine it as a way to slow down your friend who speaks too fast, helping you to understand him better!)
A constant is an just like a variable but with pre-defined, non-changeable values. What is an identifier you ask? An identifier is a name that labels the identity of a unique object or value.
As you can see from the above piece of code, HIGH and LOW are Constants.
The above food for thought brings us to the next section.
As we discussed before, a variable is used to store a piece of information temporarily. The value of a variable changes, if any action is taken on it for example; Add, subtract, multiply, and so on.
A variable is used to store a piece of information temporarily. The value of a variable changes, if any action is taken on it for example; Add, subtract, multiply etc. (Imagine how your teacher praises you when you complete your assignment on time and scolds you when you do not!)
Datatypes are sets of data that have a pre-defined value. A real life example, could be a person's name – It is usually a word like Eric whereas the answer to the question How much do you weigh? would be a number like 95lbs. One can perform addition or subtraction on weight, but one cannot add or subtract someone’s name! We come to the following conclusion:
- The datatype of name is a fixed value consisting of a word.
- The datatype of weight is a fixed value consisting of numbers.
- While writing code, we have the datatypes like integer, float, string, and so on.
Now look at the first block of the example program in the following screenshot:
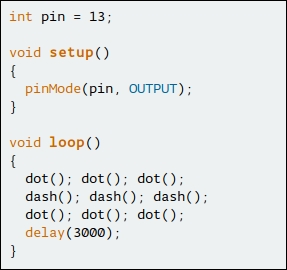
int as shown in the above screenshot, is a Datatype.
The following table shows some of the examples of a datatype.
|
Datatype |
Use |
Example |
|
|
describes an integer number is used to represent whole numbers |
1, 2, 13, 99 and so on |
|
|
used to represent that the numbers are decimal |
0.66, 1.73 and so on |
|
|
represents any character. Strings are written in single quotes |
'A', 65 and so on |
|
|
represent string |
This is a good day! |
With the above definition, can we recognize what pinMode is?
From the pinMode page of Arduino.cc we can define it as a command that configures the specified pin to behave either as an input or an output.
Now that we understood datatypes, we can proceed to learn about using them with control structures.
We have already seen the working of a control structure. In this section, we will be more specific to our code. Now I draw your attention towards this specific block from the main preceding example:
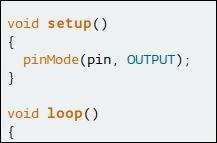
Do you see void setup() followed by a code in the brackets? Similarly void loop()?
These make the basics of the structure of an Arduino program sketch. A structure, holds the program together, and helps the compiler to make sense of the commands entered.
There are other loop and control structures as you can see in the following screenshot:

These control structures are explained next.
Imagine you are teaching your friend to build 6 cm high lego wall. You ask her to place one layer of lego bricks, and then you further ask her to place another layer of lego bricks on top of the bottom layer. You ask her to repeat the process until the wall is 6 cm high.
This process of repeating instructions untill a desired result is achieved is called Loop.
We move on to the different types of loops:
- While loop: Like the name suggests, it repeats a statement (or group of statements) while the given condition is true. The condition is tested before executing the loop body.
- For loop: Execute a sequence of statements multiple times and abbreviates the code that manages the loop variable.
- Do while loop: Like a while statement, except that it tests the condition at the end of the loop body
- Nested loop: You can use one or more loop inside any another while, for or do..while loop.
Now you were able to successfully tell your friend when to stop, but how to control the micro controller? Do not worry, the magic is on its way! You introduce control statements.
- Break statements: Breaks the flow of the loop or switch statement and transfers execution to the statement that is immediately following the loop or switch.
- Continue statements: This statement causes the loop to skip the remainder of its body and immediately retest its condition before reiterating.
- Goto statements: This transfers control to a statement which is labeled . It is no advised to use goto statement in your programs.