
You more or less have the building blocks ready for this project. Let us proceed with the rest of the project.
Problem Statement: Give yourself the robotic High-5 you deserve!
Solution: A High-5-ing robot that senses if your hand is close, and moves to High-5 you.
You have probably guessed it. We are going to use our good ol' ultrasonic proximity sensor to sense your hand.

So, the way our robot will work is as follows:
- The proximity sensor is placed in front of the servo, whose shaft is connected to a cardboard cutout of a hand via a servo horn
- When you move your hand close to the servo, it will lift the hand to give you a High-5!
Let us put this into a diagram that will define its flow:
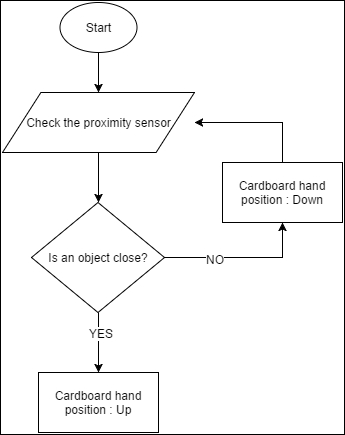
According to this flowchart, the proximity sensor will continuously check if an object (your hand) is close or not. When nothing is detected, the servomotor's position will keep the attached cardboard hand in the down position.
If it detects that your hand is close, the servo motor instantly lifts up its hand to give you a high-5!
The servo library is one of the inbuilt Arduino libraries, meaning it comes part of the Arduino IDE and you don't have to download anything. Just initialize and use!
As you have learnt before, to add a library, you will need to go to Sktech | Import Library | Servo to include it in your sketch.
Notice all the other inbuilt libraries that are there. I hope one day you become an Arduino ninja and be able to use all of them, and possibly write your own libraries some day!
So, after you include the servo library, the #include<Servo.h> gets added to your code.
The servo library brings with it a set of useful functions that will enable you to use Servo motors properly. Some of these functions are:
attach(): This function attaches a servo to a pin in the code. The following piece of code will attach a servo to a specified Arduino pin:
myservo.attach(9)
write(): This function writes a value to the servo, thus controlling the rotation of the output shaft of the servo, setting it to a specified angle in degrees. The following piece of code will rotate the shaft of the servo motor to 90 degrees from origin:
myservo.write(90)
read():This function reads the current angle of the servo.
Before getting onto our project, let's play around with some simple code that will get you familiarized with the servo library, as well as using a servo.

Image source: https://learn.sparkfun.com/tutorials/hobby-servo-tutorial
A note on the colors of these wires: different manufacturers of servos have different color-coded combinations of these wires. The following table will help you attach the servos to your Arduino:
|
Pin number |
Signal name |
Color scheme 1
(Futaba)
|
Color scheme 2
(JR)
|
Color scheme 3
(Hitec)
|
|
1 |
Ground |
Black |
Brown |
Black |
|
2 |
Power supply |
Red |
Red |
Red or Brown |
|
3 |
Control signal |
White |
Orange |
Yellow or White |
Connect the Servo to your Arduino in the following manner:

Image source: http://library.isr.ist.utl.pt/docs/roswiki/attachments/rosserial_arduino(2f)Tutorials(2f)Servo(20)Controller/arduino_servo.png
Now let's write some code that should get you used to using a servo:
#include <Servo.h>

Servo myservo;  // create servo object to control a servo

void setup()
{
  myservo.attach(9);  // attaches the servo on pin 9 to the servo object
}

void loop()
{

    myservo.write(0);
    delay(1000);

    myservo.write(90);
    delay(1000);

    myservo.write(180);
    delay(1000);

    myservo.write(90);
    delay(1000);

}
Once the code is uploaded to the Arduino, the servo motor will cycle through different positions and come back to its initial position.
The following code includes the Servo library, and creates a Servo object called myservo:
#include <Servo.h>

Servo myservo;  // create servo object to control a servo
In the setup function of the Arduino, we attach the servo's command wire to pin 9 of the Arduino, as follows:
void setup()
{
  myservo.attach(9);  // attaches the servo on pin 9 to the servo object
}
In the following piece of code, we tell the servo to move to angle 0, following which we give a delay of 1 second to give the servo enough time to move to this position, before we tell it to go to other positions:
    myservo.write(0);
    delay(1000);
In the subsequent lines of code, we tell the Arduino to go to the 90 degree position, 180 degree position, and then back again.