Things you will learn about in this chapter are as follows:
- Arduino startup
- Switches - Push Button
- Sensors - LDR
- Coding the concept to life
It has been quiet a journey hasn't it? We started out 5 chapters ago, to learn how this magical thing called Arduino works, and here we are today, 4 chapters old. Let's take a moment and give ourselves a round of applause. Here are a few things I know we know. One, we know what a problem means, and how do we identify it. Two, we know how we approach a problem statement. Three, we know the basics of electronics and micro controllers well. Four, we know what sensors are and we also know how to build our own! Five, we also know how to use Arduino IDE and open up examples in it.
Now this is the time when we weave all of these learnings together and start building!
We are going to do an additive process of learning. We will learn how can we make a very light sensitive bot. We will use a lot of steps to reach our final goal.
Let's break down the final goal a little bit more. We are going to make a Light Sensitive bot. Let's break down the word Light Sensitive further. How do you do just this? We must use a sensor that reacts to light right? So we are going to chose a sensor that understands and measures light.
Say this bot is understanding when there is light, how would the bot show it is light sensitive to us? If your friend was to pinch you, what would you do? Scream a little bit to let everyone know about it right? Its our natural reaction. We will use the same concept for a bot.
Now let's think about what have we learnt so far that can be directly applied here. Hmm, we know how to build a soil sensor, can we use that here? No.
We know how to blink an LED using the LED blink example. Hey LED could be a way for the bot to let the humans know right? Perfect. Let's use this then.
So this is what we have decided. The bot will be sensitive to light, we will use a sensor that understands and measures light for this. Once light falls on the bot, we will use an LED to inform that humans that bot is sensitive to the light that has fallen on it. Perfect.
Let's draw this out shall we so that we don't forget, at any point, what the aim of this is?
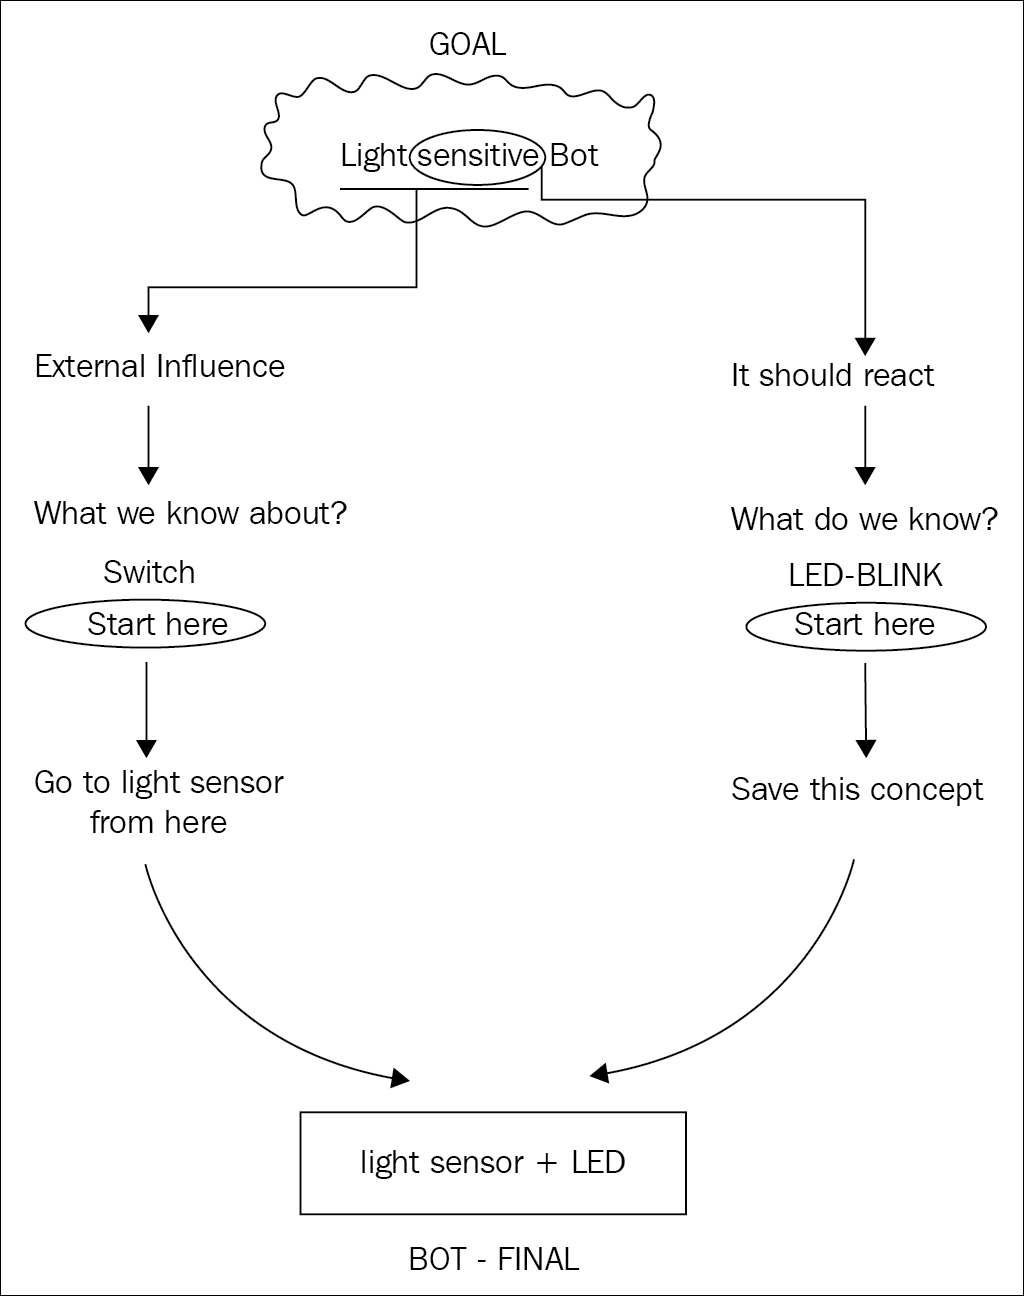
This drawing above is like a treasure map. We find keys and clues all over the map. But no one keeps the clues for us. We will have to build individual concepts to take out the key learnings that we will implement next. Most important part of this map is that we break down every piece of the problem in the things we already know and start from there.
In life, it could be an electronics problem or otherwise. You always draw yourself a map and see what can you know and take it from there.
Awesome. Now we will take small steps, one by one to build this. Get your tools out soldier! We will need an Arduino, some connecting wires, 10 Kilo Ohm resistor, Push Button switch and an LDR.