
5. The First Assembly—Storyboarding
Every video production is essentially a story with a beginning, middle, and end. Special effects, titles, and voice-overs can all be added later in the process, but the first step is to get the order of your story right so that it actually has these three story elements.
To get this right, people in the film industry use sketches of each scene to help them visualize how the film will eventually look. Historically, this actually meant sticking hand-drawn sketches on a wall and shuffling them around to create a basic visualization of the story for the producer, director, and writer. This technique is called storyboarding, and it is essential for video productions of any significant length. Nothing saves time—and money—like preparation!
By using the storyboarding technique, you can visualize the first layout of the video with a few simple mouse clicks, experimenting with the order of scenes or just figuring out which take works best. This is called creating a first assembly, and its importance should not be overlooked because this type of workflow can be much quicker than using the Timeline—especially in the initial stages of the project. It does carry a disadvantage in that you can’t add titles and certain effects, but you don’t really need these items at this stage. Much more important is making sure you have a coherent story. Remember: all the special effects in the world will not keep your video alive if you fail to provide a good story.
The Storyboard Interface
Liquid has two main interfaces: the Timeline and the Storyboard. The default interface is the Timeline, but by swapping to the Storyboard, you can begin an assemble-edit of your project. With most NLE programs with less sophisticated storyboard functions, you might be tempted to head directly to the Timeline after capture in order to start editing right away, especially when the storyboard seems like an extra step. However, Liquid’s storyboard is much more efficient and an easier way to visualize the first step. And since you can drag and drop, or send the storyboard results directly to the Timeline, it’s not an extra step after all. If you are serious about creating a project that is polished in appearance, then the storyboard should be your next stage after you have captured or imported your footage.
Users of dual-screen displays should read the information in the “Dual-Screen Users” sidebar later in this chapter as all the examples here are for a single-screen display.
To open the Storyboard interface
1. Click the Eye icon ![]() to open the various view options (Figure 5.1).
to open the various view options (Figure 5.1).
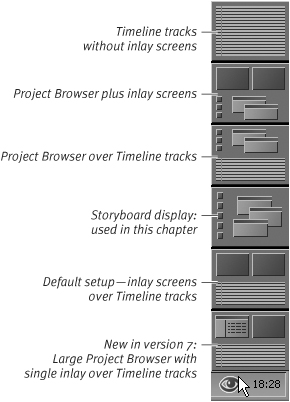
Figure 5.1. The Eye icon shows various view options.
2. Click the Storyboard icon (Figure 5.2). Your Liquid desktop will look something like Figure 5.3.
Figure 5.2. Click this icon to open the Storyboard layout.

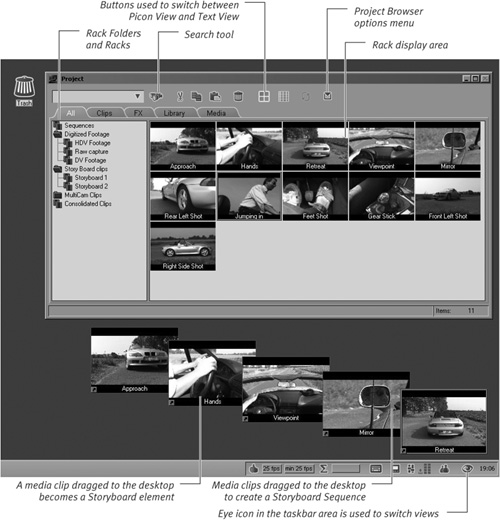
Figure 5.3. The Storyboard layout shows the Liquid desktop with five Storyboard elements and their master clips contained in the Project Browser.
• The keyboard shortcut for opening the Storyboard interface is Shift+F3. To return to the Timeline, use Shift+F2.
Figure 5.4. Dual-screen view options.
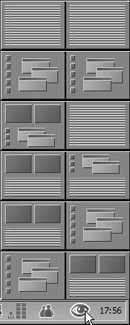
Figure 5.5. Use this layout if you have no inlay on your secondary monitor.
• You can display a much longer Timeline (Figure 5.6).
Figure 5.6. The Timeline extended across both monitors on a dual-screen setup.
• You can display both the Storyboard and the Timeline at the same time (see Figure 5.5).
• You can display the full Effects Library without having to constantly switch screens (Figure 5.7).
Figure 5.7. If the Timeline is restricted to the left monitor, then it is possible to give the Project Browser even more room. Here the real-time Transition Editors are displayed.
• Or you can reserve the monitor on the right for Timeline tracks and have the Source/Master viewer on the left over a Storyboard desktop. Liquid can in fact be adapted for just about any workflow.
Editing Using the Storyboard
Using the Storyboard involves two simple stages: creation and previewing. In this section, you’ll learn how to tackle both of these and you’ll also become familiar with a couple of tricks that will speed up your workflow. These stages contain substages that cover how to edit media clips, how to add simple effects, and how to alter the playback order. Once you have worked your way through this section, you should be able to create a complete Storyboard Sequence and make it ready for further editing on the Timeline.
Once a Storyboard Sequence is complete, it must be sent to the Timeline so that you can add titles, music, and certain effects. This task is explained fully in the last section of this chapter.
Creating the Storyboard
Creating a Storyboard Sequence is wonderfully and refreshingly easy. It’s just a matter of drag and drop.
The big advantage of the Storyboard is that any of these clips can be dragged to the desktop and sorted into any play order you like. The clips can even be shuffled around inside the Project Browser by simply dragging and dropping them.
• The five clips used in this chapter are available for download from www.peachpit.com/liquid7vqp. However, you can also use your own clips to complete the next set of tasks.
To create a Storyboard Sequence
1. Do one of the following:
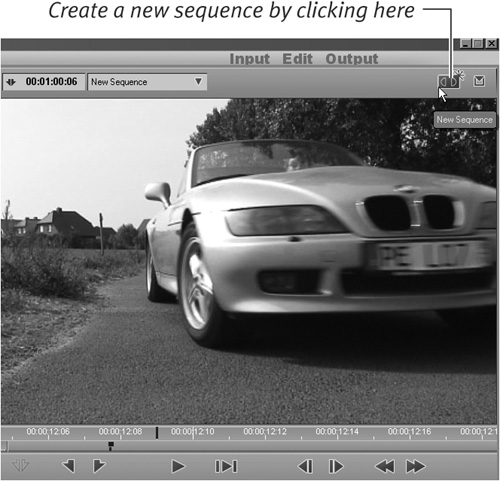
• If you are looking at the main interface, click once on the New Sequence button ![]() in the top-right corner of the interface (Figure 5.8).
in the top-right corner of the interface (Figure 5.8).
Figure 5.8. The New Sequence button creates a new Timeline sequence.
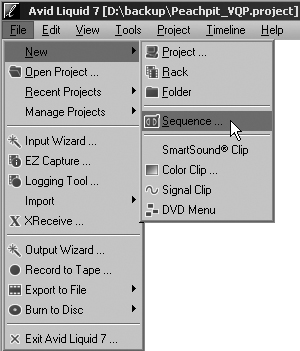
• If you are looking at the Storyboard interface, select File > New > Sequence (Figure 5.9).
Figure 5.9. Using the menu bar also allows you to create a new Timeline sequence.
2. When the New Sequence dialog appears, enter a unique name in the Sequence name field (Figure 5.10).
Figure 5.10. Clicking the New Sequence button allows you to name the sequence and select its properties.
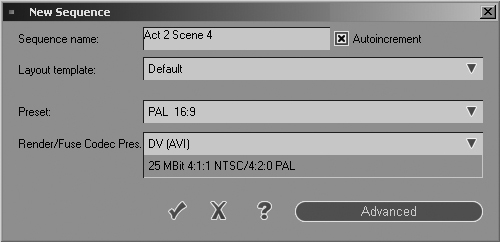
The other settings in this dialog are explained in Chapter 14, “Advanced Techniques.”
3. If you are using a single-screen monitor and haven’t already done so, open the Storyboard as described previously in this chapter and select the All tab if it is not already displayed.
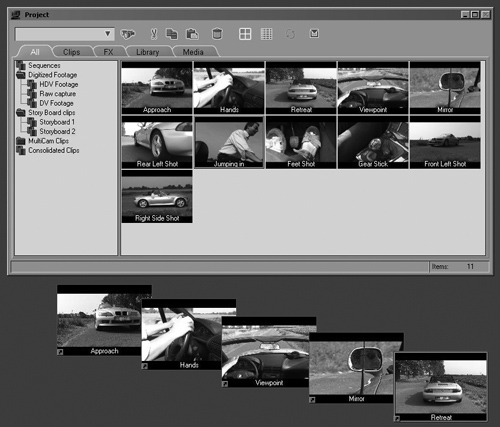
This displays your clips on the right with the Rack Folders and Racks on the left (Figure 5.11).
Figure 5.11. The Project Browser with the clips displayed as Picons. All media clips stored in the folders managed by Liquid 7 can be accessed from here.

4. Drag your clips onto the desktop in the order you want them to be played.
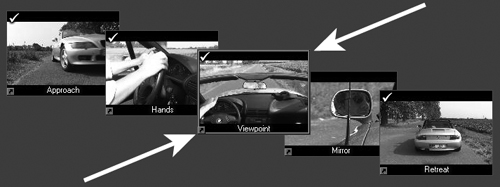
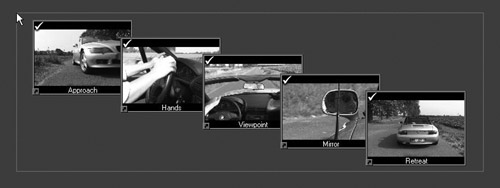
Figure 5.12 shows a sequence with a car approaching the viewer—a cut of the hands steering the car, a cut of the viewpoint of the driver, a cut of the mirror, and a cut of the car retreating. This is the beginning, middle, and end of the story, or scene, in this case.
Figure 5.12. Five clips have been dragged onto the desktop creating five overlapping Storyboard elements. This overlapping order is how playback order is determined.
• The examples in this section show you how to create a project in small, manageable building blocks, rather than trying to assemble an epic film that is one very long Timeline. Imagine Lord of the Rings sitting on your Liquid Timeline. Tracking the changes and even finding individual scenes would be time-consuming and frustrating. A much easier and more logical approach would be to split the job into bite-sized sequences that could be assembled into an epic later.
For more details on creating and using Sequences, see Chapter 14.

Show the First and Last Frames
Figure 5.14. The Picon View allows you to set the size of the Picon and its display properties.
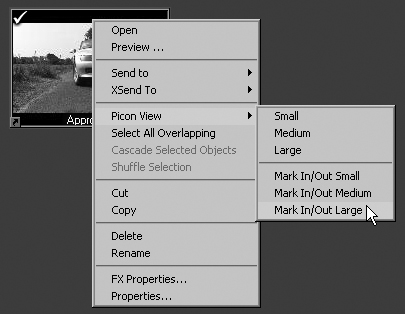
Figure 5.15. Here the Picon’s display properties have been altered to show both the start and finish point of the clip.

Previewing the Storyboard Sequence
Once you are happy with the Sequence, you’ll want to preview it so that you can see if any changes need to be made.
To play a Storyboard Sequence
1. Do one of the following:
• Using the left mouse button, drag a lasso around all of the clips to highlight them (Figure 5.16).
Figure 5.16. Dragging a lasso around the clips will mark each one with a golden frame. This means all of the clips have been selected...

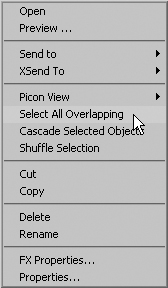
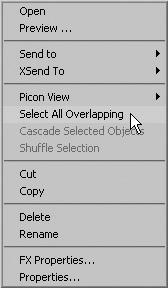
• Right-click the last clip in the pile and choose Select All Overlapping to highlight all of the clips (Figure 5.17).
Figure 5.17. ... or you can right-click the last clip in the pile and choose Select All Overlapping to highlight all of the clips.
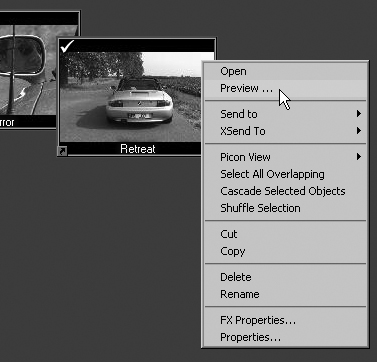
2. Once the clips are selected, right-click the last clip in the sequence (don’t click any of the others) and select Preview from the contextual menu (Figure 5.18).
Figure 5.18. Previewing a selection requires you just to right-click the last clip in the pile and choose Preview.
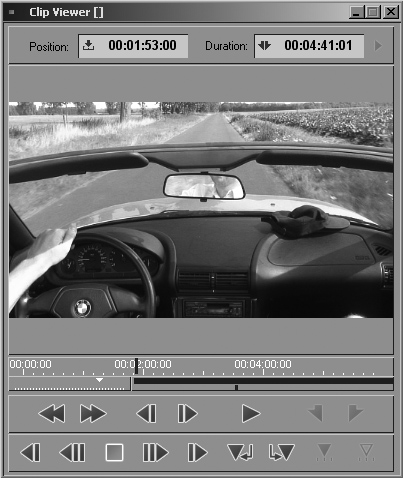
3. Once the Clip Viewer is displayed (Figure 5.19), press the spacebar or press the Play button to play the sequence back from beginning to end. If the playback order is not correct, read on.
Figure 5.19. The Clip Viewer displayed here has been customized with extra buttons to increase its functionality.
Playback order
The order in which Liquid plays the Storyboard elements is determined by the order in which you click them.
• The last element clicked is the last one played back.
• The first element clicked is the first one played back.
In Figure 5.20, you can see that the Storyboard element called Viewpoint has been clicked last and is now on top of the others. The Viewpoint clip will now play last after the Retreat clip, thus ruining the play order.
Figure 5.20. In this example, the middle clip (Viewpoint) has been clicked last and is now on top of the pile.
• If one of your clips plays out of sequence, you can reassemble the order by clicking each element once in turn from the first to the last.
Trimming Clips in the Storyboard
After playback, you may find that some clips have too much footage either at the beginning or end of the clip. To fix this, use the Clip Viewer to trim off the unwanted material (Figure 5.21).
Figure 5.21. The Clip Viewer is used extensively in the Storyboard area to trim unwanted footage from individual clips. The Clip Viewer shown here has been customized with additional tool buttons.
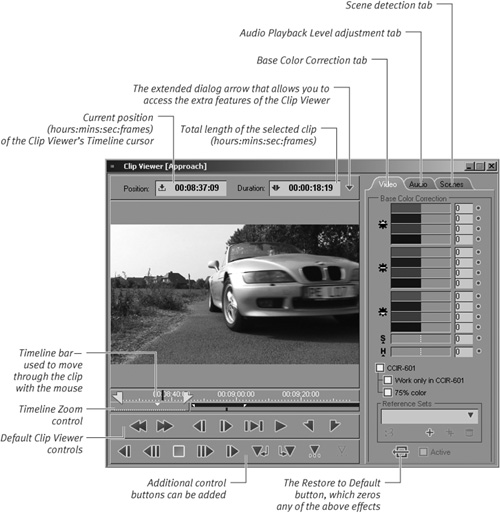
The Clip Viewer is a powerful part of the Storyboard interface with a number of interesting features, including color correction, scene detection, and audio level adjustment. It is a good idea to explore the potential of this tool even though it might not look exciting.
To open a clip in the Clip Viewer
Do one of the following:
• Double-click a clip in the Project Browser to open it inside the Clip Viewer.
• Right-click and select Open.
If this sends the clip to the Source Viewer, then you are probably using a dual-screen display with at least one monitor showing a Source Viewer. For advice on this, see the “Sending a Clip to the Clip Viewer When in Dual-Screen Mode” sidebar later in this chapter.
To set mark-in and mark-out points in the Clip Viewer
1. Once the clip is loaded into the Clip Viewer, use the mouse or the arrow keys to look for the best place for your clip to start—your new mark-in point.
This is called scrubbing and is discussed in Chapter 6.
2. Once you have found the ideal start to your clip—the mark-in point—press the I key on the keyboard or click the Mark-In Point button ![]() .
.
You will see that a small Mark-In Point icon has now been added to the left side of the Clip Viewer’s Timeline (Figure 5.22).
Figure 5.22. The left side of the Clip Viewer shows that a mark-in point has been added to the clip, and the right side of the Clip Viewer shows that a mark-out point has been added to the clip.
3. To select a point where you would like your clip to finish—the mark-out point—scrub through the clip again until you find the optimal point, and then press the O key or click the Mark-Out Point button ![]() .
.
A small Mark-Out Point icon has now been added to the right side of the Clip Viewer’s Timeline (see Figure 5.22).
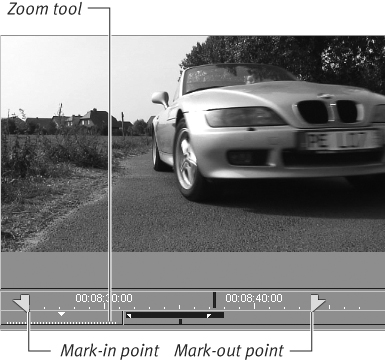
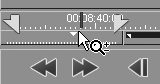
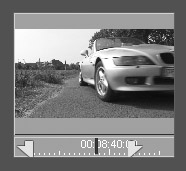
4. Use the Zoom tool to reduce the view if you can’t see both the mark-in and the mark-out points on the Timeline display (Figure 5.23).
Figure 5.23. The Zoom tool can be used to scale the Timeline. When the cursor is placed over the Zoom tool, a magnifying glass appears next to it.
5. Right click the Clip Viewer toolbar, and select Player > Play In to Out to play back the clip from the new points you have just defined (Figure 5.24).
Figure 5.24. Accessing the Play In to Out function by right-clicking on the Clip Viewer’s toolbar.
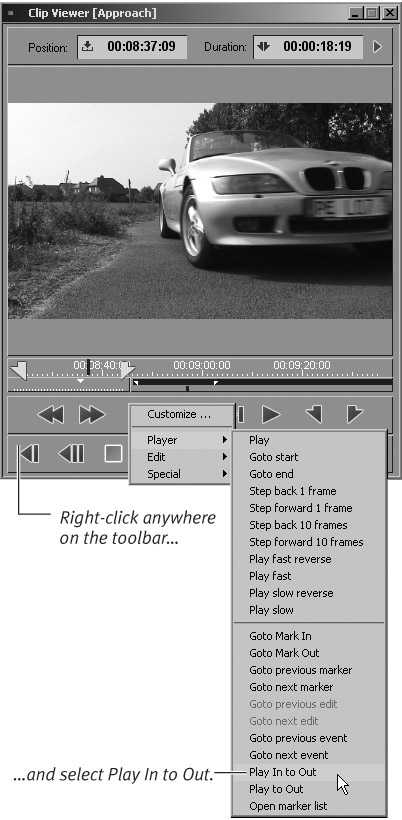
• The Play In to Out button ![]() is not present by default and must be added to the Clip Viewer toolbar. See Chapter 1 for details on customizing interfaces.
is not present by default and must be added to the Clip Viewer toolbar. See Chapter 1 for details on customizing interfaces.
• You can set a different mark-in or mark-out point simply by moving the cursor to a new point and pressing the I or the O key again.
• Hitting Home or End will take you to the first or last frame of your clip. However, if this is a Subclip, then hitting the Home or End key will take you to the mark-in and mark-out points of the master clip, not the Subclip.
Trimming a Storyboard element
You can also directly trim a clip (or Storyboard element) without opening the Clip Viewer. While this has limited potential for editing, it creates a very quick way of previewing a clip.
To open a media clip without using the Clip Viewer
1. Make sure the Project Browser is displaying the clips in Picon View, and then select the Picon you want to view by clicking it once.
2. Hold down the Alt key, and double-click the element.
The Picon plays inside its own little thumbnail (Figure 5.25), and a small Timeline appears under it.
Figure 5.25. A Storyboard element playing inside its own picon.
To trim a clip inside its own Picon
1. Press the spacebar once to stop playback.
It’s now possible to move the clip backward and forward, either frame by frame using the left and right arrow keys, or by left-clicking the mouse and dragging it to the left or right.
2. Pressing the I key on the keyboard will set a mark-in point inside the Picon. Pressing the O key will set the mark-out point.
Other Uses for the Storyboard
In addition to creating your Storyboard Sequence, you can achieve a number of other tasks while still in the Storyboard interface. You’ll accomplish most of these tasks using the advanced features of the Clip Viewer, but you can also add various filters to each clip, creating some basic visual effects without leaving the Storyboard. You accomplish this using the Effects Library.
Adding filters and other effects
In truth, adding a filter to a Storyboard clip has limited value and this operation is probably best left until the clip is on the Timeline. However, if you want to use a simple effect, such as zooming in on a picture or inverting it as shown in the following example, then it is possible to do this from within the Storyboard.
• Transitions can’t be added to clips in Storyboard mode. You must move to the Timeline to use them.
To add a clip FX-filter to a Storyboard clip
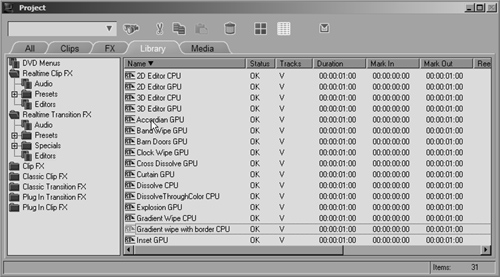
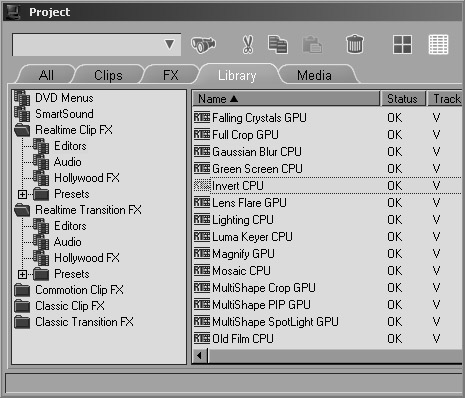
1. With the Storyboard interface open, select the Library tab and select the Editors Rack in the Realtime Clip FX folder in the left window of the Project Browser (Figure 5.26).
Figure 5.26. The Effects Library. The Effect Editors have been sorted by name.
This displays all of the video filters available to you.
2. Select a simple filter (in Figure 5.26, Invert CPU has been selected), and double-click it.
This opens the Effect Editor interface.
3. Select the All tab to display your clips if they are not already displayed (Figure 5.27), and click once on any one of your clips inside the Project Browser.
Figure 5.27. The Invert CPU Editor window opens and the Project Browser automatically moves to the bottom of the screen.
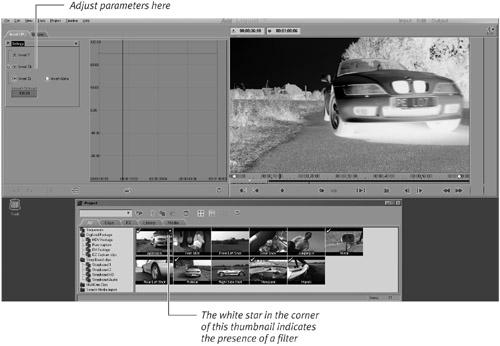
A white star appears in the clip’s top-right corner, and the clip itself is displayed inside the editor.
4. You can now alter the effect in any way you choose. When you have finished editing, click the Running Man button ![]() in the top- right corner of the Effect Editor.
in the top- right corner of the Effect Editor.
• When you exit the Effect Editor, you will be presented with half of a Storyboard interface hidden behind the Source and Timeline windows. Return to a full-sized Storyboard interface by clicking the Eye icon and selecting the Storyboard layout. Or press Shift+F3 on the keyboard.
• To display the filters as in Figure 5.26, click on the Name tab twice. This tab appears directly over the names of the effects and is circled in this figure.
Removing an effect from a clip
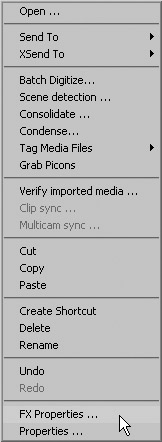
Figure 5.28. Right-clicking a clip displays this contextual menu. At the very bottom is the FX Properties selection.
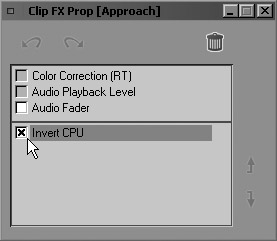
This brings up the Clip FX Prop window (Figure 5.29), where you can choose to disable the effect by clicking the X, or delete it completely by clicking the Bin icon ![]() in the top-right corner.
in the top-right corner.
Figure 5.29. The Clip FX Prop window. Here you can deselect an effect by clicking the X or by highlighting the effect and clicking the Bin icon.
Sending to the Timeline
Once you have created the first assembly of your sequence, it is time to send the whole thing to the Timeline so that you can add titles, apply special effects, and make other alterations that are beyond the ability of the Storyboard Editor.
• Before you send the Storyboard to the Timeline, switch back to Timeline view (Shift+F2) and check the position of the Timeline cursor. Ideally, this should be at the beginning of the Timeline, but you may want it somewhere else.
• If you have a dual-screen setup, then you don’t need to worry about placing the Timeline cursor ahead of time because you will have the option of dragging your clips from the Storyboard monitor to the Timeline.
To send to the Timeline
1. Do one of the following:
• Drag a lasso around all of your clips (Figure 5.30).
Figure 5.30. A Storyboard Sequence surrounded by a dragged lasso.
• Right-click the last element and click Select All Overlapping (Figure 5.31).
Figure 5.31. An alternative method of highlighting all clips in a Storyboard Sequence is to right-click the last clip and choose Select All Overlapping.
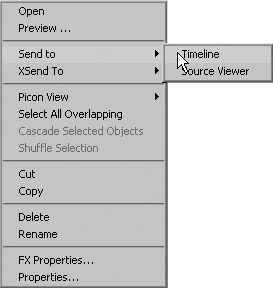
2. Right-click the last element in the sequence and select Send to > Timeline from the contextual menu (Figure 5.32).
Figure 5.32. The Send to > Timeline option will send the sequence to the Timeline cursor’s current position.
3. Switch to Timeline view by selecting the Eye icon ![]() or by pressing Shift+F2 on the keyboard.
or by pressing Shift+F2 on the keyboard.
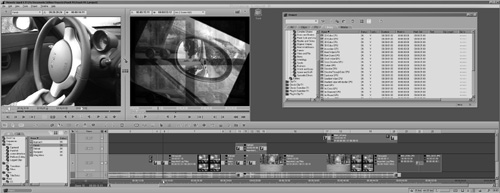
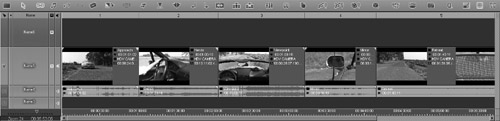
Your sequence is now on the Timeline (Figure 5.33).
Figure 5.33. The Storyboard Sequence after it has been sent to the Timeline. Mission accomplished.
• In the preceding example, the clips were sent to the default track Name 5; however, it is possible to send them to the track of your choice. For more details on this process, called track mapping, see Chapter 6.