14. Advanced Techniques
The title of this chapter is somewhat of a contradiction in terms because pretty much everything in Liquid is advanced, but it’s so easy to use, it appears simple. The effects team that worked on Star Wars: The Empire Strikes Back created a scene that involved the largest number of models to appear simultaneously in one place. It was the first film to achieve something like this (copied endlessly now with CGI), and at the time it was impressive, but one of the team members later made this comment: “It looked good, but it didn’t look nearly as good or as complex as the effort needed to accomplish it.” Liquid reverses this concept so that your project looks complex, but you don’t need to apply that much effort to get the sort of polish usually reserved for professional productions.
The techniques you’ll learn in this chapter are primarily about workflow—an area every editor wants to smooth out—and special effects—something that most users want to dabble in, but an area that is perhaps only applicable to the professional user.
This chapter appears at the end of the book because most of the techniques described here require you to understand at least the basics of how Liquid works. For example, because compositing uses the various Chroma Key filters, they follow the rules you learned in Chapter 9, “Working with Filters.” Similarly, you’ll better understand how to create and consolidate Subclips to save space if you’ve already read about media management in Chapter 4, “Managing Your Media.” In short, this chapter deals with the icing on the cake and techniques that polish your production to the highest level.
Creating a Sequence
I’ve touched on Sequences in various chapters throughout this book, but here I’d like to hammer home what a Sequence is and how you can use it to effectively improve your workflow.
Simply put, a Sequence is the end result of placing clips, titles, images, and filters on the Timeline. During the life of a project, you can (and should) create as many Sequences as you want. For a feature film, a Sequence might look something like this:
• Act 1, Scene 1
• Act 1, Scene 2
• Car Chase, Scene 1
Each Act or “take number” can be assembled into a separate Sequence so that you are not looking at an hour-long Timeline, but small bit-sized chunks of the whole Project.
If you are filming a wedding, then the Project will have “natural breaks” all over the place and your list of Sequences would (and should) look something like this:
• Sequence 1—Arriving at the Church
• Sequence 2—The Bride Enters
• Sequence 3—The Ceremony
• Sequence 10—The Best Man’s Speech
And so on. Here you can clearly see the advantage of creating a Sequence for each particular “chapter” of the film. For example, if the happy couple suddenly produces a whole bunch of photos to be included at the start of the wedding video, you will only have to change the start Sequence. The other Sequences will be unaffected because they live in their own self-contained area.
Try making those sorts of alterations on a single hour-long Timeline and see how late into the night you end up working.
For example, I once created a wedding video only to be told the happy couple wanted to change two of the songs and update a number of photos. With Liquid, solving this was a simple matter of stepping into each Sequence, replacing the music with a drag and drop, and using the Replace Edit function for the photos, ensuring that the filters and transitions I had painstakingly put in place were not ruined.
This example is all about timesavings and organization, which is what Sequences are all about too. Using Sequences to create smaller segments of the overall project allows you to concentrate on one specific area of the project at a time, editing that until it’s perfect.
In this section, you’ll learn how to create a new Sequence, switch between Sequences, and combine Sequences onto a single Timeline.
1. Click the New Sequence button ![]() in the top-right corner of the main interface once (Figure 14.1).
in the top-right corner of the main interface once (Figure 14.1).
Figure 14.1. The New Sequence dialog.
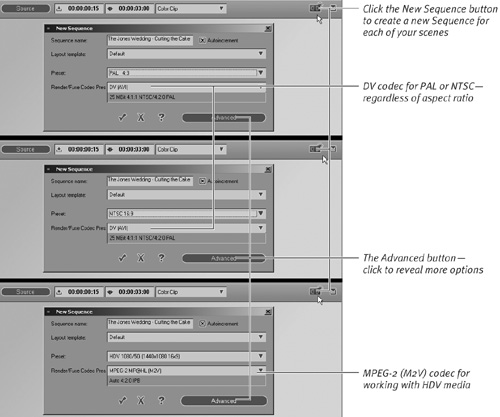
2. When the New Sequence dialog appears, enter a unique Sequence name in the top box and select the settings appropriate to the media clips you’re using.
Figure 14.1 (top and middle) shows presets for PAL 4:3 and NTSC widescreen, respectively.
Figure 14.1 (bottom) shows the preset for working with 1080i HDV cameras such as the Sony FX1.
3. Once you have set the name and selected the preset, click the check mark to accept these settings.
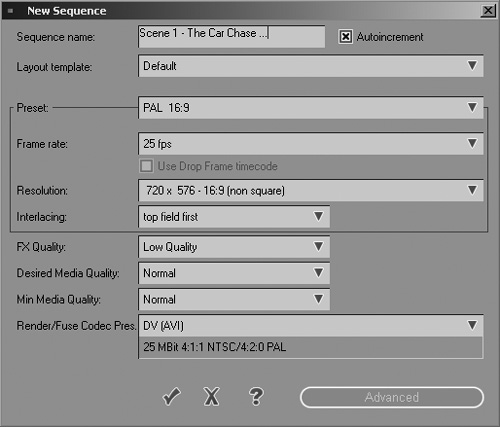
• Clicking the Advanced button in the New Sequence dialog gives you access to a number of options (Figure 14.2). These are mainly for use in special circumstances, and normally you will not need to alter any of them. Full instructions on their use can be found in the Avid Liquid Reference Manual.
Figure 14.2. The New Sequence dialog with the Advanced area open.
• You can rename a Sequence by opening the Sequences Rack, right-clicking it, and then selecting Rename from the contextual menu.
• Although Liquid can support multiple formats on a Timeline, picking a preset closest to the majority of your clips can save unnecessary rendering time every time you place a clip on the Timeline.
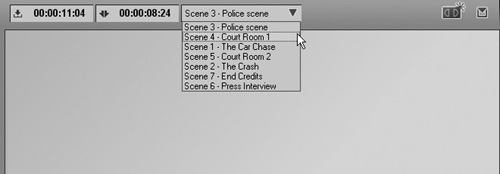
Finding Your Sequence after a Software Crash
Figure 14.3. The drop-down menu displays all Sequences stored in the current project.
Using and Combining Sequences
Once you’ve created a new Sequence, you can switch between it and any other Sequences you have made very simply. Remember that NLE is nondestructive, so you can use your media clips in as many different Sequences as you like.
Once the project is finished, you can quickly and easily combine all of these separate Sequences into the final assembly Sequence using just the power of drag and drop.
To switch between Sequences
Do one of the following:
• Left-click the drop-down Sequence menu in the top-right corner of the interface and select the Sequence you want (see Figure 14.3).
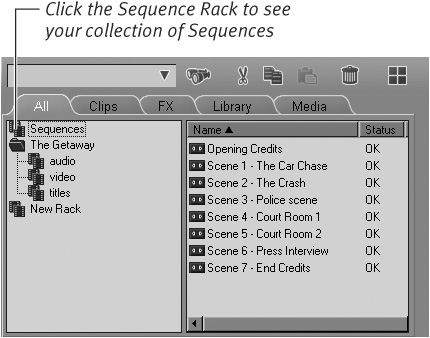
• Open the Sequence Rack by left-clicking it, then double-click the name of the Sequence you want (Figure 14.4).
Figure 14.4. You can also find them stored in the Sequences Rack in the Project Browser.
• You can also Copy and Paste Sequences inside the Project Browser to create a backup of a particular Sequence. The copy always retains the original state and isn’t affected by any edits you make to the original after the copy has been taken.
To combine Sequences onto one Timeline
1. Create a new Sequence by clicking the New Sequence button ![]() in the top-right corner of the interface once.
in the top-right corner of the interface once.
2. When the New Sequence dialog appears, enter a unique Sequence name in the top box and select the setting appropriate to the media clips you’re using.
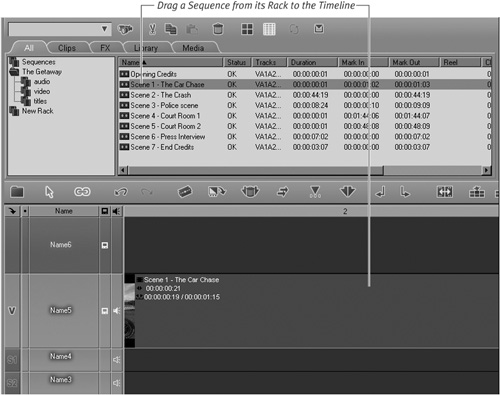
3. Drag the Sequence you want from the Sequence Rack to an empty Timeline. The Sequence appears on the Timeline as the Sequence name without displaying the various cuts the original had, although these are included inside the actual Sequence clip (Figure 14.5). Note: Markers will still be displayed.
Figure 14.5. Dragging a Sequence to the Timeline is the same as dragging a clip.
4. Repeat step 3 until all the Sequences you want are assembled on the Timeline.
• Sequences cannot be viewed in the Source Viewer. You must load them to the Timeline in order to see which one you need. This is another good reason for giving your Sequences a unique name! Try not to use the default. This is lazy and unprofessional and will cost you time in the long run.
• You can switch back to the original Sequence to make last-minute changes.
Understanding Multicam Editing
In Chapter 2, “Logging and Digitizing,” you looked briefly at Multicam capture; if you haven’t familiarized yourself with this section, it’s probably best if you do so now.
However, you don’t have to capture clips using the Multicam capture technique. Instead, you can sync together any clips in the Project Browser using the clip in, timecode, or a marker on each clip. Then you can instruct Liquid to treat these separate clips as a Multicam set.
This method has several advantages.
• You can use Multicam on clips taken using just one camera—the same scene but filmed from different angles.
• You can use clips that do not share an identical Timecode, but were filmed at roughly the same time—for example, a concert.
• Or you can simply use Multicam as a convenient way to produce an intro to your videos, one that previews the material you are about to see, but cuts to a steady beat. This is a particularly effective technique for use with wedding videos.
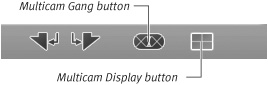
• To fully utilize the Multicam tool, you need to add the Multicam Gang button and the Multicam Display button to the Source Viewer toolbar (Figure 14.6). For information on adding buttons to the interface, see Chapter 1, “Getting Started.”
Figure 14.6. The Multicam Display and Multicam Gang buttons added to the Source Viewer toolbar.
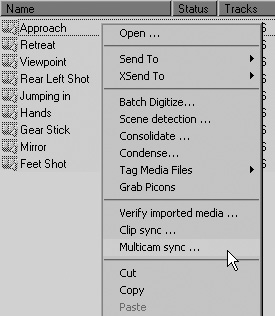
1. Select the clips you want to sync by holding down the Ctrl key and clicking each until they’re all highlighted. Then right-click any of these clips and select Multicam sync from the menu (Figure 14.7).
Figure 14.7. Right-click the highlighted clips and select the Multicam sync option from the menu...
2. In the Multicam sync interface, select which sync method you want to use. See the “Sync By?” sidebar later in this chapter for details (Figure 14.8).
Figure 14.8. ...to display the Multicam sync interface.
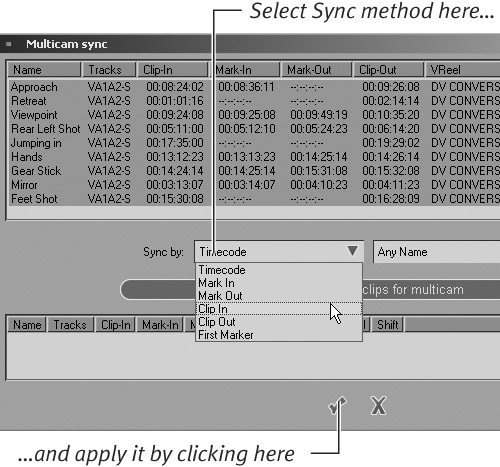
3. Once you’ve selected your sync method, click the large “Sync selected clips for multicam” button.
It is vital to click this button. If you just click the check mark at the bottom of the interface, the sync will abort and you will be back at the Project Browser with nothing more than what you started with!
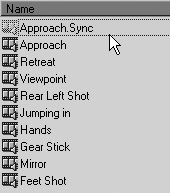
4. If you remembered to click on the Sync Selected clips for Multicam button, then the clips should appear in the bottom area of the Multicam Sync window (Figure 14.9). Click the check mark at the bottom of the interface and the clips sync together.
Figure 14.9. The applied clips appear in the bottom window.

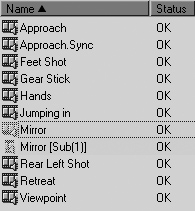
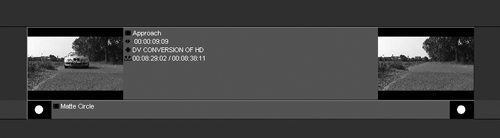
A clip called xxxx.Sync (where xxxx is the name of the first clip in your selection) is created in the Rack in which you’re working (Figure 14.10).
Figure 14.10. Multicam sync creates a new clip in the Rack—Approach.Sync in this case.
• You can sync together up to 16 video clips using this technique.
• When clips are synced together, the overall length of the xxxx.Sync clip is only as long as the shortest clip in your selection. This means that if you have a 5-second clip in your selection, all clips are shortened to 5 seconds in the xxxx.Sync clip. Consider adding Timewarp to shorter sections or fusing the clip with a “padding” color clip either at the end or the beginning of the clip you need to lengthen.
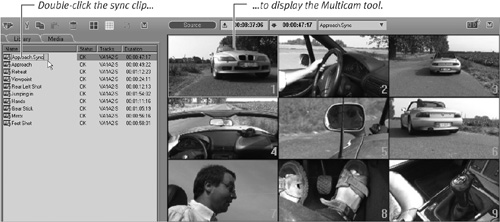
1. Double-click the xxxx.Sync clip you created either with the Multicam capture technique or the sync-clip technique (Figure 14.11).
Figure 14.11. The Multicam tool opens in the Source Viewer.
2. Select how many cameras you need by right-clicking the Source Viewer and choosing from the top three in the list (Figure 14.12).
Figure 14.12. The Multicam matrix selection menu.
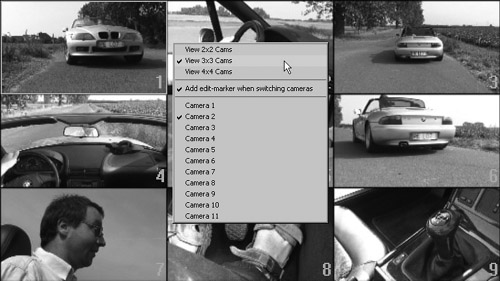
Each square in the matrix represents a camera, numbered from 1 to 4, 9, or 16—depending upon which matrix you are using. A golden square around a numbered frame indicates that it is the current active camera (Figure 14.13).
Figure 14.13. The Source Viewer displaying the camera selections.

3. You can now either move the Timeline cursor along the Source Viewer Timeline until you find a spot where you want to change to a different camera, or you can click Play and make your edits on the fly.
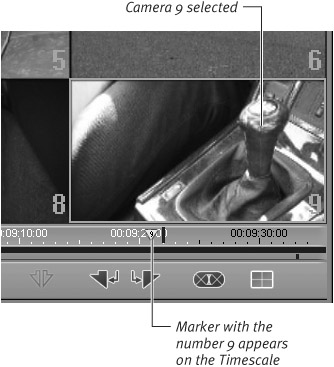
4. To change to a different active camera, simply click that square once. The golden border will change to that camera, and a marker will appear on the Source Viewer Timeline with a tiny number inside it. This number represents the current active camera (Figure 14.14).
Figure 14.14. Clicking on any of the camera squares creates a green marker with the camera number inside it.
Repeat this until you have selected all camera positions for the entire clip.
5. Return to the Timeline and position the Timeline cursor at a spot where you want to insert the clip, and then click the Insert Source into Master button ![]() to send your edit decisions directly to the Timeline (Figure 14.15).
to send your edit decisions directly to the Timeline (Figure 14.15).
Figure 14.15. The completed Multicam selection on the Timeline.

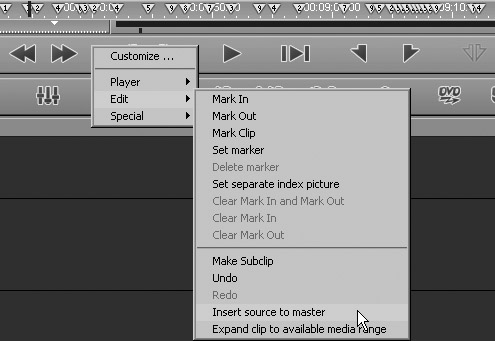
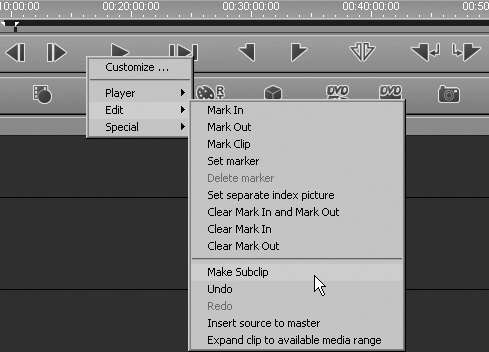
If you are in Studio view, right-click the Source Viewer toolbar and select Edit > Insert source to master (Figure 14.16).
Figure 14.16. Right-clicking on the Source Viewer toolbar to access more functions.
• Only one audio track is supported when you’re using Multicam, and this is always taken from the clip you capture using the Camera 1 setting or the first clip in the Rack when you use Multicam sync.
• If you want to return to the normal Source Viewer at any time, double-click another clip in the Project Browser or click the Multicam display button to toggle the Multicam feature on or off.
Configuring the Multicam Display
Figure 14.17. Three variations on the matrix display. If the number of clips doesn’t match one of these variations, then the spare cameras are shown as black squares.
Fine-tuning a Multicam edit
Once a Multicam edit has been sent to the Timeline, you can still adjust the Sequence with a couple of simple right mouse clicks. This is done by switching to another camera (which will replace the whole of the clip you have selected) or by cutting to another camera (which will create a cut in the clip you have selected and then play onward with the replacement camera number).
• If you are using Multicam in its default setup of allowing only one audio track to be used, you will be able to cut and trim clips without losing audio sync.
To switch a clip to a different camera
1. With a Multicam edit on the Timeline, scrub to a point where you want to change the whole of the clip to a different camera number.
As you scrub the Timeline, you will notice that Source Viewer updates allowing you to see each camera at that particular edit point.
2. Select the clip by clicking it once (Figure 14.18).
Figure 14.18. Selecting a clip prior to switching the camera number.

3. Right-click the selected clip, choose Switch to camera from the contextual menu, then choose the camera you want to switch to (Figure 14.19). The whole clip will change to the camera you have selected.
Figure 14.19. Switching to another active camera.
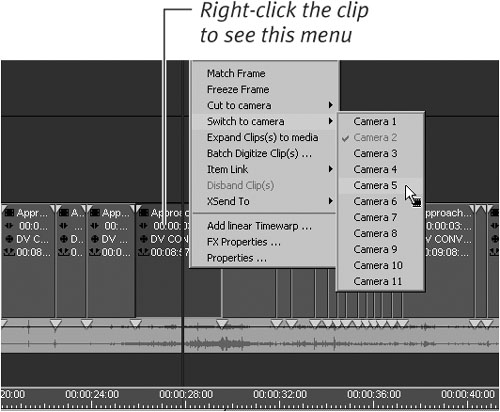
• If you do not see the Switch to camera or Cut to camera menu options, make sure you are clicking the clip and not the soundtrack or Timeline.
1. As with the previous task, you need to have a Multicam edit on the Timeline. But this time you want to scrub through to a point where you want to cut the clip to a different camera number but leave the preceding material intact.
2. Select the clip by clicking it once (see Figure 14.18).
3. Make sure the Timeline cursor is at the exact point you require—use the keyboard arrows to fine-tune this—then right-click the selected clip and choose Cut to camera from the contextual menu (Figure 14.20).
Figure 14.20. Cutting to another active camera.
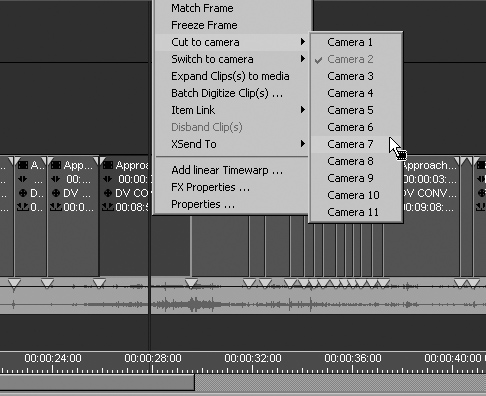
A new cut will appear. From that point on, until the next edit point, the clip will play with the camera you have selected as the replacement.
To trim a Multicam clip
Do the following:
• Click the mark-in or mark-out point of the clip, and drag that point up or down the Timeline.
It is vitally important that you work in Overwrite style while doing this so that your clips maintain audio sync with the track below. Trimming in Film Style can completely wreck this audio sync.
Using Subclips
When you’re working with long clips, it is possible to create a series of Subclips from the master clips you have stored in your Project Browser. Subclips are proxy representations of media clips that allow you to split very large media clips into bite-sized, manageable lumps.
You can create Subclips in two ways: either by using scene detection, or by manually defining each one in the Source Viewer. Scene detection is a timesaving tool, but sometimes it pays to do it yourself, particularly if you have just one small segment of a large media clip that you want to use.
To create a Subclip
1. Place the media clip into the Source Viewer by double-clicking it and then using the mouse or the arrow keys to look for the best place for your Subclip to start.
2. Once you’ve found the ideal place to start your Subclip, press the I key or click the Mark-In Point button![]() .
.
A small Mark-In Point icon has now been added to the Timeline of the Clip Viewer (Figure 14.21, top).
Figure 14.21. A mark-in point added to the Source Viewer Timeline (top). A mark-out point added to the Source Viewer Timeline (bottom).
3. Select a point where you would like your Subclip to end by pressing the O key or by clicking the Mark-Out Point button ![]() .
.
A small Mark-Out Point icon is added to the Timeline of the Clip Viewer (Figure 14.21, bottom).
4. To create the Subclip, do one of the following:
• Press the U key
• Click the Make Subclip button ![]() if you have this available.
if you have this available.
• Right-click the Source Viewer toolbar and select Edit > Make Subclip (Figure 14.22).
Figure 14.22. Accessing the Source Viewer edit functions.
A clip called xxxx [Sub(#)]—where xxxx is the name of the original clip and # is the number of Subclips created from the master clip—appears in the Rack (Figure 14.23).
Figure 14.23. The Subclip is created in the current Rack.
• For more details on adding buttons, see Chapter 1.
• Use the Zoom tool to reduce the view if you can’t see both the mark-in and mark-out points on the Timeline display.
Using Scene Detection to Create Subclips
If you don’t want to make the Subclips yourself, you can get Liquid to do it by opening the clip in the Clip Viewer and using the Scene Detection tool. This is the automatic and much faster way to create individual Subclips from a long master clip.
To use Scene Detection
1. Open a clip in the Clip Viewer. The quickest way to do this is to right-click a clip in the Project Browser and select Open.
2. Select the extended dialog arrow in the top-right corner of the Clip Viewer to display the three tabs: Video, Audio, and Scenes (Figure 14.24).
Figure 14.24. The Clip Viewer with the extended dialog displayed.

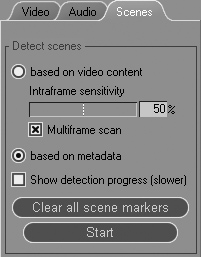
3. Select the Scenes tab (Figure 14.25) to bring up the Scene Detection options.
Figure 14.25. The Scenes tab brings up the Scene Detection options.
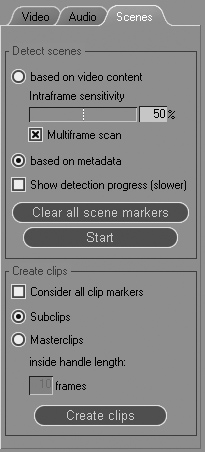
4. Select either the “based on video content” or “based on metadata” radio button. Don’t worry about the Create clips options just yet. You usually only select these once the Scene detection is complete.
5. Click Start to begin the process.
The Clip Viewer runs through the scene using a low-quality picture to speed up the process. As each scene is detected, a small green marker appears on the Clip Viewer’s Timeline marking the start of a scene (Figure 14.26).
Figure 14.26. After the detection process, green markers set out each scene change.
6. Create either a master clip or a Subclip from these markers by clicking the radio button next to either option and clicking the Create clips button. This creates your clips in the Rack where the original clip is stored.
See the “Video Content and Metadata Explained” sidebar later in this chapter for an explanation of what these do.
• Clips created as master clips only have the amount of handle length you define in the Scene Detection options. Clips created as Subclips have a handle length that is effectively the same length as the original clip.
• When you are scanning using video content, you may adjust the sensitivity of the detection program using the Interframe Sensitivity slider. You’ll need to experiment to find the perfect setting for each of your tapes.
• After Scene detection, you can review the results by jumping through each scene marker using the C and V keys on your keyboard. Delete any unnecessary scene markers by clicking the Delete Marker button ![]() . The Delete Marker button isn’t a default button for the Clip Viewer; therefore, you must customize the Clip Viewer and add the Delete Marker button to the interface. For more details on adding buttons, see Chapter 1.
. The Delete Marker button isn’t a default button for the Clip Viewer; therefore, you must customize the Clip Viewer and add the Delete Marker button to the interface. For more details on adding buttons, see Chapter 1.
Video Content and Metadata Explained
Figure 14.27. Choose here whether to create a Subclip or master clip from the detected scenes.
Using Consolidate
Once you have created Subclips, you can copy them to another hard drive using the information created in the Subclips’ mark-in and mark-out properties. This is useful when you need to save hard drive space or when you want to consolidate your media before you export a project. The processes of digitizing and importing into a project can create reams of unwanted footage that take up valuable hard drive space. Liquid uses the Consolidate Media Management function to try and reclaim some of this valuable space.
To use Consolidate
1. Once you have finished editing your Timeline, go to the Sequence Rack and right-click the name of the Sequence you want to consolidate.
2. When the Consolidate window appears, check the Create new MASTER clip(s) in new Rack check box, then give the Rack a new name (Figure 14.28).
Figure 14.28. The Consolidate dialog.
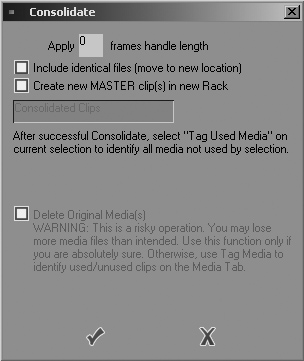
3. Click the check mark and the process begins.
If you have many files or the original file is large, this process may take some time.
4. Once this process finishes, the new master clips appear in the Rack you specified in Step 2.
• Because these clips are independent of the original media, you can now delete those original clips. Remember to do it from within the Project Browser and not from inside windows. Then test your Timeline Sequence to see if it still works.
Using Condense
Condense is a similar feature to Consolidate, and it uses Subclips simply to create a better, more logical workflow. The major problem with Subclips is that the clips’ mark-in and mark-out points remain the same as the original media. This can be distracting if you are using the Source Viewer to fine-tune these points or if you are dragging the clip out in the Timeline. This is because it’s possible to skip past the Subclip’s mark-out point and find yourself miles down the original clip.
To solve this, Condense allows you to place a block on each Subclip, effectively creating a mini-clip. However, the media actually never changes and can be returned to the original Subclip status at any time; this is something that isn’t possible when you’re using Consolidate.
To use Condense
1. Right-click the clips in the Project Browser you want to condense, and select Condense from the contextual menu.
2. Apply a handle length if you think you need one, and click the Create new MASTER clip(s) in new Rack option if you want these clips to be created in a new Rack (Figure 14.29).
Figure 14.29. The Condense dialog.
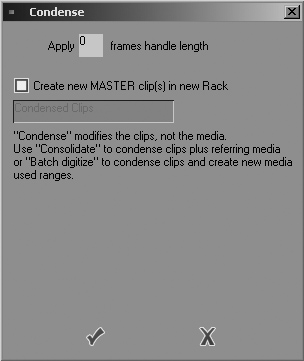
3. Click the check mark to begin the process.
• To return the clip to its original state, right-click inside the Rack where the Condensed clip is, and select Expand to media.
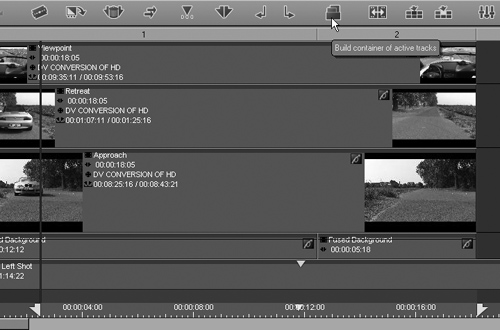
Using Containers
You use containers to group certain elements in a Timeline so that you can move them around or send them to external applications using XSend. The container is, in reality, a proxy marker for the clips and effects that you place inside the container. The effects don’t change, nor do the relative locations, unless you move them. You can also step into a container to fine-tune the edit at any point.
• By default, the Build container of active tracks button ![]() isn’t on the Liquid interface. For more details on adding buttons, see Chapter 1.
isn’t on the Liquid interface. For more details on adding buttons, see Chapter 1.
• The Build container of active tracks button is always dimmed out unless you’ve defined a mark-in and mark-out point on the Timeline.
To build a container
1. Place the Timeline cursor at the start of the area where you want to build a container, and press the I key to create a mark-in point.
2. Place the Timeline cursor at the end of the area where you want to build the container, and press the O key to create a mark-out point.
The Build container of active tracks button now becomes active (Figure 14.30).
Figure 14.30. A mark-in and mark-out point on the Timeline activates the Build container of active tracks button.
3. Build the container by doing one of the following:
• Click the Build container of active tracks button.
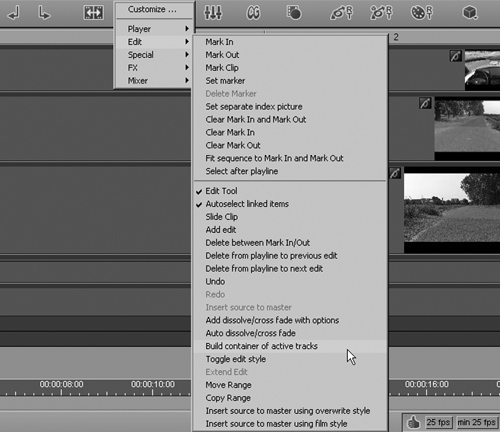
• Right-click anywhere on the Timeline button area and select Edit > Build container of active tracks (Figure 14.31).
Figure 14.31. You can also access the Build Container function without adding the button to the Toolbar.
The resulting container displays on the Timeline as one clip (Figure 14.32).
Figure 14.32. A container as it appears on the Timeline.

• Make sure all the required tracks between the mark-in and mark-out points are active before you attempt to build a container, because only active tracks are included.
• Containers can be useful if you want to apply a filter across a set number of clips or even the entire Timeline. An example involves making a container from the whole Timeline and then adding the ColorCorrection Editor to legalize each clip, image, and title to broadcast standards. See Chapter 11, “Color Correction,” for details on the ColorCorrection Editor.
• Containers can exact a toll on slower systems if used too extensively. Try not to use containers as a substitute for using the Sequence system described at the beginning of this chapter, otherwise you may find your computer slowing to a nerve-jangling crawl as you approach the end of your project.
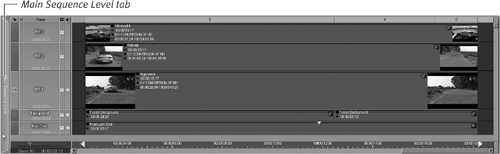
1. Right-click the container and select Container > Step Into Container (Figure 14.33).
Figure 14.33. Opening a container for further editing...
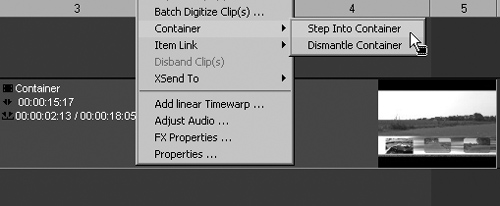
2. Once you’ve stepped into a container, you need to exit back to the Timeline by selecting the Main Sequence Level tab that appears only when you are working inside a container (Figure 14.34).
Figure 14.34. ...displays the contents in a sub-Timeline.
• To dismantle a container, right-click the container and select Container > Dismantle container.
Working with Sub Tracks
You can use Sub Tracks to conserve your work area and hide tracks that you really don’t need to see all the time.
For instance, it’s fairly common to add a motion background to a title in NLE. The motion background itself has probably been created in a third-party application and imported into Liquid. Once you place the motion background on the Timeline, you don’t really need to see it anymore. In fact, it’s taking up valuable real estate, which is always an issue for editors who work mainly in special effects.
By using Sub Tracks, you can easily get around this problem by collapsing the Sub Track after you have added the motion background. It can then be opened again at any time if you need to perform any fine-tuning.
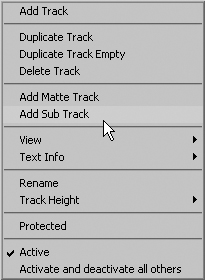
To add a Sub Track
• Right-click in the track name area and select Add Sub Track from the contextual menu (Figure 14.35).
Figure 14.35. Choosing Add Sub Track from this menu...
The Sub Track is created directly under that track, appearing in the name area as a branch (Figure 14.36).
Figure 14.36. ...creates a Sub Track under the selected track.
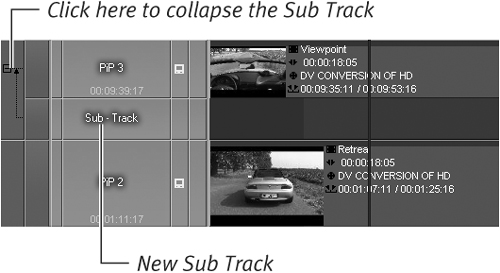
• To collapse a Sub Track, click the minus sign (–) on the far left of the track name.
• You can also create a Sub Track within another Sub Track by using the same procedure as you did to create the first Sub Track. You can use this method as an alternative to building a container.
• The video monitor for a Sub Track isn’t always switched on by default when it’s created. Watch for this, because without the small Monitor icon that appears in the Sub Track, no video is visible. Of course, the same rule applies to the Speaker icon that again may not appear when you create a Sub Track.
The Matte Track
To understand the Matte Track, you must first understand what a Matte actually is. Imagine a Matte as a stencil, the sort a painter might place on the wall, spray paint over, and then peel off to reveal the shape of the stencil in the paint.
In NLE, the Matte Track is the stencil. It allows video through the shape of the Matte, but in this case, you can actually move the Matte using the 2D Editor and create a stencil that moves across the path of the video clip. Perhaps the most famous example of this is the opening scene of every James Bond film where the barrel of the gun tracks across the screen until it finds 007. Everything else on the screen is black, except the stencil of the gun barrel, which is effectively a still image with a transparent circle in the middle.
To create a Matte Track
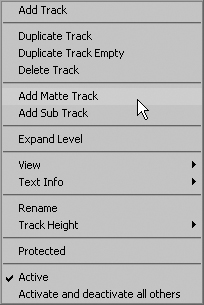
• Right-click in the track name area and select Add Matte Track from the contextual menu (Figure 14.37).
Figure 14.37. Choosing Add Matte Track from this menu...
The Matte Track is created directly under the track you right-clicked on, appearing in the name area as a branch track (Figure 14.38). The track is always colored green to differentiate it from a Sub Track.
Figure 14.38. ...creates a Matte Track under the selected track.

• To collapse a Matte Track, click the minus sign (–) to the far left of the track name.
• To delete a Matte Track, right-click it and select Delete.
• Add the Matte track filter from the RT filter Rack to a Matte or to the entire Matte Track to access some more options for controlling your Mattes.
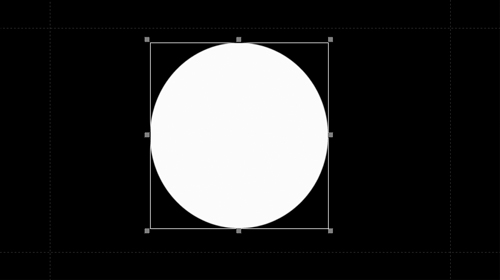
1. Open Title Deko (see Chapter 10, “Using Title Deko”), and create a title with just a circle in the center (Figure 14.39).
Figure 14.39. Simply add a circle to a blank Title Deko screen to create a Matte.
2. Place a clip on the Timeline, and then create a Matte Track under that clip.
3. Place the title you created in Step 1 onto the Matte Track, and expand it to the length of the clip above (Figure 14.40).
Figure 14.40. The Matte must go below the clip you want it to affect.
4. Place a 2D GPU filter on the title and add movement to the circle, taking it from left to right (Figure 14.41).
Figure 14.41. Adding a 2D filter to add some motion to the Matte.
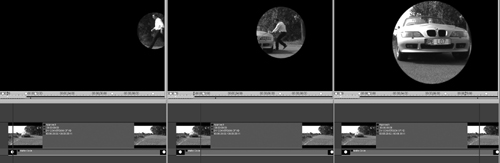
5. Add James Bond music and perhaps tweak the 2D filter’s blurring parameters to give the Matte a softer edge, and you’re done! It really is that easy.
Using Chroma Keying
There are a number of different names for Chroma Keying, including the more familiar blue- or green-screen compositing.
You often see this on national TV when the weather appears on a screen behind the weather person. In fact, the presenter is pointing to a blank green or blue screen and is looking at an image on a monitor in front of him or her.
Blue-screen compositing is used extensively in movies to put objects and people into a shot. This is what allows Superman to fly and Spider-Man to spin webs around the city without either of them having to dangle from a helicopter.
To create a chroma-based video clip, you need some fairly special equipment; just having a blue or green background isn’t really enough to produce truly professional results. First, you must have the correct lighting to remove shadows and to allow the background to be a uniform shade of blue or green. If you don’t do this correctly, the composite suffers from strange areas on the screen that appear to glimmer slightly as the light moves inside the shot. A modern audience will spot these, and when they do, your effect falls flat.
However, once you successfully shoot the clip and Liquid captures it, the process of removing the green or blue color background is simply a Matter of applying a filter and adjusting the parameters for maximum effect.
The following task-based description refers to any of the Chroma Key filters, including the Blue Screen, Green Screen, Chroma Key CPU, and Chromakeyer YUV effects.
To apply one of the Chroma Key filters
• Place the clip on the Timeline; then drag and drop the Chroma Key of your choice onto the clip (Figure 14.42).
Figure 14.42. Adding a Chroma Key filter to the Timeline.
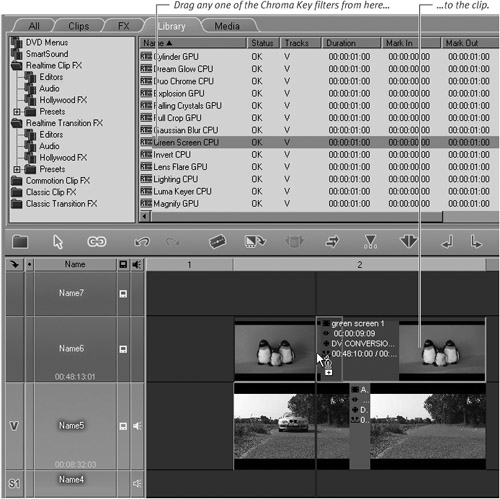
• To work correctly, the clip with the Chroma Key filter must be the uppermost clip on the Timeline tracks.
To use the Blue or Green Screen filters
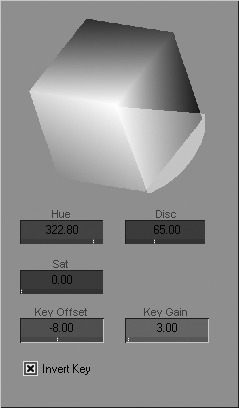
• Double-click the purple bar that runs the length of the clip to display the Green or Blue Screen Editor (Figure 14.43).
Figure 14.43. The Green Screen parameter interface. This is a Realtime filter.
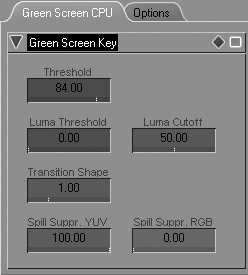
Adjusting the threshold produces the most noticeable difference when you’re fine-tuning your chroma effect, but don’t ignore the other settings as you adjust this clip (Figure 14.44).
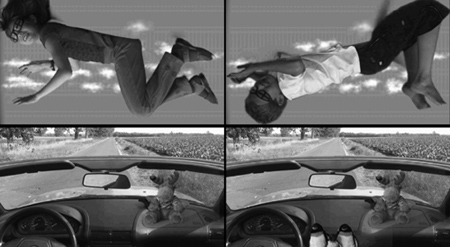
Figure 14.44. Before and after adjusting the Green Screen parameters.

• Remember that you’re working with video, and as a result, you need to change the parameters for this effect throughout the length of the clip. For more details on adjusting parameters and working with keyframes, see Chapter 9.
1. Double-click the purple bar that runs the length of the clip.
2. Draw a circle around the color chart, tracing the color of your background (green in this example) (Figure 14.45).
Figure 14.45. Defining the color area with which the filter should work.
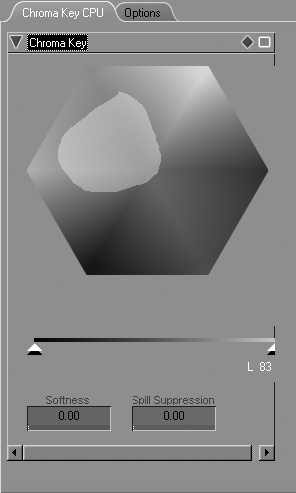
• Hold down the Ctrl key and left-click in the drawn area to move it around (Figure 14.46).
Figure 14.46. Hold the Ctrl key to move the selection area.
• Hold down the Alt key and draw inside the area to subtract areas from your original drawing.
• Hold down the Shift key to add to the areas of your original drawing.
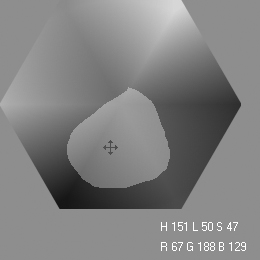
To use the Chromakeyer YUV filter
1. Double-click the purple bar that runs the length of the clip.
2. Use the color picker to drag the color band around the circle to achieve the result you are looking for (Figure 14.47).
Figure 14.47. Rotate the color area of the YUV filter to select the correct color.