
4. Managing Your Media
Much of the magic behind Liquid and the method by which it creates such spectacular effects with ease, is a simple matter of smoke and mirrors. In other words, it all happens behind the scenes and is controlled by the Media Management system. This is a complex system of file associations and file structuring, but if this means nothing to you, that’s okay, because most of the time you won’t even need to worry about what’s happening and how it all works.
Every now and then, however, you will have to get your hands a little dirty with Media Management, and that’s where the problems can start.
Every program has its own way of organizing the data with which it needs to work. Liquid’s method is no more complex than any other, but it can be a problem area for beginners. In this chapter, you’ll learn how and where Liquid stores its media clips, and also how these locations can be easily switched around at will.
Finding Your Media
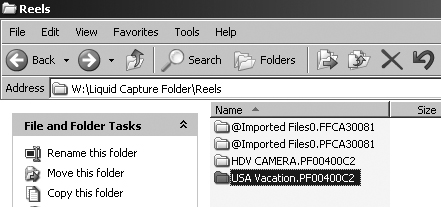
Anything digitized by the Logging Tool is stored inside a media folder; this is usually the folder you picked during the install process. If you look inside this folder using Windows Explorer, you’ll see a folder called Reels. Look in here and you will find a number of folders that will all have the same names as the Reels used when working with the Logging Tool (Figure 4.1).
Figure 4.1. A folder created with the Logging Tool. The first part of the name is created by the user when capturing.
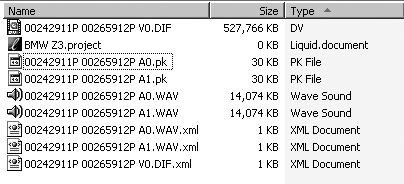
So far so easy, but look inside any of these Reel folders and you’ll see a confusing array of files with 20-digit names of seemingly random numbers and letters (Figure 4.2).
Figure 4.2. The contents of a folder created by the Logging Tool. All of these files are important.
Deciphering filenames
The numbers in filenames do actually mean something. The first eight numbers represent the clip-in point of the media file; the second set of eight numbers represents the clip-out point. This is displayed in the format of hours:minutes:seconds:frames, and the letter at the end tells you if it is a video (V) or an audio (A) track.
The other files in this folder are associated Media Management files that tell Liquid what you have been doing with this clip and to which sequences it belongs. Try to think of the contents of this folder as being the complete sum of its parts. None of these files can be separated from any of the others for Liquid to be able to work with them. They must stay together.
This is the Media Management file system in action, and although it may look confusing, don’t worry—all the Media Management tasks are and should be controlled from within Liquid. Users who ignore this “rule” will find themselves encountering problems.
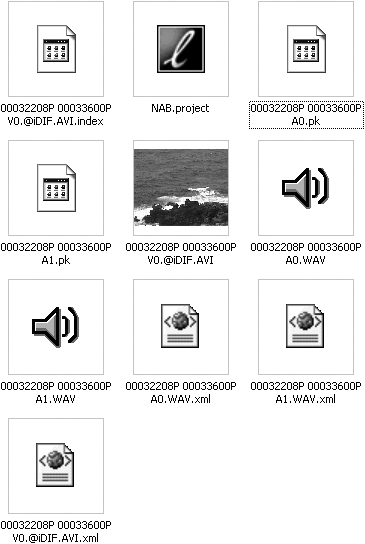
• If you need to import a media clip from a Reel folder, then you can select thumbnails from your Windows settings (Figure 4.3). You will see the first frame of the clip displayed, which at least gives you a clue as to the clip’s contents. You can also open the clip inside Media Player by double-clicking it.
Figure 4.3. Selecting thumbnails in Windows Explorer makes it easier to identify a video or sound clip.
• When importing a video clip from the Media folder, you only need to select the video track; the associated audio will be imported automatically.
Working with the Media Drive
When Liquid was installed, the wizard asked for a suitable location to store media that is either captured or imported. It’s here that you will find the directories used by the Media Management system.
However, you are not restricted to using just this drive or just this folder; it is also possible to add another drive or folder anytime.
To add a new media drive or folder
1. To open the Control Panel, do one of the following:
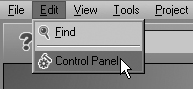
• Select Edit > Control Panel (Figure 4.4).
Figure 4.4. Accessing the Control Panel from the menu bar.
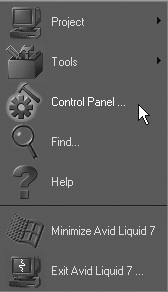
• Click the Classic interface’s Start button and select Control Panel from the list (Figure 4.5).
Figure 4.5. Accessing the Control Panel using the Classic interface.

2. Once the Control Panel is open, select the Site tab (Figure 4.6).
Figure 4.6. The Control Panel open to the Site tab.
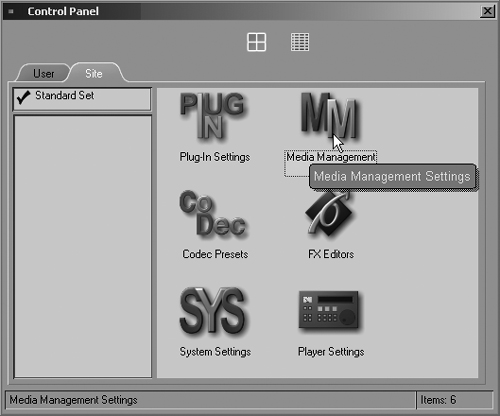
3. Double-click the Media Management button to open the Media Management interface (Figure 4.7).
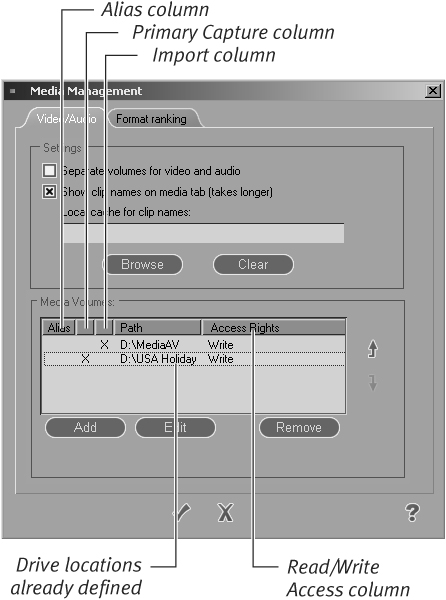
Figure 4.7. The Media Management interface.
4. Click the Add button at the bottom of the screen.
A Windows browser pops up (Figure 4.8).
Figure 4.8. Browse to the folder you want or create a new one.
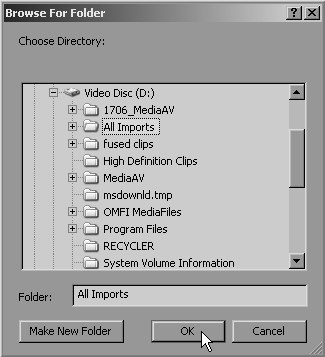
5. Browse to the drive you want and either create a new folder or use one that already exists.
6. Click the OK button.
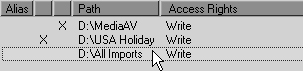
The new Media Drive is created (Figure 4.9).
Figure 4.9. The new media location added to the Media Management interface.
To move a Media Drive to another location
• Once you have created a Media Drive, you can alter its location by simply clicking the Edit button and browsing to a new location. Doing this will not affect your Project or your sequences because Media Management will always be tracking where each media clip is stored.
If you find yourself running short of hard drive space, this new location can be on a totally new hard drive without Liquid losing track of any files.
Organizing Your Media Drives
Once created, the Media Drive can be organized to further streamline your workflow by adding an alias to the drive for easier identification. It’s also possible to nominate which drive or folder will be the default for capture and which will be the default for import.
• Drives used for capture or import should always be separate from the drive that holds your operating system. It should also be a large drive with a spin speed of 7200 rpm. See the appendix for more details on drive specifications and which format you should use.
To create an alias
1. With the Media Management interface open, select a drive from the list by clicking it once.
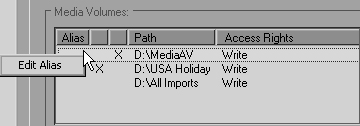
2. Right-click that drive in the Alias column (the first column in that row).
3. Click the Edit Alias contextual menu (Figure 4.10).
Figure 4.10. Editing the alias by clicking in the first column.
A text cursor appears inside the Alias area.
4. Enter your text.
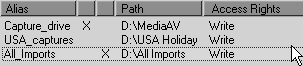
This box will grow to accommodate large strings, but it will push the others off the screen (Figure 4.11). This interface cannot be resized, although you can adjust the column widths.
Figure 4.11. All three drives now have aliases that can be recognized.
To select the default capture drive
1. With the Media Management interface open, select a drive from the list by clicking it once.
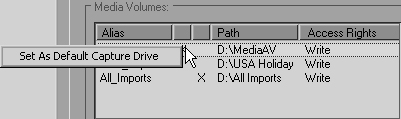
2. Right-click under the Primary Volume column (the one to the right of the “Alias” column).
3. Click Set As Default Capture Drive (Figure 4.12).
Figure 4.12. The second column is used to set the default capture drive...
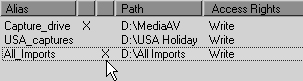
A large X appears in this column to indicate that this is now the default capture drive (Figure 4.13).
Figure 4.13. ...which is marked by a large X in this column.

To select the default import drive
1. With the Media Management interface open, select a drive from the list by clicking it once.
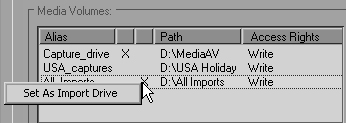
2. Right-click under the Import Volume column (the one to the left of the Path column).
3. Click Set As Import Drive (Figure 4.14).
Figure 4.14. The third column is used to set the import drive...
A large X appears in this column to indicate that this is now the default import drive (Figure 4.15).
Figure 4.15. ...which is marked by a large X in this column. Without it, all imports default to the primary volume.
• Both the Primary and Import Volume columns are blank by design. The boxes are apparently too small to fit text into.
1. With the Media Management interface open, select a drive from the list by clicking it once.
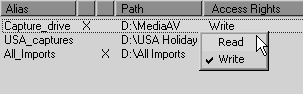
2. Right-click under the Access Rights column.
3. Click either Read or Write to set the access rights for that drive (Figure 4.16).
Figure 4.16. The last column is used to set the Read/Write access rights.
The word Read or Write appears in this column, depending upon which you selected (Figure 4.17).
Figure 4.17. Here the primary capture volume has been changed to Read, protecting it from alteration.
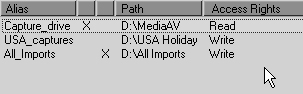
You change the access rights to Read to protect a Media Drive from being altered once a project is completed, but you will need to switch it back to Write if you need to perform any more editing.
To delete a Media Drive
1. With the Media Management interface open, select a drive from the list by clicking it once.
2. Click once on the Remove button and the drive vanishes.
There is no second warning with this feature and you will not be prompted with an “Are you sure you want to do this?” message. The drive location will simply be deleted. Make sure you have the right drive selected before you do this.
However, remember that you are only removing it from the Media Management system; you are not deleting it from your hard drive. If you delete the wrong one, then simply bring it back in again using the instructions on page 114.
• Any of the above alterations can be changed on the fly. However, be cautious when deleting a Media Drive because Liquid will no longer be able to use any files stored at that location.
Physically Moving Your Media Around
Liquid’s unique file structure means that you have to exercise some care when moving files around using Windows Explorer. Physically removing a file from a folder and transferring it to another can cause the Timeline render marker to go dark red—a sign that the media can’t be located and can’t be worked with. Restoring this can be difficult, and in some cases, impossible.
However, if you need to switch the location of your media files using Windows Explorer, then you need to understand the following rule:
• When searching for media clips, Liquid is looking for a folder called Reels. This folder can be anywhere in the directory tree, but it must be the folder that contains the video clips and all the associated files.
To physically move the location of a media file
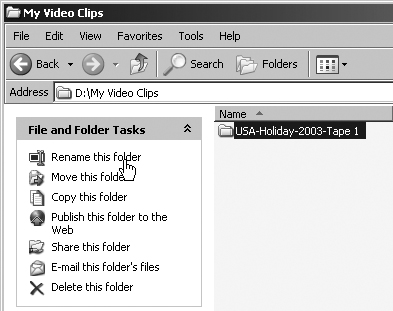
1. Open Windows Explorer and create a new folder, giving it a unique name that is associated with the project you are working on—for example, USA-Holiday-2003-Tape 1 (Figure 4.18).
Figure 4.18. Creating a clearly named folder at a new location.
2. Open this new folder and create another folder inside this one called Reels (don’t forget the “s” at the end).
3. Browse to the original Media folder and locate the original Reels folder.
Inside you will find the names of all the Reels you have captured to this location.
4. Once you’ve located the correct folder, right-click it and select Copy (Figure 4.19).
Figure 4.19. Copying the entire folder from the original location.
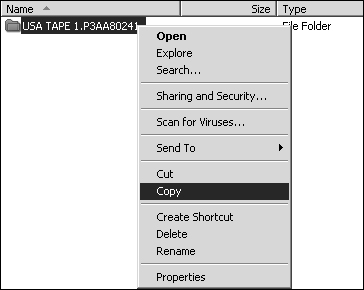
Remember, it’s the whole folder you are copying, not just the one video and accompanying audio files. Everything in that folder must be copied, so it is far easier to copy the folder itself.
5. Browse back to the new Reels folder you created in Step 2, right-click, and select Paste.
Make sure you are pasting inside the new Reels folder; if you do not, then Liquid will not be able to find it.
6. Open the Media Management interface and then add this new location following the instructions in the “To add a new media drive or folder” section earlier in this chapter. You only need to select the folder in which the new Reels folder has been created.
Once it has been added, Liquid will automatically look inside this new location for the Reels folder. Once it finds this, it will scan the contents and reassociate any clips it has in the Project Browser with any clips that are stored in this new location.
• The secret here is to remember that the folder called Reels (don’t forget the “s”) must be the folder that contains your media clips. No Reels folder, no media clips. It’s that simple.
Deleting and Restoring Media Clips
Like everything else under the Media Management system, deletion should be done with the Project Browser because physically removing files using Windows Explorer isn’t easy or safe—particularly because the filenames do not immediately allow you to identify a file.
To delete a media clip
1. Select the media clip in the Project Browser and press Delete on the keyboard.
A Delete dialog pops up asking if you want to delete the clip and also the corresponding media.
2. Do one of the following:
• To delete the clip and any parent clip that it belongs to, select both in the Delete dialog. If this clip is one of several Subclips, then all clips will be deleted.
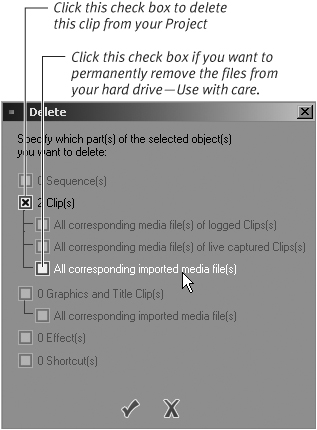
• To remove just the clip from your Project Browser, click the first check box, displaying the number of clips to be deleted, but leave the “All corresponding Imported Media Clips” check box blank. This method allows your clip to remain on your hard drive. Checking the “All corresponding” option will remove the original media, which will then need to be reimported or redigitized (Figure 4.20).
Figure 4.20. The Delete dialog box.
1. Click the Eye icon in the Liquid taskbar (Figure 4.21).
Figure 4.21. The Eye icon used to switch between interfaces.
![]()
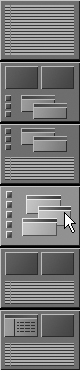
2. Switch to Storyboard view by clicking the third icon from the bottom of the column (Figure 4.22). If you are using a dual-screen setup, the Trash can icon will already be displayed on one of your monitors and, in this case, you obviously won’t need to switch your view.
Figure 4.22. The Storyboard icon is third from the bottom.
The desktop is displayed with the Trash can icon in the upper-left corner (Figure 4.23).
Figure 4.23. The Trash can icon on the Liquid desktop.
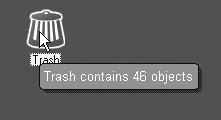
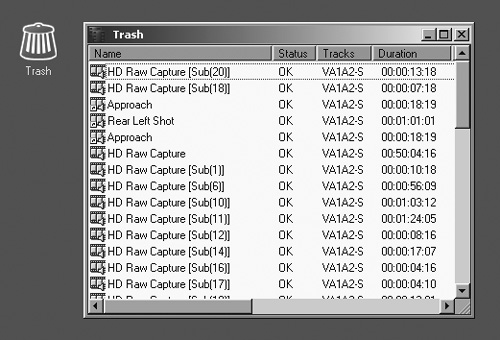
3. Double-click the Trash can icon to display a list of files recently deleted from the Media Management system (Figure 4.24).
Figure 4.24. The contents of the Trash can.
4. Select the file you want to restore and drag it back to the Rack it came from (Figure 4.25).
Figure 4.25. A file restored to its Rack using drag and drop.
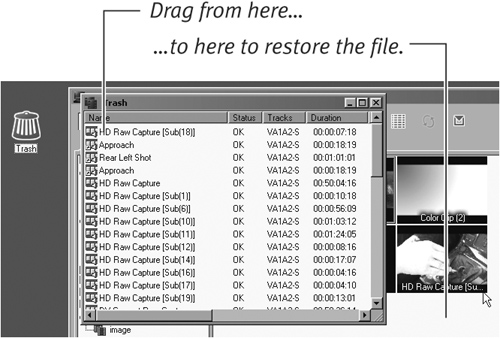
This restores the file not only in the Project Browser, but also on the Timeline if it was used there.
• Any media clips that are present on the Timeline but are deleted from the Project Browser will not be removed, but they will display a black screen with an exclamation point (!) to indicate the associated media is missing.
• You can also use Copy and Paste to restore files from the Trash to a Rack.
When Moving Media Goes Bad
There can be times, particularly when you’re using removable hard drives, that it all goes wrong and you end up with all the render slices turning dark red. This is Liquid’s way of telling you it can’t find the file. If this happens, do the following:
To verify a lost media clip
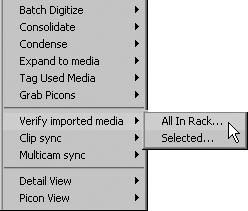
1. Right-click inside the rack window of the lost media clip and select Verify imported media.
2. Choose All In Rack or Selected as appropriate (Figure 4.26).
Figure 4.26. Right-click inside the Rack to verify the location of lost media clips.
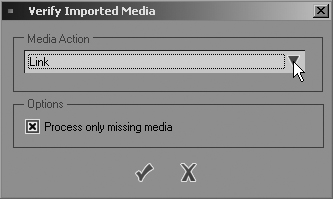
3. Follow the prompts to re-link the rack file to the target file and Liquid will search the Media folders looking for these associated clips (Figure 4.27).
Figure 4.27. Choose here if you want to Link, Copy, or Move the file.
• If it can’t find it on the first sweep, Liquid will ask you to manually find the target file.
• If it cannot find the files, then make sure the drive they are stored on appears in the Media Volume area of the Media Management interface.
Render Files
Render files are also covered by the Media Management system. They represent the magical part of the smoke and mirrors by creating the effects in real-time previews and keeping the show running smoothly.
This location was also selected during the install, but it can be changed at any time. However, any render files you have associated with the current Project will need to be re-rendered.
You should also be aware that the Render drive can only be moved, and unlike the Media Drive, you can only have one Render drive at any one time.
• To learn more about rendering, see the “Background Rendering” and “Rendering a Realtime Effect” sections in Chapter 1, “Getting Started.”
To move the Render drive
1. Open the Control Panel by doing one of the following:
• Select Edit > Control Panel (Figure 4.28).
Figure 4.28. Accessing the Control Panel from the menu bar.

• Click the Classic interface’s Start button and select Control Panel from the list (Figure 4.29).
Figure 4.29. Accessing the Control Panel using the Classic interface.
2. Select the Site tab (Figure 4.30).
Figure 4.30. The Control Panel open to the Site tab.
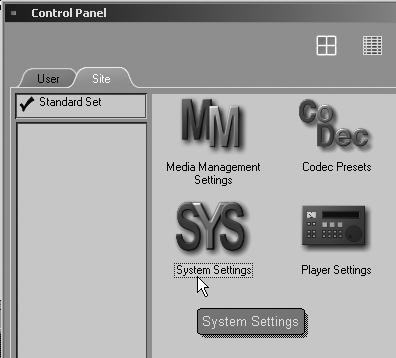
3. Double-click the System Settings button to open the System Settings interface.
4. Locate and click the word Rendering in the General tab (Figure 4.31).
Figure 4.31. The System Settings interface on the General tab.
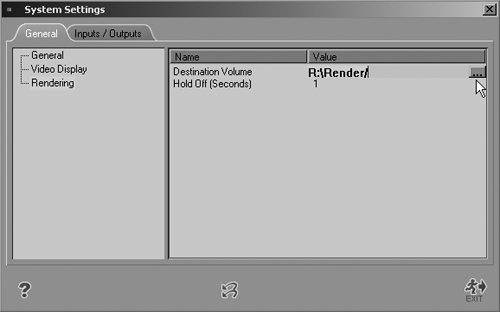
This displays the render location in the right window.
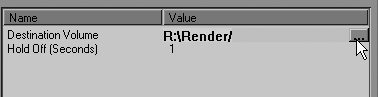
5. Double-click directly under the Value column to display a small button containing three dots. This is the Browse button (Figure 4.32).
Figure 4.32. Changing the Render folder location.
6. Click the Browse button to display the directory tree. Browse through this in the normal way until you have selected a new location for your Render folder.
7. Click the OK button and then the Running man ![]() icon to close the editor.
icon to close the editor.
All render files are now directed to this new location.
Deleting unwanted render files
During the edit process, Liquid will create a large number of render files, some of which you’ll later discover you don’t need, or you’ll find that they were used by another sequence and are taking up space you now badly need.
Liquid allows you to delete these unwanted files in a selective manner so that you can reclaim wasted space without jeopardizing the project you are working on.
To delete render files
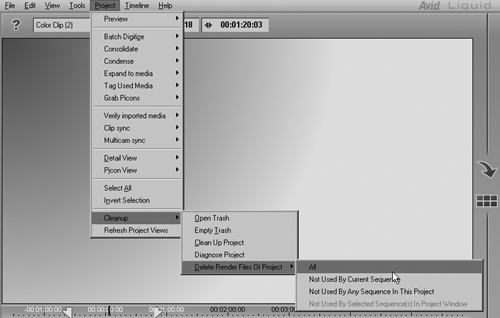
From the menu bar, select Project > Cleanup and click one of the following (Figure 4.33):
• All: To delete all render files associated with this project and all previous projects.
• Not Used By Current Sequence: To delete all render files but not the ones you are currently using.
• Not Used By Any Sequence In This Project: To delete any render files left over from previous Projects but retain the current ones.
• Not Used By Selected Sequence(s) In Project Window: To delete any render files from sequences you have not highlighted before accessing the Cleanup menu. This will be dimmed out if no items have been selected.
Figure 4.33. Cleaning up a Project from the menu bar.
Once you have clicked your choice, those render files will be deleted. You will not be prompted with an “Are you sure you want to do this?” message, so be absolutely sure before you click.
• When the Project menu is selected from the Bar menu, the Project Browser will flash yellow if you have the Project Browser open in the Timeline. This is a normal function and will happen whenever you select Project from the menu bar.
Cleaning up with the Trash Can
Figure 4.34. Cleaning up a Project using the Trash can.
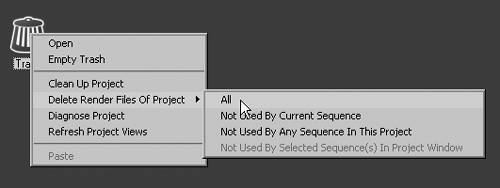
• Cleaning up a Project, which is used to clear Undo information and any redundant objects no longer associated with the Project
• Diagnose a Project, which is used to repair damaged files created in the event of software crash. Both functions are accessed by right-clicking the Trash can icon.