1. Getting Started
Before you launch into this book, it is essential that you familiarize yourself with some of the terms, phrases, and main features found in Liquid. They are simple enough to learn, but obscure enough to seem impenetrable to the absolute beginner or to users migrating from other software programs.
This chapter covers the interface and, for the benefit of total beginners, some of the basic concepts of nonlinear editing, which is often referred to as NLE. But don’t panic, I deal with all of these features in far more depth in the relevant chapters, so you won’t have to learn too much too soon. The latter part of this chapter does address customizing the interface and saving these customizations as templates, so you can learn some of the basic concepts of customizing your interface to suit your own particular workflow.
Installing Liquid 7
If your computer did not come preinstalled with Liquid, you will need to install the software from the disc. This is a simple operation, largely automated by wizards, but you should be ready to answer such questions as these: To which hard drive do you want to capture video clips? On which hard drive do you want to store render files?
• If you create a folder called Capture on your intended capture drive and another folder called Render on another drive before you install, you will greatly simplify this situation.
• Please read the “General Installation Tips” sidebar before attempting to install Liquid 7.
To install Liquid 7
1. Insert the Liquid DVD into your computer. This should automatically bring up the Installation wizard. If it doesn’t, browse to your computer’s DVD drive and double-click the Setup.exe file (Figure 1.1) found in the root directory of the DVD. Some versions of Liquid 7 may display a file called Autorun.exe.
Figure 1.1. The setup.exe shortcut. Click this to start the Installation wizard.

2. Select the install language and click OK.
This brings up a license agreement page.
3. Click Yes to agree to the license agreement, and click Next at the Welcome screen.
4. At the prompt, select the drive to which you want to install the software (Figure 1.2).
Figure 1.2. First choose where to install Liquid...
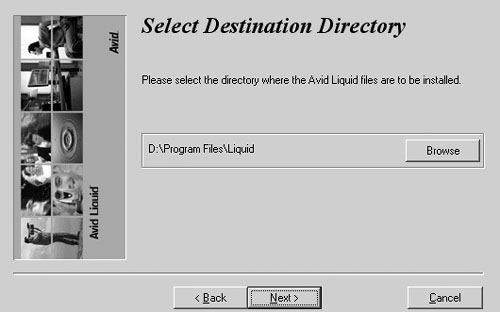
Unless you have a specific reason for doing so (see the Tips at the end of this instruction set), it is always best to install the software to the same drive that holds Windows XP.
5. The next screen asks you to choose which TV Standard and system language you want to use (Figure 1.3). This should default to the standard being used by Windows.
Figure 1.3. ...then which TV standard and language to use...
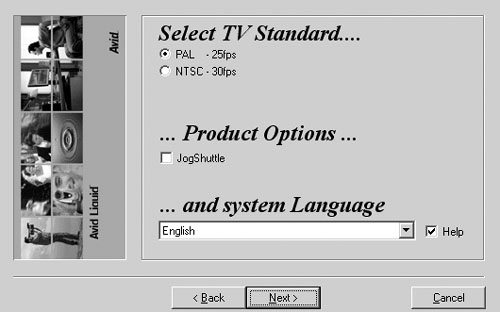
You can also choose to install the driver for a Jog/Shuttle controller from this screen if you have this hardware.
Most users will want to leave this set to the defaults and click Next.
6. Choose a drive on which you will store your render files (Figure 1.4). The optimal location will be a separate partition or hard drive that does not hold your operating system.
Figure 1.4. ...then the target location for your render files...
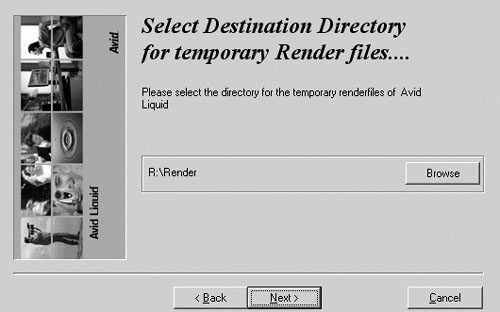
Choosing the optimal location is important because render files are created when
• Realtime effects are being displayed
• Non-Realtime effects are being rendered
• A DVD is rendering prior to the burn process.
7. Click Next and you will be asked to select the directory for the AV-capturing (Figure 1.5).
Figure 1.5. ...then the target location for your captured media...
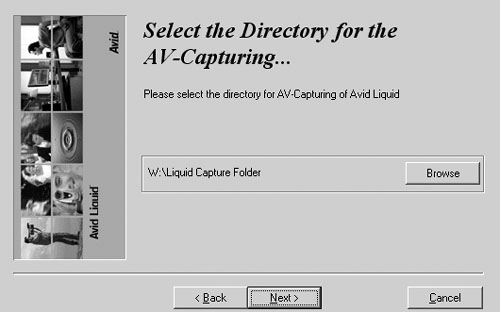
This is where your video clips will be stored when either digitized (captured) or imported. Approximately 16 minutes of digital video consumes 4 gigabytes (GB) of hard drive space, so clearly you’ll need to select a very large hard drive to get the best out of this program.
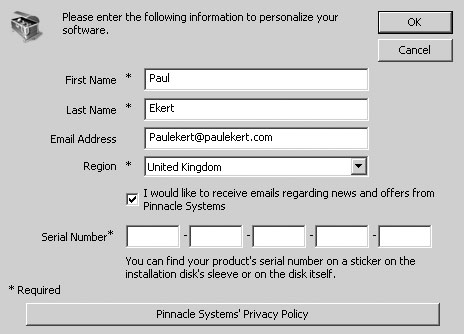
8. Click Next and Liquid will inform you it is ready to install. Click Next again and enter the serial number when prompted. Make sure you enter letters in uppercase and then click Next. You’ll also need to put some personal details in the required fields (Figure 1.6).
Figure 1.6. ...and finally, enter your serial number and personal details, and wait for the installation to finish.
9. Then... wait for the install to complete. This may take anywhere from 5 to 10 minutes to completely install the various components that make up Liquid. The Hollywood FX component is particularly slow to install, and in the beginning, it may appear as though nothing is actually happening. However, if you leave it for a while, the install process will eventually carry on.
At the end of this process, the computer will reboot. Depending on which setup you have, you may be asked to install Title Deko at once or after the computer restarts. This process is largely automatic; just stick to the defaults and let the Installation wizard do the rest. Once all of the components are installed, you may also have to reboot the computer.
• Although both Render and Video locations have to be selected during installation, you can change them later using the Control Panel. See Chapter 4, “Managing Your Media.”
• Further advice on setting up your computer and which hard drives to use for what can be found in the appendix.
• If you want to retain a working copy of Liquid 5.x or 6.x, you can install Liquid 7 to a directory different from that of 5.x or 6.x. This should retain your original program, but I would advise making backups of all Projects and saved FX’s before you begin to install Liquid 7.
Opening and Closing Liquid
Version 6.x introduced a new type of interface—the Menu Bar interface—while retaining the old, so-called “Classic” interface. Both interfaces are retained in version 7, and both menu systems offer two different methods to open and close them.
To start Liquid with the Menu Bar interface
Do one of the following:
• Double-click the desktop shortcut (Figure 1.7, right).
Figure 1.7. The icon on the right should appear on your desktop by default. Double-click it to launch Liquid, the default GUI, or use the Windows Start menu to access the Classic interface icon.

• Go to the Windows Start menu and select All Programs > Avid Liquid 7.00 > Liquid 7—not Liquid 7 (classic).
To start Liquid with the Classic interface
• Go to the Windows Start menu (since the desktop icon created during installation opens the Menu Bar interface) and select All Programs > Avid Liquid 7.00 > Liquid 7 (classic) (Figure 1.7, left).
• Depending on how many plug-ins you have installed and the speed of your processor, loading Liquid 7 can take some time to complete the initial launch. In fact, Liquid has been known to pause for more than a minute on the 40% mark while loading. This should only happen the very first time you launch Liquid.
• The first time you launch Liquid 7 you will be asked to activate the program. To do this, follow the onscreen instructions. An Internet connection is required to complete this part of the installation. You may also be asked to name a New Sequence and chose the Timeline presets. Advice on setting this can be found in Chapter 5, “The First Assembly—Storyboarding”
To exit Liquid in the Menu Bar interface
Do one of the following:
• Click the window’s X in the top right corner of the screen.
• Press Alt+4 on the keyboard.
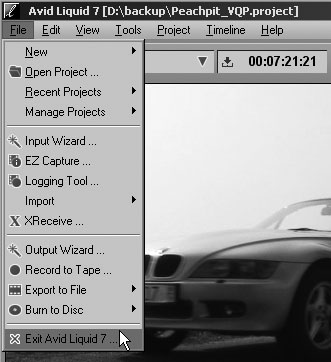
• Go to the File menu and select Exit Avid Liquid 7 (Figure 1.8).
Figure 1.8. Click this option to exit Liquid when using the Menu Bar interface.
To exit Liquid in the Classic interface
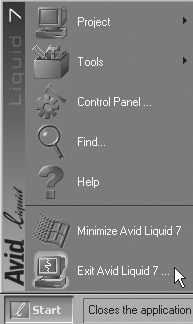
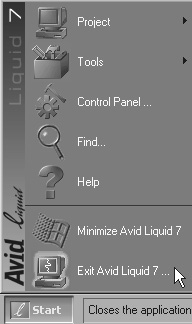
• Click the Liquid Start button and select Exit Avid Liquid 7 (Figure 1.9).
Figure 1.9. Click this option to exit Liquid when using the Classic interface.
In both cases, a small Exiting Application window appears while Liquid clears unwanted temporary files from your hard drive. This process may take more than a minute and should not be interrupted. Once this window has disappeared, you may turn off your computer.
Matching the Screen Shots in This Book with Your Interface
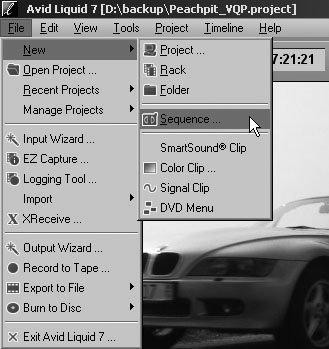
Liquid 7 opens with a demo sequence on the Timeline. To match the screen shots in this book with your computer display, you may need to start a new sequence by clicking on the New Sequence button ![]() at the top right corner of the Liquid interface, or by selecting File > New > Sequence (Figure 1.10). See Chapter 14, “Creating a Sequence” for more details on the use of Sequences.
at the top right corner of the Liquid interface, or by selecting File > New > Sequence (Figure 1.10). See Chapter 14, “Creating a Sequence” for more details on the use of Sequences.
Figure 1.10. Creating a new sequence to clear the Timeline.
Version 7 sticks to this approach but also introduces a new menu bar—the Quick Access menu ![]() . This is designed to help new users understand the interface that much quicker and allow advanced users easy access to core functions (Figure 1.11). Details on the new Quick Access menu can be found later in this chapter and in Chapter 6, “Fine-Tuning Your Edit.”
. This is designed to help new users understand the interface that much quicker and allow advanced users easy access to core functions (Figure 1.11). Details on the new Quick Access menu can be found later in this chapter and in Chapter 6, “Fine-Tuning Your Edit.”
Figure 1.11. The new Quick Access menu provides easy access to core functions.
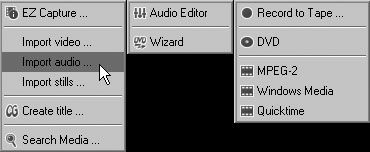
Figure 1.12. The Classic menu has a single Start button, giving you access to all functions. Recommended for advanced users only.
Technobabble—How Does Nonlinear Editing Actually Work?
• Alter the length of the clip
• Add a filter to it
• Change its color tones
• Speed it up or slow it down
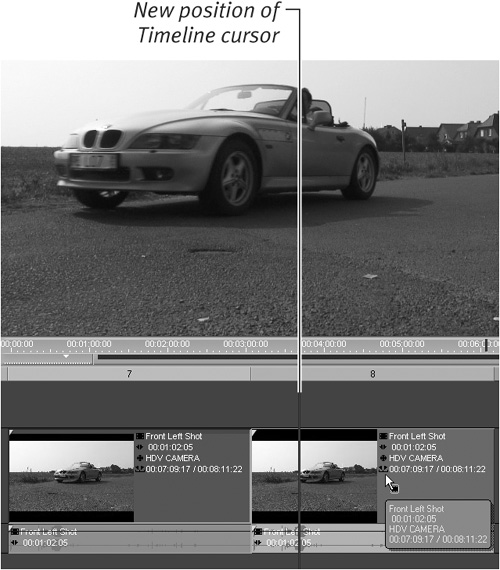
Figure 1.13. Two identical clips on the Timeline. The left one is distorted with a Swirl filter.
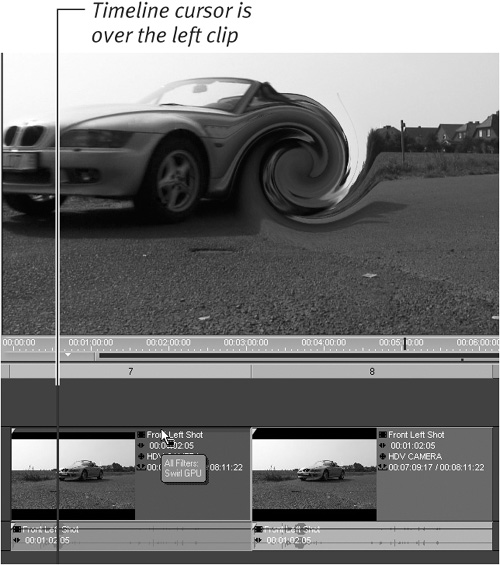
Figure 1.14. The Timeline cursor is moved to the clip on the right and shows the same clip but unaffected by the Swirl filter.
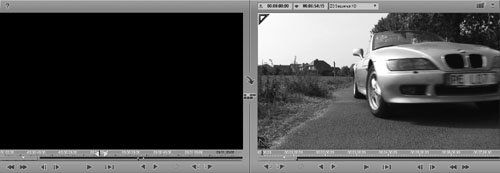
Technobabble—What Is an Inlay?
Figure 1.15. The large black area on the left is an empty inlay area. On the right the inlay is showing a clip in motion.
Touring the Interface
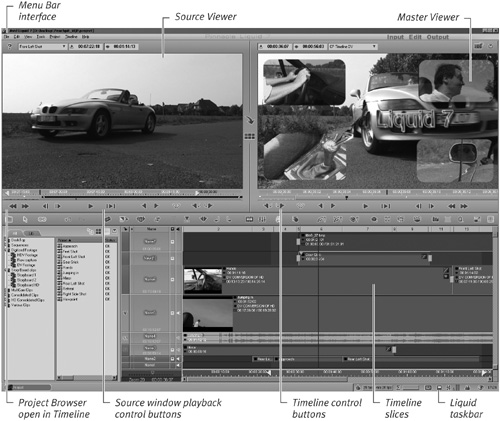
When you first launch Liquid, it displays the main interface showing the Timeline, and the two windows on the left and right called the Source and Master inlays. Both are controlled by the buttons directly under the inlays or by using the mouse and keyboard shortcuts (Figure 1.16).
Figure 1.16. The Timeline view; shown here with a fairly complex layout of clips, both audio and video.
The Timeline is the root of all of the various interfaces Liquid has to offer, and at some stage during your edit process, your Project will also be completed here. This makes the Timeline arguably the most important interface of them all.
Therefore, I will touch on the Timeline in pretty much every chapter of this book, but specifically when I discuss editing techniques in Chapter 6.
Working with buttons
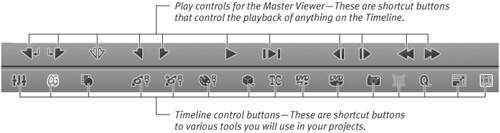
You can interact with Liquid by using a variety of buttons. To use a button, simply click it with the mouse. This action will open an interface, create an event, or perform an action, depending on which button you press (Figure 1.17).
Figure 1.17. The Control bar for the Timeline (bottom) and the Master Viewer (top).
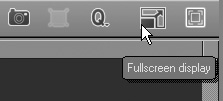
If you are unsure of what a particular button does, just hover the mouse over it and a small tool tip will pop up and give you a brief description of what that button does (Figure 1.18). In some cases, the text is very brief, but it will at least give you a clue as to the button’s ultimate purpose. From there, the answer is but a reference manual away.
Figure 1.18. The Toggle Full Size Monitor button displaying a helpful tool tip.
Working with keyboard shortcuts
The other way to access a feature is to use a keyboard shortcut. This is often a simple matter of pressing a single key, but other times, you may need to hold down a combination of keys and mouse buttons.
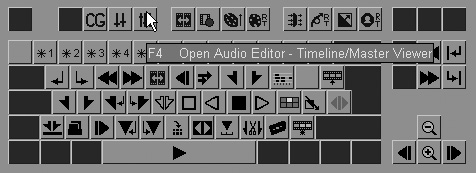
Clicking the Keyboard button ![]() (down in the taskbar area—the bottom-right corner of the interface) will bring up a template that shows which keys are assigned to which functions. Again, you’ll be able to access a tool tip to figure out what all of those icons actually mean (Figure 1.19).
(down in the taskbar area—the bottom-right corner of the interface) will bring up a template that shows which keys are assigned to which functions. Again, you’ll be able to access a tool tip to figure out what all of those icons actually mean (Figure 1.19).
Figure 1.19. The keyboard template for the Timeline shortcuts.
• Once the keyboard template has opened, clicking anywhere in the interface will toggle the keyboard shortcut window to show the shortcuts for whatever area has just been clicked.
Summing Up—Other Interfaces in Liquid
Although the most important, the Timeline is just one of the many interface screens that Liquid uses. The other interfaces of primary importance include the following:
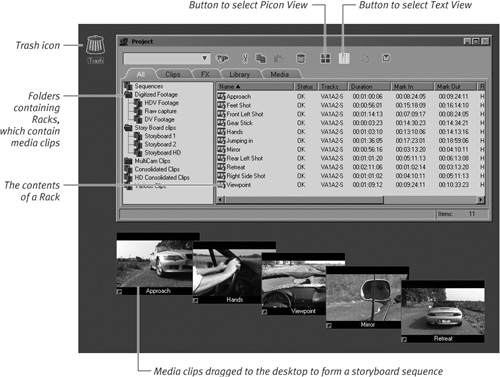
• The Storyboard view (Figure 1.20). This view provides a simple way for you to choose the running order of your clips. This interface is an essential part of any moviemaker’s planning. It’s one of the more underused interfaces of Liquid, but Chapter 5 will explain how to get the best from it.
Figure 1.20. Storyboard view.
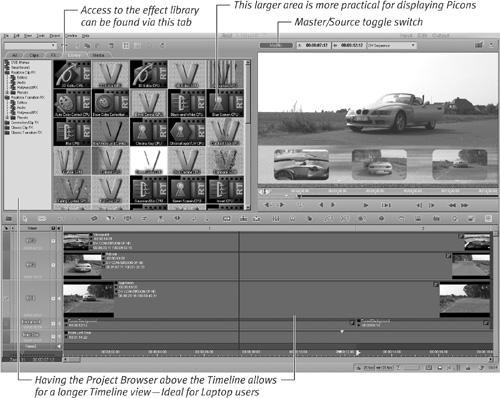
New in Version 7—The Studio Interface
• To allow users migrating from Studio to Liquid an easier upgrade path.
• To make using Liquid in a single-screen environment (such as on a laptop) a much easier proposition.
Figure 1.21. The new Studio interface.
• The Logging tool (Figure 1.22). If you want to transfer (digitize/capture) material from a DV/HDV device or analog player, this is where you will do it. The Logging tool is daunting at first glance, but it is simple to use in practice. Chapter 2, “Logging and Digitizing,” explores the possibilities.
Figure 1.22. The Logging tool.

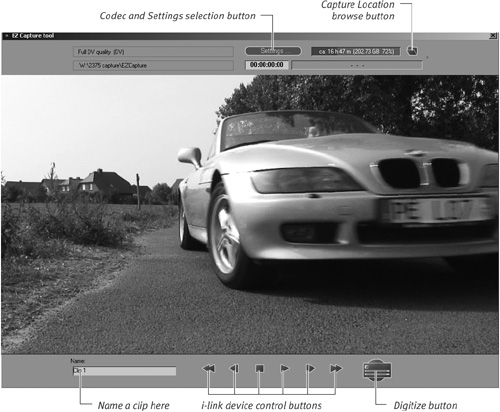
• EZ-Capture tool (Figure 1.23). New in Version 7 is an alternative capture tool that allows you to save captured files to a directory of your choice and with the name of your choice. This is a slightly more user-friendly approach than that used by the Logging tool, which uses the rather robust Media Management system to save clips with odd-looking file names. Full details of both tools can be found in Chapter 2.
Figure 1.23. The new EZ-Capture tool.
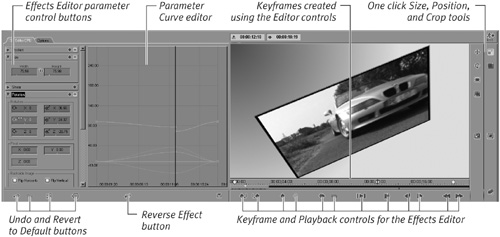
• The Effects Editors (Figure 1.24). Liquid has several Effects Editors for a variety of different operations. Although each Effects Editor has a different function, each operates on a similar principle of adjusting sliders to alter the properties of the effect and adding key frames to create effects over time. These features are discussed in Chapters 8, “Working with Transitions” and 9, “Working with Filters”.
Figure 1.24. The Effects Editors.
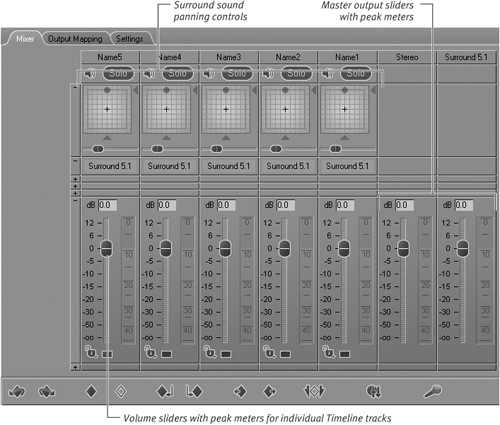
• The Audio Editor (Figure 1.25). The Audio Editor shown here has the 5.1 interface open. To access this, you must have a sound card with ASIO 2.0 compatibility and a 5.1 speaker system. Further details are in Chapter 7, “Working with Audio.”
Figure 1.25. The Audio Editor.
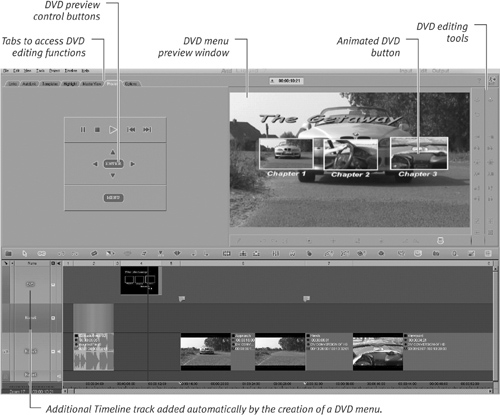
• The DVD Editor. One of the most exciting features of Liquid is its ability to create DVDs from the Timeline without first having to export the whole movie to a third-party application. Figure 1.26 shows the Preview window open, which allows you to check that your menu and its buttons are working as expected before you burn the Project to a DVD. Chapter 12, “DVD Authoring,” has more details on this cool feature.
Figure 1.26. The DVD Editor.
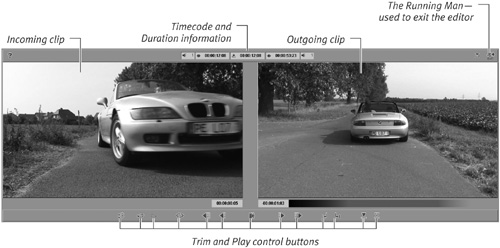
• The Trim window. You use this interface to trim media clips. Actually, it’s much more complex than that, and it’s also one of the interfaces that causes the most problems for new users. Chapter 6 has more details on understanding the complexities of the Trim window (Figure 1.27).
Figure 1.27. The Trim window.
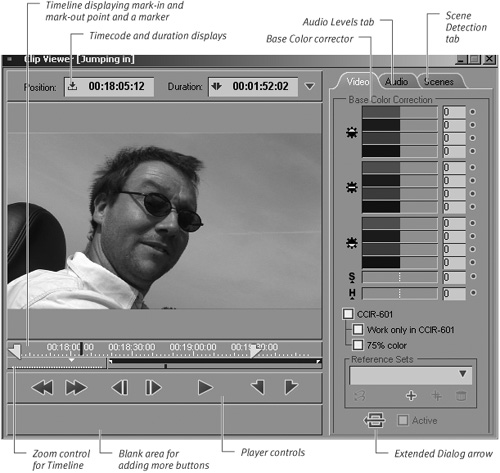
• The Clip Viewer. This is a small, compact interface that is uncluttered and fast to work with. It also has a number of features that allow you more editing opportunities than are afforded by the Source window. Sadly, it is a vastly underrated part of Liquid’s tools. See Chapter 5 for details on how to open and use the Clip Viewer (Figure 1.28).
Figure 1.28. The Clip Viewer. The right side of the interface is displayed by clicking the Extended Dialog arrow.
• The Project Browser. All of the media clips you work with are stored in the Project Browser. You open this area of the interface by clicking once on the Project Browser button ![]() (Figure 1.29).
(Figure 1.29).
Figure 1.29. The Project Browser is the heart of Liquid, shown here in List view.
The Project Browser has a second tab called Lib, which is used to access the FX library. Liquid has a comprehensive range of effects you can use in your video projects. You’ll find a full explanation of how to use these in Chapters 8 and 9.
Background Rendering
All rendering in Liquid Edition is carried out in the background. In practical terms, this means you can carry on using the program, editing new clips, creating new titles, opening other FX windows, and so on, while the program carries on rendering anything you have already worked on. You can observe any background rendering that’s taking place by opening the Render View window.
To open the Render View window
• Click once on the Sigma icon in the Liquid Edition taskbar ![]() . This will bring up the Render View dialog (Figure 1.30).
. This will bring up the Render View dialog (Figure 1.30).
Figure 1.30. The Render View window.
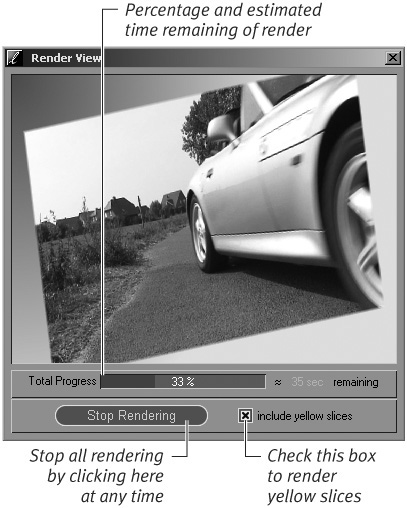
• From this screen, you can turn rendering on or off. This is useful if you want to save on processing power while experimenting with various Timeline effects.
Rendering a Realtime Effect
Although the phrase “rendering a Realtime effect”—be that a transition or a filter—sounds like a contradiction of terms, you have to remember that what you are seeing, with a Realtime effect, is a preview of that effect. With the USB2 Breakout box included with Liquid Pro, you can even view these transitions or filters on an external TV. The quality is so good that you might mistakenly think that it already has rendered, but the clue is the slice above the transition.
If this is yellow, then you are looking at a Realtime preview and you need to render this before you can create a DVD or output the Timeline to tape.
To Render a Realtime FX
1. Open the Render View window as described in the previous section.
2. Select the “include yellow slices” check box (Figure 1.30).
All Realtime effects will now start to render. Once the render has finished, all yellow slices should turn green.
• If the rendering doesn’t start, check that you haven’t previously clicked the “Stop Rendering” button to the left of the “include yellow slices” check box. If you have, it will read “Start Rendering” and the render progress bar next to the render symbol will not move.
• See “The Color of Slices” sidebar for more information on Realtime and non-Realtime rendering.
• For more information on rendering, see the sidebar, “How Does Nonlinear Editing Actually Work?” earlier in this chapter.
Figure 1.31. The color of slices on the Liquid Timeline explained.
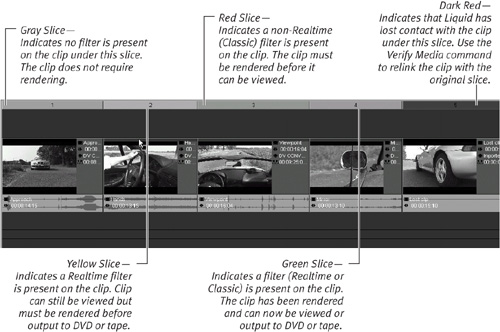
• Gray: The normal state for a clip. The clip has no special effects attached to it and no rendering is required.
• Yellow: A Realtime FX has been added to the clip. The FX will preview without rendering, but the slice will need to be rendered before it is taken out to DVD or tape.
• Red: A non-Realtime FX has been added to the clip. The FX must be rendered to be viewed. This normally occurs during background rendering. Non-Realtime effects can in fact be partially viewed as they render. The same is not true of Realtime effects.
• Green: Realtime and non-Realtime FX have been rendered. Normally the change from red to green is gradual so that you can see how much of the clip has yet to render. Any part of the slice that is green can be played back while you are waiting for the rest of the clip to render. This rule does not apply to yellow slices. For various technical reasons, some machines do not show a gradual change from red to green but rather a change once the render is complete.
• Dark Red: This means the clip directly under this slice cannot be found by the media management system. See Chapter 4 for details on relocating lost clips.
Instant Save
One thing Premiere users will fail to locate is a Save button. This is because Liquid automatically saves your work thirty times a second, which means even if a crash should occur, you are unlikely ever to lose any of your work.
Undo information from previous sessions
The save function also retains all undo information from previous sessions, allowing you to undo several days’ worth of alterations if you need to. This undo information is retained even if you close the program and turn off the computer.
If you have ever watched several hours of editing go south courtesy of a program crash only moments before you thought, “When was the last time I saved this?” you will really appreciate this particular chore being done automatically.
If you are worried about overwriting something important, Liquid also allows you to save various copies of Projects that you can refer back to.
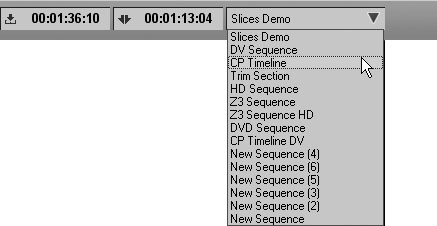
Figure 1.32. If the software should crash, you will find the sequence you last worked on in this menu.
Creating Projects
Each time you start working on a new production, you should also start a new Liquid Project. Think of a Project as being similar to an office ring binder—it allows you to place all relevant documents in one place. This has several advantages, not the least of which is that you can export an entire Project to an archive or transfer it to another editing station without too much fuss. This simple operation alone can become overly complex if you have not given a unique Project name to each of the productions you are working on.
With this in mind, try to get into the habit of creating a new Project for each production you are working on. The process of creating a Project only involves a few mouse clicks and is a sound investment for your future NLE sanity.
• Creating a new Project is also a good idea if you want to retain the default Liquid settings. Every time you alter an element of the interface, Autosave will save it. Effectively, this means the default settings will be lost forever unless you make a backup copy or always work with a new Project name. The only other way of restoring the default setting is to reinstall the software, something you should be keen to avoid.
• Liquid saves your work every 1/30 of a second, which means once a Project has been created, it will continue to be updated every moment the application is open. This is yet one more reason to create a new Project for every production you are working on.
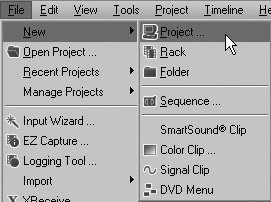
1. Select File > New > Project (Figure 1.33).
Figure 1.33. Creating a new Project via the Menu Bar.
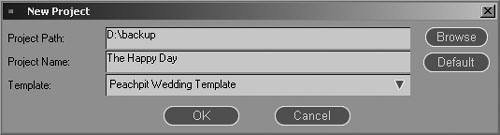
2. Browse to a directory in which you would like to store your Projects, give the Project an original name, and click OK (Figure 1.34).
Figure 1.34. Picking a unique Project name and a Save location outside the root directory.
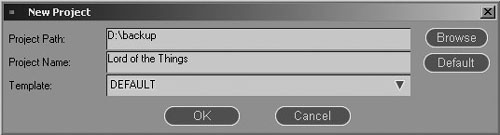
For details on the bottom drop-down menu (reading “DEFAULT” in the figure), refer to the “Using Project Templates” section later in this chapter.
• By default, Liquid saves its Project files to the root folder, the place where Liquid is installed. If you need to reinstall the software or install a service pack, then this Project data may be deleted. Therefore, it is best to use a folder on another hard drive to store your own project files.
• If you are using the Classic display, please see the “Using Projects with the Classic Interface” sidebar.
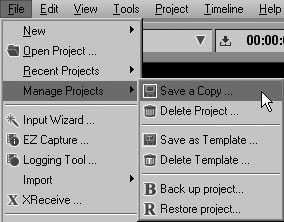
1. Select File > Manage Projects > Save A Copy (Figure 1.35).
Figure 1.35. Saving a copy of the current Project.
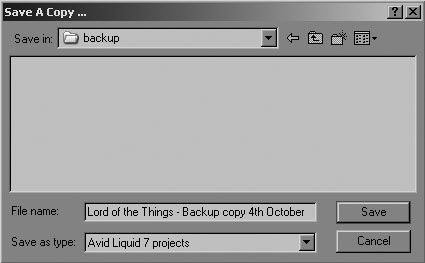
2. Browse to the directory where you want to store your Projects, give the Project an original name, and click Save (Figure 1.36).
Figure 1.36. Saving the Project to a safe location outside the Liquid folder.
• For the same reasons discussed in the previous section, it is recommended that you save your Project files in a directory outside the Liquid installation folder.
• If you are using the Classic interface, please see the “Using Projects with the Classic Interface” sidebar.
Using Projects with the Classic Interface
Figure 1.37. Creating or opening a new Project using the Classic interface.
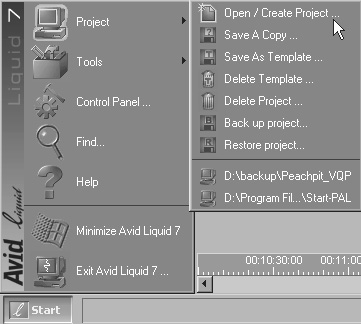
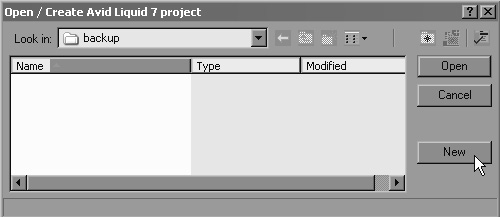
Figure 1.38. The file browser in the Classic interface looks is slightly different and has an additional New button.
To switch to a different Project
1. Select File > Recent Projects, and then click whichever Project you want to return to (Figure 1.39).
Figure 1.39. All recent Projects will be displayed here.
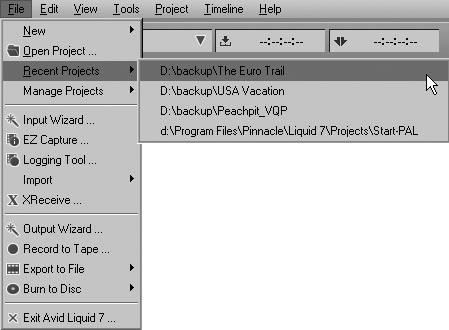
You will make this choice from a list of recent Projects; if you have picked original names for all of your Projects, the one you want will be easy to find.
2. Click the name of the Project you want to switch to, but be aware that there is no “are you sure” prompt here. The Project is loaded into Liquid as soon as you make that click.
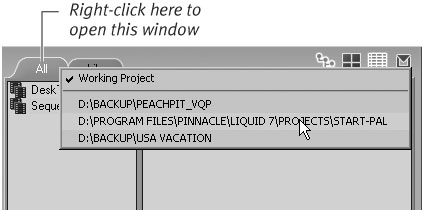
Switching between Projects in the Project Browser
Figure 1.40. Swapping between recent Projects in the Project Browser.
Using Project Templates
A Project template is useful for setting up Liquid to handle various types of projects, perhaps with a standard intro.
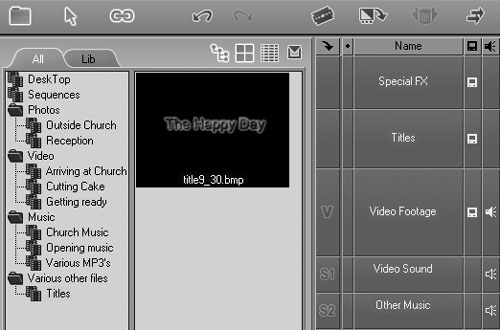
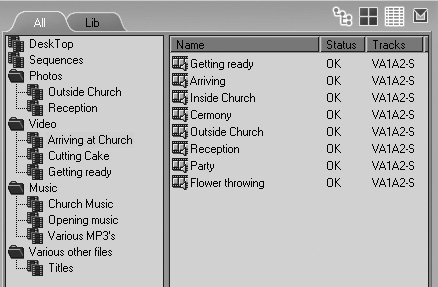
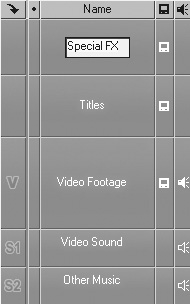
For example, you may want a wedding video to have the tracks ordered as shown in Figure 1.41. Saving a Project template means you only have to set this up once and then load it back in whenever you need it.
Figure 1.41. A typical layout for a wedding Project.
Creating a Project template will save the layout of the Racks and Rack Folders, any media clips placed in these folders, and any media clips that are on the Timeline, but it won’t save the toolbar buttons that you may have added to the interface.
To save a Project template
1. Select File > Manage Projects > Save as Template (Figure 1.42).
Figure 1.42. Saving a Project template.
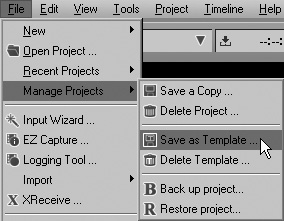
2. Once the dialog box appears, choose a unique name and then click Save.
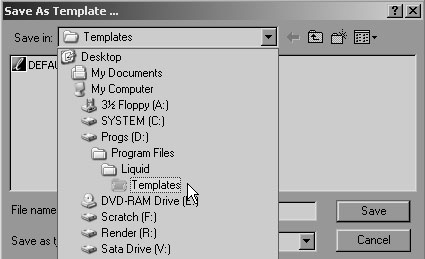
• Templates must be saved to the default template folder inside the Liquid program group (Figure 1.43). If you don’t save them to this location, Liquid can’t see them.
Figure 1.43. The default location you must use when saving a Project template.
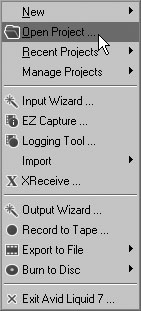
1. Select File > New > Open Project (Figure 1.44).
Figure 1.44. Opening a Project.
2. Browse to the Liquid template directory and select the one you want, and click OK (Figure 1.45).
Figure 1.45. Choosing a template from the menu bar.
• If you can’t see the template, check if it has been saved in the default Liquid directory. If it hasn’t, you can use Windows Explorer to locate the template and copy it to this location.
Using Project Backups
Using an original Project name for each and every production means that you can easily back up your work to a DVD, a zip file, or a network location.
To create a Project backup for export
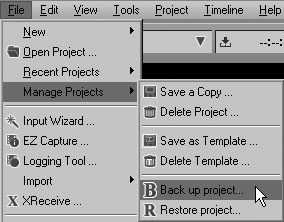
1. Select File > Manage Projects > Back up project (Figure 1.46).
Figure 1.46. Click here to create a Project backup.
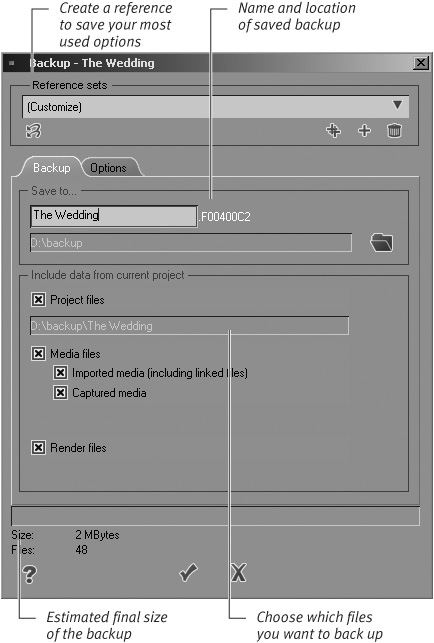
This brings up an interface with various options to choose from (Figure 1.47).
Figure 1.47. The Project backup interface.
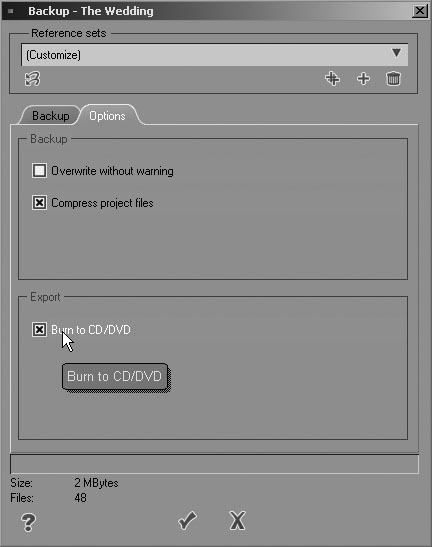
2. If you want to burn this to a DVD, select the Options tab and click the Burn to CD/DVD check box (Figure 1.48).
Figure 1.48. The second tab, Options, allows you to burn the backup directly to a DVD.
3. Once you have decided which options to use, click the check mark to begin the process. Depending on the size of the project, this may take some time.
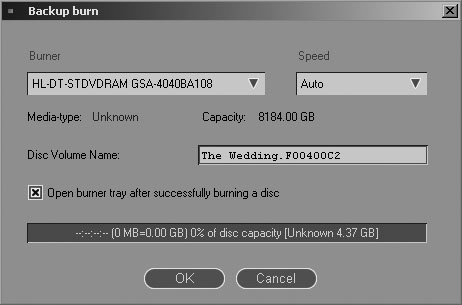
If you have selected the Burn to CD/DVD check box, then the Backup burn dialog will appear once the process is complete (Figure 1.49).
Figure 1.49. The Backup burn dialog.
• Liquid does not support large projects spanning multiple DVDs. If your project archive is larger than 4.7 GB (very likely), then you should create a folder on your hard drive and then use any DVD burning software that will support spanning. Instant CD/DVD version 7 from Avid will do this, but others on the market also have this feature.
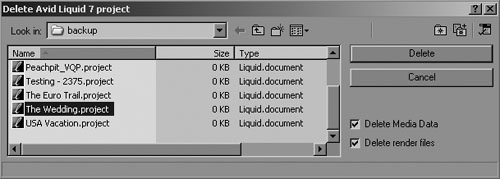
• Using the Project backup feature is a good idea if you are considering using the Delete Avid Liquid 7 project option (Figure 1.50). Using this option deletes not only the Project files, but it can also be instructed to delete the media clips and the render files associated with that Project. If you delete a Project without backing it up, it’s gone for good.
Figure 1.50. Deleting a Project makes it disappear for good, along with any media and render files if those check boxes are selected.
To restore a Project from a backup copy
1. Select File > Manage Projects > Restore project.
This brings up the Restore screen.
2. Select which Project and which media to restore (Figure 1.51).
Figure 1.51. The Restore dialog allows you to choose exactly what will be restored.
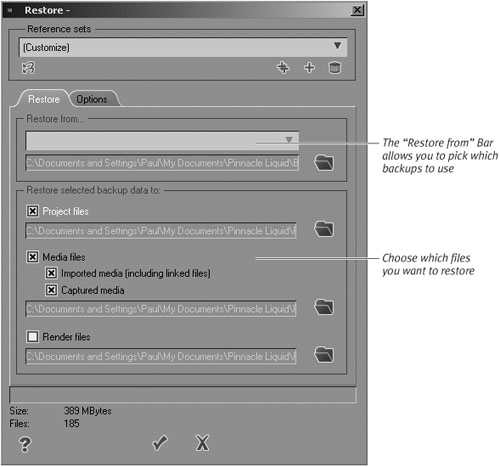
The Options tab allows you to turn off any overwrite warning messages.
3. Click the check mark to begin the process.
Depending on the size of the Project, this may take some time.
• Once the Project has been restored, you will need to open it by selecting File > Open Project and browsing to the folder you restored it to.
Customizing the Interface
Liquid is open to customization in pretty much all areas of the interface; in fact, it only takes a few mouse clicks to alter the interface to whatever style of workflow you are comfortable with.
Most users will want to customize one of four areas:
• The Timeline control buttons
• The keyboard shortcuts
• The Project Browser
• The Timeline tracks
As you can see from this list, Liquid is controlled by a combination of keyboard shortcuts, mouse control, and buttons. The buttons run horizontally across the center of the Liquid interface and are the main area of control (Figure 1.52).
Figure 1.52. Timeline control buttons.
![]()
But, nothing is more frustrating than searching for some deeply hidden keyboard shortcut while you are in full creative flow, so Liquid also allows you to add buttons to this interface.
In the next sections, you’ll learn how to customize the Liquid interface so you can have the right buttons available to you, just a click away.
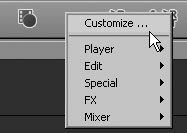
1. Right-click any blank space within the Button Control bar to bring up a contextual menu (Figure 1.53), and then choose Customize.
Figure 1.53. Right-clicking on any blank space between the buttons brings up the Customize option.
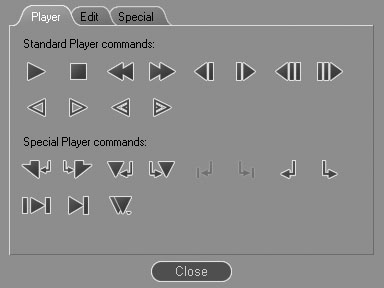
A small window with five tabs appears. The default tab houses the Player controls, but there are four other tabs to explore (Figure 1.54). Each tab contains a selection of buttons, many of which already exist on the Timeline.
Figure 1.54. The various buttons open to you behind the four tabs.

2. Buttons can be dragged and dropped from any of these tabs directly to the Timeline toolbar (Figure 1.55).
Figure 1.55. Here the Timecode Display button (New in Liquid 7) is dragged from the Special tab to the Timeline next to the Logging tool.
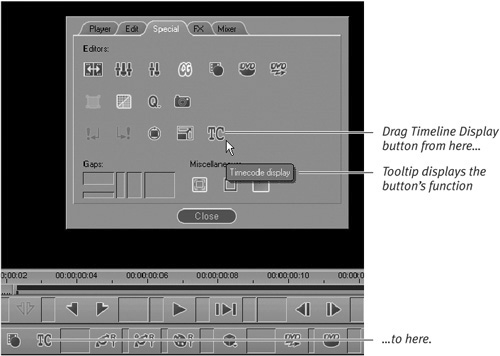
• To find out what a tool does, roll the mouse over an icon and a tool tip pops up.
• When you drag a new button to the Timeline, the other buttons will shuffle to the right and perhaps disappear from sight. To get them back, simply remove the blank spacer icons by dragging one anywhere off the interface and dropping it (Figure 1.56).
Figure 1.56. Make room for more buttons by dragging the spacers off the toolbar and dropping them anywhere on the interface.

• If you see fewer than five tabs, you are clicking the interface directly below the Source Viewer. This brings up a three-tabbed window (Figure 1.57).
Figure 1.57. The Source Viewer has fewer options available than the Master Viewer.
Customizing Keyboard Shortcuts
Navigating the interface using buttons is one way of doing it, but many users find keyboard shortcuts to be much faster.
The list of shortcuts supported by Liquid is formidable, but it doesn’t stop there. Liquid also allows all keyboard shortcuts to be customized, not only globally to support a keyboard shortcut across every interface, but also individually for each separate interface. This is particularly useful for avoiding the “Press Alt+Ctrl+Shift+A” type of scenario that leaves most users with fingers as twisted as their nerves.
To create a keyboard shortcut
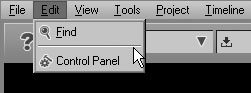
1. From the menu bar, select Edit > Control Panel (Figure 1.58).
Figure 1.58. Opening the Control Panel in the Menu Bar.
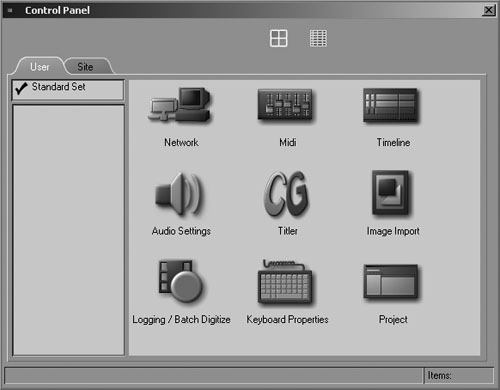
2. If it is not already selected, click the User tab (Figure 1.59).
Figure 1.59. The Control Panel with the User tab displayed.
3. Double-click the Keyboard Properties button ![]() to bring up the Keyboard Properties interface (Figure 1.60).
to bring up the Keyboard Properties interface (Figure 1.60).
Figure 1.60. The Keyboard Properties interface showing the command section on the right.
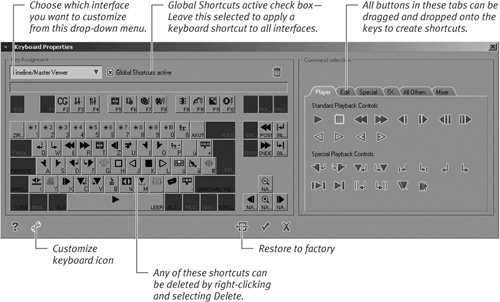
Click the Customize Keyboard icon ![]() to display the full interface.
to display the full interface.
4. If you want to add a global shortcut, make sure the Global Shortcuts active check box is selected. If you want to add a tool to a specific key and no other, make sure this box is not selected.
5. Drag any button from the right area over to the key to which you want it assigned.
6. To delete a shortcut, right-click any shortcut and select Delete.
7. To exit this interface, do one of the following:
• Save your changes and close the tool by clicking the check mark.
• Click the “X” to close the tool without saving any changes you have made.
• Clicking the ![]() button will restore the keyboard settings to the installation default. Although you will lose all of your customizations, it’s sometimes useful to do this if you have made a mess of the keyboard mapping.
button will restore the keyboard settings to the installation default. Although you will lose all of your customizations, it’s sometimes useful to do this if you have made a mess of the keyboard mapping.
Exploring the Project Browser
The Project Browser holds your media clips in Racks. A Rack is a virtual hook on which you hang your films, music clips, graphics, and titles. You can define as many Racks as you want, and you can even put these into a folder if you want to organize things further.
To create Racks and Folders
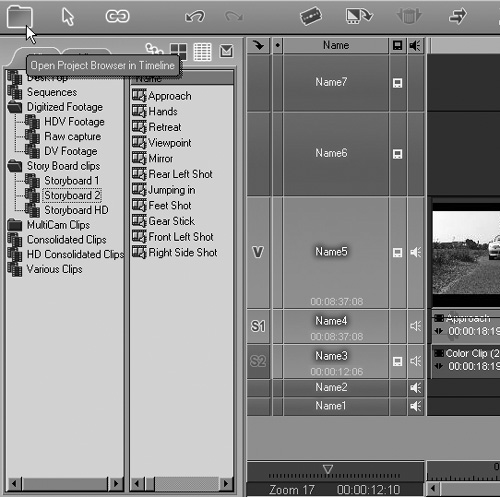
1. Click the Open Project Browser button ![]() and you will see your Racks in the left window and any media you have displayed in the right window (Figure 1.61).
and you will see your Racks in the left window and any media you have displayed in the right window (Figure 1.61).
Figure 1.61. The Project Browser with Racks and Folders on the left and media clips on the right.
2. To create a new Rack or Folder, simply right-click the mouse inside the left window of the Project Browser and choose New Rack or Folder (Figure 1.62).
Figure 1.62. Creating a new Rack or Rack folder.
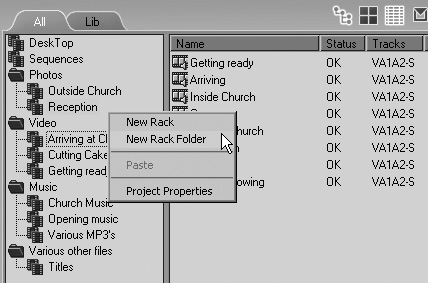
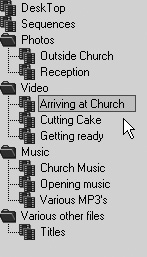
3. Name your Rack or Folder after it is created. The default is always New Rack or New Rack Folder. If you make a typing mistake, just click the actual name and it will become highlighted so that you can change it (Figure 1.63).
Figure 1.63. Renaming a Rack or Folder by simply clicking the name.
• Racks can be dragged into folders in exactly the same way that files can be dragged in the Windows environment. Using this method, it is easy to organize your media clips into a tidy easy-to-access workflow center.
• If the Create Folder option is dimmed out, make sure you are clicking inside a Folder and not inside a Rack.
Using alternate Project Browser settings
By clicking the line that separates the left and right windows of the Project Browser (Figure 1.64), you can access another range of settings (Figure 1.65).
Figure 1.64. Right-click in the middle of the Project Browser...
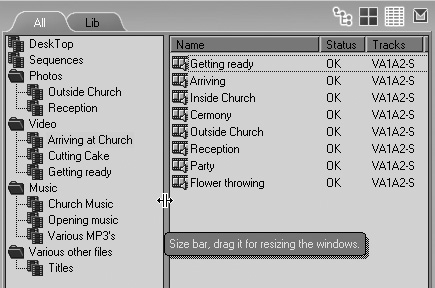
Figure 1.65. ...to bring up another range of settings to adjust the angle of the browser.
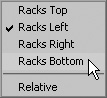
Clicking each one in turn will allow you to experiment, but to return to the default, check the Racks Left option.
Customizing the Timeline
As with the rest of Liquid, the Timeline is highly customizable, which allows you to set up the Timeline tracks to suit your own particular workflow. You can rename tracks to create more logical aliases than those assigned at startup and during the edit process. You may also find it useful to change the height of tracks, particularly when you’re working with audio files, because doing so allows you to see the Waveform a little better. You may also want to reduce the height of each track in order to fit more tracks onto the screen.
To rename tracks
• Right-click the track and select Rename from the contextual menu (Figure 1.66). A small outline box appears around the name into which you can type up to 31 characters (Figure 1.67).
Figure 1.66. Selecting Rename to rename a track. It’s that easy.
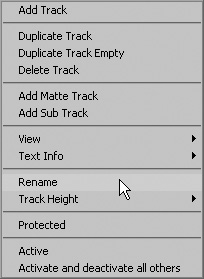
Figure 1.67. Up to 31 characters can now be entered.
To change track heights
Do one of the following:
• To expand a clip, place the cursor over the bottom track line and drag it downward.
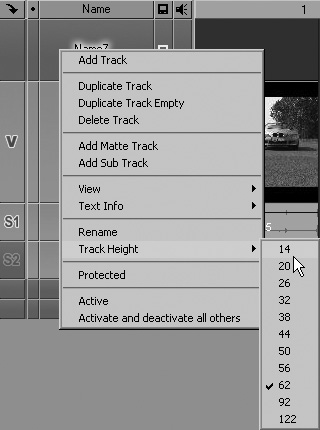
• Right-click the track and select Track Height from the drop-down menu (Figure 1.68). Then choose the height of your choice.
Figure 1.68. Right-click and select one of the preset values to adjust the track height.
Saving a customized Timeline
Clicking the New Sequence button ![]() in the top-right corner of the interface will reset the names and heights back to their default values. In order to quickly load back a preferred setup, it is possible to save individual Timeline templates.
in the top-right corner of the interface will reset the names and heights back to their default values. In order to quickly load back a preferred setup, it is possible to save individual Timeline templates.
For more details on templates, see the “Templates—What Are They Good For?” sidebar on the last page of this chapter.
To save a Timeline template
Do one of the following:
• Click the Sequence Menu icon ![]() in the upper-right corner of the interface and select Save Timeline As Template (Figure 1.69).
in the upper-right corner of the interface and select Save Timeline As Template (Figure 1.69).
Figure 1.69. Save your Timeline template with a unique name.
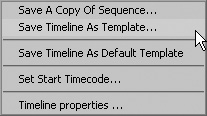
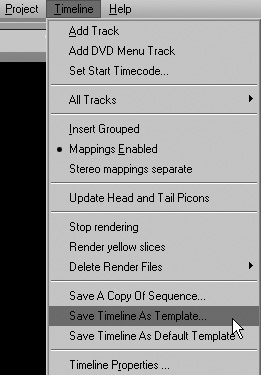
• Select Timeline > Save Timeline As Template from the Menu Bar (Figure 1.70).
Figure 1.70. Accessing Save Timeline as Template from the menu bar.
• Browse to a folder where you want to keep this, and give it a unique name before you save.
• Saving a Timeline template only saves those options that are available when you click the menu bar called Timeline, found at the top of the interface.
Templates—What Are They Good For?
• Timeline template: Saves only track heights, track names, and the position of any sub or matte tracks. Racks, Folders, and buttons are not saved in this template. The Timeline template is accessed via the Sequence Menu icon ![]() in the upper-right corner of the interface.
in the upper-right corner of the interface.
• Project template: Creates a template that includes the Racks and Folders and any material placed inside these folders and on the Timeline. It also saves the track names and heights.
• Timeline buttons are not saved in this template.
• A Project template can be saved by selecting File > New > Save As Template.
• User Templates: This is the only way to save the position and customization of the toolbar buttons.
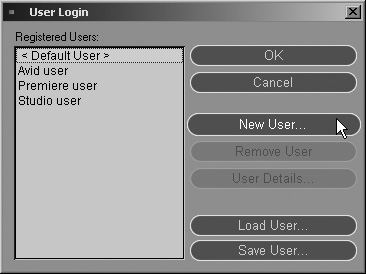
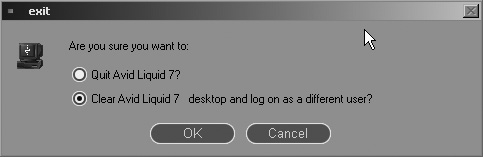
• Close Liquid and select Clear Avid Liquid 7 desktop and log on as a different user from the Exit dialog (Figure 1.71).
Figure 1.71. Logging on as a different user leads to...
• Create a new user (Figure 1.72) and give it a logical, unique name or load one of the presets; then click OK.
Figure 1.72. ...the User Login screen.