
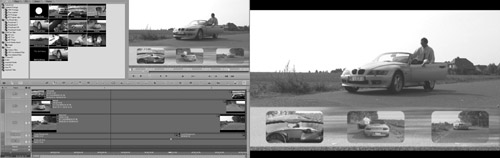
9. Working with Filters
Filters—or Clip FX as they are referred to in Liquid—are similar to transitions; they’re keyframable effects you use to visually alter the properties of a media clip. However, whereas a transition only works on the overlapping point between two separate clips, you can apply filters to the whole media clip, allowing for some interesting creative options.
Liquid offers a great selection of filters for various tasks, from adjusting the size and scale to visually altering the clip beyond recognition. Just like with transitions, Liquid also offers a whole pile of third party filters such as the newly added Commotion filters and a newly updated Hollywood FX (HFX) engine. It’s all there to really add some spice to your video productions.
Learning to apply and edit a filter is relatively easy and draws on the skills you learned with transitions. Adjusting parameters and adding keyframes involves the same procedure, and the only real difference between the two (filters and transitions) is the greater complexity you can achieve using filters.
In this chapter, you’ll learn how to apply a filter, alter the basic parameters, and adjust keyframes. You’ll also look into the complexity of Commotion and HFX and delve into the most used filter of them all, the Timewarp—Liquid’s method of creating slow-motion speed effects. Once you have mastered these concepts, you are ready to create some really original effects.
Using Filters—The Basic Concept
As we discussed in Chapter 8, “Working with Transitions,” the world of Liquid is divided into two classes: Realtime (RT) effects, which you don’t need to render in order to preview; and non-Realtime or Classic effects, which you must render before you can see the results (see Chapter 8 for more details).
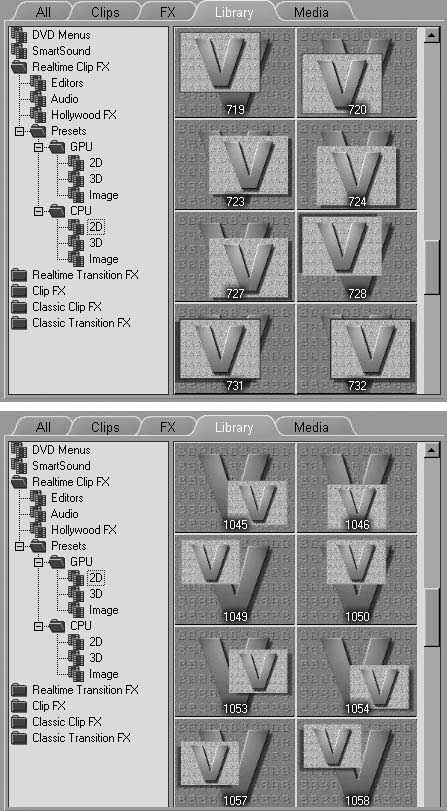
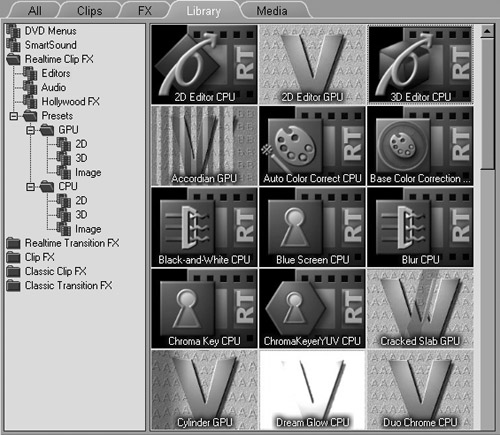
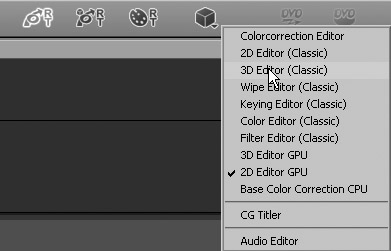
Both the Realtime and Classic filters offer you a choice of editors and presets, However, the Realtime folder also contains a large collection of edited 2D variations in both CPU and GPU format (Figure 9.1), Here’s the difference between CPU and GPU:
• CPU filters use the power of your computer’s processor to display a real-time preview.
• GPU filters use the processor fitted to your graphics card to display a real-time preview.
Figure 9.1. A selection of CPU-based (top) and GPU-based (bottom) filters displayed in Picon form.
Eventually, you’ll probably want to use GPU effects to exploit the power of your graphics card’s on-board processor and free up some valuable processing time for your computer’s CPU. However, if your graphics card isn’t a particularly fast or modern one, you may have to consider using the CPU filters. Otherwise, your Realtime effects will display with so many dropped frames that they become unwatchable.
• The Classic filters’ Color Correction and Chromakey filters are covered in Chapter 11, “Color Correction” and Chapter 14, “Advanced Techniques,” respectively. Their complexity and specialized application demanded a separate discussion outside of this chapter.
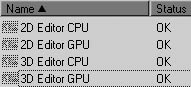
• Some of the filters—2D, 3D, and Cross Dissolve—have both CPU and GPU variations (Figure 9.2).
Figure 9.2. The 2D and 3D Editors come in both CPU and GPU flavors.
New in Version 7—Safe Area Marker for Realtime Filters
One of the more subtle improvements to the Realtime filters is the inclusion of a Safe Area marker. This is activated by pressing the Safe Area button ![]() when the FX Editor is open. The Safe Area marker places a dotted grid around the edge of the inlay, marking out where domestic TVs will stop displaying the image (Figure 9.3).
when the FX Editor is open. The Safe Area marker places a dotted grid around the edge of the inlay, marking out where domestic TVs will stop displaying the image (Figure 9.3).
Figure 9.3. The new safe area marker for Realtime filters.
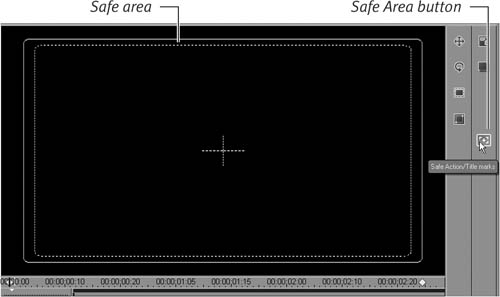
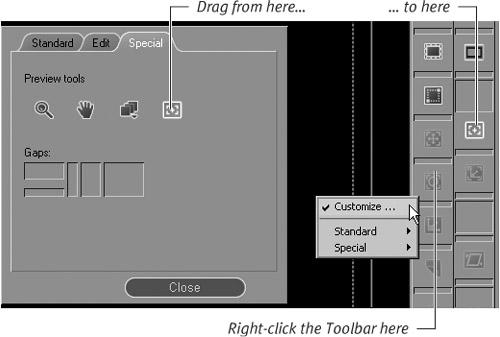
Figure 9.4. Adding the Safe Area button to the editor interface.
Understanding Clip Undo
Before you begin adding Filters, it is important that you understand the concept of removing them.
The Undo function for filters—like the Undo function for audio keyframes—is a separate entity from the Undo command you normally use.
If you add a filter to a clip on the Timeline and then use Ctrl+Z or the Timeline Undo key, then an Undo occurs on the Timeline, but the filter remains firmly on the clip. In this case, I advise you to click the Redo key to redo whatever it is that you’ve accidentally undone.
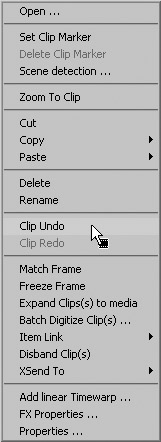
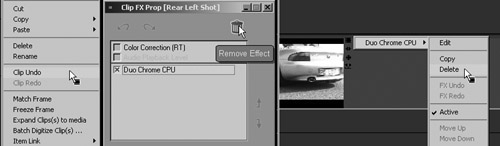
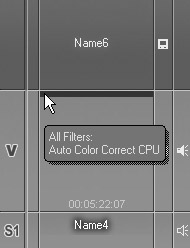
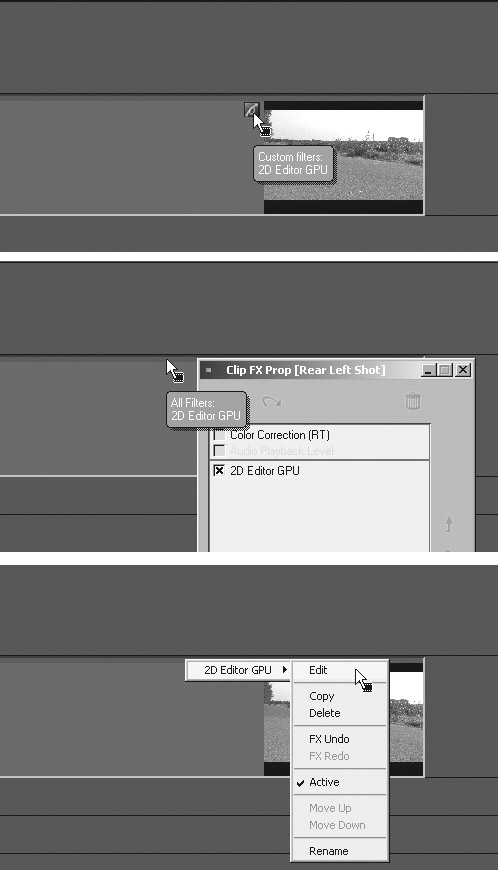
This becomes slightly more complex when you’re dealing with filters you’ve added to tracks and to clips in the Project Browser. To keep this from frying your brain early on in the chapter, I’ve listed the removal method in the last step for each of the three application techniques. But the basic method, the one used most often, is to right-click the clip and select Clip Undo from the contextual menu (Figure 9.5). If you remember this, you will stay relatively stress free while editing with Liquid; if you forget it, it could be tears before bedtime (again).
Figure 9.5. Deleting a filter using Clip Undo.
Adding a Filter
Once you understand the basic concept of using filters, and how to undo them, actually applying them is easier than you think and can be achieved by drag and drop.
• Some filters have no value until you open the editor and adjust some of the parameters, and therefore, they show no immediate change to the clip
To apply a filter
1. Place a clip on the Timeline.
2. If the Project Browser isn’t open in the Timeline, click the Open Project Browser in Timeline button ![]() .
.
3. Select the Lib tab to show the effects Liquid has to offer.
Dual-screen users will probably have the Project Browser open on the second monitor; in this case the tab will be labeled Library.
If you are displaying the new Studio View, the tab will also be labeled Library (Figure 9.6).
Figure 9.6. The Realtime filters displayed as Picons.
4. Do one of the following:
• Open the Realtime Clip FX folder by double-clicking it if you intend to add Realtime filters.
• Open the Classic Clip FX folder by double-clicking it if you intend to use non-Realtime filters.
5. Once you have selected the type of filter you want, click a Rack to display its contents.
6. Highlight the actual filter you want by clicking it, and apply the filter to the Timeline by doing one of the following:
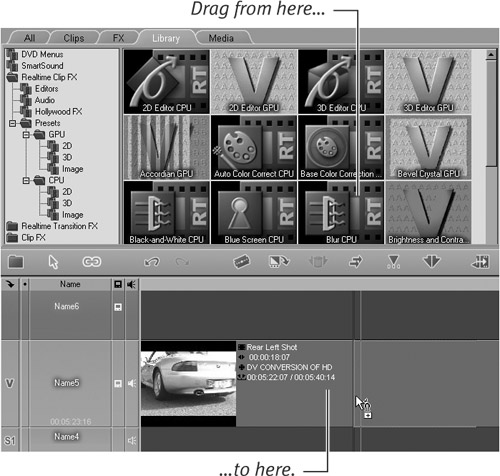
• Drag the filter to the Timeline and release the mouse button when the filter is over the clip (Figure 9.7).
Figure 9.7. Dragging a filter from the Project Browser to the Timeline.
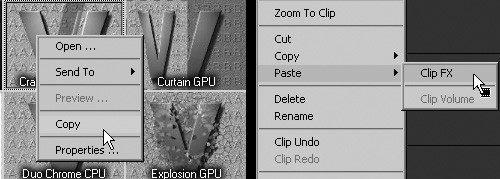
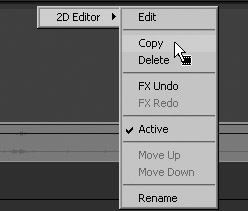
• Right-click the filter and select Copy (Figure 9.8, left). Then right-click the clip and select Paste > Clip FX (Figure 9.8, right).
Figure 9.8. Applying a filter using the Copy (left) and Paste (right) method.
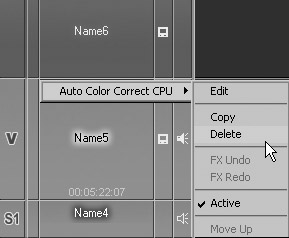
7. To remove this filter, do one of the following:
• Right-click the clip in the Timeline and select Clip Undo from the contextual menu (Figure 9.9, left).
Figure 9.9. Deleting a filter using Clip Undo (left) via the Clip FX Properties dialog (middle) and via a right-click on the purple FX line (right).
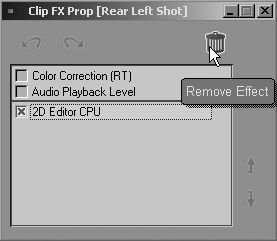
• Right-click the clip in the Timeline and select FX Properties. Then highlight the filter you want to delete and click the Trash can button (Figure 9.9, middle). You can also deactivate the filter by unchecking the box next to the name of the filter.
• Right-click the purple line running along the top of the clip and select Delete (Figure 9.9, right). You can also disable the filter by deselecting Active from this menu.
• If you are dragging a filter to the Timeline and you see the message “No Filter Target,” then you don’t have the mouse cursor over a valid media clip.
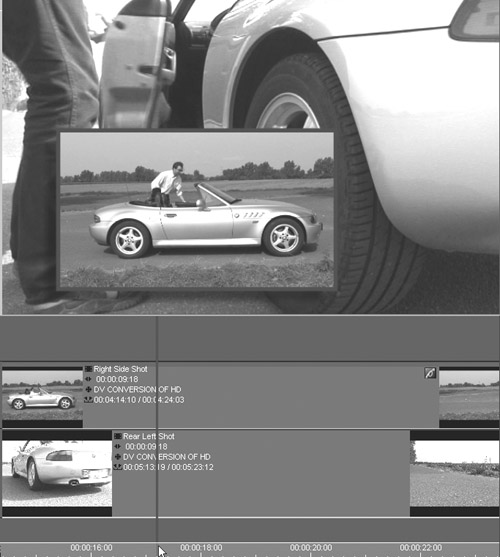
Figure 9.10. A four-layered PiP effect.
Figure 9.11. Track layout for the PiP.
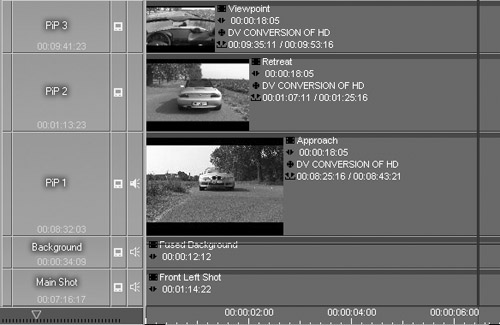
Figure 9.12. Using two monitors, you can display a great many more layers (right monitor) without losing the inlays (left monitor).
New in Version 7—Full-Screen Mode on a Second Monitor
Figure 9.13. VGA second head full-screen display.
Applying a Filter in the Project Browser
You can also add a filter directly to the clip in the Project Browser. This allows you to always have the corrected clip ready and waiting in the Project Browser whenever you need to use it.
Of course, to gain full advantage of this technique, you need to edit this filter too and this will be covered in a later section of this chapter.
To apply a filter to a clip in the Project Browser
1. Select the filter you need by following the instructions in the “Adding a Filter” section earlier in this chapter.
2. Right-click the filter and select Copy.
3. Select the All tab to take you back to your media clips, and open the Rack where the clip you want is stored.
4. Right-click anywhere in the right pane, and select Paste.
5. Click anywhere inside the right pane to deselect all clips (this must be done or the next step will not work), then click the filter and drag and drop it over the clip (Figure 9.14).
Figure 9.14. Applying a filter to a clip in the Project Browser.
6. To remove this filter, right-click the clip inside the Project Browser and select FX Properties from the menu. Then highlight the filter and click the Trash can button (Figure 9.15).
Figure 9.15. Removing the filter using the Clip FX Properties dialog and the Trash can button.
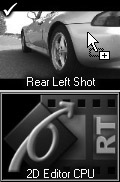
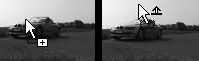
• The cursor must have a small, white box with a plus sign (+) inside it before you can drop the filter (Figure 9.16, left). If the cursor looks like it does in Figure 9.16 (right), then you have not dragged it exactly into the middle of the clip.
Figure 9.16. The cursor for successfully dragging a filter to a clip in the Project Browser (left) and the cursor indicating that the filter isn’t central enough in the clip for you to successfully apply it (right).
• Make sure no other clip in the Rack is selected before you select the filter and try to drag it; otherwise the filter only moves around the Rack and isn’t applied to the clip.
Adding a Filter to a Timeline Track
You may want to add a filter to an entire track—the 2D Editor, for example—in order to make a change to all clips on a particular track in your project Timeline. This is a global change, and you need to use it with care, but it can prove helpful if you have a lot of images on the same Track, and they all need to be cropped, or rotated in a similar fashion.
To add a filter to a Timeline track
1. Select the filter you need by following the instructions in the “To apply a filter” task earlier in this chapter.
2. Highlight the actual filter you want by clicking it, and apply it to the Timeline by dragging it into the track name and releasing the mouse button.
A purple line appears along the top of the Timeline track indicating that the filter is successfully applied (Figure 9.17).
Figure 9.17. Adding a filter to a Timeline track.
3. To remove this filter, right-click the purple line and select Delete from the contextual menu (Figure 9.18).
Figure 9.18. Deleting a filter via a right-click.
• Once again, to take full advantage of this technique, you need to edit this filter after it has been applied to a clip before it can have any effect on your Timeline.
Working with the Default Realtime Filters
The most common types of filters are the 2D Editor, the 3D Editor, and the Base Color Corrector. These three are used so often in video editing that they each have a shortcut button on the Liquid Toolbar (Figure 9.19).
Figure 9.19. The Toolbar buttons for the Realtime filters: 2D Editor, 3D Editor, and Base Color Corrector.
![]()
To apply a default filter from the Toolbar
1. Select a clip in the Timeline by clicking it once.
2. Click once on any of the default filters, but not the Effects Editor Menu button (which is covered in the “Applying the Default Classic Filters” section), to apply the filter (Figure 9.20).
Figure 9.20. Apply the filter with a single click.
Once you’ve applied the filter, the editor for that filter automatically opens (Figure 9.21).
Figure 9.21. The Realtime Filter Editor interface.
• If you exit a filter without making any changes, the filter will be removed from the clip.
• A Realtime filter produces a yellow slice above the clip to which it has been applied. This indicates that it can be viewed without rendering, but that it must be rendered before being sent to DVD or tape. More details on this can be found in Chapter 1, “Getting Started.”
Applying the Default Classic Filters
Classic filters also have a shortcut root key—the Effect Editor Menu button ![]() —from which you can access the most commonly used non-Realtime filters. These filters are compressed into one menu button that displays its contents when you click the Effects Editor Menu button (Figure 9.22).
—from which you can access the most commonly used non-Realtime filters. These filters are compressed into one menu button that displays its contents when you click the Effects Editor Menu button (Figure 9.22).
Figure 9.22. The list of editors available via the Effects Editor Menu button.
There are eleven filters you can access from this button. The bottom four are the Realtime filters that you can access through their own buttons on the interface. They’re included here only to allow you to use the workflow with which you feel most comfortable.
• You can also access the Audio Editor (see Chapter 7, “Working with Audio”) and the title creation program, Title Deko (see Chapter 10, “Using Title Deko”) from this button.
To apply a 2D or 3D filter from the Toolbar
1. Select a clip on the Timeline by clicking it once.
2. Click the Effects Editor button and select either the 2D Editor (Classic) or 3D Editor (Classic).
The filter applies to the clip you selected, and the Edit window opens automatically.
Once you exit the editor, the clip begins to render. See the Rendering section in Chapter 1 for details.
• If you exit a filter without making any changes, the filter will be removed from the clip.
• A classic filter produces a red slice above the clip to which it has been applied. This indicates that it cannot be viewed without rendering, although you can scrub through the clip to view a frame at a time and you can view the rendered areas as the filter renders in the background. More details on rendering can be found in Chapter 1.
Editing a Filter
As you can see from the previous tasks, actually adding a filter is relatively easy. The creative fun starts when you want to alter the wide range of parameters that come with each filter, hopefully with the aim of creating something unique.
This is often done with the use of keyframes, which are explained in more depth in the “Keyframes—How Do They Work?” sidebar later in this chapter.
The Filter Editor is similar in look and operation to the Transition Editor covered in Chapter 8. In fact, many filters have similar names and parameters.
To create your own custom-made filter, you need to open the editor and then scrub through the Source Viewer Timeline deciding where and when to alter the various parameters.
To understand filters, you need to experiment with them; because of their many complex parameters, it’s impossible to show everything in a book. You need to see every living variation on the screen; otherwise you’ll never know what sort of highly original effects you can create just by tweaking one underused parameter.
To open the Filter Editor
With a filter present on a clip, do one of the following:
• Double-click the Filter icon if it is visible (Figure 9.23, top).
Figure 9.23. Open a filter by clicking the Filter icon (top) or double-click the purple line at the top of the clip (middle) or right-click the purple line and select Edit (bottom).
• Double-click the purple line running across the top of a clip and select a filter from the contextual menu (Figure 9.23, middle).
• Right-click the purple line at the top of a clip and select Edit (Figure 9.23, bottom).
Any of these methods brings up the Filter Editor as seen on Figure 9.21.
• If you open an editor for the first time and then close it again without making any adjustments, you cause it to be removed from the clip.
• Right-clicking a filter by accessing the FX Properties allows you to access the full range of editing options allowed for each filter, including Copy and Delete.
1. Open the Filter Editor using one of the methods detailed in the “To open the Filter Editor” task earlier in this chapter.
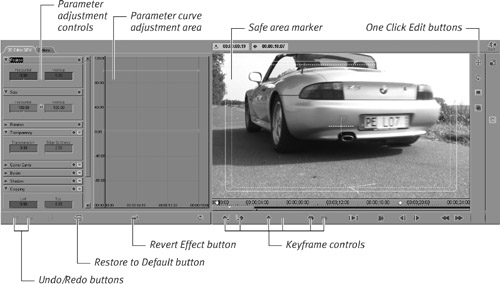
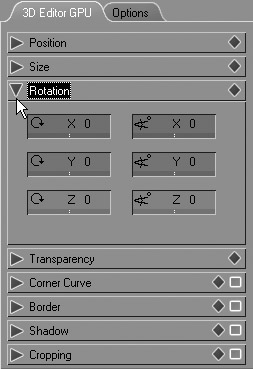
2. Open the parameter you wish to alter by clicking once on the small triangle to the left of its name (Figure 9.24).
Figure 9.24. Opening a parameter area.
3. If this is a Realtime filter, you will see various colored boxes and you can alter the parameters in the following ways:
• Place the mouse cursor over any of the parameter boxes and wait for a double-headed cursor to appear (Figure 9.25). Hold down the mouse button and drag to the right to increase the value displayed. Drag back to the left to reduce the value displayed.
Figure 9.25. Work with the double-headed arrow...
![]()
• Double-click inside the display area and enter the numerical value you need; then press Enter (Figure 9.26).
Figure 9.26. ...or enter the number directly.
![]()
• Click inside the parameter curve area on the line color that represents the parameter you wish to alter. Parameter lines and boxes always match up with coloring, but the line only appears if the parameter box is open, or if the parameter was previously adjusted (Figure 9.27).
Figure 9.27. You can add and manipulate keyframes inside the parameter curve area.
If you are using a Classic filter, you can adjust the parameters using sliders or by entering numbers directly into the boxes at the end of the slider controls (Figure 9.28).
Figure 9.28. Classic editors use simple sliders.
• RT filters can be played inside the editor to see how your keyframes have affected the final image. If it’s a Classic filter, you can only scrub through the image. To play a Classic filter, you must first exit the editor and allow the filter to render.
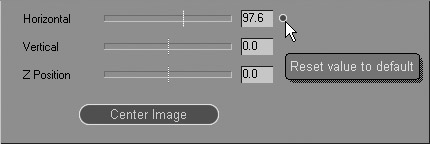
• To return the Classic slider to the default value, click the small button that appears on the right side of the slider once a parameter has been altered (Figure 9.29).
Figure 9.29. To reset a slider, click the small button next to the numbers.
• You can increase the size of any editor window by clicking the Maximum Inlay Size button on the Liquid Toolbar. This will not work if your graphics resolution is 1600 by 1200.
Controlling Keyframes
At this stage in the chapter, you should now understand how keyframes can enhance and customize your own filters. But you must carefully control keyframes if you’re to get the best from them.
In this section, you learn how to manually add and delete a keyframe and how to copy/paste and move a keyframe inside the Filter Editor.
• One button common to both the RT and Classic interfaces is the Revert Direction of Effect button ![]() , which inverts the keyframes you’ve created, effectively playing the filter backward. Due to technical restrictions, not all filters have this button.
, which inverts the keyframes you’ve created, effectively playing the filter backward. Due to technical restrictions, not all filters have this button.
• For more details on keyframes, see the “Keyframes—How Do They Work?” sidebar later in this chapter.
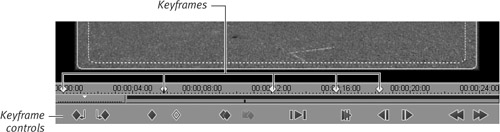
To add a keyframe
1. With the editor open, scrub through the Timeline until you find the spot where you want to add a keyframe.
2. When the cursor is over this spot, click the Set Keyframe button ![]() .
.
To delete a keyframe
1. With the editor open, scrub through the Timeline until you are on a keyframe, or use the Go to Next Keyframe button![]() to find each keyframe.
to find each keyframe.
2. When the cursor is over the keyframe, the Delete Keyframe button ![]() becomes active. Click it and the keyframe vanishes.
becomes active. Click it and the keyframe vanishes.
To copy and paste a keyframe
1. With the cursor over the keyframe, click the copy Keyframe button ![]() .
.
2. Move the cursor to the new point by scrubbing or playing, then click the Paste Keyframe button ![]() to apply this keyframe.
to apply this keyframe.
• The keyframes copied in the manner described above are entirely independent of their original keyframes and vice versa. Altering one doesn’t change the other.
• When copying a keyframe, you should be aware that all parameters associated with that keyframe will be copied over.
To move a keyframe
• Hold down the Alt key, then, using the mouse, left-click the keyframe and drag it to the new position. Note: the last keyframe cannot be moved.
Deactivating a keyframe area
Occasionally you may want to turn off certain parameters to see the interaction of the other keyframes on the Timeline more clearly. You can accomplish this using the Keyframe toggle switch.
To deactivate a set of keyframes
• Click the Activate square at the end of the row.
It turns from gold to blue and the parameters become grayed out (Figure 9.30).
Figure 9.30. Deactivating a keyframe range.
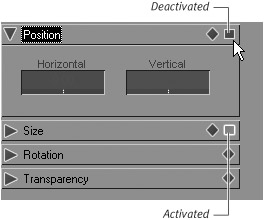
If you scrub through this effect window, these keyframes won’t be used.
Applying a parameter to a whole clip
You can also apply a parameter to the whole duration of a clip, for example a colored border or a mirror to flip an image.
To apply a parameter to a whole clip
• Drag the Keyframe symbol from the Parameters label area into the preview screen of the editor. These settings in the parameter box are then applied to the whole filter (Figure 9.31).
Figure 9.31. Applying a keyframe across the duration of a clip.
• An example of this would be to apply a constant resize of the image in a 2D editor in order to correct a shot where the subject isn’t correctly framed or something distracting is in the background.
Applying a parameter to a single keyframe
You may also want to apply a parameter setting to one specific keyframe that already exists on the Timeline.
To apply a parameter to a single keyframe
• Drag the Keyframe symbol from the Parameters label area onto that keyframe (Figure 9.32).
Figure 9.32. Applying a keyframe to an individual keyframe.
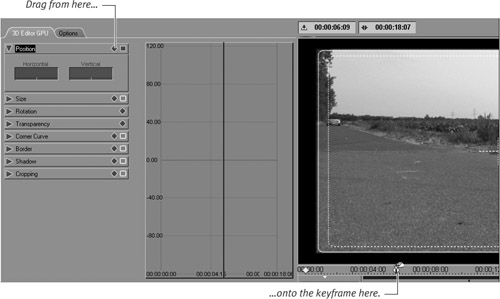
Creating a PiP effect
A PiP effect is one of the most common effects used in TV today. You probably see it everyday where a newscaster and an onsite report share the same screen, each in their own little box, or picture. Creating a PiP with Liquid 7 is very simple, and there are even several presets to help you.
To create a Realtime PiP
1. Place two clips on the Timeline, one on top of the other (Figure 9.34).
Figure 9.34. Preparing the Timeline for creating a PiP by placing two clips one on top of the other.
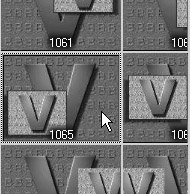
2. Select a preset PiP by selecting the Lib tab (Library for dual-screen or Studio View users), then opening the GPU Presets folder. Click on the 2D rack and scroll down to effect number 1065 (Figure 9.35).
Figure 9.35. Selecting a PiP preset.
3. Drag the effect onto the topmost clip to add a PiP to the bottom-left corner of the screen (Figure 9.36).
Figure 9.36. The end result. One drag and drop and an instant PiP is created.
4. You can edit, resize and reposition the PiP by opening the editor using any of the methods in this chapter.
• You can add as many layers above the main track as you like and create a PiP out of each and every single one.
Working Without Keyframes
Although keyframes are very valuable tools, you may encounter times when you don’t want to use them. For example, you might want to zoom in on a clip and keep that level of zoom from the first frame to the last.
• Some filters, such as the Basic Color Corrector, have keyframes turned off by default and you need to activate them before you can use them.
Working with the Lens Flare Effect
Figure 9.37. Using the Lens Flare filter to add headlights as a special effect.

To deactivate/activate keyframes
1. With the editor open, select the Options tab.
2. Open the keyframes area by clicking the small triangle.
3. Click the “Do not use Keyframes” or “Use Keyframes” radio button, depending upon what you want to do (Figure 9.38).
Figure 9.38. Turning off all keyframes.
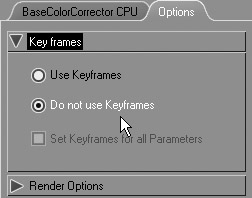
• In a filter, turning off keyframes is useful for creating global effects, such as correcting a poorly framed camera shot or for color correction. Don’t forget that you can stack filters, which allows you to use the same filter with or without keyframes as the need arises.
• Turning off keyframes in this way is global. To deactivate specific keyframes, see the “Deactivating a Keyframe Area” section earlier in this chapter.
Working with Classic Filters
Classic filters work with or without keyframes, so you can edit following the same procedure you did when editing Realtime filters. However, there are a number of additional parameters to adjust, and you will need to explore each filter in order to get at the full power these filters can unleash.
As with Classic transitions, Classic filters are the old non-Realtime filters from previous incarnations of Liquid. You need to render them in the background before you can view them, which puts them at an immediate disadvantage. However, you can access several very interesting parameters in non-Realtime filters, which are not available to their Realtime cousins. Full-screen mode and Keyframe Interpolation are two examples of features found only in the Classic set of filters.
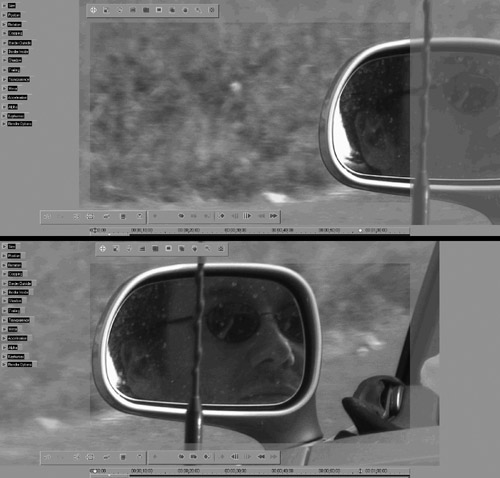
Full-screen mode
One clear advantage of using a Classic filter is the full-screen mode. You can toggle this on by clicking the Full-Screen Mode button ![]() , which allows the Classic Editor to completely take over the screen. In Figure 9.39, an oversized picture is panned from the right of the screen to slightly left off-center. This is much easier to do when you can see the whole picture.
, which allows the Classic Editor to completely take over the screen. In Figure 9.39, an oversized picture is panned from the right of the screen to slightly left off-center. This is much easier to do when you can see the whole picture.
Figure 9.39. Full-screen mode showing the hidden areas of an oversized image being tracked from right (top) to left (bottom).
• Return the editor to normal size by clicking the Full-Screen Mode button a second time.
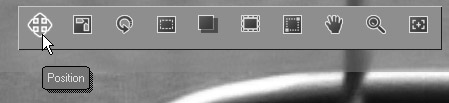
• Pan and scan can be achieved by clicking the Position button (Figure 9.40) and using the mouse to drag the picture in the direction you want it to go. Hold down the Shift key to only move on the horizontal, or hold down the Ctrl key to only move on the vertical.
Figure 9.40. Using the Position button to pan the clip.
Keyframe Interpolation
One of the most interesting parameters available using Classic filters is Keyframe Interpolation. This governs the speed at which the effect happens between any two keyframes.
Remember; this is the “speed at which the effect happens” and not the “speed of the actual clip.” You can only alter the speed of a media clip using the Timewarp non-Realtime filter, which is discussed later in this chapter.
You use Keyframe Interpolation simply to alter the pace of an effect. The following example shows a 2D Editor using this parameter to zoom in on the incoming clip. This happens slowly at first, then when it reaches the halfway mark, the zoom increases in speed until it reaches full speed at the end of the clip.
To alter Keyframe Interpolation
1. Add one of the Classic filters to a clip on the Timeline.
2. Scrub to a keyframe on the Timeline and alter the interpolation in one of the following ways:
• Drag the acceleration line toward a positive (faster) or negative (slower) amount.
• Double-click inside the number box and enter a value.
3. Exit the editor by clicking the Running Man button in the top right corner of the editor.
The editor exits and the filter begins to render in the background.
4. Once it has finished rendering, set a mark-in and mark-out point on the Timeline on either side of the filter.
5. Then play back the filter by clicking the Play from Mark-In to Mark-Out button.
• If you add a Keyframe Interpolation of 100 to the first keyframe, the effect happens immediately from that keyframe.
Saving a Customized Filter
Once you have altered just the right combination of parameters to create your dream filter, you probably want to save it for future use. You can do this with just a few clicks of your mouse.
To save a customized filter
1. Switch to the All tab in the Project Browser and create a Folder called FX.
2. In the newly created FX folder, create a Rack called My Saved FX.
3. Right-click the purple line that runs the length of the clip in the Timeline, and then select Copy (Figure 9.41).
Figure 9.41. Copying the effect with your unique parameter settings.
4. Right-click inside the right pane of the Project Browser and select Paste from the menu. The filter is copied into this Rack complete with your parameters safely stored so that you can use it again in the future with just a drag and a drop.
• The filter appears in the Rack with its default name. To change this, right-click the effect and select Rename from the contextual menu.
Using Linear (Realtime) and Dynamic Timewarp
Timewarp is one of the most commonly used filters in Liquid, but it’s rarely recognized as actually being a filter. In fact, the words Dynamic Timewarp and Linear Timewarp tend to cause some confusion among first-time Liquid users, as does the word Timewarp on its own.
Timewarp is simply a way to alter—or warp—the way time plays back on your media clip. The two variations are also easy to understand.
• A Dynamic Timewarp alters the clip using keyframes but must be rendered before it can be viewed.
• A Linear Timewarp alters the clip without using keyframes but can be previewed in Realtime.
It really is that simple. However, although the definitions are simple enough, the actual use of these is somewhat more complex.
I touched on Timewarp briefly in Chapter 6, when I used it during a four-point edit. In that case, Liquid added Timewarp automatically, but in this chapter, you’re going to learn how to manually add the Linear or Dynamic Timewarp to your clips in order to alter the speed at which they play back.
Adding a Linear Timewarp Filter
Linear Timewarp is the simpler of the two speed-change filters, and it is also the one you used during the four-point edit technique we covered in Chapter 6. Unlike Dynamic Timewarp, this filter has no keyframable abilities, but it still has many uses for everyday editing.
• Liquid 7 can also use Timewarp on an audio clip, but only down to a minimum of 50% and up to a maximum of 200%.
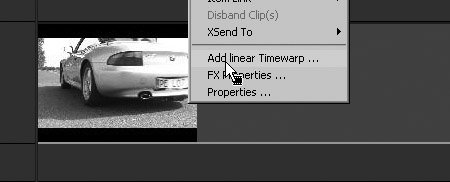
To add a Linear Timewarp filter
1. Right-click the clip on the Timeline and select Add linear Timewarp from the contextual menu (Figure 9.42).
Figure 9.42. Adding a Linear Timewarp using the contextual menu.
This automatically opens the Add Timewarp dialog (Figure 9.43).
Figure 9.43. The Add Timewarp dialog.
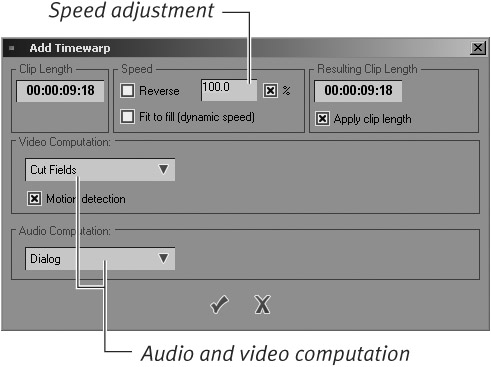
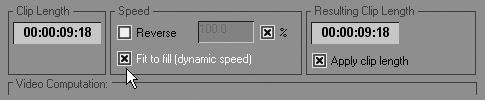
2. To speed up your clip, alter the number in the Speed box so that it is greater than 100; to slow it down, enter a number less than 100.
3. To reverse the direction of the clip, click the Reverse check box and then alter the speed if you want to.
4. Select the Video Computation method (see the “Which Computation Method Should You Use?” sidebar later in this chapter for details).
5. If you’re applying a Timewarp to an audio track, select the Audio Computation most suitable for the clip you’ve selected.
6. Once you are happy with the settings, click the check mark at the bottom of the dialog to apply these changes.
• When increasing the speed of a clip, Liquid subtracts frames from a clip, making it physically smaller on the Timeline. When decreasing the speed, Liquid adds frames to a clip, making the clip physically larger on the Timeline. Therefore, you need to make sure you know which Timeline mode you are working in, (Film Style or Overwrite Style) to avoid overwriting other clips on the Timeline or leaving gaps. You can find details of these Timeline modes and the effects they have in Chapter 6.
• You can undo a Dynamic Timewarp using the Timeline Undo key or the Ctrl+Z shortcut.
• In the Speed section, you can click the check box next to the percent sign (%) to change the settings so that the speed shows as a decimal value rather than a percentage.
Editing a Linear Timewarp
Editing a Linear Timewarp is simple enough. You can tweak any of the settings you find in the Add Timewarp dialog, but you have to be sure that you’ve opened the editor and not asked Liquid to add another linear filter on top of the one that already exists.
Timewarp doesn’t stack particularly well, which leads to strange results and possibly some green flashes on the screen—something you will be keen to avoid.
To edit a Linear Timewarp
• You must right-click directly on the small purple and black dotted line that runs along the bottom of the clip, and select Edit linear TimeWarp from the contextual menu (Figure 9.44).
Figure 9.44. Click the purple dotted line to edit a Linear Timewarp.
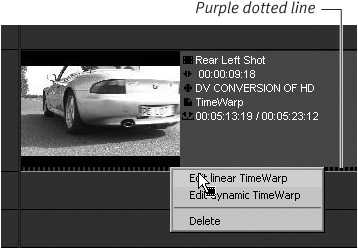
• You can also delete the Timewarp using the menu shown in Figure 9.44.
• Some GPU filters don’t mix well with Linear Timewarp. If you get results that don’t fit the filter you have applied, use a CPU alternative.
Adding a Dynamic Timewarp
Dynamic Timewarp, the more complex cousin of Linear Timewarp, was introduced in Liquid version 5.5. Dynamic Timewarp is fully keyframable, and you can use it to add a very professional look to your project by selecting at which point a clip should increase or decrease its speed.
However, using it is much more complex than using Linear Timewarp. As a result, you need to spend a great deal more time learning how it works.
• Dynamic Timewarp doesn’t support audio. Once the filter is applied, audio only plays when the clip is running at normal speed.
Which Computation Method Should You Use?
Figure 9.46. Using the “Trailing computation” on a moving object.

1. Select the Lib tab (or Library if you are a dual-screen user) in the Project Browser, open the Classic Clip FX folder, and drag the Timewarp Editor filter to the clip on the Timeline.
2. Right-click the black-and-purple dotted line that runs along the bottom of the clip and select Edit dynamic TimeWarp.
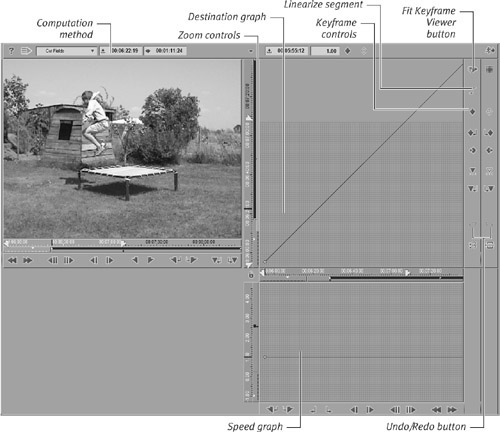
This brings up the complex-looking Dynamic Timewarp Editor (Figure 9.47).
Figure 9.47. Dynamic Editor opened to full height using the extended dialog arrow.
• There is nothing different here about working with Timewarp keyframes; the only variation is that by slowing down or speeding up a clip, you are adding frames to or subtracting frames from the overall length of the clip rather than visually altering the clip.
• The two graphs on the right display motion (top) and speed (bottom). Most of the time you work with the bottom screen, but don’t ignore the top one.
• Click the extended dialog arrow to make the Dynamic Timewarp Editor full screen as seen in Figure 9.47.
Editing a Dynamic Timewarp
Trying to explain the Dynamic Timewarp on the flat medium of paper is a little tricky. It’s difficult to get excited about a screenshot of a slow-motion sequence. To try to make this as clear as possible, I’ll first explain the basics of how to add and edit keyframes, and then I’ll offer you a real-world example of what you can try to do with your own clips.
To edit a Dynamic Timewarp
1. Open the Dynamic Timewarp editor as explained in the previous section and use the Go to Mark In button to move to the start of the clip
2. Place a keyframe at this point by clicking the Set Keyframe button (Figure 9.48).
Figure 9.48. Anchoring the start of a clip with a keyframe.
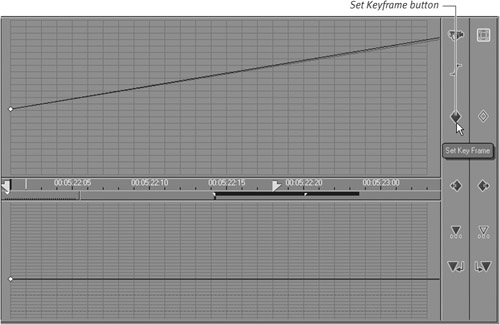
This creates a gold diamond in both graphs. This is your keyframe. When it is selected, it is gold; when it is deselected, it is white.
3. To alter the speed of a specific keyframe, do one of the following:
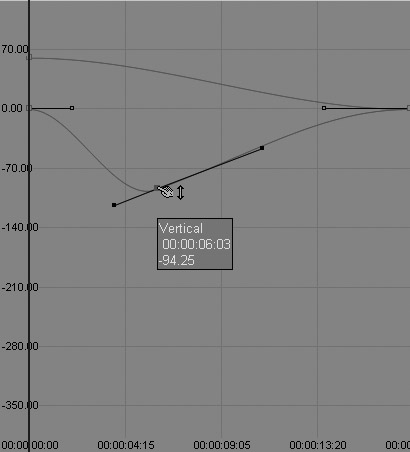
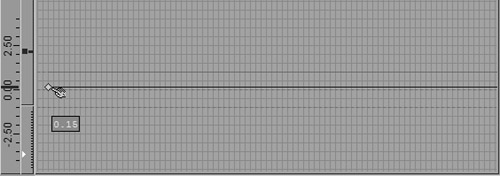
• In the bottom graph, drag the gold keyframe up to speed it up, or down to slow it down (Figure 9.49).
Figure 9.49. Dragging the keyframe down to reduce speed (0.15 or 15% of normal speed).
• Enter a speed value in the speed field at the top of the interface (Figure 9.50).
Figure 9.50. Entering the speed value directly.
![]()
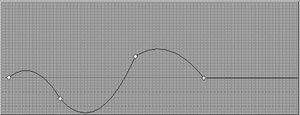
Adding more than one keyframe creates a series of parameter curves between the keyframes that exist to smooth out the change between the two points (Figure 9.51).
Figure 9.51. A typical dynamic curve.
4. Once you’ve finished altering your keyframes, exit the interface by clicking the Running Man button ![]() and allow the filter to render.
and allow the filter to render.
• The Dynamic Timewarp Editor doesn’t automatically insert a keyframe at the beginning or end of your clip, but it does place a mark-in and mark-out point that indicates the length of the clip.
• To show the mark-in and mark-out points of your clip on the Timeline, click the Fit Keyframe Viewers button ![]() .
.
Adding a linear keyframe
In the task above, “To edit a Dynamic Timewarp,” you created a speed change (perhaps several) using the bottom graph. The parameter curve this creates may cause a problem if the curve dips down too low, causing the video to slow more than you intend. Worse still, if the curve dips below the green line at the bottom of the graph, the clip begins going backward, which is almost definitely not what you want.
To solve this, you need to instruct the Dynamic Timewarp Editor to create a linear link between the keyframes, which then ignores this curve and creates a straight speed change.
To add a linear keyframe
1. Do one of the following:
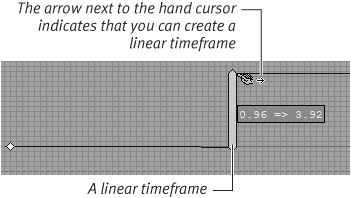
• Place the mouse cursor slightly to the left or right of the keyframe in question so that a small plus sign (+) appears next to the Hand cursor. Then drag a straight line up or down; the straight line indicates that this is a linear keyframe (Figure 9.52).
Figure 9.52. Creating a linear speed change using the mouse.
• A slightly easier method is to highlight the keyframe that occurs before the keyframe you want to linearize, and then click the Linear Adjustment button ![]() to automatically create a Linear Timewarp between these two keyframes (Figure 9.53).
to automatically create a Linear Timewarp between these two keyframes (Figure 9.53).
Figure 9.53. Before and after. The speed change creates a curve (left). The Linear Adjustment button creates a Linear Timewarp between the two keyframes (right).
2. Once you have finished altering the parameters, exit the editor by clicking the Running Man button ![]() in the top right corner of the interface. The filter has to render before you can see the result.
in the top right corner of the interface. The filter has to render before you can see the result.
Using the Dynamic Timewarp
So much for the theory. As you can see from the descriptions, Dynamic Timewarp is a lot more brain-intensive than its cousin, the relatively cuddly and friendly Linear Timewarp. Moreover, of course it doesn’t help when the Dynamic version also utilizes linear terminology.
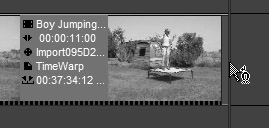
To try to get you comfortable with this theory with as little pain as possible, you can download a clip from the book’s Web site (www.peachpit.com/liquid7vqp) called Boy Jumping, import it into Liquid, and use it to follow along in this next section.
In the tasks that follow, a sequence is created that shows a boy jumping at normal speed until his hat flips off in the wind. At this point, I want to slow down to 25% until the hat hits the floor, and then speed back up to normal speed. This creates the classic “slow-suspend” effect during an event, something that is often seen in TV commercials. It’s all made possible by using keyframes to control the speed and—more importantly—the interpolation of that speed between the keyframes.
To create a slow-down/speed-up effect
1. Add the Dynamic Timewarp as described in the “To add a Dynamic Timewarp filter” task earlier in this chapter.
2. Open the editor by right-clicking the bottom purple dotted line and selecting Edit dynamic Timewarp.
3. Once the editor is open, click the Fit Keyframe Viewers button ![]() to see both the mark-in and mark-out points of your clip inside the graph and to highlight the opening keyframe.
to see both the mark-in and mark-out points of your clip inside the graph and to highlight the opening keyframe.
• Navigate to the start of the clip and add a keyframe by clicking the Set Keyframe button ![]() (Figure 9.54).
(Figure 9.54).
Figure 9.54. Creating a start point using the Set Keyframe button.
To add a speed change
1. Scrub to the point just before you want the speed to change; in this example, just before the boy’s cap lifts off his head.
Now that you have found the correct position on the Timeline, you want to slow down to a quarter of normal speed.
2. To adjust the speed, double-click the Speed value box, enter a value, and either click the Set Keyframe button or press Enter on the keyboard to apply this change.
3. As you can see in Figure 9.55, in this example version, you should enter 0.25, the decimal equivalent of 25% or ¼.
Figure 9.55. Slowing the speed down to 25% of normal by creating a new keyframe using direct number entry.
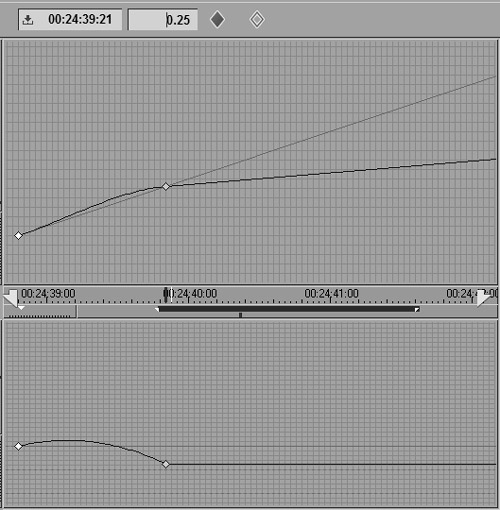
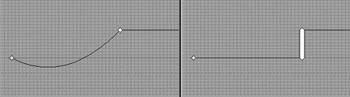
In the lower graph, notice that the blue line passes over the red line before it dips down toward the keyframe that was last added (Figure 9.56). This means the clip increases speed before it decreases.
Figure 9.56. The result is a parabolic climb in speed before the reduction occurs...
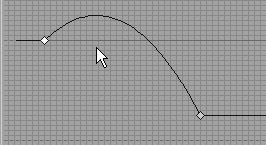
This isn’t what you want. You want it to play at normal speed and then dip down immediately to slow motion. To achieve this, you need to add a linear segment between the two keyframes.
1. Select the keyframe before the one that holds the speed change (in this case the opening keyframe), and then click the Linearize Segment button ![]() (Figure 9.57).
(Figure 9.57).
Figure 9.57. ... but it’s turned into a Linear Time adjustment by using the Linearize Segment button.

Now the clip does exactly what you want. It plays at normal speed—indicated by the blue line in the bottom graph following the red line—then it dips suddenly down to 25% of normal speed.
At this point, you should exit the editor to check the results before moving on.
2. To exit the editor, click the Running Man button in the top right corner of the interface.
After you render it, the clip plays fine except it now ends too early. This is another difficult area to understand, but put simply, when the Dynamic Timewarp slows something down, it adds frames to the clip to create something from nothing. But unlike the Linear Timewarp, Dynamic Timewarp doesn’t alter the overall length of the original clip.
To correct a shortened clip
• Trim the clip on the Timeline, dragging the handle outward until the Master Viewer displays the correct last frame for this media clip (Figure 9.58). Allow the clip to render again.
Figure 9.58. Adjusting the length of a clip to compensate for the additional frames.
Okay, that worked fine. If you are using the downloaded example, the boy’s cap flips off and the clip ends where we want it to. But the boy now moves in slow motion until the end of the clip. What we want to see is the clip return again to normal speed once the cap hits the floor.
1. Open the editor as described earlier in this chapter and click the Fit Keyframe Viewers button to realign the graph. If you are using the downloaded example, scrub through until you reach the point where the cap touches the ground. Enter “1” in the speed box and press Enter.
Now you have another problem. The bottom graph in the last parabolic curve—between the slowdown keyframe and the normal speed keyframe—touches the green line, indicating a speed of zero—a freeze-frame, in other words (Figure 9.59).
Figure 9.59. The green line indicates zero speed or stop. If the line hits this, the clip pauses. If the line goes beneath this, it moves into reverse.
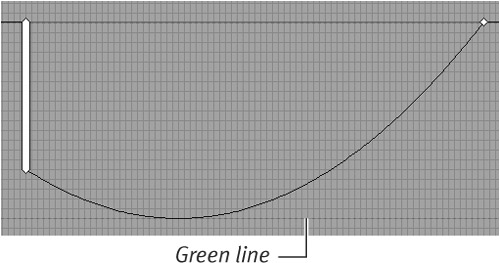
This isn’t what you want. You need the clip to return to normal speed when the cap lands, for this example.
2. Remove the parameter curve between the two keyframes by selecting the keyframe to the left of the one you added last and click the Linear Segment button ![]() (Figure 9.60).
(Figure 9.60).
Figure 9.60. The curve is removed using the Linearize Segment button.
Okay! Now if you exit the editor and allow it to render in this example, the cap falls in slow motion, but the boy jumps after it at normal speed.
However, because you’ve effectively increased the speed—you adjusted the clip from .25 to 1.0—the opposite problem to the one you experienced when you decreased the speed occurs. The clip now shows a few more frames at the end than you want. This is because when speeding up a clip, Liquid subtracts frames—in this case, the frames it added during the slow motion—but again, Dynamic Timewarp doesn’t alter the physical length of the clip.
3. To solve this problem, trim the clip again, this time taking the mark-out point down the Timeline until the Master Viewer displays the correct frame for this clip’s mark-out point.
When trimming a clip down the Timeline, you may notice that it doesn’t need to be rendered. This is as good an example as any of how intelligent the Liquid render engine can be.
• If you want to take the Dynamic Timewarp example further, try adding a keyframe to speed the boy up as he jumps after his cap. Remember to take it a step at a time and always allow it to render after each change.
• Insert a marker at the end of the clip before you add the Dynamic Timewarp filter. That way you can always locate the end point during the Timewarp edit process.
Introducing the Commotion FX Filter
Commotion is a stand-alone program purchased by Pinnacle about 7 years ago. It’s a compositing program very much like After Effects which, in the Commotion Pro version, can be used to create Movie Style effects including wire removal.
Commotion has a somewhat checkered history. After the initial purchase by Pinnacle from Puffin, very little development has been made to this program. It can still be purchased from Avid, but an impressively hard learning curve makes this a package only the very serious editor should consider buying. To all intents, Commotion is gone... but not forgotten.
Liquid 7 integrates many of the filters used in the last release of Commotion, providing yet more shiny new toys for editors to manipulate their clips with. In fact, some of them are actually very useful, but like Hollywood FX (covered in the next section of this chapter), their use is so broad that it would require another book to do them justice. Simply put, if you want to see what they do, load them and try them out. For more information, Avid has a very friendly forum where you can ask away. This can be found at the main Web site (www.avid.com).
To apply a Commotion FX filter
1. Select a clip in the Timeline by clicking it once.
2. Open the Effects Library by selecting the Lib or Library tab, depending on your view.
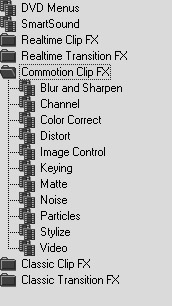
3. Double-click the Commotion Clip FX folder to reveal all the Racks where you will find many different Commotion filters to play with (Figure 9.61).
Figure 9.61. This Rack contains the Commotion effects new in Version 7.
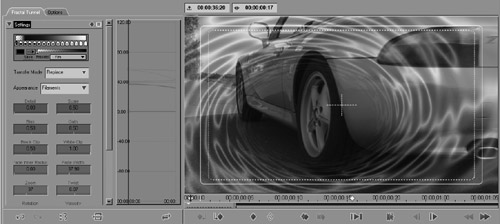
• Opening and editing a Commotion filter is the same as using any other filter in Liquid (Figure 9.62). For more details on this, see the various sections in this chapter that cover these subjects.
Figure 9.62. The Fractal Tunnel filter creates the much sought after SF film look.
• Experimentation is the key to getting the best from these effects. If you are really impressed, perhaps you should consider buying the full Commotion Pro, which allows you to experiment with some serious compositing tools such as Wire Removal and Image Tracking.
Introducing Hollywood Effects Filters
Hollywood Effects (HFX) is a popular plug-in integrated into Liquid for both transitions (see Chapter 8) and filters. This plug-in offers a specific range of filters that are never going to be described as subtle. Using these filters is like holding a flashing neon sign that says, “Yep, this is an impressive filter and I’m proud of it.” If that’s what you want, then that’s exactly what you’re going to get with HFX filters. Although, to be fair, some of the Wedding HFX templates are useful when used with restraint.
Most HFX filters are real-time, meaning they display a preview version under a yellow slice, which must be rendered before you can export to DVD or tape. But some filters are slightly more complex and require rendering first. In these cases, they are marked with a small red ball in the bottom left corner of the effects thumbnail and with a red lamp at the top of the HFX interface when you select one.
There is also a range of filters that render with the word Pro displayed across them. To unlock these filters, you need to buy a Pro serial number from Avid. You can do this online via their Web site (www.avid.com).
Adding a Hollywood Effects filter
You add a Hollywood FX filter the same way you add a normal filter; you just need to drag it from a different folder. HFX filters obey the same rules as normal filters, and you can add them to any video clip on any Track, including titles and graphics.
• You can also stack HFX filters with normal filters, although their visual complexity may mean this isn’t exceptionally practical or visually digestible.
To add a Hollywood Effects filter
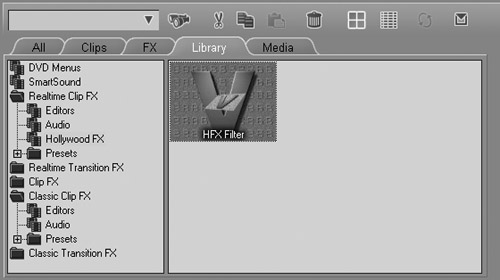
1. Select the Lib tab in the Project Browser and open the Realtime Clip FX folder.
The third Rack in this folder is the one containing the Hollywood FX filter (Figure 9.63).
Figure 9.63. The Hollywood FX filter is located in the third Rack in the Realtime Clip FX folder.
2. To apply this filter, drag and drop it to the required clip. Once it’s applied, a yellow slice appears above the clip indicating the effect is real-time.
By default, HFX displays the Fly-Away filter when it is first applied to a clip.
Editing a Hollywood Effects filter
Unlike the HFX transitions, no preset Hollywood FX filters are stored in the Project Browser Racks; however, a large number are inside the HFX interface. Once you’ve applied the HFX filter, you can access any of these presets by opening the HFX Editor.
To open the Hollywood FX Editor
Do one of the following:
• Double-click the purple line at the top of the clip, or click the filter symbol if it’s visible.
• Right-click the clip and select FX Properties then double-click the HFX filter from the Clip FX Properties box. Once it’s loaded, the HFX Editor loads, taking over the desktop (Figure 9.64).
Figure 9.64. The Hollywood FX Editor.
Taking Hollywood Effects Further
HFX is a very complex application, and explaining its use would require at least one other book. Experimentation will teach you much of what HFX has to offer, but if you want to go deeper, I recommend many of the Web sites that specialize in HFX. Of particular interest is Mike Shaw’s Web site (www.mikeshaw.co.uk).