11. Color Correction
Color correction can be used to correct camera exposure so that it conforms to how you want it to look, or to create special effects to alter a perception point. It’s a complex process that’s almost an art in itself—you’ll need to practice and cultivate patience if you’re to create stunning movies, or startling effects.
In this chapter, you learn how to use the various types of Color Correction filters that come with Liquid. You will also learn the basics of correcting some commonplace color problems, such as white balance, and also how to create special effects using only color.
Please note that a number of illustrations in this chapter are duplicated in the Color Insert section of this book.
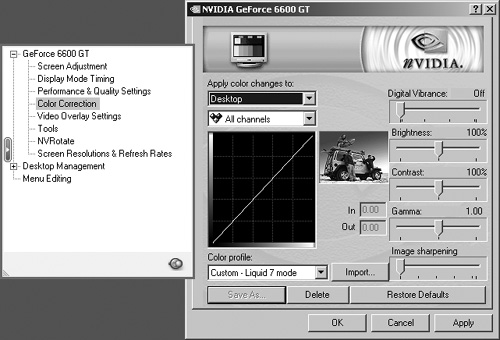
Figure 11.1. An example of the NVIDIA color calibration tool found in the Windows Display Properties.
Introducing the Color Correctors
There are five main filters in Liquid 7 suitable for basic color correction. There are also various other color filters suitable for special effects. See the “Special Effects Color Filters” sidebar later in this chapter for details.
This next section deals with the filters used to correct common problems caused by inadequate or poor lighting. No one filter does everything you want it to, so you may need to use a different type of filter for a different type of color correction to get the best possible color correction for your project.
Below is a list of the five main Color Correction filters: three of them are Realtime filters (denoted by the CPU and GPU reference after their name), and the other two need to be rendered before you can see their results.
• Base Color Correction CPU: A Realtime filter you can use to quickly correct problem areas, such as brightness and contrast, and also for adding basic color casting.
• Brightness and Contrast GPU: Use this filter to correct the light levels on your media clips in real time. This is the only color correction tool that uses the GPU engine of your graphics card.
• Auto Color Correct CPU: Use this to automatically correct certain instances of poor lighting or bad white balance.
• Color Editor (Classic): This is essentially the same as the Base Color Correction CPU, but it isn’t a Realtime filter, although it does have additional functions.
• Color Correction Editor: Use this to make major alterations to color. It comes with a set of powerful tools, You can also use it for special effects; however, it is not a Realtime filter and will need to be rendered.
All the color correctors follow the same rules as other filters in Liquid 7 and can be applied to a Timeline clip, a Timeline track, or a clip in the Project Browser. They are also stackable.
• None of the color correctors have keyframes turned on by default, and the Auto Color Corrector doesn’t support them. Generally speaking, you should carry out color correction uniformly over the entire clip, unless, of course, you’re trying to achieve a special effect using a momentary color shift.
• Black and White CPU—Used to turn any clip instantly black and white. Note: there is no editor for this effect, so it must be dragged onto the clip.
• Dream Glow CPU—Creates that dreamy glowy feeling... Just right for those dream sequence/flashback moments.
• Duo Chrome CPU—Used to create a Chrome look from two user-specified colors.
• Old Film CPU—Used to create a Buster Keaton type film look.
• Posterize and Solarize—Used to create an avant-garde look.
• Sepia—Used to create a sepia tone very much like the Old Film effect, but without the grain or hairs in the gate.
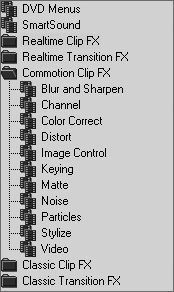
Figure 11.2. The new Commotion Racks holding a selection of imported Commotion filters.
Applying and Adjusting the RT, Classic, and Commotion Color Correctors
Essentially all the color correctors are applied to a clip or track in the same way. This is the same method described in the filter section, but is detailed below in case you are in need of a memory refresh.
To apply any of the color correctors
Do the following:
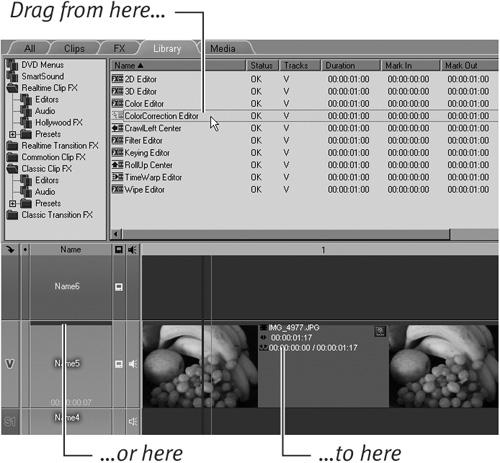
• Select the Lib tab (Library if you are in dual screen or Studio view) and the appropriate FX folder, and drag and drop the Color Corrector of your choice onto the clip, or onto the Timeline Track if you want to affect all clips on that track (Figure 11.3).
Figure 11.3. Applying any of the color correctors follows the same method.
• The Base Color Corrector can also be added via the Open Base Color corrector button ![]() on the toolbar.
on the toolbar.
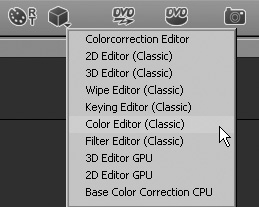
• The Color Editor Classic and the Color Correction Editor can also be added by clicking the Effects Editor button and selecting the appropriate filter from there (Figure 11.4).
Figure 11.4. The Effects Editor menu.
To adjust any of the Color Correctors
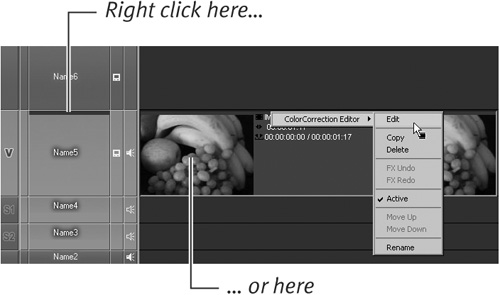
1. If the editor is not already open, right-click the purple line that runs along the top of the clip or track and choose Edit (Figure 11.5).
Figure 11.5. Open the Edit window by right-clicking the purple line.
2. Once the editor is open, adjust the parameters the same way you do for any other filter.
For a full explanation of filter editing and using Keyframe tools, see Chapter 9.
• To turn on keyframes, select the Options tab and choose Use Keyframes from the Keyframe options.
• You can revert any of the settings you make in this editor back to the default by clicking the Restore to Default button ![]() .
.
• If you close the editor without making any alterations, the filter may be removed from the clip or track.
Exploring the Auto Color Corrector
This unique Realtime filter has been designed to add a quick fix to many video clips that suffer from common faults such as low-level lighting or an incorrect white balance. It works pretty much like magic; you just apply it and all your problems melt away (Figure 11.7 and Color Insert 11-2).
Figure 11.7. This clip isn’t perfect after using the Auto Color Corrector, but it shows a marked improvement (See Color Insert 11-2).
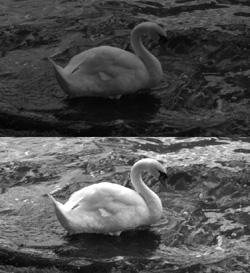
Of course it won’t always work. If it doesn’t, you can try tweaking the settings or you can fall back on the Color Correction Editor. But if you are looking for a quick and easy fix, the Auto Color Corrector is certainly worth a try.
To adjust the Auto Color Corrector
1. Apply and open the editor as described in the previous sections.
2. Once you’ve opened the editor, fine-tune the auto correction by picking a new reference color on which the auto color can base its calculations (Figure 11.8).
Figure 11.8. The Auto Color Corrector Effects Editor menu with the color picker tool open.
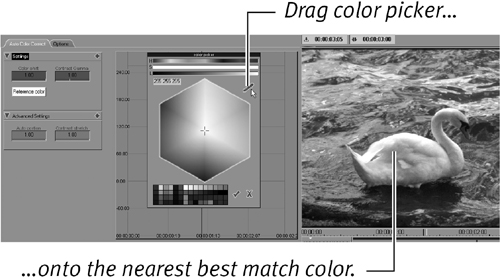
The color picker option allows you to select which color the Auto Color Corrector uses as its reference. To use this, drag the color picker onto the best source of white (or appropriate color of your choosing) in the picture.
• You can revert any settings you make in this editor back to default by clicking the Restore to Default button ![]() .
.
Working with the Color Correction Editor
This editor is the big brother to the Color Editor (Classic) and as such has a variety of different tools you can use to correct color and create some very special looking effects. You’ll discover an amazing amount of cool stuff you can do with this tool, but use it like you do most powerful functions—with restraint. More is sometimes too much!
In this section, you learn how to apply and open the editor and how to use one-click tools to solve some of the more common color and lighting problems. At the end of this section, you’ll discover how to use this filter for color removal, a special effect often used to turn the background black and white while leaving a specific foreground color untouched.
To adjust the Color Correction Editor
1. Apply and open the editor as described in the previous sections.
2. Once you’ve opened the editor, you can adjust the parameters in exactly the same way you do for any other filter. However, the range of parameters is, at first sight, a little overwhelming, especially if you click the small Extend Dialog arrow to expose a wealth of options (Figure 11.9).
Figure 11.9. The Color Correction Editor.
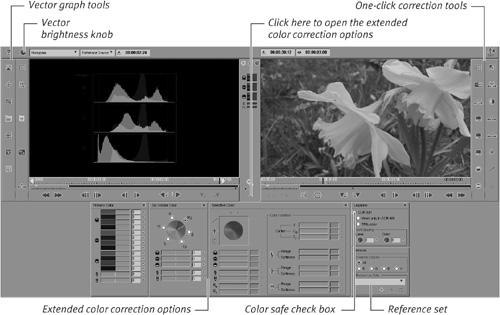
Using this tool is complex and not for the fainthearted, so I have divided the major functions into bite-sized subjects that follow on from this section.
Legalizing Color
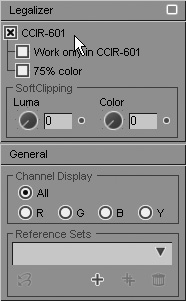
Also known as broadcast legal, color legalizing refers to a range of colors accepted as a standard by the broadcast community. To help you stay within the boundaries recognized by the broadcast legal system, the Color Correction Editor has a set of options that limit the amount of gain and luminance you can add to your color corrections.
To activate this, click the check box next to CCIR-601 in the Legalizer section of the interface (Figure 11.10).
Figure 11.10. The Color Legalizer.
Matching Color
Color matching is the process of taking two video clips and correcting the color so that shades of white and black appear matched in each clip. For example, a scene filmed with two cameras that cuts from person to person must contain the same color tones or it will jar the viewer as the colors shift in each different viewpoint. This process might involve correcting the white balance on a clip that resulted from using two different cameras or accounting for filters used incorrectly on the same camera from shot to shot.
To help you perform color matching, you have a veritable army of tools at your disposal. These include a vector scope and a selection of vector color tools that allow you to edit every color element in a clip. How good your results turn out depends greatly upon how much you know about color editing. To be honest, unless you’re well-versed in the technique, you should approach it with caution and never let your mouse wander too far from the Undo key.
• When making changes using any of the color correction tools, you might find it best to make very small changes, as adjustment to colors can give a large reaction with only a tiny percentage adjustment of any parameter. If on the other hand you want to know what a particular parameter does, drag it to either extreme—positive and negative values—to see what effect it has.
The one-click tools
If you find yourself daunted by the vector scope and find no clues in the color selection area, you don’t need to give up. Incorporated into this editor are a number of tools designed to automatically help with the most common color and lighting problems (Figure 11.11).
Figure 11.11. The one-click tools.

To make it even easier, most of these tools allow you to use a reference clip against which to match the color correction.
The reference clip
A reference clip must be another clip on the Timeline. Once you select it, you can use the colors it contains to adjust the colors in your target clip. For example, you can take this to extremes by matching the sky from a tropical photograph with the sky from your overcast shot to try creating an instantly improved skyline.
To set a reference clip
1. With the Color Correction Editor open, close the extended dialog area so that you can see the Timeline.
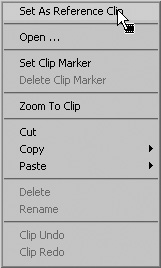
2. Right-click the clip on the Timeline that you want to use as a reference, and select Set As Reference Clip (Figure 11.12).
Figure 11.12. Setting a clip as your reference point.
The split-screen effect
If you set a reference clip, it is also possible to split the right screen of the Color Correction Editor so it contains both the reference and the original clip.
To split the screen
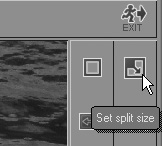
1. Click once on the Set split size button (Figure 11.13).
Figure 11.13. The Set split size button.
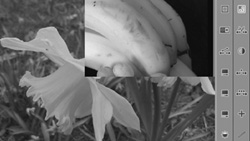
2. Click the left side of the right window and drag the cursor to the right (Figure 11.14).
Figure 11.14. An example of a split screen.
Using the 3-Point Color Balance Tool
Once you select the reference clip, you can adjust the colors of your original clip using the 3-Point Color Balance tool. This tool requires white, black, and gray reference points that you set using the reference clip as the baseline.
To use the 3-Point Color Balance tool
1. With the reference clip in the left window and your target clip in the right, click the 3-Point Color Balance button ![]() .
.
This button is located in the one-click tools on the far right of the Color Correction interface.
Three points linked by two lines appear on both screens. These are colored white, gray, and black.
2. Adjust the squares in the reference clip so that the black one is on the darkest area of the screen, the white one is on the lightest area, and the gray one is somewhere in between (Figure 11.15).
Figure 11.15. Setting up the 3-Point Color Balance tool.
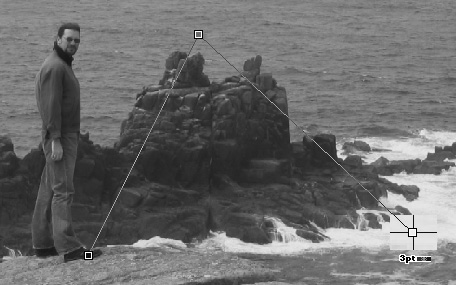
3. Now repeat this for your target clip, dragging each square to the right area.
4. Once you are happy, right-click the mouse inside the right window to apply the effect. Note: If you forget to do this, the effect will not be applied.
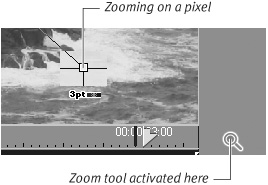
• Use the Zoom tool in the middle of the two windows to get a pixel-sized view of where to place your color balance squares (Figure 11.16).
Figure 11.16. Using the Zoom tool for accuracy.
Using the Gray Balance Tools
The Gray Balance tools are your main weapons against white balance problems. When you’re making adjustments, it’s probably best to start with the 1-Point Gray Balance tool and progress to the 2-Point and then the 3-Point tools if you aren’t getting the results you’re looking for. Remember to return the clip to its original state before you move from tool to tool by clicking the Restore to Default button ![]() ; otherwise you’ll make alterations on top of alterations.
; otherwise you’ll make alterations on top of alterations.
The 1-Point Gray Balance tool
Using this tool is the simplest and quickest way to alter a clip, but the results may not always be perfect on the first click. Try clicking several times before you give up and move on to the next tool.
To use the 1-Point Gray Balance tool
1. With the Color Correction Editor open and your target clip in the right window, click once on the 1-Point Gray Balance tool ![]() , which is located in the one-click tools on the far right of the Color Correction interface.
, which is located in the one-click tools on the far right of the Color Correction interface.
2. Move the cursor over to the target area.
A crosshair with a sun and a grayscale under it appears.
3. Find an area that’s as near to gray as you can and click it (Figure 11.17).
Figure 11.17. Using the 1-Point Gray Balance tool.
The target adjusts using the information it finds under the cursor.
The 2-Point Gray Balance tool
Using this tool is a slightly more complex process than using the 1-Point Gray Balance tool. It gives you two points with which to correct the target. For it to work correctly, you need a target clip that has both an area of light gray and an area of dark gray.
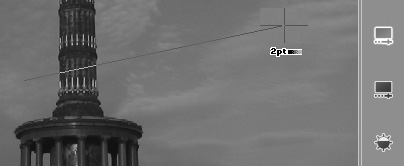
To use the 2-Point Gray Balance tool
1. With the Color Correction Editor open and your target clip in the right window, click once on the 2-Point Gray Balance tool ![]() .
.
2. Move the cursor over to the target area.
A “2pt” appears under the crosshair where the sun was in the 1-Point tool.
3. Find an area that’s as near to light gray as you can, then click and drag the mouse to an area of dark gray (Figure 11.18).
Figure 11.18. Using the 2-Point Gray Balance tool.
4. Release the mouse and the color balance is applied using information it finds under both cursor positions.
• This method is a little more refined, but you may still need to select some more sample areas before the clip looks right.
The 3-Point Gray Balance tool
The 3-Point Gray Balance tool requires the same reference points that the 3-Point Color Balance tool required, but it doesn’t need a reference clip. Instead it uses the target clip as its own reference in an attempt to adjust the levels of white, gray, and black.
To use the 3-Point Gray Balance tool
1. With the target clip in the right window, click the 3-Point Gray Balance button.
Three points linked by two lines appear on both screens. These are colored white, gray, and black.
2. Adjust the squares in the reference clip so that the black one is in the darkest area of the screen, the white one is in the lightest area, and the gray one is somewhere in between.
3. Once you’re happy, right-click the mouse inside the right window to apply the effect. Note: If you forget to do this, the effect will not be applied.
• Use the Zoom tool in the middle of the two windows to get a pixel-sized view of where to place your color balance squares.
Using the Vector Scope
This area of the Color Correction Editor is only for professional color editors who really know what they are doing, and perhaps for anyone with Photoshop experience because the way you use the histogram is fairly similar.
To open the vector scope
• Click once on the Vector button on the left side of the Color Correction Editor interface (Figure 11.19).
Figure 11.19. The Vector scope.
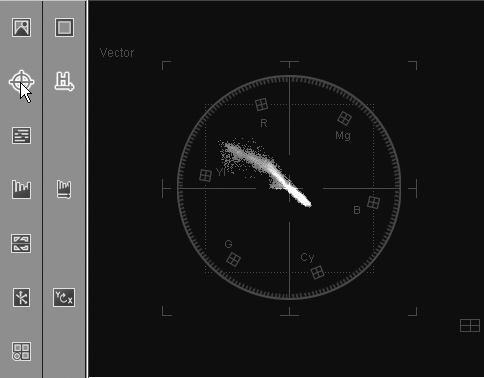
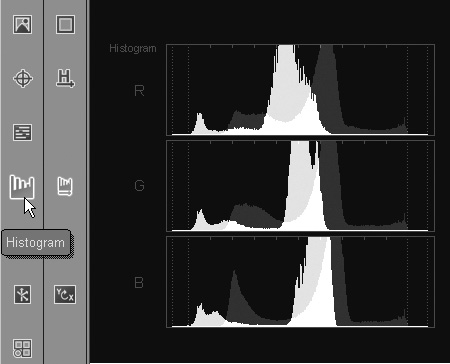
• You can display vector scopes in five other formats; the most popular are the Waveform (Figure 11.20) and the Histogram (Figure 11.21). These two are most commonly used by color editors to adjust and finely tweak their color selections. With the Histogram, you can even adjust the color by dragging the cursor over one of the three RGB graph areas.
Figure 11.20. The Waveform.
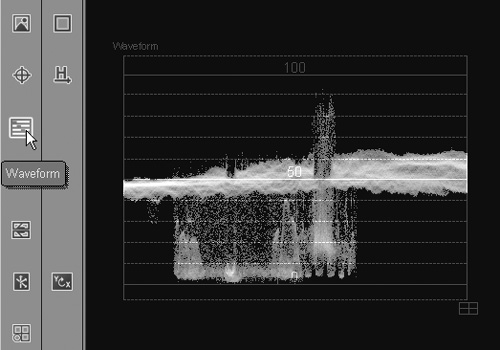
Figure 11.21. The Histogram.
Adjusting Colors Selectively
You can also use the Color Correction Editor to selectively enhance or remove individual colors from the clip. This technique has been widely used in films and TV to show a black-and-white object in a colored world, or vice versa. The actual process of doing this in Liquid is simple enough; however, it is painstakingly slow to achieve, and you only get good results if you are prepared to put in the work.
The other neat trick you often see on TV is an object, such as a car, changing color. You can do this in Liquid using the Color Correction Editor. But you need to select your subject carefully; this trick only works on objects that have the same uniform color and exist on a background that doesn’t repeat that color.
To explain color removal, it’s easier for me to show you an example where one color is retained and all the others are reduced to black and white. After you’ve seen this, you can use this experience to remove single colors.
To remove all colors from a clip except one
1. Open the Color Correction Editor and select a clip so that it appears in the right window.
2. Click the Extend Dialog arrow to open the interface (Figure 11.22).
Figure 11.22. The Extend Dialog arrow.

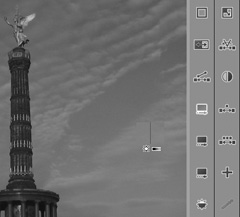
3. To select a color, click once on the plus sign (+) next to the Selective Color wheel (Figure 11.23).
Figure 11.23. Adding a color to the Selective Color wheel.
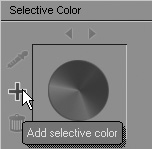
The wheel opens two color windows to its right and highlights the Ink Dropper tool to its left.
4. Place the cursor over the right window and over the color you want to keep.
5. Hold down the left mouse button and drag out a square across the color you want to keep red in this example.
This color is added to the Selective Color wheel as a small circle. Try not to let any other colors infect this sample (Figure 11.24).
Figure 11.24. Selecting the color in the clip with the Zoom tool active (see Color Insert 11-3).
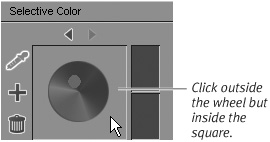
6. Click anywhere outside the wheel, but inside the square that contains the wheel (Figure 11.25).
Figure 11.25. Select all colors except the one you picked in Step 3.
You can now adjust all colors other than the one you just selected using the sliders under the Selective Color wheel.
7. To remove all of the other colors, slide the saturation slider all the way to the left so the box reads –255 (Figure 11.26).
Figure 11.26. Adjusting the saturation level of all colors except the one you picked in Step 3.
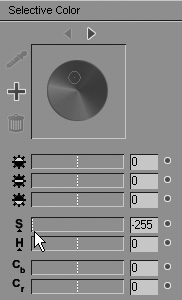
The entire picture is now black and white except for the color you selected (see Color Insert 11-3).
• To restore saturation to 0, click the small button to the right of the figures.
• A single JPEG of this video clip (Color Correction Example 1) is available for download at www.peachpit.com/liquid7vqp.
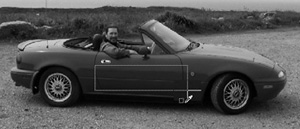
To change one color from a clip
1. Open the Color Correction Editor and select the target clip in the window on the right.
2. Click the Extend Dialog arrow to open the interface.
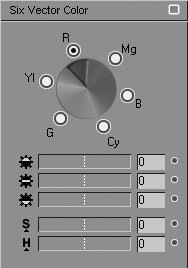
3. Click once on the color you want to change in the Six Vector Color wheel (Figure 11.27).
Figure 11.27. Selecting the color you want to adjust using the Six Vector Color wheel (see Color Insert 11-4).
4. To alter the color, drag the Hue slider to the left or right (Figure 11.28).
Figure 11.28. Altering the Hue changes the color.
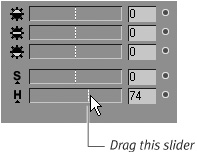
This cycles your selected color through a range of alternatives.
In this example, the color I selected was red and I adjusted the Hue, cycling through the various colors of the car (see Color Insert 11-4).
• A single JPEG of this video clip (Color Correction Example 2) is available for download at www.peachpit.com/liquid7vqp.
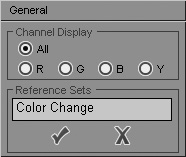
Saving a Reference Set
If you have a certain setting, a simple effect, or a color correction that you know you’ll need in the future, then you can save it as a reference set for later use. You can then load the reference set back in with just a click.
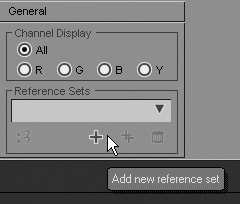
To save a reference set
1. Click once on the Add new reference set button (Figure 11.29).
Figure 11.29. Adding a new reference set.
2. Enter the name of your reference set and click the check mark (Figure 11.30).
Figure 11.30. Saving the reference set.