6. Fine-Tuning Your Edit
The Timeline view is the center hub of Liquid. Once the media clips have been digitized or imported, organized into Racks and folders, and, perhaps, roughly assembled in Liquid’s Storyboard mode, it’s time to fine-tune the edit and prepare it for any special effects you might want to add.
In the previous chapter, you learned how to use the Storyboard mode to create a basic sequence that you then arranged into the rough order you needed. Then, in the last step, you sent this sequence to the Timeline for further editing. This chapter covers the various techniques you’ll need to accomplish this fine-tuning and also those techniques you’ll need to get the most from the interface, thus increasing your workflow and productivity.
Here you will learn how to navigate the Timeline and insert media clips, but one general tip that you should learn now is that a single right-click can go a long way in Liquid, on whichever interface you are working. A simple right-click can expose a myriad of shortcut menus, allowing you to burrow quickly and deeply into the core power of Liquid.
Working with the Timeline
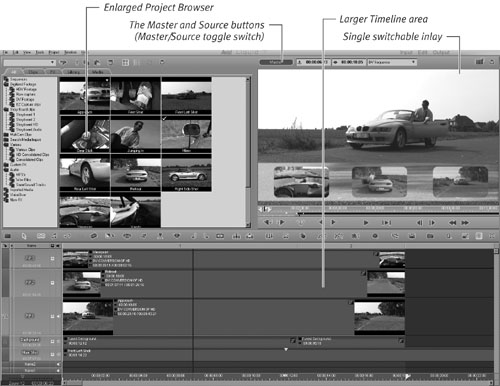
The default Timeline view in Liquid is the twin inlays (Source and Master) over the Timeline. New to Liquid 7 is the Studio view, specifically aimed at users upgrading from Pinnacle Studio and those with single-screen setups, such as laptop users or 21-inch TFT users.
The mechanics of editing in either interface are similar, with only a few minor differences that are explained in the next two sections.
1. Click the Eye icon ![]() to open the various view options (Figure 6.1).
to open the various view options (Figure 6.1).
Figure 6.1. View options for single-screen users. Dual-screen users, see Chapter 5.
2. Click the Studio View icon (Figure 6.2), which is the bottom one, so that your Liquid interface looks something like Figure 6.3.
Figure 6.2. Icon to select Studio view.
![]()
Figure 6.3. The Liquid 7 interface showing the new Studio view.
To open the Timeline interface
1. Click the Eye icon ![]() to open the various view options (Figure 6.1).
to open the various view options (Figure 6.1).
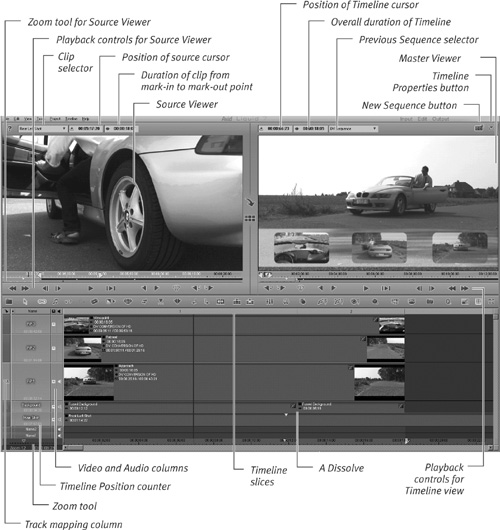
2. Click the Timeline icon (Figure 6.4); your Liquid desktop looks similar to Figure 6.5.
Figure 6.4. Icon to select the Source and Master Viewer over Timeline view. This is the default view when opening Liquid.
![]()
Figure 6.5. The Timeline view showing the Project Browser open on the Timeline.
• The keyboard shortcut is Shift+F2.
• The Timeline interface is the default view, and you will only need the above instructions if you are using a different interface view such as Studio view or Storyboard view.
Navigating the Timeline
The rules for moving around the Timeline are the same as those you learned when you were dealing with the Clip Viewer in Chapter 5, “The First Assembly—Storyboarding,” but if you skipped that chapter, the concepts of scrubbing, zooming, and undoing your mistakes are covered here. Remember, it is very important that you learn to use the mouse and keyboard shortcuts effectively.
Scrubbing the Timeline
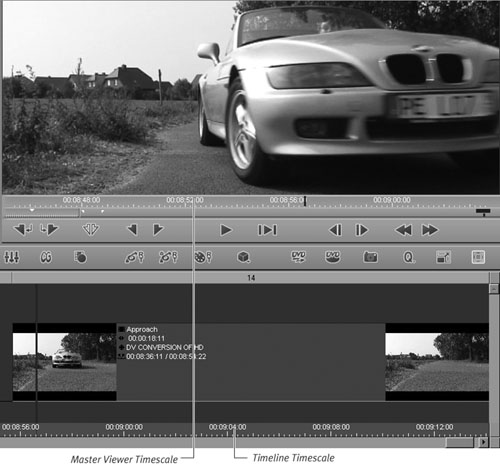
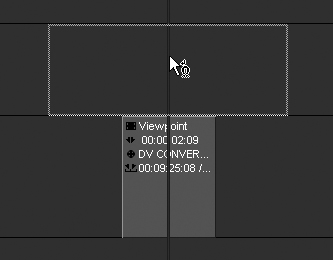
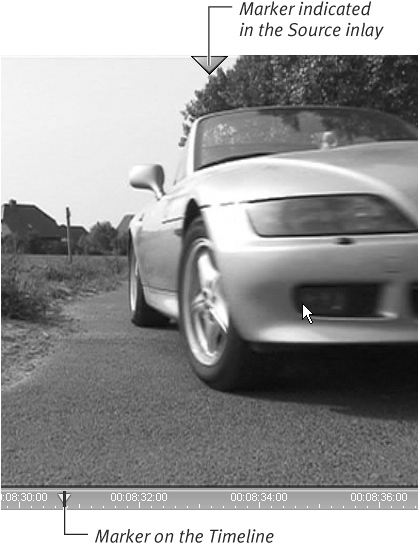
Unlike the Source Viewer, you can scrub the Timeline from two places: directly on the Timeline’s timescale or directly on the Master Viewer’s timescale (Figure 6.6).
Figure 6.6. The two locations used to scrub the Timeline.
1. Make sure the Master Viewer has a red border indicating that it is selected.
If you are using the Studio view, make sure the Master toggle switch is selected if you want to use the timescale bar directly under the inlay.
2. Scrub by doing one of the following:
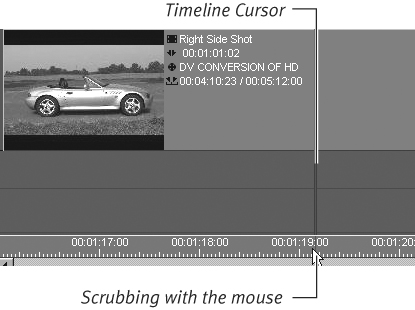
• Click the Timeline timescale, hold down the left mouse button, and drag the cursor left or right (Figure 6.7). If your mouse is equipped with a wheel, use it to step forward or backward one frame at a time. You can also place the mouse inside the Inlay area and scrub using either of the above methods.
Figure 6.7. Scrubbing the Timeline with the mouse.
• Hold down the Alt key and hold down the left mouse button and drag the cursor anywhere over the Timeline clips.
• Use the keyboard arrows to step through each frame, one at a time. To move the clip forward or backward faster, hold down the left or right arrow key. To go even faster, hold down the Shift key at the same time.
• By using the arrow keys and/or the mouse wheel, you can be frame-perfect when scrubbing the Timeline.
• The keyboard shortcuts for scrubbing are the J, K, and L keys. K stops playback, L plays the clip faster each time it is pressed, and J plays the clip backward a little faster each time it is pressed.
• When scrubbing the Timeline, you won’t hear any audio; this is because, by default, audio tracks are ignored at all times except when you are previewing. Details on hearing the audio while scrubbing can be found in Chapter 7, “Working with Audio.”
Using the Zoom tool
To display more detail on the Timeline, or to see a whole hour-long project in one screen, you’ll need to use the Zoom tool.
To use the Zoom tool
• Using the mouse, place the arrow pointer over the Zoom tool and drag it to the left to show a higher degree of magnification (Figure 6.8) or to the right to show a decreased level of magnification (Figure 6.9).
Figure 6.8. Magnification at Zoom 1 will display one frame per Timeline mark.
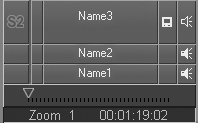
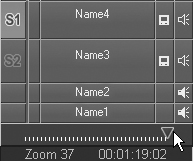
Figure 6.9. Magnification at Zoom 37 will display a two-hour Timeline (approximately) completely on a single monitor.
• Pressing the up and down arrow keys will also cause the Timeline to zoom in and out. You can do this while the Timeline is playing.
• To avoid performance problems when scrubbing the Timeline (particularly when a WAV file is displayed), I recommend keeping the Zoom setting at Zoom 9 or highter. Use Zoom 8 and lower only for specific Timeline operations and then return to Zoom 9 or higher when finished.
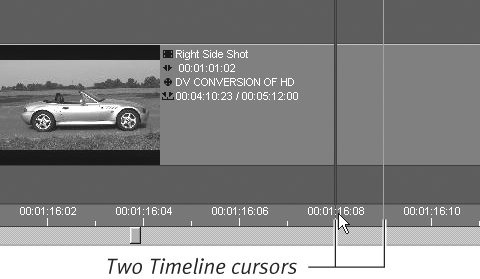
Two Cursor Lines when in Zoom 1
Figure 6.10. At Zoom 1, the Timeline cursor brackets the frame currently being displayed.
Using Undo/Redo
Undo in Liquid has the universally recognized shortcut Ctrl+Z. However, the Undo command has some restrictions that can seem confusing to the beginner.
The basic rule for the Undo command is that it only affects certain elements on the Timeline—namely, the position, duration, and existence of either a media clip or a transition.
What’s more important to use as an editor are other elements, such as filters, Timewarp, and any audio alterations not affected by the Timeline Undo. This is because they have their own integral Undo functions. Trying to Undo a filter using Ctrl+Z will not work and will lead to an undesired Undo. For full details on the various ways Liquid uses Undo, see Chapters 7, “Working with Audio,” and 9, “Working with Filters.”
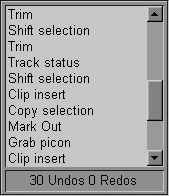
• If you are unsure what effect using the Undo command will have, you can look at a complete Undo history by Ctrl+Shift+left-clicking the Undo button ![]() (Figure 6.11). Press the Escape key (Esc) to exit the Undo History screen.
(Figure 6.11). Press the Escape key (Esc) to exit the Undo History screen.
Figure 6.11. The Undo history for the current Sequence.
• The Redo command also performs as expected, taking the user one step forward.
• Double-clicking any of the Undo items displayed in the history will undo to that particular command, undoing all other actions that took place before that point.
• Liquid stores a maximum of 63 undos per sequence.
Edit Styles Explained
Liquid has two Edit Styles that affect the way clips behave on the Timeline: Overwrite Style and Film Style. You can change between these by clicking once on the toggle switch that sits between the Source and Master Viewers (Figure 6.12).
Figure 6.12. The Overwrite/Film Style button and new “Insert source to master” using...buttons.
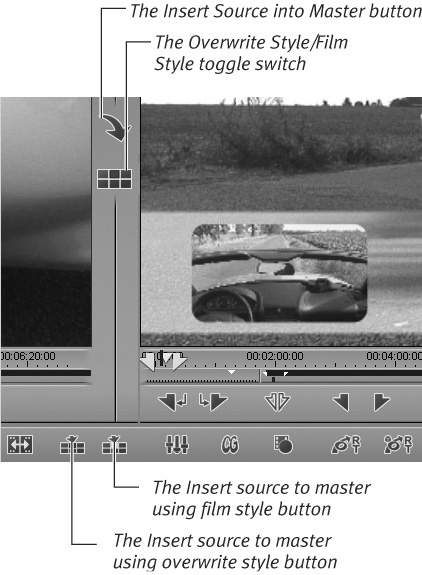
• If you are using the Studio view, both the Overwrite/Film Style toggle button and the Insert Source into Master button will be missing from your display. However, you can overcome this by using the Insert source to master using overwrite style button and Insert to master using film style button (Figure 6.12). See the sidebar, “New in Version 7—The Overwrite and Film Style buttons,” later in this chapter for details.
Overwrite Style
This is the default setting when Liquid is launched. It shows five gray squares and one red square (Figure 6.13).
Figure 6.13. The Overwrite Style button.
![]()
Overwrite style does pretty much what it says on the box—any clip you send or drag to the Timeline will overwrite the clip(s) at the Timeline cursor’s position.
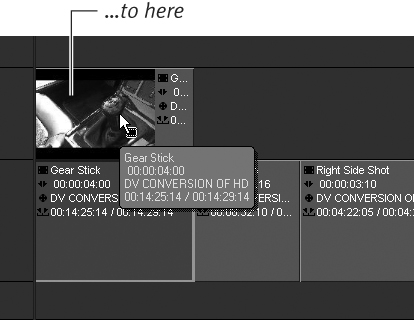
Figure 6.14 shows a new clip, Hands, brought into the Timeline (top), and overwriting the first few seconds of the Gear stick clip (bottom).
Figure 6.14. A new clip dragged onto and over the first clip on the Timeline (top). Once the media clip is dropped, the beginning of the original Timeline media clip is overwritten (bottom).

Clips sent to the Timeline using this edit style do not affect the order or (more importantly) the audio synchronization of the other clips already on the Timeline.
Film Style
This style can be seen by clicking once on the Overwrite button to display a seven-square icon, one square of which is yellow (Figure 6.15). This working style is slightly more complex, and using it on a crowded Timeline is risky. Primarily, you’ll use Film Style to insert a clip without losing any footage from clips already on the Timeline.
Figure 6.15. The Film Style button.
![]()
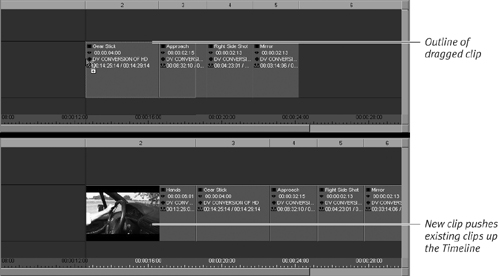
However, because added clips will move any existing clips to the right (or “up” the Timeline), to make room for any new clips, it is possible to lose audio sync if that audio track is not active. Figure 6.16 shows the Hands clip over the mark-in point of the Gear stick clip (top). Once it is dropped onto the Hands clip, all other clips to the right move up the Timeline to accommodate it (bottom).
Figure 6.16. In Film Style, all other clips will move to accommodate the size of the new clip (top). The clip has been inserted onto a track, and all existing clips have moved up the Timeline (bottom).
• Trying to drag a clip up the Timeline can also cause you problems when using Film Style, and if you try it you may see a No Entry symbol (Figure 6.17). In most cases, you can only drag clips “down” the Timeline when you’re in Film Style, although you can get around this by dragging the clip to a different Timeline track or dragging it beyond its own physical length. However, you can avoid potential problems by switching to Overwrite Style when dragging clips around the Timeline.
Figure 6.17. Dragging a clip up the Timeline toward other clips may not be allowed when using Film Style. See text for further details.

New in Version 7—The Overwrite and Film Style buttons
Figure 6.18. Two new buttons on the Liquid 7 toolbar: Insert source to master using overwrite (top) or Insert source to master using film style (bottom).
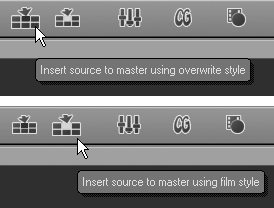
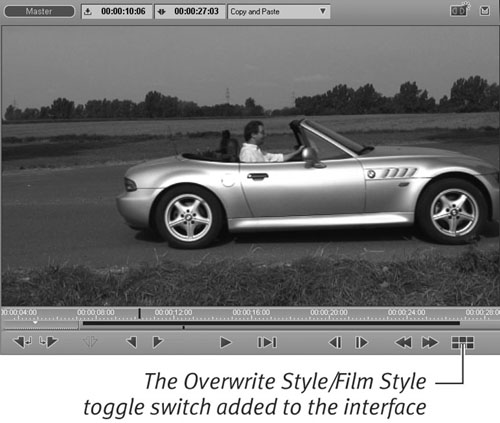
Figure 6.19. In Studio view you need to add the Overwrite Style/Film Style toggle switch to the interface.
Moving Clips Around the Timeline
Once a media clip is on the Timeline, it can be manipulated separately from its Project Browser parent. That means you can copy and paste the media clip to other parts of the Timeline, drag existing clips around the Timeline, trim the clip’s mark-in and mark-out points, or cut the clip into separate media clips live on the Timeline with the razor blade.
• Before proceeding with this section, read the “Important Information” sidebar earlier in this chapter.
Copy/cut and paste
These actions follow the Windows convention—you copy a clip onto the clipboard (a temporary scratch area) before pasting it somewhere else. It’s also possible to cut a clip so that it is removed from its present position and can be pasted elsewhere.
The Windows shortcuts Ctrl+X, Ctrl+C, and Ctrl+V are fully supported when you are using this method.
To copy/cut and paste a clip(s)
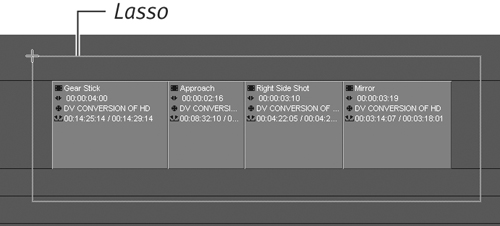
1. Select one media clip by clicking it, or select several by holding down the Ctrl key and clicking as many as you like (Figure 6.21). You can also drag a lasso around all of the clips you want to select (Figure 6.22).
Figure 6.21. To selectively highlight the clips you want, use the Ctrl key...
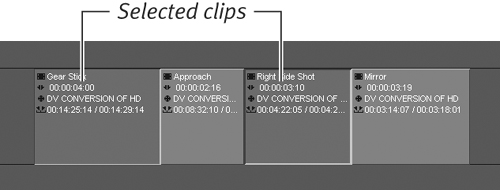
Figure 6.22. ...or drag a lasso around them.
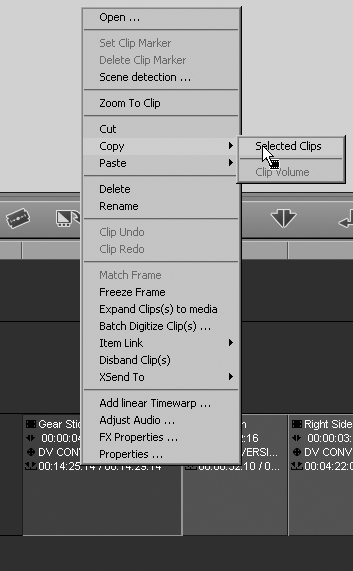
2. Press Ctrl+C or right-click the clip(s) and select Copy > Selected Clips (Figure 6.23).
Figure 6.23. Use the contextual menu to copy selected clips into a temporary area for transferring via...
It is also possible to use Ctrl+X to delete the clip and paste it elsewhere. But you can only cut one media clip at any one time.
3. Move the Timeline cursor to the position to which you want these clips copied and press Ctrl+V, or right-click and select Paste (Figure 6.24).
Figure 6.24. ...the Paste command.
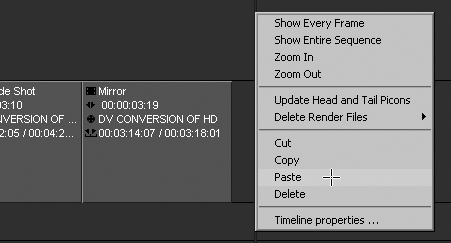
You must have the cursor over the required track before you right-click. Otherwise the clip can land in the wrong place.
• You can also copy a media clip by selecting the clip(s), holding down the Ctrl key, and dragging the clip from wherever it was on the Timeline (Figure 6.25) to its new position (Figure 6.26).
Figure 6.25. By holding down the Ctrl key, you can create an exact copy of a clip...
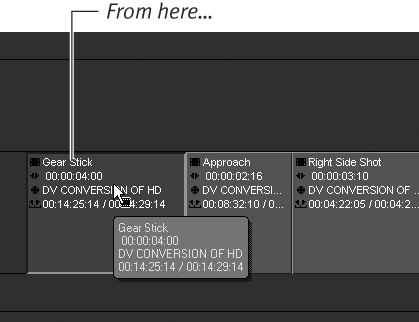
Figure 6.26. ...and drag it to anywhere on the Timeline.
• Be careful when moving a clip or overwriting an existing one, as this could accidentally force audio tracks out of sync if you are using disbanded audio. See the “Audio Grouping” sidebar earlier in this chapter for details.
• Copy and paste are affected by the Edit Style you have selected. See the “Edit Styles Explained” section earlier in this chapter for more details.
Moving a clip(s) using magnets
You can move every element on the Timeline to another location by clicking the media clip and simply dragging it to a new location, but when you drag a clip around the Timeline, it automatically uses a magnet to align itself with the edge of any neighboring clips.
The magnet symbol appears by default on the left side of the mark-in point of the media clip you are dragging. It will be attracted to any mark-in or mark-out point of a clip already on the Timeline. This point may be on a track below the one on which you want to place your clip (Figure 6.27), or on a track directly above it (Figure 6.28).
Figure 6.27. The magnet has latched onto the mark-in point of the clip under it...
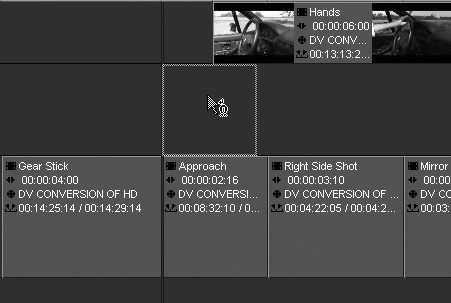
Figure 6.28. ...and now onto the mark-in point of the clip above it.

Sometimes it may not be convenient to align your clip to this point; in this case, you can change the magnet’s polarity on the fly or toggle it off.
• Before proceeding with this section, read the “Important Information” sidebar earlier in this chapter.
To change the magnet’s polarity
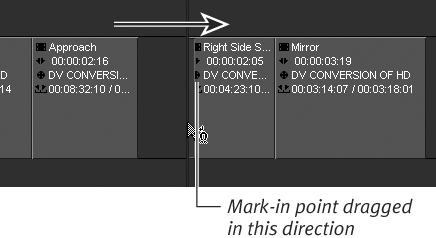
1. After making sure you have at least one other clip on the Timeline, drag a clip from the Project Browser or from somewhere else on the Timeline toward it (Figure 6.29).
Figure 6.29. The default polarity for the clip magnet is the media clip’s mark-in point.
2. Still holding down the left mouse button, press Alt once.
The magnet shifts polarity to the right side, or mark-out point of the clip (Figure 6.30).
Figure 6.30. Pressing the Alt key once again will shift the polarity to the media clip’s mark-out point.
3. Still holding down the left mouse button, press Alt again.
The magnet shifts polarity to the center section of the clip (Figure 6.31).
Figure 6.31. Pressing the Alt key once again will shift the polarity to the exact middle of the media clip.
Once a clip is released, the magnetic polarity defaults back to the mark-in point of the clip.
• Multiple clips can be selected using Shift+Ctrl, or by dragging a lasso around them.
• Clicking the Select after playline button ![]() will highlight all clips to the right of the Timeline, enabling you to move them all at the same time.
will highlight all clips to the right of the Timeline, enabling you to move them all at the same time.
Do one of the following:
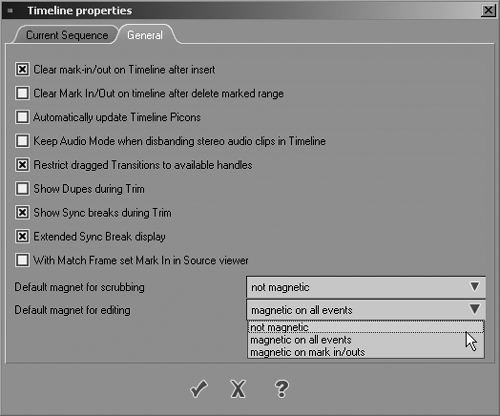
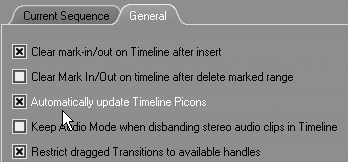
• Right-click the Timeline and select Timeline Properties. Then select the General tab and change the selection in the Default magnet for editing drop-down menu to suit your needs (Figure 6.32). Click the check mark to apply this change.
Figure 6.32. The bottom drop-down menu controls the behavior of the clip magnets.
• Hold down the Shift key while dragging; this temporarily toggles the magnets off for as long as you are holding down the key. You’ll find this option particularly useful if you are dragging a media clip onto a very complex Timeline. This is because the mark-in point will try to latch onto every single event it passes, which will make the drag-and-drop process frustratingly slow.
• A clip that is already on the Timeline will switch to a right-side polarity the first time you press the Alt key, and switch to a middle polarity the second time you press the Alt key.
Trimming Clips
The process of getting rid of unwanted material either at the beginning or end of a clip is called trimming. In Chapter 5, you accomplished this using the Clip Viewer, but it’s also possible to trim a clip directly on the Timeline, using the mouse or using the Trim Editor if you need more accuracy or you want to perform a Slip Trim.
• Before proceeding with this section, read the “Important Information” sidebar earlier in this chapter.
Trimming Directly on the Timeline
This is a quick and dirty method and is only really useful when you see a clip that you can quickly and simply adjust on the Timeline. This method lacks sophistication and can lead to alignment problems if you are using Film Style (see the “Edit Styles Explained” section earlier in this chapter for more details), but any errors you make are only an Undo key away from being fixed.
To trim a clip on the Timeline
1. Select the clip you want to trim by clicking once on its mark-in or mark-out point.
If you are in Overwrite Style, a red handle appears on the clip (Figure 6.33 and Color Insert 6-33); a yellow handle appears if you are in Film Style (Figure 6.34 and Color Insert 6-34).
Figure 6.33. A red handle on the mark-out point of a media clip indicating Overwrite Style (see Color Insert 6-33).
Figure 6.34. A yellow handle on the mark-out point indicating Film Style (see Color Insert 6-34).

2. While holding down the left mouse button, drag the clip to the left or to the right.
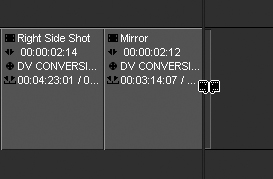
If you are in Overwrite Style, a gap appears (Figure 6.35).
Figure 6.35. In Overwrite Style, a gap is left when a mark-in point of a middle clip is dragged up the Timeline.
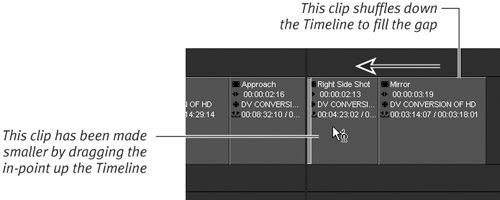
If you are in Film Style, any neighboring clips to the immediate right shuffle up or down the Timeline depending upon which way you are dragging the mark-in or mark-out point (Figure 6.36).
Figure 6.36. In Film Style, no gap is left because the neighboring clips follow the trim down the Timeline.
3. When you are happy with the result, release the mouse button.
• If you hold down the Ctrl key and use the keyboard arrows, you will be able to trim the clip one frame at a time (Figure 6.37).
Figure 6.37. The Trim tool is activated by holding down the Ctrl key and pressing an arrow key.
• For more details on these different modes, see the “Edit Styles Explained” section earlier in this chapter.
• If you are having performance problems when trimming clips on the Timeline, see the “Automatic Picon Update” sidebar later in this chapter for a possible solution.
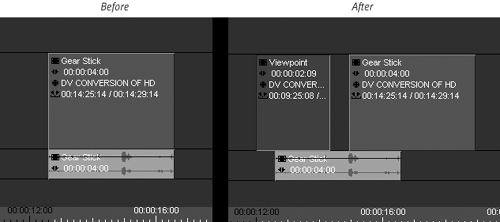
Figure 6.38. Before and after a clip has been inserted in Film Style. Screenshot on the right shows that the audio sync is now clearly out.
Preparing the Timeline for the Next Task
In order to better understand the Trim Editor, prepare your Timeline by placing a short clip on the Timeline, drag the Timeline cursor to about the halfway point of this clip, and insert a cut by pressing the Add Edit button ![]() or by pressing the Period key (.) on the keyboard (Figure 6.39).
or by pressing the Period key (.) on the keyboard (Figure 6.39).
Figure 6.39. Preparing a clip for the next exercise by cutting it in two.
Trimming with the Trim Editor
The Trim Editor is an area that some users find challenging, partly because of Liquid’s single-track Timeline, and partly because visualizing the final trim can cause some confusion. However, the problems only really occur once transitions are used (this problem is covered more fully in Chapter 8, “Working with Transitions”). For the moment, we’ll restrict this part of the tutorial to looking at trimming a hard cut.
To use the Trim Editor
1. Make sure the Timeline cursor is approximately over the point where the two clips meet on the Timeline. The Trim Editor always opens to the nearest cut and only on an active track. That might not always be the one you think it is, so check first.
2. Open the Trim Editor by clicking the Trim Editor button ![]() or by pressing F5.
or by pressing F5.
The Trim Editor opens displaying the left clip—the outgoing clip—in the left window and the right clip—the incoming clip—in the right window (Figure 6.40).
Figure 6.40. The Trim Editor.
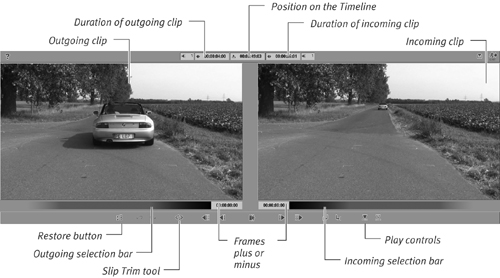
By default, both the left and right windows have a black selection bar directly under them. This means that both clips will be trimmed at the same time.
3. Press the right arrow key.
Both clips advance one frame up the Timeline; the left one (the outgoing clip) will get longer if it can, and the right one (the incoming clip) will get shorter.
4. Press the left arrow key and the opposite will happen.
In both cases, any neighboring clips to the immediate right are not affected by the changes made here.
In both cases the Frames counter increases in the positive direction for each clip.
Trimming only one clip
The previous example trims both clips together, but you may only want to make one of these clips longer or shorter. To do this, you simply activate either the Outgoing or the Incoming selection bar. However, when you trim only one clip at a time, the neighboring clips to the right will shuffle up or down the Timeline, depending upon which way you trim your clip.
This is similar to the Film Style edit detailed in the “Edit Styles Explained” section earlier in this chapter.
To adjust just one clip using the Trim Editor
1. Open the Trim Editor by pressing F5.
2. Press the P key once to switch the black bar to the right window.
This selects the incoming clip to be trimmed (Figure 6.41, top).
Figure 6.41. The black bar on the right means only the incoming clip will be trimmed (top). The black bar on the left means only the outgoing clip will be trimmed (bottom).
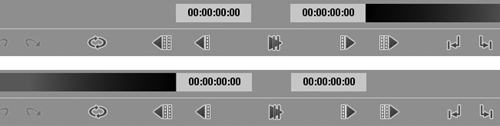
3. Press the P key twice to switch the black bar to the left window.
This selects the outgoing clip to be trimmed (Figure 6.41, bottom).
4. To decrease the size of the clip by one frame, press the right arrow key.
Any neighboring clips to the immediate right shuffle down the Timeline so that no gap is created.
Pressing the left arrow key will do the opposite.
• Clicking the Play preview button ![]() in the center of the clip will play approximately 2 seconds of the incoming clip followed by 2 seconds of the outgoing clip in a continuous loop.
in the center of the clip will play approximately 2 seconds of the incoming clip followed by 2 seconds of the outgoing clip in a continuous loop.
• Clicking the cursor in the middle of both windows will highlight both selection bars.
• The Trim 10 Frames Left/Right buttons ![]() will jump the trim 10 frames backward or forward.
will jump the trim 10 frames backward or forward.
• You cannot trim beyond the physical length of a clip.
Editing with Slip Trim
If you want to trim a clip on the Timeline but you don’t want all the neighboring clips to move up or down, you must use the Slip Trim tool. This allows you to edit both the mark-in and mark-out points of a clip or clips at the same time.
To edit with Slip Trim
1. Open the Trim Editor by clicking the Trim Editor button ![]() or by pressing F5.
or by pressing F5.
2. Select which clip you want to trim by pressing the P key to move the selection bar. By default, you will edit both clips at the same time (Figure 6.42, top).
Figure 6.42. The Timeline before and after the Slip Trim function is used.
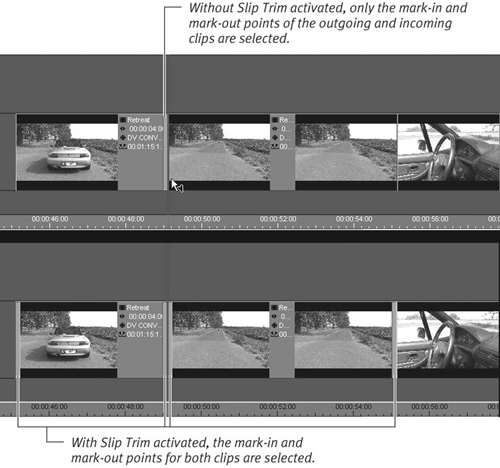
3. Click the Slip Key button ![]() .
.
The mark-in and mark-out points for the selected clip(s) become highlighted (Figure 6.42, bottom).
4. Press the left or right arrow key to adjust the clips down or up the Timeline, respectively.
Because both mark-out points are being adjusted by an equal amount to the mark-in point, any neighboring clips to the immediate right are not affected by the changes made here.
• This procedure is identical when selecting just the incoming or outgoing clip and the results are the same. Only those clips being trimmed will be affected; the rest of the Timeline will remain intact.
• Again, you cannot trim beyond the maximum length of a clip.
Figure 6.43. Manually updating the Head and Tail Picons.
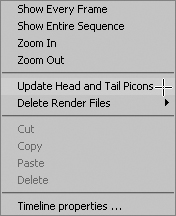
Figure 6.44. Automatic update of Timeline Picons is shown here as toggled on.
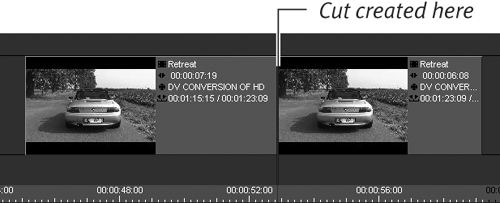
Cutting Clips
A cut is created on a media clip usually for one of two reasons: the clip contained two scenes and both require individual trimming, or the middle of the clip is not wanted and needs to be deleted.
Liquid uses the Razor Blade tool to cut a clip and add an edit point.
To cut a clip
1. Scrub through the media clip until you find the place where you want to create a cut. You can make the cut accurate by using the arrow keys to step through one frame at a time.
2. Click the Razor button ![]() or press the period key (.).
or press the period key (.).
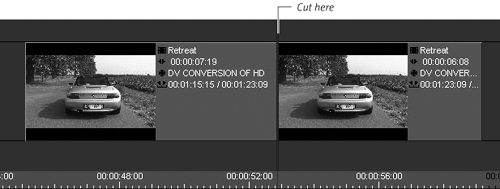
A cut is created, dividing the clip into two pieces (Figure 6.45).
Figure 6.45. The razor blade can divide a clip in two.
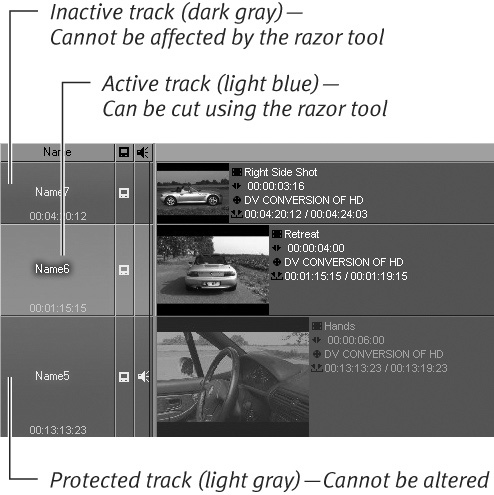
Inactive, Active, and Protected Tracks
Figure 6.46. Examples of Inactive, active, and protected tracks.
The Source Viewer
The Source Viewer is a very simple interface that contains a number of useful tricks including the ability to trim and insert media clips.
Once you have assembled your edit and trimmed your clips, you will probably need to trim and insert new material such as images or other media clips. Using the Source Viewer, you can preview clips by adjusting mark-in and mark-out points, and inserting them into the Timeline via drag and drop or by creating a three-point or four-point edit at the Timeline cursor position.
• Studio users can select the Source Viewer with the Source toggle button or by double-clicking on any media clip in the Project Browser.
To send a clip to the Source Viewer
Do one of the following:
• Double-click the media clip inside the Project Browser. This is the default setting, and in Studio view this will automatically toggle the display from Master to Source.
• Right-click the media clip and select Send to Source Viewer.
• Drag the clip from the Project Browser and drop it into the Source Viewer.
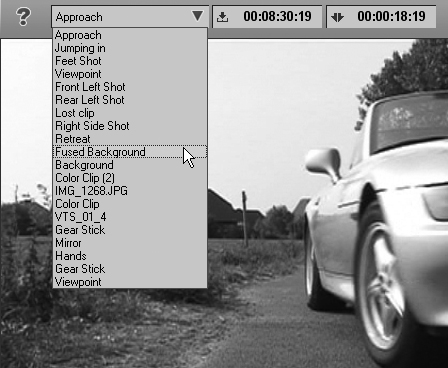
• Click the media clip selection menu and select one of the clips from there (Figure 6.47).
Figure 6.47. The media clip selection menu in the Source viewer.
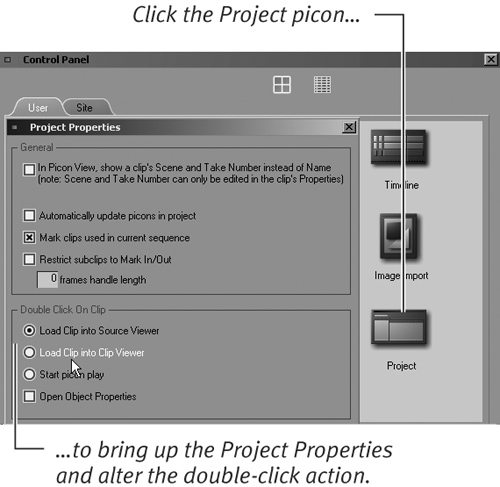
• How a clip reacts when you double-click it can be altered by opening the Control Panel and double-clicking the Project Picon. This brings up a dialog from which you can select the double-click action of your choice (Figure 6.48).
Figure 6.48. Altering the double-click action for media files.
The Source Viewer Zoom tool
Once you have a clip inside the Source Viewer, you can use the Zoom tool to adjust the size of the Timeline timescale.
To use the Zoom tool
• Place the mouse cursor over the Zoom tool so that it turns into a magnifying glass; then left-click and drag it to the left to show a higher degree of magnification or to the right to show a decreased level of magnification (Figure 6.49).
Figure 6.49. The Zoom tool in action.
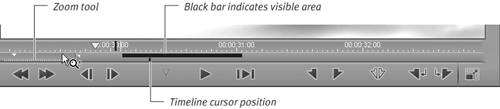
• Directly to the right of the Zoom tool is a black horizontal line. This indicates how much of the clip you can currently see in the Source Viewer’s Timeline. The red mark below this indicates the position of the cursor.
Trimming a clip in the Source Viewer
You can trim dynamically on the Timeline to adjust your clips, but a more refined method is to use the Source Viewer to trim the clip. Once the clip is in the Source Viewer, your first job is to preview and look for anything that might need to be cut out from the start or the end. In fact, you might decide just to use a few seconds from the middle of the clip. You can do all of this by adding mark-in and mark-out points to the clip.
Remember that adding either a mark-in or mark-out point does not physically alter the original clip. It merely tells the program to ignore any material that falls outside these two areas. For a further explanation of Non-Linear Editing (NLE), see Chapter 1.
To add a mark-in or mark-out point in the Source Viewer
1. Once the clip is loaded into the Source Viewer, use the mouse or the arrow keys to look for the best place for your clip to start.
This is called scrubbing and is discussed earlier in this chapter.
2. Once you have found the ideal place to start your clip—the mark-in point—press the I key or click the Mark-In Point button ![]() .
.
A small Mark-In Point icon has now been added to the Timeline of the Clip Viewer (Figure 6.50, left).
Figure 6.50. A mark-in point added to the Source Viewer (left). A mark-out point added to the Source Viewer (right).

3. To select a point where you would like your clip to finish—the mark-out point—scrub through the clip again until you find the optimal point; then press the O key or click the Mark-Out Point button ![]() .
.
A small Mark-Out Point icon has now been added to the Timeline of the Clip Viewer (Figure 6.50, right).
4. Use the Zoom tool to reduce the view if you can’t see both the mark-in and the mark-out points on the Timeline display.
5. Click the Play from Mark-In to Mark-Out button ![]() to play back the clip from the mark-in point to the mark-out point you have now defined.
to play back the clip from the mark-in point to the mark-out point you have now defined.
6. If the new mark-in and mark-out points don’t suit your needs, you can set different points simply by moving the cursor to a new point and pressing the I or the O key again.
• Pressing Home or End will take you to the first or last frame of your clip. However, if this is a Subclip, then pressing the Home or End key will take you to the clip-in or clip-out point of the clip.
• When the Source Viewer is selected, it is surrounded by a red border.
Sending a Clip to the Timeline Using the Source Viewer
Once you’ve finished adjusting the clip with the Source Viewer, it’s time to send it to the Timeline. In Chapter 5, you learned how to send a Storyboard Sequence to the Timeline, but when you use the Source Viewer to send clips, you have several options that involve using the Insert Source into Master button or drag and drop, or creating a three- or four-point edit.
Placing a clip on an empty Timeline or at the end of the current Sequence is relatively simple, and once you have trimmed your clip in the Source Viewer, you are ready to go.
To send a clip to the Timeline
1. Place the Timeline cursor where you want the clip to land by using either the navigation keys or the mouse.
2. Check that the correct clip is loaded into the Source Viewer and that the mark-in and mark-out points have been set as required.
3. To send the clip to the Timeline, do one of the following:
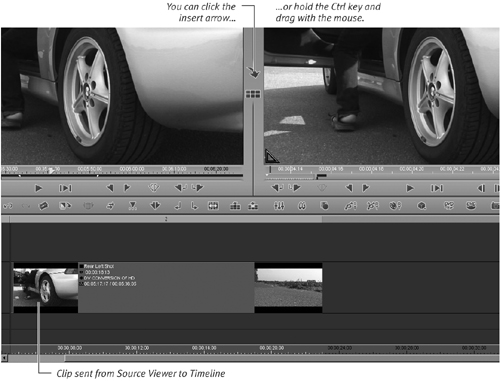
• Click once on the Insert Source into Master button ![]() . The clip is now sent from the Source Viewer to the current Timeline position (Figure 6.51).
. The clip is now sent from the Source Viewer to the current Timeline position (Figure 6.51).
Figure 6.51. The media clip is sent from the Source Viewer to the Timeline in one of two ways.
• Click either of the new insert buttons— Insert source to master using overwrite style or Insert source to master using film style. The clip will be sent to the Timeline with the selected style (Figure 6.50).
• Hold down the Ctrl key and drag the clip from the Source Viewer to the Timeline by holding down the left mouse button.
• Drag the clip from the Project Browser to the Timeline. In this case, you don’t need to hold down the Ctrl key unless you want to perform a Replace Edit. More details on Replace Edit can be found later in this chapter.
• Dragging and dropping allows you to dynamically place the clip at any point on the Timeline, but the rules of Overwrite Style and Film Style need to be observed.
• For details on the new Insert source to master using overwrite button and Insert source to master using film style button, see the “Edit Styles Explained” section earlier in this chapter
• Sending to a Timeline that already contains clips is the same process as sending to an unoccupied Timeline; however, here the Overwrite Style and Film Style rules need to be observed more carefully. For more details on these Styles, see the “Edit Styles Explained” section earlier in this chapter.
Replace Edit Function
A little known function in Liquid (available since Liquid 6.1) is the ability to replace a clip that is already on the Timeline, retaining both the mark-in and mark-out-points of the old clip, and also any filters that were present on the clip. This is very useful if you want to make a radical change to a long Timeline without disturbing any of the other clips and without losing any filter settings you might have spent hours tweaking.
To use Replace Edit
Do the following:
• Hold down the Ctrl key and drag the replacement clip from the Project Browser or the Source Viewer so that the clip overwrites any clip already on the Timeline (Figure 6.52).
Figure 6.52. The Replace Edit cursor.
• When performing a Replace Edit, the cursor will change to a downward-facing arrow with rectangles on the top and bottom.
• Once the Replace Edit is done, the new clip will assume the same length of the old clip, altering its mark-out point to fit.
• A Replace Edit will also “adopt” any filters that were present on that clip, copying it exactly, including the keyframes.
Creating a Three-Point Edit
The three-point edit is used to insert a clip into a point on the Timeline using specific reference points. The three points referred to are the mark-in and mark-out points defined in the Source Viewer and a final mark-in point (or insertion point) that is placed on the Timeline.
The process is pretty much the same as what happens if you either drag a clip from the Source Viewer to a specific point on the Timeline, or if you simply place the Timeline cursor there and click the Insert Source into Master button ![]() .
.
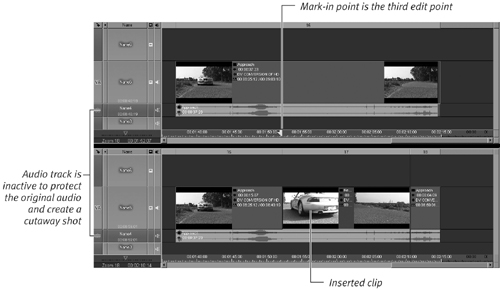
Usually a clip already occupies the point where you want to insert your clip and you want to overwrite it, and perhaps keep the audio track underneath. The three-point edit is often used for cutaway shots where the narration or the interview continues uninterrupted, but another image is displayed. For example, a journalist may be talking into the camera about a politician. At some point, the image may cut away to show a soundless clip of the politician who is being referred to before it cuts back to the journalist. This is known as a cutaway.
The advantage of placing a mark-in point on the Timeline is that it is simply more accurate to use your third point to carefully define the exact insertion point of your clip.
To create a three-point edit
1. If you want to retain the audio for the clip on the Timeline you will be overwriting, prepare it by right-clicking the clip and selecting Disband Clip(s) from the contextual menu.
Now that audio is disbanded, make sure the audio track is inactive by clicking it once to turn it gray. The audio track for this clip will now be unaffected by the added media clip.
If you don’t need to retain the audio, you can ignore this step.
2. Load a media clip into the Source Viewer and define the mark-in and mark-out points of the clip.
These are the first two points of your edit (Figure 6.53).
Figure 6.53. Mark-in and mark-out points set for the Source Viewer.
3. Now scrub the Timeline until you find a suitable place to insert the clip; then click the Mark-In Point button ![]() .
.
This creates the third point of your edit (Figure 6.54, top).
Figure 6.54. A mark-in point set on the Timeline (top). Clicking the Insert Source into Master button sends the clip to the Timeline (bottom). Note that the original audio is retained because the audio track Name 4 is deselected.
• Click the Insert Source into Master button ![]() .
.
• The clip appears at this point on the Timeline, overwriting the existing clip (Figure 6.54, bottom).
• Click the Insert source to master using overwrite button to overwrite the existing media on the Timeline or use the Insert source to master using film style button if you want to keep the existing media.
Using the default setting, the mark-in point is automatically deleted after the insertion.
• Inserting a clip via the Insert source to master using film style button may cause audio sync problems. All but advanced Liquid users should steer clear of this method when creating a three-point edit.
• Inserting a clip without replacing the original audio is also known as a cutaway shot.
• More information on disbanding audio can be found in Chapter 7.
Creating a Four-Point Edit
The four-point edit functions in a similar fashion to the three-point edit, and it is also used to either create cutaway shots or to replace the existing clip completely. However, it has an extra trick in that it also adjusts the mark-out point of the inserted clip to suit the gap you want the clip to fit into.
Liquid does this for you automatically by adjusting the overall speed of the clip; either to slow it down or to speed it up, making the clip fit inside the two points you have defined on the Timeline.
To create a four-point edit
1. To retain the audio for the clip on the Timeline, prepare it by right-clicking the clip and selecting Disband Clip(s) from the contextual menu.
Now that audio is disbanded, make sure the audio track is inactive by clicking it once to turn it gray. The audio track for this clip will not be affected by the added media clip.
If you don’t need to retain the audio, you can ignore this step.
2. Load a clip into the Source Viewer and define its mark-in and mark-out points.
These are your first two points.
3. Now scrub the Timeline until you find a suitable place to insert the clip; then click the Mark-In Point button ![]() .
.
This creates your third point.
4. Now scrub the Timeline again until you find a suitable place for your mark-out point and click the Mark-Out Point button ![]() .
.
This creates your fourth point (Figure 6.56, top).
Figure 6.56. Adding a mark-out point to the Timeline and the fourth point in a four-point edit (top). The inserted clip has been compressed to fit into a smaller gap (bottom).

• Click the Insert Source into Master button ![]() and the clip will appear at the mark-in point on the Timeline, overwriting the existing clip (Figure 6.56, bottom).
and the clip will appear at the mark-in point on the Timeline, overwriting the existing clip (Figure 6.56, bottom).
• Click the Insert source to master using overwrite button to overwrite the existing media on the Timeline or use the Insert source to master using film style button if you want to keep the existing media.
The purple line running along the bottom of the clip means a linear Timewarp is added to the clip to make it fit inside the points you have defined by increasing or decreasing the clip’s speed.
• Inserting a clip via the Insert Source to Master Using Film Style button may cause audio sync problems. All but advanced Liquid users should steer clear of this method when creating a three point edit.
• If you want to retain the audio of the clip you are overwriting, you will need to disband the audio first. See Chapter 7 for details.
• The inserted clip will retain audio up to a maximum of 200 percent and a minimum of 50 percent Timewarp, although the video is not limited to these speeds.
• The purple dotted line marking a speed adjustment will only be seen if Speed is selected in the Timeline settings. To set this, go to the menu bar and select Timeline > All Tracks > View > and then toggle the speed on or off.
Inserting a Clip: Other Methods
Of course, some clips don’t need to be trimmed or inserted using any of the more complex methods just discussed. For instance, you can bring photographs into the Timeline without trimming; as trimming a photograph (effectively, a single video frame) would achieve nothing.
To allow true creative flow, Liquid allows you to insert a clip in a variety of ways, but of course, the rules of Overwrite and Film Style still apply to each method detailed here.
To simply insert a clip
Do one of the following:
• Drag and drop a clip from the Source Viewer by holding down the Ctrl key.
• Click either of these buttons; Insert source to master using overwrite style or Insert source to master using film style. The clip will be sent to the Timeline with the selected style.
• Drag and drop a clip from the Project Browser by simply selecting the clip, holding down the left mouse button, and dragging it into position. Holding down the Ctrl key while dragging from the Project Browser will perform a Replace Edit. See the “Replace Edit Function” section earlier in this chapter for details.
• Right-click the clip in the Project Browser and select Send to Timeline from the contextual menu.
• When you send clips from the Project Browser, you can use the common Windows file-selection conventions. You can select multiple clips using the Shift or Ctrl key and the left mouse button. These clips will be placed on the Timeline in the order in which they appear inside the Project Browser.
Mapping the Timeline
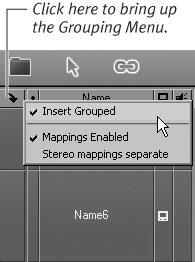
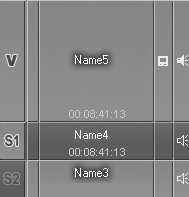
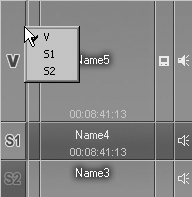
Each of the examples just discussed (except for drag and drop) will send the video by default to the Name 5 track. This is because that track has been designated, or mapped, to receive all video files. You can determine if this is the case if you see the large V that sits in the first column (Figure 6.57) or VA if the Grouped or Embedded option is selected.
Figure 6.57. The V indicates that this track is mapped for video.
Designating tracks in this way is known as mapping. Mapping tracks can be altered on the fly to suit your workflow.
To map a video track
Do one of the following:
• Right-click in the Mapping column to which you want to map the video, and select V or VA from the contextual menu (Figure 6.58).
Figure 6.58. The Mapping selection box.
• Left-click the actual V and drag it up to the column to which you want to map the video (Figure 6.59).
Figure 6.59. Manually setting the video mapping.

• If you are using the Insert Grouped option discussed earlier in this chapter, the V will be displayed as VA to indicate that it contains video and audio.
To map an audio track
Do one of the following:
• Right-click in the Mapping column to which you want to map the audio, and select S1 or A1 from the contextual menu.
• Left-click the actual S1 or A1 and drag it down to the column to which you want to map the audio.
Adding Markers
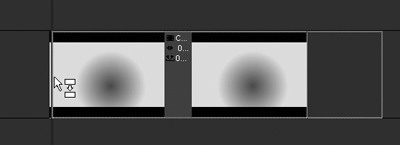
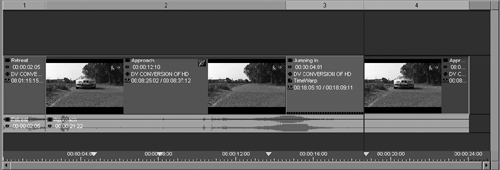
Adding markers to a clip allows you to have visual clues as to when a specific event is going to occur. This is important because when a clip is added to the Timeline, only the start frame and end frame (the heads and tails) are displayed. The rest of the clip is one long piece of blue. The Film Strip mode found in Adobe Premiere is unfortunately not an option in Liquid.
• Markers can be added to any media (audio, image, or video). Adding markers to the tempo—the rhythm of a tune—is a good example of why markers are used. But you can also use them to mark key sections of a Sequence to which you want to attach buttons during DVD authoring. See Chapter 12, “DVD Authoring,” for more details.
• Markers are also visible in all of the Effect Editors, including Timewarp.
To set a marker
1. With a clip open in the Source Viewer, scrub through the clip until you see a place where you want to add a marker.
2. Press the M key, and a small gray triangle appears on the Source Viewer’s Timeline.
When the cursor is on this point, a triangle also appears in the top-center of the Source Viewer (Figure 6.60).
Figure 6.60. A marker added to a clip in the Source Viewer.
• Extra buttons, such as Go to Next Event and Open Marker List, need to be added to the toolbars (Timeline, Source, and Clip Viewers) in order to fully exploit the full functionality of Markers. See the “Tool Buttons That Should Be Added to the Source Viewer” sidebar earlier in this chapter for details. Also, see Chapter 1 to learn how to add a button to an interface.
• Markers can be added using the Clip Viewer. They can also be added directly to the Timeline, which helps you mark out possible DVD chapter points.
To navigate the markers in a clip
Do one of the following:
• Use the Go to Next Event buttons.
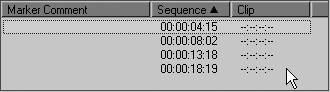
• Use the Open Marker List button ![]() to open the marker list, and double-click the marker you want (Figure 6.61).
to open the marker list, and double-click the marker you want (Figure 6.61).
Figure 6.61. Open Marker List button displaying all of the Source Viewer markers.
To rename a marker
Do one of the following:
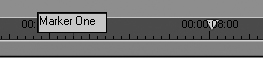
• Double-click the marker and a small dialog box will open into which you can enter your text (Figure 6.62).
Figure 6.62. Double-click the marker, and a small dialog opens into which you can enter text.
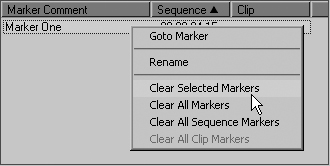
• Click the Open Marker List button and then right-click and select Rename (Figure 6.63).
Figure 6.63. Renaming a marker using the Open Marker List button.
To delete a marker
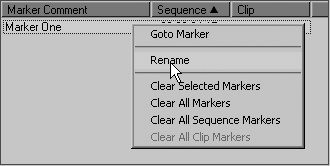
1. Open the list of markers using the Open Marker List button.
2. Highlight the marker(s) you want to delete.
3. Right-click any of the highlighted markers, and then select Clear Selected Markers or Clear All Markers (Figure 6.64).
Figure 6.64. Deleting a marker using the Open Marker List button.
To move a marker
• Hold down the Alt key and place the mouse cursor over the marker. The cursor turns into a crosshair pointer, and you can drag this marker to its new position by holding down the left mouse button. This works only in the Master and the Source Window, not on the Timeline scrub bar.
Figure 6.65. Timeline slices appear as each clip is added or as the Razor Blade is used.
Previewing Your Sequence
During the edit process, you will want to constantly preview your media clips and the adjustments you have made. You can do this by manually controlling the Timeline cursor—place the cursor at the start of where you want to preview, press the spacebar to play, and press it again to stop.
It is also possible to play a section of the Timeline in a continuous loop so that you can quickly preview whether or not a particular set of clips works together or if a Dissolve needs tweaking.
To create a continuous playback
1. Position the Timeline cursor at the start of the area you want to preview, and press the I key to add a mark-in point to the Timeline.
2. Position the Timeline cursor at the end of the area you want to preview, and press the O key to add a mark-out point to the Timeline (Figure 6.66).
Figure 6.66. A section of the Timeline marked out for playback.
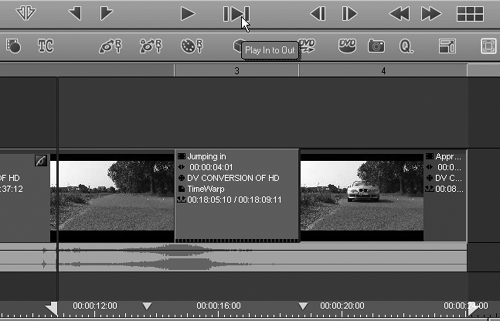
3. Click the Play from In to Out button ![]() , and the Timeline plays in a continuous loop until you click the button again.
, and the Timeline plays in a continuous loop until you click the button again.