7. Working with Audio
Audio isn’t just the other half of video editing; it’s the greater part of the whole production. Because the ear—unlike the eye—is hard to fool and is often subconsciously able to register any errors, problems, or distractions within, audiences are apt to pick up audio mistakes far more quickly than visual errors. How good (or bad) your audio editing is contributes to your audience’s visual enjoyment; without good audio they will miss vital clues as to what is going on.
With these factors in mind, you need to take audio very seriously indeed. That’s why this chapter appears after the chapter that covered how to fine-tune your Timeline Sequence and before the chapter that covers adding effects and titles. You must make sure your sound is correct early in the edit process and not shuffle it over to the “do it later” section of your life.
In this chapter, you will learn how to adjust audio levels, disband stereo tracks, add sound filters, create instant music with the new SmartSound® function, and lastly, play around with the new and exciting 5.1 surround sound feature. By the time you’ve conquered all the skills in this chapter, your audio files should sound as good as your video looks. Fail and the eye will almost certainly be distracted by the ear.
Editing Audio—Concepts and Consequences
Audio in Liquid comes from three sources:
• Video you either captured or imported.
• Music you imported in any of the supported formats.
• Music you create using the new SmartSound function.
However, although Liquid supports many formats, audio is always converted to WAV format during import. This conversion makes little difference to your editing experience, but it does make Liquid’s life a little easier. In addition, you’ll find that you’re able to use your files in more applications (more on this in Chapter 13, “Exporting the Timeline”).
Once you’ve imported the audio file into Liquid, you should treat it just like another media clip. You can trim it in the Source Viewer, on the Timeline, and in the Clip Viewer. You can copy it across your Project countless times, and you can adjust it either simply to alter the volume level, or using more complex filters to clean up and adjust the sound.
The exception to this rule is SmartSound files, which have very specific rules regarding trimming. This is covered later in this chapter.
• Any tracks you buy that are classified “Home and Education” can only be used in your home and for education. Pretty easy, huh?
• Any tracks that are classified “Pro” can be used in commercial distributions.
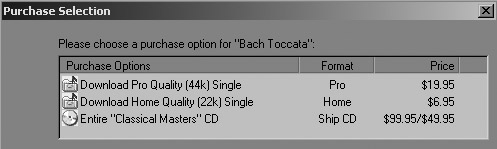
Figure 7.1. The online purchase window for a SmartSound song.
Grouped and embedded audio
In Chapter 6, “Fine-Tuning Your Edit,” my advice was to use embedded audio, that is, audio wrapped up inside the video and displayed on the Timeline as one item (Figure 7.2).
Figure 7.2. Some examples of embedded and disbanded audio.
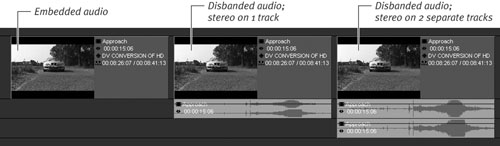
The reason for this is simple; once audio is separated from the video clip, it becomes vulnerable to synchronization problems caused by adding a new media clip into an occupied area of the Timeline. When an audio synchronization problem occurs, it can be dramatic—the sound may disappear for a few seconds—or it can be subtle—lip movements do not match the words being spoken.
Remember, the eye can be fooled, but the ear cannot. A lip sync problem is the nemesis of video editing; once you have one, it can be very difficult to get rid of it.
A much neater way is simply to avoid the problem altogether by using embedded audio at all times and only disbanding the audio clip when absolutely necessary.
• A later section in this chapter—“Keeping Audio and Video in Synch”—deals with synchronization problems that occur with disbanded audio.
• Whenever possible, try to keep the tracks on Name 4 and 3 unoccupied so that disbanding clips have somewhere to go. Background music from CD or SmartSound should go on Name 1, which I always rename as “Background Music.”
Do one of the following:
• From the menu bar, select Timeline > Insert Grouped (Figure 7.3a).
Figure 7.3a. Two methods of selecting embedded audio. From the menu bar...
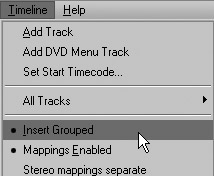
• Right-click the small arrow at the top of the Name column and select Insert Grouped (Figure 7.3b).
Figure 7.3b. ...or by right-clicking.
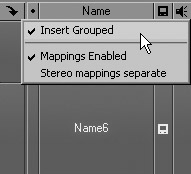
This automatically causes all audio to become embedded when the Source Viewer sends it to the Timeline.
To disband audio on the Timeline
1. Select the clip you want to disband.
2. Right-click and select Disband Clip(s) from the contextual menu (Figure 7.4).
Figure 7.4. Right-clicking a clip allows you to select Disband Clip(s).
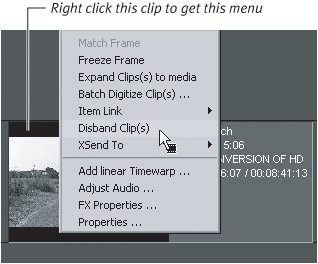
The disbanded audio appears directly under the video clip.
Figure 7.5. Selecting Stereo in the clip’s properties.
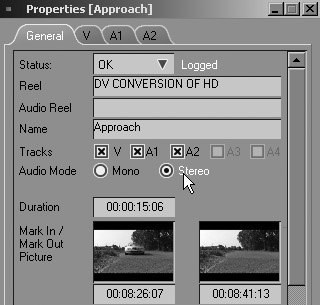
• Stereo causes both the left and right track to appear on one Timeline track (Figure 7.6, left).
Figure 7.6. Stereo audio clip on the left, disbanded to mono on the right.
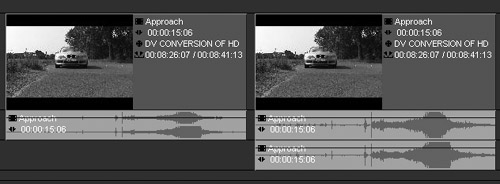
• Mono allows the left and right track each to occupy a separate track (Figure 7.6, right).
Opening the Audio Editor
The process of volume adjustment is identical for embedded and disbanded audio. Liquid allows you to freely alter the audio of either one using a variety of tools. At the same time, you can visualize the volume settings by displaying a volume line on an embedded or disbanded clip. The Audio Editor is the heart and soul of audio editing in Liquid. It’s also remarkably simple to use.
• If the Audio Editor is not open and the audio clip is NOT selected, then some of the tasks here—for example, adding audio keyframes, adjusting the volume level, and undoing audio keyframes—will not be possible. If what you are trying to do will not work, the first thing you need to check is whether or not the Audio Editor is actually open and whether or not the audio clip has been selected in the Timeline.
To open the Audio Editor
• Click the Open Audio Editor button ![]() .
.
This opens the Audio Editor (Figure 7.7).
Figure 7.7. The Audio Editor.
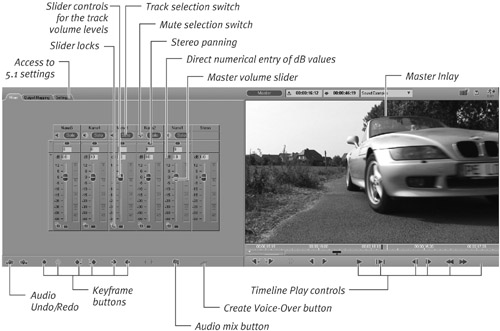
• During playback, the VU meters are yellow when the audio is in a safe range. When they peak into red, the sound can become clipped, or it may drop out entirely. This is the digital equivalent of distortion, and you should monitor your VU meters carefully to make sure they stay out of the red.
Understanding Audio Tracks
The top row of the Audio Editor contains the names of all your tracks as they appear on the Timeline; the one on the left is normally Name 5 (unless you have renamed it), and it contains your media clip.
To add/remove a track to/from the Audio Editor
• Click once on the Speaker icon column.
The track name appears or disappears in the Audio Editor (Figure 7.8).
Figure 7.8. Adding a track by clicking in the speaker icon column.

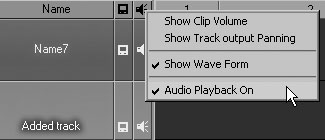
• To select all tracks, right-click the small speaker at the top of the column and select Audio Playback On (Figure 7.9).
Figure 7.9. Activate audio for all tracks via this menu.
Showing the Volume Level
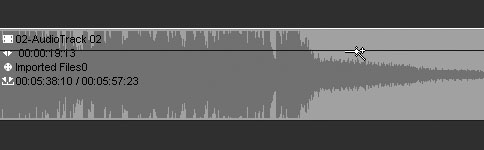
Liquid can display the volume level as a thin blue line that runs the length of the clip. When you adjust the audio level, this line moves up and down to reflect these changes.
However, by default, this graphical representation of the volume is not shown, and without this, you might have trouble visualizing exactly what you are doing.
To show volume with the volume level
• Right-click the small speaker at the top of the audio row and select Show Clip Volume (Figure 7.10).
Figure 7.10. When you select Show Volume...
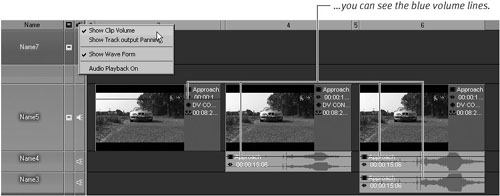
A small blue line appears near the top of all video and audio clips (see Figure 7.10).
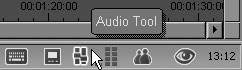
The monitor output is the level of audio you hear when editing. This is controlled by the Audio tool (Figure 7.11), which you access by clicking the Audio Tool icon ![]() in the Liquid taskbar (Figure 7.12).
in the Liquid taskbar (Figure 7.12).
Figure 7.11. The Audio tool with Extended dialog open.

Figure 7.12. Accessing the Audio tool.
Dynamically Adjusting the Audio
Once you can see a volume line, you can adjust it using the mouse or the sliders in the Audio Editor. If you use the mouse to directly alter a key and add keyframes, you have the advantage of being able to match keyframes with significant events on the Timeline. But this way of doing things does lack accuracy; for that, you need to use the sliders.
• Remember, the Audio Editor must be open for you to adjust an audio track on the Timeline. If it is not open, you won’t be able to access the keyframes with the mouse.
• Keyframes—like media clips—are used as a magnetic point when moving the Timeline cursor around the Timeline. However, you can toggle this magnetic effect off by holding down the Shift key.
To adjust the volume with keyframes
1. Open the Audio Editor by pressing F4 on the keyboard.
2. Place the mouse pointer over the blue volume line so that it turns into a small hand (Figure 7.13).
Figure 7.13. With the Audio tool open, the mouse cursor appears as a hand when placed near a volume line, either on embedded (top) or disbanded audio (bottom).
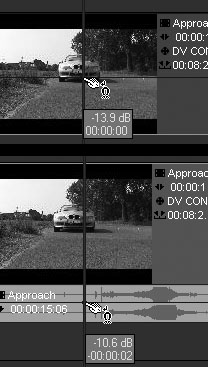
3. Hold down the left mouse button to create a keyframe that you can drag up or down, thus raising and lowering the volume (see Figure 7.13).
You can also drag this keyframe horizontally along the length of the clip.
• Once you’ve defined a keyframe, you can control it using the slider.
• Moving a slider automatically creates a keyframe.
Figure 7.14. The workflow in 6.1 with dummy frames at start and end is not used in Liquid 7...
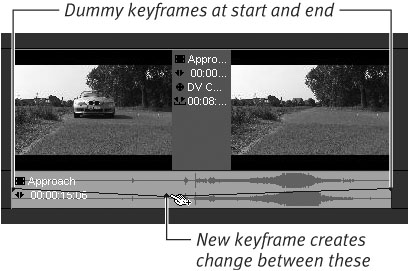
Figure 7.15. ...in favor of a quick-click system to reduce the overall volume without creating unnecessary keyframes.
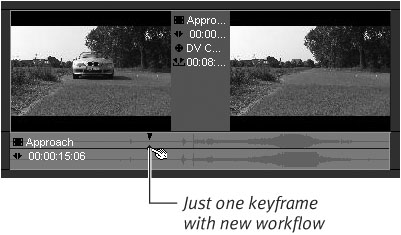
Figure 7.16. Altering the volume without any keyframes is also possible.

Controlling Keyframes
It is vital that you learn to control keyframes if you want to work with any kind of fluidity. Fortunately, the concept and the actualities are very simple. Moving a keyframe is a simple matter of clicking it and dragging it somewhere else, but deleting a keyframe is slightly more involved.
To delete an audio keyframe
Do one of the following:
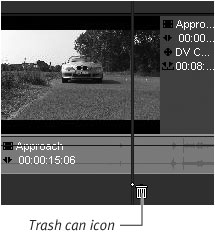
• Click the keyframe and drag it anywhere off the clip. A small trash can icon appears to let you know this is going to be deleted (Figure 7.17).
Figure 7.17. Delete a keyframe by dragging it off the audio clip.
• Use the Go to Next/Go to Previous buttons ![]() , located at the bottom of the Audio Editor, until you reach the keyframe you want to delete. Then click the Delete Keyframe button
, located at the bottom of the Audio Editor, until you reach the keyframe you want to delete. Then click the Delete Keyframe button ![]() .
.
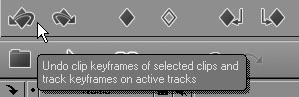
• If the keyframe you want to delete was the last one you placed, make sure you select the audio clip you were working on and click the Audio Undo key ![]() .
.
• You must have the Audio Editor open to delete an audio keyframe.
• To delete all keyframes in a marked range, set a mark-in and mark-out point on the Timeline and use the Delete Keyframes between Mark-in/out button ![]() .
.
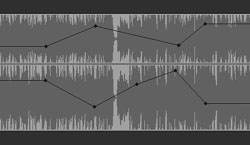
Figure 7.19. The Audio Editor Undo button. Warning: This is separate from the Timeline Undo function!
Adjusting the Volume on the Fly
The sliders represent a visualization of what most professional editors would see on a physical audio editor, except in this case, they are controlled by the mouse.
Altering the volume level of a clip isn’t just a simple matter of sliding the controls up or down as the clip plays back. You need to make certain preparations before you can adjust a clip live.
To adjust the volume during play
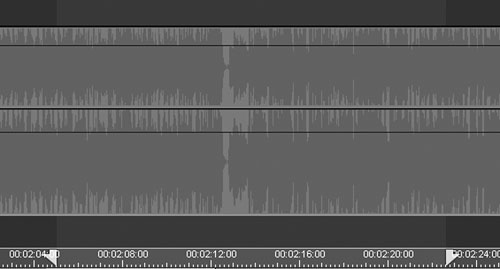
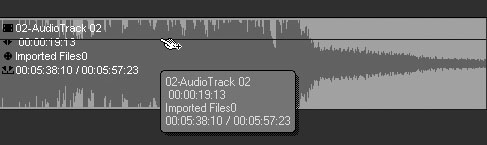
1. Place a mark-in and a mark-out point on the Timeline around the area you want to adjust.
This can be the whole Timeline if you want, or just a section of it, but the mark-in and mark-out points must be on the Timeline and not on the actual clip itself (Figure 7.20).
Figure 7.20. Place a mark-in and a mark-out point around the section you want to alter.
2. Open the Audio Editor by pressing F4.
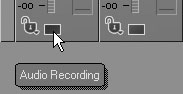
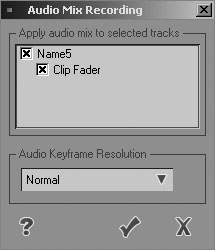
3. Click once on the Audio Recording lights to turn them red if they are not already activated (Figure 7.21).
Figure 7.21. Activate the recording lights for each track you need to work with.
4. Click the Record Audio Mix button ![]() when everything is ready.
when everything is ready.
The time cursor jumps 5 seconds behind the mark-in point and begins to play.
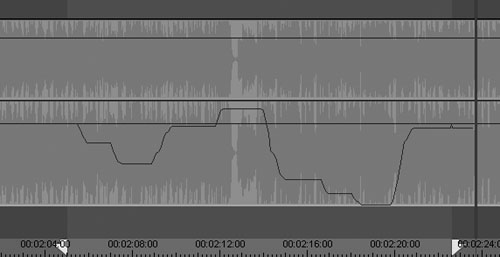
5. Alter the sliders as you see fit during playback.
A line is drawn over the audio clip describing your actions with the sliders (Figure 7.22).
Figure 7.22. The squiggle left by the sliders.
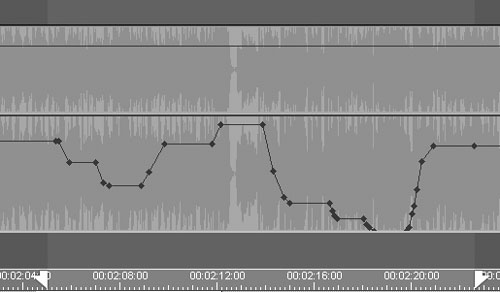
Once the mark-out point is reached or if you click the Record Audio Mix button again, the audio mix stops.
6. Click the check mark to accept these changes once the process is stopped (Figure 7.23).
Figure 7.23. Click the check mark to accept the changes...
The line changes into one peppered with blue keyframes (Figure 7.24).
Figure 7.24. ...and the squiggle turns into keyframes.
• When you are using this method, only the tracks containing audio have active sliders. Those that contain audio but lie outside the mark-in and mark-out points are grayed out.
• With the audio track selected, you can also enter the amount in the dB area of the Audio Editor.
• If you did not see a blue line drawn when moving the slider during the audio mix, check to see the Audio Recording square is activated (red).
• Figure 7.24 shows only the bottom track affected by the mix. I could have chosen to alter both using the slider lock. For details on this, see “Locking Sliders Together” later in this chapter.
Global Audio Adjustment
You may encounter times when you just want to adjust the overall volume of a specific audio clip. Perhaps the crowd clapped too loud, or Granny spoke too quietly. We saw earlier that the new audio workflow in Liquid 7 allows us to alter the volume by adding only one keyframe. See page 208 for details. However, this method cannot be used if there are other keyframes on the audio track.
Globally adjusting the sound levels when keyframes are on the Timeline can be achieved using the following method.
To globally adjust the volume
1. Open the Audio Editor by pressing F4.
2. Right-click the audio clip and select Adjust audio.
3. In the Adjust Audio box, enter the dB level you require (Figure 7.25).
Figure 7.25. Globally adjust the volume of a track using direct numerical entry.
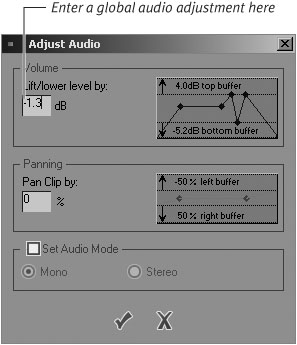
This will globally adjust the volume and the keyframes that you have added.
• Globally adjusting the volume can be achieved without the Audio Editor being open.
• Entering a minus (–) in front of the value reduces the volume level.
• When entering a numerical value, press Enter to apply it.
Locking sliders together
If you have disbanded a stereo track, you might still want to adjust the audio of both tracks an equal amount. If this is the case, you should lock the sliders together.
To lock two sliders
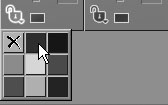
1. With the Audio Editor open, click once on the lock of the first slider you want to use.
A three-by-three color matrix is displayed.
2. Click once on any of the other colors—red for example (Figure 7.26).
Figure 7.26. Choose a color to lock sliders.
3. Click the lock of the second slider and select the same color as you did for the first (Figure 7.27).
Figure 7.27. Matching colors will be locked.
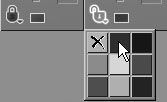
The two sliders are now locked together. To unlock them, for each slider, simply click the lock and select the gray square with the cross through it.
Creating a Cross Fade
Creating a Cross Fade is one of the most common audio adjustments you can make in video editing. It’s the audio equivalent of a Dissolve, and it allows the volume to rise gradually so that it does not sound harsh. For example, cutting from a quiet room to a crowd scene creates a large jump in volume if you don’t use a Cross Fade.
You can create a Cross Fade in a number of ways, including using the slider bar as detailed earlier. But Liquid has two shortcut methods for achieving this much used audio effect: using the one-click fade and the Cross Fade button.
The one-click Cross Fade
A one-click Cross Fade is quick and easy because it automatically adjusts the volume so that it fades gracefully in and out. If that’s all you need, then this is the quickest way to do it.
To use a one-click Cross Fade
1. Open the Audio Editor by clicking F4.
2. Place the mouse cursor over the volume line so that a pointing finger appears (Figure 7.28).
Figure 7.28. The pointing finger, only seen when the Audio Editor is open.
3. Hold down the Ctrl key and the mouse pointer changes into an arrow with a plus sign (+) next to it.
Near the mark-in point of a clip, the arrow points to the left (Figure 7.29). Near the mark-out point of a clip, the arrow points to the right (Figure 7.30). This tells you in which direction the Cross Fade will be applied.
Figure 7.29. When you press the Ctrl key, the mouse pointer turns into the one-click fade arrow—here to the mark-in point...
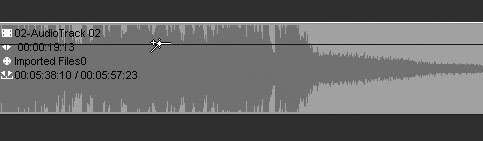
Figure 7.30. ...and here to the mark-out point.
4. Click once where you want the fade to end or begin.
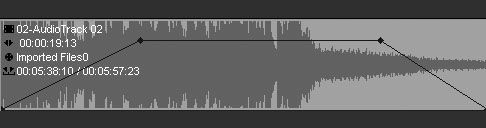
A keyframe is placed at the start of the audio volume line at zero dB (null volume), and a second one is placed where you clicked, thus creating a fade-in.
By clicking the mark-out point, you can create a fade-out with the first keyframe at normal volume levels and the second one at the end of the clip at zero dB (Figure 7.31).
Figure 7.31. Click once in each place to create the one-click fade.
The Cross Fade
The Cross Fade is the audio companion to the Dissolve, which creates a gradual visual change from one scene to the other (see Chapter 8 for details). The Cross Fade complements this by doing the same job but with audio.
To add a Cross Fade
1. Make sure the Timeline cursor is over the cut or edit decision point.
2. Click the Add Dissolve/Cross Fade button ![]() , and choose your duration and alignment in the dialog box (Figure 7.32).
, and choose your duration and alignment in the dialog box (Figure 7.32).
Figure 7.32. The Add Dissolve is also used to add a Cross Fade.
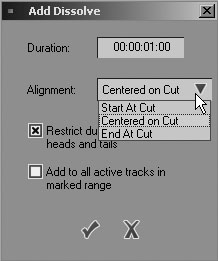
The default alignment is Centered on Cut, but you can also either end or start the Cross Fade at the cut.
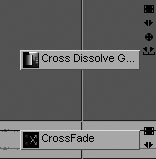
3. Click the check mark to insert the Cross Fade into the Timeline (Figure 7.33).
Figure 7.33. The Cross Fade added at center cut.
• Cross Fade does not work with an embedded audio clip.
• If the audio track is attached to a video track, then a Dissolve is automatically added to it. If you don’t want this to happen, toggle the video track off while you apply the Cross Fade by clicking it once.
• There are two reasons a Cross Fade will not appear on an audio track. The audio track is not active, or you don’t have enough overlapping material to legally call a Cross Fade. If this is the case, see Chapter 8 for details on trimming overlapping clips.
Using Audio Scrubbing
Once you have adjusted the audio, you will want to play it back to preview the changes. However, sometimes an audio event, like the single click of a camera, is difficult to isolate when it is being played back at normal speed. To get around this, you can scrub the Timeline with the mouse by moving it backward and forward over the sound event until you have found the exact spot you need to change.
However, audio scrubbing is turned off by default. This is set that way so that the majority of editing tasks can be performed while your machine is enjoying the full computer resources available to it.
Once audio scrubbing is turned on, you will see a performance hit, so I recommend that you only turn it on when you need it and then turn it back off again once the audio job is done.
Audio scrubbing in the Source Viewer
This is useful when you’re placing markers or setting mark-in and mark-out points for your media clips. Both video and audio tracks can be scrubbed in the Source Viewer.
To activate audio scrubbing in the Source Viewer
1. Press the Scroll Lock key on your keyboard to activate audio scrubbing.
A small A appears over the Audio icon in the Liquid taskbar (Figure 7.34).
Figure 7.34. Audio scrubbing activated.

2. Scrub through the Source Viewer to hear the audio.
• Audio scrubbing can either be Analog—denoted by an A in the taskbar, or digital—denoted by a D in the taskbar. More details on this can be found in the “Digital or Analog Output?” sidebar later in this chapter.
Audio scrubbing on the Timeline
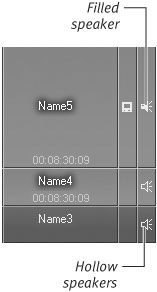
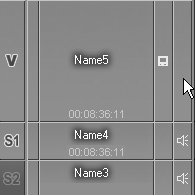
This type of scrubbing is a little more complex to activate, but it follows the same basic path—you must press the Scroll Lock key to activate it. However, you then need to make sure the speaker icon on the track you want to hear is hollow, as shown in Figure 7.35. Here, the Name 4 and Name 3 tracks display a hollow speaker icon, and audio scrubbing will be heard on these tracks. The Name 5 track shows a solid speaker icon, and audio scrubbing will not be heard on this track.
Figure 7.35. The track names showing both examples of hollow and filled speakers.
To set a Timeline track for audio scrubbing
• Hold down the Shift key and click once on the speaker representing the Timeline track you want to scrub.
The speaker becomes hollow, indicating that audio scrubbing is active for this track.
• Only those speakers with a hollow icon will be heard during audio scrubbing. Currently there is no limitation to the amount of hollow speakers you can select at any one time. However, performance will suffer the more you have.
Trimming Audio Clips
In Chapter 6, I covered trimming and showed you how to adjust video and image clips. You can apply the same principles to audio clips, meaning that trimming is simply the method you use to get rid of those elements you no longer need, such as a long musical intro, or perhaps even the lyrics from a song.
With clever trimming, you can even create a looping musical track that contains only instrumentals.
The Source Viewer is the natural place to preview and trim an audio clip because it is only a double-click away. But the steps outlined here work equally well in the Clip Viewer.
To trim an audio clip in the Source Viewer
1. Double-click an audio clip to load it into the Source Viewer.
2. Turn on audio scrubbing by pressing the Scroll Lock key.
3. Scrub through the clip until you find the point where you want your clip to begin.
4. Press the I key to insert a new mark-in point.
5. Scrub through again until you find a suitable end point.
6. Press the O key to set the mark-out point.
Figure 7.36. Switching to digital scrubbing.
![]()
• Digital output has one big advantage over analog: its performance is much better, but the quality can be poor.
• Analog output has one big advantage over digital: its audio quality is much clearer and easier to work with but Timeline performance can suffer.
To send an audio clip to the Timeline
You can send audio clips directly to the Timeline by doing one of the following:
• Press the keyboard shortcut, B.
• Drag the audio clips from the Source Viewer to an active track by holding down the Ctrl key and the left mouse button.
• When sending an audio clip to the Timeline, be aware of which mode you are in—Overwrite Style or Film Style—and also which tracks are mapped to receive your clip. You can find more details on both modes in Chapter 6.
To trim an audio clip on the Timeline
• To trim an audio clip directly on the Timeline, follow the same procedure as when you are trimming a video clip. Simply grab the mark-in or mark-out point of the clip and drag it to its new position. See Chapter 6 for more details.
Adding Markers to Audio Clips
You will find that markers are particularly useful in audio editing because the WAV forms—the somewhat complex-looking lines that appear in the Source Viewer when an audio clip is sent there—are not always as useful as you might need them to be. Picking out a specific audio section may be virtually impossible among the mass of lines displayed.
It is quicker and smarter to place a marker at every audio event you deem important. This can be as extreme as marking the beat of the music to something as simple as marking the start of the lyrics or the banging of a car door.
To add a marker to an audio clip
1. Double-click the audio clip to send it to the Source Viewer.
2. Scrub or play the audio clip until you reach the point you want to mark.
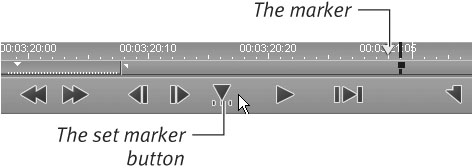
3. Press the M key or click the Set Marker button ![]() if you have this button on your interface.
if you have this button on your interface.
A small gray triangle appears at this point (Figure 7.37).
Figure 7.37. The marker appears as a small gray triangle.
• When adding a marker to the beat of a song, you can simply play the clip and press the M key every time you hear the beat change. If you miscalculate the placement of a marker, you can adjust this later by holding down the Alt key and dragging the marker to a better position.
• For more information on markers and how to name and delete them, see Chapter 6.
Working with SmartSound®
SmartSound will be familiar to many Studio users as it has been included in that program since the dawn of time. Now, finally, in version 7, Liquid users have been given the opportunity to use this software within the Liquid interface.
What is SmartSound?
SmartSound is a music creation application. It can create a backing track to your video from a predefined list of options. But the cool thing about SmartSound, or rather the smart thing, is the way in which these backing tracks are created. If, for example, you have a video clip that is 23 seconds long, SmartSound will create a track from a selection of songs that has an intro and a logical “flourish” at the end—all within 23 seconds.
If you decided to make that clip shorter or longer, SmartSound will re-render the clip to subtly alter the intro and the flourish ending to fit the new time span. Depending upon the length of the music and the particular song you have selected, you also have the option to choose from a selection of different musical arrangements, or versions, in order to better fit the video content.
This provides a very cool way to add music to your films without worrying about altering the length of your sequences to fit the music. Now the music can be tailored to fit the length of the scene. How liberating!
• If you don’t find the musical set that comes with Liquid too inspiring, there are various Audio sets or individual songs available to purchase online.
• SmartSound can also be used to add dynamically adjustable sound effects.
1. Select the area of the Timeline you want the SmartSound clip to cover by selecting a mark-in and mark-out point on that range. You can do this by using the keyboard shortcut I and O or using the In/Out marker icons.
2. Before you open SmartSound, take one second to select the Rack you want the track to be placed into. This cannot be done once SmartSound has been opened.
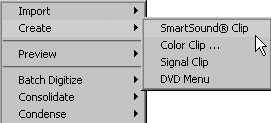
3. Open the SmartSound interface by doing one of the following:
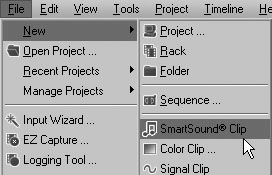
• Go to the menu bar and select, File > New > SmartSound® Clip (Figure 7.38).
Figure 7.38. Opening SmartSound from the menu bar.
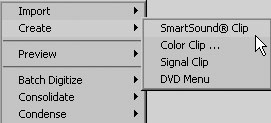
• Right-click inside the pane on the right of the Project Browser, and select Create > SmartSound® Clip from the contextual menu (Figure 7.39).
Figure 7.39. Opening SmartSound from the Project Browser.
Either one will bring up the SmartSound interface (Figure 7.40).
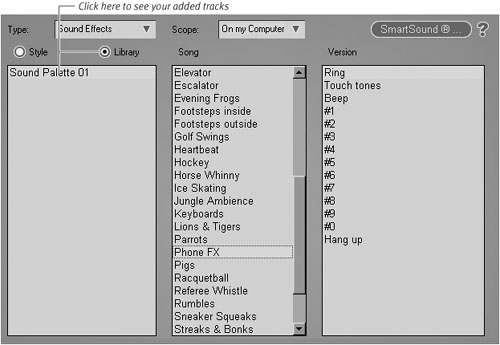
Figure 7.40. The SmartSound interface showing the various selections.
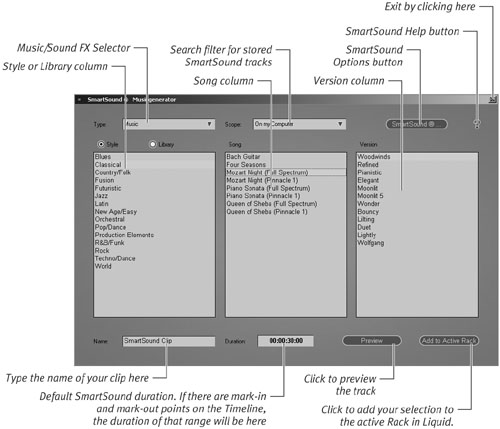
4. If you want to work with the basic choice of tunes as supplied with Liquid, then leave the Scope setting to On my Computer, and leave the radial button set to Style for the moment.
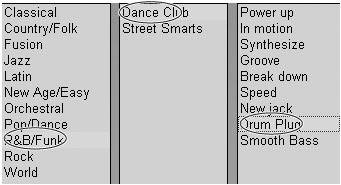
5. Select a Style from the first column, a song from the second column, and a version from the third. Figure 7.41 shows that R&B/Funk, Dance Club, and Drum Plug have been selected.
Figure 7.41. An example selection
6. If you want to listen to this selection prior to adding it to your active Rack, do one of the following:
• Click the Preview button ![]() .
.
• Double-click any of the names in the Version column of the SmartSound® interface.
7. Once you are happy with the selection, name it by clicking in the Name box and typing up to 31 characters.
8. Once you are set, click the Add to Active Rack button and the clip will appear in your Rack with the name you have given it.
9. Exit the interface by clicking the X in the top-right corner of the window.
• If you forgot to name your clip, you can right click it in the Project Browser and select Rename from the contextual menu.
• The Type tab can also display the sub-category “Sound Effects.” Sadly there are none installed as standard with Liquid 7.
• You can also customize the Liquid Toolbar by adding the SmartSound button ![]() .
.
Adding a SmartSound clip to the Timeline
1. Do one of the following:
• Drag and drop from the Project Browser to the Timeline.
• Right-click the SmartSound clip and select Send to > Timeline. To use this second option, you should have your tracks mapped correctly and a mark-in point set. See Chapter 6 for details on this.
2. Once added to the Timeline, the clip must render before you can play it, but even a five-minute SmartSound clip won’t take more than a few seconds to render.
• A SmartSound clip is a little unusual in that it doesn’t generate a slice color. However, it must be rendered.
• You can also add SmartSound from the Effects Library by selecting the Library tab and selecting the SmartSound Rack. Here you will find a dummy clip that can be dragged to the Timeline, although this dummy clip will ignore your mark-in and mark-out points and default to a length of 30 seconds. It will also default to the same SmartSound track every time. The application of SmartSound in this way is limited, so I strongly recommend the other methods detailed in this chapter.
• For technical reasons, the SmartSound clip currently does not display a wave form in version 7 of Liquid.
Trimming a SmartSound clip on the Timeline
• To trim a SmartSound clip on the Timeline, do the following:
• Click either the mark-in or mark-out point on the Timeline, hold down the left mouse button, and drag the clip in the appropriate direction (Figure 7.42).
Figure 7.42. Trimming a SmartSound clip on the Timeline.
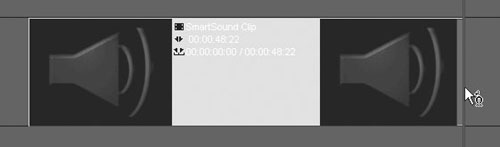
• SmartSound will then re-render the clip to the new length without you having to reopen the SmartSound interface—magic!
• SmartSound clips obey the laws of Overwrite and Film Style. Details on this can be found in Chapter 6.
• Depending on the song you have selected, longer clips may have more of a detailed introduction and a much grander “flourish” when the clip is longer than 10 seconds.
• SmartSound clips can also have the volume globally adjusted, fades inserted at the beginning or end, and the volume altered using the audio mixer and keyframes. All of these techniques are covered in this chapter.
1. Do one of the following:
• Right-click the clip in the Project Browser and select Open With Smartsound Editor (Figure 7.43).
Figure 7.43. Re-editing a SmartSound clip in the Project Browser.
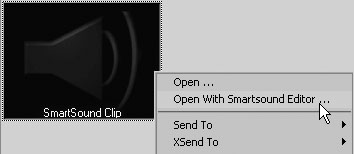
• Right-click the clip in the Timeline and select Open With Smartsound Editor.
2. Once the Editor has opened, you can choose again from the selection of songs and their variations. You can also enter a new value for the duration if you want to. Click the Accept Changes button ![]() when you are ready.
when you are ready.
• It is not possible to edit the clip’s name when opening the selected SmartSound clip in the Editor in this way. To rename, right-click the clip and select Rename from the contextual menu.
Building a SmartSound library
By default, you will have a fair number of SmartSound tracks installed by Liquid, but if you already have, or plan to buy, a collection of SmartSound CDs or songs, these can be added to the library very simply.
Adding SmartSound CDs to the SmartSound library
1. Insert the SmartSound CD into the computer.
2. Open the SmartSound interface by doing one of the following:
• Go to the menu bar and select, File > New > SmartSound® Clip (Figure 7.44).
Figure 7.44. Opening the SmartSound interface from the menu bar...

• Right-click inside the pane on the right of the Project Browser, and select Create > SmartSound Clip® from the contextual menu (Figure 7.45).
Figure 7.45. ...or from the Project Browser.
3. Before the SmartSound interface launches, a window opens asking you which version of the library you want to load (Figure 7.46).
Figure 7.46. This dialog will appear when you insert a SmartSound CD into the computer and then launch SmartSound.
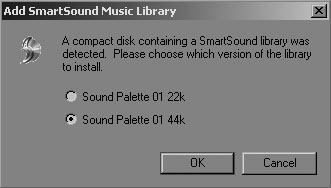
Make your selection and click the OK button and then Accept the EULA. You may also be asked to enter a Code Number found on the SmartSound CD case.
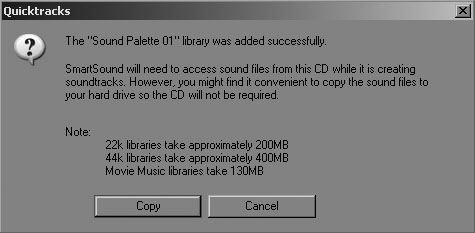
4. The above will add the tracks to your SmartSound interface, but if you want to have access to them without having to insert the CD all the time, you will need to copy them across.
The next window allows you to do this; it will also warn you about how much approximate space this will take up (Figure 7.47).
Figure 7.47. Click Copy to transfer the tracks from CD to hard drive.
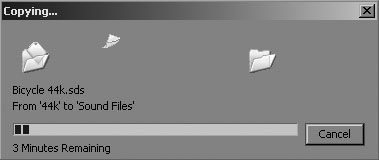
Click the Copy button and the files will be transferred across to your computer (Figure 7.48).
Figure 7.48. The transfer in progress.
5. Once this is finished, the SmartSound interface will open. Click the Library radio button to access your new tracks (Figure 7.49). In this case the Type drop-down menu displays several sound effects.
Figure 7.49. The transferred “Sound Palette 01” Sound Effects collection in the SmartSound Library.
Adding SmartSound tracks from the Internet
1. Before you begin, check that your machine is connected to the Internet.
2. Then, with the SmartSound interface open, select All from the Scope drop-down menu (Figure 7.50).
Figure 7.50. Select All to show tracks available to download and purchase.
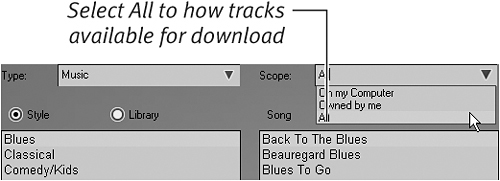
The complete collection of SmartSound tracks available for online purchase will be displayed (Figure 7.51).
Figure 7.51. The full collection arranged by style...
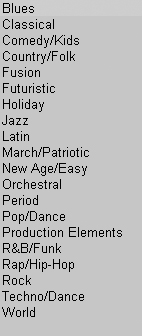
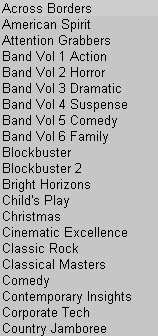
If you have any previous experience with the SmartSound catalog of tracks, you might want to click the Library radio button to display the names of each individual collection (Figure 7.52).
Figure 7.52. ...and arranged into album names.
3. In either case, click a title in the first column, then a song title in the second column.
If the third field contains the words “Click Preview below” then the song is not on your hard drive and you will need to purchase it before you can use it.
4. To preview the selection before buying, click the Preview button and a small sample of the track will be downloaded to your computer and played out through the PC speaker system (Figure 7.53).
Figure 7.53. Downloading a preview of the track takes a few seconds.
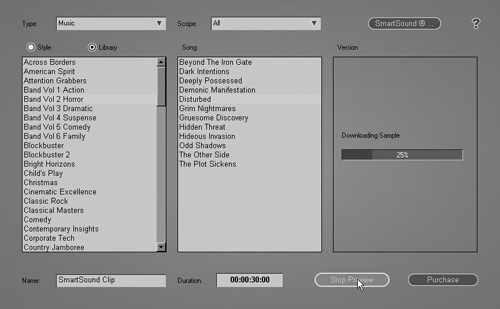
Samples are stored on your computer and only have to be downloaded once.
5. If you want to buy this track, click the Purchase button ![]() and make your selection from the dialog box that appears (Figure 7.54). Click the Next button and you will be taken to the online shopping area.
and make your selection from the dialog box that appears (Figure 7.54). Click the Next button and you will be taken to the online shopping area.
Figure 7.54. Selecting a track or CD to purchase.
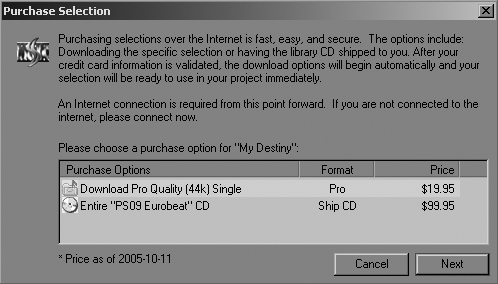
If you chose a CD, this must be shipped to you. Only individual tracks can be downloaded.
• Prices and options vary for SmartSound tracks. Some tracks are only available as part of a CD bundle, which can range from 29 to 99 dollars, while others can be bought separately for 20 dollars or less. Buying a “Pro” format CD means you can use it in commercial productions. Buying a Home format means you can only use it in private and educational productions.
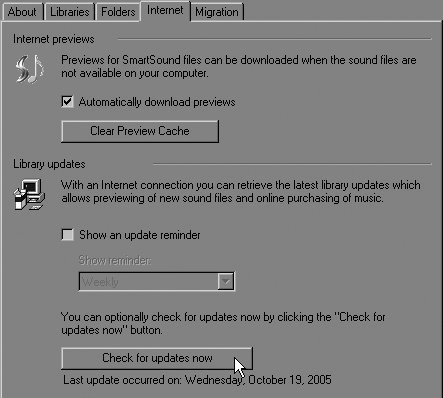
• To see an up-to-date list of available tracks, click the SmartSound button in the top-right corner of the interface and then select the Internet tab. At the bottom of this window is a “Check for updates now” button that will check the SmartSound servers for any new alterations to the track catalog (Figure 7.55).
Figure 7.55. Checking for updates to the software and the Tracks catalog.
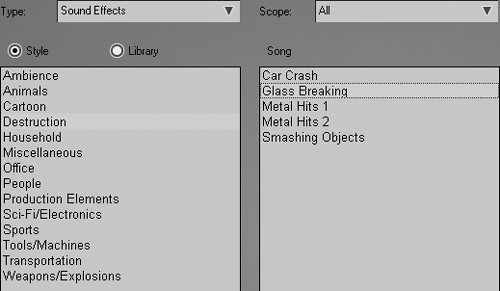
• As well as music tracks, there are hundreds of sound effects available for download, including ambient crowd noises and special effects sounds. Select Sound Effects from the Type drop-down menu, and select All from the Scope drop-down menu (Figure 7.56).
Figure 7.56. The online Sound Effects catalog.
Activating and Deactivating Audio
You can temporarily mute audio tracks so that you can hear the other audio tracks on the Timeline or simply to preserve your sanity when you are listening to the same clip over and over.
To mute an audio track on the Timeline
Do one of the following:
• Click once on the Speaker icon that belongs to the track you want to mute (Figure 7.57).
Figure 7.57. Click here to mute the volume of this track...
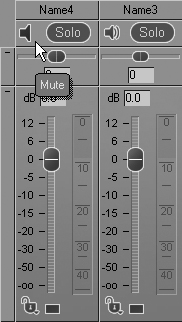
• Open the Audio Editor and click the speaker icon at the top of the sliders (Figure 7.58).
Figure 7.58. ...or click here to mute the volume.
• You can mute as many tracks as you like and bring them back again by clicking in the speaker column and selecting Audio Playback On.
Deleting an Audio Track from a Video Clip
In some cases, you might want to rid the video of its audio completely. In this case, you have two options: turning the audio off in the clip’s properties, or disbanding the audio and deleting just the audio section.
To turn off an audio track
• Right-click the media clip in the Timeline, select Properties, and deselect any audio boxes that are not grayed out (Figure 7.59).
Figure 7.59. Turning off audio in the clip’s Properties.
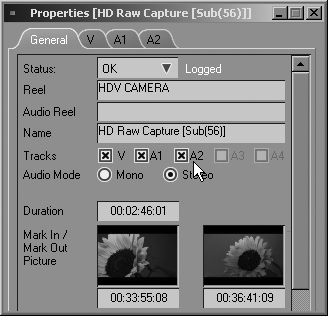
• Deselecting the audio in this way leaves the original media clip in the Project Browser untouched.
To delete an audio track
1. Select the clip on the Timeline by clicking it once.
2. Right-click and select Disband Clip(s) from the contextual menu if the clip is not already disbanded.
If you needed to perform this extra step, you need to reselect the clip again by clicking it once.
3. With the clip selected, hold down the Ctrl key and click once on the video section of the clip so that it turns a lighter shade to show it is deselected.
4. Press the Delete key, and the audio part of the clip will be deleted.
• Deleting an audio track on the Timeline only affects the clip on the Timeline. The parent clip in the Project Browser retains its audio tracks.
Exploring Advanced Audio Techniques
So far, you can think of everything covered in this chapter as the basics of audio editing. The next section covers the more advanced concepts such as panning, voice-over, filters, synchronization problems, and, last but not least, surround sound.
Although these features are classified as advanced, implementing them is simple and easy to understand.
Voice-Over
A voice-over is a standard part of any professional video project. Its inclusion often separates an amateur project from a polished one, but only if it is done correctly. Liquid has the ability to record a voice-over directly to the Timeline using a standard microphone linked to the computer’s sound card.
To create a voice-over
1. Place a mark-in point on the Timeline where you would like the voice-over to begin. You can also place a mark-out point where you would like the voice-over to end. If you do not, the recording continues until you turn it off.
2. Open the Audio Editor by pressing F4.
3. Select the track to which you want the voice-over applied by clicking the Audio Recording rectangle at the bottom of the slider. When it goes red, it has been selected (Figure 7.60).
Figure 7.60. Activating Audio Recording for this track.

4. Click the Microphone button ![]() , and the Timeline cursor will move back five seconds before the mark-in point, and then begin playing.
, and the Timeline cursor will move back five seconds before the mark-in point, and then begin playing.
5. Begin speaking when the clip reaches the mark-in point.
If you have defined a mark-out point, the recording stops there. If you haven’t, you must stop the recording by clicking the Microphone button once more.
6. Once recording has stopped, a dialog box appears asking you to name the clip and to accept it (Figure 7.61).
Figure 7.61. Naming the voice-over.
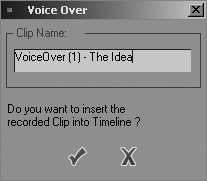
7. Click the check mark and your recorded voice-over is inserted at the mark-in point (Figure 7.62).
Figure 7.62. The voice-over inserted on the mark-in point.
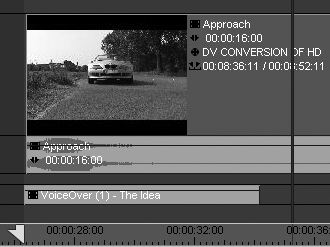
• When the Voice-Over function is used, a new Rack called Voice-Over is created in the Project Browser and all of your recordings are sent there.
• When you first click the Microphone button, the cursor jumps back five seconds before playing. This is known as the preroll time, and you can alter it by opening the Audio Properties box found in the Control Panel.
Using Audio Panning
Audio panning is simply the swapping of audio from the left channel to the right. Like volume adjustment, you alter this using keyframes that you add to the Timeline via the Audio Editor.
To use panning
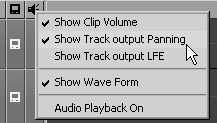
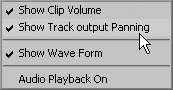
1. Activate Show Panning by clicking the speaker column for the track you are working with and selecting Show Track output Panning (Figure 7.63).
Figure 7.63. Showing the Panning selector.
Green lines indicating the track panning will appear on each track.
2. Open the Audio Editor by pressing F4.
3. Slide the horizontal slider under the Solo button to the left or right to control panning (Figure 7.64).
Figure 7.64. Slide the horizontal slider under the Solo button to the left or right to control panning.
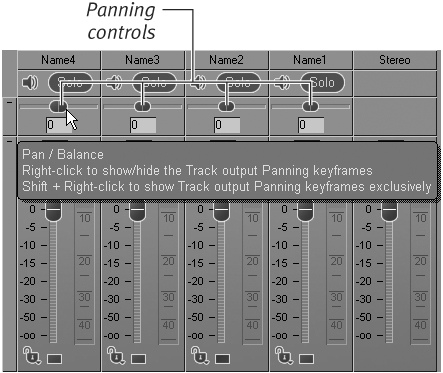
Sliding it in either direction adds a green keyframe to the Timeline signifying that the panning changes at this point.
• Track panning is independent of the actual clips and runs the length of the Timeline, not the length of the clip. If you set a panning keyframe and then move the clip, the keyframes do not follow.
• Warning: Panning keyframes are undone from the Timeline Undo button (Ctrl+Z), not the Audio Undo button.
• When panning audio streams, remember that odd-numbered channels are assigned to the left speakers (A1 & A3) by default, and even numbers (A2 & A4) are assigned to the right speakers.
Applying Audio Filters
An audio filter is simply a mask that is added to the audio so that it can be artificially altered in various ways. Earlier versions of Liquid featured very few audio filters, but then Pinnacle Systems purchased Steinberg and all that changed.
Version 7 features seven new audio filters and also the ability to use any VST plug-in, which essentially allows you to use one of the many audio plug-ins commercially available for video editing.
You can apply an audio filter in one of three ways: directly to a clip; to an entire audio track; or to an entire track via the Audio Editor.
• Additional VST plug-ins can be added to Liquid by copying them to the PluginsVST folder. You can find this in the Liquid directory on your hard drive. Once the application is restarted, Liquid should automatically detect the extra plug-ins and add them to the Audio Filters Rack.
To add an audio clip FX (filter) to a clip
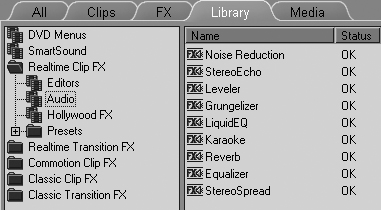
1. Select the Library tab in the Project Browser to show the filters.
2. Select the Audio Filters Rack in the Realtime Clip FX folder to display the available filters (Figure 7.65).
Figure 7.65. The Audio Filters Rack.
3. Click the filter you want, and drag and drop it onto the clip you want to adjust.
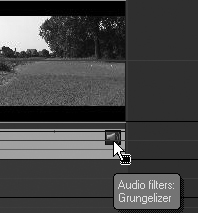
The affected clip displays a large purple line along the top; embedded audio clips also show a small speaker symbol (Figure 7.66).
Figure 7.66. The small speaker indicates the presence of an audio filter.
To add an audio clip FX to a track
1. Select the Library tab in the Project Browser to show the filters.
2. Select the Audio Filters Rack in the Realtime Clip FX folder to display the available filters.
3. Click the filter you want, and drag and drop it onto the track you want to adjust.
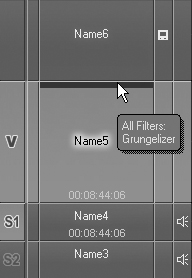
A purple line is displayed along the track name area (Figure 7.67).
Figure 7.67. Audio filter added to an entire track.
To add an audio clip FX in the Audio Editor interface
1. Open the Audio Editor by pressing F4.
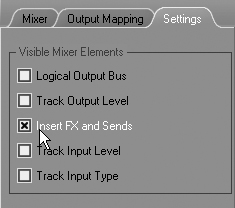
2. If the Insert FX box is not already displayed in the Audio Editor, select the Settings tab, and click the check box next to Insert FX and Sends (Figure 7.68).
Figure 7.68. Activating the FX area of the Audio Editor.
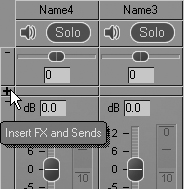
3. Return to the Mixer tab area and expand the Insert FX area by clicking the plus sign (+) (Figure 7.69).
Figure 7.69. Open the FX area...
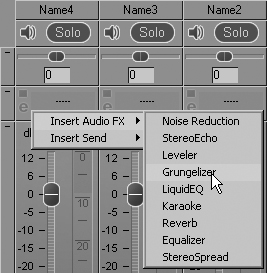
4. Place the mouse cursor over the Insert FX box until it turns into a downward-facing black arrow; click here, selecting Insert Audio FX from the two choices, and then select the filter you require (Figure 7.70).
Figure 7.70. ...and choose a filter to insert.
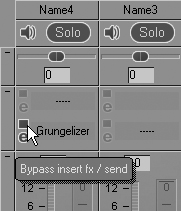
5. Click once on the small blue square next to the filter to activate the filter without first editing its parameters (Figure 7.71).
Figure 7.71. Activate the filter by clicking the red square.
A purple line appears on the track to which you have applied these filters. Placing a mouse cursor over this line displays the name(s).
• You can add as many filters as you like to a single track, but beyond a certain limit (dictated by what is on the Timeline), Liquid needs to render the audio.
Editing a Filter
Once you have added a filter in any of the ways described earlier, you will want to edit the parameters, which is, after all, the whole point of adding a filter.
To edit an audio filter
1. Depending upon which method you used to add the filter, open the editor by doing one of the following:
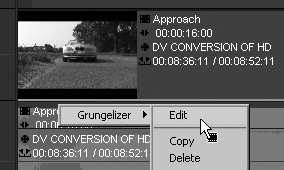
• Right-click the purple line running along the top of the clip, or click the speaker icon and choose Edit from the contextual menu (Figure 7.72).
Figure 7.72. Accessing the Edit screen on the Timeline.
• Right-click the purple line running along the top of the track name and select Edit.
• Click the small e next to the filter in the Audio Editor.
Depending upon which type of filter you are using, you see either a standard Liquid interface (Figure 7.73) or one of the new VST plug-in interfaces (Figure 7.74).
Figure 7.73. The standard Liquid Filter Editor.
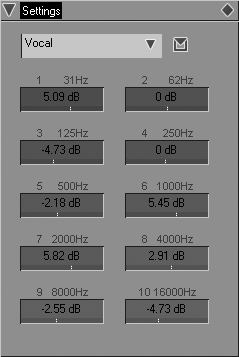
Figure 7.74. The VST Filter Editor.
2. First set a mark-in and mark-out point around the audio clip you are working on so that you can edit the parameters on any of these interfaces; then click the Play from Mark-In to Mark-Out button to loop the audio.
3. Once the audio starts, you can adjust the setting using the mouse for the VST interfaces and a combination of mouse and direct number entry for the standard Liquid interfaces.
More information on using parameters and keyframes can be found in Chapter 8.
4. Once you have finished adjusting the filter, click the Running Man button ![]() to exit the filter.
to exit the filter.
• Some of these filters do not use keyframes. This means any alterations affect the whole length of the clip.
• Once you have found a set of parameters that work well, you can save them by clicking the small envelope button and selecting Save VST Bank.
To delete an audio filter
• Right-click the purple line and select Delete.
• You can also deactivate a filter from this menu, although if you added the filter via the Audio Editor, you need to click the red square to deactivate it.
• Stacking effects is possible, but the order in which they affect the clip is from top to bottom. If you are not hearing the effect you think you should, try adjusting the stack order by moving it up or down via the contextual menu that appears when you right-click.
Keeping Audio and Video in Sync
Although my recommendation is to use embedded audio wherever possible, it’s a given that you will come across instances where it is far simpler to use disbanded audio. This may be the case when you are adding filters or simply having trouble visualizing how your project is pieced together. Many people find it useful to see the WAV form under the video and then just trim to the sound.
If you do disband your audio, you need to activate the Sync Break feature so that you can be made aware of any video and audio sync problems. See the “To activate Sync Break” task below.
Working with ungrouped files
If you send your media clips to the Timeline ungrouped, generally speaking, these files automatically stick together unless a new media clip causes others to move up the Timeline, thus leaving the audio behind.
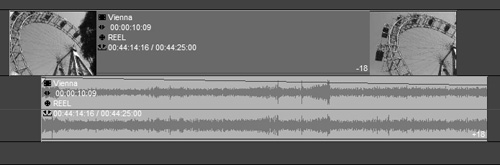
If you can’t prevent audio sync problems from occurring, then you can at least use Sync Break so you can get a warning that it has happened. Once activated, Sync Break displays a red line along the bottom of any audio files that are out of sync; it also displays how many frames out of alignment the track is (Figure 7.75).
Figure 7.75. Sync Break alerts you to an 18-frame sync problem.
• Right-click the track name and select the View options. Here you can toggle Sync Break on. You need to toggle this on for all tracks that you want to monitor.
• Note that this does not prevent sync problems, but it does alert you to prudent use of the Undo key once you see what is occurring.
Linking objects
If the audio and video were brought in separately—as in the case of a voice-over—then you can line up these objects on the Timeline and then link them together. Once linked, you can trim these objects on the Timeline or in the Trim Editor while always keeping them together.
To link Timeline objects
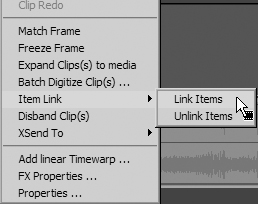
1. Use the Ctrl key to select the objects you want to link together.
2. Right-click any of the objects and select Item Link and then Link Items (Figure 7.76).
Figure 7.76. Linking two or more items together.
Working with 5.1 Surround Sound
The most exciting thing about DVD players is the 5.1 surround sound they offer home users. All of a sudden, we can watch a movie at home and not feel cheated on the sound effects front. It was inevitable that home video editors would want to include this capability in their bag of tricks.
Liquid offers a very simple and intuitive interface for controlling 5.1 sound, but before you start, you must understand some of the basics involved.
The right equipment
To start with, you are going to need a 5.1 sound card and the means to monitor the 5.1 output. This might sound obvious, but it’s a detail overlooked by many would-be Spielbergs who are rushing to produce the next Oscar winner. The sound card specifically needs to be an ASIO 2.0–compliant card, and it needs to have a genuine 5.1 output (usually this is achieved via an optical cable). This output needs to be connected to a 5.1 speaker system via a 5.1 amplifier.
You must check to make sure your system meets all these requirements before you can even think about 5.1 editing.
The right noises
Once you establish that you have the right equipment, you need enough audio to fill up 5.1 speakers. Yes, you can have the normal audio track reverberating from five different places in the room, but that kind of destroys the whole concept of surround sound, that is, being surrounded by sound.
To do this effectively, the sound needs to make sense of the video. If you have two people talking onscreen, make sure their voices come from the center speaker, not the left and right. Using the left and right speakers makes them sound like they are further apart than your eyes are telling you they are.
But if someone off camera to stage left shouts into the shot, put it on the left speaker. If the shout comes from behind the camera, put it on both rear speakers. Is the shot of a crowded room where speeches are being given? Then have the speeches come from the center speakers and, at a much lower volume, use the other speakers for the crowd noises.
Ambient sound effects such as cars, birds, and cows mooing can all be placed (at a much lower volume) on the speakers out of sight. All come together to create a surround of sound!
Setting up the Timeline and Audio Editor
Obviously you are going to need five audio tracks on the Timeline; the logical way to set them up and name them is displayed in Figure 7.77.
Figure 7.77. The ideal track layout for editing 5.1 sound.
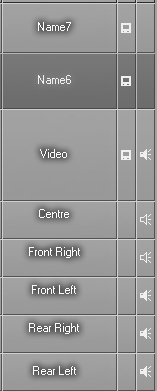
This allows you to use the Audio Editor to full effect when it comes to editing the five sound streams.
By default, the Audio Editor does not display the 5.1 panning boxes; you need to add them manually through the Logical Output Bus setting.
To access the Logical Output Bus setting
1. Open the Audio Editor by clicking F4.
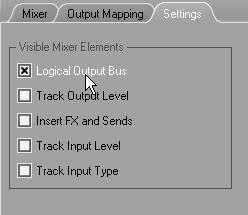
2. Switch to the Settings tab, and click the Logical Output Bus check box (Figure 7.78).
Figure 7.78. Accessing the 5.1 panning boxes.
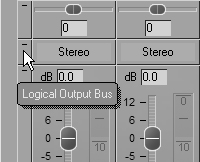
3. Switch back to the Mixer tab and see that a small (almost invisible) extra row has been inserted between the dB box and the Panning box.
Click the small plus sign (+) to expand this. Once expanded this plus sign will show as a minus sign (Figure 7.79).
Figure 7.79. Clicking the small + sign opens the interface to display the stereo boxes.
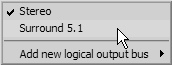
4. Place the mouse cursor over the word Stereo and click. From the contextual menu, select Surround 5.1 (Figure 7.80).
Figure 7.80. Right-click to access the 5.1 option.
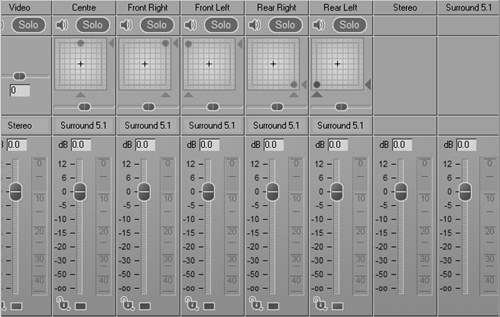
Repeat this for the other four sound channels until the Audio Editor looks like Figure 7.81.
Figure 7.81. The 5.1 panning area, at last displayed.
Creating surround sound
Once the preparations just discussed are complete, you can actually begin creating your surround sound effects, placing audio clips carefully on those areas you have predefined as routing to various speaker locations.
The fun, of course, comes when you begin panning the surround sound. This can create marvelous effects. For example, imagine a plane that appears from behind the camera and moves off into the distance in front; now imagine that this video clip is matched perfectly with the sound, which also starts behind the audience and follows the plane away.
To pan surround sound
• Simply move the dot around the panning box.
As you do this, red and green lines appear on the clip (Figure 7.82) with red and green keyframes.
Figure 7.82. An example of surround sound panning. The first keyframes (top and bottom) have panning set to the rear speaker on the right. The second keyframe has panning set to the center of the room (all speakers).
• In the diagram, the + symbol in the middle is the listener. Toward the top of the box is the front of the room; toward the bottom of the box is the back of the room.
• Similar to normal panning, surround sound keyframes are related to the Timeline, not the clip.
• If you don’t see the red and green panning lines, check that the panning display is selected (Figure 7.83). The third option—Show Track output LFE—displays the volume line associated with the subwoofer.
Figure 7.83. Activate the panning display from here.