
2. Logging and Digitizing
Once you have become familiar with Liquid’s interface, you are ready to begin creating your first production, and because every video production needs video footage, the first thing you’ll need to do is digitize or import material into your computer. This chapter deals with the former, digitizing, often referred to by other NLE programs as capturing.
Digitizing your tapes is one of the more time-consuming and tedious parts of video editing, but Liquid has several tools to help alleviate this problem. In this chapter, you’ll learn how to capture a complete tape, batch capture just a part of it, and detect the various scenes on a tape during the capture process.
Digitizing with Liquid
Digitizing is the process of transferring the contents of a videotape—DV, HDV, or analog—to your computer’s hard drive so that you can begin editing it. Liquid has the ability, when using the right hardware, to digitize the three basic video formats listed below.
Using just a FireWire card and a Mini DV or high-definition (HDV) camera, it’s possible to capture
• AVI, from a Mini DV camera
or
• MPEG, from an HDV camera
With additional hardware, such as the Liquid Pro BOB or the MovieBox Deluxe, it’s also possible to capture
• Analog, from VHS, DVD, or similar sources
Digitization, or capturing, can be achieved by transferring the whole tape in one session or by selecting individual clips from a tape and only digitizing the ones you want.
If you simply want to capture a single clip from either analog or DV quickly and without fuss, then your best bet is to use the new EZ-Capture tool.
If your needs are a little more complex, you will need to use the Logging Tool, which allows you to specify which parts of a tape you want to capture. This is done through a process called Logging and is covered later in this chapter.
The DV/HDV option
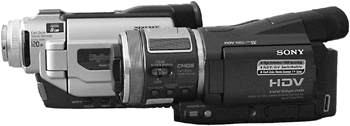
Mini DV and HDV cameras use a digital format to record what is in front of the lens. This is compressed by the camera into a space-saving form before being recorded as digital data to the tape (Figure 2.1).
Figure 2.1. A Sony High-Definition (HDV) camera and a Sony Mini DV camera. Both use Mini DV tapes.
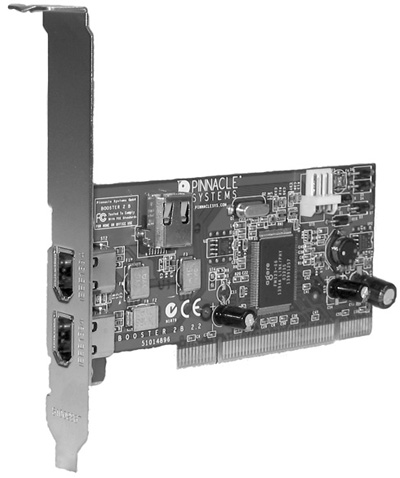
The advantage of this is that when you digitize DV or HDV footage, you are in fact simply transferring digital data from the tape to your hard drive via a FireWire card. This is a relatively simple process and doesn’t demand too much from the computer (Figure 2.2).
Figure 2.2. FireWire card.
The analog option
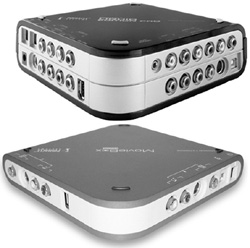
Using the Liquid Pro BOB or the legacy product the MovieBox Deluxe (Figure 2.3), you will also have the option of digitizing from a VHS or DVD player, or any other analog source. However, there is an important difference here in the way analog is captured.
Figure 2.3. The Liquid Pro BOB (top) and the MovieBox Deluxe both give Liquid 7 analog capabilities.
When you try to transfer analog to the computer, Liquid must convert this analog signal to digital data for storing on the hard drive. This will make great demands of your computer, and to do it successfully, you need a fast, well-optimized system. See the appendix for troubleshooting this problem.
Figure 2.4. An example comparison between an HDV and a Mini DV camera shot. On the left is HDV; on the right is a magnified DV clip.

Figure 2.5. A native MPEG capture is automatically selected once an HD camera is detected.

The Difference Between Logging and Digitizing
• Logging enables you to create a log of what is on your DV/HD tape; this allows you to mark the sections of video you want to digitize (Figure 2.6).
Figure 2.6. A selection of clips logged for future capture.
• Digitizing is the process of transferring the video from the camera tape to the computer.
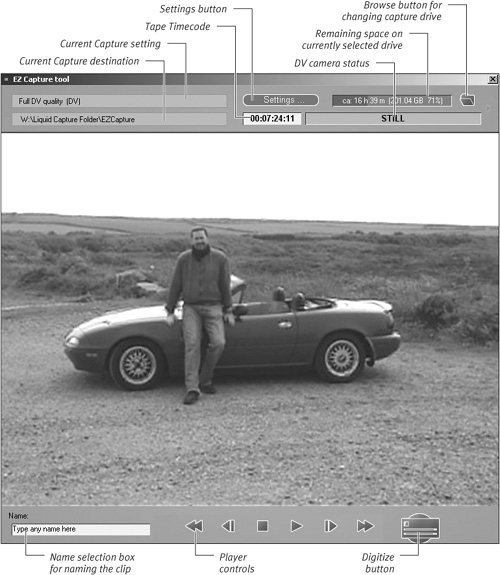
Using the EZ-Capture Tool
The EZ-Capture tool has been introduced to Liquid 7 so users can capture a single file both quickly and simply, without fuss or bother. It also has the added ability to capture in a variety of codecs not open to the user when inside the Logging Tool.
Although EZ-Capture cannot support batch capturing, it does have a number of advantages over the Logging Tool, including the following:
• Ability to capture to a specific user-defined location.
• Ability to capture using a specific user-defined file name
• Ability to capture using a variety of different codecs
These features have long been requested by the Liquid community who, while using the Logging Tool with no problems, sometimes required a way of saving a file with the name of their choosing and in the directory of their choosing. When using the Logging Tool, this is not possible as all clips are under tight control of the Media Management system. See page 67 for details.
• These days, most computers have a hard drive formatted to NTFS as standard, but there are still some that use FAT32. NTFS is the better because it allows you to capture significantly larger files. To find out the full differences between the two file formats, see the appendix.
Do one of the following:
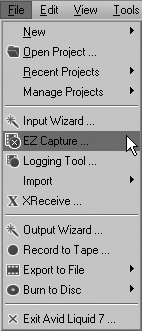
• From the menu bar, select File > EZ Capture (Figure 2.7).
Figure 2.7. Using the menu bar to access the EZ Capture tool.
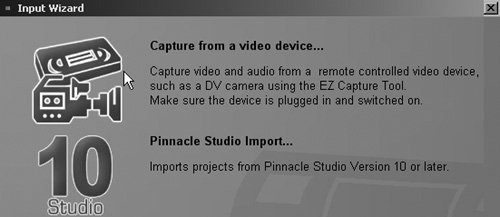
• From the menu bar, select File > Input Wizard (Figure 2.8) and then click the “Capture from a Video Device” icon (Figure 2.9).
Figure 2.8. Accessing the Input wizard.
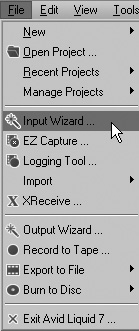
Figure 2.9. The top icon of the Input wizard now opens the EZ Capture tool.
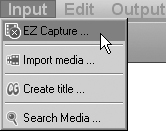
• From the Quick Access menu, select Input > EZ Capture (Figure 2.10).
Figure 2.10. The EZ Capture tool can also be accessed from the new Quick Access menu.
Any of these options should bring up the EZ Capture interface (Figure 2.11).
Figure 2.11. The EZ Capture tool. A new way of capturing introduced in Liquid 7.
To digitize DV using the EZ-Capture tool
1. Open the EZ-Capture tool using one of the methods described in the last section.
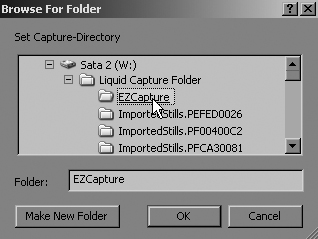
2. Click the Folder Open button ![]() and browse to the folder where you want the captured file to be sent (Figure 2.12). You can create a new folder from here if you need to.
and browse to the folder where you want the captured file to be sent (Figure 2.12). You can create a new folder from here if you need to.
Figure 2.12. Choose where you want the capture file to be stored.
3. Name the clip by clicking inside the Name area and typing up to 31 characters (Figure 2.13).
Figure 2.13. Give the clip a name of up to 31 characters.

Once you have used a particular name, you may not use it again inside this folder (and it will appear in red should you attempt to do so).
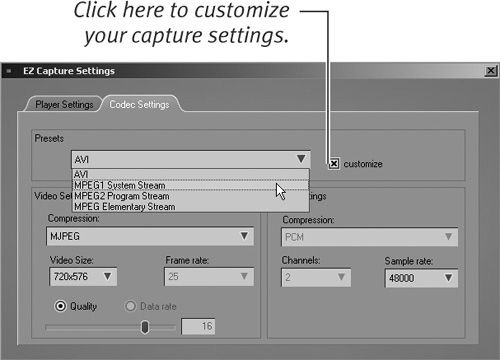
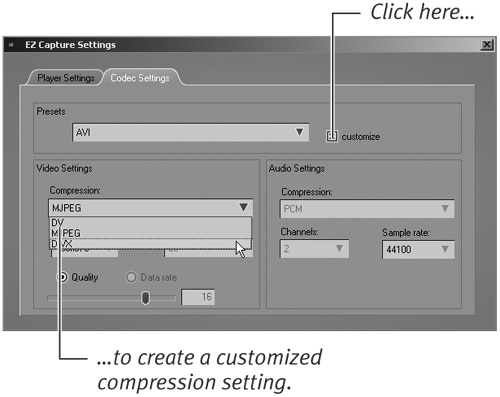
4. Click the Settings button and select the Codec Settings tab if not already displayed. Select from the presets (Figure 2.14) or from the Customize menu (Figure 2.15).
Figure 2.14. Choose which codec preset you want to use...
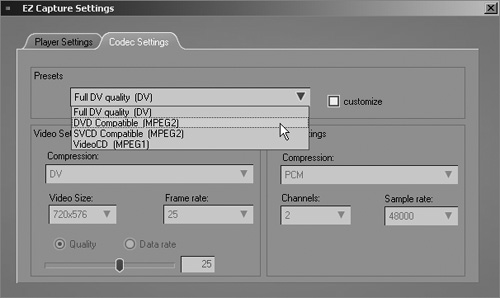
Figure 2.15. ...or create a custom setting.
More details on codecs can be found in the “Codecs—What Are They Good For?” sidebar later in this chapter.
5. Press the Play button in the EZ-Capture screen; then, when you see a picture in the overlay, use the Forward or Backward button to find the scene you wish to capture.
6. Once you have found it, rewind a few seconds before the start, press Play, then press the Digitize Start button. ![]() .
.
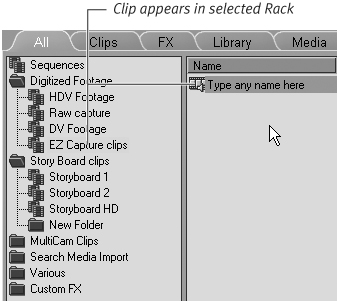
7. When you reach the end of the scene, press the Digitize button again to stop the process and the clip will appear in the directory you have preselected. It will also appear in the Rack you currently have selected (Figure 2.16).
Figure 2.16. Once captured, the clip appears in the Rack you chose with the name you gave it.
You can do this as many times as you like, but you must choose a unique name for each captured clip. Similar names can lead to clips you have previously captured being overwritten!
• By default, the EZ-Capture folder is inside your Media Management folder. If you decide to use a folder outside of this group, make sure you still remain on your dedicated video drive to avoid performance problems when capturing. See the appendix for more details on performance-related problems.
• Batch capture is not possible using the EZ-Capture tool. For this you must use the Logging Tool.
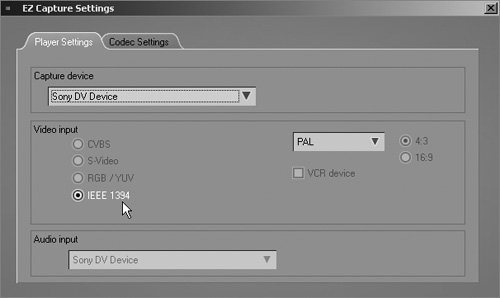
• If the DV device controls are dimmed out, this indicates that you have no connection to the camera. Check the settings by clicking the Settings button in the center of the interface and selecting the Player Settings tab (Figure 2.17). Your camera should appear as a selection in the Capture device drop-down menu and the IEEE 1394 radial button should be selected. If this is not selectable (dimmed out), then see the appendix.
Figure 2.17. The player settings for connection via a FireWire card.
• The extended dialog arrow is dimmed out when capturing from a DV FireWire device.
To digitize from an analog source using the EZ-Capture tool
1. Open the tool using one of the methods described in the last section.
2. Click the Folder Open button ![]() , and browse to the folder where you will want to the captured file to be sent (see Figure 2.12). You can create a new folder from here if you need to.
, and browse to the folder where you will want to the captured file to be sent (see Figure 2.12). You can create a new folder from here if you need to.
3. Name the clip by clicking inside the Name area and typing up to 31 characters (see Figure 2.13).
Once you have used a particular name, you may not use it again inside this folder (and it will appear in red should you attempt to do so).
4. Click the Settings button ![]() and select the Player Settings tab.
and select the Player Settings tab.
From here, select the analog converter—in this case the Liquid Pro BreakOutBox—and also the video input—Composite (CVBS) or S-Video (YUV) (Figure 2.18).
Figure 2.18. Selecting an external analog converter—in this case the Pro BOB.
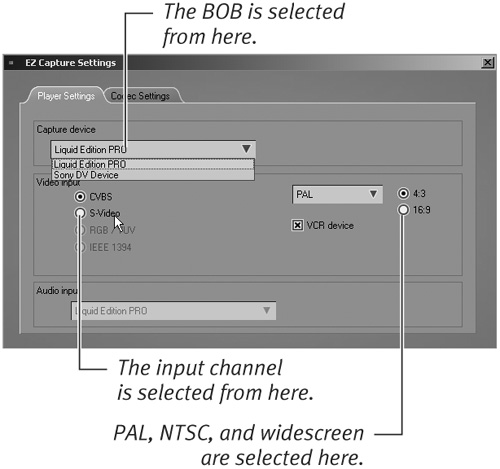
You can also select widescreen and alternative audio inputs from this screen.
5. Select the Codec Settings tab. Select one of the Presets (Figure 2.19) or customize your own by selecting from the various menus (Figure 2.20).
Figure 2.19. Select one of the analog capture presets...
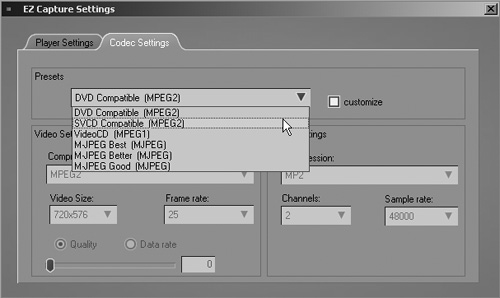
Figure 2.20. ...or create a custom setting.
Click the X in the corner of this window to exit the settings.
6. Press the Play button on your analog device. When you see a picture in the overlay, use the Forward or Rewind controls on your analog device to find the scene you wish to capture.
7. Once you have found it, rewind a few seconds before the start, press Play, and then click the Digitize Start button ![]() .
.
When you reach the end of the scene, click the Digitize button again to stop the process and the clip will appear in the directory you have preselected. It will also appear in the Rack you currently have selected (see Figure 2.16)
You can do this as many times as you like, but you should take care to choose a unique name for each captured clip.
• When capturing analog, you can also open up the Extended Dialog area by clicking on the right facing arrow next to the Open Folder button. This gives you the option of altering the video and audio qualities of the clip as you capture. These changes are hard changes and cannot be removed without recapturing the clip.
• By default, the EZ Capture folder is inside your Media Management folder. If you decide to use a folder outside of this group, make sure you still remain on your dedicated video drive to avoid performance problems when capturing. See the appendix for more details on performance-related problems.
Touring the Logging Tool
The Logging Tool, though daunting when you first see it, is in fact easy to use and a powerful tool to exploit. You should be aware of many submenus and various naming conventions to get the most out of this tool.
To open the Logging Tool
1. Open the Logging Tool by clicking the Logging Tool button ![]() or by pressing F6.
or by pressing F6.
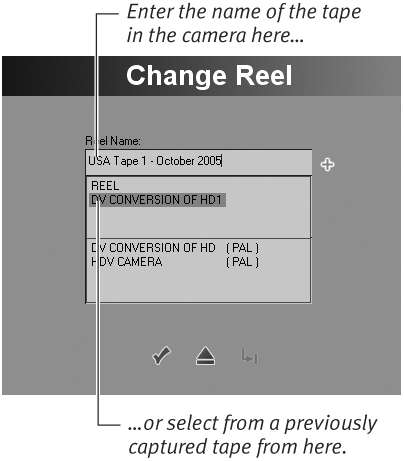
2. Enter a unique name for the tape with which you are working (Figure 2.21).
Figure 2.21. Enter a unique name for every tape you use with Liquid and, just as importantly, every Timecode break!
3. Click the check mark in Figure 2.21 to display the complete Logging Tool (Figure 2.22).
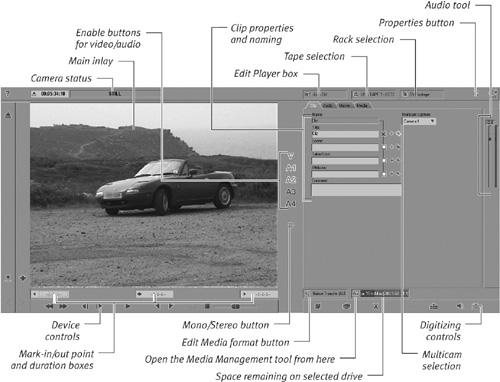
Figure 2.22. The Logging Tool open for business. Each component is described in the pages that follow.
Working with the Logging Tool
This section covers some of the components of the Logging Tool in more detail. Refer to Figure 2.22 for their location on the screen. Other areas of this interface are covered in the two sections, “Digitizing an entire DV tape” and “Digitizing part of a DV tape.”
The Main inlay
Here you will see your footage displayed. If this is black during playback, see the appendix.
The Device Control buttons
These buttons control your external DV device and can be used to play the tape or move it forward or backward at a faster or slower rate.
If the controls are dimmed and the message box at the top of the Logging Tool is flashing “Device Not Ready,” check that your camera is turned on, that you have it correctly connected, and that [i.Link DV] is selected. If you still have problems, see the appendix.
• Use the arrow keys on the keyboard to step your DV device through the video frame by frame.
• To the far right of these controls is a Shuttle slider, which can be used to dynamically play the tape forward or backward at a variety of speeds. If this control does not appear on your interface, it can be added via the Customize feature. See Chapter 1, “Getting Started,” for details.
Mark-in/mark-out points and duration boxes
When you are digitizing your tape, these information boxes will tell you the Timecode for the mark-in and mark-out points and also the overall duration of the digitized clip.
Enable buttons for video/audio
Running down the center of the Logging Tool are five garish symbols: one V and four As numbered 1 to 4. These allow you to choose what your digitized media clip will contain. By default, the V (for video) and the As (for audio) 1 to 4 are highlighted. This means you will capture video and four channels of audio.
If you only require two channels of audio (and most people do), then click once on A3 and A4 to disable them.
• Digitizing with four audio channels active will use up significantly more hard drive space than digitizing with just two. Bear this in mind if your hard drive space is at a premium.
• If you want to capture just video, you can disable all audio channels, and if you want to just capture audio without the video, you can disable the video track by clicking the V.
Edit Player box
This allows you to switch between digitizing from an i-Link (DV or HDV) source and digitizing from a live (analog) source by clicking the words i.Link DV and selecting Live (Figure 2.23). This is necessary when you’re capturing from an analog source.
Figure 2.23. Choosing between Live (analog) capture and i.Link DV (FireWire) capture.

The Properties button
Clicking here will allow you to alter various Logging Tool parameters. In general, you will use this if you are having problems with the Logging Tool. Be careful when adjusting these settings. The defaults are set to cope with the most likely digitizing scenarios, and altering them may cause the Logging Tool to drop frames or display the video incorrectly on playback.
Figure 2.24. The four options tabs for clip naming, audio adjustment, Timeline preview and media quality selection.
• The Clip tab is open by default and allows you to name your clips prior to digitizing. The information you provide in the various text fields will be available in the media clip’s Properties box once it has been digitized. Place an X in the box directly to the right of the text boxes you want to use.
The Multicam capture option is also on the Clip tab. This option allows you to capture footage from up to 16 different cameras that you can match up later on the Timeline. This is a great function if you are editing a concert that was filmed with several cameras simultaneously. You’ll find details on how to use this exciting feature later in this chapter.
• The Audio tab allows you to adjust the sound settings before you capture the clip and also as you capture the clip. You can either preview the footage before you capture and set the slider to the appropriate point, or you can dynamically alter the sound levels as you capture. This type of alteration is known as a destructive change because the alterations are permanent to that media clip.
• The Master tab displays the contents of the current Timeline sequence. This is used when you want to digitize a media clip and send it directly to the Timeline. Using this tab, you can scroll along until you find the correct point on the Timeline where you want to insert the media clip.
• The Media tab is used to adjust the quality of the captured clip. Generally you won’t need to adjust this, but you can find a full explanation of how to use it in Chapter 6 of the Avid Liquid Reference Manual.
Media Management
Click once on the graphic representation of how much hard drive space you have remaining, and you can choose to which hard drive your media clips will be saved (Figure 2.25). If you only see one location, then you can add more by clicking the AV button to bring up the Media Management screen and then add a drive location from there. Full details on using this function are in Chapter 4, “Managing Your Media.”
Figure 2.25. Selecting which media location to use during capture.
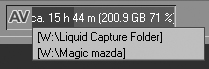
This box also displays how much room remains on the current Media drive. This is displayed as
• A percentage
• The physical number of bytes remaining
• A measurement of time
These figures are always approximate and should be treated with caution. During the digitizing process, this display will dynamically decrease in value.
• It is important to check that you have enough room before you begin digitizing. Try to avoid filling your hard drive beyond 90 percent of its total capacity as this may cause performance problems.
Edit Media format
This is used to choose into which format you will digitize your media clips. When set to digitize from a Mini DV device, the choices with Liquid are limited to using the AVI or DIF format (Figure 2.26).
Figure 2.26. Selecting which capture format to use when capturing from a Mini DV device.

If you have an HDV camera attached (and it is set to MPEG output), then you will only be able to capture in the M2V format (Figure 2.27). Clicking the Edit Media Format button will bring up some more choices, but without specialist hardware (available only to the Liquid Silver and Chrome range) you will not be able to use any of them.
Figure 2.27. Capturing from HDV gives only one option.
Using the Logging Tool
When using the Logging Tool, you can choose to digitize the whole tape or individual scenes (as you can with the EZ-Capture tool), or you can capture predefined chunks. This is known as logging or batch capturing. This section deals with both digitizing an entire tape and digitizing predefined sections.
Digitizing the whole or part of a tape
Simply digitizing a whole tape is easy enough and can be done by the computer while you do something else. The “something else” should be something not done with the computer because the digitize process likes to take full advantage of the computer resources and doesn’t like to share. In fact, trying to do something on the computer while digitizing is taking place may cause problems such as dropped frames or an aborted capture session.
• Most computers come with the hard drive formatted to NTFS as standard, but there are still some that use FAT32. NTFS is better because it allows you to capture significantly larger files. To find out the difference between the two file formats, see the appendix.
• While digitizing, the Audio tool allows you to monitor the sound levels of a tape you are previewing or digitizing. If this goes into the red too often, you should consider using the Audio tool found in the Audio tab to reduce the level. Clicking the small button above the displayed numbers, you will reset the Audio tool to its default setting.
1. Open the Logging Tool by doing one of the following:
• Click the Logging Tool button ![]() .
.
• Press F6 on the keyboard.
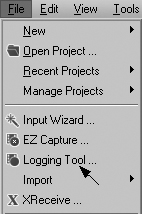
• Go to the menu bar, and select File > Logging Tool (Figure 2.28).
Figure 2.28. Selecting the Logging Tool from the menu bar.
2. Enter a unique name for the tape with which you are working (Figure 2.29).
Figure 2.29. Enter a unique name for your tape when prompted.
You must choose a unique name for each new tape you introduce to the Logging Tool. Each tape name creates a folder in the capture folder, and similar tape names can lead to clips you have previously captured being overwritten! See the “Timecode and Its Problems” sidebar earlier in this chapter for more details.
3. Click the check mark to display the entire Logging Tool.
4. Click the Rack selection menu to select the Rack you want the clips to appear in once the process is finished (Figure 2.30).
Figure 2.30. Choosing or creating a Rack in the Rack selection area.
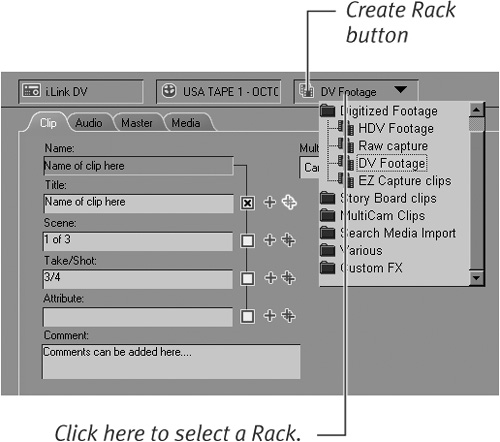
To create a new Rack without leaving the Logging Tool, click the Create Rack button.
5. If you are capturing from a Mini DV or an HDV device, make sure the player selection reads i-Link DV and that your device is switched on.
6. Select mono or stereo capture using the Mono/Stereo button.
By default, the Mono button ![]() is displayed indicating that each audio track will be a mono sound track.
is displayed indicating that each audio track will be a mono sound track.
To switch each track to stereo, click once on this button to show two circles overlapping ![]() . This indicates that stereo will be captured.
. This indicates that stereo will be captured.
7. To digitize the whole tape from beginning to end, rewind the tape and then click the Digitize button ![]() or press the N key.
or press the N key.
The Logging Tool will then begin digitizing, stopping when it reaches the end of the tape. If you want to stop the process before then, click once more on the Digitize button.
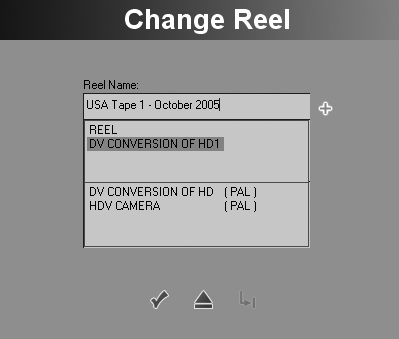
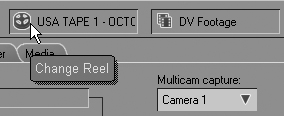
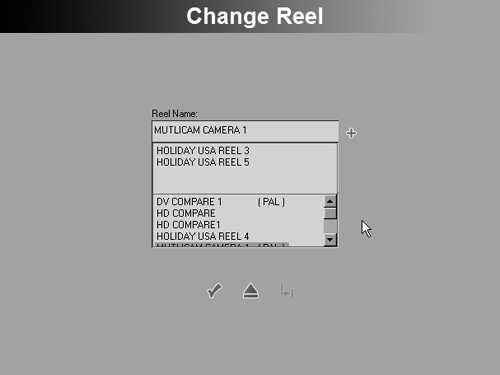
• You can also insert a new tape without leaving the Logging Tool by clicking the Change Reel button (Figure 2.31). Previously entered Reel names will appear ready for reuse by clicking on the menu next to this button.
Figure 2.31. Selecting a new Reel name from inside the Logging Tool.
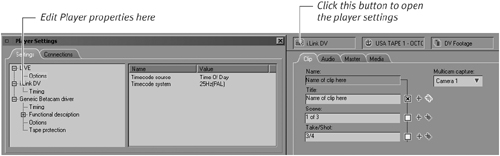
• Editing the camera properties is also possible by clicking once on the Edit Player button. Be careful here—there is no Restore to Default function (Figure 2.32).
Figure 2.32. The player settings for i-Link devices
• You can also digitize part of a DV tape by defining which parts of the tape you want to capture; you can do this by adding mark-in and mark-out points with the Logging Tool. See the next section for details.
1. Open the Logging Tool by doing one of the following:
• Click the Logging Tool button ![]() .
.
• Press F6 on the keyboard.
• Go to the menu bar and select File > Logging Tool (see Figure 2.28).
2. Enter a unique name for the tape with which you are working. This is very important when it comes to logging clips because the Logging Tool will associate the logged clips only with that tape. See the “Timecode and Its Problems” sidebar earlier in this chapter for more details.
Click the check mark to display the entire Logging Tool.
3. Click the Rack selection menu to select the Rack you want the clips to appear in once the process is finished (see Figure 2.30).
To create a new Rack without leaving the Logging Tool, click the Create Rack button.
4. If you are capturing from a Mini DV or an HDV device, make sure the player selection reads i-Link DV and that your device is switched on.
5. Select mono or stereo capture using the Mono/Stereo button.
By default, the Mono button ![]() is displayed indicating that each audio track will be a mono sound track.
is displayed indicating that each audio track will be a mono sound track.
To switch each track to stereo, click once on this button to show two circles overlapping ![]() . This indicates that stereo will be captured.
. This indicates that stereo will be captured.
6. Play the tape by pressing the spacebar, and preview the content until you find the point where you want to start digitizing.
7. Press the I key or click the Mark-In Point button ![]() .
.
This sets a mark-in point and tells the Logging Tool that you want to begin digitizing from this point (Figure 2.33).
Figure 2.33. Setting a start or mark-in point for your digitizing.

8. Continue to preview the tape until you reach the point where you want to stop recording. Press the O key or click the Mark-Out Point button ![]() .
.
This sets a mark-out point and tells the Logging Tool to stop digitizing here. This also displays the overall duration of the media clips in the middle box (Figure 2.34).
Figure 2.34. Setting an end or mark-out point for your digitizing. The mark-out point is the numerical value to the far left with the overall duration indicated by the numerical value in the middle.

9. Click the Digitize button ![]() or press N.
or press N.
The Logging Tool rewinds the tape to the mark-in point and then begins digitizing the tape until it reaches the mark-out point, where it will stop.
• You can fine-tune the mark-in/mark-out point by pressing the spacebar to pause the DV/HDV device and then using the arrow keys to move one frame at a time forward or backward.
Using Scene Detection for Long Media Clips
Getting the Logging Tool to digitize a long clip is all well and good, but you still end up with a large slice of media sitting on your hard drive. It will, at some point, need to be divided up so that it can be usefully manipulated.
This is done by
• Going through the clip and manually marking each scene yourself, creating Subclips from these markers (see Chapter 14, “Advanced Techniques”)
• Sending the media clips to the Clip Viewer and using the Scene Detection tool (see Chapter 14)
• Getting the Logging Tool to detect the scenes on the tape while digitizing takes place
This last option is possibly the most elegant because it allows the Logging Tool to capture the whole tape, without you having to hold its hand. At the end, you are presented with a Rack full of media clips, each one representing a single scene on the tape.
To set up scene detection during capture
1. With the Logging Tool open, click the Properties button ![]() and select Properties from the drop-down menu.
and select Properties from the drop-down menu.
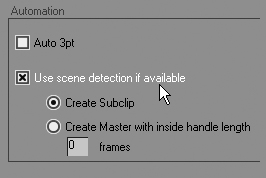
2. Select the General tab and click the check box marked “Use scene detection if available” (Figure 2.35).
Figure 2.35. The check box for enabling scene detection, labeled “Use scene detection if available,” is in the bottom-right corner in the Automation section.
There are two further choices:
• Select Create Subclip to create one long clip plus a number of Subclips—reference clips to the master. This is useful if you want to expand a particular clip or if you need to reference the whole tape at a later date.
• Select Create Master with inside handle length to create single media clips that are independent of any other. This is useful if you require a physically separate set of media clips for every scene.
You’ll need to experiment to see which suits your particular workflow.
3. Close the Properties box by clicking the check mark, and then follow the instructions given earlier for digitizing either the whole tape or part of it.
When the digitizing process is finished, you should find a large number of Subclips or master clips sitting in whichever Rack you defined.
• When creating master clips or Subclips using scene detection, nothing will appear in your Project Browser until digitizing is finished. So don’t be alarmed if at first nothing appears to be happening.
Digitizing Clips from Analog
The process of digitizing from an analog source has a number of caveats that you should be aware of before you attempt it. The actual process is fairly similar to that of digitizing a DV clip except that
• When digitizing analog, the computer must convert the analog information stored on the tape to a digital format that can be stored on the hard drive.
To do this, you need a fast CPU, a very quick hard drive, and a computer that has been optimized until it squeaks. If you don’t have this enviable PC configuration, you will experience dropped frames, which means the media clips will appear to stutter during playback.
The quality of the tape and the output quality of the camera or VHS recorder will also factor into this volatile equation. Cheap recorders from the local discount store are unlikely to give good results.
• You will not have any control over the playback functions of the analog camera or VHS recorder unless you use an RS422 control device such as a BetacamSP.
• You may see sound synchronization problems where the action on the screen does not match the audio. Sometimes this can be only a few frames out, but when this is applied to someone talking at the camera, the lack of lip synchronization is irritatingly obvious.
• If you have the option, either capture the material to Mini DV first or pass the analog signal through a DV device and capture it via FireWire. The first of these options allows you to use device control and Timecode; the second option will only filter the analog signal in an attempt to reduce problems with dropped frames and poor sound synchronization.
1. With the Logging Tool open, and after you have selected or typed in the name of a Reel, alter the input settings to accept analog by clicking in the Edit Player box once.
2. Select Live from the drop-down menu (Figure 2.36).
Figure 2.36. Selecting the Live setting in preparation for analog capture.

You are prompted to enter the name of the tape again.
3. Click the check mark.
The Timecode counter begins showing the Time of Day—this is a reference point for the editor only—and the status window shows the command Play (Figure 2.37).
Figure 2.37. Timecode is displayed as “Time of Day.” This example shows 12:56 and 07 seconds and 7 frames.
![]()
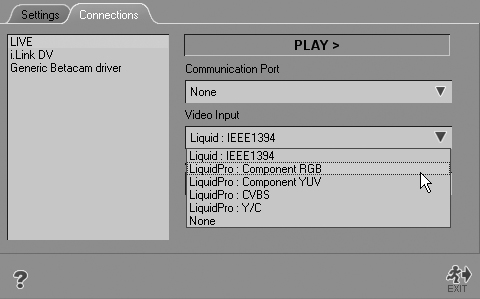
4. Click once on the ![]() button to bring up the Player Settings and open the Connections tab (Figure 2.38).
button to bring up the Player Settings and open the Connections tab (Figure 2.38).
Figure 2.38. Depending on what hardware you have attached, you will see various input options here. These are the input options for the MovieBox Pro and FireWire.
5. Alter the video and audio inputs to the appropriate one available from the pop-up menus, and then close the dialog by clicking the Running Man button ![]() .
.
6. Select the codec you want to capture with by clicking the Edit Media Format button and selecting from the list (Figure 2.39).
Figure 2.39. The various codecs available during analog capture.
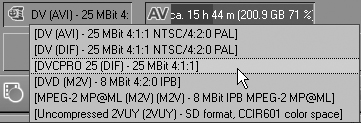
Once you have selected one of the analog inputs (CBVS, YUC, or Component) you will see a number of new codecs become available.
7. Press Play on your analog device. The Inlay should display the contents of your tape.
8. Click the Digitize button ![]() or press N, and the Logging Tool will begin digitizing until you click the Digitize button or press N again.
or press N, and the Logging Tool will begin digitizing until you click the Digitize button or press N again.
• During this process, the media will be digitized to the hard drive specified in the Media Management box and will appear in the folder specified in the Create Rack box.
• If the Inlay is black or the Digitize button remains gray, you may have to check your player settings to see if they are correct and that the cables are correctly connected between your analog source and the computer.
Logging a Tape
Logging is a way of creating a list of what is on the Reel, allowing you to batch digitize only those clips you really want or to digitize a tape at a later date. You can perform either of these logging processes without having to sit there while the computer does the actual digitization. Of course, you must first create a logged list.
It works like this: You preview a tape, probably not in real time, fast forwarding to events that interest you and that you want to digitize. By marking these files with mark-in and mark-out points and then by clicking the Log Clip button ![]() , you create a list of reference points that the Logging Tool can use to digitize the tape while you go and do something less boring.
, you create a list of reference points that the Logging Tool can use to digitize the tape while you go and do something less boring.
To log a tape
1. Open the Logging Tool by doing one of the following:
• Click the Logging Tool button ![]() .
.
• Press F6 on the keyboard.
• Go to the menu bar and select File > Logging Tool (see Figure 2.28).
2. Enter a unique name for the tape with which you are working. This is very important when it comes to logging clips because the Logging Tool will associate the logged clips only with that tape. See the “Timecode and Its Problems” sidebar earlier in this chapter for more details.
Click the check mark to display the entire Logging Tool.
3. Click the Rack Selection menu to select the Rack you want the clips to appear in once the process is finished (see Figure 2.30).
To create a new Rack without leaving the Logging Tool, click the Create Rack button.
4. If you are capturing from a Mini DV or an HDV device, make sure the player selection reads i-Link DV and that your device is switched on.
5. Select mono or stereo capture using the Mono/Stereo button.
By default, the Mono button ![]() is displayed indicating that each audio track will be a mono sound track.
is displayed indicating that each audio track will be a mono sound track.
To switch each track to stereo, click once on this button to show two circles overlapping ![]() . This indicates that stereo will be captured.
. This indicates that stereo will be captured.
6. Start the tape playing, and when you see the rough point where you want your media clips to begin, press the spacebar to pause the tape; then use the left and right arrow keys to fine-tune this position.
7. Once you are happy with this position, press the I key or click the Mark-In Point button ![]() to set the start position—the mark-in point.
to set the start position—the mark-in point.
8. Start the tape again by pressing the spacebar, and look for your end point—the optimum point where the media clip should end.
9. Press the spacebar again to pause the playback and use the arrow keys to fine-tune this position.
10. Once you are happy with this position, press the O key or click the Mark-Out Point button ![]() to set the end position—the mark-out point.
to set the end position—the mark-out point.
11. Now that you have a mark-in and mark-out point defined for this particular media clip, you can log it by clicking the Log Clip button ![]() or by pressing B.
or by pressing B.
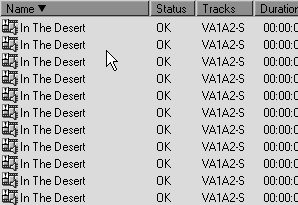
A logged clip appears in the Rack you selected in Step 3 (Figure 2.40).
Figure 2.40. A logged clip shown here in Detail view.
![]()
• When in Detail view, the logged clip will look like a small icon of a filmstrip with a butterfly in the top-left corner.
• When in Picon view, it will look like a black screen or the first frame of the media clip with a small white exclamation mark in the left corner.
12. Repeat Steps 6 to 11 until you have finished logging the entire tape, or at least until you have finished the part you are interested in.
You should now have a Rack that looks something like Figure 2.41.
Figure 2.41. The Rack full of logged clips. Note the small butterfly in the top-left corner of the icons.
• Use the keyboard shortcuts I and O to define mark-in and mark-out points, then use B to log the clip.
• If you aren’t concerned about fine-tuning the mark-in and mark-out points of your batch list, you can use the I, O, and B keyboard combination without pausing the tape or even stopping it.
Digitizing Logged Clips
Once an entire Reel is logged, you can instruct the Logging Tool to capture either the whole thing or just the logged clips you are interested in.
This is important: To digitize logged clips, you must first exit the Logging Tool. This is one of those irksome personality issues that Liquid suffers from, and if exiting the Logging Tool to begin digitizing makes no sense to you, join the club.
To digitize all the clips in a Rack
1. Make sure the Logging Tool is closed, then in the Project Browser, if it is not already open, select the Rack that contains your logged clips.
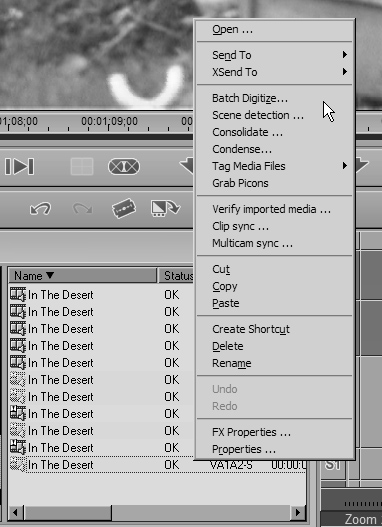
2. Right-click inside the right window of the Project Browser and select Batch Digitize from the contextual menu.
3. Select All In Rack (Figure 2.42).
Figure 2.42. Select either All In Rack or Clips Not Yet Digitized.
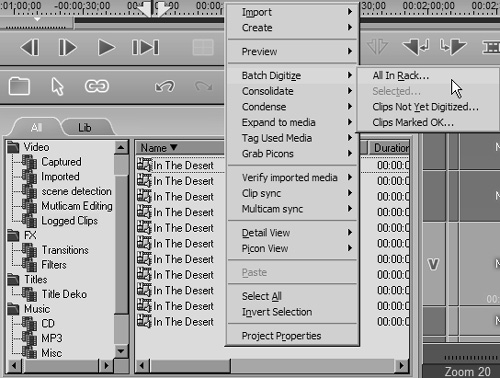
If there are clips in the Rack that have already been digitized, select Clips Not Yet Digitized.
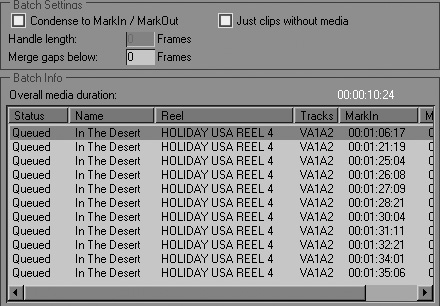
The Logging Tool opens, displaying the Batch Digitizing interface and a list of all the clips you have logged, along with details on mark-in and mark-out points and the Reel name they were taken from (Figure 2.43).
Figure 2.43. A batch list includes those clips that will be digitized.
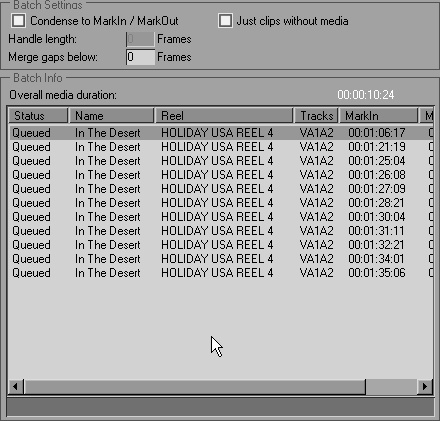
The Audio and Media tabs have the same function here as they did when you were digitizing. (See “Digitizing a DV tape” for details.) The two options at the top are specialist options for batch digitizing. Details on this can be found in Chapter 8 of the Avid Liquid Reference Manual.
5. Check that you have the correct hard drive selected in the Media Management box, and then click the Digitize button to begin the process.
6. Confirm that you are using the right tape by clicking the check mark.
The Logging Tool rewinds the tape to just before the mark-in point of the first clip and then it starts to play (Figure 2.44).
Figure 2.44. A list of batched clips being digitized. Note the progress bar at the bottom-right of the screen.
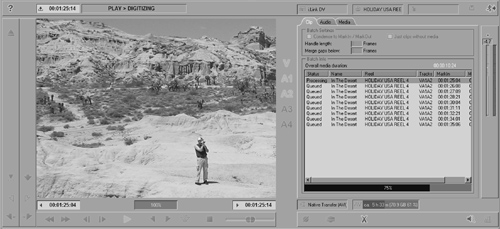
When it reaches the mark-in point, it begins to digitize; when it reaches the mark-out point, it stops digitizing and fast forwards to the next mark-in point. This continues until all the clips have been digitized.
• You may want to turn Scene Detection off when digitizing from a batch list; otherwise, your batched clips will be subdivided into their individual scenes.
To digitize a selection of clips in a Rack
1. Hold down the Ctrl key, and then left-click each of the logged clips you are interested in.
2. Click any of these clips, and then choose Selected from the Batch Digitize options (Figure 2.45).
Figure 2.45. Using the Ctrl key and left mouse button, you can selectively pick which clips to digitize.
Multicam Capture
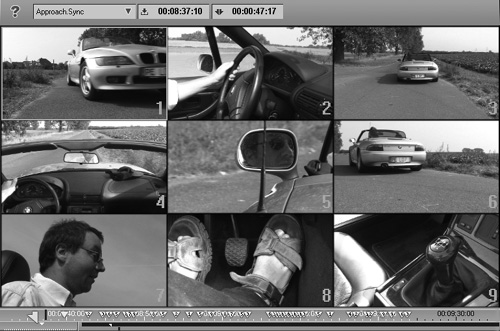
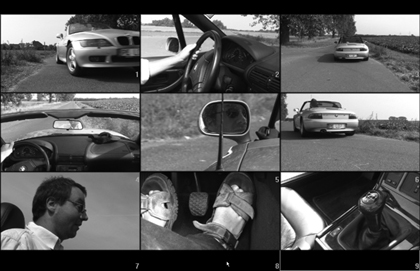
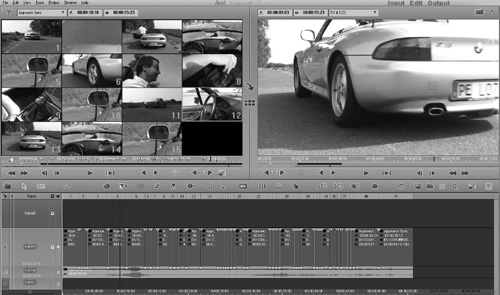
Multicam is the ability to capture several tapes with identical Timecode and match them up later on the Timeline using a Picture in Picture Effect. This allows you to edit all the cameras at the same time, in real time (Figure 2.46). Full details on how to edit with Multicam media clips can be found in Chapter 14.
Figure 2.46. An example of Multicam. Note the inserted keyframes at each camera change. The screen shows 9 cameras; you can display 4, 9, or 16.
• Clips that are not captured using the Multicam Capture feature can still use this feature by using Multicam Sync.
• Using customize, you can add the Full Screen display button ![]() to the source window to get a full screen display of Multicam. This is especially useful if you are using more than nine cameras, otherwise the camera tile will be too small. Multicam will still function correctly when in full-screen mode (Figure 2.47).
to the source window to get a full screen display of Multicam. This is especially useful if you are using more than nine cameras, otherwise the camera tile will be too small. Multicam will still function correctly when in full-screen mode (Figure 2.47).
Figure 2.47. Using the Full Screen Display button on the source window to show the nine cameras in more detail.
The rules for Multicam Capture
To use this feature, you must be aware of the following rules:
• By design, only Camera 1 should contain audio, so obviously, this should be the tape to which you want to sync audio. However, if you capture each clip as Camera 1, using the Multicam technique described in the next section, you will be able to retain audio for each camera angle. Note this method is not “as designed” by the Liquid engineers and as such is not supported by their technical department.
• The Timecode of all the tapes must be the same.
• The Timecode of all the tapes must not contain any breaks.
Once you have confirmed that your tapes fall in line with these rules and you have decided which tape to use, you can start to use Multicam Capture.
• If there is a problem with Timecode, capture all tapes as normal, then align them later using the Multicam Sync feature. See Chapter 14 for details.
• Multicam Capture is an advanced capture technique, and as a result, you should be aware of how to use the basic capture techniques and be aware of how to set mark-in and mark-out points before attempting this task.
• Scene Detection should be turned off when using Multicam Capture.
To digitize using Multicam Capture
1. Label each of your tapes clearly and then insert the first one.
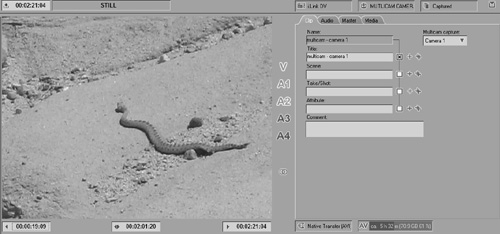
2. Open the Logging Tool as described in the previous sections, and name your Reel “Project Name camera 1,” where “Project Name” is the name of your project (Figure 2.48).
Figure 2.48. It’s important that your Reel name is totally unique when you are attempting a Multicam capture.
3. Set a mark-in and mark-out point for this media clip and give it a unique title, preferably ending with “camera 1” (Figure 2.49).
Figure 2.49. The media clips should also have a unique name ending with the camera number so that you can make sense of it later.
4. Now click the Digitize button ![]() ; the media clip for camera 1—the “Master Camera” clip—is digitized, and at the same time a template for all the other tapes you have is created.
; the media clip for camera 1—the “Master Camera” clip—is digitized, and at the same time a template for all the other tapes you have is created.
5. Once the digitize process is complete, you can insert a new tape by opening your camera. Do not exit the Logging Tool while you are doing this.
Note that when you open the camera, the Logging Tool will reset and ask you for the name of this Reel. Do not enter a new Reel name; use the Reel name you used in Step 2, and make sure the Auto increment has not changed or added a number onto the end of the Reel name (Figure 2.50).
Figure 2.50. Check that the Reel number has stayed the same.
6. With the new tape inserted, check again that the Reel name has not changed, and then click the check mark.
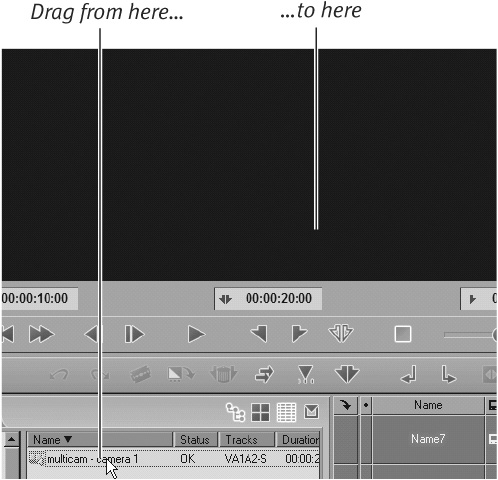
7. Drag the media clip captured using the camera 1 setting up and into the Logging Tool Inlay (Figure 2.51).
Figure 2.51. Drag the master camera clip up into the logging window to clone the mark-in and mark-out points.
The mark-in and mark-out points from this media clip are cloned and automatically appear in the Logging Tool to match the Master Camera clip.
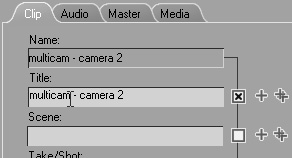
8. Select Camera 2 from the drop-down menu as shown in Figure 2.52, then name the clip again. Finish the name off with “camera 2” (Figure 2.53).
Figure 2.52. Select Camera 2 from the list.

Figure 2.53. Alter the camera number for the media clips.
9. Click the Digitize button ![]() ; this media clip will now be digitized and synchronized with the media clip captured using the camera 1 settings.
; this media clip will now be digitized and synchronized with the media clip captured using the camera 1 settings.
10. Repeat steps 5 to 9, increasing the camera setting each time and paying strict attention to the naming convention for each of your media clips.
It’s important to remember that you must always use the same Reel name for each tape you insert. If you change this, the whole thing will fall apart.
Figure 2.54. An example of Multicam at work. When it is sent to the Timeline, the Multicam edit looks like this.
• Up to 16 Reels can be synchronized together like this; but remember that only the first one can have audio.
• Media clips that have already been captured using the camera 1 setting can be turned into Multicam media clips using the Multicam Sync function. See Chapter 14 for complete details.