12. DVD Authoring
Without a doubt, DVD is now the medium of choice for the buying public, so DVD authoring should be your target when you’re constructing a project. If you want to use 5.1 sound, then DVD is your only format choice.
Liquid makes life easy for would-be DVD authors by allowing the whole process to take place on the Timeline. In fact, you never leave the Liquid interface, which means you can still fine-tune edits to the project while you create a DVD menu. The benefits of this are liberating, to say the least, for producers and editors with challenging schedules.
In this chapter, you’ll learn the basics of DVD authoring. You’ll produce a standard DVD with a menu, then you’ll move on to more advanced topics such as customizing a menu template, creating animated backgrounds and buttons, and using nested menus.
Authoring DVDs with Liquid 7
You can make DVD authoring in Liquid as easy or complex as you want. Creating a standard menu should create no real problems, but animated menus, variable bit rate, and nested menus can confuse the beginner and professional user alike.
Creating a DVD with a one-page menu is covered in the first half of this chapter. The second half contains more complex topics. By the end of this chapter, you should be able to create some impressive-looking DVD menus with fully animated backgrounds and buttons.
Preparing the Timeline
DVD authoring is all about preparation. This is the sort of preparation you need to think about even before you place your first clip on the Timeline. Only so much material fits on a single-sided DVD, so you can forget the luxury of three-hour VHS tapes. In the world of DVD, you need to justify every scene you place on the Timeline.
Dual-layer DVDs are becoming more established now, but most of you will still be using single-sided DVDs, so you need to be aware of how quickly the space is gobbled up.
How much material you can fit on a DVD depends upon two things: the amount of motion in your clips—higher motion creates a higher data rate, which needs more storage area—and the actual data rate you use to burn the DVD—the higher the rate, the less room you have. Sacrificing quality for quantity might seem like a workable option, but be careful. Lower data rates produce pixelization—visible when there is fast movement on the screen. This can make your production look anything but professional.
On the other hand, a static interview doesn’t benefit from a high data rate; by giving it one, you’re simply wasting space you could use for something else. With these facts in mind, you need to limit the Timeline to the maximum you can fit on a DVD at a data rate appropriate to the material being used.
Using Sequences
In Chapter 6, “Fine-Tuning Your Edit,” you saw how to build a Timeline in stages by creating a Sequence for each scene. Once you reach the DVD stage of your project, it is time to bring these Sequences together into one Timeline.
Remember, the real advantage of creating DVDs on the Timeline is that you can change or edit a scene when you realize that it will become a DVD chapter button. For instance, by adding a fade to the background noise or the music at this point, you help ensure that the chapter point doesn’t jar the audience with a suddenly enhanced audio level if they directly select that button. All of these edit options are open to you now, or they will be when you begin to edit your DVD menu. You don’t have this kind of control if you have to export this project to a third-party application.
• More information on creating and using sequences can be found in Chapter 14, “Advanced Techniques.”
• Make sure you place the first Sequence at about the 15-second mark of the Timeline. This gives you the room you need to insert the DVD menu.
• The alternative to using Sequences is to place the whole Timeline inside a container. For more information on using containers, see Chapter 14.
Using Markers
Before you start the DVD authoring process, take a moment to make one more timesaving preparation. In Chapter 6, you learned how to place markers on a clip or on the Timeline, so key events are more visible. You can use the same technique to scrub through the Timeline, find each potential chapter point, place a marker on it, and then rename the marker to reflect what it represents. Once inside the DVD Editor, you can use these markers to navigate the Timeline much more quickly.
To place and name markers
1. Scrub through the Timeline until you find a suitable point.
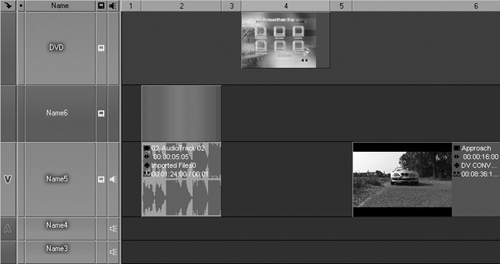
2. Press the M key to place your marker (Figure 12.2, top).
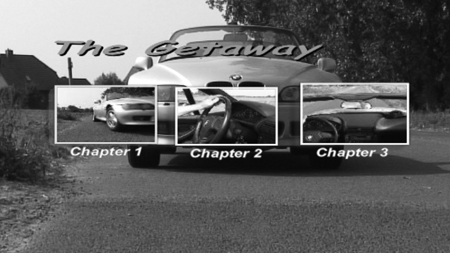
Figure 12.2. Placing a marker on the Timeline (top). Naming a marker; here I have typed in “Chapter 1” (bottom).
3. Double-click the marker to open the name dialog (Figure 12.2, bottom).
4. Give it a logical name and press Enter.
5. Move on to the next marker.
• If you want a single-page menu, then don’t place any more than six markers on any one Timeline. Six buttons on a single-page menu is about the maximum you can get without things starting to look cramped.
Building Your DVD Menu
Your first DVD should be a simple one that establishes two things: how the process works, and if any technical problems may stop you from actually burning a DVD.
Technical problems usually occur if you’re using a DVD burner that Liquid doesn’t recognize. In this case, you need to download an update from the Liquid Web site (www.avid.com). Updates are released on a regular basis, and you’ll find full instructions on how to install them on the download site.
• If you do experience a technical problem, it’s better that you experience it with a simple DVD project that hasn’t taken too much time to build. Experiencing it after you spend several hours building the most awesome menu the world has ever seen is tragic, to say the least.
Using the DVD Wizard
Building a simple DVD menu is—like just about everything in Liquid—very easy to accomplish. The built-in DVD wizard holds your hand through the first important stages; it just leaves you to decide which burn option you want to make at the end. This wizard has its own help files built in, and if you get anything wrong, you can always use the Undo command.
To open the DVD wizard
1. Prepare the Timeline as explained in the “Preparing the Timeline” section earlier in this chapter.
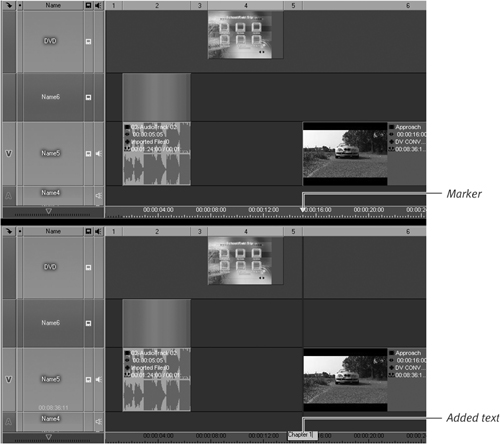
2. Click once on the DVD Menu wizard button (Figure 12.3).
Figure 12.3. Opening the DVD Menu wizard.
This opens the wizard at Step 1, which is choosing a DVD menu template.
Choosing a menu
Once the DVD wizard’s interface opens, you can choose from any of the menus available. These menus are all editable, so don’t worry too much about choosing one that doesn’t quite match your project. Later in this chapter, you’ll learn how to change everything inside the preset menu (Figure 12.4).
Figure 12.4. DVD Menu wizard, Step 1: Select a DVD Menu Template.
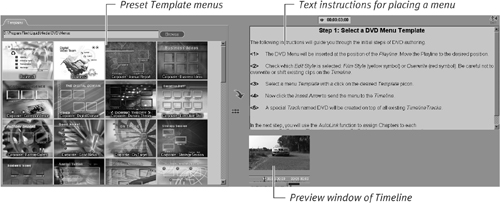
To choose a menu
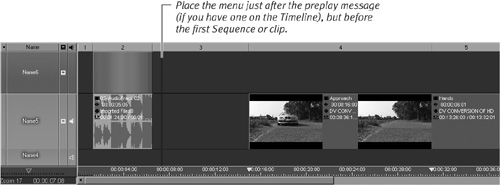
1. Make sure the Timeline cursor is at the point where you want to place the menu (Figure 12.5).
Figure 12.5. Positioning the Timeline cursor for DVD menu insertion.
2. Place the DVD menu on the Timeline by doing one of the following:
• Double-click the menu you want.
• Click the menu once and then click the Insert Source into Master button ![]() .
.
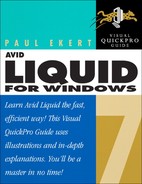
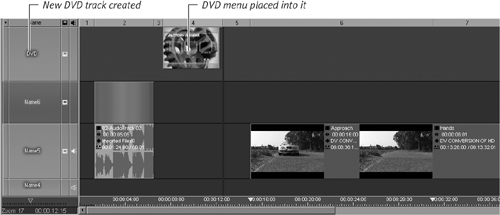
Once you’ve placed the DVD menu, a track called DVD is created on the Timeline and this menu is inserted into it (Figure 12.6).
Figure 12.6. The new DVD track with menu.
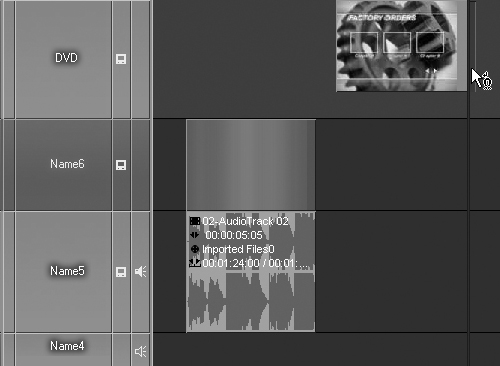
• The default menu size is a few seconds, but you can drag it to any size by clicking the handle on the right and dragging it along the Timeline (Figure 12.7).
Figure 12.7. Drag the menu to any size by clicking the handle on the right.
Adding Links
You use links to create a logical relationship between a scene on the Timeline and a button on the DVD menu. Once you choose your menu, you are presented with the AutoLink screen (Figure 12.8).
Figure 12.8. The AutoLink screen showing all edit decision points on the Timeline.
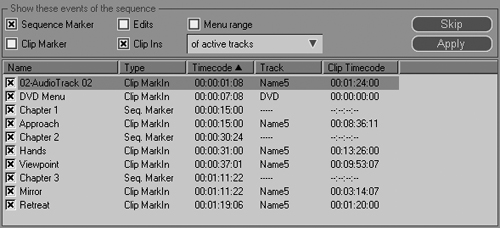
By default, this screen contains a list of every edit decision point on the Timeline. If you have a lot of these, which is highly likely, this list will be large, and quite possibly, unmanageable. You can highlight each link on the list to see each point on the Timeline, but setting links in this manner is a painstaking affair.
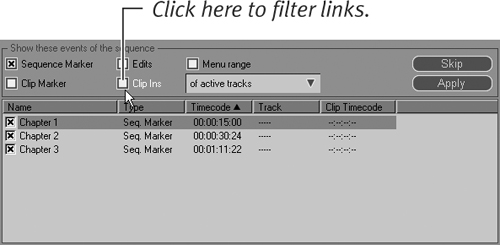
Filtering links
In order to see which links you really need, the DVD editor can filter the links to various criteria so you’re looking at fewer of them. This should help you see beyond the fog of “everything,” but it still might not help you enough to create the links without spending some time doing so.
However, if you prepared the Timeline as described in the “Using Markers” section earlier in this chapter, then you already have named markers on your Timeline at all the relevant points; you can now use these.
To filter out unwanted links
• Deselect the Clip Ins check box to display just the named markers (Figure 12.9).
Figure 12.9. Deselecting the Clip Ins check box displays just the named markers.
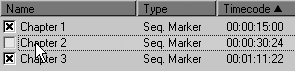
Selecting links
Now that you can see the wood for the trees, you can decide if you really want all of the chapter points. You can see which chapter point contains what material by scrubbing through the Timeline and watching the playback on the tiny preview window. This window also has its own scrub bar for previewing and displays all relevant markers.
To select/deselect a link
• Check or deselect the check box next to the chapters you want to add or subtract to your DVD menu (Figure 12.10).
Figure 12.10. Deselecting a link removes it from the DVD menu.
Applying the links
Once you’ve made a decision on which links you want to add and which you don’t, applying them is a simple matter of clicking the Apply button (Figure 12.11). If you want to proceed without applying any chapter points at this stage, just click the Skip button.
Figure 12.11. Clicking the Apply button to include these links in your menu.
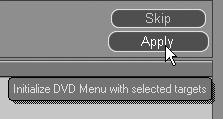
The wizard exits after you click either button; you can then preview your menu.
• Don’t worry too much if you aren’t sure about the number of buttons you have selected or their relative positions. You can change all this later in the process.
Previewing Your Menu
You can preview what you’ve created by clicking the Preview button anytime during your DVD menu’s construction (Figure 12.13).
Figure 12.13. Using the Preview button...
This displays the menu you are constructing and a set of controls on the right that simulate a DVD remote control. Once the preview cursor finds the menu, it plays it in an endless loop until you click the Preview button again (Figure 12.14). If you have a preplay sequence, it will play this once every time you enter the Preview screen.
Figure 12.14. ...to preview your menu before exporting to DVD.
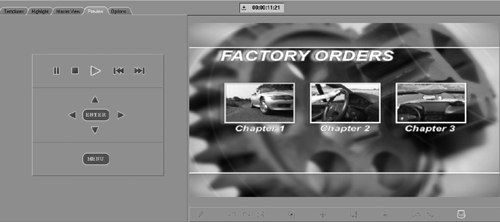
• While you are previewing your menu, double-click any of the buttons to see if they play the correct clips. The keypad on the left of the display simulates the DVD remote control’s Play and Pause buttons as well as the four direction buttons for selecting which button to activate.
• If you scrub the Timeline outside of the DVD Editor, the menu buttons will not be visible.
Understanding the Export Dialog
The Export dialog is one of the more complex areas of Liquid because the DVD burn engine is a very versatile program with many variables you can alter for every DVD you burn. Fortunately, you can use a number of presets to avoid getting too deep into the technical ramifications of this.
Once your menu is complete, you need to exit the DVD editing screen by clicking the Running Man button and then entering the Export dialog. Here you find all the settings you need to burn your project, and its menu, to a DVD.
To open the Export dialog
Do one of the following:
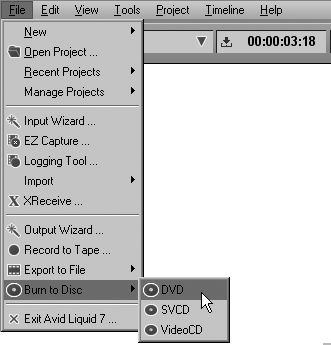
• From the menu bar, select File > Burn to Disc > DVD (Figure 12.15).
Figure 12.15. Opening the DVD Export dialog from the File menu.
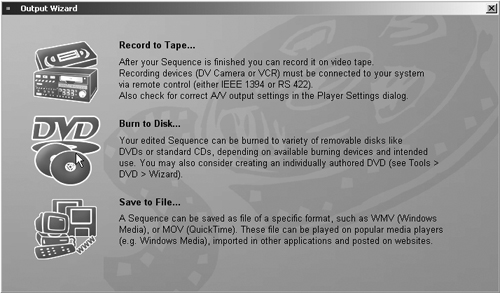
• From the menu bar select File > Output Wizard (Figure 12.16). Then click the DVD icon when the Wizard appears (Figure 12.17).
Figure 12.16. Accessing the Output Wizard.
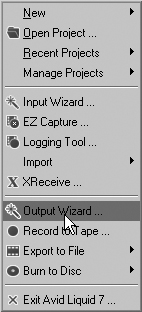
Figure 12.17. Clicking the middle icon to create a DVD.
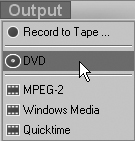
• From the new Quick Access menu, select Output > DVD (Figure 12.18).
Figure 12.18. Selecting DVD from the new Quick Access menu.
Any of these actions will bring up the DVD export screen covered thoroughly in the next section.
The DVD Export Window
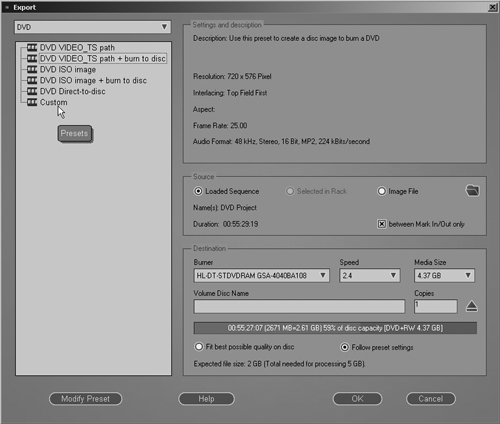
This area of Liquid has changed greatly since Version 6.x. Gone is the multi-tab selection screen and confusing array of presets, and in is the new sleeker interface (Figure 12.19).
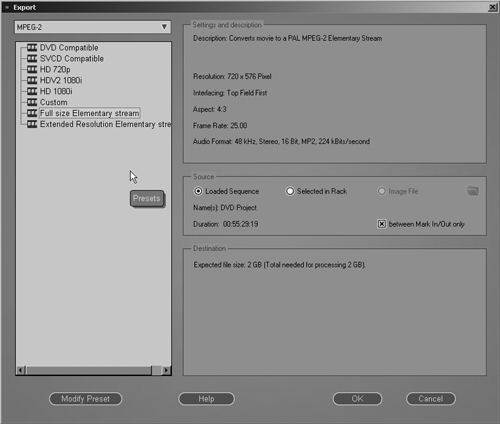
Figure 12.19. The DVD Export dialog.
This interface falls into five broad areas that are detailed in the next sections. Its best to read all of these sections carefully as each area of the interface can drastically effect the quality of your final DVD.
DVD/SVCD/VCD selector
If you opened the DVD dialog but in fact you wanted to burn an SVCD or VCD, you can quickly change it by making a selection from the choices available on this drop-down menu (Figure 12.20).
Figure 12.20. The selection menu allows you to choose what type of media to burn.
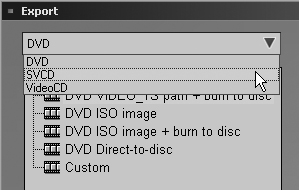
Preset selections area
If you have selected DVD, you will have a choice of five preset selections and one custom one:
• DVD VIDEO_TS path: Creates a set of VOB files on your hard drive.
• DVD VIDEO_TS path + burn to disc: Does the same as above, but additionally burns the VOB files to create a playable DVD.
• DVD ISO image: Creates an ISO image that can be burned to DVD using a third-party program.
• DVD ISO image + burn to disc: Does the same as above, but burns the ISO to a DVD to create a playable DVD.
• DVD Direct-to-disc: Just the plain and simple Burn to Disc option.
• Custom: Creates your own variation on the above selections.
Which of these options you choose will greatly depend upon what you want to do with the project, but you will probably only ever need to use DVD Direct-to-disc. That is unless you want to keep a copy of the project on your hard drive, in which case you would probably use DVD ISO image + burn to disc. You will then be able to burn more copies of this image at a future point without having to load up the project files or re-render the sequence.
• Full details of these presets and the SVCD/VCD presets can be found in the Avid Liquid Reference Manual.
Settings and description
This is just a list of everything that you have set at the moment of burn. If you want to change these settings via the Modify Preset button (more on this later), then you can use this area of the menu to see if those settings are correct before you commit to a burn.
Source
This is where you select what will actually be sent to the DVD. The default here is Loaded Sequence, which will send the current Timeline sequence to the DVD. The other options are:
• Selected in Rack: This will simply create a DVD from any files you have previously selected in the Project Browser. This DVD will not include a menu even if one of those files is a menu.
• Image file: This will create a DVD from an image file saved on your hard drive, possibly one created with the DVD ISO image preset. This is an excellent option if you want to burn more than one copy of the DVD but don’t want to re-render every single time you do it.
• If you are picking the Loaded Sequence option, you will also be able to decide if you want to include the whole Timeline or just the section marked between the mark-in and mark-out points on the Timeline.
Destination
This section is largely for information only, unless you have several burners installed on your system or these burners support more than one burn speed.
The only areas of real interest are the following:
• Media Size: From here you can select the size of the media you are using.
• Copies: This of course allows you to select how many DVDs you can burn in a single session. At the end of each burn, the Drive will eject and you must insert a new DVD. The problem is that the render time may run overnight and you wouldn’t be there to do this. It would be much better to use the DVD ISO image + burn to disc option and burn a DVD later, once you are sure the DVD you have is working correctly.
• Volume Disc Name: Here you can put a name to your project. If you are burning this for a corporation, a nice touch is to put their name here.
The Capacity bar
Below the Volume Disc Name box is the Capacity bar. This is one of the more useful information areas of the screen as it tells you whether or not the sequence (or image) will fit on a single DVD (Figure 12.21).
Figure 12.21. The Capacity bar allows you to know whether or not your sequence (or image) will fit on a DVD.
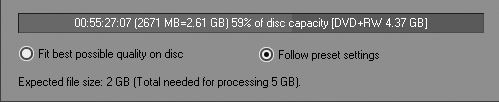
As the line approaches the right side of the box, it indicates that the DVD is nearing its maximum capacity. If the line flashes in red, this indicates that your project is too big and you must then either reduce its size or tweak the data rates you’re using to burn the DVD so that it all fits.
One way of tweaking the data rate is to click the Fit best possible quality on disc button (Figure 12.22). This will then increase or decrease the data rate to the best possible setting. When working on very long projects, or projects that approach 95% disc capacity, it is recommended that you always work with this setting selected.
Figure 12.22. The Fit best possible quality on disc button dynamically adjusts the DVD bit rate.
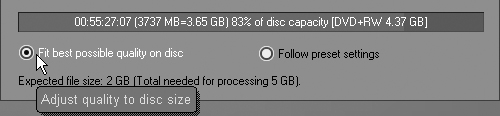
However, you should be aware that a reduction in data rate for long projects will mean a reduction in overall quality, and this might not be what you want.
• Below the above-mentioned option, you will find the expected size of the file after it has been burned to DVD. Next to this figure, in brackets, is a rough approximation of how much render area you will need to process this file. Always make sure this amount of space (plus a bit more for safety’s sake) is left free on the drive being used to render these files.
Figure 12.23. The Settings tab in the Edit Presets dialog—complex and not for the fainthearted.
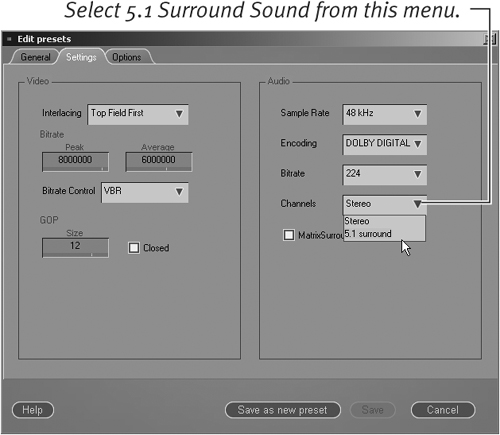
Figure 12.24. The Options tab in the Edit Presets dialog.
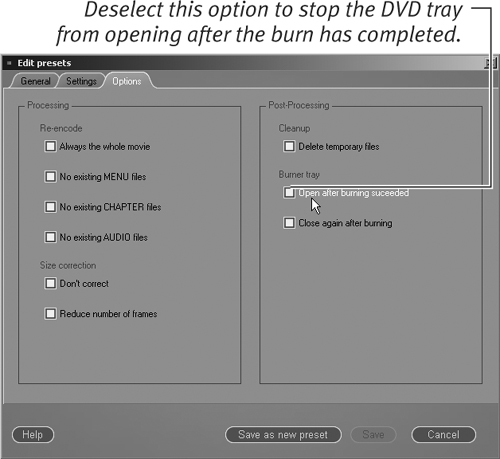
Using the Template Editor
If you use the DVD wizard to add a menu to your Timeline, you probably want to alter the text on the background and around the buttons. You may also want to replace the buttons themselves and the background. All of this is possible using the Template Editor.
If you experimented with Title Deko in Chapter 10, “Using Title Deko,” you’ll recognize that the Template Editor works in a similar fashion but with a slightly different, perhaps cleaner, interface. The basics of highlighting text to change its font or point size are the same, and the way you use color and shadow follows a similar principle.
• Although you accomplish most menu editing in this interface, including changing buttons and backgrounds, animation takes place outside this interface. This is covered in the “Adding Animation on a DVD Menu” section later in this chapter.
• To use the Template Editor, you must have a DVD menu on the Timeline.
• Although this chapter covers modifying a preset, you can create your own from scratch by using the Blank DVD menu. To add a blank menu, first switch to the Lib tab in the Project Browser and click the DVD Rack once. Then drag and drop the blank menu to the Timeline. After you have added a blank menu, you can use the tasks described throughout the rest of this chapter to build your DVD menu.
1. With the DVD menu on the Timeline, open the DVD Editor by double-clicking the actual menu or by clicking the DVD Editor button ![]() .
.
2. Click the Pencil button ![]() , or press the Z key on the keyboard.
, or press the Z key on the keyboard.
This opens the DVD Menu Template Editor (Figure 12.25).
Figure 12.25. The DVD Menu Template Editor.
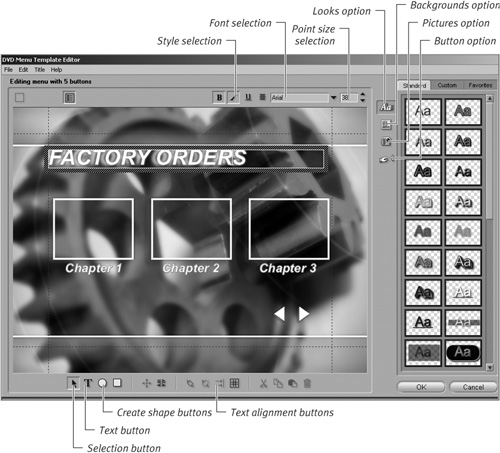
Editing a DVD Menu
Once the interface is open, you can change pretty much every element of the menu to one degree or another. You can accomplish this by using preset fonts and letter styles or creating your own in Photoshop and then importing the file.
By default, the Looks menu button is active when you open the interface. This allows you to change the style, font, and point size of the background and button text.
To edit the menu text
1. Click the Looks button to make sure it is activated.
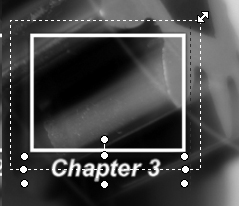
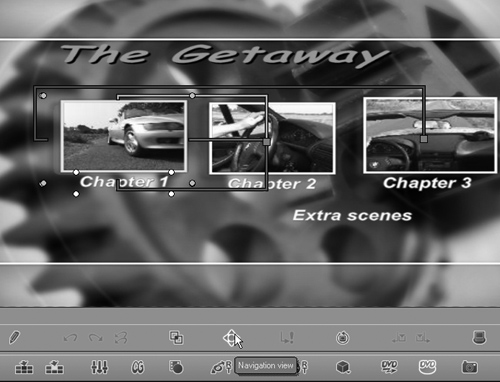
2. Highlight the text by dragging the cursor across it (Figure 12.26).
Figure 12.26. Highlighting the text.

3. Press Delete to remove the text and then enter your own via the keyboard (Figure 12.27).
Figure 12.27. Entering your own text.

1. Select the text again by dragging the cursor across it.
2. Do one of the following:
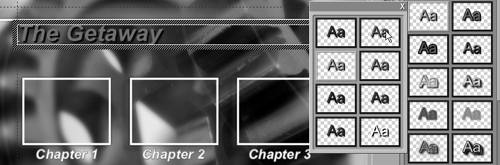
• From the preset text styles along the right side of the interface, click the style you want once (Figure 12.28).
Figure 12.28. Applying a new style to the text.
• From the Font menu, select a font style (Figure 12.29).
Figure 12.29. Selecting a font style via the drop-down menu.
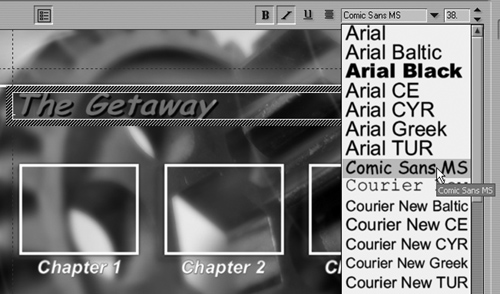
3. Adjust the point size in both cases by either entering the size into the font size box or clicking the up and down arrows (Figure 12.30).
Figure 12.30. Adjusting the point size.

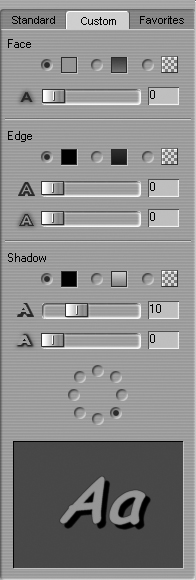
• To adjust the style further, open the Custom tab and adjust any of its settings (Figure 12.31). These alterations only affect the text you highlight.
Figure 12.31. Opening the Custom tab to adjust shadows and face styles.
Saving a style
Once you’ve created the most awesome font and colored shadow style known to humankind, you’ll probably want to save it. You can do this by simply adding it to the Favorites area.
To save the current look
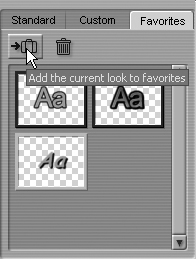
1. Highlight the text, then select the Favorites tab.
2. Click the suitcase icon.
The highlighted text is added to your collection, ready for you to use next time (Figure 12.32).
Figure 12.32. Saving a favorite text style.
Changing the Background
Liquid supplies you with a stunning range of backgrounds to use in your DVD menus. I’m sure you’ll find at least one here to suit the project you are working on, but if you don’t want to use a preset, you can always import your own graphics files.
To change the background
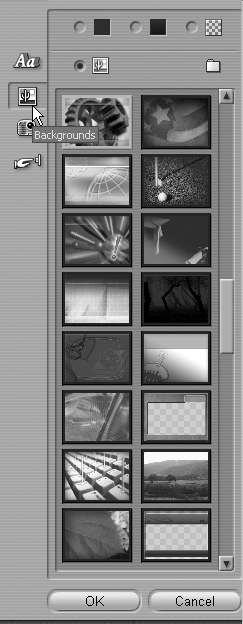
1. Click the Backgrounds button once (Figure 12.33).
Figure 12.33. With the Backgrounds button active, you can see the large selection of high-quality backgrounds that Liquid supplies.
2. Do one of the following:
• Drag and drop any of the preset styles that run down the right side of the interface into the main interface.
• Click the Solid Color button and select a single-colored background.
• Click the Gradient button and select a gradient-colored background.
• Click the Transparency button to select a transparent background.
• Click the Browse button to use one of your own backgrounds, then drag and drop it to the main interface.
Changing and Adding Buttons
As with backgrounds, the number of buttons Liquid supplies for its users is excellent. And again, if you really want to, you can import your own buttons as PSD files directly from Photoshop. Most templates come with a nominal amount of buttons per template, but you can easily add another button to the menu using drag and drop.
Buttons are preset graphic files with two states: highlighted (when selected) and nonhighlighted (when not selected). If this means nothing to you, then stick with the preset buttons and modify those within the DVD Menu Template Editor.
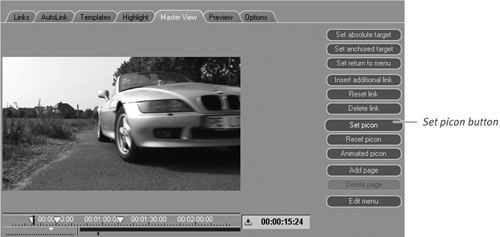
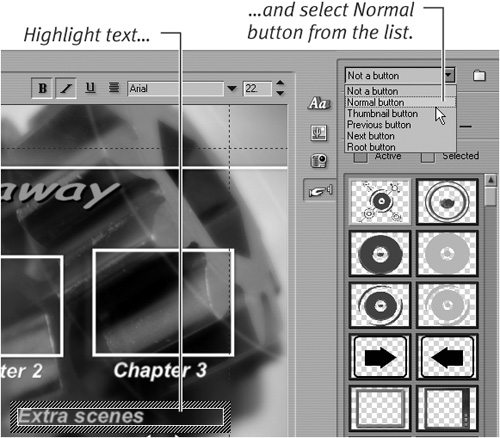
To change the style of a button
1. Make sure the Buttons option is selected.
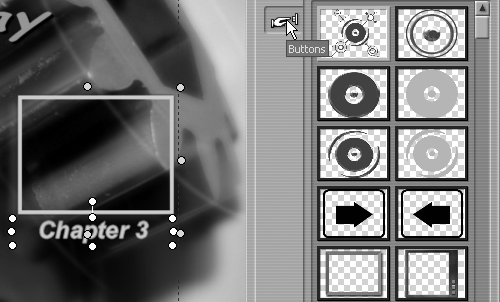
2. Select the button you want to change by clicking it once (Figure 12.34).
Figure 12.34. With the Buttons option selected, click a button to open the preset styles.
3. Select a different button from the preset area along the right side of the interface by clicking it once.
To change the size of a button
• With the button selected, grab any one of the corner handles and drag it out to the required size (Figure 12.35).
Figure 12.35. Dragging out a button to adjust its size.
To change the active and selected colors
• Click the Active or Selected color square, then change the color in the color picker (Figure 12.36).
Figure 12.36. Changing the active and selected colors.
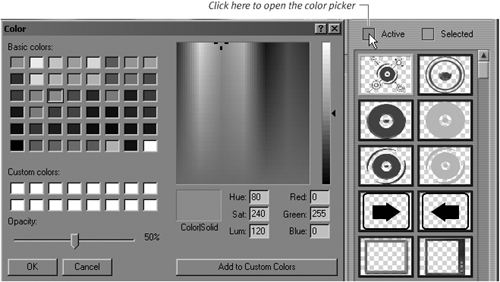
• The default active color is yellow. When you select another color, consider your choice carefully in case the active color is no longer obvious when the button is displayed as “selected” on the TV.
• Make sure the Button option is selected, and then drag your button from the right side of the interface to the menu.
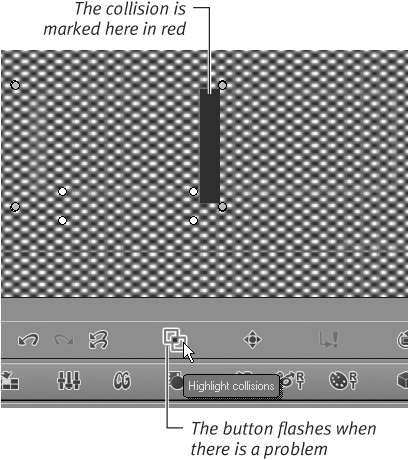
• When you add additional buttons to the interface, always check for collisions using the Collision Detection button. You can find details on this in the “Collision Detection” sidebar later in this chapter.
• If you add Next and Previous buttons to a DVD menu that currently only has one page, they don’t show up until you add a second page to your menu. See the “Adding a New Page” section later in this chapter.
Adding a New Page
If you have too many buttons on a single DVD page, it begins to look a little cramped. At this point, it’s best to add another page to spread the buttons out a bit. Once you’ve added a second page, you can see the Previous and Next buttons on your DVD menu.
• If you start with a blank template and you haven’t yet added these Previous and Next buttons, don’t forget to add them. Otherwise, you won’t be able to access the second page either in preview mode or on the final DVD.
1. Open the DVD Editor and switch to the Links tab if it isn’t already open.
2. Click once on the Add page button to add a new page.
Once the new page is added, the page indicator in the top right of the DVD interface changes to 2 and the buttons all appear empty, waiting for you to provide new links for them (Figure 12.39).
Figure 12.39. Adding a new page.
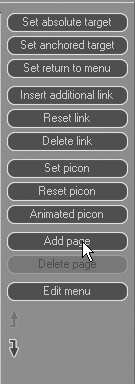
• To switch between the pages, use the page selector or click the Next/Previous button once.
• To delete a page, select it with the page selector, and then click the Delete page button.
Adding Animation on a DVD Menu
One of the coolest things you can do with a DVD menu is add animation to the buttons and the backgrounds. This is probably the killer feature for DVD menus, one that elevates them and gives your productions an immediate WOW factor. In Liquid, adding animation is also easy to accomplish and a lot of fun to play around with.
To create an animated background, you first must have a suitable clip in the Project Browser. Before you start adding this clip to the background, carefully consider which clip will work best. You can also create a color animation in any Photoshop-type program.
• To complete the next task, you should already have a DVD menu on the Timeline and a basic understanding of how the DVD Editor can be accessed and operated. If you don’t, please read this chapter from the beginning.
To add an animated background
1. First prepare a clip in the Source Viewer by adding a mark-in point where you want the animation to begin. (Don’t worry about the mark-out point; it’s automatically set as the overall length of the DVD menu.)
2. Once you’ve prepared your clip, enter the DVD menu by clicking the DVD Editor button on the Toolbar ![]() .
.
3. Open the DVD Menu Template Editor by clicking the Pencil icon ![]() .
.
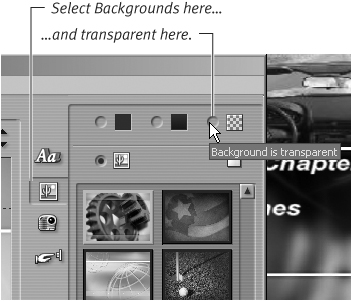
4. Select the Backgrounds button, and then click the “Background is transparent” radio button (Figure 12.41).
Figure 12.41. Setting the background to transparent.
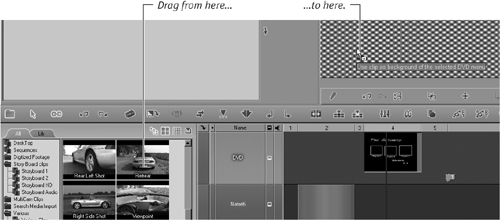
5. From the Project Browser, drag the clip you want to the Background area of the menu (Figure 12.42).
Figure 12.42. Setting a motion background by dragging the clip into the inlay.
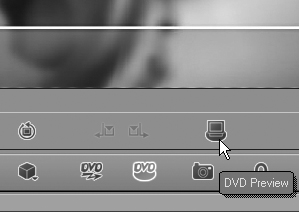
6. Click the DVD preview button to see your background motion in action (Figure 12.43).
Figure 12.43. The finished result.
The preview function always displays the first DVD menu in a loop. To preview a nested menu, click the link that leads to that menu.
• If the DVD menu isn’t quite long enough to show what you want on the animated background, drag it out to the required length instead of trimming the clip. This is another advantage of DVD authoring on the Timeline.
Animated Buttons
An animated button looks even cooler than the animated background because you can actually show a small preview of the scene related to that button. When you’re using this effect, Liquid automatically adds a 2D filter to this clip, which resizes it to the size of the button and repositions it to the button’s location. You can do this manually, but doing so takes much longer than the simple drag-and-drop method described here.
To add an animated button
1. First prepare a clip in the Source Viewer by adding a mark-in point where you want the animation to begin. Don’t worry about the mark-out point; it is set automatically to the overall length of the DVD menu.
2. Once you’ve prepared the clip, enter the DVD menu by clicking the DVD Editor button on the Toolbar ![]() .
.
3. Make sure the Links tab is displayed, then drag the clip to the button (Figure 12.44).
Figure 12.44. Adding the animated button.
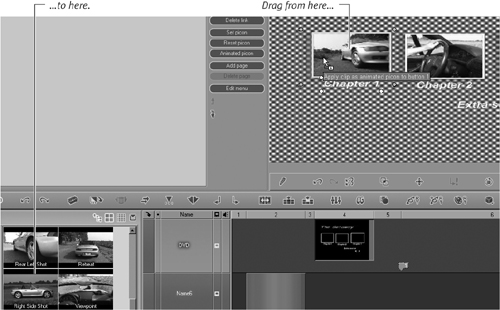
At this stage, a separate track is created called DVD-number, where number is the button you select. The background of the button changes to a checkerboard pattern to indicate that it is now transparent.
4. Click the DVD Preview button to see your button in action.
The preview function always displays the first DVD menu in a loop. To preview a nested menu, click the link that leads to that menu.
• The animations—background and buttons—must be the same length or longer than the DVD menu lasts on the Timeline. Otherwise, black shows on some areas when the menu plays back.
• You can add a filter to the clip on the DVD-number track as described in Chapter 9, “Working with Filters.”
• Warning: Animated buttons (and backgrounds) can also look corny and overstated when not used with care and restraint.
Creating Nested Menus
A nested menu is simply a menu that leads to another menu. You’ve seen this often on commercial DVDs; a menu leads from the main film to the bonus area where you normally find cut scenes, trailers, and perhaps interviews with the cast.
Creating a nested menu inside Liquid is just a matter of adding another menu to the Timeline and then creating some extra links. However, the trick is to place the nested menu at the end of the Timeline, beyond the point where your project finishes.
To insert a new menu
1. Click once on the Lib tab; then open the DVD Menu Rack.
2. Drag a preset or blank menu to a point after your movie finishes.
3. Open this menu in the DVD wizard, and link it to the buttons for the main film using the techniques described in the “Adding Links” section earlier in this chapter.
• You can also add animated buttons and an animated background to this menu. If you saved the type style from the first menu, this is a good time to use it.
Excluding a nested menu from playback
If you create a menu at the end of the Timeline, make sure that the DVD doesn’t play this menu when it reaches the end of the film. To do this, insert a jump marker at the end of the last clip and before the new menu.
To add a jump marker
1. Open the DVD editor and make sure you are displaying the first DVD menu in the Timeline and that the first button is selected.
2. Move the cursor to the mark-out point of the last clip.
3. Click the Set Return to Menu button.
A small jump marker is added to the Timeline.
• If you place the cursor over the jump marker, it displays its jump point location.
• To move a jump marker, simply drag and drop it.
Linking to a nested menu
Now that you have the new menu in place and the jump marker to stop the playline from seeing it, you have to create a link to it; otherwise you won’t be able to use it.
Remember that a single-page DVD menu doesn’t allow you to see the Next and Previous buttons, so you won’t be able to use any of those presets. In fact, the easiest way to create your own button to link to a nested menu is to create a Text button. You can do this by following the instructions in the “Changing and Adding Buttons” section earlier in this chapter. Once you’ve created a Text button, return to these instructions.
To create a link to a nested menu
1. Scrub the Timeline until you reach the start of your second DVD menu.
2. To add a link, do one of the following:
• Click the Set Absolute Target button.
• Drag the button to the Timeline at the point where the second menu starts.
A link is now created between this menu and the first one.
• Using this method, you can have as many nested menus as you like, although you must be aware that each one eats up a bit of valuable space on your DVD.
Alternatives to Creating a DVD
Maybe you don’t want to burn inside Liquid for whatever reason—perhaps you want to create MPEG files from your AVI clips. In this case, you don’t create a menu; you simply export the Timeline as is to your application in a format it can handle. Generally speaking, this means it needs to be an MPEG stream of some sort, but you need to check your program’s handbook to see which setting to use.
To export a Timeline
1. Select File > Export to file from the menu bar, and then select from the choices available (Figure 12.45).
Figure 12.45. Exporting the DVD as an MPEG file...
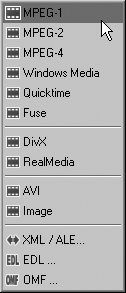
2. Select MPEG-2 to gain access to the Elementary stream presets and then create your file as you would a DVD (Figure 12.46).
Figure 12.46. ...gives you access to the Program Stream options.
3. Once the export finishes, you can import this into the application of your choice.
• The files at www.peachpit.com/liquid7vqp that can be used in this book were created using the Program Stream 2 preset to convert a single clip on the Timeline to an MPEG clip that is one-tenth the size of the original AVI.