C H A P T E R 6
Creating Indexes and Database Diagramming
Now that you have created the tables, you could stop at this point and just work with the data from here. However, this would not be a good decision. As soon as any table contained a reasonable amount of information, and you wished to find a particular record, it would take SQL Server a fair amount of time to locate it. Performance would suffer, and your users would soon get annoyed with the slowdown in speed.
In this scenario, the database is like a large filing cabinet in which you have to find one piece of paper, but there’s no clear filing system or form of indexing. If there were some sort of cross-reference facility, then it would likely be easier to find the information that is needed. And if that cross-reference facility were in fact an index, then this would be even better, as you might be able to find the piece of paper in your filing cabinet almost instantly. It is this theory that you need to put into practice in your SQL Server database tables. Generally, indexing is a conscious decision by a developer who favors faster conditional selection of records over modification or insertion of records.
In this chapter, you’ll learn the basics of indexing and how you can start implementing an indexing solution. This chapter will cover the following topics:
- What an index is
- Different types of indexes
- Size restrictions on indexes
- Qualities of a good index and a bad index
- How to build an index in code as well as graphically
- How to alter an index
Let’s begin by looking at what an index is and how it stores data.
What Is an Index?
In Chapter 5, you learned about tables, which are, in essence, repositories that hold data and information about data—what it looks like and where it is held. However, a table definition is not a great deal of use in getting to the data quickly. For this, some sort of cross-reference facility is required, where for certain columns of information within a table it should be possible to get to the whole record of information quickly.
If you think of this book, for example, as a table, the cross-reference you would use to find information quickly is the index at the back of the book. You look in the book index for a piece of information, or key. When you find the listing for that information in the index, you’ll find it’s associated with a page number, or a pointer, which directs you to where you can find the data you’re looking for. This is where an index within your SQL Server database comes in.
You define an index in SQL Server so that it can locate the rows it requires to satisfy database queries faster. If an index does not exist to help find the necessary rows, SQL Server has no other option but to look at every row in a table to see if it contains the information data required by the query. This is called a table scan, which by its very nature adds considerable overhead to data-retrieval operations.
![]() Note There will be times when a table scan is preferable to using an index. For example, if SQL Server needs to process a reasonable proportion of rows within a table (as a rule of thumb, 10% or more of them), a table scan is likely to be better than using an index. Decisions such as this one are made by SQL Server based on costs, like the cost of accessing the hard drive a row at a time as opposed to retrieving large chunks of data and holding the data in memory. There are other costs, but this is one example of why table scans may occur. This is all to say that a table scan isn’t wholly a bad thing, but on large tables, it could take some time to process.
Note There will be times when a table scan is preferable to using an index. For example, if SQL Server needs to process a reasonable proportion of rows within a table (as a rule of thumb, 10% or more of them), a table scan is likely to be better than using an index. Decisions such as this one are made by SQL Server based on costs, like the cost of accessing the hard drive a row at a time as opposed to retrieving large chunks of data and holding the data in memory. There are other costs, but this is one example of why table scans may occur. This is all to say that a table scan isn’t wholly a bad thing, but on large tables, it could take some time to process.
When searching a table using the index, SQL Server does not go through all the data stored in the table; rather, it focuses on a much smaller subset of that data, as it will be looking at the columns defined within the index, which is faster. Once the record is found in the index, a pointer states where the data for that row can be found in the relevant table.
There are different types of indexes you can build onto a table. The circumstances of the column or columns you select and the data that will be held within these columns determine which type of index you use.
Types of Indexes
Although SQL Server has three types of indexes—clustered, nonclustered, and primary and secondary XML indexes—I will concentrate only on clustered and nonclustered in this book, as XML and XML indexes are quite an advanced topic.
The index type refers to the way the index and the physical rows of data are stored internally by SQL Server. The differences between the index types are important to understand, so I will delve into them in the sections that follow.
Clustered
A clustered index defines the order of the data in the table. If you have more than one column defined in a clustered index, the data will be stored in sequential order according to columns: the first column, then the next column, and so on. Only one clustered index can be defined per table, and the clustered index has to generate unique values. It would be impossible to store the data in two different orders.
Going back to the earlier book analogy, if you examine a telephone book, you’ll see that the data are presented in alphabetical order with surnames appearing first, then first names, and then any middle-name initial(s). Therefore, when you search the index and find the key, you are already at the point in the data from which you want to retrieve the information, such as the telephone number. In other words, you don’t have to turn to another page as indicated by the key, because the data are right there. This is a clustered index of surname, first name, and initials. The clustered index not only defines the order of the data but also holds the data of the columns not defined as the index.
As data are inserted, SQL Server will take the data within the index key values you have passed in and insert the row at the appropriate point if possible. It will then move the data along so that it remains in the same order. You can think of this data as being like books on a bookshelf. Let me take you through a simple analogy, and I will put the relevant technical terms in brackets where appropriate.
When a librarian gets a new book, he will find the correct alphabetical point and try to insert the book at that point (searching the B-Tree). All the books will then be moved within the shelf. If there is no room as the books are moved, half the books approximately at the end of the shelf will be moved to the next shelf down, and so on, until a shelf with enough room is found (page splitting). However, if there were no shelves left, the librarian would build a new shelf at the relevant point (new page allocation). With all the shuffling around of books, he may find that there are shelves only partially filled and maybe shelves with only one or two books on them because of the way the shuffling has taken place (fragmentation). The librarian would do only so much shuffling before he decided it would be easier to insert a new shelf, as he doesn’t want to be spending all day shuffling books around. It’s not effective to shuffle and modify at the same time (optimization), so he would build the shelf and place the book on that shelf. All of the actions taken would also occur for updates and deletions.
Also, librarians take pride in their shelves and how quickly they can find a piece of information (index scan) and don’t particularly wish to scan every shelf for a book (table scan), although their first main task is to ensure every book that they have is held on the shelves (consistency). Remember that books may not be in order if the librarian thought it would be quicker to put the book on a new shelf rather than shuffling the books around. So the head librarian finds a quiet time, such as nighttime or weekends, to allow the library staff to take all the books off the shelves, replace them on the shelves in the right order (reindexing) with a set amount of spare space on each shelf for future insertions, and leave enough space at the end for expansion. Then, if any shelves are left over, they will remove them and reclaim the space (fill factor).
I hope this analogy shows how important it is that the correct columns are chosen for a clustered index. You want to avoid shuffling as much as possible; data are always added at the end so that the librarian does not need to shuffle the data around. Although this analogy puts the process in simple terms, this is exactly what SQL Server does. A clustered index should also be as narrow as possible. Any table with a clustered index has the index key used as part of any nonclustered index, as the nonclustered index would retrieve its data from the clustered index. Also, if you have a column that is varchar, try to place that at the end of the list of columns selected, which is why numerically based columns are best.
As a clustered index contains the table data itself, SQL Server would perform fewer I/O operations to retrieve the data using the clustered index than it would using a nonclustered index. Therefore, if you have only one index on a table, try to make sure it is a clustered index.
Nonclustered
Unlike a clustered index, a nonclustered index does not store the table data itself. Instead, a nonclustered index stores pointers to the table data or clustered index as part of the index keys; therefore, many nonclustered indexes can exist on a single table at one time.
As a nonclustered index is stored in a separate structure—in fact, it is really held as a table with a clustered index hidden from your view—from the base table, it is possible to create the nonclustered index on a different filegroup from the base table. If the filegroups are located on separate disks, data retrieval can be enhanced for your queries as SQL Server can use parallel I/O operations to retrieve the data from the index and base tables concurrently.
When you are retrieving information data from a table that has a nonclustered index, SQL Server finds the relevant row in the nonclustered index. If the information you want doesn’t form part of the data in the index, SQL Server will then use information in the index to retrieve a key pointer to the relevant row in the data or clustered index. As you can see, this involves at least two I/O actions—and possibly more, depending on the optimization of the index.
When a nonclustered index is created, the information used to build the index is placed in a separate location from the table and therefore can be stored on a different physical disk if required.
![]() Caution The more indexes you have, the more times SQL Server has to perform index modifications when inserting or updating data in columns that are within an index.
Caution The more indexes you have, the more times SQL Server has to perform index modifications when inserting or updating data in columns that are within an index.
![]() Note If you wish to index XML data, which I cover only briefly later in the book, then it would be best to read “SQL Server Books Online,” as this topic is beyond the scope of this book.
Note If you wish to index XML data, which I cover only briefly later in the book, then it would be best to read “SQL Server Books Online,” as this topic is beyond the scope of this book.
Uniqueness
An index can be defined as either unique or nonunique. A unique index ensures that the values contained within the unique index columns will appear only once within the table, including a value of NULL.
SQL Server automatically enforces the uniqueness of the columns contained within a unique index. If an attempt is made to insert a value that already exists in the table, an error will be generated and the attempt to insert or modify the data will fail.
A nonunique index is perfectly valid. However, as there can be duplicated values, a nonunique index has more overhead than a unique index when retrieving data. SQL Server needs to check if there are multiple entries to return, compared with a unique index, where SQL Server knows to stop searching after finding the first row.
Unique indexes are commonly implemented to support constraints such as the primary key and clustered indexes. Nonunique indexes are commonly implemented to support locating rows using a nonkey column.
Determining What Makes a Good Index
To create an index on a table, you have to specify which columns are contained within the index. Columns in an index do not have to all be of the same data type. You should be aware that there is a limit of 16 columns on an index, and the total amount of data for the index columns within a row cannot be more than 900 bytes. To be honest, if you get to an index that contains more than four or five columns, you should stand back and reevaluate the index definition. Sometimes you’ll have more than five columns, but you really should double-check.
It is possible to get around this restriction and have an index that does include columns that are not part of the key: the columns are tagged onto the end of the index. This means that the index takes up more space, but if it means that SQL Server can retrieve all of the data from an index search, then it will be faster. However, to reiterate, if you are going down this route for indexes, then perhaps you need to look at your design.
In the sections that follow, you will examine some of the factors that can determine if an index is good:
Using Low-Maintenance Columns
As I’ve indicated, for nonclustered indexes the actual index data are separate from the table data, although both can be stored in the same area or in different areas (e.g., on different hard drives). To reiterate, this means that when you insert a record into a table, the information from the columns included in the index is copied and inserted into the index area. So, if you alter data in a column within a table, and that column has been defined as making up an index, SQL Server also has to alter the data in the index. Instead of only one update being completed, two will be completed. If the table has more than one index, and in more than one of those indexes is a column that is to be updated a great deal, then there may be several disk writes to perform when updating just one record. While this will result in a performance reduction for data-modification operations, appropriate indexing will balance this out by greatly increasing the performance of data-retrieval operations.
Therefore, data that are low maintenance—namely, columns that are not heavily updated—could become an index and would make a good index. The fewer disk writes that SQL Server has to do, the faster the database will be, as well as every other database within that SQL Server instance. Don’t let this statement put you off. If you feel that data within a table is retrieved more often than it is modified, or if the performance of the retrieval is more critical than the performance of the modification, then do look at including the column within the index.
In the example application you are building, each month you need to update a customer’s bank balance with any interest gained or charged. However, there is a nightly job that wants to check for clients who have between $10,000 and $50,000, as the bank can get a higher rate of deposit with the Federal Reserve on those sorts of amounts. A client’s bank balance will be constantly updated, but an index on this sort of column could speed up the overnight deposit check program. Before the index in this example is created, you need to determine if the slight performance degradation in the updating of the balances is justified by the improvement of performance of the deposit check program.
Using Primary and Foreign Keys
A primary key is a constraint and therefore can be enforced logically. However, SQL Server enforces a primary key uniqueness by creating an index. You can see this in the ApressFinancial database by looking at the CustomerDetails.Customers table, and you will see the index PK_Customers. The index created will be a clustered index if the table has no clustered index already defined. If the table has a clustered index, you can have only one clustered index per table, and therefore SQL Server will create a nonclustered unique index instead. Personally, I prefer to use a primary key constraint rather than a unique clustered index as, although SQL Server will generate a clustered index for the primary key, you may feel that a different set of columns would be a better clustered index.
One important use of indexes is on referential constraints within a table. A referential constraint is where you’ve indicated that through the use of a key certain actions are constrained depending on what data exists. To give a quick example of a referential constraint, say you have a customer who owns banking products. A referential constraint would prevent the customer’s record from being deleted while those products existed.
SQL Server does not automatically create indexes on your foreign keys, although it is likely that an index is created when you build a primary key. However, as the foreign key column values need to be identified by SQL Server when joining to the parent table, it is almost always recommended that an index be created on the columns of the foreign key.
Finding Specific Records
Ideal candidates for indexes are columns that allow SQL Server to quickly identify the appropriate rows. In Chapters 9 and 10, you will meet the WHERE clause of a query. This clause lists certain columns in your table and is used to limit the number of rows returned from a query. The columns used in the WHERE clause of your most common queries make excellent choices for an index. So, for example, if you wanted to find a customer’s order for a specific order number, an index based on customer_id and order_number would be perfect, as all the information needed to locate a requested row in the table would be contained in the index.
If finding specific records is going to make up part of the way the application works, then do look at columns that will reduce significantly the rows that would be returned from a search as an area for an index to be created, especially if the column or columns would return one row.
Using Covering Indexes
As mentioned earlier, when you insert or update a record, any data in a column that is included in an index are stored not only in the table/clustered index, but also in the indexes for nonclustered indexes. From finding an entry in an index, SQL Server then moves to the table to locate and retrieve the record. However, if the necessary information is held within the index, then there is no need to go to the table and retrieve the record, providing much speedier data access.
For example, consider the ShareDetails.Shares table in the ApressFinancial database. Suppose that you wanted to find out the description, current price, and ticker ID of a share. If an index was placed on the ShareId column, knowing that this is an identifier column and therefore unique, you would ask SQL Server to find a record using the ID supplied. It would then take the details from the index of where the data are located and move to that data area. If, however, there was an index with all of the columns defined, then SQL Server would be able to retrieve the description ticker and price details in the index action. It would not be necessary to move to the data area. This is called a covered index, since the index covers every column in the table for data retrieval. However, as the current price could be altering a great deal, then you might find that the index was not ideal, as too many updates to both the data and the index would be occurring.
Looking for a Range of Information
An index can be just as useful for searching for a range of records as it can be useful for finding one record. For example, say you wish to find a list of towns in Florida with names between Orlando and St. Petersburg in alphabetical order. You could put an index on the town name, and SQL Server would go to the index location of Orlando and then read forward from there an index row at a time, until it reached the item after St. Petersburg, where it would then stop. Because SQL Server knows that an index is on this column and that the data will be sorted by town name, this makes it ideal for building an index on a town name column.
It should be noted that SQL Server indexes are not useful when attempting to search for characters embedded in a body of text. For example, suppose you want to find every author in a publisher’s database whose last name contains the letters “ab.” This type of query does not provide a means of determining where in the index tree to start and stop searching for appropriate values. The only way SQL Server can determine which rows are valid for this query is to examine every row within the table. Depending on the amount of data within the table, this can be a slow process. If you have a requirement to perform this sort of wildcard text searching, you should take a look at the SQL Server full-text feature, as this will provide better performance for such queries.
Keeping the Data in Order
As previously stated, a clustered index actually keeps the data in the table in a specific order. When you specify a column (or multiple columns) as a clustered index, upon inserting a record, SQL Server will place that record in a physical position to keep the records in the correct ascending or descending order that corresponds to the order defined in the index. To explain this a bit further, if you have a clustered index on customer numbers, and the data currently have customer numbers 10, 6, 4, 7, 2, and 5, then SQL Server will physically store the data in the following order: 2, 4, 5, 6, 7, 10. If a process then adds in a customer number 9, it will be physically inserted between 7 and 10, which may mean that the record for customer number 10 needs to move physically. Therefore, if you have defined a clustered index on a column or a set of columns where data insertions cause the clustered index to be reordered, this will greatly affect your insert performance. SQL Server does provide a way to reduce the reordering impact by allowing a fill factor to be specified when an index is created. I will discuss the fill factor shortly; however, this option allows you to define how much of an index leaf will be filled before a new leaf is created. Think of an index leaf as your index card for each cabinet. You know that more items are going to come in, and you’ll need to add some of them to existing index cards. You try to estimate how many items you’ll need to add to each card, so you can leave space for them and avoid creating any new cards unnecessarily.
Determining What Makes a Bad Index
Now that you know what makes a good index, let’s investigate what makes a bad index. There are several “gotchas” to be aware of:
- Using unsuitable columns
- Choosing unsuitable data
- Including too many columns
- Including too few records in the table
Using Unsuitable Columns
If a column isn’t used by a query to locate a row within a table, then there is a good chance that the column won’t need to be indexed, unless it is combined with another column to create a covering index, as described earlier. If this is the case, the index will still add overhead to the data-modification operations but will not produce any performance benefit to the data-retrieval operations.
With clustered indexes, as I have mentioned before, columns that are modified frequently are not ideal candidates for forming the index.
Choosing Unsuitable Data
Indexes work best when the data contained in the index columns are highly selective between rows. The optimal index is one created on a column that has a unique value for every row within a table, such as a primary key. If a query requests a row based on a value within this column, SQL Server can quickly navigate the index structure and identify the single row that matches the query predicate.
However, if the selectivity of the data in the index columns is poor, the effectiveness of the index will be reduced. For example, if an index is created on a column that contains only three distinct values, the index will be able to reduce the number of rows to just a third of the total before applying other methods to identify the exact row. In this instance, SQL Server would probably ignore the index anyway and find that reading the data table instead would be faster. Therefore, when deciding on appropriate index columns, you should examine the data selectivity to estimate the effectiveness of the index and keep the index highly selective.
Including Too Many Columns
The more columns there are in an index, the more data writing has to take place when a process completes an update or an insertion of data. Although these updates to the index data take a very short amount of time in SQL Server, they can add up. Therefore, each index that is added to a table will incur extra processing overhead, so it is recommended that you create the minimum number of indexes needed to give your data-retrieval operations acceptable performance.
Including Too Few Records in the Table
From a data-performance viewpoint, there is absolutely no need to place an index on a table that has only one row. SQL Server will find the record at the first request, without the need of an index, because it will use a table scan. That said, you may wish to include a primary key that can then be used to enforce data integrity.
This statement also holds true when a table has only a handful of records. Again, there is no reason to place an index on these tables. The reason for this is that SQL Server would go to the index, use its engine to make several reads of the data to find the correct record, and then move directly to that record using the record pointer from the index to retrieve the information. Several actions are involved in this process, as well as passing data between different components within SQL Server. When you execute a query, SQL Server will determine whether it’s more efficient to use the indexes defined for the table to locate the necessary rows or to simply perform a table scan and look at every row within the table.
Reviewing Your Indexes for Performance
Every so often, it’s necessary for you as a developer to review the indexes built on your table to ensure that yesterday’s good index is not today’s bad index. When a solution is built, what is perceived to be a good index in development may not be so good in production—for example, the users may be performing one task more times than expected. Therefore, it is highly advisable that you set up tasks that constantly review your indexes and how they are performing. This can be completed within SQL Server via its index-tuning tool, the Database Engine Tuning Advisor (DTA).
The DTA looks at your database and a workload file holding a representative amount of information that will be processed, and uses the information it gleans from these to figure out what indexes to place within the database and where improvements can be made. At this point in the book, I haven’t actually covered working with data, so going through the use of this tool will just lead to confusion. This powerful and advanced tool should be used only by experienced SQL Server developers or database administrators. However, it is useful to know that a tool exists that can aid you in keeping your database tuned well.
Getting the indexes right is crucial to your SQL Server database running in an optimal fashion. Spend time thinking about the indexes, try to get them right, and then review them at regular intervals. Review clustering, uniqueness, and especially the columns contained within indexes so that you ensure the data are retrieved as quickly as possible. Finally, also ensure that the order of the columns within the index will reduce the number of reads that SQL Server has to do to find the data. An index where the columns are defined as FirstName, LastName, and Department might be better defined as Department, FirstName, and LastName if the greatest number of queries is based on finding someone within a specific department or listing employees of a department. The difference between these two indexes is that in the first, SQL Server would probably need to perform a table scan to find the relevant records. Compare that with the second example, where SQL Server would search the index until it found the right department, and then just continue to return rows from the index until the department changed. As you can see, the second involves much less work.
Creating an Index
Now that you know what an index is and you have an understanding of the various types of indexes, let’s proceed to create some in SQL Server. There are many different ways to create indexes within SQL Server, as you might expect. Those various methods are the focus of this section of the chapter, starting with how to use the table designer in SQL Server Management Studio.
The first index you will place into the database will be on the LastName and the ZipCode fields within the CustomerDetails.Customers table.
Creating an Index with the Table Designer
In this section, you will be creating an index using SQL Server Management Studio via the Design option against the CustomerDetails.Customers table. There is already an index on the CustomerId, which is a good column to have an index on once you have retrieved a customer, but is not a good index to find a customer.
The index created will be used to find the record to update with a customer’s information. An application will usually have to find a specific customer using a combination of name and address rather than a customer ID. It is possible to have multiple records with the same details. For example, you may have John J. Doe and his son, John J. Doe, who are both living at the same address; however, a search of LastName and ZipCode would return a very small set of records to display for the operator to choose from. Once you have sufficient details displayed on the screen of all the possible customers based on the search criteria, the user can ask a few more questions such as date of birth, or when the account was opened. The user can then select the specific customer from the list. However, how will the computer program know which John J. Doe to use when it comes to completing an update?
Instead of looking for the customer by first name, last name, and address for each modification, the application will know the CustomerId and use this to find the record within SQL Server. When completing the initial search, the CustomerId will be returned as part of the set of values, so when the user selects the appropriate John J. Doe, the application will know the appropriate CustomerId. SQL Server will use this value to specifically locate the record to update. In the following exercise, we’ll add an index to the CustomerDetails.Customers table to perform the search on LastName and ZipCode.
TRY IT OUT: CREATING AN INDEX GRAPHICALLY
- Ensure that SQL Server Management Studio is running and that you have expanded the nodes in the tree view so that you can see the Tables node within the
ApressFinancialdatabase. - Find the
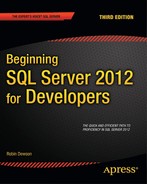
CustomerDetails.Customerstable where the index is to be added. Right-click and select Design. This will bring you into the Table Designer. Either right-click and from the pop-up menu select Manage Indexes and Keys or from the toolbar select the Manage Indexes and Keys icon (see Figure 6-1).
Figure 6-1. The Manage Indexes and Keys button
- The Indexes/Keys dialog box will appear and look similar to Figure 6-2. Notice that there is a Primary Key already defined. You created this in Chapter 5.
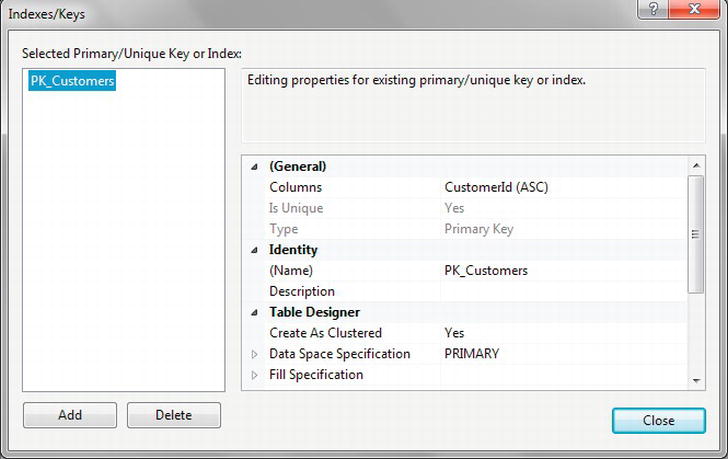
Figure 6-2. The Indexes/Keys dialog box
- Click Add to create a new index or key. The first area to change is the name of the index. Notice that in the (Name) text box, SQL Server has created a possible value for you. The name is prefixed with IX_, which is a good naming system to use. It is also good to keep the name of the table and then a useful suffix, such as the name of the column or a shortened version of this. In this case, the index will be called
IX_Customers_LastNameZip. It might also be good to place something in the description. However, index names should be self-explanatory, so there really shouldn’t be a need for a description. - SQL Server has, in this instance, incorrectly selected
CustomerIdas the column that will make up the index. Click theCustomerIdtext box, which should then highlight an ellipsis, as you can see in Figure 6-3.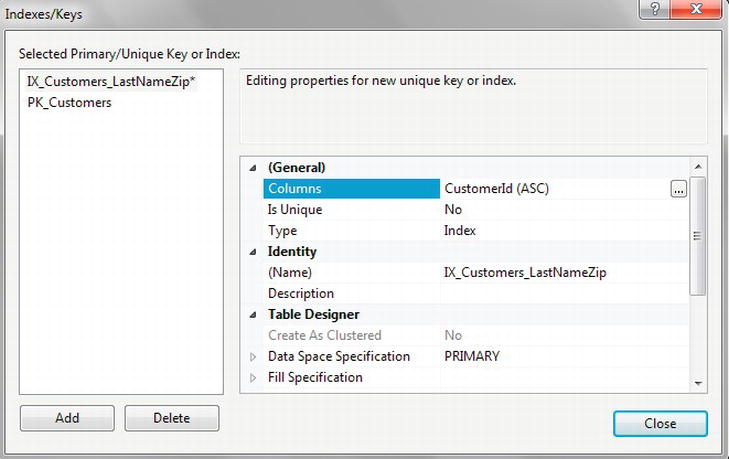
Figure 6-3. Selecting the columns to index
- Clicking the ellipsis will display the Index Columns dialog box, where you can select the correct columns. Choose
LastNameandZipCodeas shown in Figure 6-4 and then click OK.
- The sort order of the index column is useful when creating an index on the columns that will be used in an
ORDER BYclause of a query when there are multiple columns with differing sort orders. If the sort order of the columns within the index matches the sort order of those columns specified in theORDER BYclause, SQL Server may be able to avoid performing an internal sort, resulting in improved query performance. Tip If an index is only one column, SQL Server can read the index just as fast in a forward direction as it can in a backward direction.
 - Move to the Fill Specification area within the Indexes/Keys dialog box, and you will see two options: Fill Factor and Pad Index. For the moment, set Fill Factor to 90 and Pad Index to Yes, as shown in Figure 6-5. Both these options will be described in detail outside of the exercise in just a moment.
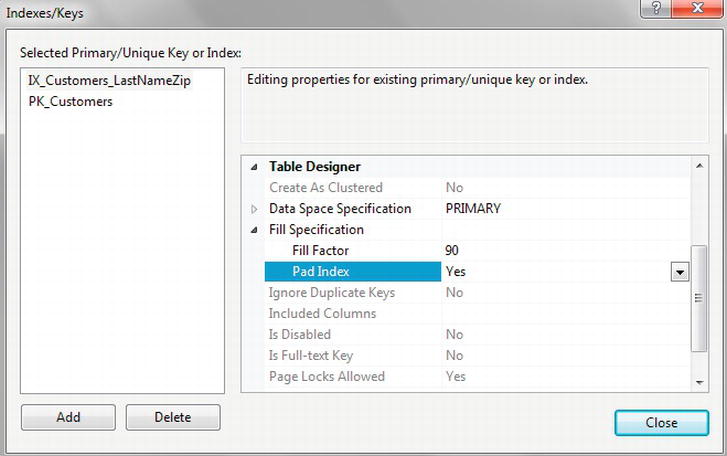
Figure 6-5. Choosing the fill factor and padding for an index
Note If this were a production environment or if you were creating a system in a development environment to move to a production environment, then you would need to take a couple of other considerations into account. You would need to alter the Filegroup or Partition scheme so that indexes were placed on a different filegroup, as I discussed earlier. - Click Close on the Indexes/Keys dialog, and then close the Table Designer, answering Yes when you are asked if you wish to save the changes. This will add the index to the database.
Building an index in Management Studio is a straightforward procedure, as you have just seen. Although this is the first index that you have created yourself, it took only a few moments, and there were just a couple of areas where you had to do any reasonable amount of decision-making. I will cover those areas now.
Choosing the name of the index and the columns to include is easy and is not worth dwelling on. You should know which columns to include from the discussions at the start of the chapter, where I examined the basics of building indexes.
The first major decision you need to make is determining whether a column carries unique or almost unique values. The columns chosen for this index would not necessarily give a unique row, as there could be two people with the same last name in the same ZIP code as mentioned earlier; however, it would give a very small list from a potentially large table. Therefore this makes last name and ZIP code a good choice. The same could be said with last name or phone number.
Fill Factor, found in the Fill Specification area, tells SQL Server how much of a page should be filled with index data before SQL Server starts a new page of data to continue with the index. In an index such as this, some space should be set aside for new data to be inserted. You will never get the perfect value as you never know at what point new customers will be joining, but you can make a good estimate. A page of data in SQL Server is 8KB. The size of the index in the example that has been built is a maximum of varchar(70) (LastName is varchar(50) and ZipCode is varchar(20)), so you have hit your first problem in reaching an accurate estimate; one method is to take an average of the data in the table, either at creation if you know the data that will be used to populate the table, or make an estimate based on a good set of random data. For the moment, an assumption is made based on a set of random LastNames and ZipCodes you know will be entered that the average index width is 35 bytes. You then also have to add a further 2 bytes for each index value for SQL Server to use. As well as each index length, an index page has information at the start of each page for SQL Server’s internal use of 96 bytes. A full index page would be (8192 – 96) / 37, which works out as just over 218 index rows. A fill factor of 60, or 60% full, would mean 130 index rows on each page at the time the index was created or rebuilt using the existing data. This would mean that between index rebuilds you are expecting 88 new rows of data to be inserted. That’s quite a lot of data and therefore too low a value. A fill factor value of 90 might be a better setting, as this would allow 22 new index rows before SQL Server had to split the page (shuffle the books in the librarian scenario).
Pad Index is similar to Fill Factor but indicates whether the same amount of space is reserved in the index tree structure. To expand a very little on this, indexes are held in a top-down tree structure, a bit like a family tree, where you have the head of the family at the top, then the next two people in the hierarchy, and so on. This is known as a B-Tree structure. At the top level in SQL Server are links to the next level in the tree that allow SQL Server to get to the index row quickly. Setting Pad Index to Yes will mean that each page on each level will also have a 90% fill rate before the pages are split.
Finally, an option that can be found at the bottom of the Indexes/Keys dialog is the Re-compute Statistics option, which determines whether SQL Server automatically recomputes the statistics on the index when data are modified. Recomputing statistics will increase the use of SQL Server resources as each modification updates the statistics, but having good statistics also means good performance. Depending on how often you rebuild your statistics, and whether your system is a high-insertion/low-retrieval system, you could switch this option off. By default the option is set to recompute statistics.
Indexes and Statistics
When retrieving data, SQL Server obviously has to make some decisions as to the best way to get to that data and return it to the query requesting it. Even if an index has been created on a set of columns, SQL Server may determine that it is better and faster to use another method to retrieve the data—through a table scan, perhaps. Or maybe there are a couple of indexes that could be chosen to retrieve the same data. No matter what the scenario, SQL Server has to have some basis of information on which to make sensible and accurate choices. This is where statistics come in.
SQL Server keeps statistics on each column contained within an index if you have Auto Create Statistics set to True. This is set at the database level. These statistics are updated over a period of time and over a number of inserts or modifications. The specifics of how all of this works in the background, and how SQL Server keeps the statistics up to date, are an advanced topic. What you need to know is that if you alter or build an index on a table that has data in it, and you don’t let SQL Server update the statistics on the table, then SQL Server could be using inaccurate information when it is trying to decide how to retrieve the data. It could even mean that the index change you thought would improve performance has in fact made the performance much slower.
That said, it is not always prudent to let SQL Server recompute statistics automatically. SQL Server will do the updates when it feels they are required. This may happen at a busy time of processing; you have no control over when it will happen. However, if SQL Server does update the statistics, the query that caused the update to start will not be impacted, as the statistics will be updated asynchronously if the AUTO_UPDATE_STATISTICS_ASYNC option is switched on.
It may be more efficient to manually update the statistics via a scheduled job and keep all statistics building off. This is what you quite often see within production environments that have a number of inserts and modifications to the data.
The CREATE INDEX Syntax
Creating an index using T-SQL is a lot easier than creating a table. In this section, you will look only at indexes on tables, although there is an object within SQL Server called a view that can also be indexed.
The full syntax for creating an index is not listed here, although you can find it within “SQL Server Books Online” once you progress in your SQL Server knowledge. A reduced version will be sufficient while you are learning SQL Server. Most of your indexes will use the following version:
CREATE [UNIQUE] [CLUSTERED|NONCLUSTERED]

INDEX index_name

ON table (column [ASC|DESC] [ ,...n ] )

[WITH {IGNORE_DUP_KEY|DROP_EXISTING|SORT_IN_TEMPDB}]

[ON filegroup ]
Let’s go through each point one by one so that the options in this cut-down version are clear:
CREATE: Required; this keyword informs SQL Server that you will be building a new object.UNIQUE: Optional; if used, this option will inform SQL Server that the columns listed in the index will bring back a single unique row. This is enforced by SQL Server when attempting to insert a duplicate row, as an error message will be returned.CLUSTEREDorNONCLUSTERED: Optional; if neitherCLUSTEREDnorNONCLUSTEREDis explicitly listed, the index will be created asNONCLUSTERED.INDEX: Required; this informs SQL Server that the new object will be an index.index_name: Required; this is the name of the index being built. This name must be unique for the table, and it is advisable to keep this name unique for the database, using the naming method ofIX_table_columndiscussed earlier.ON table: Required; this is the name of the table with which the index is associated. Only one table can be named.column: Required; this is the name of the column(s) in the table that we wish to include in the index. This is a comma-separated list.ASC: Optional (default); if neither ASC nor DESC is mentioned, then ASC is assumed. ASC informs SQL Server that it should store the column named in ascending sequence.DESC: Optional; this informs SQL Server that the column is to be stored in descending order.WITH: Optional; it is, however, required if any of the following options have to be used:
IGNORE_DUP_KEY: This option is available only when the index is defined asUNIQUE. If this option has not been used earlier, then it is not available to you. I’ll explain this further in a moment.DROP_EXISTING: This option is used if there is an existing index of the same name within the database. It will then drop the index before re-creating it. This is useful for performance if you are not actually changing any columns within the index. More on this in a moment.SORT_IN_TEMPDB: When building an index where there is already data within the table, it may be advisable, if the table is a large table, to get the data sorted for the index within the temporary database,tempdb, as mentioned in Chapter 3. Use this option if you have a large table, or iftempdbis on a different hard disk from your database. This option may speed up the building of the index, as SQL Server can simultaneously read from the disk device where the table is located and write to the disk device wheretempdbis located.ON: Optional; this option is, however, required if you are going to specify a filegroup. It is not required if you wish the index to be built on thePRIMARYfilegroup.filegroup: This is the name of the filegroup on which the index should be stored. At the moment, there is only one filegroup set up:PRIMARY.PRIMARYis a reserved word and is required to be surrounded by square brackets, [ ], if used.
Two options need further clarification: IGNORE_DUP_KEY and DROP_EXISTING. We’ll look at both in the sections that follow.
IGNORE_DUP_KEY
If you have an index defined as UNIQUE, then no matter how hard you try, you cannot add a new row whose values in the index columns match the values of any current row. However, there are two actions that you can perform, depending on this setting within an index.
When performing multirow inserts, if the IGNORE_DUP_KEY option is specified, then no error will be generated within SQL Server if some of the rows being inserted violate the unique index. Only a warning message will be issued. The rows that violated the unique index are not inserted, although all other rows are inserted successfully.
When performing multirow inserts, if the IGNORE_DUP_KEY option is omitted, then an error message will be generated within SQL Server if some of the rows violate the unique index. The batch will be rolled back, and no rows will be inserted into the table.
![]() Caution The system variable called
Caution The system variable called @@ERROR can be tested after every SQL Server action to see if there has been an error in any item of work or through another error-handling command called Try/Catch. If there has been an error, some sort of error handling within the batch will usually be performed. If you have IGNORE_DUP_KEY, then no error will be produced when there is an attempt to insert a duplicate row, and the batch will run as if everything had been inserted. So, be warned: it may look like everything has worked, but in fact some rows were not inserted! You will see @@ERROR and Try/Catch used in Chapter 13.
DROP_EXISTING
When data are being inserted and modified, there will be times when an index bloats to a less than ideal state. Just as an Access database may need to be compacted, indexes within SQL Server also need to be compacted sometimes. Compacting the index will speed up performance and reclaim disk space by defragmentating the index. To compact an index, you re-create the index without actually modifying the columns or, in fact, starting from scratch and having to rebuild the whole index and visit every row within the table.
The DROP_EXISTING clause provides enhanced performance when rebuilding a clustered index compared to a DROP INDEX command followed by a CREATE INDEX command. Nonclustered indexes will be rebuilt every time the clustered index for a table is rebuilt if the columns are included in the clustered index. The name of the clustered index must also remain the same, as must the sort order and the partition the index is built on. Finally, the uniqueness attribute must not change. So, if you drop a clustered index and then re-create it, the existing nonclustered indexes will be rebuilt twice (if they are to be rebuilt): once from the drop and once from the creation. With the DROP_EXISTING clause, an index would be built only once. Keep this in mind, as it is crucial if you are working in a time-critical batch window. With the size of table and indexes created, it may be possible to re-create a clustered index only on a weekend.
DROP_EXISTING can allow an existing index to be rebuilt by explicitly dropping and re-creating the index. This is particularly useful for rebuilding primary key indexes. As other tables may reference a primary key, it may be necessary to drop all foreign keys in these other tables prior to dropping the primary key. By specifying the DROP_EXISTING clause, SQL Server will rebuild the index without affecting the primary key constraint.
Creating an Index in Query Editor: Template
Not surprisingly, there is a template within Query Editor that you can use as a basis for creating an index. You will look at this process first, before you build an index natively in Query Editor, as this creates the basis of the SQL syntax for the creation of the index.
TRY IT OUT: USING A QUERY EDITOR TEMPLATE TO BUILD AN INDEX
- Ensure that Template Explorer is open (select View Template Explorer). Navigate to the Index node and expand it (see Figure 6-6). Select the Create Index Basic node and double-click.
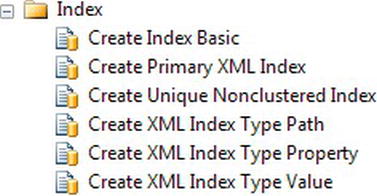
Figure 6-6. Selecting the Create Index Basic node
- A new Query Editor will open with the following code in it. The template that is installed is based on the
AdventureWorksexample. As you saw in the previous chapter, you can create new templates or modify this one.-- =============================================
-- Create index basic template
-- =============================================
USE <database_name, sysname, AdventureWorks>
GO
CREATE INDEX <index_name, sysname, ind_test>
ON <schema_name, sysname, Person>.<table_name, sysname, Address>
(
<column_name1, sysname, PostalCode>
)
GO - Alter the template by either changing the code or using the Specify Values for Template Parameters option, which will make the index creating easier. The button should be on the SQL Editor toolbar (see Figure 6-7).

Figure 6-7. The Specify Values for Template Parameters button
- In the Specify Values for Template Parameters dialog box, change the database to the example database (
ApressFinancial), name the index, setschema_nametoCustomerDetails,table_nametoCustomerProducts, andcolumn_name1toCustomerId(see Figure 6-8). Then click OK.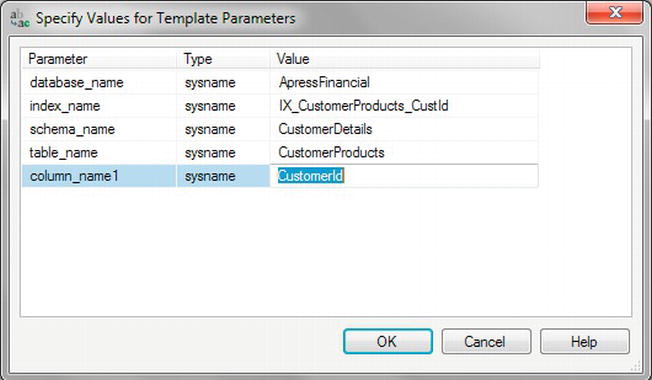
Figure 6-8. The Specify Values for Template Parameters dialog box
The code now looks as follows:
-- =============================================

-- Create index basic template

-- =============================================

USE ApressFinancial

GO


CREATE INDEX IX_CustomerProducts_CustId

ON CustomerDetails.CustomerProducts

(

    CustomerId

)

GO - Execute the code by pressing F5 or clicking the Execute toolbar button. You should then see the following success message:
Command(s) completed successfully.
- Now that you’ve completed the process, you’ll want to check that the index has actually been created as expected. From within Object Explorer, click the Refresh button on the Object Explorer toolbar or select the Refresh option from the right-click context menu. Navigate to the
CustomerDetails.CustomerProductstable and expand the Indexes node. This provides you with instant, but limited, information about this index. You can see its name and that it is neither unique nor clustered (see Figure 6-9).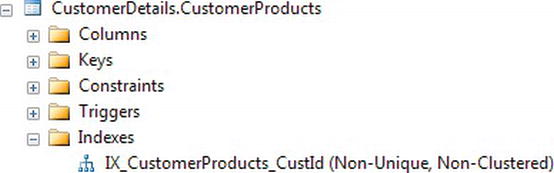
Figure 6-9. Index for
CustomerProducts - You can see a different perspective of the index if you highlight the index, right-click, and select Properties. Figure 6-10 shows you a layout that offers not only a graphical version of the index, but also a list of many other potential options.
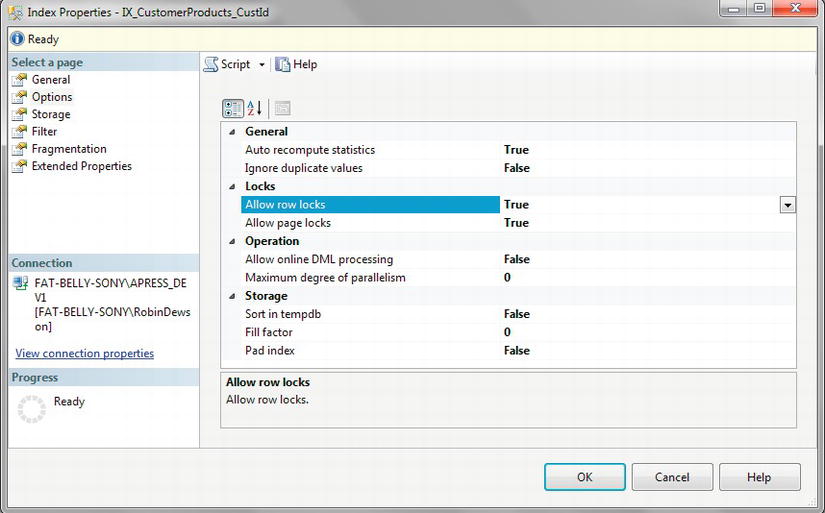
Figure 6-10. The Index Properties dialog box
- The most interesting page to view once you have data within the table or once you are in production is the Fragmentation page. As data are modified, indexes are also modified, as I have mentioned several times in the chapter. Similar to a hard drive, an index will also suffer from fragmentation of the data within the index. This will slow down your index, and, as mentioned earlier in this chapter, it is important that you continue to check on your indexes to ensure their best possible speed and performance. As a developer, you will receive more complaints from users about slowness than lack of functionality, and once a system gets a reputation for slowness it is hard to build the reputation back. It is possible to correct the fragmentation while users are still using the system. You can do this by ticking the Reorganize Index box shown at the bottom of Figure 6-11. For a slightly more detailed view, highlight the index in Object Explorer, right-click to bring up the submenu, and select Reorganize instead of Properties, which you selected in step 8.
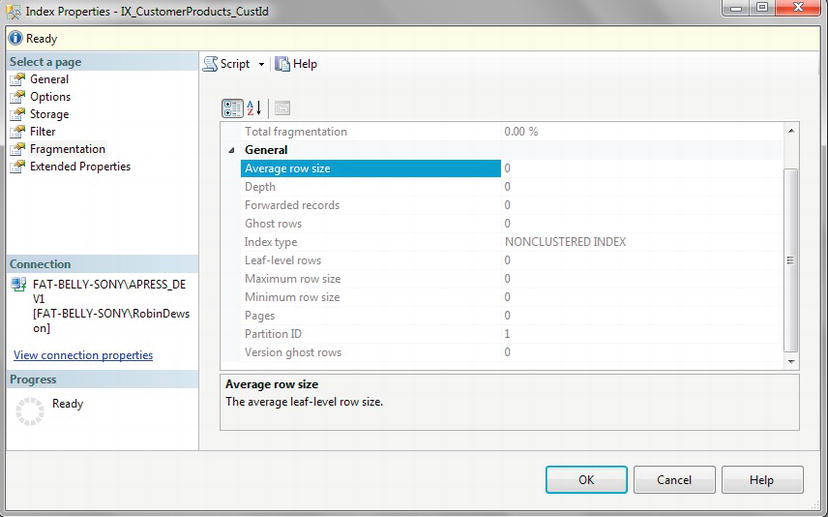
Figure 6-11. Examining index fragmentation
The final way to create an index is by coding the whole index by hand in a Query Editor window, which you will look at in the next section.
Creating an Index in Query Editor: SQL Code
In the following exercise, you will create two indexes and a primary key within a Query Editor pane. This will allow you in the next section to build a foreign key between the two tables, TransactionDetails.Transactions and TransactionDetails.TransactionTypes. The code will also demonstrate how to build T-SQL defining the options for the index presented during the CREATE INDEX syntax discussion earlier.
TRY IT OUT: CREATING AN INDEX WITH QUERY EDITOR
Once again, a couple of new areas were covered in this section, but you now have the information you need to be able to create the most common indexes. Indexes need a lot less coding than tables and can be created quickly and easily. However, if you are adding a new index to an existing table that has a substantial amount of information, adding this new index could take a few minutes to complete, depending on the scenario. It is possible to add indexes while the system is being used and the table or clustered indexes are being updated. This is available only in SQL Server Enterprise Edition, by specifying the index action with the REBUILD WITH (ONLINE = ON) option. Take care when using this option. If anybody tries to access the relevant table while the index is being built, SQL Server will not recognize the index until it has been built, and when working out the best way to access the data, it will ignore this index.
If you are creating the index after removing it for rebuilding statistics, for example, problems may arise if you don’t use the ONLINE = ON option. With this option ON, SQL Server will allow access to the table to add or modify data. However, if it is set to OFF, then all actions against the table will have to wait until the index is re-created. This will mean that any part of your system that requires access to the table that the index is being built on will pause while the index is being generated. Therefore, if you are rebuilding an index with the database available, you have to decide which of the two problems that may arise is acceptable.
Dropping an Index
There will be times when an index is redundant and should be removed (i.e., dropped) from a table. Dropping an index is simply a case of executing the DROP INDEX statement, followed by the table name and the index name. Keep in mind that for every index that exists, processing time is required to keep that index up to date for every data modification. Therefore, when you create a new index that uses the same columns as an existing index, you should drop the old one; or when an index is no longer providing speedy data access and is therefore being ignored by SQL Server, it should be dropped.
![]() Note If the index is used by a primary key or unique constraint, you cannot drop it directly. In this case, you must use the
Note If the index is used by a primary key or unique constraint, you cannot drop it directly. In this case, you must use the DROP CONSTRAINT command. The removal of this constraint will also remove the index from the table.
TRY IT OUT: DROPPING AN INDEX IN QUERY EDITOR
In the next section, you’ll examine what’s needed to alter an index.
Altering an Index
Unlike a table, it is not possible to use an ALTER command to change the columns contained in an index. To do this, you first have to drop the index and then re-create it. The DROP command will physically remove the index from the table; therefore, you should ensure that you know what the contents of the index are before you drop the index, if you want to re-create a similar index.
![]() Tip One method that should allow you to re-create the index is storing all your database code in a source control system such as Visual SourceSafe.
Tip One method that should allow you to re-create the index is storing all your database code in a source control system such as Visual SourceSafe.
Also re-creating an index can take a large amount of time, depending on the index, the columns, and the volume of data. It could take hours, so you have to take this into account and definitely complete a “dry run” on a development instance of an index build where there are hundreds of thousands or millions of rows involved. Don’t be caught out with unexpected rebuild times in a production environment.
![]() Note In Management Studio, you can add and remove columns from an index’s definition without dropping and re-creating the index, as this is all done for you behind the scenes, although the actions will be the same.
Note In Management Studio, you can add and remove columns from an index’s definition without dropping and re-creating the index, as this is all done for you behind the scenes, although the actions will be the same.
This next exercise demonstrates the steps you need to take to alter an index.
TRY IT OUT: ALTERING AN INDEX IN QUERY EDITOR
- First, you want to create an index to retrieve the price of a specific share at a set point in time. The following index will do just that, as you are querying the data using the share ID and the date you want the price for. Since this could become a large table, notice that the index is built using
tempdb, but also that the code locks the table while the index is being built, as this is simulating a build on the weekend when stock markets are closed. Execute this code to create the index, which you will then correct in step 2:USE ApressFinancial
GO
CREATE UNIQUE CLUSTERED INDEX IX_SharePrices
ON ShareDetails.SharePrices
(
ShareId ASC,
PriceDate ASC
) WITH (STATISTICS_NORECOMPUTE = OFF, SORT_IN_TEMPDB = ON,DROP_EXISTING = OFF, IGNORE_DUP_KEY = OFF, ONLINE = OFF,
ALLOW_ROW_LOCKS = ON, ALLOW_PAGE_LOCKS = OFF)
ON [PRIMARY]
GO - However, it would be better to have the
PriceDatedescending, so that the latest price is at the top. By including this column, SQL Server would read only the most recent row and price. It would also be advantageous to include thePriceitself to avoid a second read to retrieve that column of information from the clustered index. Note Remember, clustered indexes hold the data, not pointers to the data. However, in this instance, without the Pricecolumn, a second read would be performed, although that second read is likely to be from the data held in memory.CREATE UNIQUE CLUSTERED INDEX IX_SharePrices
ON ShareDetails.SharePrices
(
ShareId ASC,
PriceDate DESC,
Price
) WITH (STATISTICS_NORECOMPUTE = OFF, SORT_IN_TEMPDB = ON,
DROP_EXISTING = OFF, IGNORE_DUP_KEY = OFF, ONLINE = OFF,
ALLOW_ROW_LOCKS = ON, ALLOW_PAGE_LOCKS =
ON, DROP_EXISTING = ON) ON [PRIMARY] - Now execute the code using your chosen method, and you should see the following results. The index created in the first step is dropped, and then the new index is created:
The command(s) completed successfully.
By using the optional DROP_EXISTING clause of the CREATE INDEX command in the second step, this will drop the existing index and re-create it.
![]() Caution Take care when building indexes. It is possible to use the same columns in the same order, thus creating the same index twice, but under two different index names. This is a waste of time and will place unnecessary overhead on SQL Server. It is unusual but I have seen it happen. However, when including key column(s) from a clustered index in a nonclustered index, because the row pointer is actually the clustered index key, SQL is smart enough not to store the underlying information twice—once in the clustered index and once in the nonclustered index—as instead it will be the clustered index pointer instead of the data that is stored in the nonclustered index, and you can explicitly define the order of the clustered index keys or key columns as they are used in the nonclustered index.
Caution Take care when building indexes. It is possible to use the same columns in the same order, thus creating the same index twice, but under two different index names. This is a waste of time and will place unnecessary overhead on SQL Server. It is unusual but I have seen it happen. However, when including key column(s) from a clustered index in a nonclustered index, because the row pointer is actually the clustered index key, SQL is smart enough not to store the underlying information twice—once in the clustered index and once in the nonclustered index—as instead it will be the clustered index pointer instead of the data that is stored in the nonclustered index, and you can explicitly define the order of the clustered index keys or key columns as they are used in the nonclustered index.
There are more indexes to build, but you will take a look at these later.
When an Index Does Not Exist
As the amount of data in your database expands, expansion may occur in areas that are unexpected. The application originally built with your database could have been extended, so your original database design and index decisions may not still be 100% correct.
When SQL Server accesses data, it uses its query optimizer to generate what is termed a query plan. A query plan is a plan of actions that SQL Server uses to perform the query you have built against the data. The query plan could consist of several steps that SQL Server performs to execute your query and produce the results you require. You will see an overview of query plans when I discuss advanced T-SQL in Chapter 14. When you look at a query plan, you’ll need to decide which is the best index to use to perform the query filtration.
Diagramming the Database
Now that the database has been built, the tables have been created, a number of the indexes have been inserted, and relationships link some of the tables, it’s time to start documenting. To help with this, SQL Server offers you Database Diagram Designer, which is the topic of this section. This is an excellent tool as it can give developers a great deal of information about a database, a good start to documentation with little effort (and documentation is always the last piece of work to be completed), and can also help build relationships between tables and therefore can be more than just a simple diagramming tool.
One of the most tedious aspects of creating documentation is often the task of documenting tables and showing how they relate to one another in a diagram. Done manually, such work is tedious indeed, and the results are difficult to keep up to date. A database diagram tool, however, can do the work very quickly and simply, with one caveat: if more than one person is using the database diagram tool on the same database, and there are two sets of changes to be applied to the same table, such as rearranging tables or something more substantial such as applying a relationship, the person who saves his or her changes last will be the person who creates the final table layout. In other words, the people who save before the last person will lose their changes. Therefore, I advise that you develop a database solution using the diagramming tool only on single-developer applications. At all other times, use it as a tool for understanding and documenting the database.
As you developed tables within your database, hopefully you will have commented the columns and tables as you go along to say what each column and table is. This is a major part of documentation anyway, although a database-naming convention should make your solution self-documenting to an extent. Providing that you comment columns and tables at the start, it will be less of a chore to add in further comments when you add new columns. If you do have comments on each of your columns within a table, then this will help overall with the documentation shown within the diagram.
That said, SQL Server’s database diagram feature is more than just a documentation aid. This tool provides developers with the ability to build and maintain database solutions. It is perhaps not always the quickest method of building a solution, and it is not the most flexible or best method, but it is one that allows the entire solution to be completed in one place. Alternatively, you can use it to build up sections of a database into separate diagrams, breaking the whole solution into more manageable parts, rather than switching between nodes in Management Studio. You will see this later in this section.
Database Diagramming Basics
In the book so far, with the creation of databases, tables, indexes, and relationships, as much documentation as SQL Server will allow should have so far been maintained, although it should be noted that databases should be self-documenting, just as your source code for your application should be self-documenting. However, there is no documentation demonstrating how the tables relate to one another within the database. This is where the database diagram comes to the forefront.
A database diagram is a useful and easy tool to build simple but effective documentation on these aspects. You build the diagram yourself, and you control what you want to see within the diagram. When you get to a large database solution, you may want diagrams for sections of the database that deal with specific aspects of the system, or perhaps you want to build a diagram showing information about process flows. Although there are other external tools to do this, none is built into SQL Server that can allow diagrams to be kept instantly up to date.
A diagram will show only tables, columns within those tables, and the relationships between tables in a bare form. You will also see a yellow “key,” which denotes a primary key on the table where one has been defined, but that is all the information displayed. It is possible to define the information that is to be displayed about the columns in the table, whether it is just the column name or more in-depth information, such as a column’s data type and length, comments, and so on. However, to display more than just the bare essentials, a little bit of work is required.
Although the diagram shows the physical and logical attributes of the database that is being built or has been built, it also allows developers and administrators to see exactly what is included with the database at a glance and how the database fits together.
In the next section, you will delve a bit deeper into what the SQL Server database diagram is all about.
The SQL Server Database Diagram Designer
Management Studio’s database diagram tool aids in the building of diagrams that detail aspects of the database that a developer wishes to see. Although it is a simple and straightforward tool, and it’s not as powerful as some other tools on the market for building database diagrams, it is suitably sufficient for SQL Server.
The biggest restriction of any diagram-based database tool comes down to the amount of screen space available to view the diagram. As soon as your database solution consists of more than a handful of tables, you will find yourself scrolling around the diagram, trying to find the table you are looking for or reducing the zoom to a percentage that may be too small to read well.
Second, you cannot add stored procedures, schemas, users, views, or any object that is not a table. Other products allow you to include these objects, or they may even build some of them for you.
Finally, for the moment, when altering any of the information you can change within this tool, you are usually using the same dialogs and screens as you would in Management Studio.
As you will see as you go through the chapter, the database diagram tool is quite powerful in what it can achieve, but there are some areas of concern that you have to be aware of when working with diagrams. Keep in mind that the database diagram tool is holding all the changes in memory until you actually save the diagram.
For example, if you have a database diagram open, and a table within that diagram is deleted outside of the diagram, perhaps in Query Editor or Management Studio by yourself or another valid user ID, then one of two things can happen. First, if you have unsaved changes to the deleted table, saving your diagram will re-create the table, but don’t forget that through the earlier deletion, all the data will be removed. If, however, you have no changes pending to that table, then the table will not be re-created. When you come to reopen the diagram, the table will have been removed.
With several developers working on the database at once, any changes made from the diagramming tool of your Management Studio will not be reflected in any other developer’s diagram until his changes are saved and his diagrams are refreshed. If you have multiple diagrams open, and you alter a table and insert or remove a column, then this will reflect immediately in all the open diagrams within your own Management Studio only. Don’t forget this is an in-memory process, so this process can’t reflect on anyone else’s diagrams until the changes are saved and the diagrams are refreshed.
Also, if you remove an object in your diagram, when you then save the diagram, the object will be removed and any changes completed by others will be lost. Effectively, the last person who closes his or her diagram wins!
To summarize, if you use the database diagram tool, use it with care and use it only to diagram. Because the diagram is held in in memory, you could inadvertently cause problems.
The Default Database Diagram
Although it’s not mandatory, I do feel every SQL Server database solution should have a default database diagram built into it so that any developer—new or experienced—can instantly see how the database being inspected fits together.
A default database diagram should include every table and every relationship that are held for that database. Unlike other diagrams that may take a more sectionalized view of things, the default database diagram should be all-encompassing.
As mentioned earlier, it is imperative that you keep this diagram up to date. You will notice this statement repeated a few times in this chapter. Don’t use the default diagram as the source of development for your database solution. The default diagram includes all the tables, which means that if you’re using the database diagram tool for development, you are potentially logically locking out all other users from touching any other table as part of their development, in case their changes are lost. Update the diagram with tables and relationships only once they have been inserted in the database. We’ll look at this in more detail later when we discuss the dangers of using the database diagram tool as a source of development.
Now that you know what diagrams are and what the tool is, it’s time to create the first diagram for this database.
TRY IT OUT: CREATING A DATABASE DIAGRAM
- Ensure that SQL Server Management Studio is running and that the
ApressFinancialdatabase is expanded so that you see the Database Diagrams and Tables nodes. Select the Database Diagrams node and then right-click. Choose New Database Diagram (see Figure 6-12).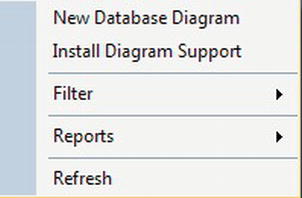
Figure 6-12. Creating a new database diagram
- If this is the first diagram you are creating for the database, you’ll need to install support objects. Without them, you cannot create the diagram, so click Yes at the next dialog prompt (see Figure 6-13).
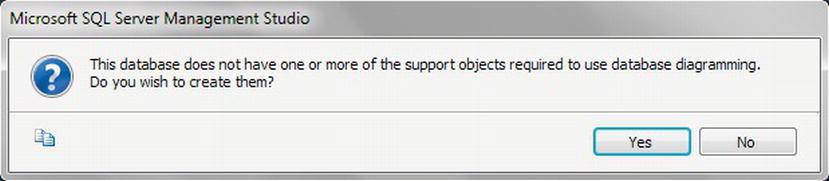
Figure 6-13. Installing diagramming support
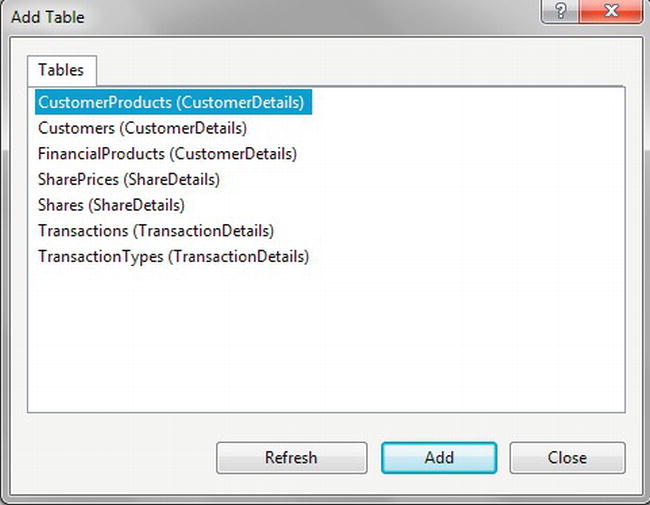
Note You can also install diagramming support from the menu as shown in Figure 6-12. - The first screen you’ll see when creating the diagram is the Add Table dialog (see Figure 6-14). Select all of the tables listed, as you want to use all the tables in your diagram, and then click Add. This will “empty” the screen. Click Close.
- After a few moments, you will be returned to Management Studio, but with the database diagram now built. The diagram will not show all the tables at this point and will be very large. You can reduce the size through the Size combo box in the diagramming toolbar, as shown in Figure 6-15.

Figure 6-15. The Size combo box
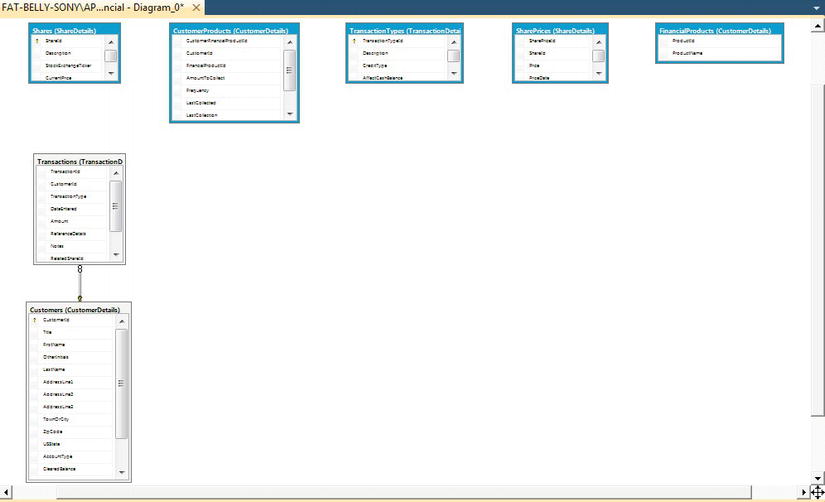
- You’ll then see a diagram similar to that shown in Figure 6-16. (Don’t be surprised if the layout is different, though.)
That’s all there is to building a basic diagram.
The Database Diagram Toolbar
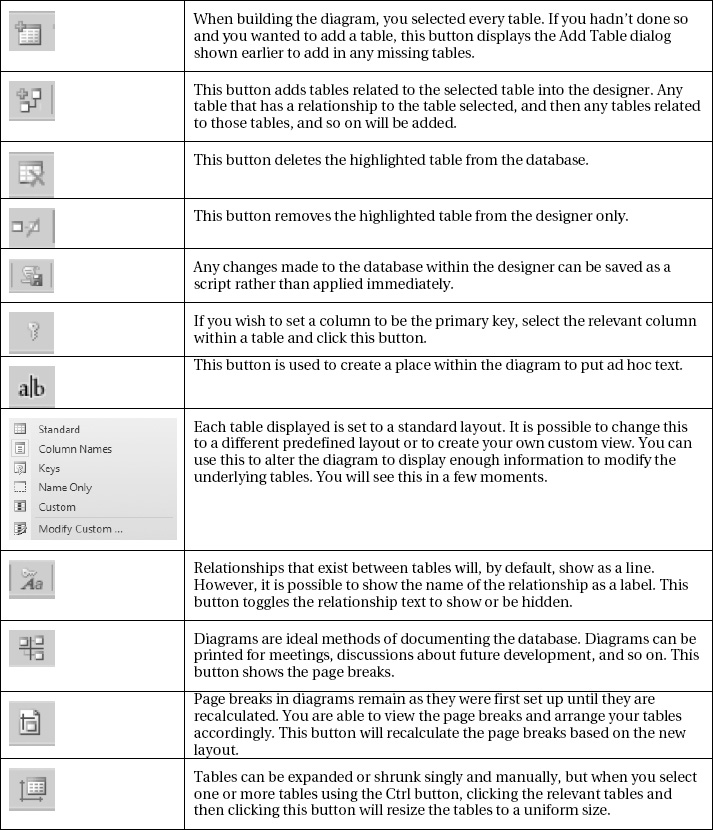
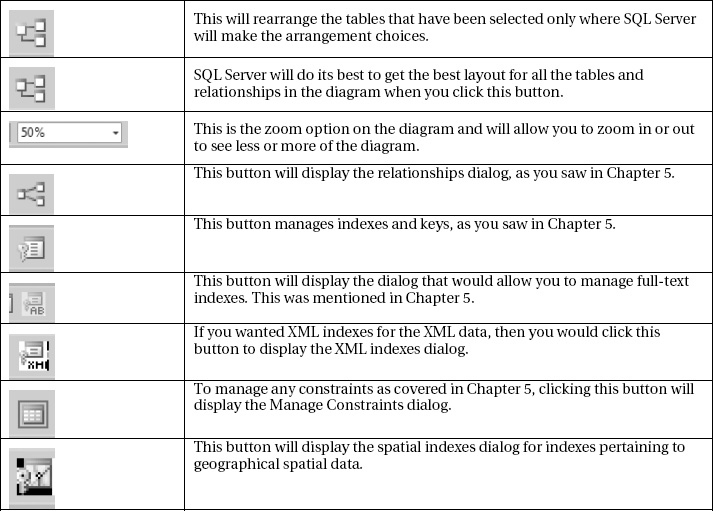
Let’s next take a look at the toolbar and how each of the buttons works within the diagram. The whole toolbar is shown in Figure 6-17, and each button is described in Table 6-1.
Figure 6-17. Database diagram toolbar
Modifying Your Database Using Database Diagram Designer
Although Database Diagram Designer will be used mainly for documentation, it can also be used to perform a few database functions, including adding, altering, and removing columns, setting primary keys, and creating a relationship between two tables. There are other tools that can perform these functions as well as many more. For example, one of the market leaders in database design tools is a product called SQL Power Architect. SQL Power Architect is a powerful database utility that not only builds diagrams of databases, but also provides data dictionary language output, which can be used to build database solutions. Through links such as OLE DB data providers, these tools can interact directly with databases and so can be used as a front end for creating databases. They can also, at the same time, keep the created source in alignment and under control from a change control perspective, not only ensuring that the code exists within the database, but also issuing a command to create a new database quickly, if necessary. An example of where this might be useful is when you’re creating a new test database. From my perspective, this is not an ideal scenario as your code should be backed up, held within Visual SourceSafe, and deployment strategies should be created. In some projects, I have used a tool from Red Gate called SQL Compare to deploy from development to production. It allows you to compare two databases and detail the changes between them, and you can then decide and detail what has to be deployed.
Summary
We’ve covered yet another major building block in creating a SQL Server solution. The last few chapters have shown you how to store data, and in this chapter, you’ve learned about indexes and how to use them to quickly and efficiently retrieve the data stored in the table.
There are many types of indexes, and choosing the right one at the right time to complete the right job is quite an art. This chapter has taken you through the steps to decide which columns will make an efficient index, and then build those columns in the right type of index to make the most of the information.
This chapter also covered database diagramming. Database diagrams should initially be thought of as a form of documentation. Keep in mind, though, that the database diagram tool may expand in future versions of SQL Server to become much more sophisticated and powerful than it is now—although even now it is quite a powerful utility.
![]() Tip Remember, those who save last save the changes.
Tip Remember, those who save last save the changes.
Don’t be caught off guard by the fact that changes in the diagram are not applied until the diagram is saved, and that your changes could overwrite another’s changes. If you’re using the database diagram tool for development in any sort of multiuser environment, take the greatest of care when completing updates (in fact, try to avoid them altogether). Unless you split your database solution into multiple diagrams, with any table being found in at most one diagram, don’t use the database designer as a development tool.